Professional Information Technology-Programming Book part 16 docx
Bạn đang xem bản rút gọn của tài liệu. Xem và tải ngay bản đầy đủ của tài liệu tại đây (24.77 KB, 6 trang )
1. If your efforts to reduce noise result in more image softening than you find
acceptable, you can try to reuse the Sharpening sliderbut don't be surprised if
you find yourself going 'round in circles. The same precautions outlined in
the "Sharpening" section pertain here as well.
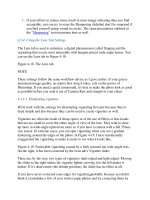
4.3.4. Using the Lens Tab Settings
The Lens tab is used to minimize a digital phenomenon called fringing and the
vignetting that occurs most noticeably with bargain-priced wide-angle lenses. You
can see the Lens tab in Figure 4-18.
Figure 4-18. The Lens tab.
NOTE
These settings follow the same workflow advice as I gave earlier: if your goal is
maximum image quality, no matter how long it takes, rely on the power of
Photoshop. If you need a quick turnaround, it's best to make the photo look as good
as possible before you send it out of Camera Raw and straight to your client.
4.3.4.1. Eliminating vignettes
We'll work with the settings for eliminating vignetting first just because they're
dead simple and also because they can be used to create vignettes as well.
Vignettes are often the result of cheap optics or of the use of filters or lens hoods
that are too small to cover the entire angle of view of the lens. They tend to show
up more in wide-angle opticseven more so if you have a camera with a full 35mm-
size sensor. In extreme cases, you can spot vignetting when you see a gradual
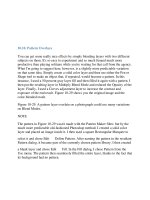
darkening around the edges of the photo. In Figure 4-19, I have intentionally
exaggerated the vignetting to make it easier to see what it looks like.
Figure 4-19. Noticeable vignetting caused by a fully zoomed out wide-angle lens.
On the right, it has been corrected by the Lens tab's Vignette slider.
There are, by the way, two types of vignettes: dark-edged and light-edged. Moving
the slider to the right makes the vignette lighter; moving it to the left makes it
darker. If it's dead center (the default position), the slider has no effect at all.
If you have never corrected your edges for vignettingprobably because you didn't
think it existedtake a few of your widest angle photos and try correcting them by
dragging the vignette slider slightly to the right. If the corners brighten just enough
that the whole image looks more "even," your lens probably has a slight amount of
vignetting. The chances are particularly good if the lens is a 28mm or wider 35mm
equivalent and has not been stopped down more than one or two f-stops.
Now, here's the interesting part: you may want to use this slider to create a
vignette. After all, vignettes can be very effective in focusing viewer attention on
the center of the image. Usually, I recommend doing that on a masked adjustment
layer in Photoshop so you can turn the layer on and off to show your client (or
yourself) the difference. However, if you want to save a layer and still do it
nondestructively, here's your big chance.
When you're correcting a vignette, you usually want to keep it centered in the
frame. However, when you're creating one, you may want to be able to control the
location of the center. However, you can't do that until you create the vignette
itself. To make the vignette darker, drag the slider to the left. To make it lighter,
drag it to the right.
Now you can move the center up or down. Simply drag the bottom slider and
watch the vignette move until the vignette is positioned as you'd like it. You can
see the result in Figure 4-20.
Figure 4-20. The result of creating a vignette.
4.3.4.2. Minimizing color fringing
Color fringing (aka chromatic aberration) comes in two flavors: Red/Cyan and
Blue/Yellow (see Figure 4-21). Camera Raw, once again, isn't the most
sophisticated tool on the planet for getting rid of this "fringe," but it's handy,
nondestructive, and quick.
Figure 4-21. Red/Cyan (left) and Blue/Yellow (right) color fringing is easiest to
spot along high-contrast edges.
Once again, color fringing is a phenomenon you're most likely to see with small
sensors, high ISO settings, and cheap optical construction. So if you can afford the
best shooting gear, you won't encounter it much. If you do, here are the steps to get
rid of it:
1. Select all the similar images that are likely to show chromatic aberration and
open them at the same time in Camera Raw. Be sure to click the Select All
button.
2. Double-click the Zoom tool. In the Preview window, all the images will be
enlarged to 100 percent. Now, move the cursor to the middle of the Preview
window and click once more. You are now zoomed in 200 percent. Use the
Hand tool to move the image around until you find some sharp, highly
contrasting edges.
3. Oh, I almost forgot. You want to make sure your fringing isn't the result of
over-sharpening. So before you go any further, click the Detail tab and take
a look at the Sharpening slider. Make sure its slider is all the way to the left.
If not, just put it there. Then go back to the Lens tab.
4. Now look carefully along your high-contrast, hard edges. Do you see any
pure Red, Cyan, Blue, or Yellow lines that are parallel to those edges? If you
do, you got fringing, baby. Don't panicfix it.
5. If the worst fringe lines are Blue or Yellow (and they usually are), drag the
Blue/Yellow slider to the left until the Blue disappears or to the right until
the Yellow disappears. You won't see both of these colors. You might,
however, see some Red or Cyan fringe lines. If so (you guessed it), move the
Red/Cyan slider left to get rid of red fringe, or to the right to get rid of blue
fringe.
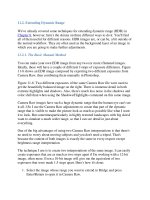
4.3.5. Using the Calibrate Tab Settings
Camera Raw in CS2 has another new tab, Calibrate (Figure 4-22), which allows
you to adjust the way your camera's sensor interprets color. You can adjust the
color tint of shadows to make them more neutral by changing the green or
magenta. You can also adjust how the sensor interprets each of the primary colors
in respect to Hue and Saturation. You'll also learn to save those settings to reuse
later or use on other images.
Figure 4-22. The new Calibrate tab.
One of the beauties of RAW file processing is that, for most purposes, you don't
really need to calibrate your camera. This is because you have so much flexibility
in interpreting the image in Camera Raw that the exact interpretation of the image
can cover a huge range. The exception is situations in which you are shooting a
product or scientific assignment in which a specific color must be reproduced
exactly (e.g., the color and shade of clothing in fashion advertising or company
logos when in a prominent portion of the photograph).
Before someone protests, it is true that Camera Raw is powerful enough to let you
match colors without calibrating your camera. If your monitor has been calibrated
to a very precise level, you could simply match colors by placing the object next to
the monitor and then making adjustments in Camera Raw to match the color of the
object. That's a good thing, because there will be timessuch as when the client
sends you a RAW file that you didn't shootwhen you have no other alternative. It is
desirable, however, to calibrate your camera because it can save you hours of
Camera Raw time. Besides, the more accurate your original exposure, the more
latitude you have in interpreting that shot.
NOTE
I've already mentioned using gray cards and color cards. If you're using only a gray
card, don't expect your calibration to be good enough to accurately reproduce
specific subject colors. However, your image will represent reality much more
accurately and I'd advise saving the profile if you are likely to find yourself in that
situation again.
The tools you use to calibrate your camera sensor are in the Calibrate tab. These
happen to be the same tools you'd use to subjectively change your camera's
interpretation of color and detail. I'll give you procedures for using the Calibrate
tab for both purposes.
To use the Calibrate tab to subjectively tweak the interpretation of individual
primary colors:
1. Click the Calibrate tab. The Camera Profile menu will show only the current
version of ACR that is installed. You should make sure you have only one
version installed because Camera Raw can become confused trying to use a
version that may not be current enough to read the RAW files for your
particular camera and model.
2. One at a time, go to the two sliders for each of the primary RGB colors. If
that color seems too overpowering, drag the Hue slider to the left. If you
want it emphasized, drag the slider to the right. You usually want the Hue
slider to give you the best compromise between the purity of that primary
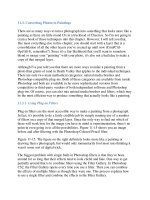
color and the amount of detail that you can see within it. Figure 4-23 shows
the Hue of the Red in this image before and after adjustment.
Figure 4-23. From left to right, the image before any Calibrate adjustment
and after the change of Hue in Reds, with lowered saturation in reds.
Getting and Installing Prebuilt Calibrations
The easy way to make sure that your camera's sensor(s) are making
accurate interpretations of each of the primary colors is to download a
Camera Raw calibration settings file from either your camera's
manufacturer orone of these daysfrom the Adobe site. The bad news is that
unless you own a very high-end camera, such as a digital back for a
medium or large-format camera, you probably won't find such a thing in
either place. It's just a matter of time, however. In the meantime,
calibration settings are likely to start appearing on enthusiasts' and well-
established digital photography sites. Use your Internet search engine.
Until manufacturers catch on, you'll have to calibrate your own camera
(see "Making situational calibrations" next in this chapter).
But wait, there's more bad news: the only way to get truly accurate camera
calibration is to calibrate for each camera, lighting, and lens combination
that you're likely to use. This works best for a studio (or home studio)
situation in which you can easily recreate the same lighting setup. Also, if
the setup includes diffusers, reflectors, or backgrounds that may reflect a
different light color temperature than the lights themselves, you'll have to
calibrate for that shooting combination as well. The "Making situational
calibrations" section tells you exactly how to go about making these
calibrations. This will also help you set your white balance more quickly
and accurately, even if you don't want to save the results as a calibration
file.
3. Once you've adjusted the Hue of a given color, use the Saturation slider
immediately below to adjust the intensity of the color until you like the
combination of what you see.
4. Check the moderately dark shadows, especially, in this case, those cast on
the sheet. Are they completely neutral gray? If not, drag the Shadow Tint
slider to the right to increase Magenta or to the left to increase Green until
the shadow turns neutral. The procedure is the same if the shadows are cast
onto colored objects, but it is hard to be as accurate. Since what you're doing
at this stage is purely subjective, it's no big deal.
If you want to create a calibration for a particular camera and lens combination
for use under particular lighting conditions, you must first take a picture in