Manning Windows Forms Programming (phần 5) doc
Bạn đang xem bản rút gọn của tài liệu. Xem và tải ngay bản đầy đủ của tài liệu tại đây (817.68 KB, 50 trang )
166 CHAPTER 6 COMMON FILE DIALOGS
These variables are required to implement all of our new menu items in this chapter.
With these in place, it is time to do just that.
6.2 MULTIPLE FILE SELECTION
Now that we have an album in our MainForm class, albeit an empty one, we can add
photos to it. In previous chapters, we allowed the user to read in a single photo, first
using a button and later with a menu item. In our new structure, this has been
replaced by the ability to add multiple photos to the album or remove the current
photo from the album. Since this code builds on our original Load handler, it is a
good place to begin.
As you would expect, we will provide
Click handlers for both the Add and
Remove items. The Add menu should allow one or more photos to be selected and
added to the album, while the Remove menu should delete the currently displayed
photo from the album. The Add menu will use the
Multiselect property of the
OpenFileDialog class, and is where our catchy section title comes from.
6.2.1 A
DDING IMAGES TO AN ALBUM
In chapter 3, the Click handler for the Load menu permitted a single file to be
selected using the
OpenFileDialog class. This made sense when only a single
image was managed by the application. In this chapter, the idea of an album permits
multiple images to be present at the same time. As a result, our user should also be
able to load multiple images at once. This is again done using the
OpenFileDialog
class, so the code for this handler will be similar to the Click event handler for the
Load menu from chapter 3. The
Multiselect property is provided by the Open-
FileDialog
class to indicate whether multiple files can be selected in the dialog.
This and other members specific to this class are summarized in .NET Table 6.1.
2 Within the MainForm class,
add a protected album
variable
_album.
protected PhotoAlbum _album;
3 Add a protected boolean
called
_bAlbumChanged to
track when an album is
modified.
protected bool _bAlbumChanged = false;
Note: This will be useful when deciding whether to save
an existing album before loading a new one or closing the
application. If no changes have occurred, then we will
know to not save the album.
4 Create an empty album at
the end of the
MainForm
constructor.
public MainForm()
{
. . .
_album = new PhotoAlbum();
}
CREATE SOME CLASS VARIABLES (continued)
Action Result
MULTIPLE FILE SELECTION 167
The steps to implement a
Click event handler for the Add menu are shown in the
following table.
Set the version number of the MyPhotos application to 6.2.
.NET Table 6.1 OpenFileDialog class
The OpenFileDialog class represents a common file dialog box for loading one or more
files from disk, and is part of the
System.Windows.Forms namespace. This class inherits
from the
FileDialog class, and is the standard class for opening existing files. See .NET
Table 1.2 on page 24 for a list of members inherited from the
FileDialog class.
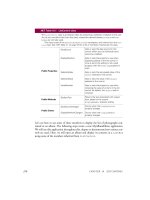
Public Properties
Multiselect Gets or sets whether the user can select
multiple files in the dialog. The
FileNames
property inherited from the
FileDialog class
should be used to retrieve the selected files.
ShowReadOnly Gets or sets whether the dialog should contain
a read-only check box. Defaults to
false.
ReadOnlyChecked Gets or sets whether the read only checkbox is
checked. Defaults to
false.
Public Methods OpenFile Returns a Stream with read-only access for the
file specified by the
FileName property.
IMPLEMENT ADD HANDLER
Action Result
1 Open the Windows Forms
Designer window for the
MainForm.cs file.
As we have seen before, a graphic of the current layout for
this form is displayed.
2 Add a
Click event handler for
the Add item under the Edit
menu.
How-to
Double-click on the menu
item.
A new
menuAdd_Click method is added to and displayed in
the MainForm.cs source file.
The line to add the handler is created by Visual Studio in the
InitializeComponent method automatically:
menuAdd.Click += new
EventHandler (this.menuAdd_Click);
3 Remove the
menuLoad_Click handler and
copy its code into the
menuAdd_Click handler.
Note: This code opens a single file and arranges to dis-
play it in the window. Here, we just want to add the file
to the album, so some changes are required. The code
in the subsequent steps is based on the Load handler,
although there are some differences. In particular, we
do not handle any exceptions that might occur. This is
done intentionally so that we can discuss the handling
of such exceptions in chapter 7.
168 CHAPTER 6 COMMON FILE DIALOGS
In the code, note how the Multiselect property is used to permit multiple file
selections. This property is one of the few
OpenFileDialog members not inherited
from the
FileDialog class.
4 Initialize an OpenFileDialog
instance to allow multiple
selections of various image
file types.
How-to
Use the Multiselect
property to allow multiple files
to be selected.
Note: The
Filter setting
here includes most of the
common formats users are
likely to see. All of these for-
mats are supported by the
Bitmap class.
protected void menuAdd_Click
(object sender, System.EventArgs e)
{
OpenFileDialog dlg = new OpenFileDialog();
dlg.Title = "Add Photos";
dlg.Multiselect = true;
dlg.Filter
= "Image Files (JPEG, GIF, BMP, etc.)|"
+ "*.jpg;*.jpeg;*.gif;*.bmp;"
+ "*.tif;*.tiff;*.png|"
+ "JPEG files (*.jpg;*.jpeg)|*.jpg;*.jpeg|"
+ "GIF files (*.gif)|*.gif|"
+ "BMP files (*.bmp)|*.bmp|"
+ "TIFF files (*.tif;*.tiff)|*.tif;*.tiff|"
+ "PNG files (*.png)|*.png|"
+ "All files (*.*)|*.*";
dlg.InitialDirectory
= Environment.CurrentDirectory;
5 Invoke the dialog and process
an OK response.
if (dlg.ShowDialog() == DialogResult.OK)
{
6 Extract the array of files
selected by the user.
string[] files = dlg.FileNames;
7 Turn off the status bar panels
while the images are loading.
statusBar1.ShowPanels = false;
statusBar1.Text
= String.Format("Loading {0} Files",
files.Length);
8 Iterate through the array of
selected files.
int index = 0;
foreach (string s in files)
{
9 Add each image to the album
if it is not already present.
How-to
Use the IndexOf method to
see if the photo is already in
the album.
Photograph photo = new Photograph(s);
// Add the file (if not already present)
index = _album.IndexOf(photo);
if (index < 0)
{
index = _album.Add(photo);
_bAlbumChanged = true;
}
}
Note: The IndexOf method relies on the Equals override
we implemented in chapter 5.
10 Dispose of the nonmemory
resources used by the dialog.
dlg.Dispose();
11 Invalidate the main window to
display the new settings.
this.Invalidate();
}
}
IMPLEMENT ADD HANDLER (continued)
Action Result
PAINT EVENTS 169
The code also sets the
InitialDirectory property to the current directory using
the
Environment class. This ensures that the initial directory in the dialog is always the
current directory for our application. While this may not seem so relevant right now, it
will become important when we implement
Click handlers for our Save and Save As
menus. We will look at the
Environment class in more detail later in the chapter.
The
menuAdd_Click method is similar to our original Load menu handler, but
also very different. In particular, this method leaves unresolved the issue of what to dis-
play in the form, and the exception handling has been removed. We will handle these
issues subsequently. For now, let’s move on to the Remove menu handler.
6.2.2 R
EMOVING IMAGES FROM AN ALBUM
The event handler for the Remove menu uses the CurrentPosition property to
locate the current photo and delete it from the album.
The
menuRemove_Click handler uses the RemoveAt method from our PhotoAl-
bum
class to remove the current photo. The issue of adjusting the current position in
case we remove the last photo from the album is left to the
PhotoAlbum class to han-
dle. If you recall, the
RemoveAt method we implemented in chapter 5 ensures that
the current index remains valid after it is called through an override of the
OnRe-
moveComplete
method, so the current position is properly updated here.
Once again we have ignored the display issues. This is because our menu handlers
will no longer interact with the
Form window directly. Instead we will override the
protected
OnPaint method for this purpose, which is our next topic.
6.3 PAINT EVENTS
Now that we can load multiple images into our album, we need a way to make them
appear in the window. In previous chapters, we have simply assigned the selected
photo to the
Image property of our PictureBox control and relied on the .NET
Framework to deal with the rest. The framework will still do most of the work, but
now we need to identify which image from our album should be drawn.
IMPLEMENT REMOVE HANDLER
Action Result
1 Add a
Click handler for
the Remove menu.
protected void menuRemove_Click
(object sender, System.EventArgs e)
{
2 Implement this handler to
remove the current photo
from the album.
if (_album.Count > 0)
{
_album.RemoveAt(_album.CurrentPosition);
_bAlbumChanged = true;
}
this.Invalidate();
}
170 CHAPTER 6 COMMON FILE DIALOGS
As in previous Microsoft development environments, such drawing is called
painting in .NET. You may have noticed in chapter 3 that the
Control class provides
a
Paint event for custom painting of a control. The event name is one piece of the
support provided for each event in the .NET Framework. While we have seen these
pieces in our previous use of events, this is a good place to list them more formally.
The following support is required in order to define and support an event.
• A class that defines the event data. This is either the
System.EventArgs class
or a class derived from
System.EventArgs. The event data for the Paint
event is defined by the PaintEventArgs class. We will discuss the contents
of the
PaintEventArgs class in chapter 7.
• A delegate for the event. This delegate is used by Visual Studio .NET to add the
event handler in the
InitializeComponent method. By convention, the
name of this delegate is the event name followed by the string “EventHandler.”
The
Paint event is supported by the PaintEventHandler delegate. The
creation of delegates is discussed in chapter 9.
• A class that raises the event. This class must define the event and provide a
method to raise the event. By convention the method to raise the event is the
string “On” followed by the event name. The protected
OnPaint method
raises the
Paint event.
For painting of controls, the
Control class defines the Paint event. Within the def-
inition of this class, the event is defined using the
event keyword in C#.
public event PaintEventHandler Paint;
6.3.1 DRAWING THE CURRENT PHOTOGRAPH
Returning to our code, we need a way to draw the appropriate photograph in our
album. We could handle the
Paint event directly in our Form or PictureBox
control for this purpose. Instead, since the MainForm class derives from the Form
class, we can override the method that raises the event directly. This technique is pre-
ferred where possible to avoid the extra overhead of creating and invoking an event
handler. In this case, we will override the protected
OnPaint method to handle the
Paint event.
PAINT EVENTS 171
Set the version number of the MyPhotos application to 6.4.
6.3.2 DISPLAYING THE CURRENT POSITION
Before we see our changes in action, it would be nice to have some indication of our
current position within the album and the total album size in the window. We can do
this by adding a new
StatusBarPanel to hold this information, as detailed by the
following steps.
OVERRIDE THE ONPAINT METHOD
Action Result
1 In the MainForm.cs
file override the
OnPaint method.
protected override void OnPaint(
PaintEventArgs e)
{
2 Only paint an image if the album is
not empty.
Note: The three comments here
are implemented in the subsequent
steps. In all cases, the status bar is
invalidated.
if (_album.Count > 0)
{
// Paint the current image
// Update the status bar
}
else
{
// Indicate the album is empty
}
statusBar1.Invalidate();
3 Call OnPaint in the base class.
base.OnPaint(e);
}
Note: This call is required to ensure that any
Paint event handlers registered with the Form
are called. As mentioned in chapter 5, the base
keyword refers to the base class of the current
object.
4 Paint the current image by setting
the
Image property of the pbxPhoto
control.
// Paint the current image
Photograph photo = _album.CurrentPhoto;
pbxPhoto.Image = photo.Image;
5 Update the status bar to hold the
appropriate information about the
image.
Note: The code here is similar to
what we used in our
menuLoad_Click event handler in
chapter 4.
// Update the status bar.
sbpnlFileName.Text = photo.FileName;
sbpnlImageSize.Text = String.Format
("{0:#} x {1:#}",
photo.Image.Width,
photo.Image.Height
);
statusBar1.ShowPanels = true;
6 When no images are present, clear
the screen and display an
appropriate status bar message.
// Indicate the album is empty
pbxPhoto.Image = null;
statusBar1.Text = "No Photos in Album";
statusBar1.ShowPanels = false;
172 CHAPTER 6 COMMON FILE DIALOGS
The preceding tables have made a number of changes to the OnPaint method. The
following code pulls together all of the pieces presented in the preceding tables. We
will not discuss these changes in additional detail.
protected override void OnPaint(PaintEventArgs e)
{
if (_album.Count > 0)
{
// Paint the current image
Photograph photo = _album.CurrentPhoto;
pbxPhoto.Image = photo.Image;
// Update the status bar.
sbpnlFileName.Text = photo.FileName;
sbpnlFileIndex.Text = String.Format("{0}/{1}",
_album.CurrentPosition+1, _album.Count);
sbpnlImageSize.Text = String.Format("{0} x {1}",
photo.Image.Width, photo.Image.Height);
ADD A NEW STATUS BAR PANEL
Action Result
1 In the MainForm.cs
Design window,
display the StatusBarPanel Collection
Editor for the
statusBar1 control.
The StatusBarPanel Collection Editor dialog
appears as was shown in chapter 4.
2 Add a new
StatusBarPanel in this
dialog just before the existing
sbpnlImagePercent panel.
The new panel is added to the
Panels collection.
The source code in the
InitializeComponent
method is updated to define the new panel and
add it to the status bar.
3 In the
OnPaint method, set the text for
this panel to contain the image index
and album size.
sbpnlFileIndex.Text = String.Format
("{0:#}/{1:#}",
_album.CurrentPosition+1,
_album.Count);
How-to
a. Display the properties for this control.
b. Click on the Panels property item.
c. Click the … button.
How-to
a. Click the Add button.
b. Click the up arrow in the center of
the dialog to move the panel just
beforethe image percent panel.
c. Assign the proper settings as shown.
d. Click OK to add the panel.
Settings
Property Value
(Name) sbpnlFileIndex
AutoSize Contents
ToolTipText Image Index
CONTEXT MENUS REVISITED 173
statusBar1.ShowPanels = true;
}
else
{
// Indicate the album is empty
pbxPhoto.Image = null;
statusBar1.Text = "No Photos in Album";
statusBar1.ShowPanels = false;
}
statusBar1.Invalidate();
base.OnPaint(e);
}
Our code is coming along. We can add new photos to the album, and remove the
photo currently displayed.
TRY IT!
Compile the code and verify that you can add and remove images to the
album. Make sure you can add multiple images at once by selecting a range
of images with the Shift key. This can be done by clicking the first file,
holding down the Shift key, and then clicking the last file. You can also se-
lect multiple single images with the Ctrl key by clicking the first, holding
down the Ctrl key, clicking the second, and so on.
Also see what happens when a nonimage file is specified. You should see
our invalid image with the red X that we created in chapter 5. This indicates
to the user that something is wrong, but maintains the image paradigm
used by our application.
The current code does not allow us to move to the next and previous images in the
album, so only the first photo in the album is ever displayed. Navigating within the
album using the Next and Previous menus is our next topic.
6.4 CONTEXT MENUS REVISITED
In this section we implement the Next and Previous menu items for our application.
These menus are part of the View menu on the main menu bar. If you recall, this
menu was cloned and assigned to the context menu for use with the
PictureBox
control. Our careful implementation in chapter 3 ensured that the contents of the
context menu always match the contents of the View menu. In fact, your application
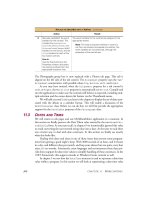
should include these menus now, as can be seen in figure 6.2.
174 CHAPTER 6 COMMON FILE DIALOGS
The handlers for Next and Previous use concepts we have previously discussed, so let’s
get to it.
6.4.1 D
ISPLAYING THE NEXT PHOTOGRAPH
The Next handler uses the CurrentNext method from our PhotoAlbum class, and
is implemented using the following steps.
Set the version number of the MyPhotos application to 6.4.
You will note that we invalidate any image currently displayed only if a next photo-
graph is available. It might be a good idea to beep or display a message when no next
photo is available to inform the user they are at the end of the album. We will discuss
how to do this in the next chapter.
6.4.2 D
ISPLAYING THE PREVIOUS PHOTOGRAPH
The Click event for the Previous menu is implemented in a similar manner.
Figure 6.2
A context menu displays keyboard
shortcuts just like the main menu. As a
special treat, an image not yet seen in
this book is shown here.
IMPLEMENT HANDLER FOR THE NEXT MENU
Action Result
1 Add a
Click handler for
the Next menu item.
protected void menuNext_Click
(object sender, System.EventArgs e)
{
2 Implement this handler
using the
CurrentNext
method.
if (_album.CurrentNext())
{
this.Invalidate();
}
}
FILES AND PATHS 175
Compile and run the application to verify that your code produces the screen shown
in figure 6.2 earlier in this section.
TRY IT!
It would be useful to have First and Last menu items here. These would dis-
play the first or last photo in the album, respectively. Add these two menus
to the View menu and provide a
Click event handler for each menu.
6.5 FILES AND PATHS
Before we implement our save methods, a brief talk on the name of an album is in
order. While we may store the album in a file such as “C:\Program Files\MyPho-
tos\sample.abm,” such a name is a bit cumbersome for use in dialogs and on the title
bar. The base file name, in this case “sample,” is more appropriate for this purpose.
Another issue is where exactly should album files be stored?
This section resolves these issues by defining a default directory where albums are
stored and establishing a title bar based on the current album name. These features will
then be used to implement a
Click event handler for our New menu.
6.5.1 C
REATING A DEFAULT ALBUM DIRECTORY
While an album file can be placed in any directory, it is nice to provide a common
place for such files. This location will be used by default for both opening and saving
albums. Common directories for this and other standard information are available
from the
Environment class, as summarized in .NET Table 6.2.
For our default directory, the
GetFolderPath method provides convenient
access to the special folders in the system, such as the user’s My Documents directory.
There are a number of special folders available, with a few of them listed in .NET
Table 6.3. We are interested in the location of the My Documents directory, which
corresponds to the
Personal enumeration value.
IMPLEMENT PREVIOUS HANDLER
Action Result
1 Add a
Click handler for
the Previous menu item.
protected void menuPrevious_Click
(object sender, System.EventArgs e)
{
2 Implement this handler
using the
CurrentPrev
method.
if (_album.CurrentPrev())
{
this.Invalidate();
}
}
176 CHAPTER 6 COMMON FILE DIALOGS
We will use this value to define a static DefaultDir property in our PhotoAlbum
class. We will allow a programmer to modify this value, but this provides a starting
point for album storage. To distinguish photo albums from other documents, we will
create an
Albums directory within the My Documents folder.
.NET Table 6.2 Environment class
The Environment class represents the current user’s environment, providing the means to
retrieve and specify environmental information. This class is sealed and the members defined
by this class are static. The
Environment class is part of the System namespace.
Public Static
Properties
CurrentDirectory Gets or sets the fully qualified path of the current
directory for this process.
ExitCode Gets or sets the exit code for the process.
MachineName Gets the NetBIOS name of this local computer.
OSVersion Gets an
OperatingSystem instance under
which this process is currently running.
TickCount Gets the number of milliseconds elapsed since
the system started.
UserName Gets the user name that started the current
thread for this process.
WorkingSet Gets the amount of physical memory mapped to
this process context.
Public Static
Methods
Exit Terminates this process and returns the
specified exit code to the underlying operating
system.
GetCommandLineArgs Returns an array of
string objects containing
the command line arguments for the current
process.
GetEnvironmentVariable Returns the value of a specified environment
variable as a
string.
GetEnvironmentVariables Returns the set of all environment variables as
an
IDictionary instance.
GetFolderPath Returns the path of a special folder as identified
by the
Environment.SpecialFolder
enumeration.
GetLogicalDrives Returns an array of
string objects containing
the names of the logical drives on the computer
under which this process is running.
FILES AND PATHS 177
Let’s see how this looks by creating the required code.
Set the version number of the MyPhotoAlbum library to 6.5.
.NET Table 6.3 SpecialFolder enumeration
The SpecialFolder enumeration specifies various types of predefined folders in the .NET
Framework. This enumeration is used by the
GetFolderPath method in the Environment
class. This enumeration is defined within the Environment class as part of the System
namespace.
Enumeration
Values
ApplicationData The common directory where application data for the
current roaming, or network, user is typically stored.
Cookies The directory where Internet cookies are typically stored.
Favorites The directory where the user’s favorite items are typically
stored.
Personal The directory where the user’s documents are typically
stored.
SendTo The directory that contains the Send To menu items.
StartMenu The directory that contains the Start menu items.
CREATE A DEFAULT ALBUM DIRECTORY
Action Result
1 In the PhotoAlbum.cs file, indicate
we are using the
system.IO
namespace.
using System.IO;
2 Define static members for the
default directory and whether this
directory has been initialized.
static private string _defaultDir = null;
static private bool _initializeDir = true;
3 Define a static InitDefaultDir
method to initialize the default
directory setting.
Note: The ampersand ‘@’ in C#
specifies an “as-is” string, where
escape sequences normally
denoted by the backslash charac-
ter are ignored.
static private void InitDefaultDir()
{
if (_defaultDir == null)
{
_defaultDir = Environment.GetFolderPath(
Environment.SpecialFolder.Personal);
_defaultDir += @"\Albums";
}
Directory.CreateDirectory(_defaultDir);
}
178 CHAPTER 6 COMMON FILE DIALOGS
The InitDefaultDir method does much of the work for this property. If an explicit
value for the default directory has not been set, then this method assigns a value based
on the user’s personal directory for documents, with an Albums subdirectory added.
static private void InitDefaultDir()
{
if (_defaultDir == null)
{
_defaultDir == Environment.GetFolderPath(
Environment.SpecialFolder.Personal);
_defaultDir += @"\Albums";
}
Since this directory, or any directory provided by the user, may or may not exist at the
start of the program, we create the directories as part of our initialization.
Directory.CreateDirectory(_defaultDir);
}
For programmers familiar with earlier development environments from Microsoft,
the lack of directory-related classes and dialogs has been a noticeably missing feature.
Microsoft has provided a
Directory class .NET containing a number of static
methods for dealing with directories. This class resides in the
System.IO namespace
and should simplify the handling of directories in applications. We will not look at
this class in detail here. The
CreateDirectories method used in our code ensures
that each of a string of directories in a given path exist. Note that if the
_defaultDir setting is not a well-formed directory string, then the CreateDi-
rectories
method will throw an exception.
4 Implement a DefaultDir
property to retrieve or assign the
default directory setting.
How-to
Use the _initializeDir field to
ensure that the directory setting is
only initialized once.
static public string DefaultDir
{
get
{
if (_initializeDir)
{
InitDefaultDir();
_initializeDir = false;
}
return _defaultDir;
}
set
{
_defaultDir = value;
_initializeDir = true;
}
}
CREATE A DEFAULT ALBUM DIRECTORY (continued)
Action Result
FILES AND PATHS 179
6.5.2 S
ETTING THE TITLE BAR
So far we have only set the title bar in our MainForm constructor. Realistically, we
will likely want to set this from a number of places in our application, especially if we
want to include information about the current album as part of the title bar.
Let’s create a
SetTitleBar method to assign the title bar based on the current
album name, if any. This method requires a means of extracting the base name from
the current album file. This functionality is provided by the
Path class, as described
in .NET Table 6.4. The rather cumbersome
GetFileNameWithoutExtension
method obtains the base file name without the extension.
The code for the
SetTitleBar method is described in the following table:
Set the version number of the MyPhotos application to 6.5.
We will make use of this new method in our implementation of a Click handler for
the New menu.
SET THE APPLICATION TITLE BAR
Action Result
1 In the MainForm.cs code
window, indicate that
we are using the
System.IO namespace.
using System.IO;
2 Add a new
SetTitleBar method to
the
MainForm class.
private void SetTitleBar()
{
Version ver = new Version(
Application.ProductVersion);
3 Define a default title bar
when no album file is
set.
if (_album.FileName == null)
{
this.Text = String.Format("MyPhotos {0:#}.{1:#}",
ver.Major, ver.Minor);
}
4 When an album file is
set, include the base file
name in the title bar.
else
{
string baseFile = Path.
GetFileNameWithoutExtension(
_album.FileName);
this.Text = String.Format(
"{0} - MyPhotos {1:#}.{2:#}",
baseFile, ver.Major, ver.Minor);
}
}
180 CHAPTER 6 COMMON FILE DIALOGS
6.5.3 HANDLING THE NEW MENU
With the ability to manage an album file and directory in place, this is as good a place
as any to implement a
Click handler for our New menu. We will use our new SetTi-
tleBar
method to initialize the title bar for the application. This method is used here
as well as later in this chapter to initialize the title bar when the current album changes.
.NET Table 6.4 Path class
The Path class represents an object stored on disk, whether a file or directory object. This
class is sealed, and is part of the
System.IO namespace. The Path class contains static
methods for creating and managing disk objects.
Public Static
Readonly
Fields
DirectorySeparatorChar A platform-specific directory separator
character. This is the backslash character
‘\’ on Windows systems.
InvalidPathChars A platform-specific array of characters.
Each character is not permitted in a file
system path.
PathSeparator A platform-specific path separator
character. The semicolon
‘;’ character
on Windows systems.
Public Static
Methods
ChangeExtension Changes or removes the file extension
for a file.
GetDirectoryName Returns the directory path of a file.
GetExtension Returns the extension of a file.
GetFileName Returns the file and extension parts of a
file.
GetFileNameWithoutExtension Returns the file name without its
extension.
GetFullPath Returns the fully qualified path for a given
path.
GetPathRoot Returns the root of a given path.
GetTempFileName Returns a unique temporary file name
and creates an empty file with that name
on disk.
HasExtension Determines whether a path includes a
file extension.
SAVE FILE DIALOGS 181
We have made a few changes to our MainForm constructor here. To make sure we are
all on the same page (so to speak), your constructor in Visual Studio should now look
something like the following:
public MainForm()
{
//
// Required for Windows Form Designer support
//
InitializeComponent();
// Additional Form initialization
DefineContextMenu();
menuNew_Click(this, EventArgs.Empty);
}
With this infrastructure in place, we can turn our attention to the methods required
in the
PhotoAlbum class.
6.6 SAVE FILE DIALOGS
So far we have used the MyPhotoAlbum library to support the creation and manipu-
lation of an album in memory. At this point, we would like to preserve this album by
storing it on disk. In this section we will handle the Save menu item to do just this. In
CREATE A CLICK EVENT HANDLER FOR THE NEW MENU
Action Result
1 In the MainForm.cs [Design] window,
add a
Click event handler for the
New menu.
private void menuNew_Click
(object sender, System.EventArgs e)
{
2 In this handler, dispose of the existing
album and create a new one.
Note: This really is poor design,
since we throw away any changes to
the existing album. We will fix this in
chapter 8 when we discuss the
Mes-
sageBox class.
if (_album != null)
_album.Dispose();
_album = new PhotoAlbum();
3 Initialize the application title bar.
// Set the application title bar
SetTitleBar();
4 Invalidate the current window.
this.Invalidate();
}
5 Add a call to this method in the
MainForm constructor.
menuNew_Click(this, EventArgs.Empty);
Note: The static EventArgs.Empty property
provides an empty
EventArgs instance for
use when calling event handlers from your
code.
6 Remove the code to set the title bar
from the
MainForm constructor.
The initial title bar is now set as part of the
menuNew_Click method.
182 CHAPTER 6 COMMON FILE DIALOGS
the next section we will implement an Open menu handler to allow such an album to
be reloaded and used at a later time.
We have already seen how the
OpenFileDialog class is used to locate image
files. As you might expect, .NET provides a
SaveFileDialog class to store infor-
mation to a file. A summary of this class is shown in .NET Table 6.5.
To save an album to disk, we need to implement two types of methods. The first is a
Click event handler for both the Save and Save As menus. These handlers will use
the
SaveFileDialog class to allow a file to be selected. Second is a PhotoAl-
bum.Save
method to write the album information into the selected file. Separating
the user interface portion, in this case the file selection, from the data manipulation
portion, here the actual file writes, is a common design technique that allows us to
change either aspect of the task without overly affecting the other. As we shall see in
future chapters, changes to how the data is stored by the
PhotoAlbum.Save
method will not affect the menu handlers implemented here.
6.6.1 W
RITING ALBUM DATA
The Click handlers for our Save and Save As menus will rely on a Save method in
the
PhotoAlbum class to actually save the data, so let’s implement this first. This
method will accept the name of a file in which to store the data. We rely on the user
interface in
MainForm to provide a file name approved by the user, so if the file
already exists we will simply overwrite it.
.NET Table 6.5 SaveFileDialog class
The SaveFileDialog class represents a common file dialog box for saving a file to disk, and
is part of the
System.Windows.Forms namespace. This class inherits from the FileDialog
class. See the FileDialog class description in .NET Table 1.2 on page 24 for a list of inher-
ited members.
Public Properties
CreatePrompt Gets or sets whether the dialog should prompt
the user for permission to create a specified file
that does not exist. The default is
false (do not
prompt).
OverwritePrompt Gets or sets whether the dialog should prompt
the user for permission to overwrite a specified
file that already exists. The default is
true
(always prompt).
Public Methods OpenFile Returns a
Stream object with read/write
permission of the file selected by the user.
SAVE FILE DIALOGS 183
Set the version number of the MyPhotoAlbum library to 6.6.
The format to use when creating such a file is always a question. One possibility
would be to write an XML file to hold this album information. This is a good idea,
but beyond the scope of this chapter, so we will stick with a simple text format. Since
the file format will likely change, especially in this book, we will allow for possible
future changes.
With these issues in mind, we will store each photograph in the album on a sep-
arate line, with a version number at the beginning of the file. This section will use 66
as the version number, since we are in section 6.6 of the book. The resulting file looks
like this:
66
<path to photograph 0>
<path to photograph 1>
<path to photograph 2>
. . .
Our version number is likely to change in future chapters, so we will provide a con-
stant to hold the current version.
The
Save method will store the version number followed by the file name of each
Photograph written as a simple string.
ADD PHOTOALBUM.SAVE METHOD
Action Result
1 Display the PhotoAlbum.cs file.
2 At the end of the file, add the
new
Save method.
public void Save(string fileName)
{
}
Note: This method is void since an error is not
expected. If something goes wrong, an
Exception
will be thrown.
ADD A CURRENT VERSION CONSTANT
Action Result
3 Add a static constant integer called
_CurrentVersion to hold the version
number.
private const int _CurrentVersion = 66;
184 CHAPTER 6 COMMON FILE DIALOGS
This code uses some classes we have not seen before, so let’s break our main Save
method down piece by piece. Our first line opens or creates the given file name as a
FileStream object. This class provides file I/O using simple byte arrays, and sup-
ports the well-known standard in, standard out, and standard error streams familiar
to C and C++ programmers. Files can be open in various modes (via the
FileMode
enumeration), with various access levels (via the FileAccess enumeration). Differ-
ent sharing options can be specified as well (not shown here) via the
FileShare
enumeration.
public void Save(string fileName)
{
FileStream fs = new FileStream(fileName,
FileMode.Create,
FileAccess.ReadWrite);
Next, we create a StreamWriter instance using the new FileStream object. Since
we are using strings and not byte arrays, we need a class that provides simple string
operations. The
StreamWriter class does just this, and includes a constructor that
accepts a
FileStream instance.
StreamWriter sw = new StreamWriter(fs);
IMPLEMENT PHOTOALBUM.SAVE METHOD
Action Result
4 Implement the
Save method to
store the album in the given file
using the agreed-upon format.
public void Save(string fileName)
{
FileStream fs = new FileStream(fileName,
FileMode.Create,
FileAccess.ReadWrite);
StreamWriter sw = new StreamWriter(fs);
try
{
sw.WriteLine(_CurrentVersion.ToString());
// Store each file on a separate line.
foreach (Photograph photo in this)
{
sw.WriteLine(photo.FileName);
}
}
finally
{
sw.Close();
fs.Close();
}
}
5 Implement an alternate Save
method that uses the default file
name.
public void Save()
{
// Assumes FileName is not null
Save(this.FileName);
}
SAVE FILE DIALOGS 185
The new
StreamWriter instance is used to write our data into the file. We encapsulate
the code to write the actual data in a
try block to catch any exception that might occur.
try
{
First we write the version number as a string on the first line of the file. This line is a
bit more magical than it looks. We are using a constant integer as an
object here.
While permitted, it requires the conversion of the value type
_CurrentVersion
into a reference type that can be treated as an object instance on the heap. This
conversion is called boxing, since the value is “boxed” into a reference type on the
heap. More information on boxing is provided in appendix A.
sw.WriteLine(_CurrentVersion.ToString());
The Photograph objects in the album are written using a foreach loop to iterate
through the array. This code relies on the fact that our album contains
Photograph
objects and implements the IEnumerable interface. The WriteLine method from
the
StreamWriter class (actually, this method is inherited from the base Text-
Writer
class) writes a given string onto a single line of the file and adds the appro-
priate line termination characters.
// Store each file on a separate line.
foreach (Photograph photo in this)
{
sw.WriteLine(photo.FileName);
}
You may think the magic of garbage collection obviates the need to explicitly clean up
system resources such as files. As we have seen, this just isn’t so. Normally the
Dis-
pose
method is used to clean up nonmemory resources. For file objects such as
FileStream and StreamWriter, the more traditional Close method is used. By
definition,
Close is equivalent to Dispose in the .NET Framework. Classes that
provide a
Close method are automatically disposed of when the Close method is
called. We will discuss this notion in more detail in chapter 8.
Since the files must be closed even when an exception occurs, we encapsulate
these lines in a
finally block. As you may know, while a finally block does not
catch any exceptions, any code in the block is executed regardless of whether an excep-
tion occurs or not.
finally
{
sw.Close();
fs.Close();
}
}
Note that closing the objects in the reverse order of which they were opened is criti-
cal. Once the
FileWriter is closed, the StreamWriter is not able to write any
186 CHAPTER 6 COMMON FILE DIALOGS
remaining data into the file. Calling the Close methods in the proper order ensures
all data is properly written to the file and avoids this potential error.
More .NET
In this book we take a rather straightforward approach to reading and writ-
ing files, and will stick with a simple text file to represent our album
throughout the book. There are some summaries of using the
System.IO
namespace in the .NET documentation if you are interested in more de-
tails. Search for the “Working with I/O” section in the .NET Framework
Developer’s Guide.
We could also have stored our file in XML using classes from the
Sys-
tem.XML
namespace. The use of XML, for eXtensible Markup Language,
is a great way to organize data, and is particularly useful when interacting
with database systems or interfacing with remote computer systems. We
opted for a simple text file in our application since many readers may not
be familiar with XML. You can read up on XML in general at
www.xml.org, or look up the
XmlReader class and other members of the
System.XML namespace in the .NET documentation.
Our new Save method can now be used in our MyPhotos application to save an
album via our Save and Save As menus.
6.6.2 S
AVING AN ALBUM AS A NEW FILE
Let’s implement a handler for the Save As menu first. This handler should prompt the
user to select a file where the album should be stored (using the
SaveFileDialog
class) and then use this file name to save the actual data. There are some questions to
answer here about how photo albums should be saved. These questions apply more gen-
erally to any file, so are presented generically to apply to any file and not just our albums.
SaveFileDialog: questions to answer
• Where are photo albums stored?
Even though you may allow the user to select any location on disk, it is a good
idea to encourage a standard location for the files in your application. In our
case, this location is specified by the static DefaultDir property in the Pho-
toAlbum
class.
• What is the file extension?
The selection of extension is a bit subjective. On Windows platforms, the fol-
lowing conventions normally apply:
• Use three-letter extensions. The one exception is .html files for HTML files, but
even here the .htm extension is preferred.
• Keep the first letter. Typically, the first letter of the type of file should be the
first letter of your extension. In our case, the extension for album file should
begin with the letter ‘a’.
SAVE FILE DIALOGS 187
•Avoid numbers. At a minimum, start the extension with a letter. Use a number
only if it is a critical aspect the type file you are creating.
• Avoid well-known extensions. You will avoid confusion by using a somewhat
unique combination of letters. You would not want to use extensions such as
.txt (already used for Text files) or .jpg (for JPEG files). To see the list of file
types currently registered on your computer, open Windows Explorer and
select the Folder Options… item under the Tools menu. Click on the File
Types tab to see the extensions currently in use.
• Use an acronym. It helps if your extension has some meaning to your users. If
it makes sense, use an acronym of the full name. For example, the .gif extension
is used for Graphics Interchange Format files.
• Leave out the vowels. Another common tactic is to leave out any vowels in the
name. Examples of this include the .txt (Text) and .jpg (JPEG) extensions.
Based on these conventions, we could use alb or abm here, which both derive
from Album without the vowel “u’). We will use the extension .abm.
• What is the right title bar text?
Don’t forget to set a custom title bar that makes sense for your dialog. The
default title bar is “Save,” which is not very descriptive. We will use “Save
Album” for our title.
• How should existing or nonexistent files be handled?
By default, the user will be prompted if they select a file that already exists (the
OverwritePrompt property) and will not be told if the file is new (the Cre-
atePrompt
property). Often the default behavior is fine, but it is worth mak-
ing a conscious decision for your application. We will (consciously!) use the
defaults in our code.
Now that we understand the right behavior to provide, we can implement the Save As
menu handler.
188 CHAPTER 6 COMMON FILE DIALOGS
Set the version number of the MyPhotos application to 6.6.
You will note that our code for the menuSaveAs_Click handler is reminiscent of our
previous use of the
OpenFileDialog class. The album is saved only if the user clicks
the OK button. The yet-to-be-implemented Save menu handler actually saves the file.
Also note the use of the
RestoreDirectory property. We set this to true so
that the current directory setting for the application is restored after the dialog exits.
By default, this property is set to
false, and the current directory for the application
is modified to match the final directory in the dialog. You may recall that we set the
InitialDirectory setting for our menuAdd_Click handler to the current direc-
tory via the
CurrentDirectory property of the Environment class. Since we have
different menus interacting with the file system in different ways, we ensure that the
initial directory seen for each menu makes some amount of sense.
6.6.3 S
AVING AN EXISTING ALBUM
We come at last to the Save menu handler. Here we need to select an album file name
if one does not already exist, and save the actual data associated with the album.
IMPLEMENT HANDLER FOR SAVE AS MENU
Action Result
1 Add a
Click handler to the
Save As menu.
protected void menuSaveAs_Click
(object sender, System.EventArgs e)
{
2 Create a SaveFileDialog
instance and initialize the
properties as discussed.
Note: In the
Filter property
setting, we permit all files to
be shown, even though only
the abm extension is a recog-
nized album file. This is not
necessary, but a nice conve-
nience to allow the user to see
all files in a directory.
SaveFileDialog dlg = new SaveFileDialog();
dlg.Title = "Save Album";
dlg.DefaultExt = "abm";
dlg.Filter = "Album files (*.abm)|*.abm|"
+ "All files|*.*";
dlg.InitialDirectory = PhotoAlbum.DefaultDir;
dlg.RestoreDirectory = true;
3 Once a user selects a file,
record the album name and
save the current album using
this name.
if (dlg.ShowDialog() == DialogResult.OK)
{
// Record the new album name
_album.FileName = dlg.FileName;
// Use Save handler to store the album
menuSave_Click(sender, e);
// Update title bar to include new name
SetTitleBar();
}
4 Dispose of nonmemory
resources used by the dialog.
dlg.Dispose();
}
OPEN FILE DIALOGS 189
Note the neat trick we play between the Save and Save As
Click handlers. When you
save an album with no name, the Save handler calls the Save As handler to select a
name, which then calls the Save handler to perform the actual save. The second time
in the
menuSave_Click method, a name will exist and the data will be saved.
Of course, whenever you interact with the file system, you should be concerned
about possible exceptions. I intentionally ignored this issue here to whet your appetite
for the next chapter. There, we will formally introduce the
MessageBox class as a way
to display simple dialogs to the user, most notably when an exception occurs.
Compile your code to verify that you can create an album and save it to disk.
Open a saved album file in Notepad or some other text editor to see what it looks like.
You should see something similar to the following:
66
C:\My Images\Samples\castle.jpg
C:\My Images\Samples\goose.jpg
C:\My Images\Samples\castle3.jpg
C:\My Images\Samples\gardens.jpg
Of course, saving the file is not very useful if you cannot also open a previously saved
file. We will talk about this next.
6.7 OPEN FILE DIALOGS
So far, we have provided our application with the ability to load multiple photo-
graphs to create a photo album, step between these photographs using the Next and
Previous menus, and save the album onto disk. Our final task is to open a previously
saved album and display the first photo in our window. As you probably realize, we
need to implement the user interface portion by handling the Open menu in our
MainForm class, and the data portion by implementing an Open method for our
PhotoAlbum class.
IMPLEMENT A CLICK HANDLER FOR THE SAVE MENU
Action Result
1 Add a
Click handler for the Save
menu.
protected void menuSave_Click
(object sender, System.EventArgs e)
{
2 If an album name does not exist,
use the Save As menu handler to
prompt the user for an album
name.
if (_album.FileName == null)
{
// Need to select an album file
menuSaveAs_Click(sender, e);
}
3 If an album name exists, then
simply save the file.
else
{
// Save the album in the current file
_album.Save();
4 Mark that the now-saved album
has no changes.
_bAlbumChanged = false;
}
}
190 CHAPTER 6 COMMON FILE DIALOGS
As before, we will begin with our PhotoAlbum class.
6.7.1 R
EADING ALBUM DATA
The Open method will accept a file name and read the photo album stored in this
file. It relies on the user interface layer in the caller to provide an actual file, and will
throw an exception if an error occurs.
Set the version number of the MyPhotoAlbum library to 6.8.
IMPLEMENT AN OPEN METHOD IN THE PHOTOALBUM CLASS
Action Result
1 In the PhotoAlbum.cs file, add an
Open method to the class.
public void Open(string fileName)
{
2 Open the given file with read
access.
FileStream fs = new FileStream(fileName,
FileMode.Open,
FileAccess.Read);
StreamReader sr = new StreamReader(fs);
3 Read the version string from the
file and convert it to an integer.
How-to
Use the Int32.Parse method.
This will throw an exception if the
string is not actually an integer.
int version;
try
{
version = Int32.Parse(sr.ReadLine());
}
catch
{
version = 0;
}
4 Clear the existing album and
assign the new file name to the
corresponding property.
try
{
this.Clear();
this.FileName = fileName;
5 Read in the list of photos.
Note: The C#
switch statement
used here allows for additional
version numbers in the future.
switch (version)
{
case 66:
{
// Read in the list of image files
string name;
do
{
name = sr.ReadLine();
if (name != null)
{
// Add the name as a photograph
Photograph p = new Photo-
graph(name);
this.Add(p);
}
} while (name != null);
break;
}