Netframwork 2.0 (phần 5) doc
Bạn đang xem bản rút gọn của tài liệu. Xem và tải ngay bản đầy đủ của tài liệu tại đây (491.81 KB, 50 trang )
Lesson 2: Creating and Configuring Menus 175
Copying Menu Items from Existing Menu Strips at Run Time
You will frequently want to create context menus that also expose the same menu
items as items in regular menus. Although a single tool strip menu item can belong to
only one menu strip at a time, it is a simple task to create an exact copy of a menu item
at run time. The ToolStripMenuItem constructor has several overloads that allow you
to specify the text, image, and click event handler. The following example demon-
strates how to make a copy of an existing tool strip menu item named ExitToolStrip-
MenuItem and add it to a ContextMenuStrip control named ContextMenuStrip1. This
example assumes the existence of a method named ExitToolStripMenuItem_Click,
which is the event handler for the ExitToolStripMenuItem.Click event.
' VB
Dim anItem As ToolStripMenuItem
anItem = New ToolStripMenuItem(ExitToolStripMenuItem.Text, _
ExitToolStripMenuItem.Image, New EventHandler(addressof _
ExitToolStripMenuItem_Click))
ContextMenuStrip1.Items.Add(anItem)
// C#
ToolStripMenuItem anItem;
anItem = new ToolStripMenuItem(ExitToolStripMenuItem.Text, _
ExitToolStripMenuItem.Image, new
EventHandler(ExitToolStripMenuItem_Click));
ContextMenuStrip1.Items.Add(anItem);
Quick Check
1. What is the difference between a MenuStrip and a ContextMenuStrip?
2. How do you associate a ContextMenuStrip with a control?
Quick Check Answers
1. A ContextMenuStrip is designed to be shown when the user right-clicks on
a control. Thus it contains no top-level elements and has no visual presence
on the form until a control is right-clicked.
2. You can associate a ContextMenuStrip with a control by setting that con-
trol’s ContextMenuStrip property.
176 Chapter 4 Tool Strips, Menus, and Events
Lab 2: Adding File Browsing Capability to Your Web Browser
In this lab, you will extend the capabilities of the Web browser you created in Lesson
1, “Configuring Tool Strips.” You will add a menu, with menu items that allow you to
browse, print, or save a file.
� Exercise 1: Extending the Capabilities of Your Web Browser
1. Open your completed lab from Lesson 1 or load the Lab 1 solution from the
folder on the companion CD.
2. Open Form1. In the Designer, drag a MenuStrip control from the Toolbox to the
top panel of the ToolStripContainer.
3. Add a top-level tool strip menu item named &File to the menu strip.
4. Add the following sub-menu items to the File tool strip menu item: &Open,
&Print, P&rint Preview, &Save, and &Exit.
5. From the Toolbox, drag an OpenFileDialog component onto the form.
6. In the Designer, double-click OpenToolStripMenuItem to open the code window
to the OpenToolStripMenuItem_Click event handler. Add the following code to
this method:
' VB
Dim result As DialogResult
result = OpenFileDialog1.ShowDialog()
If result = System.Windows.Forms.DialogResult.OK Then
WebBrowser1.Navigate(OpenFileDialog1.FileName)
End If
// C#
DialogResult result;
result = openFileDialog1.ShowDialog();
if (result == System.Windows.Forms.DialogResult.OK)
webBrowser1.Navigate(openFileDialog1.FileName);
7. Double-click the PrintToolStripMenuItem to open its Click event handler and
add the following code:
' VB
WebBrowser1.ShowPrintDialog()
// C#
webBrowser1.ShowPrintDialog();
8. Double-click the PrintPreviewToolStripMenuItem and add the following line to its
Click event handler:
' VB
WebBrowser1.ShowPrintPreviewDialog()
Lesson 2: Creating and Configuring Menus 177
// C#
webBrowser1.ShowPrintPreviewDialog();
9. Double-click the SaveToolStripMenuItem and add the following line to its Click
event handler:
' VB
WebBrowser1.ShowSaveAsDialog()
// C#
webBrowser1.ShowSaveAsDialog();
10. Double-click the ExitToolStripMenuItem and add the following line to its Click
event handler:
' VB
Application.Exit()
// C#
Application.Exit();
11. In the Properties window, set the ShortCutKeys property of ExitToolStripMenu-
Item to Ctrl+E.
12. Press F5 to test your application.
Lesson Summary
■ The MenuStrip control is the host for ToolStripMenuItems, which represent indi-
vidual menu items. The top-level menu items in a menu strip are contained in
the Items collection.
■ Individual tool strip menu items can host their own sub-menus, which are con-
tained in the DropDownItems collection.
■ Individual menu items can be displayed with check marks next to the menu
items and can have access keys and shortcut keys to allow keyboard-based
navigation.
■ Menus can be merged by using the ToolStripManager.Merge method. The config-
uration of the menu resulting from a merge is determined by the individual Tool-
StripMenuItem MergeAction and MergeIndex properties.
■ ContextMenuStrip allows you to create context menus for your application.
Menus created with the ContextMenuStrip control are not visible at run time and
do not host a top-level menu but behave like MenuStrip controls otherwise. You
can associate a ContextMenuStrip with a control by setting the control’s Context-
MenuStrip property.
178 Chapter 4 Tool Strips, Menus, and Events
Lesson Review
You can use the following questions to test your knowledge of the information in
this lesson. The questions are also available on the companion CD if you prefer to
review them in electronic form.
NOTE Answers
Answers to these questions and explanations of why each choice is right or wrong are located in
the “Answers” section at the end of the book.
1. Which of the following are required to create an access key for a menu item?
A. The UseMnemonic property for the ToolStripMenuItem must be set to True.
B. The AccessKeys property must be set to the correct key.
C. The letter for the access key in the Text property must be preceded by an
ampersand (&) symbol.
D. The ShortCutKeys property must be set to Ctrl + the letter for the access key.
2. Which of the following code snippets will add a new menu named Menu1 to a
form at run time?
A.
' VB
ToolStripManager.Menus.Add(Menu1)
// C#
ToolStripManager.Menus.Add(Menu1);
B. ' VB
ToolStripManager.Merge(Form1, Menu1)
// C#
ToolStripManager.Merge(Form1, Menu1);
C. ' VB
ToolStripManager.Controls.Add(Menu1)
// C#
ToolStripManager.Controls.Add(Menu1);
D. ' VB
Me.Controls.Add(Menu1)
// C#
this.Controls.Add(Menu1);
Lesson 2: Creating and Configuring Menus 179
3. Which of the following are required to associate and enable a context menu strip
named ContextMenu1 with a button named Button1?
A. The ContextMenuStrip property for Button1 must be set to ContextMenu1.
B. The ShowPopUp property for Button1 must be set to True.
C. Button1 must call the ContextMenu1.ShowPopUp method in its RightClick
event handler.
D. The ContextMenu1.Control property must be set to Button1.
180 Chapter 4 Tool Strips, Menus, and Events
Lesson 3: Using Events and Event Handlers
Events are messages that represent something interesting happening in your applica-
tion. When an event is raised, other parts of your application are given an opportunity
to respond to those events by executing methods called event handlers. In this lesson,
you will learn how to work with form and control events, how to assign event han-
dlers at design time, and how to assign event handlers at run time. You will also learn
how to use the code editor to override methods that are defined in your base class.
After this lesson, you will be able to:
■ Use the Windows Forms Designer to create default event handlers.
■ Use the Windows Forms Designer to create event handlers.
■ Manage mouse and keyboard events within Windows Forms applications.
■ Program a Windows Forms application to recognize modifier keys.
■ Create event handlers at run time to respond to system or user events dynamically.
■ Connect multiple events to a single event handler.
■ Use the Code Editor to override methods defined in the base class.
Estimated lesson time: 30 minutes
Overview of Events
Events are members of the class or control that raises them. You’ve been using events
throughout the labs in this book. Whenever you create an OnClick method, you are
responding to that control’s Click event. An event represents a message that is sent to
the rest of the application. When something noteworthy happens, a control or class
can raise an event, which sends out the message. This message can wrap any argu-
ments that contain information about the event and send them out to the rest of the
application. A method that has the same signature as the event (i.e., it has the same
number and types of parameters) can handle the event, which means that the method
is executed when the event occurs. An event can be handled by more than one
method, and a given method can handle more than one event.
Controls and forms can raise a variety of events in response to user input. The most
familiar event is the Click event, which is raised by almost all controls when the mouse
is positioned on the control and the left mouse button is clicked. Other common
events exposed by controls include events that respond to mouse and keyboard
Lesson 3: Using Events and Event Handlers 181
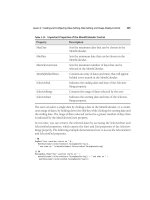
input. Some common events raised by controls are shown in Table 4-8.
Table 4-8 Common Events Raised by Controls
Event Description
Click Occurs when the left mouse button is clicked. Depending on
the control, it can also occur with certain keyboard input, for
example, when the control is selected and the Enter key is
pressed.
DoubleClick Occurs when the left mouse button is clicked twice rapidly.
Not all controls respond to the DoubleClick event.
KeyDown Occurs when a key is pressed when a control has the focus.
Contains different information from the KeyPress event.
KeyPress Occurs when a key is pressed when a control has the focus.
Contains different information from the KeyDown event.
KeyUp Occurs when a key is released while the control has the focus.
MouseClick Occurs when a control is clicked by the mouse.
MouseDoubleClick Occurs when a control is double-clicked by the mouse.
MouseDown Occurs when the mouse pointer is over a control and the
mouse button is pressed.
MouseEnter Occurs when the mouse pointer enters the control.
MouseHover Occurs when the mouse pointer rests on the control.
MouseLeave Occurs when the mouse pointer exits the control.
MouseMove Occurs when the mouse moves over the control.
MouseUp Occurs when a mouse button is released over the control.
MouseWheel Occurs when the mouse wheel moves while the control has
the focus.
Each event carries some information about itself to the method that handles it. Events
raised by controls usually contain two parameters: a parameter that carries an object ref-
erence to the control that raised it and a parameter that derives from the EventArgs class
182 Chapter 4 Tool Strips, Menus, and Events
that carries event arguments. In some events, such as the Click event, the EventArgs argu-
ment carries practically no information. In others, such as the MouseClick event, a great
deal of information about the state of the mouse is carried in the MouseClickEventArgs
argument.
Creating Event Handlers in the Designer
You can create event handlers in the Designer by using the Properties window. By
pressing the “lightning bolt” button in the Properties window (shown in Figure 4-6),
Figure 4-6 The Events button in the Properties window
The Properties window displays the events that can be raised by the control, as shown
in Figure 4-7.
Figure 4-7 The Properties window configured to display events
Creating Default Event Handlers
You can create default event handlers for an event through the Properties window. A
default event handler is a method that handles a given event for a control and has a
descriptive name. For example, the default event handler for the Click event of a but-
ton named Button1 would be called Button1_Click. The following procedure describes
how to create a default event handler.
Lesson 3: Using Events and Event Handlers 183
� To create a default event handler
1. In the Designer, select the control. In the Properties window, click the “lightning
bolt” button to list events for that control.
2. Double-click the entry for the event for which you want to create the default
event handler. The method is created with the proper signature and the Code
Editor opens to the new method.
3. Add the code that you want to execute when the event is raised.
Creating Event Handlers in the Designer
In addition to default event handlers, you can use the designer to assign other meth-
ods to handle events raised by controls. The following procedure describes how to
create an event handler other than the default event handler.
1. In the Code Editor, create a method whose signature matches the signature of
the event that you want to handle. For example, if you wanted to handle the But-
ton.Click event, you would create a Sub (void) method with Object and EventArgs
parameters.
2. In the Designer, select the control for which you want to create an event handler.
In the Properties window, click the lightning bolt to list the events for this control.
3. Single-click the cell next to the event you want to create a handler for. A drop-
down arrow appears.
4. Click the drop-down arrow to display a list of methods that match the signature
of the event. Choose the event you created in the Code Editor.
Assigning Multiple Events to the Same Event Handler
You can assign multiple events to the same event handler. All that is required is that
the signature of the method matches the signature of the event. You can assign mul-
tiple events in a single control to a single event handler, or you can assign events from
several controls to a single event handler. An example of when this might be useful
would be in an application such as a calculator. You might have the Button controls
that are used to input numbers all share the same Click event handler, programming
logic into the event handler to distinguish between the buttons that are clicked.
You can assign multiple events to the same event handler in the same way that you
assign an individual event. Select the control and then, in the Properties window,
select the event for which you want to assign a handler. Choose the method for the
184 Chapter 4 Tool Strips, Menus, and Events
event handler from the drop-down menu. Repeat the process for each event you want
to assign a handler to.
Managing Mouse and Keyboard Events
Most of the events involved in interacting with the user are mouse and keyboard
events. Controls can raise events in response to mouse clicks or a variety of keystrokes
and can detect whether modifier keys such as Ctrl, Alt, or Shift are pressed. This sec-
tion describes how to respond to mouse and keyboard events.
Mouse Events
Controls can interact with the mouse in several ways. Controls raise events when the
mouse enters the control, leaves the control, moves over the control, clicks, hovers
over the control, or when the mouse wheel moves while the pointer is over a control.
Click and DoubleClick The most familiar mouse events are the Click and DoubleClick
events. The Click event is raised by a control when the mouse pointer is over the con-
trol and the left button is pressed and released. This event is also raised when the con-
trol has the focus and the Enter key is pressed. The DoubleClick event is raised when
the left mouse button is clicked twice in rapid succession. Note that not all controls
respond to the DoubleClick event.
The Click and DoubleClick events have a fairly simple signature. They return an Object
reference to the control that raised the event (the parameter that Visual Studio names
Sender when it generates a handler) and an instance of the EventArgs class that carries
no useful information about the event. The following code example demonstrates the
appropriate signature for an event handler that handles the Click or DoubleClick event.
' VB
Private Sub ClickHandler(ByVal sender As System. Object, ByVal e As _
System.EventArgs)
' Insert code to be executed when the event is raised
End Sub
// C#
private void ClickHander(object sender, EventArgs e)
{
// Insert code to be executed when the event is raised
}
You can assign any method with this signature to handle the Click or DoubleClick
events.
Lesson 3: Using Events and Event Handlers 185
Mouse Movement Events Controls raise events that track the movement of the
mouse pointer into and out of the bounds of the control. These events are detailed in
Table 4-9.
Table 4-9 Mouse Movement Events
Event Description
MouseEnter This event is raised when the mouse pointer enters a control.
MouseHover This event is raised when the mouse pointer hovers over the
control.
MouseLeave This event is raised when the mouse pointer exits the control.
Like the Click event, these events pass relatively little information to the methods that
handle them. Their event handlers also require an Object parameter representing the
sender of the event and an EventArgs parameter.
Other Mouse Events Although the events described previously are useful for tracking
mouse movement and clicks, they provide practically no information about the event
itself. If you want to retrieve more information about the event, such as the position of
the mouse, use one of the mouse events that pass an instance of MouseEventArgs in its
signature. These events are shown in table 4-10.
Table 4-10 Mouse Events That Pass MouseEventArgs
Event Description
MouseClick This event is raised when a mouse button is pressed
and released on a control.
MouseDoubleClick This event is raised when a mouse button is clicked
twice on a control.
MouseDown This event is raised when a mouse button is pressed
over a control.
MouseMove This event is raised when the mouse moves over the
control.
MouseUp This event is raised when a mouse button is released
over a control.
186 Chapter 4 Tool Strips, Menus, and Events
Table 4-10 Mouse Events That Pass MouseEventArgs
Event Description
MouseWheel This event is raised when the mouse wheel is moved.
All of the events shown in Table 4-10 require a handler with two parameters: an object
parameter that represents the control that raised the event and an instance of Mouse-
EventArgs. The following example demonstrates an event handler for any of these
methods.
' VB
Private Sub MouseHandler(ByVal sender As System.Object, ByVal e As _
System.MouseEventArgs)
' Insert code to handle your event here
End Sub
// C#
private void MouseHandler(object sender, MouseEventArgs e)
{
// Insert code to handle your event here
}
The instance of MouseEventArgs that is passed to the event handler contains a large
amount of information about the event. It contains properties that describe what
buttons were clicked, how many times they were clicked, the location of the mouse,
and how far the mouse wheel has been turned. Table 4-11 shows the MouseEvent-
Args properties.
Table 4-11 MouseEventArgs Properties
Property Description
Button Indicates which button was pressed.
Clicks Indicates how many times the button was pressed.
Delta Indicates the number of clicks the mouse wheel has moved.
Location Indicates the current location of the mouse.
X Indicates the X coordinate of the mouse.
Y Indicates the Y coordinate of the mouse.
Lesson 3: Using Events and Event Handlers 187
Keyboard Events
Controls that can receive keyboard input can raise three keyboard events:
■ KeyDown
■ KeyPress
■ KeyUp
KeyDown and KeyUp The KeyDown and KeyUp events are raised when a key is
pressed and a key is released respectively. The control that has the focus raises the
event. When these events are raised, they package information about which key or
combination of keys were pressed or released in an instance of KeyEventArgs that is
passed to the method that handles the event. Table 4-12 describes the properties of
KeyEventArgs.
Table 4-12 KeyEventArgs Properties
Property Description
Alt Gets a value indicating whether the Alt key was pressed.
Control Gets a value indicating whether the Ctrl key was pressed.
Handled Gets or sets a value indicating whether the event was handled.
KeyCode Returns an enum value representing which key was pressed.
KeyData Returns data representing the key that was pressed, together
with whether the Alt, Ctrl, or Shift key was pressed.
KeyValue Returns an integer representation of the KeyData property.
Modifiers Gets the modifier flags for the event, indicating what combi-
nation of Alt, Ctrl, or Shift key was pressed.
Shift Gets a value indicating whether the Shift key was pressed.
SuppressKeyPress Gets or sets a value indicating whether the key event should
be passed on to the underlying control.
The KeyUp and KeyDown events determine what key and what modifier keys, if any,
were pressed. This information is exposed through properties in the KeyEventArgs ref-
erence that is passed to the event handler.
188 Chapter 4 Tool Strips, Menus, and Events
Determining When Modifier Keys Have Been Pressed The KeyEventArgs properties
Alt, Control, and Shift return a Boolean value that indicates if the Alt, Ctrl, and Shift
keys are pressed, respectively. A value of True is returned if the key is pressed, and
False is returned if the key is not pressed. The following code demonstrates a KeyUp
event handler that checks whether the Ctrl key is pressed.
' VB
Private Sub TextBox1_KeyUp(ByVal sender As System.Object, ByVal e As _
System.Windows.Forms.KeyEventArgs) Handles TextBox1.KeyUp
If e.Control = True Then
MsgBox("The CTRL key is still down")
End If
End Sub
// C#
private void textBox1_KeyUp(object sender,
e System.Windows.Forms.KeyEventArgs)
{
if (e.Control == true)
MessageBox.Show("The CTRL key is still down");
}
KeyPress When a user presses a key that has a corresponding ASCII value, the KeyPress
event is raised. Keys with a corresponding ASCII value include any alphabetic or numeric
characters (alphanumeric a–z, A–Z, and 0–9) as well as some special keyboard characters
such as the Enter and Backspace keys. If a key or key combination does not produce an
ASCII value, such as the Alt, Ctrl, or Shift key, it will not raise the KeyPress event.
This event is most useful for intercepting keystrokes and evaluating them. When this
event is raised, an instance of KeyPressEventArgs is passed to the event handler as a
parameter. The KeyPressEventArgs exposes the character representation of the key(s)
pressed through the KeyPressEventArgs.KeyChar property. You can use this property
to evaluate keystrokes received by your application.
Creating Event Handlers at Run Time
You can create event handlers for events and add them in code at run time by associ-
ating an existing event with an existing method. You might want to create an event
handler at run time to modify the way an application responds to events. Visual Basic
Lesson 3: Using Events and Event Handlers 189
and Microsoft Visual C# have somewhat different methods for creating event han-
dlers at run time, so this section presents separate procedures for each.
� To create or remove an event handler at run time in Visual Basic
1. Create a Sub whose signature matches the signature for the event. Use the
AddHandler keyword to associate the event handler with the event. The
AddressOf operator must be used to create a delegate at run time. An example is
shown here:
‘ VB
AddHandler Button1.Click, AddressOf myEventHandler
2. You can remove an event handler at run time by using the RemoveHandler key-
word, as shown here:
' VB
RemoveHandler Button1.Click, AddressOf myEventHandler
� Creating or Removing an Event Handler at Run Time in C#
1. Create a method whose signature matches the signature for the event. Unlike
Visual Basic, this method can return a value. Use the += operator to associate the
method with the event. Here is an example:
// C#
button1.Click += myMethod;
2. You can remove an event handler at run time by using the =- operator, as shown
here:
// C#
button1.Click -= myMethod;
Overriding Methods in the Code Editor
When you inherit from a base class, your class automatically gains all of the implemen-
tation and functionality of that base class. At times, you will want to override a method
that has been defined in a base class. For example, if you want to create a new visual
representation for a control that inherits from a standard Windows Forms control, you
must override the Paint method. You must also override virtual (MustOverride) meth-
ods in abstract classes, and you can override methods to provide functionality that is
different from what might be provided by the base class.
190 Chapter 4 Tool Strips, Menus, and Events
The Code Editor allows you to override methods easily in your base class. In the Code
Editor, inside the class body but outside of a method, type Overrides (Visual Basic) or
override (C#). An Intellisense window showing all of the overridable methods in the
base class appears. Choose the method you want to override from the window and
the rest of the method is stubbed out for you automatically. All you have to do then
is add the implementation. The Code Editor and Intellisense window are shown in
Figures 4-8 and 4-9.
Figure 4-8 Overriding a method in Visual Basic
Figure 4-9 Overriding a method in C#
Lesson 3: Using Events and Event Handlers 191
Quick Check
■ Briefly explain what an event is and how it works in the application’s exe-
cution cycle.
Quick Check Answer
■ An event is a notification that is sent from a control or component to the
rest of the application. When an event is fired, any methods that are register
to handle that event will execute.
Lab 3: Practice with Mouse Events
In this lab, you will create a simple application that tracks the mouse events that hap-
pen to a particular control.
� Exercise 1: Creating the Event Monitor
In Visual Studio, create a new Windows Forms application.
1. From the Toolbox, drag a Label control and a ListBox control onto the form.
2. In the Properties window, set the Label1.Text property to Mouse Here!
3. Select Label1. In the Properties window, generate default event handlers for
Click, DoubleClick, MouseClick, MouseDoubleClick, MouseDown, MouseEnter,
MouseHover, MouseLeave, MouseMove, and MouseUp.
4. In the Code Editor, add code to each of the default event handlers as shown in
the Table 4-13.
Table 4-13 Code for default event handlers
Event Handler Visual Basic C#
Click ListBox1.Items.Add listBox1.Items.Add
(“Click”) (“Click”);
DoubleClick ListBox1.Items.Add listBox1.Items.Add
(“DoubleClick”) (“DoubleClick”);
MouseClick ListBox1.Items.Add listBox1.Items.Add
(“MouseClick”) (“MouseClick”);
MouseDoubleClick ListBox1.Items.Add listBox1.Items.Add
(“MouseDoubleClick”) (“MouseDoubleClick”);
MouseDown ListBox1.Items.Add listBox1.Items.Add
(“MouseDown”) (“MouseDown”);
192 Chapter 4 Tool Strips, Menus, and Events
Table 4-13 Code for default event handlers
Event Handler Visual Basic C#
MouseEnter ListBox1.Items.Add
(“MouseEnter”)
listBox1.Items.Add
(“MouseEnter”);
MouseHover ListBox1.Items.Add
(“MouseHover”)
listBox1.Items.Add
(“MouseHover”);
MouseLeave ListBox1.Items.Add
(“MouseLeave”)
listBox1.Items.Add
(“MouseLeave”);
MouseMove ListBox1.Items.Add
(“MouseMove”)
listBox1.Items.Add
(“MouseMove”);
MouseUp ListBox1.Items.Add
(“MouseUp”)
listBox1.Items.Add
(“MouseUp”);
5. Press F5 to test your application. Move the mouse pointer over the label and per-
form various mouse operations. Note that each mouse event is recorded in the
ListBox, and note the order in which events occur.
Lesson Summary
■ Events represent a programmatic notification that something interesting has
happened in the application. You can assign methods called event handlers to
execute in response to an event. Event handlers must have a signature that
matches the event that they handle.
■ You can create event handlers in the Designer through the Properties window.
You can create a default event handler or assign the event to any method or
methods that have the correct signature.
■ Controls can respond to events that are raised by the mouse and keyboard. Mouse-
EventArgs, KeyEventArgs, and KeyPressEventArgs provide detailed information
regarding the state of the mouse or keyboard to their respective events.
■ You can add and remove event handlers at run time by using the AddHandler and
RemoveHandler keywords for Visual Basic and the += and -= operators for c#.
■ You can override methods that can be overridden in the base class in the Visual
Studio Code Editor. The Intellisense window provides a list of available methods
and can automatically stub overridden methods in the Code Editor.
Lesson 3: Using Events and Event Handlers 193
Lesson Review
You can use the following questions to test your knowledge of the information in
this lesson. The questions are also available on the companion CD if you prefer to
review them in electronic form.
NOTE Answers
Answers to these questions and explanations of why each choice is right or wrong are located in
the “Answers” section at the end of the book.
1. Which of the following properties of an instance e of the KeyEventArgs class can
be used in a KeyDown event handler to determine if the Ctrl key has been
pressed? (Choose all that apply.)
A. e.Control
B. e.KeyCode
C. e.KeyData
D. e.Modifiers
2. Which of the following code examples will add a new event handler named
ClickHandler to the Button1.Click event at run time?
A.
' VB
Button1.Click.AddHandler(ClickHandler)
// C#
ClickHandler += Button1.Click;
B. ' VB
AddHandler(Button1.Click, ClickHandler)
// C#
AddHandler(Button1.Click, ClickHandler);
C. ' VB
AddHandler Button1.Click, AddressOf ClickHandler
// C#
Button1.Click += ClickHandler;
D. ' VB
Button1.Click += AddressOf ClickHandler
// C#
Button1.Click ++ ClickHandler;
194 Chapter 4 Review
Chapter Review
To further practice and reinforce the skills you learned in this chapter, you can per-
form the following tasks:
■ Review the chapter summary.
■ Review the list of key terms introduced in this chapter.
■ Complete the case scenarios. These scenarios set up real-world situations involv-
ing the topics of this chapter and ask you to create a solution.
■ Complete the suggested practices.
■ Take a practice test.
Chapter Summary
■ ToolStrip controls can host a wide range of functionality. ToolStripItems duplicate
the functionality of several other Windows Forms controls as well as combine
some Windows Forms functionality with menu functionality.
■ Tool strips support rafting, merging, rearrangement of controls, and overflow of
controls.
■ MenuStrip controls are used to create menus for forms and host ToolStripMenu-
Item controls, which represent menu entries and commands.
■ MenuStrip controls derive from ToolStrip and expose similar functionality. Menus
can be merged using the ToolStripManager class.
■ The ContextMenuStrip control is used for creating context menus. You can asso-
ciate a context menu with a control by setting the ContextMenuStrip property.
■ The Properties window can be used to create default event handlers or to assign
preexisting methods to handle events.
■ A variety of mouse and keyboard events are raised in response to user actions. The
MouseEventArgs parameter in many of the mouse events provides detailed infor-
mation regarding the state of the mouse, and the KeyEventArgs and KeyPressEvent-
Args parameters provide information regarding the state of the keyboard.
■ Event handlers can be created at run time and used to dynamically associate
events with methods.
195 Chapter 4 Review
Key Terms
Do you know what these key terms mean? You can check your answers by looking up
the terms in the glossary at the end of the book.
■ event
■ event handler
■ MenuStrip
■ ToolStrip
■ ToolStripItem
■ ToolStripMenuItem
Case Scenarios
In the following case scenarios, you will apply what you’ve learned about how to use
controls to design user interfaces. You can find answers to these questions in the
“Answers” section at the end of this book.
Case Scenario 1: Designing a Complex User Interface
Well, you’ve been moving up in the world at Trey Research, your current employer.
You’ve been tasked with the design of the front end of an insurance application for
Humongous Insurance, one of your clients. True to their name, they want a
humongous front end, with an enormous amount of options and commands avail-
able to the user. Your task is to provide full functionality for your client while at the
same time creating an application that is intuitive and easy to use.
Questions
Answer the following questions for your manager:
1. How can we make all of these commands available without making the user
interface (UI) completely impossible to use?
2. How can we make all of these commands intuitive and easy to learn?
Case Scenario 2: More Humongous Requirements
Now that you’ve successfully implemented menus and toolbars for Humongous
Insurance, you must implement a series of keyboard commands.
196 Chapter 4 Review
Technical Requirements
■ All main menu items must have access keys.
■ Key menu items must have shortcut keys that are accessible by the user.
■ Certain TextBox controls on the form must auto-fill when Ctrl key combinations
are pressed.
Questions
1. How can this functionality be implemented?
Suggested Practices
■ Create toolbars with similar members and practice merging them together,
changing the MergeIndex and MergeItem properties of each tool strip item.
■ Build an application similar to the application from Lab 3, “Practice with Mouse
Events,” that monitors keyboard events.
■ Build an application that consists of a form with a single button that the user can
chase around the form with the mouse but can never actually click.
Take a Practice Test
The practice tests on this book’s companion CD offer many options. For example, you
can test yourself on just the content covered in this chapter, or you can test yourself on
all the 70-526 certification exam content. You can set up the test so that it closely sim-
ulates the experience of taking a certification exam, or you can set it up in study mode
so that you can look at the correct answers and explanations after you answer each
question.
MORE INFO Practice Tests
For details about all the practice test options available, see the “How to Use the Practice Tests” sec-
tion in this book’s Introduction.
Chapter 5
Configuring Connections and
Connecting to Data
Typically, most real-world applications use databases as a store for the data in that
application. For example, inventory systems, contact management systems, and air-
line reservation systems store data in a database and then retrieve the necessary
records into the application as needed. In other words, the data used by an applica-
tion is stored in a database external to the actual application, and it is retrieved into
the application as required by the program.
When creating applications that work with data, the Microsoft .NET Framework pro-
vides many classes that aid in the process. The classes that you use for common data
tasks such as communicating, storing, fetching, and updating data are all located in
the System.Data namespace. The classes in the System.Data namespace make up the
core data access objects in the .NET Framework. These data access classes are collec-
tively known as ADO.NET.
Before you can begin working with data in an application, you must first establish and
open a connection and communicate with the desired data source. This chapter
describes how to create the various connection objects that are used to connect appli-
cations to different data sources and sets the basis for working with data in the follow-
ing chapters. After learning to establish connections to databases in this chapter, we
will move on to Chapter 6, “Working with Data in a Connected Environment,” which
provides instructions for running queries, saving data, and creating database objects
directly between your application and a database. Chapter 7, “Create, Add, Delete, and
Edit Data in a Disconnected Environment,” describes how to create DataSet and
DataTable objects that allow you to temporarily store data while it is being used in a
running application. Finally, Chapter 8, “Implementing Data-Bound Controls,” pro-
vides information on binding data to be displayed and worked with in Windows
Forms controls.
Typically, data sources are relational databases such as Microsoft SQL Server and Ora-
cle, but, additionally, you can connect to data in files such as Microsoft Office Access
(.mdb) and SQL Server (.mdf) database files. The connection object you use is based
on the type of data source your application needs to communicate with.
197
198 Chapter 5 Configuring Connections and Connecting to Data
Exam objectives in this chapter:
■ Manage connections and transactions.
❑ Configure a connection to a database using the Data Source Configuration
Wizard.
❑ Configure a connection to a database using the Server Explorer.
❑ Configure a connection to a database using the Connection class.
❑ Connect to a database using specific database Connection objects.
❑ Enumerate through instances of SQL Server.
❑ Open an ADO.NET connection to a database.
❑ Close an ADO.NET connection to a database by using the Close method of
the Connection object.
❑ Protect access to the connection details of a data source.
❑ Create a connection designed for reuse in a connection pool.
❑ Control a connection pool by configuring ConnectionString values based on
database type.
❑ Use the Connection events to detect database information.
❑ Handle exceptions when connecting to a database.
Lessons in this chapter:
■ Lesson 1: Creating and Configuring Connection Objects. . . . . . . . . . . . . . . . 200
■ Lesson 2: Connecting to Data Using Connection Objects . . . . . . . . . . . . . . . 212
■ Lesson 3: Working with Connection Pools . . . . . . . . . . . . . . . . . . . . . . . . . . . . 225
■ Lesson 4: Handling Connection Errors . . . . . . . . . . . . . . . . . . . . . . . . . . . . . . . 232
■ Lesson 5: Enumerating the Available SQL Servers on a Network . . . . . . . . . 237
■ Lesson 6: Securing Sensitive Connection String Data . . . . . . . . . . . . . . . . . . . 241
Before You Begin
To complete the lessons in this chapter, you must have:
■ A computer that meets or exceeds the minimum hardware requirements listed in
the “Introduction” at the beginning of the book.
■ Microsoft Visual Studio 2005 Professional Edition installed on your computer.
199 Before You Begin
■ An understanding of Microsoft Visual Basic or C# syntax and familiarity with
the .NET Framework.
■ A basic understanding of relational databases.
■ Available data sources, including SQL Server 2005 (SQL Server 2005 Express Edi-
tion is acceptable), the Northwind sample database for SQL Server, and the
Nwind.mdb Access database file. Directions for setting up the sample databases
are located in the Setting up Sample Databases Read Me file on the companion CD.
Real World
Steve Stein
At a previous employer, I was responsible for extracting data from an arcane pro-
prietary database that was virtually impossible to connect to directly. As a result,
time-consuming reports were periodically generated that were then imported
into a workable database management system for further processing. Thinking
back, I realize how much easier life would have been if I had been able to spin up
a connection object and communicate directly with the data source without the
need for the intermediary process of creating reports and exporting and import-
ing data.