Red Hat Linux Networking , System Administration (P3) potx
Bạn đang xem bản rút gọn của tài liệu. Xem và tải ngay bản đầy đủ của tài liệu tại đây (960.15 KB, 30 trang )
does not occur automatically. The goal of disaster recovery is to restore full
functionality as quickly as possible. Depending on the degree of fault toler-
ance your systems have, disaster recovery may not be necessary at all.
Planning for fault tolerance and disaster recovery requires that you assess
the needs of your systems. The following two questions are the most impor-
tant ones you should ask:
■■ How critical are the systems to daily operation?
■■ Could the systems be down and not affect operations?
Obviously, if your systems are used for business, they could not be down for
long, if at all. You must determine how vital a given system is to your opera-
tion. Vital systems require greater fault tolerance than nonvital systems do. Be
sure to keep in mind that greater fault tolerance costs more than less fault tol-
erance does. Another important consideration is the amount of money avail-
able for building fault tolerance into your system. Balance your need for fault
tolerance with the amount of money you can spend on it.
Clustering Solutions
If your systems must be up 24/7, you have to rely on a clustering solution for
your fault tolerance. You basically have two choices for clustering: failover
clustering and true clustering. Both of these solutions are costly to implement
and require a great deal of configuration. Configuring these types of systems
is well beyond the scope of this book, but a brief description of the two types
of clustering is useful.
Failover clustering typically requires two systems. The first system is the
active system that responds to service requests. The second, failover system is
an exact copy of the first system that is connected to the first system by a dedi-
cated link. The second system uses the dedicated link to listen for a signal —
called a heartbeat — from the first system at a specified interval. The second
system does nothing but listen to the heartbeat signal from the first system. If
the second system does not receive the signal, it assumes that the first system
has gone offline and immediately begins accepting requests for services. When
the first system comes back online, the second system returns to monitoring the
heartbeat signal.
True clustering uses multiple systems, usually more than two, often in dif-
ferent locations, that act as a single system. Network services run on each sys-
tem and requests for services are distributed between the systems. Each
system is connected to every other system by a dedicated link. Unlike the sec-
ond system in failover clustering that only listens for the heartbeat, the sys-
tems in true clustering handle requests for services. If a system does go down,
the requests for service are just sent to the other systems, which take up the
slack. Neither clustering solution employs disaster recovery. Because they
24 Chapter 2
07_599496 ch02.qxd 8/30/05 6:21 PM Page 24
must be up 100 percent of the time, there is no disaster from which to recover,
except perhaps the disaster to your budget because the cost of implementing
such a system is quite high.
Disaster Recovery
For systems that do not require 100 percent uptime, disaster recovery is the
method used. A typical solution is to configure an identical system and keep it
ready for service. Placing the other system into service requires intervention
by the administrator and no services will be possible during this time. Service
can usually be restored fairly quickly using this method, and the cost is less
than the cost of a clustering solution.
The least costly method (in hardware) of dealing with system problems is to
fix them after they have occurred. Here, you shut down the system until it is
fixed; no services are available during the repair. For example, if the hard drive
in your system crashes, you simply replace the hard drive.
System administrators who plan their network well may not be able to pre-
vent disasters entirely, but they greatly reduce the likelihood of such events
taking place and make complete or near-complete recovery a quick and
orderly process.
Planning for recovery ideally involves considering everything bad that can
possibly happen and figuring out a way around it. However, that which is ideal
often does not square with what’s practical, especially when it involves spend-
ing money to guard against an infinitesimal likelihood. Fortunately, the things
that save you from likely disasters save you from the most unlikely ones, too.
Just as security planning requires attention to threats from outside and
inside the network, there are two parts to disaster planning. The first is doing
everything you can to prevent a catastrophe from taking place.
Only you, or other administrators at your organization, know how impor-
tant your system is and how much money is budgeted to keep it running.
Chances are good that an uninterruptible power supply (UPS) that keeps the
network up long enough to save and close files and shut down the system in
an orderly fashion fits within the available budget. Agood UPS system is espe-
cially useful if your enterprise has a generator backup that kicks on in the
event of power failure because generators do not always start instantly and,
when they do, the electricity provided is not always clean enough for com-
puter use. A battery backup can protect you from both of these potential prob-
lems. If your enterprise is important enough to have an emergency generator,
it’s probably important enough to keep the network running.
Renegade electricity is one of the worst enemies of system reliability. Small
power strips with surge suppression are better than nothing, but more robust
power conditioning is needed if really important equipment and data are to be
protected. In fact, be sure to protect all lines from the outside world that attach
Planning the Network 25
07_599496 ch02.qxd 8/30/05 6:21 PM Page 25
to your computer or its peripherals, be they phone lines or cable or DSL con-
nections. Likewise, put the peripherals themselves on protected circuits.
Second, formulate a regular (daily or better) backup scheme, with one set of
backups stored in a safe place off-site as protection against loss of data in the
event of fire, flood, tornado, or other physical disaster. One way of making this
process relatively painless, albeit an expensive one, is to rent storage from a
commercial operation whose business is storing other people’s data. The best
firms are very responsive and secure.
Redundancy is also important. Make sure that your plans don’t put critical
data on only one machine. That way, in the event of a machine failure, a
replacement machine with a copy of your critical data can be put online very
quickly. This is some, but not all, of the theory behind redundant array of inde-
pendent disks (RAID) systems, in which multiple hard drives in the same
machine contain the same data. RAID is good protection in case any one drive
fails. (The best RAIDs allow the hot-swapping of drives so that a replacement
can be added without bringing the system down.) But RAID also allows for
much faster data access, making it especially useful for file server machines.
Don’t be lulled into complacency by a RAID, though; there are computer fail-
ure modes that can render an entire system useless. In keeping with Murphy’s
Law, the worst failures and calamities occur at the worst possible time — just
before the rollout of a new product, just as the monthly billing is scheduled to
go out, in the middle of the worst blizzard in 10 years, or when most of the
computer staff is on vacation or out sick. You need to establish an emergency
response policy that takes these examples, and there are many others, into
account. This involves convincing your employer of the necessity of having
sufficient staff to guard against such horrors, or even the employment of an
outside firm to augment your own staff in the event of an especially ill-timed
disaster. If your company follows the latter route, it’s well worth the invest-
ment of time and money to make sure that the outside firm’s representatives
tour and learn your network on a day when everything is working smoothly.
Some of this planning is far more elaborate than anything you’re likely to
undertake if you have only a small household network or a very small office; on
the other hand, if you’re in a very large enterprise, data security and system
integrity involve issues and procedures far beyond the scope of this book.
Everything mentioned in this section, however, can be scaled to fit any network.
Writing It Down: Good Records Can Save Your Job
A very important part of network planning is to put it all down on paper and
to save that piece of paper. Working out your network’s design is best done by
actually diagramming the network, making multiple diagrams to explore dif-
ferent strategies. Once you settle on a design, draw a more formal diagram.
26 Chapter 2
07_599496 ch02.qxd 8/30/05 6:21 PM Page 26
Sometimes it’s a good idea to save your discarded designs as well, with a note
on each version explaining why it wasn’t chosen. Formalizing the network
design and saving the discarded ideas is useful for several reasons. It bolsters
your decisions in case you’re second-guessed, it demonstrates that you con-
sidered all the possibilities, and the formal diagram is a valuable tool should
someone need to administer the system in your absence.
A written security policy is essential in the enterprise and not a bad idea
even for a home network. An additional security file you should always keep
is a full security log. Such a record might begin by detailing what security mea-
sures you have designed into the system. It should include copies of any secu-
rity notices you have received, as well as an initialed notation of when the
recommended security patch was applied. If log files show an attempted crack
of your network, hard copies of the relevant portions should be kept there, too.
When users or management complain about how you have the system so
tight that it seems inconvenient even for them to log in, there’s nothing like
proving that the system is regularly under attack — and it will be, by port
scanners and others — to demonstrate the wisdom of tight security. One very
big company has made huge amounts of money by putting user convenience
over security, and many companies have paid a high price for adopting their
products. Your Red Hat system costs a very small amount in user inconve-
nience in exchange for greatly enhanced system security. It’s useful to be able
to prove that the threat is real.
A security log is also the place to keep copies of any security-related email
messages from within the company, from log listings of employees who have
decided to “go exploring” (which is sometimes but not always a sign of bad
intent) to exchanges with management over the implementation of new secu-
rity features. This file is not something for general consumption, but it’s very
important. Keep a copy locked away at work, and it won’t hurt to keep a copy
safely off-site, too.
CROSS-REFERENCE To learn more about writing a security policy, see
Chapter 34.
While your security log should detail actions you have taken to prevent dis-
aster and actions you have recommended in that regard, your plan of action in
the event of a catastrophe should also be committed to paper and should be
well known and easily available. If you are the sole administrator, it is far bet-
ter to work out your plan of action calmly and ahead of time, which of course
you will have done. But under the stress of an actual emergency, it is easy to
forget important details. Having a specific plan on paper right in front of you
is a big help and a great stress reliever. Your action plan should be sufficiently
detailed so that if the disaster takes place while you are away, any competent
Planning the Network 27
07_599496 ch02.qxd 8/30/05 6:21 PM Page 27
system administrator can use it to bring the system back up. If you are part of
a larger department, include the assignments of others in restoring the system.
In either case, someone who is completely trusted and who is never on vaca-
tion at the same time you are should know the root’s password. Alternately,
the password can be placed in a sealed envelope inside the company safe —
the one time it is allowable to put a password on paper.
TIP Keep a hard copy of your security log in a safe place!
We’re all happy with the idea of the paperless office, but until computers
become perfectly reliable, paper — as a roadmap, indicating where you are
and how you arrived there — will remain necessary.
Summary
In this chapter you learned the importance of planning your network before
you begin to construct it, discovered some of the options available to you, and
found out some of the reasons why you might choose one over another. You
learned that network security is a never-ending task made easier by careful
planning and that threats can come both from outside the network and from
among its users. Working to prevent catastrophic failures and having a plan to
recover from them is something you’ve learned to do. You now know the
importance of putting it all on paper as you proceed, too.
28 Chapter 2
07_599496 ch02.qxd 8/30/05 6:21 PM Page 28
29
Standard
Installation
IN THIS CHAPTER
■■ Exploring Your PC’s Components
■■ Checking for Supported Hardware
■■ Creating the Red Hat Boot Disk
■■ Starting the Installation
■■ Partitioning the Hard Disk
■■ Using Disk Druid to Partition Your Disks
■■ Configuring the Installation
■■ Selecting the Package Groups to Install
■■ Running Firstboot
This chapter explains the steps necessary to install Red Hat Enterprise Linux and
Fedora Core on a single system. You begin by making a list of your PC’s hard-
ware. You use this hardware inventory later when you begin the installation.
NOTE When you purchase Red Hat Enterprise Linux, you are eligible for
installation support from Red Hat. Also, an online installation manual is
available on the Red Hat Web site at www.redhat.com/docs. There is no
official support for Fedora Core from Red Hat.
NOTE The installation processes for Red Hat Enterprise Linux and Fedora
Core are nearly identical. Throughout the remainder of this chapter, we will
refer to both Red Hat Enterprise Linux and Fedora Core as Red Hat Linux except
in the instances where it is necessary to make a distinction between them. The
figures in the chapter show the Fedora installation screens, but with the
exception of the name on the screen (Fedora or Enterprise Linux), the content
of the installation screens is identical.
CHAPTER
3
08_599496 ch03.qxd 8/30/05 6:20 PM Page 29
Exploring Your PC’s Components
Before installing Red Hat Linux, you should compile a list of the hardware
components in your computer. Linux supports different types of hardware
through software components called device drivers, similarly to other operating
systems. A driver is required for each type of peripheral device; depending on
the age of your hardware, a driver may not be available. If your hardware is
current, meaning less than two years old, the drivers you need are probably
available and included with the distribution. If you need a driver that is not
included with the distribution, searching the Internet usually provides you
with a solution.
You can install and run Red Hat Linux even if no Linux drivers are available
for certain devices. Of course, those devices won’t function, but this may not
be a problem for you, depending on the device. To be able to install Red Hat
Linux, you must have a compatible processor, bus type, floppy disk, hard disk,
video card, monitor, keyboard, mouse, and CD-ROM drive. If you are plan-
ning to use a graphical user interface (GUI), such as GNOME or KDE, you
must ensure that XFree86 (the X Window System for Linux) supports the
mouse, video card, and monitor. Nearly all devices made within the past two
years are supported.
The following sections briefly describe the supported PC hardware. Your
hardware list should contain information about the hardware described here
before you begin to install Red Hat Linux on your PC.
Processor
The central processing unit (CPU) — or just the processor — is an integrated cir-
cuit chip that performs nearly all control and processing functions in the PC.
Both Red Hat Enterprise Linux and Fedora Core run on an Intel 80386 proces-
sor or newer, as well as compatibles made by AMD or Cyrix. However, you
probably don’t want to use any processor older than a Pentium-class proces-
sor. Red Hat Linux also supports motherboards with multiple processors that
use the symmetric multiprocessing (SMP) Linux kernel.
Bus
The bus provides the electrical connection between the processor and its periph-
erals. Several types of PC buses exist on the motherboard with slots to accept
peripheral components. Each of the slots is colored to help in its identification.
The most recent is the Peripheral Component Interconnect (PCI) bus, and it is found
on all current production motherboards. The PCI slot is white and is available
in 32- and 64-bit form as well as 33 and 64 MHz. The new PCI-X standard will
30 Chapter 3
08_599496 ch03.qxd 8/30/05 6:20 PM Page 30
support speeds up to 533 MHz. Another type of slot is also based on the PCI bus
specifications, but offers significant advantages over the PCI bus. The Accelerated
Graphics Port (AGP) is a special slot on the motherboard designed to accept an
AGP graphics card. The AGP slot is brown. Another is the Industry Standard
Architecture (ISA) bus, formerly called the AT bus because IBM introduced it in
the IBM PC-AT computer in 1984. The ISA bus is black. Other, less frequently
encountered, buses because of their aging status include Extended Industry Stan-
dard Architecture (EISA); VESA local (VL-bus); and Micro Channel Architecture
(MCA). Red Hat Enterprise Linux supports all of these buses.
Memory
Referred to as random access memory, or RAM, is not a consideration in deter-
mining compatibility. This means that Linux does not care what kind of mem-
ory it is or how fast it is, it just uses whatever is there. For good performance
though, you need at least 64 MB of RAM for a text install and 192 MB for a
graphical install. If you are planning to run the X Window system to use a
graphical user interface (GUI) on the PC, you need even more memory
because the X Window System manages the graphical interface through an X
server, which is a large program that needs a lot of memory to run efficiently.
Red Hat recommends a minimum of 256 MB RAM to run a graphical system.
TIP If you are buying a new PC, it probably comes with 128 MB or more RAM.
If you can afford it, buy as much RAM as you can. The more RAM a system has,
the more efficiently it runs multiple programs (because the programs can all fit
in memory). Red Hat Linux can use a part of the hard disk as virtual memory.
Such disk-based memory, called swap space, is much slower than physical
memory.
Video Card and Monitor
If you are not planning to use the X Window system, any video card works.
Red Hat Linux supports all video cards in text mode. If you are planning to use
the X Window system, be sure to find a video card that is supported by
XFree86, which is the version of the X Window System used in Red Hat Linux.
It is pretty unlikely that you would find a video card that doesn’t work with X,
but you can save yourself a lot of aggravation if your video card is supported
by XFree86.
Your choice of monitors depends on your use of the X Window system. For
text mode displays, typically used on servers, any monitor will do. If you are
setting up a workstation, or using the X Window system on your server, choose
Standard Installation 31
08_599496 ch03.qxd 8/30/05 6:20 PM Page 31
a monitor that supports the display resolution you use. Resolution is expressed
in terms of the number of picture elements, or pixels, horizontally and vertically
(such as 1024 × 768).
XFree86’s support for a video card depends on the video chipset — the inte-
grated circuit that controls the monitor and causes the monitor to display out-
put. You can find out the name of the video chipset used in a video card from
the card’s documentation.
Your video card’s name may not be in the list at the Red Hat site. The impor-
tant thing to note is the name of the video chipset. Many popular video cards
made by different manufacturers use the same video chipsets. Look for the
name of the video chipsets listed at the Red Hat site. In nearly all cases, the Red
Hat installation program automatically detects the video chipset as it sets up
the X Window System.
Hard Drive
Red Hat Linux supports any IDE hard drive that your PC’s basic input/output
system (BIOS) supports, as long as the system BIOS supports the hard drive
without any additional drivers. This would include EIDE- and ATA-compatible
drives as well.
For hard drives connected to your PC through a Small Computer System
Interface (SCSI) controller card, Red Hat Linux must have a driver that enables
the SCSI controller to access and use the hard drive. If you have a recent SCSI
controller card, there is most likely a driver for it already included with the dis-
tribution.
Also supported are Serial Advanced Technology Attachment (SATA) drives,
which use serial technology instead of the parallel ATA technology currently
used by IDE drives. SATA provides a significant speed increase over IDE.
As for the size (storage capacity) of the drive, most new systems seem to
have drives 20 GB or larger. You should buy the highest capacity drive you can
afford.
Floppy Disk Drive
Linux drivers use the PC BIOS to access the floppy disk drive, so any floppy
disk drive is compatible with Red Hat Linux. The Red Hat installation program
can be started from the CD-ROM if your PC has one and is able to boot from it.
If not, you have to boot Red Hat Linux from a floppy disk drive during the
installation, so you need a high-density 3.5-inch (1.44-MB capacity) floppy disk
drive. You can also avoid booting from a floppy if you can boot your PC under
MS-DOS (not an MS-DOS window under Windows 95/98/2000), and you can
access the CD-ROM from the DOS command prompt.
32 Chapter 3
08_599496 ch03.qxd 8/30/05 6:20 PM Page 32
Keyboard and Mouse
Red Hat Linux supports any keyboard that already works with your PC. The
mouse, however, needs explicit support in Red Hat Linux. You need a mouse if
you want to configure and run XFree86, the X Window System for Linux. Red
Hat Linux supports most popular mice, including the commonly found PS/2
and USB mouse. Red Hat Linux also supports touch pad devices, such as ALPS
GlidePoint, as long as they are compatible with one of the supported mice.
SCSI Controller
The Small Computer System Interface, commonly called SCSI (and pronounced
“skuzzy”), is a standard way of connecting many types of peripheral devices to
a computer. SCSI is used in many kinds of computers, from servers to high-end
UNIX workstations to PCs. Typically, you connect hard drives and CD-ROM
drives through a SCSI controller. To use a SCSI device on your PC, you need
a SCSI controller card that plugs into one of the bus connector slots on your
PC’s bus.
If you want to access and use a SCSI device under Linux, you have to make
sure that Red Hat Linux supports your SCSI controller card.
CD/DVD-R/RW Drive
CD-R (compact disc read-only) drives are popular because each CD-ROM can
hold up to 650 MB of data, a relatively large amount of storage compared with
a floppy disk. CD-ROMs are reliable and inexpensive to manufacture. Vendors
can use a CD-ROM to distribute a large amount of information at a reasonable
cost.
DVD-ROM drives are found already installed on many new systems. DVD-
ROM discs are capable of storing up to 4.7 GB and are most frequently used to
record digital video, but can be used to hold any data.
CD-RW and DVD-R/RW and DVD+R/RW drives are used to create CDs
and DVDs, respectively. Either of these types of drives can be used in your Red
Hat system. Any IDE/ATAPI-compatible drive, as well as SCSI drives, will
work with Red Hat Enterprise Linux.
Sound Card
If you are configuring a server, you probably aren’t too interested in playing
sounds. But with Red Hat Linux you can play sound on a sound card to enjoy
multimedia programs and games. If you have a sound card, you can also play
audio CDs. Nearly all sound cards available today, whether built into the
motherboard or a separate card that plugs into a bus socket, are supported.
Standard Installation 33
08_599496 ch03.qxd 8/30/05 6:20 PM Page 33
Network Card
A network interface card (NIC) is necessary if you connect your Red Hat Linux
PC to a local area network (LAN), which is usually an Ethernet network. If you
are configuring a server, you certainly want to configure at least one network
card. Red Hat Enterprise Linux supports a variety of Ethernet network cards.
ARCnet and IBM’s Token Ring network are also supported. Check the hard-
ware list on the Red Hat site to see if your NIC is supported. Nearly all NICs
currently in use are supported.
For any Red Hat Linux PC connected to a network, you need the following
information:
■■ Hostname of the PC
■■ Domain name of the network
■■ Internet Protocol (IP) address of the PC
■■ Address of the gateway
■■ IP address of name servers
NOTE If you plan to use DHCP to obtain your IP information, you do not need
to specify the IP information in the above list.
Checking for Supported Hardware
To check if Red Hat Linux supports the hardware in your PC, follow these
steps:
1. Make a list of the make, model, and other technical details of all hard-
ware installed in your PC. Most of this information is in the manuals
that came with your hardware. If you don’t have the manuals, and you
already have an operating system (MS Windows for example) on the
PC, you may be able to obtain this information from that operating sys-
tem. Refer to that operating system’s instructions for obtaining hard-
ware information.
2. Go to the Red Hat Web site at redhat.com/hardware. Compare your
hardware list to the list of hardware that the latest version of Red Hat
Linux supports. If the components listed earlier are supported, you can
prepare to install Red Hat.
34 Chapter 3
08_599496 ch03.qxd 8/30/05 6:20 PM Page 34
NOTE You do not need a boot disk if you can start your PC from your CD-ROM
drive. The first installation disk is a bootable CD-ROM and can be used to start
the installation process. If you can boot from your CD-ROM, skip to the “Starting
the Red Hat Linux Installation” section. If you are unable to boot from your
CD-ROM drive, continue to the next section, “Creating the Red Hat Boot Disk,”
and then go to the installation section.
Creating the Red Hat Boot Disk
To boot Red Hat Linux for the first time and start the Red Hat Linux installa-
tion program, you need a Red Hat boot disk. For this step, you should turn on
your PC without any disk in the A drive and run Windows as usual.
NOTE You do not need a boot disk if you can start your PC under MS-DOS
(not an MS-DOS window in Windows) and access the CD-ROM from the DOS
command prompt. If you run Windows, restart the PC in MS-DOS mode.
However, you may not be able to access the CD-ROM in MS-DOS mode because
the startup files (AUTOEXEC.BAT and CONFIG.SYS) may not be configured
correctly. To access the CD-ROM from DOS, you typically must add a CD-ROM
driver in CONFIG.SYS and add a line in AUTOEXEC.BAT that runs the MSCDEX
program. Try restarting your PC in MS-DOS mode and see whether the CD-ROM
can be accessed.
The Red Hat boot disk starts your PC and the Red Hat Linux installation
program. After you install Red Hat Linux, you no longer need the Red Hat
boot disk (except when you want to reinstall Red Hat Linux from the
CD-ROMs).
The Red Hat boot disk contains an initial version of the Red Hat Linux
installation program that you use to start Red Hat Enterprise Linux, prepare
the hard disk, and load the rest of the installation program. Creating the Red
Hat boot disk involves using a utility program called RAWRITE.EXE to copy a
special file called the Red Hat Linux boot image to a disk.
To create the Red Hat boot disk under Windows, follow these steps:
1. In Windows 95/98/ME open an MS-DOS window (select Start ➪ Pro-
grams ➪ MS-DOS Prompt). In Windows 2000 or XP, select Start ➪ Run
and enter cmd in the dialog box.
2. In the MS-DOS window, enter the following commands at the MS-DOS
prompt. (Our comments are in parentheses and your input is in
boldface.)
Standard Installation 35
08_599496 ch03.qxd 8/30/05 6:20 PM Page 35
a. d: (use the drive letter for the CD-ROM drive)
b. cd \dosutils
c. rawrite
d. Enter disk image source filename: \images\boot.img
e. Enter target disk drive: a
f. Insert a formatted disk into drive A and press ENTER.
3. As instructed, you should put a formatted disk into your PC’s A drive
and press Enter. RAWRITE.EXE copies the boot-image file to the disk.
When the DOS prompt returns, remove the Red Hat boot disk from the floppy
drive and label it as a Red Hat boot disk.
Starting the Installation
To start the Red Hat Linux installation, power up the PC and put the Red Hat
Installation CD-ROM 1 (and the boot disk if you created one) into your PC’s
CD-ROM drive (and floppy drive if applicable). The PC boots Red Hat Linux
and begins running the Red Hat installation program. The Red Hat installation
program controls the installation of the operating system.
NOTE If you are using a boot disk that you created, be sure to place the first
installation CD-ROM in the CD-ROM drive after you start the PC. The installation
program looks for the Red Hat Linux CD-ROMs to start the installation in
graphical mode. If the installation program can’t find the CD-ROM, the
installation program starts in text mode and prompts for it.
A few moments after you start the boot process, an initial screen appears.
The screen displays a welcome message and ends with a boot: prompt. The
welcome message tells you that more information is available by pressing one
of the function keys F1 through F5.
If you want to read the help screens, press the function key corresponding to
the help you want. If you don’t press any keys after a short delay, the boot
process proceeds with the loading of the Linux kernel into the PC’s memory.
To start booting Red Hat Linux immediately, press Enter.
36 Chapter 3
08_599496 ch03.qxd 8/30/05 6:20 PM Page 36
NOTE On CDs that you made from downloaded ISO files (Fedora Core) you
are prompted to check the CD media for errors. The disk-checking process takes
a few minutes but is time well spent to be sure there are no errors on your
installation CDs. To begin disk checking, press Enter. You will be prompted to
change the disks as required. You can also choose to skip disk checking by
using the Tab key to highlight Skip and then pressing Enter. If you purchased
Red Hat Enterprise Linux, you are not prompted to check the disks.
After the Linux kernel loads, it automatically starts the Red Hat Linux
installation program. This, in turn, starts the X Window System, which pro-
vides a graphical user interface for the installation.
You should compile all the configuration information explained earlier in
this chapter before you begin. If the installation program detects your hard-
ware, installing Red Hat Linux from the CD-ROM on a 200-MHz or better Pen-
tium PC should take 30 to 40 minutes.
NOTE During installation, the Red Hat installation program tries to determine
the hardware in your PC and alters the installation steps as required. For
example, if the installation program detects a network card, the program
displays the appropriate network configuration screens. If a network card is not
detected, the network configuration screens are not displayed. So, depending
on your specific hardware, the screens you see during installation may differ
from those shown in this section.
CROSS-REFERENCE If you run into any problems during the installation,
refer to Chapter 35 to learn how to troubleshoot common installation
problems.
You go through the following steps before moving on to disk setup and
installation:
1. The installation program starts the X Window System and displays a
welcome message that provides some explanatory information on the
left side of the screen. Take a look at this information and be sure to
click the Release Notes button. When you are finished reading, click
the Next button to proceed.
Standard Installation 37
08_599496 ch03.qxd 8/30/05 6:20 PM Page 37
2. After clicking Next, a list of languages to use during the installation is
displayed, as shown in Figure 3-1. Use your mouse to select the lan-
guage you want to use for installation, and then click the Next button
to proceed to the next step.
Figure 3-1 Choosing the installation language.
NOTE In the graphical installation, each screen has online help available on
the left side of the screen. You can read the help message to learn more about
what you are supposed to select in a specific screen.
38 Chapter 3
08_599496 ch03.qxd 8/30/05 6:20 PM Page 38
3. The installation program displays a list of keyboard language layouts,
as shown in Figure 3-2. Select a keyboard language layout appropriate
to the language you desire.
Figure 3-2 Selecting a keyboard configuration during Red Hat Linux installation.
Standard Installation 39
08_599496 ch03.qxd 8/30/05 6:20 PM Page 39
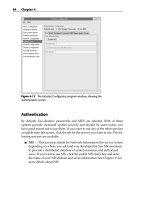
4. The installation program searches for previous installations of Enter-
prise Linux or Fedora Core and displays a screen, shown in Figure 3-3,
asking if you want to install a new system or upgrade an older Red Hat
installation if one is detected. Select the choice that is appropriate for
your system, and click Next to continue.
Figure 3-3 Choosing to install a new system or upgrade an existing one.
40 Chapter 3
08_599496 ch03.qxd 8/30/05 6:20 PM Page 40
5. If you select new installation, the installation program displays a
screen, shown in Figure 3-4, that requires you to select the installation
type: Personal Desktop, Workstation, Server, or Custom.
Figure 3-4 Choosing the installation type for your system.
Standard Installation 41
08_599496 ch03.qxd 8/30/05 6:20 PM Page 41
6. There is a brief description of each installation type, and you should
choose the appropriate type for your system, depending on how you
plan to use the system. After making your selection, click Next to go on
to the Disk Partitioning Setup screen shown in Figure 3-5.
The next major phase of installation involves partitioning the hard disk.
Figure 3-5 Choosing to use automatic partitioning or manual partitioning.
Partitioning the Hard Disk
Red Hat Linux requires you to partition and prepare a hard disk before you
can begin installation. With a new PC that you purchase from a vendor, you
usually do not perform this step because the vendor normally takes care of
preparing the hard disk and installing the operating system and other appli-
cations on the hard disk. Because you are installing Red Hat Linux from
scratch, however, you have to perform this crucial step yourself. As you see in
the following sections, this task is just a matter of following instructions.
42 Chapter 3
08_599496 ch03.qxd 8/30/05 6:20 PM Page 42
The Red Hat Linux installation program offers you two choices for parti-
tioning your hard drive. You can choose to have the installation program auto-
matically partition your disk or you can choose to use Disk Druid to manually
partition your drives. If you select automatic partitioning, the installation pro-
gram does all the hard work for you and creates the partitions and allocates
space for your file system. If you want to manually partition your disks, go to
the section “Using Disk Druid to Partition Your Disks.”
1. To use automatic partitioning be sure the radio button in front of this
choice is checked, and click Next on the Disk Partitioning Setup screen.
2. The Automatic Partitioning screen, shown in Figure 3-6, appears. Here
you decide how automatic partitioning should handle existing parti-
tions. You can choose to remove Linux partitions, remove all partitions,
or keep all partitions and use free space. If you are installing a new sys-
tem, you should choose to remove all partitions. A warning screen will
appear asking if you are sure you want to remove all partitions. Click
Yes to continue.
Figure 3-6 Choosing how to use automatic partitioning on your disk partitions.
Standard Installation 43
08_599496 ch03.qxd 8/30/05 6:20 PM Page 43
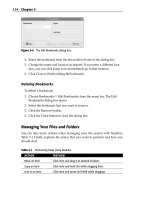
3. The Disk Setup screen shown in Figure 3-7 appears. The Disk Setup
screen shows the partition setup that automatic partitioning has
selected for your system. Click Next to accept the settings and go the
section titled “Configuring the Installation.”
TIP If you want to change any of the settings here you still can, but then you
will be doing manual partitioning. Continue to the next section to learn how to
manually partition your disks.
Figure 3-7 Reviewing the disk partitioning settings selected by automatic partitioning.
44 Chapter 3
08_599496 ch03.qxd 8/30/05 6:20 PM Page 44
Using Disk Druid to Partition Your Disks
Before you begin to use Disk Druid to partition your disk, you need to know
how to refer to the disk drives and partitions in Linux. Also, you should
understand the terms mount points and swap partition. In the next three sec-
tions, you learn these terms and concepts and then proceed to use Disk Druid.
Naming Disks and Devices
If you are experienced with UNIX or Linux, this section and the two following are
quite basic to you. If you are already familiar with UNIX and Linux file systems
and naming conventions, skip to the section titled “Preparing Disk Partition.”
The first step is to understand how Red Hat Linux refers to the various disks.
Linux treats all devices as files and has actual files that represent each device. In
Red Hat Linux, these device files are located in the /dev directory. If you are new
to UNIX, you may not yet know about UNIX filenames. But you’ll learn more as
you continue to use Red Hat Linux. If you know how MS-DOS filenames work,
you find that Linux filenames are similar. However, they have two exceptions:
they do not use drive letters (such as A and C), and they substitute the slash (/)
for the MS-DOS backslash (\) as the separator between directory names.
Because Linux treats a device as a file in the /dev directory, the hard disk
names start with /dev. Table 3-1 lists the hard disk and floppy drive names
that you may have to use.
Table 3-1 Hard Disk and Floppy Drive Names
NAME DESCRIPTION
/dev/hda First Integrated Drive Electronics (IDE) hard drive (the C drive in
DOS and Windows) connected to the first IDE controller as the
master drive
/dev/hdb Second (IDE) hard drive connected to the first IDE controller as the
slave drive
/dev/hdc First (IDE) hard drive connected to the second IDE controller as the
master drive
/dev/hdd Second (IDE) hard drive connected to the second IDE controller as
the slave drive
/dev/sda First Small Computer System Interface (SCSI) drive or first SATA drive
/dev/sdb Second SCSI drive or second SATA drive
/dev/fd0 First floppy drive (the A drive in DOS)
/dev/fd1 Second floppy drive (the B drive in DOS)
Standard Installation 45
08_599496 ch03.qxd 8/30/05 6:20 PM Page 45
TIP When Disk Druid displays the list of partitions, the partition names take
the form hda1, hda2, and so on. Linux constructs each partition name by
appending the partition number (1 through 4 for the four primary partitions on
a hard disk) to the disk’s name. Therefore, if your PC’s single IDE hard drive has
two partitions, notice that the installation program uses hda1 and hda2 as the
names of these partitions.
Mounting a File System
In Red Hat Linux, you use a physical disk partition by associating it with a
specific part of the file system. This arrangement is a hierarchical directory —
a directory tree. If you have more than one disk partition (you may have other
disks with Linux partitions), you can use all of them in Red Hat Linux under a
single directory tree. All you have to do is decide which part of the Linux
directory tree should be located on each partition — a process known in Linux
as mounting a file system on a device. (The disk partition is a device.)
NOTE The term mount point refers to the directory you associate with a disk
partition or any other device.
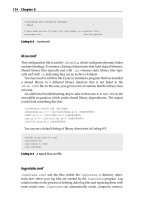
Suppose you have two disks on your PC and you have created Linux parti-
tions on both disks. Figure 3-8 illustrates how you can mount partitions on
different parts of the Linux directory tree (the file system).
Figure 3-8 Mounting the Red Hat Linux file system on two disk partitions.
Disk 1 Disk 2
/(root)
Linux File System
/bin /boot /dev /etc /sbin /usr
/usr/X11R6 /usr/doc /usr/local /usr/share /usr/src
46 Chapter 3
08_599496 ch03.qxd 8/30/05 6:20 PM Page 46
Understanding the Swap Partition
Most advanced operating systems support the concept of virtual memory, in
which part of your system’s hard disk functions as an extension of the physical
memory (RAM). When the operating system runs out of physical memory, it can
move (or swap out) the contents of currently unneeded parts of RAM to make
room for a program that needs more memory. When the operating system needs
to access anything in the swapped-out data, it has to find something else to swap
out and then it swaps in the required data from disk. This process of swapping
data back and forth between the RAM and the disk is also known as paging.
Because the disk is much slower than RAM, the system’s performance is
slower when the operating system has to perform a lot of paging. However,
virtual memory enables you to run programs that you otherwise couldn’t run
by using the swap partition.
Red Hat Enterprise Linux supports virtual memory and can make use of a
swap partition. When you create the Linux partitions, you also create a swap
partition. With the Disk Druid utility program, described in the next section,
creating a swap partition is easy. Simply mark a partition type as a swap
device, choose the size, and let Disk Druid perform the necessary tasks.
Preparing Disk Partitions
After you select Disk Druid to manually partition your disks, the Disk Setup
screen, shown in Figure 3-7, reappears.
Before beginning to partition the drive, consider exactly how you want to
create the partitions. You must create one partition on the drive to be used as
the root (/) partition. This works well in most cases, but it can cause some prob-
lems. If the root partition should become full, the system could crash. Many
times the partition fills up because of system logging, email, and print queue
files. These files are all written to the /var directory by default, so it may be a
good idea to create a separate partition for /var to prevent the root partition
from filling up with system logs, email, and print files. You might also want to
create a separate partition for your user’s home directories (/home) if you have
a large number of users.
You also need to create a swap partition. A swap partition is used for virtual
memory to hold data that is too large to fit into system RAM. Your swap par-
tition should be at least 32 MB or two times your system’s RAM, whichever is
larger.
Disk Druid gathers information about the hard drives on your system and
displays a list of disk drives in the lower part of the screen and the current par-
tition information for one of the drives in the Partitions area in the upper part.
For each partition, Disk Druid shows seven fields:
Standard Installation 47
08_599496 ch03.qxd 8/30/05 6:20 PM Page 47
■■ Device refers to the partition’s device name. For example, hda1 is the
first partition on the first IDE drive.
■■ Mount Point/RAID/Volume indicates the directory where the partition
will be mounted. For example, if you have only one partition for the
entire Linux file system, the mount point is the root directory (/). For
the swap partition, this field shows <Swap>. If this field appears as
<not set>, you have to specify a mount point. To do so, select the parti-
tion and click the Edit button.
■■ The Type field shows the partition’s file type, such as ext3, swap, or DOS.
■■ The Format field shows a check mark if the partition will be formatted
and is blank if the partition will not be formatted.
■■ The Size field shows the amount of disk space the partition is using.
■■ Start and End are the beginning and ending cylinders on the hard drive
used by the partition.
If there are no partitions defined, the table in the Partitions list is empty. You
have to add new partitions by clicking the Add button.
You perform specific disk setup tasks in Disk Druid through the six buttons
that run across the middle of the screen. The buttons perform the following
actions:
■■ New enables you to create a new partition, assuming that there is
enough free disk space available. When you click this button, another
dialog box appears in which you can fill in information necessary to
create a partition.
■■ Edit enables you to alter the attributes of the partition currently high-
lighted in the Partitions list. You make changes to the current attribute
in another dialog box that appears when you click the Edit button.
■■ Delete removes the partition currently highlighted in the Partitions list.
■■ Reset causes Disk Druid to ignore any changes that you may have made.
■■ RAID sets up a redundant array of independent disks (RAID) device —
a technique that combines multiple disks to improve reliability and
data transfer rates. There are several types of RAID configurations. This
button is active only if your system has the hardware necessary to sup-
port a RAID device.
NOTE The reference to RAID in this section is for a software RAID
configuration.
48 Chapter 3
08_599496 ch03.qxd 8/30/05 6:20 PM Page 48