Red Hat Linux Networking , System Administration (P4) ppsx
Bạn đang xem bản rút gọn của tài liệu. Xem và tải ngay bản đầy đủ của tài liệu tại đây (1.22 MB, 30 trang )
The screen includes a General Kernel Parameters text field that enables you
to enter any special options that Red Hat Linux may need as it boots. Your
need for special options depends on what hardware you have.
The remainder of the Boot Loader Configuration screen gives you the option
to select the disk partition from which you want to boot the PC. Atable then lists
the Linux partition and any other partitions that may contain another operating
system. If your system has a Linux partition and a DOS partition (that actually
has Windows 95/98 installed on it), the table shows both of these entries. Each
entry in that table is an operating system that the boot loader can boot.
After you install the boot loader, whenever your PC boots from the hard
disk, the boot loader runs and displays a screen showing the operating sys-
tems that you can boot. The default selection will be highlighted and will boot
automatically after a few seconds. You may move the highlight bar to the
name of another operating system to boot. (The Boot label column in the table
in the center section of Figure 3-10 shows the names you may enter at the boot
loader prompt.)
When booting the PC, if you enter nothing at the boot loader screen, the boot
loader waits for a few seconds and boots the default operating system. The
default operating system is the one with a check mark in the Default column
in Figure 3-10. In this case, Red Hat Linux is the default operating system.
All of the instructions in this section are for your information if you choose
to change any of the default settings. You can essentially accept the default
selections on this screen and click the Next button to proceed to the next con-
figuration step.
Configuring the Network
If the Linux kernel detects a network card, the Red Hat installation program
displays the Network Configuration screen (see Figure 3-12), which enables
you to configure the LAN parameters for your Linux system.
This step is not for configuring dial-up networking. You need to perform
this step if your Linux system is connected to a TCP/IP LAN through an
Ethernet card.
TIP If the Red Hat installation program does not detect your network card
and you have a network card installed on the PC, you should restart the
installation and type expert at the boot prompt. Then you can manually select
your network card.
54 Chapter 3
08_599496 ch03.qxd 8/30/05 6:20 PM Page 54
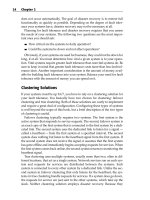
Figure 3-12 The Network Configuration screen enables you to configure the local area
network.
The Network Configuration screen (see Figure 3-12) displays a list of the
network card(s) installed on your system and detected by the Linux kernel.
The network cards are labeled eth0, eth1, and so on. If your system has only
one Ethernet card, you see only eth0. Figure 3-12 shows that only one net-
work card has been detected. The default selections for the network card are
Active on Boot and Configure Using DHCP. If you want to enter an IP address
manually for your network card or disable the card on boot, click the Edit but-
ton to open the Edit Interface dialog box.
To disable DHCP remove the check mark from the box and enter an IP
address and net mask into the appropriate boxes. To enable DHCP, click the
option to place the check mark there.
To disable the card on boot, remove the check mark from the box. To enable
the card on boot, click the option to place the check mark there. Normally, you
would want your primary Ethernet interface to be configured on system boot.
Standard Installation 55
08_599496 ch03.qxd 8/30/05 6:20 PM Page 55
The Hostname section of the Network Configuration screen shown in Figure
3-12 lets you choose how your system hostname will be set. The choices are:
■■ Automatically via DHCP — This is the default setting. Your PC will
obtain its IP address and other network information from a DHCP
server.
■■ Manually — If you choose this option, you must provide a hostname.
Select DHCP only if a DHCP server is running on your local area network. If
you choose DHCP, your network configuration is set automatically and you
can skip the rest of this section. You should leave the Activate on Boot button
selected so that the network is configured whenever you boot the system.
If you have disabled DHCP, you will need to enter the IP address and net
mask manually for the network card by editing the card. In addition, you have
to enter certain parameters for the TCP/IP configuration in the text input fields
for hostname and the “Miscellaneous Settings” section shown in Figure 3-12.
The Network Configuration screen asks for the following key parameters:
■■ The hostname of your Linux system (for a private LAN, you can assign
your own hostname without worrying about conflicting with any other
existing systems on the Internet)
■■ IP address of the gateway (the system through which you might go to
any outside network)
■■ IP address of the primary name server
■■ IP address of a secondary name server (if available)
■■ IP address of a ternary name server (if available)
CROSS-REFERENCE If you have a private LAN (one that is not directly
connected to the Internet), you may use an IP address from a range designated
for private use. Common IP addresses for private LANs are the addresses in the
range 192.168.1.1 through 192.168.1.254. Chapter 11 provides more in-depth
information about TCP/IP networking and IP addresses.
After you enter the requested parameters, click Next to proceed to the next
configuration step.
Configuring the Firewall
In this part of the installation process, you can choose the firewall settings for
your system security. Look at Figure 3-13 as you go through this section’s con-
figuration steps.
56 Chapter 3
08_599496 ch03.qxd 8/30/05 6:20 PM Page 56
Figure 3-13 The Firewall Configuration screen lets you choose your security level.
CROSS-REFERENCE See Chapter 34 for more information about
configuring a firewall.
The first choice that you make from this dialog box is whether you want to
enable the firewall or to choose no firewall. By default, the installation program
selects to enable the firewall for you. If you choose to enable the firewall, only
connections that are in response to outbound requests are accepted. You can
also select individual services that are allowed through the firewall. You can
allow the following services:
■■ Remote Login (SSH) — If you allow remote access to your server
through the SSH protocol, you should enable this option.
■■ Web Server (HTTP, HTTPS) — If you plan to run a Web server, you
should choose this option. You do not need to choose this option to
use a browser to view Web sites.
■■ File Transfer (FTP) — If you plan to run an FTP server, you should
enable this option. You do not need to choose this option to retrieve
files from FTP sites.
Standard Installation 57
08_599496 ch03.qxd 8/30/05 6:20 PM Page 57
■■ Mail Server (SMTP) — If you are going to run an email server, you
should enable this option. You do not need to enable this option to
retrieve mail from an ISP.
If you choose the No Firewall option, all connections are allowed and no
security checking is done on your system. Select No Firewall only if you have
absolute faith in the security of your network.
TIP Choosing to enable the firewall is always safest, especially if you will be
connecting directly to the Internet.
The final configuration step on the Firewall Configuration dialog box con-
cerns Security-Enhanced Linux (SELinux). SELinux was developed by the
National Security Agency (NSA) to provide enhanced security based on access
control specified by a security policy. You can choose one of three states for
SELinux:
■■ Disable — If you select this option, SELinux is not enabled on your sys-
tem and there is no enforcement of a security policy.
■■ Warn — Choosing this option puts a security policy in place, but the
policy is not enforced. Only warnings about possible security violations
are noted. If you plan to use SELinux, this option provides a good basis
for determining how the security policy would affect the operation of
your system.
■■ Active — This state applies full enforcement of the SELinux security
policy. You should choose this option only if you are sure that the policy
will not affect your system operation.
CROSS-REFERENCE See Chapter 33 for more information about SELinux.
TIP You can read more about SELinux by visiting the NSA Web site at
www.nsa.gov/selinux.
After you make your configuration choices, click Next to continue.
Choosing Additional Languages
The Additional Language Support screen, shown in Figure 3-14 is where you
select the default language to be used on your system.
58 Chapter 3
08_599496 ch03.qxd 8/30/05 6:20 PM Page 58
Figure 3-14 On the Additional Language Support screen you set the default language for
your system as well as additional languages you may use.
The language you chose to use for system installation earlier in the installa-
tion process will be shown as the default language. If you desire to use other
languages as well, you can select them from the list. Select as many other lan-
guages as you desire. Note that installing additional languages consumes stor-
age space on your disk, so install only the languages you plan to use. After you
make your selections, click Next to continue.
Setting the Time Zone
After completing the default and additional language selection, you have to
select the time zone — the difference between your local time and Greenwich
Mean Time (GMT) or UTC (the current time in Greenwich, England), which was
selected by the International Telecommunication Union (ITU) as a standard
abbreviation for Coordinated Universal Time. If you had systems in many dif-
ferent time zones, you might want to choose UTC for all your locations to keep
your time synchronized on all your systems. The installation program shows
you the Time Zone Selection screen (see Figure 3-15) from which you can select
the time zone, either in terms of a geographic location or as an offset from UTC.
Figure 3-16 shows the selection of a time zone.
Standard Installation 59
08_599496 ch03.qxd 8/30/05 6:20 PM Page 59
Figure 3-15 Select your time zone using the Time Zone Selection screen.
Notice that there are two tabs on the Time Zone Selection screen: Location
and UTC Offset. Initially, the screen shows the Location tab, which enables
you to pick a time zone by simply clicking your geographic location. As you
move the mouse over the map, the currently selected location’s name appears
in a text field. If you want, you can also select your location from a long list of
countries and regions. If you live on the east coast of the United States, for
example, select USA/Eastern. Of course, the easiest way is to simply click the
eastern United States on the map.
If the world view of the map is too large for you to select your location, click
the View button on top of the map. A drop-down list of views appears with
several choices. Click the appropriate view for your location.
The other way to set a time zone is to specify the time difference between your
local time and UTC. Click the UTC Offset tab to select the time zone this way.
For example, if you live in the eastern part of the United States, select UTC-
05:00 as the time zone. The -05:00 indicates that the eastern part of the U.S. is
five hours behind UTC time. This tab also lets you activate Daylight Savings
Time. After you select your time zone, click the Next button to proceed to the
next configuration step.
60 Chapter 3
08_599496 ch03.qxd 8/30/05 6:20 PM Page 60
Setting the Root Password
After selecting the time zone, the installation program displays the Set Root
Password screen (see Figure 3-16) in which you set the root password.
The root user is the superuser in Linux. Because the superuser can do any-
thing in the system, you should assign a password that only you can remember,
and that others cannot guess easily. Typically, make the password at least eight
characters long, include a mix of letters and numbers, and (for good measure)
throw in some special characters such as + or *. Remember that the password
is case-sensitive.
Type the password on the first line, and then reenter the password on the
next line. Each character in the password appears as an asterisk (*) on the
screen for security reasons. Both entries must match before the installation
program accepts the password. The installation program displays a message
when it accepts the root password.
NOTE You must enter the root password before you can proceed with the rest
of the installation. After you do so, click Next to continue with the installation.
Figure 3-16 Setting the root password.
Standard Installation 61
08_599496 ch03.qxd 8/30/05 6:20 PM Page 61
Selecting the Package Groups to Install
After you complete the key configuration steps, the installation program dis-
plays a screen from which you can select the Red Hat Linux package groups
that you want to install. After you select the package groups and click Next,
take a coffee break while the Red Hat installation program formats the disk
partitions and copies all selected files to those partitions.
NOTE If you selected custom installation as your install type, you will see the
screen shown in Figure 3-18. If you chose any other installation type, you will
see a screen listing the most commonly installed packages for the installation
type you chose. You can accept the default on that page or you can select
Customize software packages to be installed option to pick your own packages,
which will then show you the screen in Figure 3-17.
CROSS-REFERENCE Red Hat uses special files called packages to bundle
files that make up specific software. For example, all configuration files,
documentation, and binary files for the Perl programming language come in a
Red Hat package. You use a special program called Red Hat Package Manager
(RPM) to install, uninstall, and get information about packages. Chapter 30
shows you how to use RPM. For now, just remember that a package group is
made up of several Red Hat packages.
Figure 3-17 shows the Package Group Selection screen with the list of pack-
age groups that you can elect to install. An icon, a descriptive label, and a radio
button for enabling or disabling identify each package group.
Some of the components are already selected, as indicated by the checked
boxes. This is the minimal set of packages that Red Hat recommends for instal-
lation for the class of installation (Personal Desktop, Workstation, Server, or
Custom) you have chosen. You can, however, install any or all of the compo-
nents. Scroll up and down the list and click the mouse on an entry to select or
deselect that package group.
TIP In an actual Red Hat Linux installation, you install exactly those package
groups that you need. Each package group requires specific packages to run.
The Red Hat installation program automatically checks for any package
dependencies and shows you a list of packages that are required but that you
have not selected. In this case, you should install the required packages. Install
only those packages that you think you will need immediately after starting the
system. Installing too many packages could expose your system to security
risks. You can always add packages later.
62 Chapter 3
08_599496 ch03.qxd 8/30/05 6:20 PM Page 62
Figure 3-17 GUI screen from which you select the components to install.
Because each package group is a collection of many different Red Hat pack-
ages, the installation program also gives you the option of selecting individual
packages. If you click the Customize software packages option, which appears
on the Personal Desktop, Workstation, and Server package screens and then
click Next, the installation program takes you to other screens where you can
select individual packages. If you are installing Red Hat Enterprise Linux for
the first time, you really do not need to go down to this level of detail to install
specific packages.
Notice to the right of each group name there are two numbers separated by
a slash. For instance, next to the X Window System is 37/41. This means that
37 of the 41 packages in this group have been selected for installation. To the
right of the numbers is a link labeled Details. Clicking this link opens a new
screen that lists the packages that are in the selected group. You can select or
deselect packages as desired.
After you select the groups you want, click Next to continue with the rest of
the installation. The installation program now presents the About to Install
screen, as shown in Figure 3-18. This screen tells you which disks are required
for the installation.
Standard Installation 63
08_599496 ch03.qxd 8/30/05 6:20 PM Page 63
Figure 3-18 The About to Install screen gives you one last chance to cancel the installation
process.
If you are absolutely sure that everything is correct and you are ready to
proceed, click Continue to begin the installation. The time required for instal-
lation depends on the number of packages you chose to install. This would be
a good time to take a break, but remember to check the installation’s progress
occasionally as you will need to change CDs. A screen showing the installation
progress is displayed to show you how the installation is proceeding.
CROSS-REFERENCE You can always install additional packages later with
the RPM utility program, described in Chapter 30.
64 Chapter 3
08_599496 ch03.qxd 8/30/05 6:20 PM Page 64
Running Firstboot
After the installation process completes, you are prompted to remove all disks
and to reboot your system. A program called Firstboot runs the first time the
system boots after the installation, as shown in Figure 3-19.
Figure 3-19 The Firstboot program runs to let you do additional system configuration.
Standard Installation 65
08_599496 ch03.qxd 8/30/05 6:20 PM Page 65
Shown on the left side of the Firstboot Welcome screen are the steps you
must complete to boot into your newly installed system. Proceed as follows:
1. Click Next to continue to the License Agreement screen, as shown in
Figure 3-20.
Figure 3-20 The License Agreement screen.
66 Chapter 3
08_599496 ch03.qxd 8/30/05 6:20 PM Page 66
2. Click the radio button in front of Yes to accept the License Agreement.
3. Click Next to continue to the Date and Time screen, as shown in
Figure 3-21.
Figure 3-21 You can verify or change the system time on this screen.
Standard Installation 67
08_599496 ch03.qxd 8/30/05 6:20 PM Page 67
4. Click Next to continue to the Display screen, as shown in Figure 3-22.
Figure 3-22 The Display screen is where you can configure your screen resolution and
color depth.
68 Chapter 3
08_599496 ch03.qxd 8/30/05 6:20 PM Page 68
5. Click the button next to the parameter you wish to change and select
the new parameter from the drop-down list. When you are satisfied
with the settings, click Next to continue to the System User screen, as
shown in Figure 3-23.
On this screen you need to create a system user. The system user is a
regular, nonroot user with ordinary, not superuser access rights. After
you have filled in the appropriate information into the text boxes, click
Next to continue to the Additional CDs screen, as shown in Figure 3-24.
6. If you have any additional CDs or documentation disks from Red Hat
you can install them by clicking Install and selecting what you want to
install. Be sure to put the appropriate CD into your CD drive. When
you are finished, click Next.
7. When the Finish Setup screen appears click Finish, and your newly
installed system will boot to the GNOME desktop.
Figure 3-23 You add a system user on the System User screen.
Standard Installation 69
08_599496 ch03.qxd 8/30/05 6:20 PM Page 69
Figure 3-24 You can install additional programs from Red Hat provided CDs here.
Summary
In this chapter you learned how to install Red Hat Enterprise Linux and
Fedora Core. You began by examining the hardware on your system and mak-
ing a list of the components. You checked for hardware compatibility by refer-
ring to the Red Hat Web site. You learned how to partition your hard drive,
and you chose the type of system you wanted to install. You chose the pack-
ages you wanted to install, and you began the process of installing them on
your system. Finally, you rebooted your system and ran the Firstboot program
to finish the installation.
70 Chapter 3
08_599496 ch03.qxd 8/30/05 6:20 PM Page 70
71
As a system administrator, one of your jobs is installing and configuring Red
Hat on other computers. This could be time-consuming if you have many
servers and clients to administer. To make your job easier, a program is available
that automates the Red Hat installation process. This program is called Kick-
start. With Kickstart you can create and store configuration files for your server
or client installations and then use these files to perform your installations and
upgrades. Installations and upgrades can be done from a local CD-ROM or
using NFS, FTP, Hypertext Transfer Protocol (HTTP), or a hard drive. If you are
installing across the network, you need to have a Dynamic Host Configuration
Protocol (DHCP) server for each network segment.
Using the Kickstart Configurator
Fedora Core has a graphical tool, called Kickstart Configurator, that you can
use to configure the Kickstart configuration file. The Kickstart configuration
file is used to give the installation program the answers to the configuration
steps that usually require user intervention. So by using Kickstart, you can
automate the installation process. But before you can use the Kickstart Config-
urator, you need to install it, since it isn’t installed by default.
Kickstart
Installation
IN THIS CHAPTER
■■ Using the Kickstart Configurator
■■ Starting the Kickstart Installation
CHAPTER
4
09_599496 ch04.qxd 8/30/05 6:30 PM Page 71
Installing the Kickstart Configurator
To install the Kickstart Configurator program in GNOME follow these steps.
1. From the desktop, choose Desktop ➪ System Settings ➪ Add/Remove
Applications to open the Package Management tool dialog box, as
shown in Figure 4-1.
2. Scroll down to the System section, and click Details to the right of
Administration Tools to open the Administration Tools Package
Details dialog box, as shown in Figure 4-2.
3. Click the check box in front of system-config-kickstart.
4. Click Close and then Update on the Package Management tool.
5. When the Completed System Preparation screen appears, click Con-
tinue. When prompted, put installation disk one into the CD drive and
Click OK.
6. When the Update Complete dialog box appears click OK, then click
Quit to close the Package Management tool.
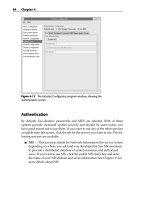
Figure 4-1 The Package Management tool is used to install packages
from the installation CDs.
72 Chapter 4
09_599496 ch04.qxd 8/30/05 6:30 PM Page 72
Figure 4-2 The Administration Tools Package details dialog box.
You are now ready to start the Kickstart Configurator. Follow these steps:
1. Choose Applications ➪ System Tools ➪ Kickstart. The Kickstart Config-
urator window shown in Figure 4-3 appears.
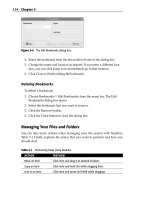
When the Kickstart Configurator window opens, the Basic Configura-
tion dialog box is shown on the right side. You will notice that many
of the text fields are already filled in. This is because the program has
loaded the anaconda-ks.cfg file that was created during your sys-
tem installation.
NOTE The anaconda-ks.cfg file you see will be based on the type of
installation you did. You should keep in mind that there may be significant
differences between a server configuration file and a workstation or desktop
configuration file, although having a file to refer to is always a good place to
start.
Kickstart Installation 73
09_599496 ch04.qxd 8/30/05 6:30 PM Page 73
Figure 4-3 The Kickstart Configurator program opens to the
Basic Configuration dialog box.
On the left side of the window is a list showing the other configuration
dialog boxes. Clicking an item in the list will open its respective dialog
box on the right side of the Kickstart Configurator window. Beginning
with the basic configuration, the fields are:
■■ Language — Click the down arrow on the right of the field, and
click the language you want to use for the installation.
■■ Keyboard — Click the down arrow on the right of the field, and
click the language appropriate for your keyboard.
■■ Mouse — Click the down arrow on the right of the field, and click
the appropriate mouse for your system. If you have a two-button
mouse and want to emulate a three-button mouse, check the box to
emulate three buttons.
■■ Time zone — Click the down arrow on the right of the field, and
click the appropriate time zone for your location. Click the Use UTC
Coordinated Universal Time clock check box if you want your time
to be set to UTC (Coordinated Universal Time). UTC was previously
known as GMT, or Greenwich Mean Time.
74 Chapter 4
09_599496 ch04.qxd 8/30/05 6:30 PM Page 74
■■ Root password — Enter the password for the root user. Notice that
it will be encrypted by default unless you remove the check from
the box.
■■ Language support — Choose additional languages you want to
install on your system by checking the box in front of each lan-
guage’s name.
■■ Target architecture — This field lets you choose the type of system
on which you are installing. For example, choose x86 for a typical
Intel Pentium system.
■■ Reboot system after installation — By default, the system reboots
unless you remove the check from the box.
■■ Perform installation in text mode — By default, the installation is
performed in graphical mode unless you remove the check from
the box.
■■ Perform installation in interactive mode — Place a check in this
box if you want to use interactive mode during the installation. This
method still uses the Kickstart configuration file but lets you see the
options selected for installation one screen at a time. You need to
click Next to continue at each screen.
2. After you have verified or entered the appropriate information into the
Basic Configuration dialog box, click Installation Method to open the
Installation Method dialog box shown in Figure 4-4.
In the Installation Method dialog box you select whether you want to
do a new installation or an upgrade of an existing system.
On the Installation Methods screen, you can pick the type of installation
you will be performing. You can choose to do a new installation or an
upgrade by clicking the radio button in front of your choice. If you
choose to upgrade an existing system you won’t have to define parti-
tions or packages for the installation program to use because the exist-
ing partitions and packages will be used.
NOTE You will require a separate disk for each type of installation. You
cannot use a disk meant for a new installation to do an upgrade, or use a disk
meant to upgrade a system to do a new installation.
Kickstart Installation 75
09_599496 ch04.qxd 8/30/05 6:30 PM Page 75
Figure 4-4 The Installation Method dialog box is where you choose
how to perform the installation.
You can also choose the type of media you will be using for the installa-
tion. The default choice is CD-ROM. You also have the following choices:
■■ NFS — If you choose this method, two additional fields will appear
where you need to enter the name of the NFS server and the direc-
tory to use.
■■ FTP — If you choose this method, four additional fields will appear.
You need to enter the name of the FTP server and the directory to
use in two of the fields. You are also given the opportunity to show
an FTP username and password by clicking the check box and enter-
ing the appropriate information.
■■ HTTP — If you choose this method, two additional fields will
appear where you need to enter the name of the HTTP server and
the directory to use.
■■ Hard Drive — If you choose this method, two additional fields will
appear where you need to enter the partition of the hard drive and
the directory to use.
3. When you are satisfied with your choices, click Boot Loader Options to
open the Boot Loader dialog box shown in Figure 4-5.
76 Chapter 4
09_599496 ch04.qxd 8/30/05 6:30 PM Page 76
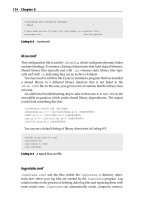
Figure 4-5 The Kickstart Configurator program window, showing the
Boot Loader Options screen.
Boot Loader Options Screen
On this screen, you have several choices related to the system boot loader. You
can choose to install a boot loader, not to install the boot loader, or to upgrade
an existing boot loader. Just click the button in front of your choice. You can
also set a password for the GRUB boot loader as well as encrypt it by clicking
the appropriate check box.
You can choose the location of the boot loader by clicking the radio button
in front of either Master Boot Record (MBR) or first sector of boot partition.
The final field of this screen allows you to pass additional parameters to the
kernel if necessary.
After making your choices, click Partition Information to open the Partition
Information dialog box shown in Figure 4-6.
Kickstart Installation 77
09_599496 ch04.qxd 8/30/05 6:30 PM Page 77
Figure 4-6 The Kickstart Configurator program window, showing the Partition
Information dialog box.
Partition Information Screen
In this dialog box, you can create your disk partitions and set the mount points
for your directories. By default, the master boot record (MBR) is cleared dur-
ing installation. If you do not want to clear the MBR, click the Do not clear
MBR radio button.
Also by default, all existing partitions are removed during the installation. If
you do not want to do this, click the radio button in front of your choice. You
can choose to remove only existing Linux partitions, or you can keep the exist-
ing partitions.
If you are installing on a new hard drive, you will want to keep the default
setting of Initialize the disk label. If you are installing on a previously used
drive and want to keep the existing drive label, check the Do not initialize the
disk label radio box.
The partition window in this dialog box is currently empty, since you
haven’t created any partitions yet. To create a partition, click the Add button at
the bottom of the screen. You see a Partition Options dialog box, as shown in
Figure 4-7.
78 Chapter 4
09_599496 ch04.qxd 8/30/05 6:30 PM Page 78