Red Hat Linux Networking , System Administration (P5) potx
Bạn đang xem bản rút gọn của tài liệu. Xem và tải ngay bản đầy đủ của tài liệu tại đây (888.4 KB, 30 trang )
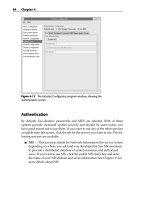
Figure 4-12 The Kickstart Configurator program window, showing the
Authentication screen.
Authentication
By default, Use shadow passwords and MD5 are selected. Both of these
options provide increased system security and should be used unless you
have good reason not to use them. If you want to use any of the other services
available from this screen, click the tab for the service you want to use. The fol-
lowing services are available.
■■ NIS — This acronym stands for Network Information Service (or system
depending on whom you ask) and was developed by Sun Microsystems
to provide a distributed database of system resources and authorized
users. If you want to use NIS, click the enable NIS check box and enter
the name of your NIS domain and sever information. See Chapter 13 for
more details about NIS.
84 Chapter 4
09_599496 ch04.qxd 8/30/05 6:30 PM Page 84
■■ LDAP — LDAP is an acronym for Lightweight Directory Access Proto-
col and is used to provide single sign-on services for users. LDAP is
based on the X.500 directory standard and uses a systemwide database
of resources and authorized users. To use LDAP click the Enable check
box and enter your LDAP server and base names. You can learn more
about LDAP in Chapter 17.
■■ Kerberos 5 — Kerberos is the mythical three-headed dog that guarded
the gates to the underworld. It is also the name chosen by the MIT-
based group for their network authentication system. To use Kerberos
click the enable check box and enter your Kerberos realm, domain con-
troller, and master server names. You can learn more about Kerberos in
Chapter 17.
■■ Hesiod — Hesiod was a poet from ancient Greece and also the name
chosen by the MIT group for their network database that was based on
DNS and used to provide information across the network. To use Hes-
iod click the Enable check box and enter the domain prefix in the LHS
field and the Hesiod domain in the RHS field. For more information
about Hesiod read the hesiod.conf man page.
■■ SMB — SMB is an acronym for Server Message Block, which is the proto-
col used by Microsoft for its networking implementation. If you want to
use Samba, you need to install the Samba package on your system to use
SMB. This option only enables SMB authentication. To enable SMB
authentication, click the Enable check box and enter the names of the SMB
servers and workgroup. You can learn more about SMB in Chapter 14.
■■ Name Switch Cache — To use this service, click the Enable nscd check
box. NSCD is the daemon that handles requests for password and
group lookups and caches this information. Caching provides faster
response for future lookups. For more information about NSCD, read
the nscd main page.
After you have made your choices, click Firewall Configuration on the left
to open the Firewall Configuration dialog box, as shown in Figure 4-13.
Kickstart Installation 85
09_599496 ch04.qxd 8/30/05 6:30 PM Page 85
Figure 4-13 The Kickstart Configurator program window showing the
Firewall Configuration dialog box.
Firewall Configuration
From this dialog box, you can set the level of security you want on your sys-
tem. You can make your choices from the following fields.
■■ Security Level — Either enable or disable the firewall for your system
by clicking the down arrow in the Security Level field and choosing one
or the other. If the firewall is enabled, it will allow only inbound traffic
in response to outbound requests. Choosing Disable firewall allows
remote systems to access any services on your system that are running.
Unless your system is already protected by another firewall it is proba-
bly a good idea not to disable the firewall.
■■ Trusted devices — If you configured a NIC earlier, this device is listed
in this field. Click the check box for the device to allow any connections
to the selected device.
■■ Trusted services — If you check the check box in front of a listed ser-
vice, requests for that service are accepted by your system.
86 Chapter 4
09_599496 ch04.qxd 8/30/05 6:30 PM Page 86
■■ Other ports — In this field you can enter specific ports to open to allow
incoming traffic. The example shows 1029:tcp, which means that incom-
ing TCP traffic on port 1029 is allowed. You can specify whatever ports
you need based on the services you plan to provide. For example, if you
were going to run a VNC server you would want to open ports 590x.
After you have made your choices, click Display Configuration on the left to
open the Display Configuration dialog box shown in Figure 4-14.
Display Configuration
If you plan to use a graphical interface, you need to configure the X window
system and your system display.
1. After the Display Configuration dialog box opens, click the Configure
the X Window system check box. After you do this, the three tabs
become selectable, and you need to enter the appropriate information
for each tabbed screen.
Figure 4-14 The Kickstart Configurator program window, showing the
Display Configuration dialog box.
Kickstart Installation 87
09_599496 ch04.qxd 8/30/05 6:30 PM Page 87
2. On the General tab you can set the color depth, or number of colors
your system will display. The screen resolution is the size of the screen
you want displayed. Click the down arrow next to the fields and choose
the desired values from the drop-down lists. Also choose the default
desktop, either Gnome or KDE. Gnome is selected as the default choice.
If you want the X Window system to start at system boot, click the
check box. Choosing this option gives the user a graphical login win-
dow instead of a console login terminal. Finally, you can choose
whether you want to run the Firstboot program the first time the sys-
tem boots. Make your choice by clicking the down arrow next to the
field and clicking what you want.
NOTE If you are installing the desktop or workstation versions of Fedora Core
or Enterprise Linux, it is probably a good idea to start the X Window system and
enable the Firstboot option. This will give your users the opportunity to easily
fine-tune their displays.
3. When you have finished configuring the General settings, click the
Video Card tab to open the Video Card dialog box shown in Figure 4-15.
Figure 4-15 The Kickstart Configurator program window showing
the Video Card dialog box.
88 Chapter 4
09_599496 ch04.qxd 8/30/05 6:30 PM Page 88
The default selection here is to have the installation program probe for
the video card installed in the system. This is nearly always a good
choice for most video cards, especially cards produced within the last
two or three years. You can disable this option by removing the check
from the check box. If you disable probing for the video card, you will
have to select the appropriate card from the list of cards and set the
amount of video memory.
4. When you finish configuring your video card, click the Monitor tab to
open the Monitor dialog box shown in Figure 4-16.
Figure 4-16 The Kickstart Configurator program window, showing
the Monitor dialog box.
The default selection here is to have the installation program probe for
the monitor installed in the system. This is nearly always a good choice
for most monitors, especially monitors produced within the last two or
three years. You can disable this option by removing the check from the
check box. If you disable probing for the monitor, you will have to
select the appropriate monitor from the list of cards. Rather than select-
ing a monitor, you may set the vertical and horizontal sync of your
monitor if you know it.
Kickstart Installation 89
09_599496 ch04.qxd 8/30/05 6:30 PM Page 89
5. When you have finished configuring your monitor, click Package Selec-
tion from the list on the left to open the Package Selection dialog box
shown in Figure 4-17.
Figure 4-17 The Kickstart Configurator program window, showing the
Package Selection dialog box.
Package Selection
From the Page Selection dialog box, you can select the packages you want to
install on your system. Click the box in front of the package name to select it.
By default, the installation automatically resolves package dependencies and
installs additional packages if required. You can choose to ignore dependen-
cies by selecting this option, and no additional packages will be installed to
resolve dependency problems. There is a possibility that your selected pack-
ages may not work with unresolved dependencies, so it is best to let the instal-
lation program automatically resolve the dependency.
90 Chapter 4
09_599496 ch04.qxd 8/30/05 6:30 PM Page 90
NOTE If you aren’t sure about which packages to select to install, you can
refer to the acaconda-ks.cfg file to see which packages were selected for
installation. Remember that the packages installed are based on the type of
installation you chose when you installed. For example, if you chose a
workstation install, then the anaconda-ks.cfg file would show the packages
installed for that type.
When you have finished selecting your packages, click Pre-Installation
Script from the list on the left to open the Pre-Installation Script dialog box
shown in Figure 4-18.
Figure 4-18 The Kickstart Configurator program window, showing the
Pre-Installation Script dialog box.
Pre-Installation Script
If you want to have commands run on your system before the installation
starts, you can enter them in the area indicated on the screen. The system
parses the Kickstart file and then runs your commands before beginning the
Kickstart Installation 91
09_599496 ch04.qxd 8/30/05 6:30 PM Page 91
installation. You can have your script interpreted by the scripting language of
your choice by selecting the Use an Interpreter option and entering the inter-
preter to use.
After you have entered your information, if any, click Post-Installation
Script from the list on the left to open the Post-Installation Script dialog box
shown in Figure 4-19.
Post-Installation Script
If you want to have commands run on your system after the installation ends,
you can enter them in the area indicated on the screen. If you desire, you can
have the post-installation script run outside of the chroot environment by
selecting this option. A chroot environment is basically a minimal root file sys-
tem created within the actual root file system. The minimal root environment
lets your programs run, but prevents anyone from doing any damage to your
actual root file system. Also, you can have your script interpreted by the script-
ing language of your choice by selecting the Use an Interpreter option and
entering the interpreter to use.
Figure 4-19 The Kickstart Configurator program window, showing the
Post-Installation Script dialog box.
92 Chapter 4
09_599496 ch04.qxd 8/30/05 6:30 PM Page 92
After you have entered your information here, you are finished configuring
the Kickstart configuration file. Choose File ➪ Save File to save all your work.
Be sure to name the file ks.cfg if it isn’t already named that in the Save File
dialog box.
Starting the Kickstart Installation
After you have completed configuring your ks.cfg file, you are ready to use
it to do your installation. But, before you can begin a Kickstart installation,
there are a few additional steps that you need to do. These steps are:
■■ You must place a copy of the configuration file in one of three locations.
The file can be placed on a bootable floppy, a bootable CD-ROM, or a
network drive.
■■ You need to make the installation tree available. The installation tree is a
copy of the Fedora Core or Red Hat Enterprise Linux CD-ROMs with the
same directory structure. For a CD-ROM installation, you can put the
Installation CD 1 into the CD-ROM drive. For a hard drive or network
installation, you need to have the ISO images of the binary Fedora Core
or Red Hat Enterprise Linux CD-ROM accessible from those locations.
■■ If you are planning to use a bootable floppy or CD-ROM to start the Kick-
start installation, you will have to make those bootable disks. Also, if you
are planning to place the ks.cfg file on a bootable floppy or CD-ROM,
you can do it when you create the bootable floppy or CD-ROM.
NOTE You need to be logged in as the root user (or su to become root) to
create the bootable disks.
Creating a Bootable Floppy
To create a bootable floppy, follow these instructions:
1. Place the Red Hat Linux Installation CD-ROM 1 into your CD-ROM
drive.
2. The CD will be automatically mounted and will appear in the
/media/CDROM directory. Change to the images directory on the CD.
3. Place a floppy disk into your floppy drive. At a terminal prompt, enter
dd=didiskboot.img of=/dev/fd0 bs=1440k
Kickstart Installation 93
09_599496 ch04.qxd 8/30/05 6:30 PM Page 93
4. If you want a copy of your Kickstart configuration file, ks.cfg, on
your bootable floppy, mount the floppy by entering the command
mount /dev/fd0 /media/floppy; then copy the ks.cfg file that
you created to the /media/floppy directory.
Creating a Bootable CD-ROM
To create a bootable CD-ROM, follow these instructions.
1. Place the Red Hat Linux Installation CD-ROM 1 into your CD-ROM
drive.
2. The CD will be automatically mounted and will appear in the /media/
CDROM directory.
3. Copy the isolinux directory from the CD-ROM to a directory on your
hard drive. You should create a temporary directory for this purpose.
I created a directory called /root/tempdir on my system to use for
an example. Be sure to use the correct path for your system. Use the
following command:
cp -r isolinux/ /root/tempdir/
4. If you want a copy of your Kickstart configuration file, ks.cfg, on
your bootable CD-ROM, copy the ks.cfg file that you created to the
/isolinux directory on your hard drive at the location where you cre-
ated it.
cp /root/ks.cfg /tempdir/isolinux/
5. Change to the temporary directory, cd /root/tempdir, that you
created.
6. Use the chmod command to be sure the files you copied have the cor-
rect permissions.
chmod u+w isolinux/*
7. Create the ISO image file with this command. (The command should be
entered on one line.)
mkisofs -o file.iso -b isolinux.bin -c boot.cat -no-emul-boot \-boot-
load-size 4 -boot-info-table -R -J -v -T isolinux/
8. The last step is writing the image file you created, file.iso, to a
CD-ROM using the process you would normally use to write to a
CD-ROM.
94 Chapter 4
09_599496 ch04.qxd 8/30/05 6:30 PM Page 94
Starting a Kickstart Installation
To begin installation, boot the system from a boot disk, and when the boot
prompt appears, enter one of the following boot commands.
If the Kickstart file is on the floppy or CD boot disk, enter one of the follow-
ing boot commands:
■■ linux ks=floppy
■■ linux ks=cdrom:/ks.cfg
If the Kickstart file is on a server, use the following boot command:
linux ks=<file location>
The installation program, Anaconda, looks for a Kickstart file at the location
specified in the ks command line argument that is passed to the kernel. You
can enter any of the following as file locations for the ks=<file location>
command.
■■ ks=hd:<device>:/<file> — Use this command to have the instal-
lation program mount the file system on <device>. (<device> must
be VFAT or ext2). Kickstart searches for the configuration file as
<file> in that file system (for example,
ks=hd:sda3:/mydir/ks.cfg).
■■ ks=file:/<file> — Use this command to have the installation pro-
gram read the file <file> from the file system without mounting any-
thing. You would use this option if the Kickstart file is already on the
initrd image.
■■ ks=nfs:<server:>/<path> — Use this command if you want the
installation program to look for the Kickstart file on the NFS server
<server>, as file <path>. The Ethernet card will be configured using
DHCP.
■■ ks=http:<server:>/<path> — Use this command if you want the
installation program to look for the Kickstart file on an HTTP server
<server>, as file <path>. The Ethernet card will be configured using
DHCP.
■■ ks=cdrom:/<path>: — Use this to force the installation program to
look for the Kickstart file on CD-ROM, as file <path>.
■■ ks — If you enter ks without any command line options, the installation
program will use the boot server field of the configuration file to find a
DHCP server to get information about an NFS server. The Ethernet card
Kickstart Installation 95
09_599496 ch04.qxd 8/30/05 6:30 PM Page 95
will be configured using this information. Finally, the installation pro-
gram tries to find the Kickstart configuration file in one of the following
places:
■■ If the name of the bootfile begins with a /, Kickstart will search the
NFS server’s root directory.
■■ If the name of the bootfile does not begin with a /, Kickstart will
search the NFS server’s /kickstart directory.
■■ If you don’t list a bootfile, the PC receiving the IP address is searched.
NOTE To use Kickstart for a network installation, you need to configure a
DHCP server. See Chapter 11 for details about configuring a DHCP server.
Summary
In this chapter, you learned about installing Fedora Core and Red Hat Enter-
prise Linux using the Kickstart program. First, you learned about the Kickstart
configuration file and how to configure it using the Kickstart Configurator.
Then you learned how to start the Kickstart installation.
96 Chapter 4
09_599496 ch04.qxd 8/30/05 6:30 PM Page 96
97
Exploring the
Desktops
IN THIS CHAPTER
■■ Examining the Graphical Login Screen
■■ Logging in and Using the GNOME Desktop
■■ Using the Nautilus File Manager
■■ Configuring GNOME
■■ Taking a Look at KDE
■■ Using the Konqueror File Manager
The GNU Network Object Model Environment (GNOME) desktop is a graphi-
cal user interface (GUI) that is installed as the default user interface during the
installation process. Another popular desktop, KDE (K Desktop Environment),
can also be selected as an option to be installed during system installation. Each
of these user interfaces is similar to that of MS Windows or Mac OS X but with
some notable differences. One large difference is the ability of the user to select
which desktop to use upon system login. In this chapter, you examine both of
these GUIs to discover some of the features that they offer and how to config-
ure them to your liking.
Examining the Graphical Login Screen
Before you can do any exploring of the GNOME or KDE desktops, you
must first log in. You log in from the graphical login window that is shown in
Figure 5-1.
CHAPTER
5
10_599496 ch05.qxd 8/30/05 7:09 PM Page 97
Figure 5-1 The graphical login window waits for you to log in.
Take a quick look at the options that you can choose from the login window.
At the bottom of the window are four choices that you can click to make addi-
tional selections:
■■ Language — Clicking this opens a box displaying the languages avail-
able on your system. If you want to use the system default language,
which was installed during system installation, you don’t need to do
anything with this choice. In most cases, only one language is listed
unless additional languages were installed during the system installa-
tion. The default language will typically be the language used at your
location. If other languages have been installed, just click the language
that you want to use.
■■ Session — Clicking Session gives you the opportunity to select the
desktop that you use after you log in. GNOME is the default desktop,
so you need to use this choice only if you want to change to a different
desktop, such as KDE.
■■ Reboot — When you click Reboot a message asks whether you want to
reboot the system.
■■ Shut Down — When you click Shut Down a message asks whether you
want to shut down your system.
98 Chapter 5
10_599496 ch05.qxd 8/30/05 7:09 PM Page 98
Directly in the center of the window is the login field. This is where you
enter your username and password to login. To login, do the following:
1. Type your username.
2. Press Enter.
3. Type your password.
4. Press Enter again.
Logging In and Using the GNOME Desktop
In this section you log in to the GNOME desktop and do some exploring to
help you become familiar with its features. As mentioned earlier, the GNOME
desktop is installed as the default desktop, so to enter GNOME, you can just
enter your username and password in the graphical login window without
having to make any choices from the four options, as explained in the preced-
ing section.
NOTE The GNOME desktop in Fedora Core 4 is slightly different from the
GNOME desktop in Enterprise Linux 4 because they use different versions of
GNOME. These differences are related to the menus displayed at the top of
the desktop and are explained in this chapter.
After entering your username and password, you see the Fedora Core 4
GNOME desktop, as shown in Figure 5-2.
The GNOME desktop has a similar appearance to other well-known desk-
top environments such as MS Windows or Mac OS X. If you can use either of
these desktops, you can easily master GNOME in a short time. Notice that the
GNOME desktop has a rather clean, almost Spartan, appearance.
The three icons in the upper-left corner of the desktop are links to your
home directory, the system trash can that holds your deleted files until you
empty the trash, and the Computer icon that opens the Nautilus graphical
shell. The Nautilus File Manager gives you access to your files and directories
so that you can do typical file management tasks such as copying and moving
files. In addition to regular file management tasks, the Nautilus File Manager
lets you perform desktop management as well. You look more closely at Nau-
tilus later in this chapter. This list provides a closer look at these icons:
■■ Computer — This icon also opens a Nautilus window the system. Your
system devices may be different. The Computer window on my system
contains four icons that are links to the following options:
Exploring the Desktops 99
10_599496 ch05.qxd 8/30/05 7:09 PM Page 99
■■ Floppy Drive — The Floppy Drive icon is a link to the folder that con-
tains the system mount point for the floppy drive. Double-clicking
this icon displays the contents of the floppy disk that you inserted in
the floppy drive.
■■ CD-R Drive — The CD-R Drive icon is a link to the folder that con-
tains the system mount point for the CD-R drive. Double-clicking
this icon displays the contents of the CD-ROM disk that you
inserted in the CD-R drive.
■■ Filesystem — This icon is a link to the file system. Double-clicking
this icon opens a new window displaying the root directory of the
file system.
■■ Network — Clicking the Network icon gives you access to the net-
work file systems. Any files or directories that are available across
your network are shown here.
Figure 5-2 The Fedora Core 4 GNOME desktop after logging in for the first time.
100 Chapter 5
10_599496 ch05.qxd 8/30/05 7:09 PM Page 100
■■ Home directory — This icon is a link to the user’s home directory. The
name of the user shown on the desktop corresponds to the user who is
logged in. For example, Figure 5-2 shows the icon labeled as terry’s
Home because I logged in with that username. You can double-click this
icon — or right-click and choose Open from the contextual menu — to
open a window that displays the user’s home directory. If you right-
click and choose Browse Folder, a File Browser window opens.
■■ Trash — This icon is a link to the system trash can. You can drag any
icon, file, or directory and drop it here. When you’re ready to empty the
trash, just right-click and select Empty Trash from the contextual menu.
Playing with the Panel
At the top and bottom of the desktop is a gray, horizontal bar. This area of the
desktop is the panel and is similar to the taskbar in Windows. The left side of
the top panel differs slightly between the Fedora Core version and the Enter-
prise Linux 4 version because Fedora Core and Enterprise Linux use different
versions of GNOME. The description here will explain the differences. On the
far left of the top panel of both Enterprise Linux and Fedora Core is the Appli-
cations icon, indicated by the word Applications and the Red Hat icon. To the
right of the Applications icon is an Actions menu on Enterprise Linux that con-
tains some actions you can perform, such as locking the desktop or logging
out. To the right of the Applications icon on a Fedora system is the Places menu
that gives you access to your file system and other locations such as a remote
computer or network connection. To the right of the Places menu is the Desk-
top menu that gives you access to system settings and preferences and also lets
you log out. To the right of the Actions menu on Enterprise Linux and the
Desktop menu on Fedora are icons representing programs that were installed
during the system installation. You can start any of these programs by clicking
them from the panel. Just move your mouse over any icon, and a pop-up mes-
sage appears with a description of the program represented by the icon.
At the far right of the top panel is a small speaker icon that you can click to
open a slider box to change the system volume setting. To the left of the
speaker icon is the date and time display. You can change the system date and
time properties by right-clicking on the date and time display and selecting
your choice from the pop-up context menu. If you left-click on the date and
time display a small calendar windows opens and displays the current month.
Click again to close the calendar. To the left of the date and time display is the
system status icon, which shows update status for the system. This icon can be
shown as a blue check mark, a red exclamation point, green arrows, or a gray
question mark.
Exploring the Desktops 101
10_599496 ch05.qxd 8/30/05 7:09 PM Page 101
CROSS-REFERENCE Refer to Chapter 26 for more information about the
system status icon and how to update your system.
At the far right of the bottom panel is a square gray area — the Workspace
Switcher — that is divided into four sections. When you first log in to GNOME
the leftmost section of Workspace Switcher should be blue, indicating that you
are in workspace one. You can switch between four workspaces in GNOME, so
you actually get four distinct desktops that you can use. You can open differ-
ent programs on the different desktops and switch between them by clicking
the Workspace Switcher for the desktop that you want to see. Open some pro-
grams on the different desktops and then try clicking each of the four squares
to see the effect of changing to a different workspace.
On the far left of the bottom panel is a Close Window icon that will hide, if
visible, all open windows on the desktop. If the windows are already hidden,
clicking this icon displays the windows. The open area on the bottom panel
between the Workspace Switcher and the Close Window icon is used to show
any programs that you’re running on your desktop. You can switch between
programs running on a single desktop by clicking the program name from the
bottom panel. Also shown in this area are icons that you can add to the panel
as well as applets — applications that provide some type of useful information
or entertainment.
Managing Applets on the Panel
The icons on the top and bottom panels are small programs called applets that
have a variety of uses. For example, there is a weather applet that you can place
on the panel to give you weather forecasts for any area you desire. In addition
to the applets that are already on the panel, you can add your own. You also can
move applets that are already there or delete them to make more room.
To add applets to the panel, do the following:
1. Right-click an empty area of the panel.
2. Choose Add to Panel from the contextual menu.
3. Choose the applet that you want to add.
4. Click Add to add it to the panel.
To move applets to another location on the panel:
1. Right-click the applet you want to move.
2. Click Move from the contextual menu.
3. Drag the applet to the desired location.
4. Click to release the applet to its new location.
102 Chapter 5
10_599496 ch05.qxd 8/30/05 7:09 PM Page 102
To remove an applet from the panel:
1. Right-click the applet you want to remove.
2. Choose Remove from Panel from the contextual menu.
To modify the properties of an applet (or the panel):
1. Right-click the applet (or an empty area of the panel).
2. Choose Properties from the contextual menu.
3. Change the parameters in the Properties dialog box.
4. Click Close to accept your changes and close the Properties dialog box.
TIP Right-clicking the panel or any applets on it presents a contextual menu,
which gives you access to Help and some useful utilities for panel configuration.
Contextual menus may be different, depending on the type of applet that you’re
selecting.
Choosing Items from the Applications Menu
in Fedora Core
The Applications menu, represented by the Red Hat icon, is on the far-left cor-
ner of the top panel. The Applications menu button gives you access to a large
number of applications. Click the Red Hat icon to open the Applications menu,
and you see a menu, as shown in Figure 5-3, listing the many categories of
applications from which you can choose.
Notice that many of the categories contain a right-pointing arrow. Moving
your cursor over categories with a right-pointing arrow opens additional
menus from which you can choose even more applications in that category.
There are probably more than 100 applications from which you can choose,
many more than we can describe in this chapter. However, we do provide a
brief description of the main category of applications here so you can have
some idea what they do. Begin by starting at the top of the menu and then
work your way toward the bottom.
■■ Accessories — Here you can find applications that don’t fit well into
the other categories, such as the calculator, as well as some text editors.
■■ Graphics — This menu choice contains graphical programs. Here you
find image viewing and editing applications.
■■ Internet — Here you will find applications related to the Internet. For
example, the Web browsers are located here as well as an FTP program.
Exploring the Desktops 103
10_599496 ch05.qxd 8/30/05 7:09 PM Page 103
■■ Office — This menu choice gives you access to the OpenOffice.org
office suite. The OpenOffice suite contains word processing, spread-
sheet, and presentation software, and much more. You can also start
several of the OpenOffice applications by clicking the icons on the left
side of the panel.
■■ Sound & Video — Choosing this item gives you access to programs
and utilities related to system sound and video. For example, if you
want to adjust the system volume, use the utility here.
■■ System Tools — This menu choice gives you access to many Enterprise
Linux system administration utilities. You explore many of these tools
in other chapters of this book.
■■ Run Application — This menu item opens a dialog box where you can
enter the name of a program that you want to run.
Figure 5-3 The Applications menu on the GNOME desktop in Fedora Core.
104 Chapter 5
10_599496 ch05.qxd 8/30/05 7:09 PM Page 104
Choosing Items from the Places Menu in Fedora Core
The Places menu in Fedora Core is where you can choose the locations you
want to view or go to. Figure 5-4 shows the Places menu.
Items on this menu include:
■■ Home Folder — This menu item opens the home folder of the user who
is logged in to the system.
■■ Desktop — This menu item gives you a quick way to get to your desk-
top. It is really useful when you have several windows open and want
to go to the desktop without having to close the open windows.
■■ Computer — This menu item opens the computer folder of the user
who is logged in to the system.
■■ Connect to Server — Choosing this menu item opens the Nautilus File
Manager and displays any network servers that you can connect to.
■■ Search for Files — Choosing this menu item opens a file search
dialog box.
■■ Recent Documents — Documents that you have recently opened
appear in this list.
Figure 5-4 The Places menu in Fedora Core lets you choose places to go.
Exploring the Desktops 105
10_599496 ch05.qxd 8/30/05 7:09 PM Page 105
Choosing Items from the Desktop Menu in Fedora Core
Items you can choose from the Desktop menu let you make changes to your
system preferences and settings. You can also get systemwide help and lock
your desktop and log out. Figure 5-5 shows the Desktop menu.
The following items are available on the Desktop menu:
■■ Preferences — This menu choice opens the System Preferences win-
dow. Most of the GNOME settings can be modified with this menu
choice. Selecting this from the menu is the same as double-clicking the
Computer icon on the desktop.
■■ System Settings — This menu item contains Enterprise Linux system
administration utilities and some GNOME configuration utilities as well.
■■ Help — This menu item opens the Help browser. You can get help on
using GNOME by choosing this item.
■■ About GNOME — Choosing this item gives you information about the
GNOME version you are using.
Figure 5-5 The Desktop menu in Fedora Core lets you change system preferences.
106 Chapter 5
10_599496 ch05.qxd 8/30/05 7:09 PM Page 106
■■ Lock Screen — This menu option starts your system screensaver and
locks your desktop. Move your mouse or press a key to open a dialog
box that lets you enter your password to unlock the desktop.
■■ Log Out — Choosing Log Out opens a dialog box giving you the option
to log out, shut down, or restart the computer. Select the radio button of
your choice, and then click OK.
Choosing Items from the Applications Menu
on Enterprise Linux
The Applications menu, represented by the Red Hat icon, is on the far-left cor-
ner of the top panel. The Applications menu button gives you access to a large
number of applications. Click the Red Hat icon to open the Applications menu,
and you see a menu, as shown in Figure 5-6, listing the many categories of
applications from which you can choose.
Notice that many of the categories contain a right-pointing arrow. Moving
your cursor over categories with a right-pointing arrow opens additional
menus from which you can choose even more applications in that category.
There are probably more than 100 applications from which you can choose,
many more than we can describe in this chapter. However, we do provide a
brief description of the main category of applications here so that you can have
some idea what they do. Start at the top of the menu and then work your way
toward the bottom.
Figure 5-6 The Applications menu on the GNOME desktop in Enterprise Linux.
Exploring the Desktops 107
10_599496 ch05.qxd 8/30/05 7:09 PM Page 107
TIP Your Applications menu might not be exactly as described in this section,
depending on the type of system (Desktop, Workstation, Server) that you have
installed.
■■ Accessories — Here you can find applications that don’t fit well into
the other categories, such as the calculator, as well as some text editors.
■■ Graphics — This menu choice contains graphical programs. Here you
find image viewing and editing applications.
■■ Internet — Here you will find applications related to the Internet. For
example, the Web browsers are located here as well as an FTP program.
■■ Office — This menu choice gives you access to the OpenOffice.org
office suite. The OpenOffice suite contains word processing, spread-
sheet, presentation software, and much more. You can also start several
of the OpenOffice applications by clicking the icons on the left side of
the panel.
■■ Preferences — This menu choice opens the System Preferences win-
dow. Most of the GNOME settings can be modified with this menu
choice. Selecting this from the menu is the same as double-clicking the
Computer icon on the desktop.
■■ Programming — This menu item gives you access to some programs
that can be used for debugging programs.
■■ Sound & Video — Choosing this item gives you access to programs
and utilities related to system sound and video. For example, if you
want to adjust the system volume, use the utility here.
■■ System Settings — This menu item contains Enterprise Linux system
administration utilities and some GNOME configuration utilities as well.
■■ System Tools — This menu choice gives you access to many Enterprise
Linux system administration utilities. You explore many of these tools
in other chapters of this book.
■■ File Browser — This menu item is a link to the Nautilus File Manager
and opens in the user’s home directory.
■■ Help — This menu item opens the Help browser. You can get help on
using GNOME by choosing this item.
■■ Network Servers — Choosing this menu item opens the Nautilus File
Manager and displays any network servers that you might have.
108 Chapter 5
10_599496 ch05.qxd 8/30/05 7:09 PM Page 108