Red Hat Linux Networking , System Administration (P6) ppt
Bạn đang xem bản rút gọn của tài liệu. Xem và tải ngay bản đầy đủ của tài liệu tại đây (930.41 KB, 30 trang )
Figure 5-9 The Edit Bookmarks dialog box.
2. Select the bookmark from the list on the left side of the dialog box.
3. Change the name and location as desired. If you enter a different loca-
tion, you can click Jump to to immediately go to that location.
4. Click Close to finish editing the bookmark.
Deleting Bookmarks
To delete a bookmark:
1. Choose Bookmarks ➪ Edit Bookmarks from the menu bar. The Edit
Bookmarks dialog box opens.
2. Select the bookmark that you want to remove.
3. Click the Remove button.
4. Click the Close button to close the dialog box.
Managing Your Files and Folders
You can take many actions when managing your file system with Nautilus.
Table 5-1 briefly explains the action that you want to perform and how you
should do it.
Table 5-1 Performing Tasks Using Nautilus
ACTION METHOD
Move an item Click item and drag it to desired location.
Copy an item Click item and hold Ctrl while dragging item.
Link to an item Click item and press Ctrl+Shift while dragging.
114 Chapter 5
10_599496 ch05.qxd 8/30/05 7:10 PM Page 114
ACTION METHOD
Select single item Click item.
Select contiguous In icon view, click and drag box around items. In list view,
items press Shift; click the first item, and then click the last.
Select multiple items Press Ctrl; click desired items.
Select all items Choose Edit ➪ Select All Files from menu bar.
Create folder Right-click and choose Create Folder from contextual menu.
Rename item Right-click and choose Rename from the contextual menu.
Move to trash Right-click and choose Move to Trash from the contextual
menu.
Delete item Right-click and choose Move to Trash.
Change permissions Right-click, choose Properties, and click the Permissions tab.
Display trash Right-click the Trash icon and choose Open from the
contextual menu.
Restore trashed item Open Trash folder and drag item to desired location.
Empty trash Right-click the Trash icon and choose Empty Trash.
Add emblem Right-click, choose Properties, click the Emblems tab, and
choose desired emblem.
Change single icon Right-click, choose Properties, click Select Custom Icon,
and choose desired icon.
Change item size Choose Zoom In or Zoom Out from toolbar.
Customizing the Nautilus File Manager
A very nice feature of Nautilus is that you can configure it to make it work the
way you want it to. You can change many preferences; in this section, I tell you
about them and how to change them.
Editing File Manager Preferences
To open the Nautilus File Management Preferences dialog box, choose Edit ➪
Preferences from the menu bar in a Nautilus window. The dialog box shown in
Figure 5-10 appears.
Exploring the Desktops 115
10_599496 ch05.qxd 8/30/05 7:10 PM Page 115
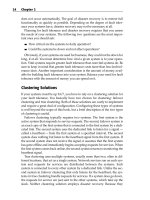
Figure 5-10 The Nautilus Preferences dialog box.
On this dialog box are five tabbed pages:
■■ Views — Preferences on this tab give you options for setting the default
view parameters for Nautilus, such as icon view, sort order, and show-
ing hidden files.
■■ Behavior — Preferences on this tab are concerned with the way Nau-
tilus handles executable files and trash. You can also choose between
single- and double-clicking here.
■■ Display — This tab lets you decide what information you want dis-
played with your icons, such as size, date created, date modified, and
date format.
■■ List Columns — The settings on this tab let you choose what informa-
tion is displayed as well as its order, when you choose list view.
■■ Preview — The settings on this tab determine how your files are dis-
played in their folders. For example, you can decide here whether you
want thumbnail views of graphic files.
TIP You can change many preferences to alter the appearance and
performance of Nautilus. You have seen only a few of them, so experiment with
them to see for yourself what they do.
116 Chapter 5
10_599496 ch05.qxd 8/30/05 7:10 PM Page 116
Changing the File Manager Background and Icon Emblems
Another nice feature of Nautilus is the ability to display colors and patterns in
the File Manager window. For example, I like to change the background color
for my home directory to light blue. That way, I can tell immediately when I’m
in my home directory when I see the blue background. You can also assign
emblems to icons. Emblems are small graphics that are used to make your icons
more meaningful You can easily change the colors and patterns or add
emblems by doing the following:
1. Choose Edit ➪ Backgrounds and Emblems from the Nautilus menu
bar to open the Backgrounds and Emblems dialog box, as shown in
Figure 5-11.
2. Click the Patterns, the Colors, or the Emblems button on the left side of
the dialog box.
3. Click and drag the pattern, color, or emblem from the right side of the
dialog box to where you want to place it. You can drag a color or pat-
tern to the large, right pane of the File Manager window to change the
color or pattern. You can drag an emblem to an icon to attach it to the
icon. Click close when you are finished.
TIP You can also drag the patterns or colors directly to the desktop and drop
them there. Your desktop will change to reflect your new color or pattern.
Figure 5-11 The Background and Emblems dialog box.
Exploring the Desktops 117
10_599496 ch05.qxd 8/30/05 7:10 PM Page 117
Showing and Hiding Views
You can decide what you want to view and what you don’t in your File Man-
ager. You can view or hide the side pane, the status bar, the toolbar, and the
location bar by clicking the appropriate item from the View menu on the menu
bar. These items are toggled items. If the item is checked, it is available for
viewing; if not checked, it is not available. Clicking the item toggles it on or off.
Configuring GNOME
You can also customize your entire desktop as easily as you configure your
Nautilus File Manager. Quite a few preferences can be modified in GNOME.
We can’t possibly explain all of them here in this chapter, but we can show you
how to change one of them. You can play around with the rest and make
changes as you desire. Take a look at setting up a screensaver. To set the pref-
erences for the screensaver, do the following:
1. Choose Applications ➪ Preferences ➪ Screensaver in Enterprise Linux
or Desktop ➪ Preferences ➪ Screensaver in Fedora Core. The Screen-
saver Preferences dialog box, as shown in Figure 5-12, opens.
2. Choose the mode for the screensaver by making your choice from the
drop-down list.
3. Select the image or images that you want for your screensaver by select-
ing the check box in front of your choice.
4. Pick the times that you want to use.
Figure 5-12 Configure the screensaver here.
118 Chapter 5
10_599496 ch05.qxd 8/30/05 7:10 PM Page 118
TIP Also be sure to look at the Advanced tab to see whether you want to
change any items there. Items on the Advanced tab include image manipulation,
display power managements, color map, and diagnostic settings.
5. When you finish making choices, test your screensaver by clicking the
Preview button.
TIP Don’t forget to have a look at the settings for the screensavers that you
chose. (Click the Settings button to see them.) In many cases, you can create
some interesting effects by changing the settings. For example, you can change
the speed of the screensaver or the number of colors displayed.
6. Click the Close button when you’re finished. Your new screensaver is
enabled.
Logging Out
After you finish working in GNOME, you should log out before leaving the
PC. Logging out is always a good idea to prevent anyone from using your sys-
tem. You can log out of GNOME as follows:
1. Choose Actions ➪ Log Out in Enterprise Linux or Desktop ➪ Log Out
in Fedora Core.
2. From the Log Out dialog box, you can choose to log out, restart the sys-
tem, or shut down the system by selecting the radio button in front of
your choice.
3. After making your choice, click OK to execute it.
Taking a Look at KDE
The default desktop in Fedora Core and Enterprise Linux is GNOME, but
another desktop — KDE — is available if you want to give it a try. If you want
to use it, you’ll have to make sure that it is installed on your system because the
default installation of Fedora Core and Enterprise Linux does not install KDE.
In this section, we give you a brief overview of KDE just to make you aware
of it and perhaps tempt you to try it. We will briefly explain the KDE desktop,
show you the Applications menu where you can find some applications to try,
and tell you about the Konqueror File Manager. After that, you are on your
own to explore if you like.
Exploring the Desktops 119
10_599496 ch05.qxd 8/30/05 7:10 PM Page 119
You can check whether KDE is installed from the graphical login screen.
Click Session (refer to Figure 5-1) and select KDE from the choices. If KDE is
not a choice, it isn’t installed — but you can easily install it by using the Pack-
age Management tool.
After selecting KDE for your session, enter your username and password to
login. You will see the KDE desktop, as shown in Figure 5-13.
The KDE desktop has an appearance similar to other well-known desktop
environments such as GNOME or MS Windows or Mac OS X. If you can use
these desktops, you will easily master KDE in a short time. Notice that the
KDE desktop has a rather clean appearance with little desktop clutter — just
one icon at the top and a panel at the bottom. A description of the KDE desk-
top is in order here.
At the bottom of the desktop is a gray, horizontal bar. This area of the desk-
top is the panel and is similar to the taskbar in Windows. On the far left of the
panel is the Applications icon, indicated by the Red Hat icon. To the right of
Applications are icons representing programs that were installed during the
system installation. You can start any of these programs by clicking them from
the panel. Just move your mouse over any icon, and a contextual menu
appears with a description of the program represented by the icon.
Figure 5-13 The KDE desktop after logging in.
120 Chapter 5
10_599496 ch05.qxd 8/30/05 7:10 PM Page 120
To the right of the program icons on the panel is a square gray area — the
Workspace Switcher — that is divided into four sections. When you first log in
to KDE, the leftmost section of Workspace Switcher should be white, indicat-
ing that you are in workspace one. You can switch between four workspaces in
KDE, so you actually get four distinct desktops that you can use. You can open
different programs on the different desktops and switch between them by
clicking the Workspace Switcher for the desktop that you want to see. Open
some programs on the various desktops and then try clicking each of the four
squares to see the effect of changing to a different workspace.
On the far right of the panel is a display of the current date and time. The
open area on the panel between the Workspace Switcher and the date and time
display is used to show any programs that you’re running on your desktop.
You can switch between programs running on a single desktop by clicking the
program name from the bottom panel. Also shown in this area are icons that
you can add to the panel as well as applets. Applets are applications that pro-
vide some type of useful information or entertainment.
Managing Applets
The icons on the bottom panel are small programs called applets that have a
variety of uses. For example, there is a weather applet that you can place on
the panel to give you weather forecasts for any area you desire. In addition to
the applets that are already on the panel, you can add your own. You also can
move applets that are already there or delete them to make more room.
To add applets to the panel, do the following:
1. Right-click an empty area of the panel.
2. Choose Add to Panel from the contextual menu.
3. Choose the application that you want to add.
4. Click Add to add it to the panel.
To move applets to another location on the panel:
1. Right-click the applet that you want to move.
2. Click Move from the contextual menu.
3. Drag the applet to the desired location.
4. Click to release the applet to its new location.
To remove an applet from the panel:
1. Right-click the applet that you want to remove.
2. Choose Remove from Panel from the contextual menu.
Exploring the Desktops 121
10_599496 ch05.qxd 8/30/05 7:10 PM Page 121
To modify the properties of an applet (or the panel):
1. Right-click the applet (or an empty area of the panel).
2. Choose Properties from the contextual menu.
3. Change the parameters in the Properties dialog box.
TIP Right-clicking the panel or any applets on it presents a contextual menu,
which gives you access to Help and some useful utilities for panel configuration.
Contextual menus are different depending on the type of applet that you’re
selecting.
Choosing Applications from the Applications Menu
The Applications menu, represented by the Red Hat icon, is on the far-left cor-
ner of the bottom panel. The Applications button gives you access to a large
number of applications. Click the Red Hat icon to open the Applications menu,
and you see a menu, as shown in Figure 5-14, listing the many categories of
applications from which you can choose.
Figure 5-14 The Applications menu on the KDE desktop.
122 Chapter 5
10_599496 ch05.qxd 8/30/05 7:10 PM Page 122
Notice that many of the categories contain a right-pointing arrow. Moving
your cursor over categories with a right-pointing arrow opens additional
menus from which you can choose even more applications in that category.
There are probably more than 100 applications from which you can choose,
many more than I can describe in this book. However, I do provide a brief
description of the main category of applications here so you can have some
idea what they do. Begin by starting at the bottom of the menu and work your
way toward the top.
TIP Your Applications menu might not be exactly as described in this section,
depending on the type of Fedora Core installation or version of Enterprise Linux
you have installed.
■■ Logout — This menu item gives you a quick way to get to your
desktop. It is really useful when you have several windows open and
want to go to the desktop without having to close the open windows.
Choosing Logout opens a dialog box giving you the option to log out
or cancel. Select the radio button of your choice and then click OK.
■■ Lock Session — This menu option starts your system screensaver and
locks your desktop. Move your mouse or press a key to open a dialog
box that lets you enter your password to unlock the desktop.
■■ Run Command — This menu item opens a dialog box where you can
enter the name of a program that you want to run.
■■ Home — This menu item is a link to the user’s home directory.
■■ Help — This menu item opens the Help browser. You can get help on
using KDE by choosing this item.
■■ Control Center — The Control Center is used for making configuration
changes to the KDE desktop.
■■ System Tools — This menu choice gives you access to many Enterprise
Linux system administration utilities. Tools for configuring your net-
work and printers are located here.
■■ System Settings — This menu item contains Enterprise Linux system
administration utilities and some KDE configuration utilities as well.
Some of the tools here can be used to configure your Web server as well
as other servers.
■■ Sound & Video — Choosing this item gives you access to programs
and utilities related to system sound and video. For example, if you
want to adjust the system volume, use the utility here.
Exploring the Desktops 123
10_599496 ch05.qxd 8/30/05 7:10 PM Page 123
■■ Programming — This menu item gives you access to some programs
that can be used for debugging programs.
■■ Preferences — This menu choice opens the System Preferences win-
dow. Most of the GNOME settings can be modified with this menu
choice. Selecting this from the menu is the same as double-clicking the
Computer icon on the desktop.
■■ Office — This menu choice gives you access to the OpenOffice.org
office suite. The OpenOffice suite contains word processing, spread-
sheet, and presentation software, and much more. You can also start
several of the OpenOffice applications by clicking the icons on the left
side of the panel.
■■ Internet — Here you will find applications related to the Internet. For
example, the Web browsers and FTP program are located here.
■■ Graphics — This menu choice contains graphical programs. Here you
find image viewing and editing applications.
■■ Accessories — Here you can find applications that don’t fit well into
the other categories, like the calculator, as well as some text editors.
Using the Konqueror File Manager
The Konqueror File Manager is a graphical shell for KDE. You can use Kon-
queror not only to manage the files and directories on your system but also as
a Web browser to access the Internet.
To start the Konqueror File Manager, shown in Figure 5-15, select Home
from the Applications menu.
A brief explanation of the items on the Konqueror File Manager window is
in order:
■■ Menu bar — At the top of the window is the menu bar, similar to menu
bars from other programs. From the menu bar, you can access tools to
perform various actions.
■■ Toolbar — Below the menu bar is the toolbar. The toolbar holds buttons
that you can use to perform the action indicated by the button, such as
back, forward, or reload. The toolbar also has a zoom-in and a zoom-
out button (magnifying glass icons) with which you can change the size
of items. Finally, the toolbar contains icons that let you choose how you
want to view the items in the folder.
124 Chapter 5
10_599496 ch05.qxd 8/30/05 7:10 PM Page 124
Figure 5-15 The Konqueror File Manager window.
■■ Location bar — The location bar contains a text field where you can
enter a file, folder, or URL to go to.
■■ Window panes — Beneath the location bar, the Konqueror window is
divided into two panes. The left, smaller pane shows information about
the icon selected from the far left side of the File Manager window.
Moving your mouse over an icon displays information about the icon.
Clicking an item from the list in the left pane displays items in the
larger, right pane. If you choose the Root Folder icon, you can see your
entire file system tree in the left pane.
The larger, right pane displays the contents of the files or directories that
you’re viewing. Note: All directories appear as folders in Konqueror. You
can view the contents of folders as either a list or as icons by choosing
from the View As icons (in the toolbar). You can also access Web or FTP
sites by entering the URL into the location text field.
■■ Status bar — At the bottom of the Konqueror window is the status bar,
which displays status information about the files or folders that you are
viewing.
Exploring the Desktops 125
10_599496 ch05.qxd 8/30/05 7:10 PM Page 125
Logging Out of KDE
After you finish working in KDE, you should log out before leaving the PC.
Logging out is always a good idea to prevent anyone from using your system.
You can log out of KDE as follows:
1. Choose Applications ➪ Log Out.
2. From the Log Out dialog box, you can choose to log out or cancel to
return to the desktop.
3. After making your choice, click OK to execute your choice.
Summary
In this chapter you took the express tour of the two most common desktops
provided with Fedora Core and Enterprise Linux. The GNOME desktop is the
default desktop that is installed when the system is installed. GNOME is very
powerful, and you can use it as is or configure it to your liking as you saw in
some of the examples in this chapter. The KDE desktop is not installed by
default but can be selected to be installed during system installation, or after
the system is already installed. KDE is also a very powerful graphical envi-
ronment as you saw from some of the examples in this chapter.
126 Chapter 5
10_599496 ch05.qxd 8/30/05 7:10 PM Page 126
127
System Startup
and Shutdown
IN THIS CHAPTER
■■ Examining the Boot Process
■■ Exploring Runlevels
■■ Starting Programs at System Boot
■■ Shutting Down the System
■■ Changing the GRUB Configuration
All Red Hat systems, whether Fedora Core or Enterprise Linux, use a similar
procedure for starting up the operating system. As the system boots, the oper-
ating system loads programs in an orderly fashion. You are able to make
changes to the programs that load and their configurations after the system
has booted. The changes you make will then affect the boot process the next
time and all subsequent times that your system boots.
The process of shutting down the system also follows a consistent, orderly
method that you can customize as you desire. For a clear understanding of
how your system works, it is good to know the methodology behind the
orderly process of bringing your system up as well as shutting it down. By
knowing this process in depth, you can make any desired changes to the con-
figuration files and gain total control over the functionality of your system.
You will also be able to easily find problems that may be keeping your system
from booting properly and quickly correct them. This chapter gives you the
details about what happens when your start and shut down your system.
CHAPTER
6
11_599496 ch06.qxd 8/30/05 6:21 PM Page 127
Examining the Boot Process
There are some basic steps that all systems must perform to boot. When you
turn on your PC, it runs a program called the basic input/output system
(BIOS). The BIOS is the only way to communicate with the system components
until the operating system is up and running and able to take over system
management functions. Unlike the operating system, which is installed on a
user-writable disk, such as a floppy, CD-ROM, or hard drive, the system BIOS
is typically installed on a read-only memory (ROM) chip physically attached
to the system board. This ROM chip is a type of chip usually referred to as an
electronically erasable programmable read-only memory (EEPROM) chip,
meaning that it is not normally writable by the end user. It is possible to
rewrite an EEPROM BIOS chip, but this requires a program from the chip
manufacturer and is not a process that should be taken lightly as any errors
here could make your system totally unusable.
After the BIOS loads, it performs some diagnostics on the hardware, checks
the installed components to be sure they are functioning, and checks the sys-
tem RAM. Next, the BIOS tries to find a system drive from which it can load
the boot program to begin the process of starting the operating system. You
can specify the search order for the drives by changing the settings in the sys-
tem BIOS configuration, which you can typically access by entering some key
combination while the system is performing its power-on self test (POST). If
you don’t make any changes to the BIOS configuration, most systems by
default will look for a bootable floppy disk or CD-ROM before moving on to
the system hard drives. Usually the first hard drive that boots is the master
IDE device of the primary IDE bus, but you can also change this setting in the
BIOS if you desire. The first sector of the drive has an area called the Master
Boot Record (MBR), which holds the program that is used to begin the actual
loading of the operating system. As soon as the BIOS finds the MBR, it gives
up control of the boot process. In the case of Fedora Core and Enterprise Linux,
a program called a boot loader begins the loading of the operating system. The
boot loader program used is called the Grand Unified Boot loader, or GRUB. In
the next section you take a closer look at GRUB and how it works.
The Boot Loader
The GRUB program used by Fedora Core and Enterprise Linux uses a two-
step process to begin loading the operating system. These two steps are typi-
cally referred to as stages one and two. In stage one, a program on the MBR is
used to find the second stage program that will begin the process of loading
the operating system into system memory. GRUB uses a configuration file
128 Chapter 6
11_599496 ch06.qxd 8/30/05 6:21 PM Page 128
called /boot/grub/grub.conf to provide information to the second-stage
loader. Later in this chapter you learn how to make changes to the /boot/
grub/grub.conf configuration file. The first thing the second stage loader
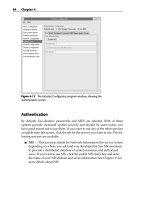
does is present you with a nice graphical menu screen, as shown in Figure 6-1.
As you can see from Figure 6-1, there are two versions of the kernel listed
with one highlighted. This is the kernel that will be loaded by default. But you
can use the GRUB menu to select different Linux kernels, or even different
operating systems, to load. In many cases, when someone decides to try Linux
for the first time, he or she is already running MS Windows and is planning to
set up the system to do a dual boot. So, when the GRUB menu appears there is
an additional choice for the other operating system. Most of the time Windows
is already installed and Linux is installed later. In this case, the Linux installa-
tion would take care of making the changes to the /etc/boot/grub.conf
file to present the other operating system as a choice on the GRUB menu.
NOTE If you have more than one processor in your system, or you have a
Pentium 4 processor with hyper-threading, you will see two kernels listed even
on a freshly installed system. The second kernel will end with the letters smp,
which means symmetrical multiprocessor. In this case, you should choose to
boot the SMP kernel.
Figure 6-1 The GRUB graphical menu screen shows the kernel(s)
available to boot.
System Startup and Shutdown 129
11_599496 ch06.qxd 8/30/05 6:21 PM Page 129
If you don’t choose a kernel to load, GRUB will load whichever kernel is
specified in the configuration file as the default kernel. If you want to select the
kernel to load, you can use your cursor keys to highlight the kernel you want
loaded. Regardless of whether you choose the kernel or let GRUB do it for you,
the next step in the boot process is the actual loading of the kernel. The kernel
is always located in the /boot directory and will have a name similar to
vmlinuz-2.6.10-1.737_FC3. Your kernel version number will most likely
be different from the version shown here. GRUB has one more task to do and
that is to load a ramdisk image, called initrd that has the same version num-
ber as the kernel you are going to load into system memory. initrd loads any
special drivers that might be needed by the kernel to load the OS. And that is
it for GRUB; its work is done and the kernel is now responsible for continuing
the boot process. But before you say good-bye to GRUB, take a look at some of
the things you can do with GRUB while the system is booting.
Using GRUB during Boot
In addition to loading a default kernel or operating system when GRUB takes
over from the BIOS, GRUB lets you make changes to the parameters it passes to
the kernel. You’ll notice that Figure 6-1 shows some instructions for selecting
the OS as well as which keys to press to edit the parameters that will be passed
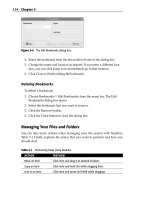
by GRUB to the kernel. To edit the boot parameters, highlight the kernel you
want to edit and press the e key. A new screen opens, as shown in Figure 6-2.
Figure 6-2 Selecting a kernel to edit boot parameters.
130 Chapter 6
11_599496 ch06.qxd 8/30/05 6:21 PM Page 130
Figure 6-2 displays the locations of the kernel and initrd files that will be
used to begin booting the OS. To edit any of the information displayed here,
highlight your choice and again press the e key. For example, if you want to
edit kernel parameters, highlight the line beginning with kernel and press e. A
new screen appears, as shown in Figure 6-3.
To enter any parameters you want to pass to the kernel, type them in at the
end of the line. Be sure to separate them by spaces. For example, to tell the ker-
nel not to use ACPI enter the command acpi=off. Now when the kernel boots
it will disable ACPI. After you have finished entering the parameters you
desire press Enter to accept your changes and return to the previous screen.
Press the letter b and the kernel will boot and begin the process of loading the
operating system.
NOTE Using this method to pass parameters to the kernel is only applied to
this instance. When the system is rebooted, the parameters will not be passed
again. If you want the parameters passed at every boot, you need to put them
into the /boot/grub/grub.conf file. You learn how to modify this file later in
the chapter.
It is also possible to open a command line from GRUB that is similar to a
Bash shell except the commands entered are specific to GRUB. To enter the
GRUB command line interface, press the letter c from the GRUB menu. You
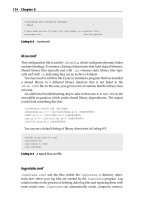
can then press to get a listing of the commands you can use. Figure 6-4 shows
the GRUB command-line interface listing the possible commands.
Figure 6-3 Editing the kernel boot parameters.
System Startup and Shutdown 131
11_599496 ch06.qxd 8/30/05 6:21 PM Page 131
Figure 6-4 The GRUB command-line interface showing possible commands.
TIP You can use the info pages that are already installed on your system to
get a complete explanation of all the GRUB commands. Just type info grub at a
command prompt.
The next section explains the steps taken by the kernel.
The Kernel
The first thing the kernel does after taking over from GRUB is to prepare the
system memory for use. Next all system hardware is probed and configured if
possible. The kernel will uncompresses the initrd in RAM, mount it as a
ramdisk, and then runs linuxrc in the ramdisk. This can be a command file
like a regular rc file or a symlink to init on the initrd. If the former, it runs
the commands in there, sets the real root device at the end, and then returns so
that init starts. If the latter, it runs the commands in /etc/inittab on the
ramdisk like any other Linux boot process. This can end with a pivotroot or
chroot to the real root device. Fedora’s initrd files use /Linux as a com-
mand script; the initrd and its linuxrc script are very important nowadays
because that’s what mounts /proc, /sys, and /dev/shm, starts udev and
hotplug, and insmods special drivers such as SCSI drivers. Most of the time
the kernel is able to autodetect and configure hardware devices, but some-
times, especially with new devices, the kernel cannot properly configure them.
Usually, this means that your device won’t function correctly, or at all, but the
132 Chapter 6
11_599496 ch06.qxd 8/30/05 6:21 PM Page 132
system will still function. If you have set up RAID or Logical Volume Manage-
ment (LVM) on your system, the kernel will also configure these devices. After
the kernel has configured all the system devices and mounted the system
drives, it runs the /sbin/init command.
The /sbin/init Program
The /sbin/init program is the first system process that runs after the kernel
has configured the system devices and mounted the system drives. The /init
program is like the project manager of the system because it manages the
remaining steps of booting the system and is the parent or grandparent of all
the rest of the automatically started system boot processes. Basically, the init
program coordinates the order of the many scripts it will run to complete sys-
tem setup. The first script /init runs is the /etc/rc.d/rc.sysinit script.
This script starts system swap, checks the file systems, and performs other sys-
tem initialization. Then the init command refers to the /etc/inittab
script to get information about how to start the system, which system initial-
ization script to run and bring the system to the runlevel indicated in the
inittab script. After a typical system installation, the default runlevel is set
to runlevel 5. The rest of this section describes the steps the system takes to
boot to runlevel 5.
After reading the /etc/inittab script, init turns over control to the
rc.sysinit program which reads the /etc/rc.d/init.d/functions
file to determine the procedure to use to set the default system path, start and
stop programs, find the process ID (PID) of a running process and how to log
the success or failure of starting a program. The next script to run is
/etc/rc.d/rc, which is responsible for starting and stopping services when
the runlevel changes and determining the new runlevel.
In the /etc/rc.d directory are additional directories rc0.d, rc1.d,
rc2.d, rc3.d, rc4.d, rc5.d, and rc6.d. The number in the directory name
corresponds to the runlevel. Each of these directories contains scripts that are
used to stop and start services for the runlevel. In this example, the system is
booting to runlevel 5, so the init program looks in the /etc/rc.d/rc5.d/
directory for the processes to start and stop. Listing 6-1 shows the contents of
the rc5.d directory for a newly installed Fedora Core 3 system.
K01yum -> /init.d/yum
K02NetworkManager -> /init.d/NetworkManager
K05saslauthd -> /init.d/saslauthd
K10psacct -> /init.d/psacct
K20nfs -> /init.d/nfs
K24irda -> /init.d/irda
Listing 6-1 The scripts used to stop and start services in runlevel 5. (continued)
System Startup and Shutdown 133
11_599496 ch06.qxd 8/30/05 6:21 PM Page 133
134 Chapter 6
K30spamassassin -> /init.d/spamassassin
K35vncserver -> /init.d/vncserver
K35winbind -> /init.d/winbind
K36lisa -> /init.d/lisa
K50netdump -> /init.d/netdump
K73ypbind -> /init.d/ypbind
K74nscd -> /init.d/nscd
K74ntpd -> /init.d/ntpd
K85mdmpd -> /init.d/mdmpd
K89netplugd -> /init.d/netplugd
K90bluetooth -> /init.d/bluetooth
K94diskdump -> /init.d/diskdump
K99microcode_ctl -> /init.d/microcode_ctl
S04readahead_early -> /init.d/readahead_early
S05kudzu -> /init.d/kudzu
S06cpuspeed -> /init.d/cpuspeed
S08iptables -> /init.d/iptables
S09isdn -> /init.d/isdn
S09pcmcia -> /init.d/pcmcia
S10network -> /init.d/network
S12syslog -> /init.d/syslog
S13irqbalance -> /init.d/irqbalance
S13portmap -> /init.d/portmap
S14nfslock -> /init.d/nfslock
S15mdmonitor -> /init.d/mdmonitor
S18rpcgssd -> /init.d/rpcgssd
S19rpcidmapd -> /init.d/rpcidmapd
S19rpcsvcgssd -> /init.d/rpcsvcgssd
S25netfs -> /init.d/netfs
S26apmd -> /init.d/apmd
S26lm_sensors -> /init.d/lm_sensors
S28autofs -> /init.d/autofs
S33nifd -> /init.d/nifd
S34mDNSResponder -> /init.d/mDNSResponder
S40smartd -> /init.d/smartd
S44acpid -> /init.d/acpid
S55cups -> /init.d/cups
S55sshd -> /init.d/sshd
S56xinetd -> /init.d/xinetd
S80sendmail -> /init.d/sendmail
S85gpm -> /init.d/gpm
S90crond -> /init.d/crond
S90xfs -> /init.d/xfs
S95anacron -> /init.d/anacron
S95atd -> /init.d/atd
S96readahead -> /init.d/readahead
S97messagebus -> /init.d/messagebus
Listing 6-1 (continued)
11_599496 ch06.qxd 8/30/05 6:21 PM Page 134
S97rhnsd -> /init.d/rhnsd
S98cups-config-daemon -> /init.d/cups-config-daemon
S98haldaemon -> /init.d/haldaemon
S99local -> /rc.local
Listing 6-1 (continued)
All of the scripts in the rc5.d directory are symbolic links to the actual
scripts that are located in the /etc/rc.d/init.d/ directory. The use of sym-
bolic links means that the runlevels can be modified by adding or removing
symlinks or changing the order the scripts run in the rc0.d through rc6.d
directories without affecting the scripts to which they are linked.
TIP A symbolic link is a type of file that points to another file in the file
system.
As you can see, each symbolic link begins with a K and a number or
an S and a number. The K links are processes that are killed on that runlevel,
and those beginning with an S are started. All of the processes beginning
with K are stopped first and then all the processes beginning with S are
started. The processes are stopped or started in numerical order, beginning
with the lowest number and continuing in increasing order. Processes are
stopped by the /etc/rc.d/init.d/ process stop command, and started
by /etc/rc.d/init.d/ process start. If you desire, you can change the
stop and start order by changing the numbers in the symbolic links.
TIP You can stop, start, or restart processes on your system by running the
command for the process and then typing stop, start, or restart after the
command. For example, the command /etc/rc.d/init.d/vstpd stop stops
the vsftp server.
The init program has a few more tasks it needs to do before it is finished.
One of these tasks is running the gettys specified in the /etc/inittab file.
This provides the six terminals you can use to login to your server. These ter-
minals are in addition to the standard login screen that is provided by the run-
level 5 login scripts. The last thing the init program does is run the
/etc/rc.d/rc.local script. If you want to run any of your own scripts,
you can put the calls to them in this file. See the section titled “Starting Pro-
grams at System Boot” later in this chapter for more information. Since the sys-
tem is starting in runlevel 5, you will see a graphical login prompt.
System Startup and Shutdown 135
11_599496 ch06.qxd 8/30/05 6:21 PM Page 135
Exploring Runlevels
The term runlevel has been used a few times so far in this chapter and now is
a good time to learn more about runlevels and why they are used. There are
typically eight runlevels on Linux systems, but we are only interested in the
seven used on Fedora Core or Enterprise Linux systems. Each of the runlevels
has a set of processes associated with that runlevel that will be started by
entering that runlevel. The runlevels on a Fedora Core or Enterprise Linux sys-
tem and their purpose are:
■■ 0 — Halt
■■ 1 — Single-user mode
■■ 2 — Not used (user-definable)
■■ 3 — Full multiuser mode (without a graphical user interface, GUI)
■■ 4 — Not used (user-definable)
■■ 5 — Full multiuser mode (with a GUI)
■■ 6 — Reboot
The /etc/inittab file controls the default runlevel for the system to use
when it boots. You can easily change the runlevel for your system by making
the following change.
Changing the System Runlevel
Look for the following line in the /etc/inittab file. It will be just below the
listing of available runlevels.
id:5:initdefault:
The number 5 in the line means the system will boot into runlevel 5. If you
want to boot into runlevel 3, just change the number 5 to a number 3, so the
line now looks like this.
id:3:initdefault:
The default runlevel on Fedora Core and Enterprise Linux systems is run-
level 5, which provides a full multiuser environment and starts the X Window
system to give the users a graphical environment. Runlevel 3 provides a full
multiuser system exactly the same as runlevel 5, with the exception of not pro-
viding graphical environment for the users. Runlevel 3 is typically used for
server systems that don’t require a GUI, because running a GUI uses a lot of
system resources unnecessarily.
136 Chapter 6
11_599496 ch06.qxd 8/30/05 6:21 PM Page 136
Runlevels 2 and 4 are not used in Fedora Core or Enterprise Linux systems.
These runlevels are there so that the user can use them to configure them as
they desire. By doing this, you can make your own custom runlevels for test-
ing or whatever suits your purposes.
Runlevel 1 lets you enter single-user mode. This runlevel is useful for trou-
bleshooting or running diagnostics on your system, but it isn’t usually set as a
default runlevel in the /etc/inittab file. If you are having problems with
your system, you would usually enter runlevel 1 by entering the command
during system boot, as shown here:
1. When the boot screen appears, highlight the kernel you want to change
by using the down-arrow key.
2. Press the letter e.
3. Scroll to the second line and press e again.
4. At the end of the line type init 1 and press Enter.
5. Press the letter b to boot the system into single-user mode.
Starting Programs at System Boot
The file /etc/rc.d/rc.local script is the last file run by the init com-
mand when the system boots. If you want to run additional scripts to config-
ure other devices, you can place the commands for the script into this file.
Listing 6-2 shows a typical /etc/rc.d/rc.local file with a call to another
script called /usr/bin/novellconfig. The novellconfig script is used
to load the modules and configure IPX on the server. You can also pass options
to your scripts by entering them after the call to the script.
NOTE The script novellconfig is just used as an example and does not
actually exist on a default installation. You can create your own scripts and call
them whatever you want.
#!/bin/sh
#
# This script will be executed *after* all the other init scripts.
# You can put your own initialization stuff in here if you don’t
# want to do the full Sys V style init stuff.
touch /var/lock/subsys/local
/usr/bin/novellconfig
Listing 6-2 An /etc/rc.d/rc.local file calling another program.
System Startup and Shutdown 137
11_599496 ch06.qxd 8/30/05 6:21 PM Page 137
Shutting Down the System
If you are running a GUI on your system, shutting down your system is as
easy as a few mouse clicks. The shutdown procedure for the GNOME desktop
is as follows:
1. Choose Actions ➪ Logout from the top panel menu. A screen appears
asking if you want to logout, restart or shutdown.
2. Click the shutdown radio button.
3. Click OK, and your system begins to shut down.
If you are not running a GUI on your system, the command to shut down is
shutdown and uses the following syntax:
/sbin/shutdown [-t sec.] [-arkhncfF] time [warning message]
You can refer to the man page for shutdown to get all the details for the
shutdown command. To access the man page for shutdown, type the follow-
ing command:
man shutdown
Regardless of the method used to start the shutdown command, the process
that follows is the same. Any users who are logged in to the system will receive
a notice that the system is going down and anyone trying to log in after the
shutdown command has been given will not be allowed to do so. Running
processes on the system are sent the SIGTERM signal, which will attempt to
cleanly stop the running processes. The shutdown program signals the init
program to change to a different runlevel depending on the shutdown com-
mand. Runlevel 0 is used to shut down the system, whereas runlevel 6 is used
reboot the system. Some examples of commonly used shutdown commands
with explanations of their meanings are:
NOTE In most cases, only the root user can use shutdown to shut down the
system.
The /sbin/shutdown -h now command immediately begins the shut-
down process and halts the system. The /sbin/shutdown -r now command
immediately begins the shutdown process and reboots the system.
138 Chapter 6
11_599496 ch06.qxd 8/30/05 6:21 PM Page 138