Red Hat Linux Networking , System Administration (P9) ppsx
Bạn đang xem bản rút gọn của tài liệu. Xem và tải ngay bản đầy đủ của tài liệu tại đây (754.5 KB, 30 trang )
14_599496 pt02.qxd 8/30/05 6:18 PM Page 204
205
This chapter introduces you to the X Window system that is used to provide a
graphical user interface (GUI) to the operating system. If you have used MS
Windows or Apple Macs, then you are already familiar with using a GUI.
Fedora Core and Enterprise Linux also give you similar features.
Configuring the X Server with
the X Configuration Tool
You have basically two ways to configure the X server on your Fedora Core or
Enterprise Linux system. First, you can use the X Configuration tool, which is a
graphical tool that gives you the ability to change some of the most significant
settings, such as display, monitor, and video card settings. The X Configura-
tion tool is a graphical front end to the X configuration file, xorg.conf, which
is located in the /etc/X11 directory. Any changes that you make using the
graphical utility are written to the /etc/X11/xorg.conf file. Second, you
can edit the X Configuration file directly by using a text-editing application. In
this section, I show you how to make X server configuration changes by using
the X Configuration tool, beginning with changing the display resolution.
Managing the
X Window System
IN THIS CHAPTER
■■ Configuring the X Server with the X Configuration Tool
■■ Manually Configuring the X Server
CHAPTER
9
15_599496 ch09.qxd 8/30/05 6:23 PM Page 205
Changing the Display Resolution
The X Configuration tool makes it easy for you to change your display resolu-
tion. To change your display resolution, do the following:
1. On Enterprise Linux 4 choose Applications ➪ System Settings ➪ Dis-
play to open the Display Settings dialog box, shown in Figure 9-1. On
Fedora Core 4 choose Desktop ➪ System Settings ➪ Display to open the
Display Settings dialog box.
NOTE If you are not logged in as root, you will be prompted to enter the root
password.
2. Select your desired resolution from the drop-down Resolution list.
3. Click OK to accept your choice, and close the dialog box.
NOTE Any time you make changes to the X server configuration, you
must restart the X server for the changes to take effect. When using the X
Configuration tool, you see a window reminding you to restart the X server.
Figure 9-1 Change your screen resolution here.
206 Chapter 9
15_599496 ch09.qxd 8/30/05 6:23 PM Page 206
Changing the Display Color Depth
The system display color depth setting determines the number of colors that
are shown on the display. A higher color depth displays more colors on the
monitor. To change the system color depth, do the following:
1. On Enterprise Linux 4 choose Applications ➪ System Settings ➪ Dis-
play to open the Display Settings dialog box. On Fedora Core 4 choose
Desktop ➪ System Settings ➪ Display to open the Display Settings dia-
log box. (Refer to Figure 9-1.)
2. Select your desired color depth from the Color Depth drop-down list.
3. Click OK to accept your choice and close the dialog box.
Changing Monitor Type Settings
The Fedora Core or Enterprise installer can usually detect the type of monitor
that is connected to your system and set the configuration accordingly. Some-
times, however, the installer might not properly configure your monitor,
requiring you to change the monitor settings. You also want to change your
monitor settings if you get a different monitor with different parameters than
your previous monitor. To change your monitor settings, do the following:
1. On Enterprise Linux 4 choose Applications ➪ System Settings ➪ Dis-
play to open the Display Settings dialog box. On Fedora Core 4 choose
Desktop ➪ System Settings ➪ Display to open the Display Settings dia-
log box. (Refer to Figure 9-1.)
2. Click the Hardware tab. (See Figure 9-2.)
3. Click the top Configure button (to the right of the monitor type listing)
to open the Monitor dialog box, shown in Figure 9-3.
4. Find the manufacturer of your monitor in the list, and then click the
arrow to the left of the manufacturer’s name to see a list of models.
5. Click the model number that matches your monitor.
6. Click OK twice to accept your choice, and exit the Display Settings dia-
log box.
TIP If you can’t find your monitor manufacturer or model number on the
monitor list, choose one of the generic monitors from the top of the monitor
list.
Managing the X Window System 207
15_599496 ch09.qxd 8/30/05 6:23 PM Page 207
Figure 9-2 Access monitor and video card settings here.
Figure 9-3 Choose your monitor type.
Changing Your Video Card Type
The Fedora Core or Enterprise installer can usually detect the type of video
card that is connected to your system and set the configuration accordingly.
However, if the installer doesn’t properly detect your video card, you might
need to change the video card type. You would also want to change your video
card type if you install a different video card. To change your video card type,
do the following:
208 Chapter 9
15_599496 ch09.qxd 8/30/05 6:23 PM Page 208
1. On Enterprise Linux 4 choose Applications ➪ System Settings ➪ Dis-
play to open the Display Settings dialog box. On Fedora Core 4 choose
Desktop ➪ System Settings ➪ Display to open the Display Settings dia-
log box. (Refer to Figure 9-1.)
2. Click the Hardware tab. (Refer to Figure 9-2.)
3. Click the bottom Configure button (to the right of the video card type
listing) to display the Video Card dialog box, shown in Figure 9-4.
4. Find the manufacturer of your video card in the list, and click the
appropriate model.
Configuring Dual Monitors
In Fedora Core or Enterprise Linux, you can use two video cards and monitors
on your system if you desire. To configure a second video card and monitor, do
the following:
1. On Enterprise Linux 4 choose Applications ➪ System Settings ➪ Dis-
play to open the Display Settings dialog box. On Fedora Core 4 choose
Desktop ➪ System Settings ➪ Display to open the Display Settings dia-
log box. (Refer to Figure 9-1.)
2. Click the Dual Head tab, shown in Figure 9-5, in the Display Settings
dialog box.
Figure 9-4 Configure your video card.
Managing the X Window System 209
15_599496 ch09.qxd 8/30/05 6:23 PM Page 209
Figure 9-5 Use the Dual Head tab to configure dual monitors.
3. Select the Use Dual Head check box.
4. Click the Configure button (next to the Second Monitor Type), choose
your monitor from the list, and then click OK.
5. Enter the appropriate information for the video card type, display reso-
lution, and color depth.
6. Select whether you want individual desktops on each display or a sin-
gle desktop spanning both displays by selecting the appropriate choice.
7. Click OK twice to exit the configuration tool.
Manually Configuring Your X Server
The Fedora Core or Enterprise installer program usually does a good job of
detecting the system mouse, keyboard, video card, and monitor. When you log
in to your system, the settings are generally what they should be for a func-
tioning X server. You may never need to configure your X server manually, but
if you do, it would be good to know how. In this section you look at the X
server configuration file /etc/X11/xorg.conf.
The X Server Configuration File
The X server configuration file, like most configuration files in Fedora Core or
Enterprise Linux is a plain-text file. Listing 9-1 is a typical X server configuration
210 Chapter 9
15_599496 ch09.qxd 8/30/05 6:23 PM Page 210
Managing the X Window System 211
file that was created during system installation. A description of the section of
the file follows the file.
# XFree86 4 configuration created by redhat-config-xfree86
Section “ServerLayout”
Identifier “Default Layout”
Screen 0 “Screen0” 0 0
InputDevice “Mouse0” “CorePointer”
InputDevice “Keyboard0” “CoreKeyboard”
InputDevice “DevInputMice” “AlwaysCore”
EndSection
Section “Files”
# RgbPath is the location of the RGB database.
#Note, this is the name of the
# file minus the extension (like “.txt” or “.db”).
#There is normally no need to change the default.
# Multiple FontPath entries are allowed (they are
# concatenated together)
# By default, Red Hat 6.0 and later now use a font
#server independent of the X server to render fonts.
RgbPath “/usr/X11R6/lib/X11/rgb”
FontPath “unix/:7100”
EndSection
Section “Module”
Load “dbe”
Load “extmod”
Load “fbdevhw”
Load “glx”
Load “record”
Load “freetype”
Load “type1”
Load “dri”
EndSection
Section “InputDevice”
# Specify which keyboard LEDs can be user-controlled
#(eg, with xset(1))
# Option “Xleds” “1 2 3”
# To disable the XKEYBOARD extension, uncomment
# kbDisable.
# Option “XkbDisable”
# To customise the XKB settings to suit your
# keyboard, modify the lines below (which are the
# defaults). For example, for a non-U.S.
# keyboard, you will probably want to use:
Listing 9-1 The X server configuration file /etc/X11/xorg.conf. (continued)
15_599496 ch09.qxd 8/30/05 6:23 PM Page 211
# Option “XkbModel” “pc102”
# If you have a US Microsoft Natural keyboard, you
# can use:
# Option “XkbModel” “microsoft”
#
# Then to change the language, change the Layout
# setting.
# For example, a german layout can be obtained with:
# Option “XkbLayout” “de”
# or:
# Option “XkbLayout” “de”
# Option “XkbVariant” “nodeadkeys”
#
# If you’d like to switch the positions of your
# capslock and control keys, use:
# Option “XkbOptions” “ctrl:swapcaps”
# Or if you just want both to be control, use:
# Option “XkbOptions” “ctrl:nocaps”
#
Identifier “Keyboard0”
Driver “kbd”
Option “XkbModel” “pc105”
Option “XkbLayout” “us”
EndSection
Section “InputDevice”
Identifier “Mouse0”
Driver “mouse”
Option “Protocol” “IMPS/2”
Option “Device” “/dev/input/mice”
Option “ZAxisMapping” “4 5”
Option “Emulate3Buttons” “yes”
EndSection
Section “InputDevice”
# If the normal CorePointer mouse is not a USB mouse #then this input
device can be used in AlwaysCore #mode to let you also use USB mice at
the same time.
Identifier “DevInputMice”
Driver “mouse”
Option “Protocol” “IMPS/2”
Option “Device” “/dev/input/mice”
Option “ZAxisMapping” “4 5”
Option “Emulate3Buttons” “no”
EndSection
Section “Monitor”
Identifier “Monitor0”
Listing 9-1 (continued)
212 Chapter 9
15_599496 ch09.qxd 8/30/05 6:23 PM Page 212
VendorName “Monitor Vendor”
ModelName “LCD Panel 1280x1024”
DisplaySize 376 301
HorizSync 31.5 - 67.0
VertRefresh 50.0 - 75.0
Option “dpms”
EndSection
Section “Device”
Identifier “Videocard0”
Driver “nv”
VendorName “Videocard vendor”
BoardName “NVIDIA GeForce 2 MX (generic)”
VideoRam 32768
EndSection
Section “Screen”
Identifier “Screen0”
Device “Videocard0”
Monitor “Monitor0”
DefaultDepth 24
SubSection “Display”
Depth 24
Modes “1024x768” “800x600” “640x480”
EndSubSection
EndSection
Section “DRI”
Group 0
Mode 0666
EndSection
Listing 9-1 (continued)
This file contains configuration information for the fonts used by the sys-
tem, the keyboard type and layout, and the video card, monitor, and displays.
There is a section in the file for each of these items. The sections and their uses
are shown in Table 9-1.
Table 9-1 Sections Names and Their Uses
SECTION NAME USED FOR
Files File pathnames for fonts
Server Flags Server Flags
Module Dynamic module loading
(continued)
Managing the X Window System 213
15_599496 ch09.qxd 8/30/05 6:23 PM Page 213
Table 9-1 (continued)
SECTION NAME USED FOR
Input Device Keyboards, mice, and other input devices
Device Video card information
VideoAdapter Not used
Monitor Monitor description
Modes Video mode descriptions
Screen Display configuration
Server Layout General description of the X server
DRI Direct Rendering Infrastructure information
Listing 9-2 is the section listing for the screen section. Each of the sections
follows a similar pattern beginning with the word Section, followed by the
name of the device, then information or configuration details about the device,
and finally ending with EndSection.
Section “Screen”
Identifier “Screen0”
Device “Videocard0”
Monitor “Monitor0”
DefaultDepth 24
SubSection “Display”
Depth 24
Modes “1024x768” “800x600” “640x480”
EndSubSection
EndSection
Listing 9-2 A typical section of the xorg.conf file.
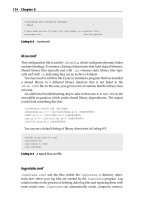
Making changes to the xorg.conf file is easy. For example, to change the
default color depth you just need to change the DefaultDepth number 24
shown in Listing 9-2 to 8, 16, or 32.
The modes line specifies the screen size in pixels that the X server will try to
use in order beginning with the first one. If you wanted to add another screen
resolution, you would enter the information into the Modes line of the display
subsection. For example if you wanted to add 1200 × 1024, you would enter
1200x1024 to the beginning of the Modes line.
NOTE You can toggle through the modes by holding Crtl+Alt and pressing
plus or minus.
214 Chapter 9
15_599496 ch09.qxd 8/30/05 6:23 PM Page 214
Now you know what to do to change the screen section of the
/etc/X11/xorg.conf file. Changing the information in the other sections is
similar.
NOTE Refer to the xorg.conf man pages for a complete description of the
xorg.conf file. The xorg.conf man pages are included with every installation
of Fedora Core or Enterprise Linux and are an excellent resource that provides
great detail about the xorg.conf file. To access the xorg.conf man page type
man xorg.conf at a terminal prompt.
Summary
In this chapter you learned about configuring the X server on your system. First
you looked at using the graphical X configuration tool to make changes to the
X server configuration file. Then you looked at the configuration file itself and
how to change some settings manually. Finally, you learned that the best place
to get complete details about the xorg.conf file is the xorg.conf man pages.
Managing the X Window System 215
15_599496 ch09.qxd 8/30/05 6:23 PM Page 215
15_599496 ch09.qxd 8/30/05 6:23 PM Page 216
217
In this chapter you learn how to successfully configure and manage your sys-
tem printers. Included with Fedora Core and Red Hat Enterprise Linux is the
Printer Configuration tool to help you configure your printing system. The
Printer Configuration tool is an easy-to-use, graphical tool that will help you
to set up whatever type of printer you choose.
After your printer is configured, you might want to gather information
about jobs that you sent to the printer. You will also want to be able to change
print job priority, see the contents of your print queue, and maybe even delete
some of your scheduled print jobs. You will be able to do all these functions
after going through this chapter.
Configuring Printers with the
Printer Configuration Tool
Because the Printing Configuration tool is a graphical-based utility, you can
start it by choosing it from the Applications menu. To start the Printer Config-
uration tool, follow these steps:
1. In Enterprise Linux choose Applications ➪ System Settings ➪ Printing.
In Fedora Core 4 choose Desktop ➪ System Settings ➪ Printing.
Configuring
Printers
IN THIS CHAPTER
■■ Configuring Printers with the Printer Configuration Tool
■■ Editing the Printer Configurations
■■ Managing Print Jobs
CHAPTER
10
16_599496 ch10.qxd 8/30/05 6:22 PM Page 217
NOTE If you aren’t logged in as the root user, the system prompts you for the
root password before you can continue.
2. Type the root password, if necessary. The Printer Configuration tool
opens, as shown in Figure 10-1.
3. Click the New button in the main Printer Configuration tool window.
The window shown in Figure 10-2 appears.
4. Click the Forward button. The Queue Name screen appears, as shown
in Figure 10-3.
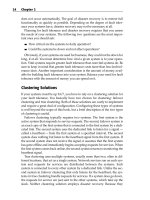
5. Enter a unique name for the printer in the Name text field. Choose a
descriptive name for your printer, and follow these parameters:
■■ The printer name must begin with a letter and can’t contain spaces.
■■ You can use any valid characters for the remainder of the printer
name. The valid characters are lowercase and uppercase letters a
through z, numeral 0 through 9, – (dash), and _ (underscore).
■■ If you want, you can enter a description for the printer in the Short
Description field.
Figure 10-1 The Printer Configuration tool.
Figure 10-2 The Add a new print queue window.
218 Chapter 10
16_599496 ch10.qxd 8/30/05 6:22 PM Page 218
6. When you finish entering a name for your printer, click Forward. The
Queue Type window appears, as shown in Figure 10-4, and the Printer
Configuration tool attempts to detect your printer.
The following sections detail the various possibilities available for configur-
ing your print queue and selecting your print driver.
Configuring the Print Queue
You can configure six types of print queues. A print queue is a directory that
holds the print jobs for the type of printer that you configure to work with the
queue. The print queue is associated with the type of printer that you want to
configure. At the top of the Queue Type window is a drop-down list contain-
ing the six types of print queues that you can configure. The queue type is set
to Locally-Connected by default. If the printer is connected locally — that is, to
either the parallel or the USB port on the PC, and is also recognized — it is
shown in the list.
Figure 10-3 The Queue name window.
Figure 10-4 The Queue type window.
Configuring Printers 219
16_599496 ch10.qxd 8/30/05 6:22 PM Page 219
The following list shows the six types of queue that you can install; to
choose one, select the type that you desire from the drop-down list.
■■ Locally-Connected — A printer attached directly to your computer
through a parallel or USB port. If your printer isn’t listed, click the Cus-
tom Device button, type the name of your printer, and then click OK to
add it to the printer device list. A printer attached to the parallel port is
usually referred to as /dev/lp0. A printer attached to the USB port is
usually referred to as /dev/usblp0.
NOTE When you set up a locally connected printer it is set up as a local CUPS
printer that only the localhost can use. If you want to use the printer on your
local network you need to modify the /etc/cups/cupsd.conf file to allow
other systems on your network to access the printer.
■■ Networked CUPS (IPP) — A printer that can be accessed over a
TCP/IP network. The Common Unix Printing System (CUPS) is based
on the Internet Printing Protocol (IPP), which was created in an attempt
to set some standards for printing over the Internet. If you choose this
type of queue, you need to enter the server name and the path to the
server. Figure 10-5 shows the Networked CUPS queue dialog box.
■■ Networked UNIX (LPD) — A printer attached to a different UNIX sys-
tem that can be accessed over a TCP/IP network (for example, a printer
attached to another Red Hat Linux system on your network). If you
choose this type of queue, you need to enter the server name and path
to the server, as shown in Figure 10-6.
Figure 10-5 The Networked CUPS (IPP) screen is
where you enter the server name and path.
220 Chapter 10
16_599496 ch10.qxd 8/30/05 6:22 PM Page 220
Figure 10-6 Enter the server and queue for a networked UNIX (LPD) printer.
■■ Server — The hostname or IP address of the remote machine to
which the printer is attached.
■■ Queue — The remote printer queue. The default printer queue is
usually lp. By default, the Strict RFC1179 Compliance option is not
chosen. If you are having problems printing to a non-Linux lpd
queue, choose this option to disable enhanced lpr printing features.
LPR is an older printing protocol used by many UNIX systems.
NOTE The remote machine must be configured to allow the local machine to
print on the desired queue. As root, create the file /etc/hosts.lpd on the
remote machine to which the printer is attached. On separate lines in the file,
add the IP address or hostname of each machine that should have printing
privileges.
■■ Networked Windows (SMB) — A printer attached to a different system
that shares a printer over an SMB network (for example, a printer
attached to a Microsoft Windows machine). The Server Message Block
(SMB) protocol is the native protocol that computers running Windows
use to communicate with each other. See Figure 10-7.
On this screen, you see a list of shares from which you can select the
networked Windows printer that you want to use. To the left of the
share name is an arrow that you can click to expand the share listing
and show any configured printers. Figure 10-7 shows the RHL10 share
expanded and also lists three printers. Click the printer that you wish to
use and then click Forward. An Authentication screen appears, as
shown in Figure 10-8.
Configuring Printers 221
16_599496 ch10.qxd 8/30/05 6:22 PM Page 221
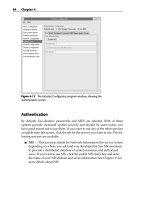
Figure 10-7 Configuring the Networked Windows (SMB) printer screen.
Figure 10-8 The Authentication screen
for connecting to a SMB printer.
Text fields for the following options appear as shown in Figure 10-8:
■■ Workgroup — The name of your Windows workgroup needs to be
entered here.
■■ Server — The name of the print server needs to be entered here.
■■ Share — This is the name of the shared printer on which you want to
print. This name must be the same name defined as the Samba
printer on the remote Windows print server.
■■ User Name — This is the name by which you must log in to access the
printer. This user must exist on the Windows system, and the user
must have permission to access the printer. The default user name is
typically guest for Windows servers or nobody for Samba servers.
■■ Password — The password (if required) for the user specified in the
User Name field.
■■ Networked Novell (NCP) — A printer attached to a different system
that uses the Novell NetWare networking technology. After choosing
this type of queue, you need to enter additional information into the
Queue Type window, as shown in Figure 10-9.
222 Chapter 10
16_599496 ch10.qxd 8/30/05 6:22 PM Page 222
You need to enter information for the following fields in Figure 10-9:
■■ Server — The host name or IP address of the NCP system to which
the printer is attached.
■■ Queue — The remote queue for the printer on the NCP system.
■■ User — The name by which you must log in to access the printer.
■■ Password — The password for the user specified in the User field.
■■ Networked JetDirect — A printer connected directly to the network
through HP JetDirect instead of to a computer. (See Figure 10-10.)
You need to enter the appropriate information for the following text
fields:
■■ Printer — The hostname or IP address of the JetDirect printer.
■■ Port — The port on the JetDirect printer that is listening for print
jobs. The default port is 9100.
Figure 10-9 Configuring a networked Novell (NCP) printer.
Figure 10-10 Configuring a networked JetDirect printer.
Configuring Printers 223
16_599496 ch10.qxd 8/30/05 6:22 PM Page 223
NOTE Whenever you add a new print queue or change an existing one, you
must restart the printer daemon for the changes to take effect. See the
upcoming “Editing the Printer Configuration” section. In case you are
wondering what a daemon is, it means disk and execution monitor. It is
basically a program that runs in the background, waiting for some event to
occur. In this case, the printer daemon is waiting for print jobs.
Selecting the Print Driver
The next step in configuring a printer is to select the print driver. The print dri-
ver processes the data that you want to print into a format that the printer can
understand.
1. After you select the queue type of the printer and enter the required
information, click Forward to go to the Printer Model window, shown
in Figure 10-11.
2. Select the driver from the list.
a. Click the arrow beside the manufacturer for your printer.
b. Find your printer from the expanded list, and then click the arrow
beside the printer’s name. A list of drivers for your printer appears.
The printers are listed by manufacturer.
c. Select one appropriate for your printer. Sometimes you might need
to try several of the listed drivers to find one that works properly.
Figure 10-11 Select the printer manufacturer and model.
224 Chapter 10
16_599496 ch10.qxd 8/30/05 6:22 PM Page 224
NOTE To read more about the print drivers, go to www.linuxprinting.org
/printer_list.cgi. You can select a different print driver after adding a
printer by starting the Printer Configuration tool, selecting the printer from the
list, clicking Edit, clicking the Printer Driver tab, selecting a different print driver,
and applying the changes.
3. Click Forward to go to the printer information confirmation page where
you can verify your printer configuration choices.
a. Click Apply to add the print queue if the settings are correct.
b. Click Back to modify the printer configuration if necessary.
4. Click the Apply button in the main window to save your changes to the
printer configuration file and restart the printer daemon (lpd), or click
Back to modify the printer configuration if necessary. Be sure to test
your configuration by printing a test page.
Editing the Printer Configuration
After adding your printer(s), you can edit settings by selecting the printer from
the printer list after opening the Printer Configuration tool and then clicking
the Edit button. The tabbed window shown in Figure 6-12 appears. The win-
dow contains the current values for the printer that you selected to edit. Make
any changes and click OK. Then click Apply in the main Printer Configuration
tool window to save the changes and restart the printer daemon.
Figure 10-12 The Edit a print queue screen.
Configuring Printers 225
16_599496 ch10.qxd 8/30/05 6:22 PM Page 225
The tabs and what they hold are as follows:
■■ Queue Name — To rename a printer, change the value of Name on the
Queue Name tab. Click OK to return to the main window. The name of
the printer changes in the printer list. Click Apply to save the change
and restart the printer daemon.
■■ Queue Type — The Queue Type tab shows the queue type that you
selected when adding the printer and its settings. You can change the
queue type of the printer or just change the settings. After making mod-
ifications, click OK to return to the main window. Click Apply to save
the changes and restart the printer daemon. Depending on which
queue type you choose, you will see different options. Refer to the sec-
tion of this chapter that describes your particular printer; options
unique to your printer are listed there.
■■ Queue Options — From the Queue Options tab, you can select banner
pages before and after your print job. You can also set the printable area
of the page. To modify filter options, highlight the option and click Edit
to modify or click Delete to remove it. Click OK to accept your changes
and return to the main window. Click Apply to save the change and
restart the printer daemon.
■■ Printer Driver — The Printer Driver tab shows which print driver is
currently being used. This is the same list that you use when you add
the printer. If you change the print driver, click OK to accept your
changes and return to the main window. Then click Apply to restart the
printer daemon.
■■ Driver Options — The Driver Options tab displays advanced printer
options. Options vary for each print driver. Common options include:
■■ Select Send Form-Feed (FF) if the last page of your print job is not
ejected from the printer (for example, the form feed light flashes). If
selecting this option does not force the last page out of the printer,
try selecting Send End-of-Transmission (EOT) instead. Some printers
require both Send Form-Feed (FF) and Send End-of-Transmission
(EOT) to eject the last page.
■■ Select Send End-of-Transmission (EOT) if sending a form feed does
not work. Refer to the preceding bullet on the Send Form-Feed (FF)
option.
■■ Select Assume Unknown Data Is Text if your print driver does not
recognize some of the data sent to it. Select it only if you are having
problems printing. If this option is selected, the print driver assumes
that any data it cannot recognize is text and tries to print it as text. If
you select this option and the Convert Text to PostScript option, the
226 Chapter 10
16_599496 ch10.qxd 8/30/05 6:22 PM Page 226
print driver assumes that the unknown data is text and then con-
verts it to PostScript.
■■ Select Prerender PostScript if you are trying to print characters out-
side of the basic ASCII character set (such as foreign language char-
acters) that won’t print correctly. If your printer doesn’t support the
fonts you are trying to print, try selecting this option. You should
also select this option if your printer cannot handle PostScript level 3.
This option converts it to PostScript level 1.
■■ Convert Text to PostScript is selected by default. If your printer can
print plain text, try deselecting this when printing plain-text docu-
ments to decrease the time it takes to print.
■■ Page Size allows you to select the paper size for your printer, such as
US Letter, US Legal, A3, and A4.
■■ Effective Filter Locale defaults to C. If you are printing Japanese
characters, select ja_JP. Otherwise, accept the default of C.
■■ Media Source defaults to Printer default. Change this option to use
paper from a different tray.
If you modify the driver options, click OK to return to the main window.
Then click Apply to save the changes and restart the printer daemon.
Deleting a Printer
To delete an existing printer, select the printer and click the Delete button on
the toolbar. The printer will be removed from the printer list. Click Apply to
save the changes and restart the printer daemon.
Setting the Default Printer
To set the default printer, select the printer from the printer list and click the
Default button on the toolbar. The default printer icon appears in the first col-
umn of the printer list beside the default printer.
Managing Print Jobs
Whenever you print a document or image, the Print Notifier automatically
opens and an icon appears on the panel at the top of the desktop. See Figure
10-13 to find out what the icon looks like.
You can open the Print Notifier by clicking the panel icon to open the win-
dow shown in Figure 10-14.
Configuring Printers 227
16_599496 ch10.qxd 8/30/05 6:22 PM Page 227
Figure 10-13 The Print Notifier icon on the top panel.
Figure 10-14 The Print Notifier window.
You can see a list of your print jobs and their status. You can choose a job by
clicking it and then either right-click or choose Edit from the top menu. This
will let you pause the selected job, delete the selected job, or resume printing a
previously paused job.
Summary
In this chapter you learned about the Printer Configuration tool. With this tool
you can configure many different types of printers for use on your system. You
saw the procedure to add a printer, select a print queue, and choose the proper
driver for your printer. You also learned how to modify an existing printer
configuration and manage jobs that you sent to the printer.
228 Chapter 10
16_599496 ch10.qxd 8/30/05 6:22 PM Page 228