Red Hat Linux Networking , System Administration (P12) ppsx
Bạn đang xem bản rút gọn của tài liệu. Xem và tải ngay bản đầy đủ của tài liệu tại đây (1.3 MB, 30 trang )
■■ Hide filesystems beneath — This option corresponds to the hide
option listed in Table 12-1.
■■ Export only if mounted — This option corresponds to the mp[=path]
option listed in Table 12-1. Selecting this option is equivalent to specify
the mp mount option with out the optional path mount point.
■■ Optional mount point — This option corresponds to the path portion
of the mp[=path] option listed in Table 12-1. You can type the mount
point, if you want to specify on, the text box or use the Browse button
to select the mount point graphically.
■■ Set explicit Filesystem ID — This option corresponds to the fsid=n
option listed in Table 12-1. Enter the actual FSID value in the text box.
Figure 12-4 shows the General Options tab. We have disabled subtree check-
ing for /home and left the required sync option (Sync write operations on
request) enabled.
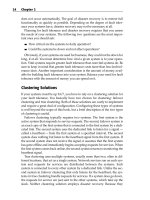
The User Access tab, shown in Figure 12-5, implements the UID/GID
remapping and root-squashing options described earlier in this chapter. Select
the Treat remote root user as local root user check box if you want the equiva-
lent of no_root_squash. To remap all UIDs and GIDs to the UID and GID of
the anonymous user (the all_squash option from Table 12-1), select the Treat
all client users as anonymous users check box. As you might guess, if you want
to specify the anonymous UID or GID, click the corresponding check boxes to
enable these options and then type the desired value in the matching text
boxes. In Figure 12-5, all clients will be remapped to the anonymous user.
Figure 12-5 shows the User Access Tab as it appears in Fedora Core; it looks
slightly different in RHEL.
Figure 12-4 The General Options tab.
294 Chapter 12
18_599496 ch12.qxd 8/30/05 6:42 PM Page 294
Figure 12-5 The User Access tab.
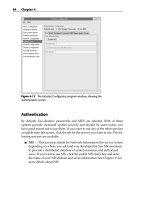
When you have finished configuring your new NFS export, click the OK
button to close the Add NFS Share dialog box. After a short pause, the new
NFS share appears in this list of NFS exports, as shown in Figure 12-6. If you
want to change the characteristics of an NFS share, select the share you want
to modify and click the Properties button on the toolbar. This will open the
Edit NFS Share dialog box, which has the same interface as the Add NFS Share
dialog box.
Similarly, if you want to remove an NFS share, select the export you want to
cancel and click the Delete button. To close the NFS Server Configuration tool,
type Ctrl+Q or click File ➪ Quit on the menu bar.
Figure 12-6 Adding an NFS share.
The Network File System 295
18_599496 ch12.qxd 8/30/05 6:42 PM Page 295
Configuring an NFS Client
Configuring client systems to mount NFS exports is simpler than configuring
the NFS server itself. This section of the chapter provides a brief overview of
client configuration, identifies the key files and commands involved in config-
uring and mounting NFS exported file systems, and shows you how to con-
figure a client to access the NFS exports configured in the previous section.
Configuring a client system to use NFS involves making sure that the
portmapper and the NFS file locking daemons statd and lockd are avail-
able, adding entries to the client’s /etc/fstab for the NFS exports, and
mounting the exports using the mount command.
As explained at the beginning of the chapter, a mounted NFS exported file
system is functionally equivalent to a local file system. Thus, as you might
expect, you can use the mount command at the command line to mount NFS
exports manually, just as you might mount a local file system. Similarly, to
mount NFS exports at boot time, you just add entries to the file system mount
table, /etc/fstab. As you will see in the section titled “Using Automount
Services” at the end of this chapter, you can even mount NFS file systems auto-
matically when they are first used, without having to mount them manually.
The service that provides this feature is called, yup, you guessed it, the auto-
mounter. More on the automounter in a moment.
As a networked file system, NFS is sensitive to network conditions, so the
NFS client daemons accept a few options, passed via the mount command,
address NFS’s sensitivities and peculiarities. Table 12-4 lists the major NFS-
specific options that mount accepts. For a complete list and discussion of all
NFS-specific options, see the NFS manual page (man nfs).
Table 12-4 NFS-Specific Mount Options
OPTION DESCRIPTION
bg Enables mount attempts to run in the background if the first
mount attempt times out (disable with nobg).
fg Causes mount attempts to run in the foreground if the first
mount attempt times out, the default behavior (disable with
nofg).
hard Enables failed NFS file operations to continue retrying after
reporting “server not responding” on the system, the default
behavior (disable with nohard).
intr Allow signals (such as Ctrl+C) to interrupt a failed NFS file
operation if the file system is mounted with the hard option
(disable with nointr). Has no effect unless the hard
option is also specified or if soft or nohard is specified.
296 Chapter 12
18_599496 ch12.qxd 8/30/05 6:42 PM Page 296
Table 12-4 (continued)
OPTION DESCRIPTION
lock Enables NFS locking and starts the statd and lockd
daemons (disable with nolock).
mounthost=name Sets the name of the server running mountd to name.
mountport=n Sets the mountd server port to connect to n (no default).
nfsvers=n Specify the NFS protocol version to use, where n is 1, 2, 3,
or 4.
port=n Sets the NFS server port to which to connect to n (the
default is 2049).
posix Mount the export using POSIX semantics so that the POSIX
pathconf command will work properly.
retry=n Sets the time to retry a mount operation before giving up to
n minutes (the default is 10,000).
rsize=n Sets the NFS read buffer size to n bytes (the default is
1024); for NFSv4, the default value is 8192.
soft Allows an NFS file operation to fail and terminate (disable
with nosoft).
tcp Mount the NFS file system using the TCP protocol (disable
with notcp).
timeo=n Sets the RPC transmission timeout to n tenths of a second
(the default is 7). Especially useful with the soft mount
option.
udp Mount the NFS file system using the UDP protocol, the
default behavior (disable with noupd).
wsize=n Sets the NFS write buffer size to n bytes (the default is
1024); for NFSv4, the default value is 8192.
The options you are most likely to use are rsize, wsize, hard, intr, and
nolock. Increasing the default size of the NFS read and write buffers
improves NFS’s performance. The suggested value is 8192 bytes, that is,
rsize=8192 and wsize=8192, but you might find that you get better per-
formance with larger or smaller values. The nolock option can also improve
performance because it eliminates the overhead of file locking calls, but not all
servers support file locking over NFS. If an NFS file operation fails, you can
use a keyboard interrupt, usually Ctrl+C, to interrupt the operation if the
exported file system was mounted with both the intr and hard options. This
prevents NFS clients from hanging.
The Network File System 297
18_599496 ch12.qxd 8/30/05 6:42 PM Page 297
Like an NFS server, an NFS client needs the portmapper running in order to
process and route RPC calls and returns from the server to the appropriate
port and programs. Accordingly, make sure that the portmapper is running on
the client system using the portmap initialization script:
# service portmap status
If the output says portmap is stopped (it shouldn’t be), start the
portmapper:
# service portmap start
To use NFS file locking, both an NFS server and any NFS clients need to run
statd and lockd. As explained in the section on configuring an NFS server,
the simplest way to accomplish this is to use the initialization script, /etc
/rc.d/init.d/nfslock. Presumably, you have already started nfslock
on the server, so all that remains is to start it on the client system:
# service nfslock start
Once you have configured the mount table and started the requisite dae-
mons, all you need to do is mount the file systems. You learned about the
mount command used to mount file systems in a previous chapter, so this sec-
tion shows only the mount invocations needed to mount NFS file systems.
During initial configuration and testing, it is easiest to mount and unmount
NFS export at the command line. For example, to mount /home from the
server configured at the end of the previous section, execute the following
command as root:
# mount -t nfs bubba:/home /home
You can, if you wish, specify client mount options using mount’s -o argu-
ment, as shown in the following example.
# mount -t nfs bubba:/home /home -o rsize=8292,wsize=8192,hard,intr,nolock
After satisfying yourself that the configuration works properly, you probably
want to mount the exports at boot time. Fortunately, Fedora Core and RHEL
make this easy because the initialization script /etc/rc.d/init.d/netfs,
which runs at boot time, automatically mounts all networked file systems not
configured with the noauto option, including NFS file systems. It does this by
parsing /etc/fstab looking for file systems of type nfs, nfs4 (described in
the next section), smbfs (Samba) cifs (Common Internet Filesystem) or
ncpfs (Netware) and mounting those file systems.
298 Chapter 12
18_599496 ch12.qxd 8/30/05 6:42 PM Page 298
TIP If you are connecting an NFSv4 client to an NFSv2 server, you must use
the mount option nfsvers=2 or the mount attempt will fail. Use nfsvers=1
if you are connecting to an NFSv1 server. We learned this the hard way while
trying to mount an export from an ancient server running Red Hat Linux 6.2
(we told you it was ancient). We kept getting an error indicating the server was
down when we knew it wasn’t. Finally, we logged into the server, discovered
it was running a very old distribution and were able to mount the export.
While we’re somewhat embarrassed to be running such an old version of Red
Hat, we’re also quite pleased to report that it has been running so well for so
long that we forgot just how old it was.
Configuring an NFSv4 Client
The introduction of NFSv4 into the kernel added some NFSv4-specific behav-
ior of which you need to be aware and changed some of the mount options.
This section covers NFSv4-specific features and begins with the mount options
that have changed in terms of their meaning or behavior. Table 12-5 lists the
new or changed mount options.
The two new options listed in Table 12-5 are clientaddr and proto. Ver-
sion 3 of NFS introduced NFS over TCP, which improved NFS’s reliability over
the older UDP-based implementation. Under NFSv3, you would use the mount
option tcp or udp to specify to the client whether you wanted it to use TCP or
UDP to communicate with the server. NFSv4 replaces tcp and udp with a sin-
gle option, proto= that accepts two arguments: tcp or udp. In case it isn’t
clear, the NFSv3 option tcp is equivalent to the NFSv4 option proto=tcp.
Figuring out the udp option is left as an exercise for the reader.
Table 12-5 NFSv4-Specific Mount Options
OPTION DESCRIPTION
clientaddr=n Causes a client on a multi-homed system to use the IP address
specified by n to communicate with an NFSv4 server.
proto=type Tells the client to use the network protocol specified by type,
which can be tcp or udp (the default is udp); this option
replaces the tcp and udp options from earlier versions of NFS.
rsize=n Sets the read buffer size to n bytes (the default for NFSv4 is
8192); the maximum value is 32678.
sec=mode Set the security model to mode, which can be sys, krb5,
krb5i, or krb5p.
wsize=n Sets the write buffer size to n bytes (the default for NFSv4 is
8192); the maximum value is 32678.
The Network File System 299
18_599496 ch12.qxd 8/30/05 6:42 PM Page 299
The semantics for the rsize and wsize options have changed with NFSv4.
The default buffer size is for NFSv4 is 8192 bytes, but it can grow to as large
and 32,678 bytes, which should result in a noticeable performance improve-
ment, especially when you are transferring large files. The buffer setting is
only a suggestion, however, because the client and server negotiate the buffer
size to select an optimal value according to network conditions.
Strictly speaking, the sec option for selecting the security model NFS uses
isn’t new with NFSv4. It existed in NFSv3, but now that NFSv4 has added
strong encryption to the core NFS protocol, using this option is worthwhile. As
shown in Table 12-5, legal values for the sec option are sys, krb5, krb5i,
and krb5p. sys, the default security model, uses standard Linux UIDs and
GIDs to authenticate NFS transactions. krb5 uses Kerberos 5 to authenticate
users but takes no special measures to validate NFS transactions; krb5i (Ker-
beros 5 with integrity checking) uses Kerberos 5 to authenticate users and
checksums to enforce the data integrity on NFS transactions; krb5p (Kerberos
5 with privacy checking) uses Kerberos 5 to authenticate users and encryption
to protect NFS transactions against packet sniffing. You can use the various
Kerberos-enabled security models only if the NFS server supports both NFSv4
and the requested security model.
Example NFS Client
The example in this section demonstrates how to mount /home and /usr
/local from the NFS server configured earlier in the chapter.
1. Clients that want to use both exports need to have the following entries
in /etc/fstab:
bubba:/usr/local /usr/local nfs
rsize=8192,wsize=8192,hard,intr,nolock 0 0
bubba:/home /home nfs
rsize=8192,wsize=8192,hard,intr,nolock 0 0
The hostname used on the left side of the colon, bubba, must resolve to
an IP address either using DNS or an entry in the /etc/hosts file. We
don’t recommend using an IP address because, in a well-run system, IP
addresses can change, whereas a hostname won’t. If DNS is properly
configured and maintained, the hostname will always point to the proper
system regardless of what that system’s IP address is at any given time.
2. If it isn’t already running, start the portmapper using the following
command:
# service portmap start
Starting portmapper: [ OK ]
300 Chapter 12
18_599496 ch12.qxd 8/30/05 6:42 PM Page 300
3. Mount the exports using one of the following commands:
# mount –a –t nfs
or
# mount /home /usr/local
or
# service netfs start
The first command mounts all (-a) file systems of type nfs (-t nfs).
The second command mounts only the file systems /home and
/usr/local (for this command to work, the file systems you want to
mount must be listed in /etc/fstab). The third command uses the
service command to mount all network file systems using by invok-
ing the netfs service. Verify that the mounts completed successfully
by attempting to access files on each file system. If everything works as
designed, you are ready to go.
If all the preceding seems unnecessarily tedious, it only seems that way
because it is more involved to explain how to set up an NFS client than it is
actually to do it. Once you’ve done it a couple of times, you’ll be able to dazzle
your friends and impress your coworkers with your wizardly mastery of NFS.
You can really wow them after reading the next section, which shows you how
to avoid the tedium by using the automounter to mount file systems automat-
ically the first time you use them.
Using Automount Services
The easiest way for client systems to mount NFS exports is to use autofs, which
automatically mounts file systems not already mounted when the file system is
first accessed. autofs uses the automount daemon to mount and unmount file
systems that automount has been configured to control. Although slightly more
involved to configure than the other methods for mounting NFS file systems,
autofs setup has to be done only once. In the next chapter, you’ll even learn how
to distribute automounter configuration files from a central server, obviating
the need to touch client systems manually at all.
autofs uses a set of map files to control automounting. A master map file,
/etc/auto.master, associates mount points with secondary map files. The
secondary map files, in turn, control the file systems mounted under the cor-
responding mount points. For example, consider the following /etc/auto
.master autofs configuration file:
/home /etc/auto.home
/var /etc/auto.var timeout 600
The Network File System 301
18_599496 ch12.qxd 8/30/05 6:42 PM Page 301
This file associates the secondary map file /etc/auto.home with the
mount point /home and the map file /etc/auto.var with the /var mount
point. Thus, /etc/auto.home defines the file systems mounted under
/home, and /etc/auto.var defines the file systems mounted under /var.
Each entry in /etc/auto.master, what we’ll refer to as the master map file,
consists of at least two and possibly three fields. The first field is the mount
point. The second field identifies the full path to the secondary map file that
controls the map point. The third field, which is optional, consists of options
that control the behavior of the automount daemon.
In the example master map file, the automount option for the /var mount
point is timeout 600, which means that after 600 seconds (10 minutes) of
inactivity, the /var mount point will be umounted automatically. If a timeout
value is not specified, it defaults to 300 seconds (5 minutes).
The secondary map file defines the mount options that apply to file systems
mounted under the corresponding directory. Each line in a secondary map file
has the general form:
localdir [-[options]] remotefs
localdir refers to the directory beneath the mount point where the NFS
mount will be mounted. remotefs specifies the host and pathname of the NFS
mount. remotefs is specified using the host:/path/name format described in the
previous section. options, if specified, is a comma-separated list of mount
options. These options are the same options you would use with the mount
command.
Given the entry /home /etc/auto.home in the master map file, consider
the following entries in /etc/auto.home:
kurt -rw,soft,intr,rsize=8192,wsize=8192 luther:/home/kurt
terry luther:/home/terry
In the first line, localdir is kurt, options is -rw,soft,intr,rsize=8192,
wsize=8192, and remotefs is luther:/home/kurt. This means that the NFS
export /home/kurt on the system named luther will be mounted in /home
/kurt in read-write mode, as a soft mount, with read and write buffer sizes of
8192 bytes. A key point to keep in mind is that if /home/kurt exists on the
local system, its contents will be temporarily replaced by the contents of the
NFS mount /home/kurt. In fact, it is probably best if the directory specified
by localdir does not exist because autofs dynamically creates it when it is
first accessed.
The second line of the example auto.home file specifies localdir as terry,
no options, and remotefs as the NFS exported directory /home/terry exported
from the system named luther. In this case, then, /home/terry on luther
will be mounted as /home/terry on the NFS client using the default NFS
302 Chapter 12
18_599496 ch12.qxd 8/30/05 6:42 PM Page 302
mount options. Again, /home/terry should not exist on the local system, but
the base directory, /home, should exist.
Suppose that you want to use autofs to mount a shared projects directory
named /proj on client systems on the /projects mount point. On the NFS
server (named diskbeast in this case), you would export the /proj as described
in the section “Configuring an NFS Server.” On each client that will mount this
export, create an /etc/auto.master file that resembles the following:
/projects /etc/auto.projects timeout 1800
This entry tells the automount daemon to consult the secondary map file
/etc/auto.projects for all mounts located under /projects. After 1800
seconds without file system activity in /projects, autofs will automati-
cally unmount it.
NOTE If the autofs RPM is installed, Fedora Core and RHEL systems provide a
default /etc/auto.master map file. All of the entries are commented out
using the # sign, so you can edit the existing file if you wish.
Next, create the following /etc/auto.projects file on each client that
will use diskbeast’s export:
code -rw,soft,rsize=8192,wsize=8192 diskbeast:/proj
This entry mounts /proj from mailbeast as /projects/code on the
client system. The mount options indicate that the directory will be
read/write, that it will be a soft mount, and that the read and write block sizes
are 8192 bytes. Recall from Table 12-4 that a soft mount means that the kernel
can time out the mount operation after a period of time specified by the
timeo=n option, where n is defined in tenths of a second.
Finally, as the root user, start the autofs service:
# /sbin/service autofs start
Starting automount: [ OK ]
After starting the autofs service, you can use the status option to verify
that the automount daemon is working:
# /sbin/service autofs status
Configured Mount Points:
/usr/sbin/automount timeout 600 /projects file /etc/auto.projects
Active Mount Points:
/usr/sbin/automount timeout 600 /projects file /etc/auto.projects
The Network File System 303
18_599496 ch12.qxd 8/30/05 6:42 PM Page 303
As you can see under the heading Active Mount Points, the /projects
mount point is active. You can verify this by changing to the /projects/code
directory and executing an ls command:
# cd /projects/code
# ls
3c501.c atp.c fmv18x.c net_init.c smc9194.c
3c503.c au1000_eth.c gmac.c ni5010.c smc-mca.c
3c505.c auto_irq.c gt96100eth.c ni52.c smc-
ultra32.c
3c507.c bagetlance.c hamachi.c ni65.c smc-ultra.c
3c509.c bmac.c hp100.c ns83820.c sonic.c
You can also see the automount daemon at work by using the mount
command:
# mount -t autofs
automount(pid11081) on /projects type autofs
(rw,fd=4,pgrp=11081,minproto=2,maxproto=4)
# mount -t nfs
diskbeast:/proj on /projects/code type nfs
(rw,soft,rsize=8192,wsize=8192,nfsvers=2,addr=192.168.0.1)
Using mount’s -t option limits the output to file systems of the specified
type, autofs for automounted file systems, and nfs for NFS file systems.
The first output line shows that automount is managing the /projects file
system; the second line shows that the automount-managed file system has
mounted the NFS file system diskbeast:/proj on /projects using the
options specified in /etc/auto.projects.
To stop the automounter, use the service script’s stop argument:
# /sbin/service autofs stop
Stopping automount: [ OK ]
One of the handiest features of the autofs service is that changes made to
the secondary map files go into effect almost immediately. The next time that
a directory or file system managed by autofs is accessed, the automounter
rereads the secondary map files. So, changes to the secondary map files do not
require any special treatment. However, if you modify the master map file,
you have to reload the configuration file using the following command:
/sbin/service autofs reload
304 Chapter 12
18_599496 ch12.qxd 8/30/05 6:42 PM Page 304
Examining NFS Security
As explained at the beginning of the chapter, NFS protocol versions 3 and older
have some inherent security problems that make it unsuitable for use across the
Internet and potentially unsafe for use even in a trusted network. This section
identifies key security issues of NFS in general and the security risks specific to
an NFS server and to NFS clients and suggests remedies that minimize your
network’s exposure to these security risks. Be forewarned, however, that no list
of security tips, however comprehensive, makes your site completely secure.
Nor will plugging possible NFS security holes address other potential exploits.
General NFS Security Issues
One NFS weakness, in general terms, is the /etc/exports file. If a cracker is
able to spoof or take over a trusted address, an address listed in /etc/exports,
your exported NFS mounts are accessible. Another NFS weak spot is normal
Linux file system access controls that take over once a client has mounted an
NFS export: Once an NFS export has been mounted, normal user and group per-
missions on the files take over access control.
The first line of defense against these two weaknesses is to use host access
control as described earlier in the chapter to limit access to services on your
system, particularly the portmapper, which has long been a target of exploit
attempts. Similarly, you should add entries in /etc/hosts.deny lockd,
statd, mountd, and rquotad.
More generally, judicious use of IP packet firewalls, using netfilter, dra-
matically increases NFS server security. netfilter is stronger than NFS dae-
mon-level security or even TCP Wrappers because it restricts access to your
server at the packet level. Although netfilter is described in detail in Chap-
ter 34, this section gives you a few tips on how to configure a netfilter fire-
wall that plays nicely with NFS.
First, you need to know the ports and services NFS uses so that you know
where to apply the packet filters. Table 12-6 lists the ports and protocols each
NFS daemon (on both the client and server side) use.
Table 12-6 NFS Ports and Network Protocols
SERVICE PORT PROTOCOLS
portmap 111 TCP, UDP
nfsd 2049 TCP, UDP
mountd variable TCP, UDP
(continued)
The Network File System 305
18_599496 ch12.qxd 8/30/05 6:42 PM Page 305
Table 12-6 (continued)
SERVICE PORT PROTOCOLS
lockd variable TCP, UDP
statd variable TCP, UDP
rquotad variable UDP
NOTE Before NFSv4, NFS over TCP was experimental on the server side, so
most administrators used UDP on the server. However, TCP is quite stable on
NFS clients. Nevertheless, using packet filters for both protocols on both the
client and the server does no harm. NFSv4’s server-side TCP code is much more
stable than NFSv3, so it is safe for deployment in a production environment.
Note that mountd, lockd, statd, and rquotad do not bind to any specific
port; that is, they use a port number assigned randomly by the portmapper
(which is one of portmapper’s purposes in the first place). The best way to
address this variability is to assign each daemon a specific port using the
portmapper’s -p option and then to apply the packet filter to that port.
Regardless of how you configure your firewall, you must have the following
rule:
iptables -A INPUT -f -j ACCEPT
This rule accepts all packet fragments except the first one (which is treated
as a normal packet) because NFS does not work correctly unless you let frag-
mented packets through the firewall. Be sure to read Chapter 34 carefully to
configure your NFS server’s firewall properly.
Server Security Considerations
On the server, always use the root_squash option in /etc/exports. NFS
helps you in this regard because root squashing is the default, so you should
not disable it (with no_root_squash) unless you have an extremely com-
pelling reason to do so, such as needing to provide boot files to diskless clients.
With root squashing in place, the server substitutes the UID of the anonymous
user for root’s UID/GID (0), meaning that a client’s root account cannot change
files that only the server’s root account can change.
The implication of root squashing might be unclear, so we’ll make it explicit:
all critical binaries and files should be owned by root, not bin, wheel, adm or
another non-root account. The only account that an NFS client’s root user cannot
access is the server’s root account, so critical files owned by root are much less
exposed than if they are owned by other accounts.
306 Chapter 12
18_599496 ch12.qxd 8/30/05 6:42 PM Page 306
It gets better, though. Consider the situation in which a user has root access
on a system. In this case, exporting file systems using the all_squash option
might be worth considering. A user with root access on a client can usually su
to any user, and that UID will be used over NFS. Without all_squash, a com-
promised client can at least view and, if the file system is mounted read-write,
update files owned by any user besides root if root_squash is enabled. This
security hole is closed if the all_squash option is used.
NFS also helps you maintain a secure server through the secure mount
option; because this mount option is one of the default options mountd
applies to all exports unless explicitly disabled using the insecure option.
Ports 1–1024 are reserved for root’s use; merely mortal user accounts cannot
bind these ports. Thus, ports 1–1024 are sometimes referred to as privileged or
secure ports. The secure option prevents a malevolent nonroot user from ini-
tiating a spoofed NFS dialog on an unprivileged port and using it as a launch
point for exploit attempts.
Client Security Considerations
On the client, disable SUID (set UID) root programs on NFS mounts using the
nosuid option. The nosuid mount option prevents a server’s root account
from creating an SUID root program on an exported file system, logging in to
the client as a normal user, and then using the UID root program to become
root on the client. In some cases, you might also disable binaries on mounted
file systems using the noexec option, but this effort almost always proves to
be impractical or even counterproductive because one of the benefits of NFS is
sharing file systems, such as /usr or /usr/local, that contain scripts or pro-
grams that need to be executed.
TIP You might not want to use nosuid if you are sharing system binary
directories, because many things in /bin and /usr/bin will break if they are
not SUID.
NFS versions 3 and 4 support NFS file locking. Accordingly, NFS clients
must run statd and lockd in order for NFS file locks to function correctly.
statd and lockd, in turn, depend on the portmapper, so consider applying
the same precautions for portmap, statd, and lockd on NFS clients that
were suggested for the NFS server.
In summary, using TCP wrappers, the secure, root_squash, and nosuid
options, and sturdy packet filters can increase the overall security of your NFS
setup. However, NFS is a complex, nontrivial subsystem, so it is entirely con-
ceivable that new bugs and exploits will be discovered.
The Network File System 307
18_599496 ch12.qxd 8/30/05 6:42 PM Page 307
Summary
In this chapter, you learned to configure NFS, the Network File System. First,
you found a general overview of NFS, its typical uses, and its advantages and
disadvantages. Next, you found out how to configure an NFS server, you iden-
tified key files and commands to use, and you saw the process with a typical
real-world example. With the server configured and functioning, you then
learned how to configure a client system to access NFS exported file systems,
again using key configuration files and commands and simulating the proce-
dure with a representative example. You also learned how to address NFS per-
formance problems and how to troubleshoot some common NFS errors. The
chapter’s final section identified potential security problems with NFS and
suggested ways to mitigate the threat.
308 Chapter 12
18_599496 ch12.qxd 8/30/05 6:42 PM Page 308
309
The Network
Information System
IN THIS CHAPTER
■■ Understanding NIS
■■ Planning an NIS Installation
■■ Configuring an NIS Server
■■ Configuring an NIS Client
■■ Using NIS and NFS Together
A common challenge facing administrators charged with maintaining a net-
work of Linux machines is sharing information across the network while main-
taining that information centrally. The Network Information Service (NIS) is
one solution to such a challenge. This chapter describes NIS and explains how
to configure an NIS server and an NIS client. You’ll also learn how to integrate
NIS and NFS, which can significantly simplify administering a large or geo-
graphically dispersed network.
Understanding NIS
NIS distributes information that needs to be shared throughout a Linux net-
work to all machines that participate in the NIS domain. Originally developed
by Sun Microsystems, NIS was first known as Yellow Pages (YP), so many
NIS-related commands begin with the letters yp, such as ypserv, ypbind,
and yppasswd. Unfortunately for Sun, the phrase “Yellow Pages” was (and is)
a registered trademark of British Telecom in the United Kingdom, so Sun
changed the name of their Yellow Pages services to Network Information Ser-
vice. Despite the name change, however, the NIS suite of utilities retained the
yp prefixes because administrators had become accustomed to them.
CHAPTER
13
19_599496 ch13.qxd 8/30/05 6:24 PM Page 309
The information most commonly shared using NIS consists of user authen-
tication information, such as /etc/passwd and /etc/group. If users’ pass-
word entries are accessible to all login hosts via NIS, any user can log in on any
login host on the network that is running an NIS client. However, sharing
authentication information is far from the only use for NIS; any information
that needs to be distributed across a network and that can or should be cen-
trally administered is a viable candidate for sharing via NIS. For instance, you
can use NIS to distribute a company telephone directory or a listing of
accounting codes. One of the examples in this chapter shows you how to dis-
tribute NFS automounter configuration files using NIS, which eliminates the
need to edit automount files individually on each NFS client system.
Like NFS, NIS uses a standard client-server architecture that can be arrayed
in one of several possible configurations. Each NIS domain must have at least
one NIS server. An NIS server is a centrally administered repository for infor-
mation shared across the network using NIS. NIS clients are programs that use
NIS to query designated servers for information that is stored in the servers’
databases, which are known as maps. NIS maps are stored in DBM format, a
binary file format derived from simple ASCII text files. For example, the files
/etc/passwd and /etc/group can be converted directly to DBM databases
using an ASCII-to-DBM conversion program named makedbm.
NOTE Do not be confused by the use of the word database. As used in this
chapter, database refers to a centralized store of information, not to refer to
relational database management systems (RDBMSs) such as Oracle, PostgreSQl,
or MySQL.
NIS servers can be further subdivided into master and slave servers. A mas-
ter server maintains the authoritative copies of the NIS maps. A slave server
maintains copies of the maps, which it receives from the master. If the maps on
the master server change, the slaves receive updated copies. Slave servers
receive copies of the DBM databases, not the ASCII source files. The yppush
program notifies slave servers of changes to the NIS maps, and then the slaves
automatically retrieve the updated maps in order to synchronize their data-
bases with the master. The purpose of slave servers is to provide redundancy.
On a busy network, slave servers can reduce the load on the master server.
More importantly, if the master server becomes unavailable for some reason,
slave servers can function as backup servers until the master is again available.
NIS revolves around the notion of a domain. An NIS domain is a unique
name that refers to any group of systems that use the same NIS maps. NIS
domains function as system management tools providing a convenient method
to organize groups of systems that need to access the same information set into
310 Chapter 13
19_599496 ch13.qxd 8/30/05 6:24 PM Page 310
a logical unit. NIS does not impose any physical restrictions on the make-up of
a domain. While an NIS domain might consist of hosts on a single subnet or
contain all of the systems in a single office or building, it doesn’t necessarily
need to. At one place where Kurt worked, an NIS domain for the engineering
group included hosts in both the United States and Germany.
Likewise, do not confuse an NIS domain with an Internet or DNS domain.
A DNS name (more specifically, a fully qualified domain name, or FQDN) is
the official name that uniquely identifies a system to the Internet domain name
system. In fact, although doing so is common practice, most NIS experts rec-
ommend not naming an NIS domain with the same name used in a DNS name
or FQDN because such a naming convention is potentially confusing and
makes it trivially easy for crackers to guess the name of your NIS domain. So,
if your domain name is possumholler.com, avoid the temptation to name
your NIS domain possumholler.
Before you proceed, make sure you have the NIS programs installed. For a
complete installation, you need the following three packages:
■■ ypbind
■■ ypserv
■■ yp-tools
Planning an NIS Installation
Four NIS topologies are commonly used:
■■ A single domain with a master server, no slave servers, and one or more
clients. (See Figure 13-1.)
■■ A single domain with a master server, one or more slave servers, and
one or more clients. (See Figure 13-2.)
■■ Multiple domains, each with its own master server, no slave servers,
and one or more clients. (See Figure 13-3.)
■■ Multiple domains, each with its own master server, one or more slave
servers, and one or more clients. (See Figure 13-4.)
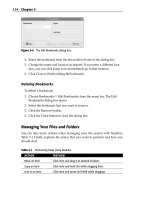
The single domain configurations are the most widely used. Figure 13-1
illustrates a typical single-domain/single-server configuration. The NIS
domain name is admin. A single master server, admin-master, responds to all
queries from NIS clients (client-1, client-2, and client-3) and is the sole source
of information for the domain.
The Network Information System 311
19_599496 ch13.qxd 8/30/05 6:24 PM Page 311
Figure 13-1 A single-domain/single-server NIS configuration.
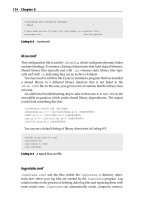
Figure 13-2 shows the single-domain/multiple-server configuration. The
admin domain shown in Figure 13-1 has a slave server, admin-slave, in addi-
tion to the master server, admin-master. In the modified configuration, client-1
and client-2 continue to query the master server, but client-3 communicates
with the slave server when performing NIS queries. client-3 has not been con-
figured specifically to communicate with admin-slave. Rather, client-3 sends
out NIS broadcast messages to any listening server in its domain and accepts
replies from any server authoritative for that domain — the server that “wins”
is the server that replies first, whether it is a master or a slave.
At large sites or in complicated networks, you might find it necessary to cre-
ate multiple NIS domains. Figures 13-3 and 13-4 illustrate such configurations.
Figure 13-3 shows two domains, admin and devel, each with its own master
server, admin-master and devel-master. Clients in the admin domain (client-1,
client-2, and client-3) communicate only with the admin-master server, and
clients in the devel domain (client-4, client-5, and client-6) communicate only
with devel-master.
Figure 13-4 illustrates the same setup as Figure 13-3, except that each
domain has a slave server, admin-slave and devel-slave, and some of the
clients in each domain communicate with the slave servers rather than with
the master. As in the single-server example, any given client communicates
with the server for its domain that responds the fastest to a broadcast query.
admin
admin-master
client-1 client-2 client-3
312 Chapter 13
19_599496 ch13.qxd 8/30/05 6:24 PM Page 312
Figure 13-2 A single-domain/multiple-server NIS configuration.
Figure 13-3 The multiple-domain/single-server NIS configuration.
admin
admin-master
client-1 client-2 client-3
devel
devel-master
client-4
NETWORK
client-5 client-6
admin
admin-master
admin-slave
client-1 client-2 client-3
The Network Information System 313
19_599496 ch13.qxd 8/30/05 6:24 PM Page 313
Figure 13-4 The multiple-domain/multiple-server NIS configuration.
CAUTION A singleton server (one whose function is not duplicated or
replicated elsewhere in the network) that relies upon NIS for key data
potentially represents a single point of failure. If your network or organization
relies on the high availability of your network, NIS might not be an acceptable
solution for information sharing unless you configure at least one slave server
to provide redundancy and fail-over support for the master server.
Acomplete NIS setup involves configuring at least one NIS server and one or
more NIS clients. If your Linux system is going to be part of a network with
existing NIS servers, you only need to install and configure an NIS client pro-
grams, ypbind, ypwhich, ypcat, yppoll, and ypmatch. The most impor-
tant program on an NIS client is the NIS client daemon, ypbind. ypbind is
usually started from the system’s startup procedure. As soon as ypbind is run-
ning your system has become an NIS client.
On the other hand, if your system is going to be part of a network that does
not already have NIS servers in place, you need to configure a master server
and possibly one or more slave servers in addition to any NIS clients. Creating
an NIS server involves configuring the ypserv client daemon and identifying
the information that you want to distribute using NIS.
admin
admin-master
admin-slave devel-slave
client-1 client-2 client-3
devel
devel-master
client-4
NETWORK
client-5 client-6
314 Chapter 13
19_599496 ch13.qxd 8/30/05 6:24 PM Page 314
Configuring an NIS Server
The simplest NIS configuration consists of a single NIS server and one or more
clients. In this case, NIS server configuration involves the following steps:
1. Setting the NIS domain name.
2. Initializing the NIS maps.
3. Editing the configuration files.
4. Starting the server daemon, ypserv.
5. Starting the NIS password daemon.
6. Starting the NIS transfer daemon if you use slave servers.
7. Modifying the startup process to start the NIS daemons when the sys-
tem reboots.
If your NIS configuration also utilizes slave servers, you need to perform
configuration steps on the slave servers. This section shows you how to create
an NIS master server and a slave server.
NOTE For more information about NIS configuration, see the NIS How-To at the
Linux Documentation Project, linuxdoc.org/HOWTO/NIS-HOWTO/index.html,
and the NIS Web pages at www.linux-nis.org.
Key Files and Commands
Table 13-1 lists the commands, daemons, and configuration files used to con-
figure and maintain an NIS server.
Table 13-1 NIS Server Configuration Commands and Files
COMMAND DESCRIPTION
/etc/ypserv.conf Stores runtime configuration options and special host
access directives
nisdomainname Sets a system’s NIS domain name
/var/yp/securenets Lists hosts permitted to access the NIS maps
ypinit Builds and installs the NIS databases
yppasswdd Processes user password changes in an NIS
environment
(continued)
The Network Information System 315
19_599496 ch13.qxd 8/30/05 6:24 PM Page 315
Table 13-1 (continued)
COMMAND DESCRIPTION
yppush Propagates updated NIS maps to slave servers
ypserv Handles the primary NIS server duties
ypxfrd Speeds up the transfer of large NIS maps from master
to slave servers
The initial step in configuring an NIS client is to set the NIS domain name.
When first configuring the NIS server and for testing purposes, the quickest
way to set an NIS domain name is to use the nisdomainname command:
# nisdomainname nisdomain
Replace nisdomain with the name of your NIS domain. Next, reissue the
nisdomainname command with no arguments to confirm that the NIS
domain name was successfully set. Setting the NIS domain name in this way is
not a permanent change and will not survive a system reboot. You learn later
in this section how to set the NIS domain name permanently.
NOTE You can also use the domainname command to get and set a system’s
NIS domain name. In fact, you can use one of a number of similarly named
commands to do so. See the domainname man page for more information.
After you set the NIS domain name, configure the NIS server daemon,
ypserv. The key configuration files are /var/yp/securenets and /etc
/ypserv.conf. /var/yp/securenets lists the hosts permitted to access
the NIS maps on this server. /etc/ypserv.conf contains runtime configu-
ration options and client access specifications that control ypserv and the NIS
transfer daemon, ypxfrd.
The most important configuration file is /var/yp/securenets. As a rule,
RPC, on which NIS is based, happily replies to any client that asks for informa-
tion. Obviously, you don’t want to share your password database, just for exam-
ple, with any host that asks for it. So, securenets makes it possible to restrict
access to NIS maps based on a requester’s IP address. The securenets file con-
tains net mask and network number pairs that define the lists of hosts permitted
to access your NIS server maps. /var/yp/securenets contains one pair per
line of the form m.m.m.m n.n.n.n, where m.m.m.m. is a net mask, and n.n.n.n. is
network number. Ahost match occurs when the IP address matches the network
number and mask. For example, consider a /var/yp/securenets with these
entries:
255.255.255.255 127.0.0.1
255.255.255.0 192.168.0.0
316 Chapter 13
19_599496 ch13.qxd 8/30/05 6:24 PM Page 316
The first line indicates that localhost (IP address 127.0.0.1) is permitted to
access the NIS server. The second line specifies that any host with an IP
address in the range 192.168.0.1 to 192.168.0.254 is permitted to access the NIS
server. All other hosts are denied access.
The second configuration file, /etc/ypserv.conf, is used by both
ypserv, the primary NIS server daemon, and ypxfrd, the NIS transfer dae-
mon. ypserv.conf contains two types of runtime configuration directives.
The first type of directive is known as an option line and is only used by
ypserv. The second configuration directive type is called an access rule. Access
rules, used by ypserv and ypxfrd, determine which hosts may use NIS ser-
vices and under what conditions. The following listing shows the default val-
ues in /etc/ypserv.conf:
dns: no
files: 30
slp: no
slp_timeout: 3600
xfr_check_port: yes
*: *: shadow.byname: port
*: *: passwd.adjunct.byname: port
Entries in the file appear one per line. Option lines and access rules are made
up of colon-separated fields. The first five entries in the example are option
lines. The last two entries are access rules.
Option lines have the following format:
option:value
option can be one of files, trusted_master, slp, slp_timeout, or
xfr_check_port.
■■ files:n — Sets the number of maps that ypserv should cache. Set-
ting n to 0 disables map caching.
■■ trusted_master:server — Informs a slave server of the name
of the server to accept as master. For instance, trusted_master
:nisbeast.example.com tells the slave server to accept new or
updated maps from the master NIS server nisbeast.example.com.
By default, no trusted master server is set.
■■ slp:{yes|no|domain} — Indicates whether ypserv should use the
Service Location Protocol (SLP) and register itself as an SLP server. The
default is no. If domain is set, ypserv registers itself as an NIS domain
server for a specific group of NIS domains. The sidebar “A Hundred-
Word Tour of SLP” describes the Service Location Protocol.
The Network Information System 317
19_599496 ch13.qxd 8/30/05 6:24 PM Page 317
■■ slp_timeout — Defines the interval after which ypserv reregisters
itself as an SLP server. This option is currently ignored.
■■ xfr_check_port — Controls whether ypserv runs on a port num-
bered less than 1024, a so-called privileged port. The default is yes.
As you can see in the default configuration file, the dns option is no. The
absence of xfr_check_port from the configuration file means that ypserv
uses a privileged port.
Access rules have a slightly more complicated format:
host:domain:map:security
■■ host — Specifies the IP address to match. Wildcards and address/net
mask address forms are allowed. For example, the host values 192.168.0.
and 192.168.0.0/255.255.255.0 both refer to all IP addresses between
192.168.0.1 and 192.168.0.254.
■■ domain — Indicates the NIS domain to which the rule applies.
■■ map — Identifies the name of a map to match (or * for all maps).
■■ security — Indicates the type of security to use. Legal values are none,
port, or deny. A value of none enables access to map for host. port
enables access if the connection comes from a privileged port (one num-
bered less than 1024). deny denies the matching host access to this map.
Access rules are tried in order, and all rules are evaluated. If no rule matches
a connecting host, access to the corresponding map is enabled.
As usual with any RPC-based service, before starting the server, make sure
that the portmapper daemon, portmap, is running. NIS requires the portmap-
per because NIS uses remote procedure calls (RPC). To see if the portmapper is
running, you can use the portmapper’s initialization script, /etc/rc.d
/init.d/portmap, or the rpcinfo command. If the portmapper is not run-
ning, you can easily start it. Using the initialization script, the command to
execute and its output is:
# service portmap status
portmap (pid 559) is running
The output shows the process ID (PID) of the portmapper. On the other
hand, if the portmapper is not running, the output of the command looks like
the following:
# service portmap status
portmap is stopped
318 Chapter 13
19_599496 ch13.qxd 8/30/05 6:24 PM Page 318