Red Hat Linux Networking , System Administration (P15) ppsx
Bạn đang xem bản rút gọn của tài liệu. Xem và tải ngay bản đầy đủ của tài liệu tại đây (1017.69 KB, 30 trang )
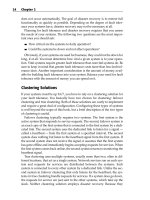
Figure 16-1 Typical VNC client and server configuration.
The output is important. The first line after setting the password indi-
cates that Xvnc has created a new display, :1 on the host coondog.example
.com. You will need this information when you connect from the client sys-
tem. vncserver asks for a password only the first time you start it. You can
change the password later using the command vncpasswd or by removing
the file $HOME/.vnc/passwd.
The next two lines tell you that a startup script, /home/bubba/.vnc
/xstartup, has been created and that the script has been executed, that is, the
applications it specifies are running on the Xvnc display. This means that
when you connect to the VNC server, the client will have those applications
already running. This also means that if you want to customize the desktop
provided by the server, you can edit the xstartup file. Finally, vncserver
tells you where to find the log file it creates, which will simplify troubleshoot-
ing the VNC server problems if you encounter any. When vncserver com-
pletes, a simple, unadorned VNC desktop is ready to accept connections.
Configuring Your Firewall for VNC
Well, your VNC server is almost ready to accept connections. VNC listens on
port 5500 plus the X display number for incoming VNC client sessions. On a
properly secured system, these ports are blocked at the firewall. You have to
punch a hole in the firewall for that port so that VNC clients can get through
to the server. This configuration step requires root access because you need to
use the Security Level Configuration tool to modify your system’s firewall
setup (you are running a firewall, right?).
1. To start the Security Level Configuration tool, select Red Hat ➪ System
Settings ➪ Security Level or type system-config-securitylevel
at a command prompt. Figure 16-2 shows the Security Level Configura-
tion tool’s main screen.
INTERNET
Corporate
Firewall
Home
Firewall
V
NC Server VNC Clien
t
384 Chapter 16
22_599496 ch16.qxd 8/30/05 6:40 PM Page 384
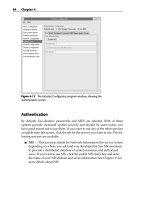
Figure 16-2 The Security Level Configuration tool.
The firewall configuration shown in Figure 16-2 is tight: no external
access of any sort is permitted on this machine. You’re about to change
this. In the Other ports: (1029:tcp) text box, type 5901:tcp. By default,
VNC uses ports numbered 5900 plus the display number. In this exam-
ple, the display number is :1, so the port number is 5901. If you were
using display number :21, the port number would be 5912. The :tcp
portion of the port number tells the firewall to open port 5901 for TCP
connections because the remote framebuffer protocol uses TCP, not UDP.
2. After you have entered the appropriate port number (see Figure 16-3),
click OK to save your change and close the Security Level Configura-
tion tool. Click Yes when the tool warns you that you are about to over-
write your existing firewall configuration.
VNC clients can now access the VNC server, so the server configuration is
complete.
Creating a VNC Server 385
22_599496 ch16.qxd 8/30/05 6:40 PM Page 385
Figure 16-3 Opening TCP port 5901 with the Security Level Configuration tool.
Customizing the VNC Server
Sure, the server configuration is complete, but the default desktop (jump
ahead to Figure 16-5) is ugly, unless you like the twm window manager and
the plain gray background. Remember that xstartup file, /home/bubba/
.vnc/xstartup? You can edit that to change the default desktop. Listing
16-1 shows the default xstartup file:
#!/bin/sh
# Uncomment the following two lines for normal desktop:
# unset SESSION_MANAGER
# exec /etc/X11/xinit/xinitrc
[ -x /etc/vnc/xstartup ] && exec /etc/vnc/xstartup
[ -r $HOME/.Xresources ] && xrdb $HOME/.Xresources
xsetroot -solid grey
vncconfig -iconic &
xterm -geometry 80x24+10+10 -ls -title “$VNCDESKTOP Desktop” &
twm &
Listing 16-1 The default xstartup file.
386 Chapter 16
22_599496 ch16.qxd 8/30/05 6:40 PM Page 386
As you learned in Chapter 9, X Window System startup files configure your
X environment and start certain X programs each time you log in. In this case,
xstartup does the following:
1. Executes the file /etc/vnc/xstartup if it exists and is executable.
2. Loads any X resources stored in the file .Xresources if it exists and is
readable.
3. Invokes xsetroot to set the background color to solid gray.
4. Starts the vncconfig program minimized.
5. Starts an 80x24 xterm with a specific title.
6. Starts twm, the Tab Window Manager.
If you want your usual desktop, the one you get when you are sitting in
front of the system, do what the instructions suggest and uncomment the fol-
lowing two lines:
# unset SESSION_MANAGER
# exec /etc/X11/xinit/xinitrc
You should also comment out the last four lines. The modified file should
resemble Listing 16-2.
#!/bin/sh
# Uncomment the following two lines for normal desktop:
unset SESSION_MANAGER
exec /etc/X11/xinit/xinitrc
[ -x /etc/vnc/xstartup ] && exec /etc/vnc/xstartup
[ -r $HOME/.Xresources ] && xrdb $HOME/.Xresources
#xsetroot -solid grey
#vncconfig -iconic &
#xterm -geometry 80x24+10+10 -ls -title “$VNCDESKTOP Desktop” &
#twm &
Listing 16-2 xstartup modified to display your standard desktop.
The modified xstartup file starts your usual desktop because it invokes
the system xinitrc file, which starts the standard X initialization process.
You might want to stick with the default VNC server configuration, though.
Running X over a network connection is always going to be slower than run-
ning it directly unless you have a very fat pipe and no network congestion. The
default VNC configuration runs the twm window manager, which is consider-
ably faster than X desktop environments like KDE and GNOME. twm is also
Creating a VNC Server 387
22_599496 ch16.qxd 8/30/05 6:40 PM Page 387
faster than many modern window managers too. The point is that the less eye
candy transmitted over the wire, the faster your VNC setup will be. Yes, twm
might make your eyes bleed, and it definitely lacks features that many have
come to expect from your window manager. However, if you are working
remotely, you might not need the application integration and the eye candy as
much as you need a responsive “desktop.” You can also customize twm by edit-
ing (or creating) a twmrc file, which might make it a little easier on your eyes.
Testing the VNC
Testing your VNC setup is simple. First, make sure that it works locally by
starting a VNC client on the same system as the VNC server. If the VNC server
you started in the section “Setting Up a VNC Server” isn’t running, restart it:
$ vncserver
New ‘luther.kurtwerks.com:1 (kwall)’ desktop is luther.kurtwerks.com:1
Starting applications specified in /home/kwall/.vnc/xstartup
Log file is /home/kwall/.vnc/luther.kurtwerks.com:1.log
Next, in a terminal window, start the VNC client, or viewer, by executing the
command vncviewer :n, replacing n with the display number vncserver
reported when it started (1, in the example). You will see the password prompt
shown in Figure 16-4.
$ vncviewer :1
VNC Viewer Free Edition 4.1.1 for X - built Apr 27 2005 02:25:46
Copyright (C) 2002-2005 RealVNC Ltd.
See for information on VNC.
Sat May 21 01:01:32 2005
CConn: connected to host localhost port 5901
CConnection: Server supports RFB protocol version 3.8
CConnection: Using RFB protocol version 3.8
Figure 16-4 The VNC authentication dialog box.
388 Chapter 16
22_599496 ch16.qxd 8/30/05 6:40 PM Page 388
Type the password you provided when you configured the VNC server and
press Enter. Assuming that you are using the default VNC server configura-
tion (the one that uses twm), the resulting screen should resemble Figure 16-5.
Figure 16-5 doesn’t look terribly impressive, but the purpose of this exercise
is to satisfy yourself that the server is working. You should be able to start
applications, surf the Web (assuming that the server is connected to the Inter-
net), and use the remote computer just as if you were sitting in front of it. Fig-
ure 16-6, for example, shows the Fedora Project Web site in a Mozilla browser
session started from the VNC client.
Figure 16-5 Viewing the default VNC desktop in a VNC client.
Figure 16-6 Using Mozilla in the VNC client.
Creating a VNC Server 389
22_599496 ch16.qxd 8/30/05 6:40 PM Page 389
You can also start the VNC client by selecting Red Hat ➪ Accessories ➪
VNC Viewer. If you use the menu, you will have to specify the VNC server to
which to connect, as shown in Figure 16-7.
The server specification shown in Figure 16-7 included the display number.
If you don’t include this value, you won’t get a connection. You can use either
the IP address, as shown in the figure, or the hostname. In fact, if you use the
hostname, you can use the FQDN or the alias, if one is defined in /etc/hosts.
After establishing that the server is working, close the client session by pressing
F8 while the viewer has the focus and selecting Exit Viewer from the pop-up
menu. (See Figure 16-8.)
Now, test the configuration from a remote machine. Figure 16-9 shows a
VNC client session running on Microsoft Windows XP. The client software is
the RealVNC for Windows, which is the same product as used on Fedora Core
and RHEL systems.
Figure 16-7 Specifying the target VNC server.
Figure 16-8 The VNC viewer pop-up menu.
390 Chapter 16
22_599496 ch16.qxd 8/30/05 6:40 PM Page 390
Figure 16-9 Using a Linux VNC server from Microsoft Windows.
To get the full effect of VNC, especially when you use the viewer from a
Windows system, consider Figure 16-10, which shows a VNC session to the
server configured in the first section of this chapter. In this case, the server was
started using the modified xstartup in Listing 16-2, which displays the stan-
dard system desktop (KDE, in this case) rather than the faster, nimbler, and
uglier twm.
To reiterate the point made earlier, running X across a network, especially
the Internet, is going to be a slower affair than running it directly. On a LAN
such as a home network (the environment in which the Figures 16-9 and 16-10
were taken), the performance hit will be minimal, and you might not notice or
mind the difference. Across the Internet, you will find it intolerably slow run-
ning something like KDE, GNOME, or the more, shall we say, feature-rich
window managers. Whether you use KDE with all the trimmings or some-
thing leaner like twm, you will definitely appreciate being able to access your
desktop system from a remote location.
Creating a VNC Server 391
22_599496 ch16.qxd 8/30/05 6:40 PM Page 391
Figure 16-10 Running KDE on Microsoft Windows via VNC.
When you are done running the VNC server, you can kill the running
process by passing the -kill option to vncserver:
$ vncserver -kill :1
Killing Xvnc process ID 30790
Replace :1 with the display number on which the VNC server was running.
Summary
Providing road warriors and telecommuters access to LAN-based services is
an increasingly important requirement that system administrators are asked to
meet. VNC is one way to meet that requirement. With minimal configuration
on the server side and no configuration on the client side, you can provide
remote access to one or more Linux systems using VNC. As always, poking a
hole in your firewall to permit external access poses a security risk, so you
have to weigh that risk against the advantages and decide whether VNC is the
way you want to go. As you saw in this chapter, the advantages of remote
access to your desktop system are hard to dispute.
392 Chapter 16
22_599496 ch16.qxd 8/30/05 6:40 PM Page 392
393
Any system administrator can testify that requests for new or enhanced ser-
vices pop up constantly. Sometimes they arrive in a trickle; other times a fire
hose delivers them. One commonly requested service is a time server, a service
that provides the authoritative clock against which all other systems on the
LAN sync their clocks. Perhaps the boss wants people to be able to share infor-
mation on the company intranet and asks you to create a way to post Web doc-
uments to the intranet Web server. This chapter describes setting up two
nonessential LAN-based services that select groups of intranet users (or you)
might find useful. These services fall into the nonessential category because
they provide functionality that is nice to have but without your LAN is still
amply serviceable.
The nonessential services described in this chapter include an NTP-based
time server and a caching proxy server. Naturally, these two topics hardly
exhaust the possible list of conveniences users (and managers) can and do
request. Some of the topics that might seem appropriate for this chapter are cov-
ered elsewhere in the book. For example, Chapter 16 describes how to set up a
VNC server to give remote users access to their desktops. Building a Web server
for your company intranet is no different from building a Web server that faces
the Internet, a topic covered in Chapter 23. Likewise, Chapter 24 shows you how
to configure some of the Web-based services users typically want, such as mail-
ing lists, Web-based email, site search functionality, and RSS feeds.
Providing Additional
Network Services
IN THIS CHAPTER
■■ Configuring a Time Server
■■ Providing a Caching Proxy Server
CHAPTER
17
23_599496 ch17.qxd 8/30/05 6:41 PM Page 393
More to the point, we had to limit the topics we covered, just as administra-
tors have to limit the services they provide. And that point might be as impor-
tant as the specifics of creating a time server or setting up a proxy server. You
have to know when to say “No” to feature requests. In some cases, a requested
feature might pose more of a security risk than you are willing to take. In other
cases, a network enhancement might stress your network infrastructure or uti-
lize network, system, and CPU resources better used for other purposes. In
still other cases, you might simply lack the personnel or time to manage any
more services. Whatever the case, you must be able and willing to say no to
such requests, if only to preserve your sanity.
Configuring a Time Server
For this chapter’s purposes, a time server is a daemon that runs on one machine
and to which other systems (in this case, clients on your LAN) synchronize their
system clocks. In the common case, you synchronize your time server’s clock
against one or more reference time servers that are situated outside your LAN.
In some cases, the time server synchronizes its time against a specially designed
clock. This hardware clock is a separate, single-purpose hardware device that
maintains extremely accurate time. (More about these details shortly.)
The motivation for a time server is to keep the system time consistent
throughout the LAN so that time-sensitive operations work reliably. In devel-
opment shops, the make utility uses files timestamps to determine which com-
ponents of a software project need to be rebuilt. If you have an inaccurate
system clock, the timestamps on files will be inconsistent, causing project
builds to fail or to behave unpredictably. Similarly, source code version control
systems often rely on file and directory timestamps to track changes to files
maintained in the source code repository. NFS is also sensitive to timekeeping
irregularities. If the system clock on a client machine is significantly faster or
slower than the system clock on the NFS server, you will run into problems
saving files. Irregularities in system clocks between client systems and the
server can adversely affect the mechanisms content management systems use
to update and maintain complex Web sites.
To take one example from our own experience, we have an NFS server from
which users mount home directories and project-specific work directories.
Everything was working smoothly until we started seeing errors during proj-
ect builds. The errors initially pointed to a problem with the server’s system
clock. After we reset the system clock and synced it to an external time server,
most users reported no further problems and project builds worked normally
again, but some users continued to experience timestamp-related write errors
on files mounted from the server. It took a couple of days for us to work out
394 Chapter 17
23_599496 ch17.qxd 8/30/05 6:41 PM Page 394
that the only users continuing to have these problems were users whose sys-
tems had flaky system clocks that lost anywhere from 15 seconds to several
minutes each day. After configuring these client systems to coordinate their
system clocks with the NFS server’s clock, the problem went away and has not
returned. Eventually, we set up a time server for the entire LAN and config-
ured all systems to synchronize to that time server.
Selecting a Time Server Solution
If you’ve decided (or have been told) that you need a time server, your options
fall into three categories: hardware, software, or both. As mentioned a moment
ago, the hardware solution involves installing a high-resolution clock in your
facility and then configuring client systems to synchronize their system clocks
against that dedicated device. If you have a bottomless pit of money for a bud-
get, you can install an atomic clock, such as a cesium fountain clock, to keep
ridiculously accurate time. In the great majority of cases, though, hardware
clocks aren’t quite so high end. Instead, these lower-end clocks are equipped
with a radio or satellite receiver that monitors one of several radio or satellite
broadcast frequencies specifically allocated to carrying a time signal. These
time signals are broadcast by the United States Naval Observatory (USNO),
the National Institute of Standards and Technology (NIST), or another official
organization of the United States government. (Most countries provide similar
services.) You can buy high-quality hardware clocks for $1000. In fact, depend-
ing on your needs, you can get good, high-resolution, dedicated hardware
clocks for a few hundred dollars.
NOTE For the record, USNO and NIST have multiple atomic clocks, so they keep
ridiculously accurate time on your behalf and do so with your tax dollars. To learn
more about the NIST timekeeping service, visit the NIST’s Time & Frequency
Division Web site at www.boulder.nist.gov/timefreq/service/its.htm.
The USNO operates a comparable site at />The most common time server solution, especially for small(ish) networks
and organizations, is strictly software-based. The simplest approach is to use
the date program to set your system clock to the time broadcast by another sys-
tem. The kid-tested, mom-approved, and syadmin-preferred method, though,
is to use the Network Time Protocol, or NTP. NTP is an open standard that
defines how Internet time servers work and how clients can communicate with
these time servers to maintain accurate time. How accurate? If you believe the
NTP documentation, the best precision is about 232 picoseconds, or 2.32 × 10
–10
seconds, or 0.000000000232 seconds. If you need greater precision than 232
picoseconds, get that cesium clock.
Providing Additional Network Services 395
23_599496 ch17.qxd 8/30/05 6:41 PM Page 395
NOTE David Mills wrote the NTP implementation universally used on Linux
systems. Mills has done an excellent job of documenting his work. For an
overview of time synchronization issues in general, see “Executive
Summary: Computer Network Time Synchronization” at Mills’ Web site,
eecis.udel.edu/~mills/exec.html. For more information about NTP,
the authoritative Web site is ntp.org.
NTP consists of a daemon (ntpd), a small set of utility programs (ntpq,
ntpdc, ntpdate, ntptrace, tickadj, ntptime, ntiptime, ntp-kegen, and ntpdsim),
and the all-important configuration file, /etc/ntp.conf. The NTP daemon
is dual-purpose. It acts as a server, listening for time synchronization requests
and providing the time in response, and as a client, communicating with other
time servers to get the correct time and adjust the local system accordingly.
Table 17-1 briefly describes the utility programs.
Configuring the Time Server
Setting up your time server requires a small amount of preparation, imple-
mentation, and verification. You’ll need to perform the following tasks:
1. Install the NTP software.
2. Locate suitable time servers to serve as reference clocks.
3. Configure your local time server.
4. Start the NTP daemon on the local time server.
5. Make sure that the NTP daemon responds to requests.
Table 17-1 NTP Utility Programs
PROGRAM DESCRIPTION
ntpdate Sets the system date and time via NTP
ntpdc Controls the NTP daemon, ntpd
ntp-keygen Generates public and private keys for use with NTP
ntpq Queries the NTP daemon
ntpsim Provides NTP simulation for development and testing
ntptime Displays the time variables maintained by the Linux kernel
ntptrace Traces a chain of NTP servers back to the primary source
tickadj Sets certain time variables maintained by the Linux kernel
396 Chapter 17
23_599496 ch17.qxd 8/30/05 6:41 PM Page 396
Installing the NTP software is simple. Use the rpmquery command to make
sure that the ntp package is installed:
$ rpmquery ntp
ntp-4.2.0.a.20040617-4
The version number you see might be slightly different. If the ntp package
isn’t installed, install it using the installation tool of your choice before
proceeding.
Selecting Reference Clocks
For your time server to keep and thus to serve accurate time, your local time
server needs to synchronize its time against one or more master or reference
clocks. NTP is a distributed application, meaning that servers and clients are
dispersed, that any given client can request a time check from any given server
(modulo access restrictions), and that the application continues to function in
spite of the failure or inaccessibility of one or even many of the servers. NTP is
also hierarchical and organizes time servers into several strata to reduce the
load on any given server or set of servers. Stratum 1 servers are referred to as
primary servers, stratum 2 servers as secondary servers, and so on. There are far
more secondary servers than primary servers. Secondary servers sync to pri-
mary servers, and clients sync to secondary or tertiary servers.
NTP also provides for syncing to pool servers, a large class of publicly acces-
sible secondary servers maintained as a public service for use by the Internet-
connected computing community at large. The NTP pool time servers,
organized into the subnet pool.ntp.org, use DNS round robin to assign
randomly selected open access time servers to NTP clients (recall that an NTP
server can also be an NTP client). The rationale for random server selection is
to distribute the client load more or less equally across all servers participating
in the pool and to ensure that clients are syncing to an appropriately distrib-
uted set of time servers.
The upshot for you is simple:
■■ Use one or more secondary servers as your local server’s reference clock.
■■ Use the pool servers if possible.
Accordingly, this section configures an NTP server to use the pool servers
and also shows you how to configure your local time server to use explicitly
selected secondary servers.
To use the pool servers, NTP is ready to run after you install the ntp pack-
age. Listing 17-1 shows ntpd’s configuration file, /etc/ntp.conf, stripped
of most comments and white space.
Providing Additional Network Services 397
23_599496 ch17.qxd 8/30/05 6:41 PM Page 397
restrict default nomodify notrap noquery
restrict 127.0.0.1
# OUR TIMESERVERS
server pool.ntp.org
server pool.ntp.org
server pool.ntp.org
# GENERAL CONFIGURATION
server 127.127.1.0 # local clock
fudge 127.127.1.0 stratum 10
driftfile /var/lib/ntp/drift
broadcastdelay 0.008
keys /etc/ntp/keys
Listing 17-1 The default NTP configuration file.
The first two entries, beginning with the restrict directive, are, not sur-
prisingly, restrictions on the listed IP addresses or hostnames. The first entry
uses the keyword default, which means an IP address and mask of 0.0.0.0. The
option flags, nomodify, notrap, and noquery, prevent the listed IP address
from modifying, logging, or querying the NTP service on the server. The second
rule, restrict 127.0.0.1, permits all NTP activity over the loopback inter-
face. All activity is permitted because there are no option flags specified. To deny
all activity, you would use the ignore flag, but you shouldn’t do this on the
loopback interface because doing so would prevent certain NTP administrative
functions (issued using the ntpdc command) from working properly.
The next three entries, beginning with the server directive, identify the
time servers you want to use as reference clocks. In this case, ntpd is being con-
figured to use the pool servers. Notice that the names are all pool.ntp.org.
Even though the names are the same, the NTP server pool is configured to use
DNS round robin, so three hostname lookups on the same name will return
three different IP addresses. You can try this yourself to verify that round robin
is working. Issue the command host pool.ntp.org at the command
prompt and, unless your DNS client is broken, you should see output resem-
bling the following:
$ host pool.ntp.org
pool.ntp.org has address 213.219.244.16
pool.ntp.org has address 216.27.185.42
pool.ntp.org has address 62.220.226.2
pool.ntp.org has address 69.37.143.241
pool.ntp.org has address 81.169.154.44
pool.ntp.org has address 82.219.3.1
pool.ntp.org has address 139.140.181.132
pool.ntp.org has address 146.186.218.60
398 Chapter 17
23_599496 ch17.qxd 8/30/05 6:41 PM Page 398
pool.ntp.org has address 195.18.140.242
pool.ntp.org has address 203.217.30.156
pool.ntp.org has address 209.126.142.251
pool.ntp.org has address 212.23.29.225
pool.ntp.org has address 212.41.248.75
pool.ntp.org has address 212.254.25.164
pool.ntp.org has address 213.10.208.72
Normally, a hostname resolves to one and only one IP address, but when
DNS round robin behavior is enabled, a single hostname can resolve to multi-
ple IP addresses, the purpose being to equalize the load on any single system.
The general configuration section sets broad operational policies that control
ntpd’s overall behavior. The line server 127.127.1.0 instructs the NTP dae-
mon to use the local clock (referred to as an undisciplined local clock) if no exter-
nal reference clocks are accessible. You can use any address in the range
127.127.1.0 to 127.127.1.255, although the convention is to use 127.127.1.0. The
line fudge 127.127.1.0 stratum 10 limits the use of the local lock by
assigning it a very low place in the time server hierarchy, the intent being to
prevent the local clock from interfering with other, likely more accurate time
sources elsewhere on network and to enable (or, perhaps, compel) ntpd to look
pretty hard for other time sources before using the undisciplined local clock. In
its normal operation, ntpd listens for broadcasts from other time servers when
trying to find a reference clock. If it finds a time server declaring itself at a
higher stratum than 10, ntpd will use the higher-stratum clock instead of the
undisciplined local clock.
The directive driftfile /var/lib/ntp/drift specifies the name of the
file that stores the oscillation frequency of the local clock. NTP uses this fre-
quency, which varies slightly over time, to make appropriate adjustments to
the system time. The broadcastdelay directive sets the number of seconds
(0.008 in this case) used to calculate the network latency or delay between the
local server and a remote reference server. On a LAN, values between 0.003
and 0.007 seconds are suitable, but when two servers must communicate
across the Internet, it is often necessary to use a longer delay value.
The last line, keys /etc/ntp/keys, tells NTP where to find the crypto-
graphic keys used to encrypt exchanges between client and server machines.
The purpose for encrypting the data exchange is to prevent an unauthorized
reference server accidentally or deliberately sending time signals to your local
time server. Another reason to use encryption is when you enable remote NTP
administration and want to make sure that only properly authorized and
authenticated systems can perform remote administration.
NTP version 4 (NTPv4) supports asymmetric encryption, more commonly
known as public key encryption, using a method or protocol referred to as
autokey but the default configuration on Fedora Core and RHEL systems as
installed doesn’t use it without some configuration work. If you wish to use
Providing Additional Network Services 399
23_599496 ch17.qxd 8/30/05 6:41 PM Page 399
server-side encryption, the following procedure creates a basic autokey setup.
You should use the following procedure on the system that will be configured
as an NTP server. The next section, “Configuring an NTP Client,” describes
configuring client authentication. Although advisable, it isn’t strictly neces-
sary to set up encryption. Of course, wearing seat belts while driving is advis-
able, but isn’t strictly necessary.
1. Add the following lines to /etc/ntp.conf:
broadcast 224.0.1.1 autokey
crypto pw serverpassword
keysdir /etc/ntp
Replace serverpassword with a password of your choosing.
2. Generate the key files and certificates using the following commands:
# cd /etc/ntp
# ntp-keygen -T -I -p serverpassword
Using OpenSSL version 90701f
Random seed file /root/.rnd 1024 bytes
Generating IFF parameters (512 bits)
IFF 0 60 81 1 49 111 2 1 2 3 1 2
Generating IFF keys (512 bits)
Confirm g^(q - b) g^b = 1 mod p: yes
Confirm g^k = g^(k + b r) g^(q - b) r: yes
Generating new iff file and link
ntpkey_iff_ntpbeast.example.com- \
>ntpkey_IFFpar_ntpbeast.example.com.3318548048
Generating RSA keys (512 bits)
RSA 0 24 112 1 11 135 3 1 4
Generating new host file and link
ntpkey_host_ntpbeast.example.com- \
>ntpkey_RSAkey_ntpbeast.example.com.3318548048
Using host key as sign key
Generating certificate RSA-MD5
X509v3 Basic Constraints: critical,CA:TRUE
X509v3 Key Usage: digitalSignature,keyCertSign
X509v3 Extended Key Usage: trustRoot
Generating new cert file and link
ntpkey_cert_ntpbeast.example.com->ntpkey_RSA- \
MD5cert_ntpbeast.example.com.3318548048
The output wraps (indicated by \ in the listing) because of page layout
constraints.
3. If ntpd is running, restart it:
# service ntpd restart
Shutting down ntpd: [ OK ]
Starting ntpd: [ OK ]
400 Chapter 17
23_599496 ch17.qxd 8/30/05 6:41 PM Page 400
If ntpd is not running, start it:
# service ntpd start
Starting ntpd: [ OK ]
4. Use the following chkconfig commands to make sure that ntpd starts
in at boot time and in all multiuser run levels:
# chkconfig level 0123465 ntpd off
# chkconfig level 345 ntpd on
At this point, NTP’s autokey encryption is enabled, and you’ve also made
sure that NTP services will start and stop appropriately at boot time.
Configuring an NTP Client
Configuring an NTP client requires fewer steps than configuring a server does.
You select the server to use as a reference clock, start the NTP daemon, ntpd,
and you’re done. The GUI-addicted can use the Date/Time Properties tool.
Either start it from the menu (Red Hat ➪ System Settings ➪ Date & Time) or
type system-config-date at a command prompt. Either way, you should
see the screen shown in Figure 17-1.
If NTP is already running on your system, the Date & Time tab will be dis-
abled (grayed out). Click the Network Time Protocol tab to configure NTP. To
enable NTP, place a check mark in the Enable Network Time Protocol check
box. Doing so enables the NTP Servers pane, as shown in Figure 17-2.
Figure 17-1 The Date/Time Properties tool.
Providing Additional Network Services 401
23_599496 ch17.qxd 8/30/05 6:41 PM Page 401
Figure 17-2 The Network Time Protocol tab.
Fedora Core and RHEL ship with two servers configured: clock.redhat
.com and clock2.redhat.com. To use one of these servers, select it from the
Server drop-down box and click the Add button. If you want to add a different
server, type the name or IP address of the server you want to use and click the
Add button to add it to the list. Figure 17-3 shows the added servers pool
.ntp.org and ntpbeast.example.com. To delete a server, highlight in the
list and click the Delete button.
To configure advanced NTP options, click the Show advanced options
arrow. These options allow you to use the system clock (the undisciplined
local clock described in the previous section) as a reference clock (enabled by
default) and to use NTP broadcast (disabled by default). NTP broadcast causes
the NTP daemon to listen for remote servers rather than configuring clients to
use a specific server.
After you have made your configuration changes, click the OK button to
close the Date/Time Properties tool. If you see a dialog box indicating that the
tool is connecting to an NTP server, just be patient; this dialog box is strictly
informational and disappears quickly.
CAUTION If you use the Date/Time Properties tool to configure your NTP
client, any hand edits you might have made to /etc/ntp.conf will be lost. The
lesson here is either not to use the graphical tool or to make a backup copy of
/etc/ntp.conf before using the GUI tool.
402 Chapter 17
23_599496 ch17.qxd 8/30/05 6:41 PM Page 402
Figure 17-3 Adding NTP servers.
One reason you might not want to use the Date/Time Properties tool is that
you cannot perform advanced customization of NTP. Moreover, if you want to
use the pool servers and provide the name pool.ntp.org, the tool replaces
that name with the first IP address that resolves to the hostname. The problem is
that the Date/Time Properties tool does not take into account that
pool.ntp.org uses DNS round robin. As a result, if you choose to use the NTP
server pool, you will have to edit /etc/ntp.conf by hand. It might be simpler
and less aggravating to edit the configuration file directly. The additional con-
figuration steps described next require you to edit /etc/ntp.conf directly.
If you configured your NTP server to use autokey encryption, you will also
need to configure any NTP clients you have to use autokey encryption. The
following procedure walks you through doing so.
1. Add the following lines to /etc/ntp.conf on the client:
crypto pw clientpassword
keysdir /etc/ntp
server timeserver autokey
Replace clientpassword with the password you want to use on the
client. Replace timeserver with the name or IP address of the system
you configured as the server in the previous section.
Providing Additional Network Services 403
23_599496 ch17.qxd 8/30/05 6:41 PM Page 403
2. Generate the client keys and certificate:
# cd /etc/ntp
# ntp-keygen -H -p clientpassword
We don’t show the output of this command to conserve space.
3. Import the key created in the section on server configuration using
some sort of encrypted mechanism, such as sftp or scp. The following
example uses scp:
# cd /etc/ntp
# scp user@timeserver:/etc/ntp/ ntpkey_IFFkey_timeserver.3318548048 .
# ln -s ntpkey_IFFkey_timeserver.3318548048 ntpkey_iffkey_timeserver
Replace user with the name of a user that has scp privileges on the
machine you are using as the time server. Under normal circumstances,
this can be any user with a login account on the time server.
4. If ntpd is running, restart it:
# service ntpd restart
Shutting down ntpd: [ OK ]
Starting ntpd: [ OK ]
If ntpd is not running, start it:
# service ntpd start
Starting ntpd: [ OK ]
5. Execute the command ntpq -p to make sure that the NTP client can
communicate with the designed server. The output should resemble
the following:
# ntpq -p ntpbeast.example.com
remote refid st t when poll reach delay offset jitter
==============================================================================
ntpbeast.example 192.168.0.1 1 u 209 1024 377 37.200 7.199 0.226
Replace ntpbeast.example.com in the command with the name (or
IP address) of the time server you are using.
As a final test, you can use the ntpstat command to query the time server
from the host machine to ensure that you can retrieve the time. The output will
show the server to which ntpd synchronizes, the clock’s precision, and the
interval on which ntpd resynchronizes:
# ntpstat
synchronised to NTP server (192.168.0.1) at stratum 3
time correct to within 70 ms
polling server every 128 s
404 Chapter 17
23_599496 ch17.qxd 8/30/05 6:41 PM Page 404
After ntpd has been running for a while, you can grep the system log for
NTP-related log entries to see ntpd’s activity. The following listing briefly
illustrates what you might see:
# grep ntpd /var/log/messages
Feb 28 07:56:56 luther ntpd[3549]: ntpd Mon Oct 11 09:10:20
EDT2004 (1)
Feb 28 07:56:56 luther ntpd: ntpd startup succeeded
Feb 28 07:56:56 luther ntpd[3549]: precision = 1.000 usec
Feb 28 07:56:56 luther ntpd[3549]: Listening on interface wildcard, 0.0.0.0#123
Feb 28 07:56:56 luther ntpd[3549]: Listening on interface wildcard, ::#123
Feb 28 07:56:56 luther ntpd[3549]: Listening on interface lo, 127.0.0.1#123
Feb 28 07:56:56 luther ntpd[3549]: Listening on interface eth0, 192.168.0.4#123
Feb 28 07:56:56 luther ntpd[3549]: kernel time sync status 0040
Feb 28 07:57:16 luther ntpd[3549]: frequency initialized -67.149 PPM from \
/var/lib/ntp/drift
Feb 28 07:58:23 luther ntpd[3549]: synchronized to 192.168.0.1, stratum 2
Feb 28 07:58:22 luther ntpd[3549]: time reset -0.461319 s
Feb 28 07:58:22 luther ntpd[3549]: kernel time sync disabled 0041
Feb 28 08:01:35 luther ntpd[3549]: synchronized to 192.168.0.1, stratum 2
Feb 28 08:09:04 luther ntpd[3549]: kernel time sync enabled 0001
One line of output wraps due to page layout constraints. In this log snippet,
you can see ntpd’s startup, a report of the interfaces on which it is listening, and,
in the final six lines, the synchronization activity. For example, the line that reads
frequency initialized -67.149 PPM from /var/lib/ntp/drift indi-
cates that ntpd read the drift file to set the clock frequency. The following lines
shows ntpd synchronizing to the clock at 192.168.0.1, subtracting 0.461319 sec-
onds from the system clock, and then reconfirming the synchronization about
three minutes later. This type of activity will continue throughout the day.
Playing Nicely and Wisely with NTP
Playing nicely with NTP means that you should adhere to the recommended
guidelines for selecting an external time server as a reference clock. The rule of
thumb is that if your network has less than 100 systems, you should use a stra-
tum 2 server rather than a stratum 1 server. This guideline exists to limit the
ever-increasing load on the stratum 1 servers. Rather than syncing 100 client
systems to an external reference server, the preferred practice is to set up a time
server inside your firewall (you do have firewall, right?), synchronize it with
an external reference clock, and then synchronize your LAN clients with your
internal time server. If you have a large network, that is, one with more than
100 NTP clients, it might be prudent to invest in a dedicated hardware clock
and use that as your time server. Such a measure would reduce your reliance
on an external resource and limit the load placed on public time servers. If you
Providing Additional Network Services 405
23_599496 ch17.qxd 8/30/05 6:41 PM Page 405
wanted to be a really good netizen, you could even make your hardware time
server part of the NTP public access server pool — see the NTP Web site at
for all the particulars.
Playing wisely with NTP means choosing at least three external reference
clocks (we usually select four) and making sure that the reference clocks are dis-
persed geographically and in terms of network connections. The geographic dis-
persal is easy enough to achieve by selecting one from each compass point that
you don’t occupy. For example, if you are located in Pittsburgh, Pennsylvania,
which is situated in the northeastern United States, choose reference clocks from
the southeast, southwest, and northwest regions of the United States.
Network dispersal is somewhat more difficult to achieve because you want
to try to locate reference clocks that use different Internet backbones or back-
bone providers. The theory is that if one backbone or a segment of one
provider’s backbone fails (because the fiber-optic cable is cut by a backhoe,
say), access to that time server will be impaired. NTP is engineered to select an
alternative server, but if all your servers use that same severed backbone,
you’re hosed. So, for example, if your primary network access uses UUNet,
good geographic dispersal requires finding reference clocks that use, say,
Sprint, MCI, or AT&T. As a practical matter, you can use the traceroute
command to examine the network paths packets follow to reach a given time
server and then compare those paths, confirming that there are as few routing
points in common between each time server as possible. It is a tedious under-
taking, but if your network and the services it provides rely on accurate, con-
sistent time services, it is well worth the effort.
Providing a Caching Proxy Server
What is a caching proxy server and why should you use one? A caching proxy
server is software (and potentially hardware) that stores (caches) frequently
requested Internet objects such as Web pages, Java scripts, and downloaded
files closer (in network terms) to the clients that request those objects. When a
new request is made for a cached object, the proxy server provides the object
from its cache instead of allowing the request to go to the source. That is, the
local cache serves the requested object as a proxy or substitute for the actual
server. The motivation for using a caching proxy server is two-fold: to provide
accelerated Web browsing by reducing access time for frequently requested
objects and to reduce bandwidth consumption by caching popular data
locally, that is, on a server that exists between the requesting client and the
Internet. The HTTP acceleration feature speeds up Web browsing because
cached pages need not be re-retrieved unless the original page has been
updated since it was last cached.
406 Chapter 17
23_599496 ch17.qxd 8/30/05 6:41 PM Page 406
NOTE Caching proxy servers are sometimes used to create content filters to
block attempts to access certain sites or content. Quite aside from the
Orwellian aspect of content filters, using a proxy server as a content filter
misuses the proxy server. Limiting access to certain sites is easier to accomplish
by blocking packets destined for banned sites. Moreover, because proxy servers
utilize system resources, especially RAM, for caching data, the resources
allocated to content filters are better applied to caching and retrieving data.
Nevertheless using a proxy as a single point through which to apply and simplify
site-blocking is quite common. Such site-blocking proxy servers squander
resources only on the system on which they’re running, which can be an efficient
approach if your site uses a single HTTP proxy for hundreds of desktops.
The Web proxy discussed in this chapter is called Squid. There is no intrin-
sic connection between the name Squid and the function of the proxy server.
It’s just a name that stuck. The Squid FAQ explains the name this way:
“Harris’ Lament says, ‘All the good [names] are taken.’ We needed to distin-
guish this new version from the Harvest cache software. Squid was the code
name for initial development, and it stuck (Squid FAQ, squid-cache.org
/Doc/FAQ/FAQ-1.html#ss1.3).” Squid provides the basic caching and
proxy functions just described. It also caches DNS lookups, to speed up subse-
quent DNS queries, performs nonblocking DNS queries, and implements neg-
ative caching, which means that Squid remembers when a request was made for
an object (or for a DNS resource) that doesn’t exist and doesn’t try to retrieve
it or find the nonexistent object in its cache. In addition to these proxy and
caching services, Squid also has full SSL support, includes extensive access
control, and features a rich logging system that you can use to fine-tune the
caching behavior.
Finally, Squid can work as a transparent proxy. An “ordinary” (opaque?)
proxy requires Web clients to specify the hostname and port of the proxy,
which then forwards requests to the requested server. This has obvious disad-
vantages, the biggest one being that you have to configure all the Web clients
to use the proxy. With transparent proxying, Web clients think they are com-
municating with the requested server when in fact they are communicating
with the proxy. A transparent proxy still intercepts requests, but Web clients
neither notice nor care.
Squid is included in both Fedora Core and RHEL, but depending on the
type of installation you performed, it might not be installed. The following
rpmquery command will show you if Squid is installed (you only need the
Squid package):
$ rpmquery squid
squid-2.5.STABlE8-1.FC3.1
Providing Additional Network Services 407
23_599496 ch17.qxd 8/30/05 6:41 PM Page 407
The version number might be slightly different by the time you read this
text. If Squid is not installed, you’ll obviously need to install it before proceed-
ing. The configuration process includes the following steps:
1. Verifying the kernel configuration
2. Configuring Squid
3. Modifying the Netfilter configuration
4. Starting Squid
5. Testing the configuration
The following subsections provide the details for each of these steps.
Verifying the Kernel Configuration
This section is titled “Verifying the Kernel Configuration” because the kernel
features you need, such as IP forwarding and Netfilter (iptables) support, are
already in place on Fedora Core and RHEL systems. The most you should
need to do is load a kernel module or enable IP forwarding. Nonetheless,
knowing the kernel modifications that have to be made is useful if you decide
at some point to discard the stock Fedora or RHEL kernel and roll your own.
The most important kernel feature you need is Netfilter support because
Netfilter will handle the actual proxying of browser requests. Specifically, you
need to enable Netfilter and the modules that support:
■■ Connection tracking
■■ IP tables
■■ Full NAT (Network Address Translation)
■■ Support for the REDIRECT target
For completeness’ sake, you need support for the /proc file system and
sysctl support for manipulating tunable runtime kernel options. These two
options are pretty much de jure these days and they are definitely present in the
stock Fedora and RHEL kernels.
The first thing to do is enable IP forwarding on the system that will run
Squid. IP forwarding enables the kernel to send, or forward, packets that arrive
on one network interface to another, an essential capability for proxying. The
following sysctl command will show you if IP forwarding is enabled:
# sysctl -n net.ipv4.ip_forward
1
408 Chapter 17
23_599496 ch17.qxd 8/30/05 6:41 PM Page 408