microsoft press windows workflow foundation step by step phần 3 ppsx
Bạn đang xem bản rút gọn của tài liệu. Xem và tải ngay bản đầy đủ của tài liệu tại đây (599.94 KB, 33 trang )
70 Part I Introducing Windows Workflow Foundation (WF)
6. In the Name field, type the name of your project or application.
7. In the Location field, type the file system location where you would like your project files
stored.
8. If the Create Directory For Solution check box is not already selected, select it.
9. Click OK. Visual Studio 2005 will now create the basic project for you and bring up the
workflow visual designer user interface.
As with the sequential workflow application, Visual Studio is now ready for us to build a state-
machine workflow. We’re not quite ready to actually build a state-machine workflow at this
point in the book. Why? Because we need to trigger the events that cause the workflow to
change state. To do that, we’ll need to understand how workflow instances communicate with
their host applications so that our host application can perform the trigger actions. We’ll
begin looking at host and workflow communication in Chapter 8, “Calling External
Methods,” but it’s in Chapter 10, “Event Activities,” that we learn what we need to know
to drive state-machine workflows.
Chapter 4 Introduction to Activities and Workflow Types 71
Chapter 4 Quick Reference
To Do This
Select the appropriate workflow type Model your system, and look closely at what is controlling
the process. If the workflow is controlling the process,
select a sequential workflow model. If external inputs are
controlling the workflow, select a state-machine workflow.
If complex behavior is to be modeled, a rules-based
approach might be the best. Often a combination of
workflow types will be necessary.
Build a sequential workflow application Start Visual Studio 2005, and select the New and then
Project menu items from the main File menu. From the
resulting New Project dialog box, select the Workflow node
from the Visual C# subtree shown in the Project Types
pane. From the Templates pane, select either the Sequen-
tial Workflow Console Application or the Sequential
Workflow Library type.
Build a state-machine workflow application Follow the steps for building a sequential workflow appli-
cation until you choose the template. In the Templates
pane, select either the State Machine Workflow Console
Application or the State Machine Workflow Library type.
Build a rules-based workflow application Create a sequential workflow application, and then skip to
Chapter 12 to learn how to apply the Policy or rule
condition.
73
Chapter 5
Workflow Tracking
After completing this chapter, you will be able to:
■ Describe workflow-pluggable services
■ Create an event tracking database and populate it with tables and scripts
■ Activate the event-tracking service
■ Create a custom tracking profile
■ View your workflow's tracking information
So far we’ve seen the basic objects that workflows are built from and controlled by. We build
workflow tasks from activities, which when executing are managed by a WorkflowInstance
object. Workflow instances are queued and controlled by the WorkflowRuntime. But Windows
Workflow Foundation (WF) doesn’t just provide us with objects—it also provides us with
services that work alongside our objects.
Pluggable Services
Workflow services are additional software functions that your workflows can, and will, use to
complete their tasks. Some of the services are optional, like the tracking service we’ll work
with in this chapter. Other services are required for your workflow to execute at all.
Workflow services are pluggable. A pluggable service is a service that can be selected a la carte
to perform specific tasks. For example, there are services that manage threading, tracking,
transactions, and so forth. You select the service that’s right for your workflow. You can even
create your own.
So what do these services look like? What do they do for us? Table 5-1 lays out the available
base services and gives you a better idea which services are available and what they do.
74 Part I Introducing Windows Workflow Foundation (WF)
Most of these services we don’t use directly. We’ll typically use services derived from
these base services.
Remember that these are base classes. The services we actually use are derived from these. For
instance, when we run a workflow instance, something needs to create a thread for that
instance to use. DefaultWorkflowSchedulerService does just that, using WorkflowSchedulerService
as its base. But if you want to provide the thread yourself, you can use ManualWorkflowSched-
ulerService instead. In this chapter, we’ll look at the tracking service provided by
SqlTrackingService, which has TrackingService for a base class.
The “pluggable” part comes in when you consider that at any given time you might need to
use a scheduler service (one that prepares threads for your workflow instance to use), the
runtime service, and queueing and subscriptions (timers). But you can add persistence
(saving in-progress workflow instances) and tracking, as well as external data communication
services. They all just plug in and work together.
Workflow Tracking
In this chapter, we’ll concentrate on the tracking service. Other chapters will look at other
available services. Regarding tracking, WF ships with one primary tracking service—SqlTrack-
ingService. However, should you need them, there are two additional services available as sam-
ples. These services, ConsoleTrackingService and SimpleFileTrackingService, allow you to write
tracking information to the console window or to files instead of to a Microsoft SQL Server
database. We won’t use those services here, but they are available if you need to use them.
Table 5-1 Base Workflow Services
Service Purpose
WorkflowPersistenceSer vice The abstract base class from which all persistence services are
derived.
WorkflowQueuingService The base class that provides methods you can use to manage the
workflow queues associated with a workflow instance.
W orkflowRuntimeService The abstract base class from which the workflow runtime core
services are derived.
WorkflowSchedulerService The base class for all classes that create threads that run workflow
instances on the workflow runtime host.
Wo rkflowSubscriptionService The base class for classes that manage subscriptions for a
workflow runtime.
WorkflowTransactionService The base class for all transaction services.
Tra ckingSer vice The abstract base class that provides the basic interface between
a tracking service and the runtime tracking infrastructure.
Chapter 5 Workflow Tracking 75
Note The samples are installed with the Windows SDK—see Chapter 1, “Introducing
Microsoft Windows Workflow Foundation” for installation instructions. See also the section in
this chapter entitled “Viewing Tracking Information with WorkflowMonitor” for accessing the
samples. The tracking services to which I refer, “Console” and “File,” are located in the Tech-
nologies directory under “Tracking.”
Workflow Event Tracking Using SqlTrackingService
You track your workflow processes by adding a tracking service to the workflow runtime—typ-
ically, SqlTrackingService. As your workflow instance progresses, it fires events, as do individual
activities within your workflow. If you have specific tracking needs, you can create your own
user-defined tracking events. If the events that are captured provide you with more tracking
data than you require, you can filter the tracked data using a tracking profile you establish.
As tracked events fire, WF creates and manages tracking records. Although you’re not required
to do so, you can easily access the tracking records directly from WF. Note that the informa-
tion is recorded in the database as well, so retrieving the information directly from the data-
base is also a possibility. Queries for tracking information are normally made at a later date
using an external tracking monitor tool, such as WorkflowMonitor (a tracking tool that comes
with WF as a sample, with source code) or a tool of your own design.
Table 5-2 lists the objects you’ll typically use when working with WF event tracking, and
we’ll use some of these as we progress through the chapter. If all you ever do is use WF’s out-
of-the-box event tracking capabilities, you won’t directly use many of the objects shown in
Table 5-2, but they will be used by WF on your behalf. However, if you need to customize your
workflow’s event tracking capabilities, it’s nice to know WF provides a strong library of track-
ing-related objects for you to use.
Table 5-2 Event Tracking Objects
Object Purpose
ActivityDataTrackingExtract Specifies a property or a field to be extracted from an activity and
sent to the tracking service together with an associated collection
of annotations when a track point is matched.
ActivityTrackingCondition Represents a condition resulting from comparing the value of
an activity property with a known value by using a specified
comparison operator.
ActivityTrackingLocation Defines an activity-qualified location that corresponds to an
activity status event in the executing root workflow instance.
ActivityTrackingRecord Contains the data sent to a tracking service by the runtime track-
ing infrastructure when an ActivityTrackP oint is matched.
ActivityTrackPoint Defines a point of interest that is associated with an activity exe-
cution status change to be tracked.
76 Part I Introducing Windows Workflow Foundation (WF)
These objects can be thought of as belonging to two main categories: tracking data retrieval
and tracking specification. Tracking retrieval objects, such as SqlTrackingQuery, help you
gather tracking data once it is stored in the database. Tracking specification objects, such as
the track points and locations, allow you to dictate what is tracked from your workflow code.
The tracking specification objects, such as the point and location obects, are organized into
three main groups: activity events, workflow events, and user events. The activity-related
tracking objects, such as ActivityTrackingPoint or ActivityTrackingLocation, are designed to
record activity-related event information to the tracking database. These events include such
things as activity cancellation, unhandled exceptions, and execution events. Workflow event-
tracking objects work in a similar manner but for workflow-related events, such as the
SqlTrackingQuery Provides methods and properties that you can use to access cer-
tain kinds of tracking data stored in a SQL database by the Sql-
Tracki n gSe r v i c e.
SqlTrackingQueryOptions Contains properties that are used to constrain the set of SqlTrack-
ingWorkflowInstance objects returned by the SqlTrack-
ingQuery.GetWorkflows method.
SqlTrackingWorkflowInstance Returned by a call to either SqlTrackingQuery.TryGetWorkflow or
SqlTrackingQuery.GetWorkflows to provide access to the tracking
data collected by the SqlTrackingService in a SQL database for a
specific workflow instance.
TrackingProfile Filters tracking events, and returns tracking records based on this
filtering to a tracking service. There are three kinds of tracking
events that can be filtered: activity status events, workflow status
events, and user events.
UserTrackingLocation Specifies a user-defined location that corresponds to a user event
in the executing root workflow instance.
UserTrackingRecord Contains the data sent to a tracking service by the runtime track-
ing infrastructure when a UserTrackPoint is matched.
UserTrackPoint Defines a point of interest that is associated with a user event.
WorkflowDat aTrackingExtract Specifies a property or a field to be extracted from a workflow
and sent to the tracking service together with an associated col-
lection of annotations when a track point is matched.
WorkflowTrackingLocation Defines a workflow-qualified location that corresponds to a
workflow event in the executing root workflow instance.
W o rkflowTrackingRecord Contains the data sent to a tracking service by the runtime track-
ing infrastructure when a WorkflowTrackPoint is matched.
WorkflowTrackPoint Defines a point of interest that is associated with a workflow
event.
Table 5-2 Event Tracking Objects
Object Purpose
Chapter 5 Workflow Tracking 77
workflow starting and stopping; instances being created, idling, and finishing; and other sim-
ilar things. And finally, user event tracking, which is where you customize the tracking needs
of your particular workflow, is specific to your workflow and depends entirely on how you
want your workflow tracked. You can allow as many or as few tracked user events in your
workflow as you require. We’ll see a couple of these when we look at tracking profiles later in
the chapter.
The tracking records are decorated with annotations. Annotations are just strings that are kept
with the tracking record and recorded into the tracking database. The activity-related and
workflow-related tracking records have an established collection of annotations, but you
might want to provide additional annotations for user-related event tracking records.
Tracking in WF terms isn’t that dissimilar to the notion of tracing. Tracing, as you might know,
is a useful debugging tool, and ASP.NET and .NET client technologies—such as Windows
Presentation Foundation (WPF) and Windows Forms—all support tracing capabilities.
Tracing embodies the concept of trace levels, where you specify what is traced for varying
degrees of severity, such as tracing on an error, tracing to record a warning, and writing trace
entries for informational purposes. This allows people reviewing the trace records to filter the
trace information according to their desires. They can see only exception trace information, or
they can see the entire trace stack.
WF tracking is based on a similar concept, at least as far as the filtering is concerned. As you
might imagine, both activity-related and workflow-related events will generate all manner of
tracking records, some of which you might find interesting (such as records for unhandled
exceptions or idle status). You might decide other events are not as necessary for tracking
purposes.
To filter the tracked events you don’t want, you create a tracking profile. Ultimately, a tracking
profile is an XML document that identifies what is to be tracked and what is to be excluded.
Unlike tracing, the tracking profile dictates what is written to the tracking database, not what
is later to be viewed. If you exclude events, nothing regarding the excluded events is written to
the database. Also unlike tracing, the tracking profile XML document is recorded in the track-
ing database and recalled when the workflow is executed. Tracing, on the other hand, records
everything designated to be traced but categorizes the trace information for later filtered
viewing.
Setting Up SQL Server for Tracking
Although you could build custom tracking services that record tracking data to various repos-
itories (such as a message queue or data file), in this chapter we’ll concentrate on WF’s ability
to record event data in a SQL Server 2005 database. WF comes with built-in support for using
SQL Server 2005.
78 Part I Introducing Windows Workflow Foundation (WF)
Note Because SQL Server 2005 and SQL Server Express both use SQL Server Management
Studio, the steps will be identical for either database service, at least as far as establishing the
event tracking database itself is concerned. SQL Server Express doesn’t ship with SQL Server
Management Studio, but you can download the Express version from this site:
www.microsoft.com/
downloads/details.aspx?displaylang=en&FamilyID=C243A5AE-4BD1-4E3D-94B8-5A0F62BF7796
We’ll begin by creating a new database in SQL Server Management Studio (or the Express ver-
sion). We’ll then need to run some SQL scripts that ship with the WinFX components (or that
come prepackaged with Windows Vista). These scripts will create the database roles, the
tables and views, and the stored procedures necessary to interact with your workflow. Let’s
start by creating a new database and running some preliminary scripts; then we’ll record
tracking data to that database using the WF tracking service.
Note
I’ll refer to SQL Server Express in the steps that follow, but for those of you using the
full version of SQL Server, the steps remain the same. When you read “SQL Server Express,”
think to yourself “SQL Server.”
Create a SQL Server 2005 tracking database
1. In Microsoft Windows, click the Start button, move the cursor to All Programs, and then
select Microsoft SQL Server 2005 from the programs menu.
2. Click the SQL Server Management Studio Express icon to start the SQL Server manage-
ment application (or if you have SQL Server installed, click the SQL Server Management
Studio icon).
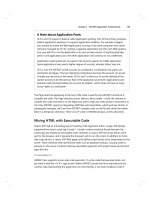
3. We’ll need to connect to the database server we want to use, using the SQL Server
Connect To Server dialog box:
Chapter 5 Workflow Tracking 79
(If SQL Server Management Studio Express is already running, click the Connect button
and then choose Database Engine in the Object Explorer pane.) The Server Type drop-
down list should indicate Database Engine (the default value). The Server Name drop-
down list should display the server’s name and the instance of SQL Server 2005 you
want to use on that server. My server is named “Redbarron,” and the SQL Server instance
I want to use is “SQL2005.” If you want to use the default instance, simply provide only
the server’s name. As for authentication, you should use the authentication methodol-
ogy you selected when you installed SQL Server (or see your database administrator for
any assistance you might require). Click Connect to connect to your database server.
4. SQL Server Management Studio Express’s user interface typically consists of two panes.
The left pane mimics Windows Explorer and shows the databases and services associ-
ated with your database server. The right pane is the work pane, where you’ll type in
scripts, set up table columns, and so forth. The left pane is known as the Object
Explorer, and if it is not visible, you can activate it by selecting Object Explorer from
the View menu.
5. Right-click on the Databases node to activate the context menu, and select New
Database.
6. The New Database dialog box appears. Type WorkflowTracking in the Database Name
field, and click OK.
80 Part I Introducing Windows Workflow Foundation (WF)
If you expand the Databases node in the Object Explorer, you will find that the new
WorkflowTracking database has been added.
7. Next we’ll need to execute the scripts Windows Workflow Foundation provides for
setting up tracking, starting with the schema script. (This builds the tables and views, as
well as creating workflow tracking roles.) The scripts are located in <%WINDIR%>\
Microsoft.NET\Framework\v3.0\Windows Workflow Foundation\SQL\EN, where
<%WINDIR%> is your Windows directory (typically, C:\Windows). From SQL Server
Management Studio Express’s File menu, select Open and then File, which brings up the
common Open File dialog box. Using the controls in the Open File dialog box, locate the
schema script, Tracking_Schema.sql. Select that from the available scripts, and click the
Open button. Note you’ll need to connect to your database server once again.
Chapter 5 Workflow Tracking 81
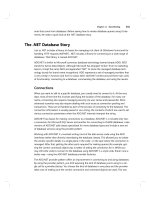
8. SQL Server Management Studio Express should have loaded the script into a new win-
dow, but before we actually run the script, we need to specify which database we want
the script to run against. Naturally, we want to use the WorkflowTracking database we
just created. So locate the WorkflowTracking database in the drop-down list of data-
bases, and select it as the target, as shown below.
Note
Don’t forget this step! If you forget to specify the database, the tables, views,
and roles will be created on whichever database is active in the drop-down list at the
time. You will need to delete the inserted elements by hand. Don’t ask how I know
9. With the script loaded and ready to execute, and with the WorkflowTracking database
designated as the target of the script, execute the script by clicking the Execute button
on the toolbar.
Tip
You can alternatively execute the script using the Execute menu option, found
under the Query main menu item, or just press the F5 key.
10. Repeat steps 7 through 9 to execute the Tracking_Logic.sql script. This loads the
necessary stored procedures into the database.
We now have a database in which we’ll record tracking information, but how does the
information get recorded? What component is responsible for that? Let’s find out!
82 Part I Introducing Windows Workflow Foundation (WF)
Using the SqlTrackingService Service
With the workflow tracking database in place, it’s time to actually use it. Let’s create a new
workflow and see how we track events. We’ll start by creating a slightly more complex work-
flow so that we have a few events to play with. After we have the basic workflow built, we’ll add
the necessary tracking code.
Create a new workflow for tracking
1. To make it easier, I’ve created two versions of this sample application. (In fact, I’ll try to
do that for the remainder of the book.) The WorkflowTracker application has two differ-
ent versions: one incomplete and one complete. The complete version is entirely fin-
ished and ready to run, and you will find it in the \Workflow\Chapter5\
WorkflowTracker Completed\ directory. The incomplete version is yours to modify
when completing the steps I’ve outlined here, and you’ll find it in the \Work-
flow\Chapter5\Workflow Tracker\ directory. Feel free to use either one. Whichever ver-
sion you choose, you can open it for editing by dragging its .sln file onto an executing
copy of Visual Studio.
2. After Visual Studio opens the WorkflowTracker solution for editing, create a separate
sequential workflow library project as you did in Chapter 3 to house our new workflow.
(See the section in Chapter 3 entitled “Adding a sequential workflow project to the
WorkflowHost solution”.) Name this workflow library TrackedWorkflow and save it in
the \Workflow\Chapter5\WorkflowTracker directory.
Note
This will turn out to be a common theme—creating a workflow to go with a
basic application. The good news is you’ll become quite adept at creating workflow
host applications, which isn’t a bad thing, I think. If you prefer, you can create a work-
flow-based console application directly within Visual Studio, but you should still create
a separate workflow library. This arrangement will make it easier to monitor your work-
flow when we use WorkflowMonitor later in the chapter.
3. After you have completed the steps to add the workflow library project, Visual Studio
opens the visual workflow designer for editing. If it doesn’t, locate the Workflow1.cs file
in Visual Studio’s Solution Explorer and click the View Designer toolbar button to
activate the designer.
4. For this workflow, let’s combine some aspects of previous workflows we’ve built. This
should give us a slightly more complex workflow without pushing us too far away from
what we’ve seen. Let’s begin by dragging an IfElse activity from the Toolbox onto the
designer’s surface.
Tip
Building this part of the workflow will be a lot like building the workflow from
Chapter 1.
Chapter 5 Workflow Tracking 83
5. Click once on the left branch, ifElseBranchActivity1, to activate its properties in the Visual
Studio Properties window.
6. Look for ifElseBranchActivity1’s Condition property. Open the drop-down list by clicking
the down arrow, and select Code Condition.
7.
The
Condition
property should now display a plus sign (+) to its left. Click the plus sign
to expand the property grid and expose the
Condition
property’s
Condition
name field.
(It may seem confusing to have a property of a property use a name that is identical to
its parent, but that’s how the WF team chose to name things.) In the edit control, type
QueryDelay
. We’ll use this method to decide which path we’ll take through the
IfElse
activity.
84 Part I Introducing Windows Workflow Foundation (WF)
8. Next we’ll add some activities to the left branch (which is the branch that is executed
when the condition evaluates to true). First, drag a Code activity from the Toolbox and
drop it onto the left IfElse branch, ifElseBranchActivity1.
9. The exclamation mark (!) you see in the preceding figure means we have work to do. In
this case, it indicates we need to to add a method to be called when the code activity we
just placed into our workflow is executed. In the Visual Studio Properties pane, locate
the ExecuteCode property and type PreDelayMessage into its edit control.
10. You probably see what I’m doing I’m essentially adding the delay workflow we created
in Chapter 3 to this workflow. And as we did in Chapter 3, drop a Delay activity and
Chapter 5 Workflow Tracking 85
another Code activity into ifElseBranchActivity1 and set their properties. The Delay activ-
ity should delay 10 seconds (00:00:10), as in Chapter 3, and the second Code activity
should execute a method called PostDelayMessage. When completed, the designer
should look like the following:
11. With our designer work complete, let’s add some code. Click the View Code toolbar
button in the Visual Studio Solution Explorer toolbar to bring up the C# code for
Workflow1.cs. Begin by adding a reference to System.Windows.Forms as well as the
corresponding using statement at the top of the Workflow1.cs file.
using System.Windows.Forms;
12. As you scan through the file, you should see the three event handlers Visual Studio
added for you as activity properties: PreDelayMessage, PostDelayMessage, and QueryDelay.
As you did in Chapter 3, add message boxes to the Code activity methods so that the
application notifies you when the workflow is executing. To PreDelayMessage, add this
code:
MessageBox.Show("Pre-delay code is being executed.");
To PostDelayMessage, add this code:
MessageBox.Show("Post-delay code is being executed.");
13. The slightly more interesting case is the code we’ll add to QueryDelay:
e.Result = false; // assume we'll not delay
if (MessageBox.Show("Okay to execute delay in workflow processing?",
"Query Delay",
MessageBoxButtons.YesNo,
MessageBoxIcon.Question) == DialogResult.Yes)
{
// Allow progression
e.Result = true;
// Show message
86 Part I Introducing Windows Workflow Foundation (WF)
Console.WriteLine("Delay path taken ");
} // if
else
{
// Show message
Console.WriteLine("Delay path NOT taken ");
} // else
14. With the workflow complete, we’ll need to add a reference from our main application,
WorkflowTracker, to the workflow, TrackedWorkflow. A project-level reference is easiest,
and to add the reference right-click the References folder in the WorkflowTracker project
in Visual Studio’s Solution Explorer and select Add Reference. When the Add Reference
dialog box appears, select the Project tab and then click the TrackedWorkflow project
from the list. Click OK.
15. Open Program.cs in the WorkflowTracker project for editing and then look for this line
of code:
Console.WriteLine("Waiting for workflow completion.");
16. To create a workflow instance, add this code following the line of code you just located:
// Create the workflow instance.
WorkflowInstance instance =
workflowRuntime.CreateWorkflow(typeof(TrackedWorkflow.Workflow1));
// Start the workflow instance.
instance.Start();
17. Compile the solution by pressing F6. Correct any compilation errors.
18. To execute the application, press F5 (or Ctrl+F5) and respond “Yes” to the delay query.
You should see this console output:
We now have a basic workflow we can use to experiment with WF’s tracking capabilities. Let’s
turn now to adding the code we’ll need to actually perform the tracking.
Chapter 5 Workflow Tracking 87
Add SqlTrackingService to your workflow
1. WF ships with activity and workflow event tracking capability, so we won’t need to do
much to track those events. Nonetheless, we will still need to add some logic to the main
program application file. Start by adding a reference to System.Configuration to the Work-
flowTracker application. We’ll need this to access the database connection string we’ll
store in the application configuration file. Do this by clicking Add Reference for the
WorkflowTracker project. When the Add Reference dialog box comes up, select the
.NET tab and then System.Configuration from the list of available .NET assemblies.
Click OK.
2. Next, add an application configuration file to the WorkflowTracker application. To do
this, right-click the WorkflowTracker tree control node in Visual Studio’s Solution
Explorer and select Add and then New Item. When the Add New Item dialog box
appears, select Application Configuration File from the list and click OK. This adds a
new app.config file to your application.
3. Visual Studio will create the new app.config file and open it for editing. Insert this XML
between the configuration opening and closing tags. Note that printing limitations pre-
vent the connectionString attribute from being shown as a single line, but the line you
insert should be a single line with no line breaks:
<connectionStrings>
<add name="TrackingDatabase"
connectionString="Data Source=(local)\SQLEXPRESS;
Initial Catalog=WorkflowTracking;Integrated Security=True;"/>
</connectionStrings>
Note The connection string I’ve shown might or might not work for you. If you’re
using a different server or a named instance, you’ll need to adjust the Data Source
value accordingly. Or, if you’re using SQL Server authentication, you’ll want to replace
the Integrated Security value with the UID and PWD (user ID and password, respec-
tively) values that correspond to the SQL login you want to use.
88 Part I Introducing Windows Workflow Foundation (WF)
4. Click WorkflowFactory.cs for the WorkflowTracker project in the Visual Studio Solution
Explorer, and then click the Solution Explorer’s View Code button.
5. So that we can use the Visual Studio IntelliSense capability, add the following lines of
code to the top of the file, following the last using directive you find there:
using System.Workflow.Runtime.Tracking;
using System.Configuration;
6. While in the WorkflowFactory.cs file, scan down and find the line where we create the
WorkflowRuntime instance. We’ll need to introduce SqlTrackingService to the workflow
runtime at this point. Add this line of code following the line of code calling
GetWorkflowRuntime:
String conn = ConfigurationManager.
ConnectionStrings["TrackingDatabase"].
ConnectionString;
_workflowRuntime.AddService(new SqlTrackingService(conn));
With that last step, we’re done adding code that we’ll need to actually perform the tracking.
(In a moment, we’ll add more code to display the tracking results.) Compile the application by
selecting Build Solution from the Build menu, and execute it by pressing the F5 or Ctrl+F5
keys.
Note
If the program crashed with an ArgumentException telling you that the runtime can’t
access the given database, you probably need to add the login account you’re using as a
valid database user (as specified in the connection string we added to the workflow code a
moment ago) or otherwise adjust the connection string. If you’re unsure how to do this, the
online reference material can help ( />ms254947(VS.80).aspx), or see your local database administrator for assistance.
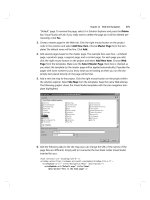
Assuming the workflow runs as expected, you should find entries in the WorkflowTracking
database’s ActivityInstance table, as shown in Figure 5-1.
Note
To see the table, open SQL Server Management Studio Express (if not already open)
and expand the Databases tree control node. Locate the WorkflowTracking database and
expand its tree node. Expand the Tables node and right-click the ActivityInstance tree node.
From the resulting context menu, select Open Table.
Figure 5-1 ActivityInstance table
Chapter 5 Workflow Tracking 89
If all you ever want to do is record tracking data in the tracking database, the steps we’ve com-
pleted so far are enough to accomplish this. But let’s take a minute and use a couple of the
objects listed in Table 5-2 to draw tracking data from the database from within our application.
Retrieve tracking records from your workflow
1. To begin, with the application we just created open and ready for editing in Visual
Studio, open the WorkflowTracker project’s Program.cs file for editing.
2. Add the using statements for configuration and workflow tracking to the top of the file:
using System.Configuration;
using System.Workflow.Runtime.Tracking;
3. In the Main method, locate this line of code:
waitHandle.WaitOne();
4. Add these lines of code following the line of code you found in step 3:
ShowWorkflowTrackingEvents(instance.InstanceId);
ShowActivityTrackingEvents(instance.InstanceId);
5. Because we’ve called a couple of methods that don’t yet exist, we need to implement
those methods. Add these methods to the Program class:
static void ShowActivityTrackingEvents(Guid instanceId)
{
SqlTrackingQuery sqlTrackingQuery =
new SqlTrackingQuery(ConfigurationManager.
ConnectionStrings["TrackingDatabase"].
ConnectionString);
SqlTrackingWorkflowInstance sqlTrackingWorkflowInstance = null;
sqlTrackingQuery.TryGetWorkflow(instanceId,
out sqlTrackingWorkflowInstance);
if (sqlTrackingWorkflowInstance != null)
{
Console.WriteLine("\nActivity Tracking Events:\n");
Console.WriteLine(" Status :: Date/Time :: Qualified ID");
foreach (ActivityTrackingRecord atr in
sqlTrackingWorkflowInstance.ActivityEvents)
{
Console.WriteLine(" {0} :: {1} :: {2}", atr.ExecutionStatus,
atr.EventDateTime, atr.QualifiedName);
} // foreach
} // if
}
static void ShowWorkflowTrackingEvents(Guid instanceId)
{
SqlTrackingQuery sqlTrackingQuery =
new SqlTrackingQuery(ConfigurationManager.
ConnectionStrings["TrackingDatabase"].
ConnectionString);
90 Part I Introducing Windows Workflow Foundation (WF)
SqlTrackingWorkflowInstance sqlTrackingWorkflowInstance = null;
sqlTrackingQuery.TryGetWorkflow(instanceId,
out sqlTrackingWorkflowInstance);
if (sqlTrackingWorkflowInstance != null)
{
Console.WriteLine("\nWorkflow Instance Events:\n");
Console.WriteLine(" Description :: Date/Time");
foreach (WorkflowTrackingRecord wtr in
sqlTrackingWorkflowInstance.WorkflowEvents)
{
Console.WriteLine(" {0} :: {1}", wtr.TrackingWorkflowEvent,
wtr.EventDateTime);
} // foreach
}
}
We blew out a lot of code in that last step, but in reality what we’re doing isn’t terribly com-
plex. We first create an instance of SqlTrackingQuery, providing it the same connection string
we provided to SqlTrackingService. Then we effectively query the database for tracking informa-
tion for our current workflow instance, identified by the instance’s ID (a Guid). The query is
performed by SqlTrackingService.TryGetWorkflow. If tracking information for our workflow
instance is located in the database, we loop through the tracking records (returned to us as a
collection of WorkflowTrackingRecord objects) and extract the information of interest. If no
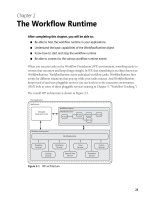
records are found, no tracking information is written to the console window. The screen out-
put should look something like the screen you see in Figure 5-2 (you might need to set a
breakpoint and run the code in debug mode to see the output).
Figure 5-2 WorkflowTracker application screen output
Chapter 5 Workflow Tracking 91
Tracking User Events
SqlTrackingService, because it is a part of WF, is capable of tracking events that are inherently
a part of WF. That is, it can track standard events fired from activities and workflow instances.
But what about events your workflow generates? How do we track those?
As it happens, the Activity activity supports a method named TrackData. TrackData has two
overloaded versions: one that takes an object to be stored in the tracking database and one
that accepts a string as a key as well as the object to be stored.
If you execute TrackData and pass in data for tracking purposes, usually a string, the
information will be stored in the tracking database as user-event data. Try the procedure
below with the WorkflowTracker project we created earlier in the chapter.
Retrieve tracking records from your workflow
1. With the WorkflowTracker project open in Visual Studio for editing, open the
Workflow1.cs C# file for editing.
2. Scroll down until you find the PreDelayMessage and PostDelayMessage methods we added
when we created the workflow.
3. After the code to display the message box in PreDelayMessage, add this code:
this.TrackData("Delay commencing");
4. Similarly, add this code following the message box code in PostDelayMessage:
this.TrackData("Delay completed");
5. Compile and execute the program using F5 or Ctrl+F5.
Now open the UserEvent table in the WorkflowTracking database, following the procedure
outlined for the ActivityInstance table (Figure 5-1). There should be two rows, one for each
time we called TrackData in our workflow, as shown in Figure 5-3.
Figure 5-3 UserEvent table showing results of calling TrackData
Building Custom Tracking Profiles
I’ve mentioned tracking profiles a few times already in this chapter, but I intentionally didn’t
get into the details. I left those for this section.
As you might recall, a tracking profile is a mechanism for limiting the amount of information
the WF tracking architecture will store in the tracking database. Ultimately, a tracking profile
is no more than an XML document that stipulates what is to be included or excluded from a
92 Part I Introducing Windows Workflow Foundation (WF)
given workflow’s tracking perspective. But to make things easier in code, there is a Tracking-
Profile object as well as the rest of the objects you saw in Table 5-2. You can use these objects
to create this XML document.
Because there is a tracking profile object, you might naturally assume that there is also an
XML serializer available to convert the TrackingProfile object into the XML document you’ll
need to store in the database. And in fact, there is—TrackingProfileSerializer. There is no inher-
ent WF support for writing the XML information to the database once it’s serialized, but that’s
easily accomplished using typical ADO.NET techniques and a stored procedure you’ll find in
the tracking database.
If you glance back at Table 5-2, you’ll find objects named using words such as “location” and
“point”—one each for activity, workflow, and user events. What do we mean when we talk
about locations and points?
Well, locations refer to specific places in your workflow where events occur, whether activity-
related, workflow-related, or user-related (with “user-related” referring to events you coded
into your workflow, not end users of your workflow-based application). Locations describe
the events to be tracked. Using a location object, you can specify more precisely which events
you want included and at what location in your workflow you want those events included in
the tracking database, as well as which events you want excluded from tracking consideration.
Track points collect locations, and as such they can trigger tracking information in one or
many places within your workflow. You can think of a track point as a point of interest that
can span different places in your workflow code. Given the conditions and locations you
assign to the track point, it might or it might not be triggered for tracking purposes.
Why mention all of this? Because when you set up a tracking profile, what you are really doing
is adding tracking points and locations to the profile object to be used as filters for writing
tracked events. Let’s work this into the workflow example we’ve been using throughout the
chapter.
Create a new tracking profile
1. Open the WorkflowTracker project in Visual Studio for editing if it’s not already open.
Select Program.cs in Solution Explorer, and click the View Code toolbar button to edit
the C# source code for the main application file. All the code we’ll add in this section will
be placed in this one file.
2. The code we’ll be adding isn’t necessarily difficult to understand, but there is quite a bit
of it. Therefore, let’s add the necessary using directives we’ll need to compile as well as to
keep IntelliSense happy. Add these lines to the using directives you find in Program.cs:
using System.Data;
using System.Data.SqlClient;
using System.Globalization;
using System.IO;
Chapter 5 Workflow Tracking 93
3. As for the code we’ll add, we’ll begin by locating the Main method. Add these lines
following the opening brace for the Main method. You want to do this before you
execute the code that creates your workflow:
TrackingProfile profile = CreateProfile();
StoreProfile(profile, ConfigurationManager.
ConnectionStrings["TrackingDatabase"].
ConnectionString);
4. The code we just added calls two methods we need to add to the Program class. Scroll
down through the Program class, and add the CreateProfile method you see here:
static TrackingProfile CreateProfile()
{
TrackingProfile profile = new TrackingProfile();
ActivityTrackingLocation actLoc = new
ActivityTrackingLocation(typeof(Activity));
actLoc.MatchDerivedTypes = true;
actLoc.ExecutionStatusEvents.Add(ActivityExecutionStatus.Executing);
ActivityTrackPoint actPt = new ActivityTrackPoint();
actPt.MatchingLocations.Add(actLoc);
profile.ActivityTrackPoints.Add(actPt);
WorkflowTrackingLocation wfLoc = new WorkflowTrackingLocation();
wfLoc.Events.Add(TrackingWorkflowEvent.Started);
wfLoc.Events.Add(TrackingWorkflowEvent.Idle);
WorkflowTrackPoint wfPt = new WorkflowTrackPoint();
wfPt.MatchingLocation = wfLoc;
profile.WorkflowTrackPoints.Add(wfPt);
profile.Version = new Version("1.0.0.0");
return profile;
}
5. Similarly, add the StoreProfile method:
static void StoreProfile(TrackingProfile profile, string connString)
{
TrackingProfileSerializer serializer = new TrackingProfileSerializer();
StringWriter writer = new StringWriter(new StringBuilder(),
CultureInfo.InvariantCulture);
serializer.Serialize(writer, profile);
SqlConnection conn = null;
try
{
if (!String.IsNullOrEmpty(connString))
{
conn = new SqlConnection(connString);
string storedProc = "dbo.UpdateTrackingProfile";
94 Part I Introducing Windows Workflow Foundation (WF)
SqlCommand cmd = new SqlCommand(storedProc, conn);
cmd.CommandType = CommandType.StoredProcedure;
SqlParameter parm = new SqlParameter("@TypeFullName",
SqlDbType.NVarChar, 128);
parm.Direction = ParameterDirection.Input;
parm.Value = typeof(TrackedWorkflow.Workflow1).ToString();
cmd.Parameters.Add(parm);
parm = new SqlParameter("@AssemblyFullName",
SqlDbType.NVarChar, 256);
parm.Direction = ParameterDirection.Input;
parm.Value =
typeof(TrackedWorkflow.Workflow1).Assembly.FullName;
cmd.Parameters.Add(parm);
parm = new SqlParameter("@Version", SqlDbType.VarChar, 32);
parm.Direction = ParameterDirection.Input;
parm.Value = "1.0.0.0";
cmd.Parameters.Add(parm);
parm = new SqlParameter("@TrackingProfileXml",
SqlDbType.NText);
parm.Direction = ParameterDirection.Input;
parm.Value = writer.ToString();
cmd.Parameters.Add(parm);
conn.Open();
cmd.ExecuteNonQuery();
} // if
} // try
catch (Exception ex)
{
if (ex is SqlException)
{
// Check to see if it's a version error.
if (ex.Message.Substring(0,24) == "A version already exists")
{
// Version already exists
Console.WriteLine("NOTE: a profile with the same version" +
" already exists in the database");
} // if
else
{
// Write error message
Console.WriteLine("Error writing profile to database: {0}",
ex.ToString());
} // else
} // if
else
{
// Write error message
Console.WriteLine("Error writing profile to database: {0}",
ex.ToString());
} // else
} // catch
finally
{
Chapter 5 Workflow Tracking 95
if (conn != null)
{
conn.Close();
} // if
} // finally
}
6. If you execute the application at this point, by pressing F5 or Ctrl+F5, the profile created
in CreateProfile should be built and written to the database. If you look closely at the code
shown in step 4, you’ll note that only a small handful of activity and workflow events are
being tracked. Therefore, we should expect to see far fewer lines of text written to the
console window by ShowActivityTrackingEvents and ShowWorkflowTrackingEvents. And
in fact, that is exactly what happens, as you can see in Figure 5-4 (compare this to
Figure 5-2):
Figure 5-4 WorkflowTracker screen output with tracking data
CreateProfile creates a new TrackingProfile and adds both an activity tracking point and a work-
flow tracking point. Each tracking point has a single tracking location defined that dictates
which events are tracked. (Events not listed are excluded by default.) So we should see only
Executing events from activities and Started and Idle events from the workflow instance, and
indeed, if you examine the screen output shown in the preceding figure, this is the case.
StoreProfile, in turn, serializes the tracking profile to its XML form and then uses typical
ADO.NET techniques to record the XML in the tracking database. Because it is considered an
error by the tracking database profile update logic to try to update a tracking profile with the
same version, the catch logic in StoreProfile senses this and writes an informational note to the
console window. Otherwise, the entire error string is written if there is an exception.