Wrox Professional Crystal Reports for Visual Studio NET Second Edition phần 6 potx
Bạn đang xem bản rút gọn của tài liệu. Xem và tải ngay bản đầy đủ của tài liệu tại đây (2.19 MB, 38 trang )
05 557300 Ch05.qxd 3/24/04 9:40 AM Page 168
Chapter 5
This report has been written from a single table, Customer, for which we are setting the ConnectionInfo.
The name of our server is
localhost, off of the Northwind database, with sa as the user ID, and no
password.
Add this code to the
Form1_Load method:
Private Sub Form1_Load(ByVal sender As System.Object, ByVal e As
System.EventArgs) Handles MyBase.Load
Dim myReport = New ch5_worldsales_northwind()
Dim myTableLogonInfos = New CrystalDecisions.Shared.TableLogOnInfos()
Dim myTableLogonInfo = New CrystalDecisions.Shared.TableLogOnInfo()
Dim myConnectionInfo = New CrystalDecisions.Shared.ConnectionInfo()
With myConnectionInfo
.ServerName = “localhost”
.DatabaseName = “Northwind”
.UserID = “sa”
.Password = “”
End With
myTableLogonInfo.ConnectionInfo = myConnectionInfo
myTableLogonInfo.TableName = “customers”
myTableLogonInfos.Add(myTableLogonInfo)
CrystalReportViewer1.LogOnInfo = myTableLogonInfos
CrystalReportViewer1.ReportSource = myReport
End Sub
Make sure that when you are finished setting the ConnectionInfo for the table, you specify the table
name you are working with prior to using the
Add method; otherwise you will receive an error message.
Compile and run the example. The report should appear, looking identical to the previous examples.
This is a very simple example, as our report has only one table to worry about. If you have a report that
features multiple tables or if you don’t know the names of the tables, you could also set up a loop to go
through each
report.database.table in report.database.tables and set the ConnectionInfo
properties for each.
In order to get all of the tables in your report and loop through them, you will need to use the Report
Engine, which is covered in Chapter 9, “Working with the Crystal Reports Engine.”
Setting Report Record Selection
Just like the functionality found in the Crystal Viewer for Windows applications, we can also set the
record selection formula that is used to filter our report records when viewing a report through the Web
Viewer.
Just like the Windows Viewer, the
SelectionFormula property gives us the ability to return or set this
value at run time. To return a record selection formula, we would simply request the property as a
string, as shown here:
CrystalReportViewer1.SelectionFormula.ToString
168
05 557300 Ch05.qxd 3/24/04 9:40 AM Page 169
Report Integration for Web-Based Applications
Using the report and viewer we have been working with, we could set the record selection property
when the form loads, before the call to the database, ensuring that only records for customers in the
region of NC (North Carolina) are shown:
Dim myConnectionInfo = New CrystalDecisions.Shared.ConnectionInfo()
CrystalReportViewer1.SelectionFormula = “{Customer.Region} = ‘NC’”
With myConnectionInfo
This is almost exactly like the method you would use to change the record selection formula in a
Windows-based application, so it shouldn’t be too hard.
Working with Parameter Fields
Another report feature that is often used is parameter fields; a Crystal Report can use parameter fields to
prompt the user for values that can be displayed on the report, used in record selection criteria, and so
on. If you have played with this feature in conjunction with Windows applications, you are probably
already familiar with the default dialog that appears when you run or preview a report that has parame-
ters. In the last chapter, we looked at how to create your own dialogs to capture these parameters, noting
you could always just let Crystal Reports pop the default parameter dialog and save you the trouble of
creating one.
With the Crystal Viewer for Web-based applications, this is not an option; in order to use parameters
with a report, we will need to create our own user interface to capture those parameters and then send
them to the viewer to be processed and shown on our report. So in the following section, we are going to
look at how to programmatically set different types of parameters found in your reports using the
Crystal Viewer for Web applications.
Again, to walk through the examples in this section, you will need to have a report that includes param-
eters and make sure that the parameters are used in the report—either displayed on the report, used in a
formula, in the record selection, and so on—because we want to see the results when we actually set
these parameter values.
To see this in action, we are going to add yet another new project and add it to our existing one. Click
File → New → Project, and select ASP .NET Web Application. Call the
project viewer_parameters
and save it to Crystal.NET2003\Chapter05. Make sure that the radio button Add to Solution is
selected as opposed to Close Solution, as shown in Figure 5-14.
The sample report that goes along with this section is called
ch5_parameters.rpt and to add this
report to your project, select Project → Add Existing Item and browse for the report where you unzipped
the downloaded sample files. Add it to the project and click the Open button.
Now drag and drop a
CrystalReportViewer onto your form and add the report that was just added as
a component to your Form. Look in the toolbox under Components. In this section, you should see a
component labeled
ReportDocument. Drag this component onto your form.
From the drop-down list, select the
ch5_parameters.rpt report and click OK.
169
05 557300 Ch05.qxd 3/24/04 9:40 AM Page 170
Chapter 5
Figure 5-14
Then in the
Page_Init event of your form, add a single line of code to call the DataBind method imme-
diately after the
InitializeComponent() call, as shown here:
CrystalReportViewer1.DataBind()
If you prefer to set the initial report source using the property pages, you will need to open the
Properties page for the Report Viewer, and then select the (
DataBindings) property, as we did in the
first example. Then right-click the project name, and click Set As Startup Project. You’re now ready to
start setting working with parameters.
Again, a good starting place for working with parameters is looking at the different types of parameters
you could have in a report; in addition to a parameter’s data type (String, Number, and so on), you can
also set options for how the parameter is entered. These options will seem familiar to you if you have
already read the previous chapter, but they are repeated here just to drive the point home and for the
benefit of anyone who doesn’t want to flip back and find that particular section. There are three basic
options available when creating parameter fields:
❑ Discrete parameters accept single, discrete values; depending on how the parameter field was
set up, it can accept only one value or multiple values.
❑ Ranged parameters can accept a lower and upper value, selecting everything that is within that
range of numbers, letters, and so on.
❑ Discrete and Ranged parameters support a combination of the two different types, where you can
enter multiple discrete values as well as multiple ranges.
Parameters within a report are contained within a collection called ParameterFields and within the col-
lection, a set of attributes is stored for each field using the Parameter Field object. As we walk through
170
05 557300 Ch05.qxd 3/24/04 9:40 AM Page 171
Report Integration for Web-Based Applications
this example, we will set properties relating to this object in this collection and then use this collection to
set the
ParameterFieldInfo property of the viewer, as shown subsequently:
crystalReportViewer1.ParameterFieldInfo = myParameterFields
To set the values for a particular parameter, we first need to dimension both the collection and object. We
also need to create a variable to hold the value that we want to pass to the report for this parameter.
Because in this example we are passing only a discrete value to the parameter, we would simply create a
variable by dimensioning it as a ParameterDiscreteValue. All we need to do at that point is set the value
of the parameter equal to some value we have entered or hard-coded and then set the
ParameterFieldInfo property of the Report Viewer.
Because we want to enter the value ourselves, we would want to put a textbox and a command button
on another form to collect and submit the value to be used in our parameter to the form with the viewer
present. To create a new form, select Project → Add Web Form and then add a textbox, label, and com-
mand button, which would make the form look something like Figure 5-15.
Figure 5-15
171
05 557300 Ch05.qxd 3/24/04 9:40 AM Page 172
Chapter 5
Set the properties of the textbox to make it blank when the form appears and change the name of the
command button to “View Report.” Then put the code behind to use Response.Redirect to go to the form
that is hosting your Crystal Viewer and pass the value entered in the textbox as a URL parameter.
You can now go to the page where your viewer resides and use the following code to set your parameter
fields. In this example, we are using a variable called “PassedInValue” that contains the value passed
from the previous page.
Dim myParameterFields As New ParameterFields()
Dim myParameterField As New ParameterField()
Dim myDiscreteValue As New ParameterDiscreteValue()
myParameterField.ParameterFieldName = “OriginCountry”
myDiscreteValue.Value = PassedInValue
myParameterField.CurrentValues.Add(myDiscreteValue)
myParameterFields.Add(myParameterField)
crystalReportViewer1.ParameterFieldInfo = myParameterFields
crystalReportViewer1.RefreshReport
The next scenario we are going to look at is for multiple discrete variables; in this situation we would
use the same methods, only instead of setting a single value using the
ParameterDiscreteValue vari-
able, we would continually redeclare this variable and use it to push values into the
ParameterField
object. Again, the same method would apply here—creating a front-end page to collect the parameter
information and then passing it to the page with the viewer on it. This would go behind the viewer page
and again you would have to pass the values from the previous page. Here we have hard-coded them to
make this code a bit easier to follow.
Dim myParameterFields As New ParameterFields()
Dim myParameterField As New ParameterField()
Dim myDiscreteValue As New ParameterDiscreteValue()
myParameterField.ParameterFieldName = “OriginCountry”
myDiscreteValue.Value = “USA”
myParameterField.CurrentValues.Add(myDiscreteValue)
myDiscreteValue= New ParameterDiscreteValue()
myDiscreteValue.Value = “Canada”
myParameterField.CurrentValues.Add(myDiscreteValue)
myParameterFields.Add(myParameterField)
crystalReportViewer1.ParameterFieldInfo = myParameterFields
172
05 557300 Ch05.qxd 3/24/04 9:40 AM Page 173
Report Integration for Web-Based Applications
In this example, we have used the variable twice to push both “USA” and “Canada” to the report.
Remember, in your actual report design you must specify the parameter option—for example, whether it
is a discrete, multi-value discrete, or ranged parameter. Otherwise you will receive an error message
when running your report.
Finally, our last type of parameter is a ranged parameter, which can be set using the same method except
instead of a discrete value, we are going to pass in a range, with a start and end value, as shown in the
following code:
Dim myParameterFields As New ParameterFields()
Dim myParameterField As New ParameterField()
Dim myDiscreteValue As New ParameterDiscreteValue()
Dim myRangeValues as New ParameterRangeValues()
myParameterField = New ParameterField()
myParameterField.ParameterFieldName = “LastYearsSales”
myRangeValues.StartValue = 100000
myRangeValues.EndValue = 500000
myParameterField.CurrentValues.Add(myRangeValue)
myParameterFields.Add(myParameterField)
You can also combine the two methods, depending on the type and number of parameters you have cre-
ated in your report. You could have two parameters, for example, that accept discrete values, one that
accepts a range, and still another that accepts a combination of the two. The methods used to set the val-
ues for these parameters are the same, so users can easily enter parameter values through your own
application and filter the report content.
Customizing the Appearance and
Layout of the Report Viewer
The CrystalReportViewer class contains all of the properties, methods, and events that relate to the
viewer itself—its appearance, methods that are used to make the viewer perform certain actions (such as
refresh or go to the next page), and events that can be used to determine when a particular event (such
as drill-down or refresh) has occurred. To start learning how to work with the viewer, we are going to
start with the basic properties and move on from there.
To get started, we need to create a new project to work in. From within Visual Studio, select File → New
→ Project and from within Visual Basic Projects, select ASP .NET Web Application and specify a name
and location for your project files, as shown in Figure 5-16.
173
05 557300 Ch05.qxd 3/24/04 9:40 AM Page 174
Chapter 5
Figure 5-16
In the sample files, we have called this project (
web_viewer_properties). Once you have selected a
name for your project and clicked OK, the development environment will open with a default form that
we will use in the section. Alternatively, you can create a virtual directory for this project using the sam-
ple code provided.
We also need to add a report to work with in this section, so select Project → Add Existing Item and
select
product_listing_bytype.rpt. Add this to your project, insert the CrystalDecisions.
CrystalReports.Engine
namespace, drag across a ReportDocument, and place this on the form
(selecting
product_listing_bytype.rpt out of the options on the dialog), and then insert the
CrystalReportViewer and set the binding to this report in the Page_Init event:
CrystalReportViewer1.ReportSource = product_listing_bytype1
You are now ready to get started!
When you were working through the earlier example, binding to a viewer and previewing your report,
you may have noticed that there is a standard set of icons and layout that appears by default on the
CrystalReportViewer. You can control most of the aspects of the viewer and toolbar by setting a few
simple properties, as shown in Figure 5-17.
174
05 557300 Ch05.qxd 3/24/04 9:40 AM Page 175
Report Integration for Web-Based Applications
Figure 5-17
The area at the top of the viewer is the toolbar, which can be shown or hidden as an entire object or you
can choose to show only certain icons. On the left-hand side is a Group Tree, generated by the grouping
that you have inserted into your report. The properties that control these general properties are Boolean
and are listed below:
Property Description
BestFitPage For showing the report as-is or with scroll-bars
DisplayGroupTree For showing the Group Tree on the left-hand side of the viewer
DisplayPage For showing the page view
DisplayToolbar For showing the entire toolbar at the top of the viewer
SeparatePages For displaying a report in separate pages or one long page
All of these properties default to True, and you cannot change the position of any of these elements; they
are fixed in place on the viewer. You can, however, hide all of these icons and create your own buttons
for printing, page navigation, and so on.
For the icons within the toolbar, you can also set simple Boolean properties to show or hide a particular
icon, as shown subsequently:
❑
HasDrillUpButton
❑ HasGotoPageButton
175
05 557300 Ch05.qxd 3/24/04 9:40 AM Page 176
Chapter 5
❑ HasPageNavigationButtons
❑ HasRefreshButton
❑ HasSearchButton
❑ HasZoomFactorList
So a typical use of these properties is where you want to give users a preview of the report with the abil-
ity to refresh the data shown. You could easily set a few properties before you set your
ReportSource
property to make this happen:
CrystalReportViewer1.HasRefreshButton = true
When the report is previewed, it will appear, as shown in Figure 5-18.
Figure 5-18
In addition to simple Boolean properties, there are also a couple of other properties that can be set to
control the appearance and behavior of the viewer, as seen in the following table:
176
05 557300 Ch05.qxd 3/24/04 9:40 AM Page 177
Report Integration for Web-Based Applications
Property Description
PageToTreeRatio
PageZoomFactor
For setting the ratio between the Group Tree and the rest of the page;
larger numbers mean a larger report page, with a smaller Group Tree
The initial zoom factor for the report when viewed
So if we wanted to change the
PageToTreeRatio and zoom factor so that the report was presented a lit-
tle bit better on the page, we could add the following code to be evaluated when the page was loaded:
CrystalReportViewer1.PageToTreeRatio = 7
CrystalReportViewer1.PageZoomFactor = 80
Our previewed Web Form would look like Figure 5-19.
Figure 5-19
Viewer Methods
When working with the CrystalReportViewer, we have a number of methods available to us, which
will allow us to integrate specific viewer functions into our application. As we move through this section,
177
05 557300 Ch05.qxd 3/24/04 9:40 AM Page 178
Chapter 5
keep in mind that these methods can be used to create your own look and feel for the report preview
window.
Create a new Web Form, which we’ll call
web_viewer_methods. Again, the code for this application is
included with the download code. Drag a
CrystalReportViewer onto this form. Include the report
product_listing_bytype.rpt in your project (in the download code, the path is Crystal.NET2003/
Chapter05/product_listing_bytype.rpt
). Drag a ReportDocument component from the Toolbox
onto your form, and when the dialog opens up, select
web_viewer_methods.product_listing_bytype
from the drop-down box. Click OK.
Now we add some code to tie our report to the application. In the
Page_Init event in the designer gen-
erated code, once again add:
CrystalReportViewer1.DataBind()
Now all that remains is to set the ReportSource property in the Page_Load sub:
CrystalReportViewer1.ReportSource = cachedproduct_listing_bytype1
Compile and run this. Now, we’re all set to customize our viewer.
In this example, we are actually going to walk through building a custom viewer. The first thing we
need to do is set the
DisplayToolbar property and the DisplayGroupTree property to False in the
Properties pane for the viewer, and add some additional buttons and textboxes to our Web Form using
the screen shot earlier as a guide, which we will walk through later in this article.
As we walk through this example, we are going to add the code behind these buttons and this form
using the methods described later in this Chapter and learn how to match the viewer user interface to
your own application.
Setting Browser Rendering
The CrystalReportViewerBase class provides a number of key properties, one of which is the
ClientTarget. The ClientTarget property is a string and determines how the Crystal Report Viewer
will render the report.
These strings are:
❑
ie4—for Internet Explorer 4.0
❑
ie5—for Internet Explorer 5.0
❑
uplevel—for most other Web browsers
❑
downlevel—for very basic Web browsers
A Web browser is considered
uplevel if it can support the following minimum requirements:
❑ ECMAScript (JScript, JavaScript) version 1.2
❑ HTML version 4.0
❑ The Microsoft Document Object Model (MSDOM)
❑ Cascading style sheets (CSS)
178
05 557300 Ch05.qxd 3/24/04 9:40 AM Page 179
Report Integration for Web-Based Applications
Browsers that fall into the downlevel category include those browsers that provide support only for
HTML version 3.2.
So, to set the browser version you are targeting, you could set the
ClientTarget property for your form
like this, under the
Page_Load subroutine:
CrystalReportViewer1.ClientTarget = “ie4”
There is also an Auto value, which is the default setting and automatically selects the best rendering
option based on the browser type. Unless you are writing an application for a specific browser or com-
patibility level, leaving this property set to
Auto will provide the best viewing experience for the
browser you are using.
combined help collection.
For more information on detecting the browser type your Web application is using,
see the topic “Detecting Browser Types in Web Forms” in the Visual Studio .NET
Refreshing the Data in a Report
When a report is refreshed, it goes back to the database for the most current set of data available and
runs the report again. On our custom Web viewer, you should have a Refresh button, so pull a Button
control onto the Web Form and rename it
Refresh_Button in the ID property in the Properties pane.
Change the text property to
Refresh.
Now, double-click the
Refresh_Button on your form to open the code for it. We can add some code
behind this button to refresh the report using the
RefreshReport method as shown subsequently:
Private Sub Refresh_Button_Click(ByVal sender As System.Object, ByVal e
As System.EventArgs) Handles Refresh_Button.Click
CrystalReportViewer1.RefreshReport()
End Sub
Compile and run the application. The button should now be present on your form. Click it. This will
cause the report to return to the database and read the records again. Use this functionality with caution;
if a report has a large SQL query to perform before it can return the first page, you may experience per-
formance problems.
Page Navigation and Zoom
Now we are going to insert some buttons across the top of our Web Form in the same way we did with
the Refresh button, with the following names and text values:
Button Name (ID Property Value) Text Property Value
FirstPage_Button First
Back_Button Back
Forward_Button Forward
LastPage_Button Last
179
05 557300 Ch05.qxd 3/24/04 9:40 AM Page 180
Chapter 5
We access these properties, once again, through the Properties pane in Visual Studio .NET.
For page navigation using the buttons we have drawn on our custom form, we have a number of meth-
ods that can be called without any additional parameters, as shown:
❑
ShowFirstPage
❑ ShowPreviousPage
❑ ShowNextPage
❑ ShowLastPage
These methods do not return a result, and unlike the Windows Forms Viewer, the Web Form Viewer
does not have a
GetCurrentPageNumber method, which would have returned an integer representing
the page you are currently viewing.
To add these methods to the page navigation buttons, double-click the appropriate buttons on your Web
Form and enter the code behind, as shown:
CrystalReportViewer1.ShowNextPage()
Do this for the other three buttons, including the appropriate method for each. Compile the project and
test these buttons.
In addition to page navigation, you also have the ability to choose the zoom factor that is applied to your
report. By default, the zoom is set to 100% of the report size unless you specify otherwise.
In our custom viewer, you should have a drop-down list for the zoom factor. To create our own zoom
factor functionality, drag a drop-down list onto the form. Open the properties for your drop-down list
(in our example, we have named the drop-down list
ZoomList).
In the properties for your drop-down list, locate and open the
Items property, which should open the
dialog shown in Figure 5-20.
Using this dialog, we are going to create the items that will appear in our drop-down list and specify the
corresponding values that will be passed to the form when an item is selected. Use the Add button to
add items and make sure that the values correspond to the text you have entered (for instance, Full Size
= 100, 50% = 50, and so on).
Once you have entered all of the values, click OK to accept these changes and return to your form’s
design. To use the
Zoom method, double-click your drop-down box and add the following code:
CrystalReportViewer1.Zoom(ZoomList1.SelectedItem.Value)
This is simply calling the Zoom method using the item the user selects from your drop-down box. When
you run your application and preview your custom viewer, you should be able to select your own zoom
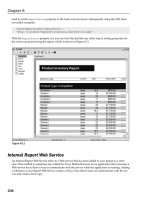
factor, and have it appear in the browser by pressing the Refresh button, as shown in Figure 5-21.
180
05 557300 Ch05.qxd 3/24/04 9:40 AM Page 181
Report Integration for Web-Based Applications
Figure 5-20
Figure 5-21
181
05 557300 Ch05.qxd 3/24/04 9:40 AM Page 182
Chapter 5
Searching Within a Report
Another powerful navigation feature can be found in the SearchForText method within Crystal
Reports .NET, which will allow you to search for a specific string that appears in your report.
On our custom viewer, we are going to create a textbox and a button labeled Search. We are going to use
this textbox to enter some search string and when the user clicks the Search button, we are going to use
the
SearchForText method to find the search string within our report.
To start, we will call our textbox
TextBox_SearchString and our Search button Search_Button. Add
these to the design view of our Web Form, remembering to replace the Text property for the button with
Search.
To use the
SearchForText method, double-click the Search button and add the following code behind:
Private Sub Search_Button_Click(ByVal sender As System.Object, ByVal e As
System.EventArgs) Handles Search_Button.Click
If TextBox_SearchString.Text <> “” Then
CrystalReportViewer1.SearchForText(TextBox_SearchString.Text, _
CrystalDecisions.[Shared].SearchDirection.Forward)
End If
TextBox_SearchString.Text = “ “
End Sub
The Crystal Report Viewer will search the entire report and when the value is found, go directly to the
page on which it appears (the last line of the preceding code is just to clear the textbox for the next
search). This method can be called repeatedly to find all of the occurrences of a particular string. Each
time it finds the string in your report (in our example that follows, we searched for
Youth Helmet), it
will jump to that page, as shown in Figure 5-22.
the additional parameter of Search Direction for searching forward or backward
You may have noticed that this method is slightly different between the Windows
and Web viewers for Crystal Reports; with both types of Forms Viewer, you can pass
through your report. However, this method in Windows will also highlight the
found value. The Web version does not have this capability.
Printing Your Report
Now, if you have already done some report integration with Windows applications, you may have
noticed that the Web Forms Viewer is missing one very important icon—the Print button. When a
Crystal Report is viewed on the Web, it is actually rendered in static HTML 3.2 or HTML 4.0, with all of
the report elements represented in HTML code and syntax.
This makes things difficult when it comes time to print your report. In a case where you were just using
the plain old viewer with little or no modification, imagine if you were to click the print button from
your browser to print your report.
182
05 557300 Ch05.qxd 3/24/04 9:40 AM Page 183
Report Integration for Web-Based Applications
Figure 5-22
It is not going to be very pretty to say the least; if your application uses single-page reports or discrete
parts of a report, you may be happy with this, but for the rest of us, there has to be a better solution. So
in answer to this limitation in HTML and the way reports are presented in a browser window, we have
to come up with some creative solutions to actually print our report to a printer.
The following sections detail the different ways a report can be printed from the Web, as well as some of
the advantages and drawbacks of each method. Because we are looking at new functionality within
Crystal Reports .NET, we are going to create a new project specifically for this section.
From within Visual Studio, select File → New → Project and from Visual Basic Projects, select ASP .NET
Web Application and call this new application
web_viewer_print. This application is included with
the download code. To use the downloaded version a virtual directory should again be created for it in
its downloaded location.
Once you have clicked OK, the development environment will open with the default form that we will
be using in the section.
We also need to add a report to work with in this section, so select Project → Add Existing Item. Change
the drop-down list to show All Files and specify
*.rpt for the file name to filter the list to show only the
183
05 557300 Ch05.qxd 3/24/04 9:40 AM Page 184
Chapter 5
available reports. The web_printing_report.rpt file is in the code download path Crystal.NET2003\
Chapter05\web_printing_report.rpt
.
Once you have selected the
web_printing_report.rpt report, click Open and this report will be
added to your project in the Solution Explorer. We will be looking at the different methods for printing
this report in the following sections.
Now, simply drag a
ReportDocument component onto the form, which should offer you
web_viewer_printing.web_printing_report as first choice in the drop-down box. Select it and
drag a
CrystalReportViewer onto the Web Form. Now, to bind the ReportDocument component to
the viewer, merely enter the following code in the Web Form’s
Page_Init event, as we have done more
than once in this chapter:
CrystalReportViewer1.ReportSource = New web_printing_report()
Compile and run the application to check that everything is working. We are now ready to start looking
at printing this report.
Printing from the Browser
The simplest method for printing a report is to print directly from the browser. You have already seen
how well this works, but there are some tricks that we can use to improve the way the report prints if we
are forced to use this method.
First, you can disable the
DisplayGroupTree property if the report is likely to be printed. Do this by
setting it to False in the Properties window, or you could do this programmatically by inserting the fol-
lowing code into the
Page_Load event:
CrystalReportViewer1.DisplayGroupTree = False
The viewer object model provides a property called SeparatePages that by default is set to True,
meaning that the report is chunked up into individual HTML pages based on the report pagination.
When this property is set to
False, the report itself becomes one long page, which can then be printed
just like any other Web page. You can set this property through the property page of the Crystal Report
Viewer, as shown in Figure 5-23.
Or you can also set this option programmatically:
CrystalReportViewer1.SeparatePages = False
Another trick is to actually turn off the toolbar and all of the icons so that the output on the page is close
to what you would like to see when the report is printed.
CrystalReportViewer1.DisplayToolbar = False
184
05 557300 Ch05.qxd 3/24/04 9:40 AM Page 185
Report Integration for Web-Based Applications
Figure 5-23
So with the toolbar turned off and our report showing as one long page, you can then print your report
and have a somewhat decent output as shown in Figure 5-24, which is a preview from Internet Explorer.
The only problem is that this method does not take advantage of any of the neat formatting features for
page headers and footers, as the browser just thinks this is one big page to be printed. In addition, the
column headings are printed only on the first page, so it is difficult to read the report as you move
through the pages.
This method is recommended only for reports with a small number of pages (1–20) as the entire report is
concatenated into one long page, which may take a while to render on screen or print.
However, with that said, printing from the browser is the easiest method of printing your report from
the Web, even with its limitations. For report developers who have put a lot of time and effort into their
report design and want that report to be seen and printed by the users (and look good!), we need to look
at another solution.
185
05 557300 Ch05.qxd 3/24/04 9:40 AM Page 186
Chapter 5
Figure 5-24
Printing from the Adobe Acrobat Plug-In
Crystal Reports .NET supports many export formats, and one of the more popular ones is Adobe’s
Portable Document Format, or PDF. Using the export functionality within Crystal Reports .NET and a
copy of Adobe Acrobat Reader (or the plug-in) installed on the client machine, reports can be printed
from the Web.
This is one of the methods recommended by Crystal Decisions for printing your reports in a presentation-
quality format, and it actually developed the workaround used in this section to help developers who
were used to the way Crystal Reports normally operates and were frustrated by not having that print
button.
The first thing we need to do is create a new Web Form that will contain our instructions. We will call
this form
AcrobatPrinter.aspx, and create it by right-clicking the project name, and selecting Add →
Add New Item. We will then select Web Form and name it as noted earlier. Right-click it and select Set
As Start Page.
Draw or drag a button onto the Web Form and call it
PDF_Button, and label it Export via PDF.
186
05 557300 Ch05.qxd 3/24/04 9:40 AM Page 187
Report Integration for Web-Based Applications
Now we need to do some setup to utilize the Crystal Reports Engine (covered in Chapter 9, “Working
with the Crystal Reports Engine”) and set some options available from the
CrystalDecisions.Shared
namespace.
So, we are going to put some code behind our export button to dimension variables for the export
options that we want to use, and also for the specific options for exporting to a disk file. Double-click the
button in the designer, and insert the following code:
Private Sub PDF_Button_Click(ByVal sender As System.Object, ByVal e As _
System.EventArgs) Handles PDF_Button.Click
Dim myExportOptions As CrystalDecisions.Shared.ExportOptions
Dim myDiskFileDestinationOptions As _
CrystalDecisions.Shared.DiskFileDestinationOptions
Next, we are going to create a variable to hold the name of the file that we are going to be exporting to,
as well as creating a new instance of a Sales Report that has already been added both to the project and
to this form, through the
ReportDocument component.
Dim myExportFile As String
Dim myReport As New web_printing_report()
For our next order of business, we need to set a temporary location for the output file (this can be any-
where on your server) and we are going to build a unique file name using the session ID from the ASP
.NET session and tacking the PDF extension on the end, so the file association will work correctly when
we go to view this file in our browser.
myExportFile = “C:\Crystal.NET2003\Chapter05\PDF “ & _
Session.SessionID.ToString & “.pdf”
Now, for the meat of the matter—actually setting the destination options to export your report to a PDF
file and write it to the disk.
myDiskFileDestinationOptions = New
CrystalDecisions.Shared.DiskFileDestinationOptions()
myDiskFileDestinationOptions.DiskFileName = myExportFile
myExportOptions = myReport.ExportOptions
With myExportOptions
.DestinationOptions = myDiskFileDestinationOptions
.ExportDestinationType = .ExportDestinationType.DiskFile
.ExportFormatType = .ExportFormatType.PortableDocFormat
End With
Then we call the Export method to export our report:
myReport.Export()
But we are not done yet! We need to take the exported PDF file that has been generated and output it to
the browser so the user can view it using the Acrobat Plug-In or standalone viewer. To do that, we are
going to use some simple response statements to return the file to the browser:
187
05 557300 Ch05.qxd 3/24/04 9:40 AM Page 188
Chapter 5
Response.ClearContent()
Response.ClearHeaders()
Response.ContentType = “application/pdf”
Response.WriteFile(myExportFile)
Response.Flush()
Response.Close()
Finally, once we have delivered the file to the user, we need to clean up after ourselves and remove the
file from the server altogether.
System.IO.File.Delete(myExportFile)
End Sub
So when all of this code is put together behind our export button and our application is run, the user can
click the button and preview and print the report from Adobe Acrobat, with the page numbering and
other features in place.
Printing from Other Export Formats
In addition to Adobe Acrobat format, you can also print to other supported export formats such as Excel,
Word, or others, by changing the file extension, the MIME type, and the
ExportFormatType property in
the aforementioned code. There are a number of different destinations that are supported, including:
Name Description MIME Type
Excel To export to a Microsoft Excel file Application/vnd.ms-xls
HTML32 To export to an HTML file compatible Application/html
with HTML v3.2
HTML40 To export to an HTML file compatible Application/html
with HTML v4.0
PortableDocFormat To export to PDF (Acrobat) format Application/pdf
RichText To export to an RTF file for use with Application/rtf
Microsoft Word, WordPerfect,
and so on
WordForWindows To export to a Microsoft Word file Application/msword
If you want to export to Word, the RTF export actually provides a better export format. To open the RTF
on the client side using Word (instead of the application associated with the RTF file extension), leave
the
ExportFormatType property set to RichText, but change the MIME type to be application/
msword
.
Using Viewer Events
Viewer events provide the ability to track when different events are fired from the browser—for
instance, when the user navigates through the pages of the report or when they refresh the report.
These events can then be used to fire other code within your application.
188
05 557300 Ch05.qxd 3/24/04 9:40 AM Page 189
Report Integration for Web-Based Applications
Although all of the different events have their own unique properties and methods, they all inherit a
common property called
Handled that is a Boolean value used to determine whether the event was fired
and subsequently handled.
In the following section, we will be looking at all of the available events associated with the viewer and
their common use. If you would like to try out some of the following events, open the custom viewer we
were working with earlier in the chapter (
WebForm1.aspx from the project web_viewer_properties)
and add a label to your form (call it
Event_Label); we’ll use this label to notify the user when an event
is fired. Clear its Text property. Now we are ready to begin.
Page Navigation Events
For page navigation, the NavigateEventArgs class provides the properties we need to work with the
Navigate event, including:
Property Description
CurrentPageNumber
NewPageNumber Gets or sets the new page number
Returns the current page number
In the following example, the
Navigate event would fire when a user changed the page within the
viewer, resulting in a label that would show the page they are coming from and the page they are navi-
gating to.
Insert the following subroutine into your Web Form code:
Private Sub CrystalReportViewer1_Navigate(ByVal source As Object, ByVal
MyEvent As CrystalDecisions.Web.NavigateEventArgs) Handles
CrystalReportViewer1.Navigate
If MyEvent.NewPageNumber <> 1 Then
Event_Label.Text = “Current page: “ & MyEvent.CurrentPageNumber & _
“ New Page: “ & MyEvent.NewPageNumber
End If
End Sub
So, as the user navigates through the pages, this information is shown and can be used in your applica-
tion. Compile and run this code to see this happen. (Make sure you set WebForm1 as the startup form
for your project if it isn’t already.)
Refresh Events
The ReportRefresh event has no arguments other than the inherited Handled property. It can be used
to build metrics on how often a report is run or refreshed, and to pass information to users about the
report before they launch a refresh, as shown:
189
05 557300 Ch05.qxd 3/24/04 9:40 AM Page 190
Chapter 5
Private Sub CrystalReportViewer1_ReportRefresh(ByVal source As Object,
ByVal MyEvent As CrystalDecisions.Web.ViewerEventArgs) Handles
CrystalReportViewer1.ReportRefresh
Event_Label.Text = “Please be advised this report takes up to 2 minutes
to run.”
End Sub
Insert this subroutine into your Web Form code, in the same way we did earlier. Compile and run. The
message should now appear in the label when you hit Refresh.
Search Events
When a user searches for a report value, either through the standard icon on the toolbar or through your
own method call, the
Search event is fired. The arguments for the Search event are:
Property Description
Direction Gets or sets the direction in which to search. This can be
either
Backward or Forward.
PageNumberToBeginSearch Gets or sets the page number on which to start searching.
TextToSearch Gets or sets the text to search for in the report.
So by using these event arguments, you could keep a record of what values users searched for or offer a
Top 10 search facility to let them search using the 10 most requested search strings. An example of getting
the text that is being used in the search follows. Insert this subroutine into your code, build and run it:
Private Sub CrystalReportViewer1_Search(ByVal source As Object, ByVal
MyEvent As CrystalDecisions.Web.SearchEventArgs) Handles
CrystalReportViewer1.Search
Event_Label.Text = “You searched for “ & MyEvent.TextToSearch
End Sub
Zoom Events
When the user changes the zoom factor for a particular report, the ViewZoom event fires, and has only
one argument,
ZoomEventArgs. The NewZoomFactor property will get or set the magnification factor
for the viewer, as shown here:
Private Sub CrystalReportViewer1_ViewZoom(ByVal source As Object, ByVal
MyEvent As CrystalDecisions.Web.ZoomEventArgs) Handles
CrystalReportViewer1.ViewZoom
Select Case MyEvent.NewZoomFactor
Case “25”
Event_Label.Text = “You have selected 25%”
Case “50”
Event_Label.Text = “You have selected 50%”
Case “100”
Event_Label.Text = “You have selected full size”
End Select
End Sub
190
05 557300 Ch05.qxd 3/24/04 9:40 AM Page 191
Report Integration for Web-Based Applications
For further customization of your report and control of your report’s features and functionality, you
may want to turn to Chapter 9, “Working with the Crystal Reports Engine” to learn how to work with
the Crystal Reports Engine, which provides control over your report at run time.
Summary
By now you know how to integrate reporting into both your Windows and Web applications, with this
chapter focusing on the latter. You should be able to pick the right object model for the functionality you
want to provide to your users, as well as work with all of the properties, methods, and events contained
within those models.
For our next trick, we are going to look at extending Crystal Reports through the use of XML Report
Web Services, which is the topic of Chapter 6, “Creating SML Report Web Services.”
191
05 557300 Ch05.qxd 3/24/04 9:40 AM Page 192