Wrox Professional Crystal Reports for Visual Studio NET Second Edition phần 7 ppsx
Bạn đang xem bản rút gọn của tài liệu. Xem và tải ngay bản đầy đủ của tài liệu tại đây (2.04 MB, 38 trang )
06 557300 Ch06.qxd 3/24/04 9:36 AM Page 206
Chapter 6
need to set the ReportSource property in the load event (as shown subsequently using the URL from
our earlier example):
CrystalReportViewer1.ReportSource =
“http://localhost/Chapter06/inventory_reportService.asmx”
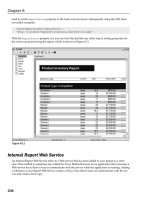
With the ReportSource property set, you can treat this just like any other report, setting properties for
the viewer and previewing the report, which is shown in Figure 6-11.
Figure 6-11
Internal Report Web Service
An internal Report Web Service refers to a Web service that has been added to your project as a refer-
ence. This method is sometimes also called the Proxy Method because every application that consumes a
Web service has to have a way to communicate with the service when the application is running. Adding
a reference to your Report Web Service creates a Proxy Class that in turn can communicate with the ser-
vice and create a local copy.
206
06 557300 Ch06.qxd 3/24/04 9:36 AM Page 207
Creating XML Report Web Services
To add the XML Report Web Service to your Web or Windows application, select Project → Add Web
Reference to open the dialog shown in Figure 6-12.
Figure 6-12
Using this dialog, enter the complete URL of your Report Web Service and click OK, and this will add
this reference to your project in the Project Explorer under Web References.
To bind an internal Report Web Service to the Windows Crystal Report Viewer, you will again need to
set the report source, only this time using the reference you have added instead of a URL. For example:
CrystalReportViewer1.ReportSource = New localhost.inventory_reportService()
From that point, all of the techniques you learned in Chapter 3, “Designing Reports,” and Chapter 4,
“Report Integration for Web-Based Applications,” can be applied to the Report Viewer to customize how
your report is presented.
Generic Report Web Service
To consume a report served through the generic Report Web Service, you will need to add the report
from the Server Explorer to your project. In the Server Explorer dialog, under the node marked Crystal
Services, navigate to the Server Files branch, where you should be able to see all of the available reports
that are within the Samples path we looked at earlier.
207
06 557300 Ch06.qxd 3/24/04 9:36 AM Page 208
Chapter 6
To add a report to your project, simply drag and drop the report onto a Windows or Web form. From
that point, you can add the appropriate Crystal Report Viewer to your form and bind the report to the
viewer, as shown here:
CrystalReportViewer1.ReportSource = ServerFileReport1
All of the properties, methods, and events available in the Crystal Report Viewer can be used from this
point.
Deployment Considerations
Report Web Services are deployed on a Web server and can be consumed by developers and users
within your organization or externally, based on where you deploy the service itself and what access
users have to the location you have selected.
When deploying Report Web Services (and Web applications in general), we have two deployment
options. The first is the easiest and involves copying your project to the Web server for deployment. To
use this method, you will need to open the project where your Report Web Service resides and select
Project → Copy Project, which will open the dialog shown in Figure 6-13.
Figure 6-13
You will need to specify a folder location for your project, as well as a Web access method. If you select
the FrontPage method, you must have the FrontPage Extensions installed and configured on the server
where you want to deploy your Report Web Service. Choose the File share method if you have direct
access to the server and just want to copy the files over.
At the bottom of the dialog, you will also need to select what files you want copied across to the Web
server. You have three choices:
208
06 557300 Ch06.qxd 3/24/04 9:36 AM Page 209
Creating XML Report Web Services
❑ Copy files needed to run this application—will copy across all of the built output files and any
files where the
BuildAction property is set to Content
❑ All project files—will copy across everything, including the output and source files, and so on
❑ All files in the source project folder—will copy across all files within the folder, regardless of
whether they are included in the project
The second method of deploying a Report Web Service involves creating a Web setup project that can be
used to deploy your service on a local or remote Web server. To create a new Web setup project, select
New → Project and from the folder marked Setup and Deployment Projects, select the icon for Web
Setup Project and make sure you click the radio button for Add to Solution (instead of Close Solution).
We will call this project
WebServiceSetup.
A new tab called File System on Target Machine will open. Right-click the Web Application Folder and
select Add → Project Output. From the dialog that appears, shown in Figure 6-14, select Content Files,
Primary Output, and Debug Symbols all at once using Ctrl-click.
Figure 6-14
With these components added, save your project and select Build
WebServiceSetup to create a
Windows Installer Package (MSI) that will install your Report Web Service. If you are deploying this to a
server that does not have Visual Studio .NET or the .NET Framework installed, you will need to install
that before you install and deploy your Report Web Service.
209
06 557300 Ch06.qxd 3/24/04 9:36 AM Page 210
Chapter 6
Summary
In this chapter, we looked at XML Report Web Services and how they can be used to improve the
exchange of information between organizations, cut down on development time, and extend simple
reporting applications. We found that from the Visual Studio IDE, it takes only a few clicks to add a
report and publish as a Web service.
With an XML Report Web Service created, the second half of the chapter focused on actually consuming
and deploying XML Report Web Services. With that under our belt, it is time to take a look at working
with .NET data.
210
07 557300 Ch07.qxd 3/24/04 9:38 AM Page 211
Working with .NET Data
Up until now we have been creating reports directly off of tables in a relational database, but
Crystal Reports .NET can actually be used to create reports from a wide variety of datasources,
including ADO .NET, and it provides a number of tools for working with databases. In particular,
there are a number of tools and techniques available within Crystal Reports .NET for working
with SQL, allowing you to leverage your knowledge of SQL and any existing queries or reports
that you may be using.
In this chapter, we will be looking at the way Crystal Reports .NET works with different data-
sources and how it interacts with ADO .NET. This will include:
❑ Understanding data access
❑ Working with datasources
❑ Creating SQL commands and expressions within Crystal Reports
❑ Working with ADO .NET
At the end of this chapter, you will have an understanding of how Crystal Reports .NET interacts
with different datasources, the options for working with these datasources, and using ADO .NET
as a datasource for your report development.
The Sample Files
In the download files for Chapter 6 (C:\Crystal.NET2003\Chapter06\), you will find all of the
datasets and reports used in this chapter:
❑
Employee_Profile_Basic—This version is used as the starting point in two examples
in this chapter.
❑
Employee_Profile_Table—The same as the basic version with a second table added to
the report.
07 557300 Ch07.qxd 3/24/04 9:38 AM Page 212
Chapter 7
❑ Employee_Profile_SQLExp—The same as the basic version with an SQL Expression added to
the report.
❑
SQLCommand—A report based on a Virtual Table created from an SQL command, discussed in
“Defining Virtual Tables,” later in this chapter.
❑
Reporting_App_Dataset—An application that only contains a dataset.
❑
Reporting_App_ViewData—An application that displays an ADO .NET dataset.
❑
Reporting_App—A report that takes its data from an ADO .NET dataset.
If you have problems running these examples, please read the sections in this chapter relating to them.
Data Access with Crystal Reports .NET
Traditionally, Crystal Reports accessed data through two different methods—native connections and
Open Database Connectivity (ODBC) connections. A native connection to a datasource was accom-
plished through a set of specialized
.dll files and executables that were specific to your datasource.
Over the years, Crystal Reports has teamed up with a number of database and application vendors to
create native drivers for PC or file-type databases, relational databases, and various ERP (Enterprise
Resource Planning) systems. The second data access method is through the ODBC layer, providing a
common interface for interrogating relational databases. Regardless of where the data resides, ODBC
provides a reliable, stable platform that can be used to develop drivers and data access methods.
With the integration of Crystal Reports into Visual Studio .NET, the native and ODBC drivers that were
included with previous versions of Crystal Reports are no longer provided for use, and datasources are
now accessed through one of the following methods:
Datasource Description
Project data Crystal Reports can leverage the ADO .NET Framework and report directly
from the datasets that appear in your application.
OLEDB (ADO) For datasources that can be accessed through OLEDB, including SQL
Server, Oracle, and Microsoft Jet 3.51/4.00-accessible datasources (Access,
Excel, Paradox, dBase).
ODBC (RDO) For datasources that can be accessed through an ODBC-compliant driver
(which is just about every other datasource). In addition to reporting from
tables, views, and stored procedures, Crystal Reports .NET will also allow
you to enter an SQL command to serve as the basis for your report (see
“Working with SQL Commands and Expressions” later in this chapter).
Database files Includes a number of file-type database formats, including Access, Excel,
XML, and Crystal Field Definition files (TTX), as used with previous ver-
sions of Crystal Reports and bound reporting.
More datasources Any other datasource supported by Crystal Reports .NET.
To help both new and existing report developers, the following section walks through the different types
of data you may want to integrate into your reporting application.
212
07 557300 Ch07.qxd 3/24/04 9:38 AM Page 213
Working with .NET Data
Database Files
Previous versions of Crystal Reports could use a direct, native connection to create reports directly off of
file-type databases, including dBase/Xbase, Paradox, and FoxPro, among others.
Through this direct connection, Crystal Reports extracted data without having to submit an SQL state-
ment against a database server. With the ease of use, there was also a price. Because the data is held in a
file and not on a database server, there is no opportunity to push the processing back down to the
database server. Also, when working with these types of databases, the only join available between two
or more tables was a left-outer join, meaning all of the information from the left-hand table will be read
first, and any matching items from the right-hand table will also be shown.
As mentioned earlier, these native drivers (and the limitations that come with them) are not included
with Crystal Reports .NET, apart from the direct drivers for Excel and Access. In order to create reports
from these datasources, we have a number of options:
❑ Use an ODBC connection—using a compatible ODBC driver to access your datasource
❑ Use an ADO .NET dataset—create a dataset from your datasource
Create a custom data provider. For developers who have a specific data file format, you can create a cus-
tom data provider for your datasource. For more information on creating your own Custom Data
Provider, check out the MSDN article at
toc.asp.
One type of native connection that is still supported is the direct connection to
Microsoft Access databases and Excel spreadsheets. Both of these file types can be
used as the datasource for your report without having to use ODBC.
Relational Databases
By far, the most popular data access method is through a native or ODBC connection to a relational
database. The retail version of Crystal Reports that you would buy in a store ships native drivers for the
most popular RDBMS, including DB/2, Informix, Oracle, and Sybase, among others. Most of these native
drivers require that the standard database client be installed and configured before they can be used.
Again, these drivers are not available with Crystal Reports .NET, so you will need to look at connecting
to these datasources through the following methods:
❑ Use an ODBC connection—Uses a compatible ODBC driver to access your datasource.
❑ Use an OLEDB connection—Uses a compatible OLEDB provider to access your datasource.
Providers are available for SQL Server, Oracle, ODBC Drivers, and Jet 4.0, among others.
❑ Use an ADO .NET dataset—Creates a dataset from your datasource.
❑ Utilize a custom data provider—Currently, there is a custom data provider available for SQL
Server and an Oracle provider in beta (available from the MSDN site) that allow you direct
access to the database.
213
07 557300 Ch07.qxd 3/24/04 9:38 AM Page 214
Chapter 7
OLAP Data
OLAP data (sometimes called multidimensional data) can be accessed and used in your application
through OLEDB for OLAP, a standard interface for accessing OLAP data, but unfortunately Crystal
Reports .NET does not support OLAP reporting in this version. If you do have an existing report that
shows an OLAP grid, this area will be blanked out when you first import your report.
Crystal Dictionaries, Queries, and Info Views
With previous retail versions of Crystal Reports, there were two separate tools designed to make report
development easier. The first, Crystal Query, could be used to create Crystal-specific QRY files that con-
tained SQL queries. You could then use these query files as the datasource for your report.
The second tool, Crystal Dictionaries, was used to create dictionaries (DC5, DCT) that served as a meta-
data layer between your report and the database itself. Using a Crystal Dictionary, you could take care of
all of the linking and joins for the user, reorganize and alias fields and tables, and add help text and data
for browsing, among other things.
Unfortunately, none of these file formats is supported as a datasource for reports within Crystal Reports
.NET. If you do have an existing report that uses any of these datasources, you will receive an error mes-
sage and will be unable to use the report. If you wanted to create a report with similar features, you
would need to base your report on the underlying database.
If you do need to work with complex SQL queries, Crystal Reports .NET provides the ability to use SQL
Commands as the basis for your report, effectively cutting out the need to use Crystal Query files.
Currently, there isn’t any way to work around Crystal Query files for creating a meta-data layer between
the end user and the database itself other than using various third-party meta-data providers.
Other Datasources
In the past, Crystal Reports has included a number of drivers for nontraditional datasources, including
SalesLogix Act!, Microsoft Exchange, Microsoft Logs, and more. Most of these datasources have had
their own unique setup and configuration requirements, as they do not fit into the standard datasource
categories that can be accessed through a native or ODBC driver.
Because the drivers for these datasources are not included with Crystal Reports .NET, you will need to
find an alternative method of accessing this data, using a data provider.
So, in summary, Crystal Reports .NET supports the following datasources:
❑ Any database with an ODBC driver
❑ Any database with an OLEDB Provider
❑ Microsoft Access databases
❑ Microsoft Excel workbooks
❑ ADO .NET datasets
❑ Legacy recordsets (Classic ADO, CDO, DAO, RDO—which covers just about everything else)
214
07 557300 Ch07.qxd 3/24/04 9:38 AM Page 215
Working with .NET Data
Now that you understand the different ways Crystal Reports .NET can access data, we need to take a
look at actually working with these datasources from within your report.
Working with Datasources
When working with data within the Report Designer, most of the options and functionality relating to
databases and tables can be found in the Database menu, found under the main menu by right-clicking
in your report (see Figure 7-1).
Figure 7-1
In the following sections, we are going to look at some of the most common tasks when working with
data in our reports.
215
07 557300 Ch07.qxd 3/24/04 9:38 AM Page 216
Chapter 7
Setting Database Options
Crystal Reports .NET has a number of options that are specific to working with datasources and can be
set once for the design environment. To see these settings, open any report, right-click, and select
Designer → Default Settings → Database, which will open the dialog shown in Figure 7-2.
Figure 7-2
You can select the database objects you wish to show when creating a Crystal Report, including:
❑ Tables
❑ Views
❑ System Tables
❑ Synonyms
❑ Stored Procedures
This is where most developers get tripped up when working with stored procedures.
until
They won’t appear as an available datasource when you connect to your server
you turn the Show Stored Procedure setting on.
216
07 557300 Ch07.qxd 3/24/04 9:38 AM Page 217
Working with .NET Data
You can also set a filter for database objects, using the Table name LIKE and Owner LIKE textboxes. Use
the (%) symbol for multiple characters and the underscore ( _ ) to indicate a single character. If you were
looking for all objects owned by user DMCAMIS, the Owner LIKE text would be
DMCAMIS%.
With the options in the middle of the dialog, select whether to list the tables and fields by their Name,
Description, or Both, and use the checkboxes beside these options to sort table and field names
alphabetically.
Finally, in the bottom of the dialog, under Advanced Options, select from the following:
❑ Use Indexes or Server for Speed—Use existing database indexes or the database server itself
for processing where a performance improvement could be gained.
❑ Perform Grouping on Server—If you have created a summary report with none of the details
showing and no drill-down capabilities, you can push the grouping of that report back to the
server. This improves performance because Crystal Reports .NET doesn’t have to get all the
records and do the grouping itself. A
GROUP BY clause will be inserted into the SQL that Crystal
Reports generated.
❑ Database Server is Case-Insensitive—By default, Crystal Reports .NET is case sensitive, mean-
ing
{Customer.Country}=”ca” and {Customer.Country}=”CA” would return different
datasets. This setting eliminates that case sensitivity for SQL databases.
❑ Select Distinct Data for Browsing—When browsing for data from pull-down or browse
dialogs, this ensures that only a distinct recordset (no duplicates) is returned.
Because some of these changes relate directly to the database you are working with, you may need to log
off and log back on for them to take effect.
Adding a Database or Table to a Report
When designing a report, you will need to add additional databases or tables from time to time as the
need arises. In the sample reports included with this chapter, there is an Employee Profile
(
Employee_Profile_Basic) that lists employee names, birth dates, and hire dates. It does not list the
employee’s city; that information is held within another table that we are going to add to the report.
To start, open
Employee_Profile_Basic in Visual Studio .NET by double-clicking the solution (.sln)
file within that folder. Double-click
employee_profile.rpt to open it in the Report Designer. Look at
the four fields that are displayed in the report, and then look in the Field Explorer (View → Other
Windows → Document Outline), where you will see the
Employee table under Database Fields, as
shown in Figure 7-3
We want to add the
City to the report, but it isn’t available from this table, so we are going to have to
add the table that it is in. Right-click anywhere within the report, and select Database → Add/Remove
Database, to open the Database Expert dialog (shown in Figure 7-4), which you can then use to add
additional data structures to the report.
217
07 557300 Ch07.qxd 3/24/04 9:38 AM Page 218
Chapter 7
Figure 7-3
Figure 7-4
218
07 557300 Ch07.qxd 3/24/04 9:38 AM Page 219
Working with .NET Data
Locate the Xtreme Sample Database and expand the node to find the table you wish to add, in this case,
Employee_Addresses. Select the table name and click the arrow icon to add it to the right window,
which indicates that it has been added to your report. You can add further databases or tables here.
When you have finished, select the Links tab, which allows you to specify the relationships between
these tables, as shown in Figure 7-5.
Figure 7-5
You may need to draw the link(s) to indicate the relationship between the new tables you have
added to the tables currently in your report. On this occasion, the link between
Employee and
Employee_Addresses was automatically generated. By clicking the link, and then Link Options, we
can set the options for the join types that these links represent (detailed in the next section). When you
have finished, click OK to exit the Database Expert and return to your report design.
The first thing you should look for is your new table in the Field Explorer, shown in Figure 7-6.
If you expand the
Employee_Address table, as shown in Figure 7-7, you can add some extra items to
the report that you couldn’t see before, for example,
Country, Postal Code, and of course, City.
219
07 557300 Ch07.qxd 3/24/04 9:38 AM Page 220
Chapter 7
Figure 7-6
Figure 7-7
Drag
City from the Field Explorer to the Details section of your report, and a label will automatically be
added directly above it in the Page Header. You can now add additional fields as required; the report
should now be similar to the
Employee_Report_Table that is saved in the Chapter07 folder of the
code download and shown in Figure 7-8.
220
07 557300 Ch07.qxd 3/24/04 9:38 AM Page 221
Working with .NET Data
Figure 7-8
You may want to adjust the linking in the Visual Linking Expert, or check the database schema for more
information on how the tables should be joined together, which is described in the next section.
Using the Visual Linking Expert
Relational databases are usually split into a number of different tables; these tables can be joined back
together to create complex queries. In Crystal Reports .NET, these joins are created by using the Visual
Linking Expert to visually draw a line between two key fields and setting options on these links to indi-
cate join types.
In addition to specifying database linking when you first add a datasource to your report, you can also
invoke the Visual Linking Expert at any time by right-clicking your report and selecting Database →
Visual Linking Expert from the right-click menu that appears, as shown in Figure 7-9 (this is the same
dialog that you used a moment ago to set up the links).
221
07 557300 Ch07.qxd 3/24/04 9:38 AM Page 222
Chapter 7
Figure 7-9
Using the dialog, you can draw links between the databases and tables in your report to indicate the
relationship between each. To draw a line between two fields, imitate dragging the first field and drop-
ping it on top of the second. You will know you have the field positioned correctly when your cursor
turns into the shortcut icon.
If you make a mistake, you can remove a link by clicking the line to highlight it and pressing the delete
key, or to clear all links, use the button of the same name on the right-hand side of the expert.
multiple links between tables if your database schema requires them.
Our earlier example was very simple; in the Visual Linking Expert you can create
By default, Crystal Reports will join two SQL tables with an
Equal join. To change the default join type,
right-click directly on the line drawn between the two tables and select Link Options from the menu,
shown in Figure 7-10.
222
07 557300 Ch07.qxd 3/24/04 9:38 AM Page 223
Working with .NET Data
Figure 7-10
Using the Link Options dialog, select a join type for this link from the following list:
❑ Inner Join
❑ Left Outer Join
❑ Right Outer Join
❑ Full Outer Join
You can also select an operator to work with the join type you have selected, including:
Operator Description
= Equal To
≥ Greater Than
≥= Greater Than or Equal To
≤ Less Than
≤= Less Than or Equal To
!= Not Equal To
At any point you can click the Auto-Arrange button to arrange the Visual Linking Expert layout for
readability, but sometimes you will get better results if you position the tables yourself.
223
07 557300 Ch07.qxd 3/24/04 9:38 AM Page 224
Chapter 7
If it’s still open from the last example, take a look at employee_profile.rpt in Crystal Reports .NET.
The report has been created from the
Employee and Employee_Addresses tables. To see the SQL that
Crystal Reports .NET has generated, right-click the report, and select Database → Show SQL Query:
SELECT `Employee`.`Last Name`, `Employee`.`First Name`, `Employee`.`Birth Date`,
`Employee`.`Hire Date`, `Employee_Addresses`.`City`
FROM `Employee` `Employee` INNER JOIN `Employee Addresses` `Employee_Addresses`
ON `Employee`.`Employee ID`=`Employee_Addresses`.`Employee ID`
The fields you select in your report control the contents of the SELECT statement, but it is the links that
control the
FROM clause. When working with multiple tables or a large database, your database adminis-
trator should be able to give you some guidance on how the tables should be arranged and joined
together.
If you find working with links in Crystal Reports .NET difficult, you can always use an SQL command
as the datasource for your report, and perform any joins in the SQL statement you write.
Verifying Database Structures Used in Your Report
As your database structures evolve and change, Crystal Reports you have created from these structures
may no longer work due to differing field names and types. To ensure that the changes made in the
database are reflected and accounted for in your existing reports, you will need to verify the database
that they were created on by selecting Database → Verify Database from the main right-click menu.
If you have databases or tables in your report that are not used, you may receive the message “Verify
files in report that are not used?” Click Yes to proceed.
At this point, Crystal Reports .NET will run through the data structures in your report and verify that
nothing has changed. If all of the data structures are unchanged, “The database is up to date” will be dis-
played on your screen.
If anything has changed in the data structures, you will receive a message informing you of this, and
that Crystal Reports .NET is proceeding to fix the report (shown in Figure 7-11).
Figure 7-11
If Crystal Reports .NET finds simple changes, like a database field that has been extended or a decimal
place that has changed, it will simply update its version of the data structures and display the message
“The database is up to date.”
If Crystal Reports .NET finds a major change (like a field name missing, or a changed field type) it will
open a Map Fields dialog. A list of unmapped fields will appear in the upper left-hand corner of this
224
07 557300 Ch07.qxd 3/24/04 9:38 AM Page 225
Working with .NET Data
dialog. These are fields that are currently in your report that Crystal Reports .NET could not find when it
attempted to verify the underlying data structure. To resolve any mismatched fields, select a field out of
the dialog that has Report Fields at the top, locate its counterpart in the list on the right-hand side, and
click Map.
If the type of the field has changed as well as the name, uncheck the Match Type option to show all fields.
When you have finished mapping all of the fields that were not found in the verification of the data
structures, you can return to your report design and Crystal Reports .NET will use these mapped values
in place of the missing fields.
Changing a Database Location
Another handy feature is the ability to change the location of the database that your report uses. For
example, you can design a report on your test database, and then later point it to a production version.
To change the location of the database in your report, right-click and select Database → Set Location and
from the dialog shown, select the database or table you want to point to.
Using the Data Explorer tree on the right, locate the datasource and database or table you wish to
change the location to, highlight, and click the Replace button.
If you are using multiple databases or tables in your report and subreports, there is a checkbox in the
bottom left-hand corner with the option of Apply this change to subreports. Turning this option on will
change the database location for all other subreports as well.
If the data structures are different between the old database or table and the database in the new location
you have selected, the Map Fields dialog will appear (Figure 7-12), and you must map any unfound
fields in your report to fields in the new database structure.
Figure 7-12
225
07 557300 Ch07.qxd 3/24/04 9:38 AM Page 226
Chapter 7
Setting a Database Alias
Aliases are used when you need to reference a table in a report more than once. A common example
would be where you had an employee table with a supervisor ID that was also the employee ID of the
supervisor. To get Crystal Reports .NET to reference the same table, you would need to add it to the
report a second time, and give it an alias like
EmployeeSupervisor.
To set a database alias, open the Database Expert by right-clicking and selecting Database →
Add/Remove Database. In the window on the left, find and then double-click the database or table you
want to apply the alias to, and the dialog shown in Figure 7-13 will open.
Figure 7-13
Select Yes, and enter the new alias for the database in the Alias Name dialog, shown in Figure 7-14.
Figure 7-14
You will see your new alias in the right-hand window of the Database Expert, with the alias you speci-
fied in the previous dialog, shown in Figure 7-15. You can edit this name by selecting the table in the
Selected Tables window, and pressing F2.
This will only change the alias of the datasource within Crystal Reports .NET and will not touch the
underlying SQL statement. Selecting OK will accept this and present you with the Visual Link Designer,
as seen in Figure 7-16, which you can use to change the links between the different tables, as we
described earlier in this chapter.
226
07 557300 Ch07.qxd 3/24/04 9:38 AM Page 227
Working with .NET Data
Figure 7-15
Figure 7-16
227
07 557300 Ch07.qxd 3/24/04 9:38 AM Page 228
Chapter 7
Working with SQL Commands and
Expressions
In addition to reporting directly from database tables, views, and stored procedures, you also have the
ability to use custom SQL commands as the datasource for your report. Using this method, you can cre-
ate a virtual table that contains all of the fields you want to use. This functionality offers a flexible alterna-
tive to using Crystal Reports’ own database and linking functionality, and can help you reuse the
investment you have made in other report tools, or existing SQL statements. SQL Expressions are used
within a report to create new values to display; for example, projected sales figures can be generated by
applying a mathematical expression to the previous year’s sales.
Defining Virtual Tables
To see this feature in action, create a new Visual Basic .NET Windows Application within Visual Studio
.NET called
SQLCommand. (This project is available in the code download at the location
C:\Crystal.NET2003\Chapter07\SQLCommand.) Select Project → Add New Item and then choose
Crystal Report from the available templates. Call the file
sql_command.rpt, as shown in Figure 7-17,
and click Open. We will first step through the setup of a basic report again.
Figure 7-17
This will open the Crystal Report Gallery and allow you to select an expert to help you get started. In
this example, we are going to select the Standard Report Expert, but SQL commands can be used with
any of the experts listed.
The first step of the Standard Report Expert is selecting the datasource for your report; double-click the
node for ODBC (RDO) and select
Xtreme Sample Database 2003 as our sample datasource. This will
open the dialog shown in Figure 7-18 where you can double-click Add Command to do just that.
228
07 557300 Ch07.qxd 3/24/04 9:38 AM Page 229
Working with .NET Data
Figure 7-18
When adding an additional datasource to an existing report using Database →
Add/Remove Database, the option to add an SQL command is also available.
When you select Add Command, another dialog will open and allow you to enter an SQL statement to
serve as the datasource for your report. Enter
SELECT * from Customer in the window, as shown in
Figure 7-19.
Figure 7-19
229
07 557300 Ch07.qxd 3/24/04 9:38 AM Page 230
Chapter 7
Click OK, and Crystal Reports will treat the results of this query as a virtual table. You can now use the
fields you have specified in your select statement in your report.
Click Next to move on to the Fields tab, and where you would normally see a table to select data from,
you will see your command. It behaves just like a table in this dialog, so click the + to expand the com-
mand, as shown in Figure 7-20 and you will see the results of your SQL command, in this case the
Customer table.
Figure 7-20
Now select the fields you want to see on your report, which in this case are:
❑
Customer Name
❑ Contact First Name
❑ Contact Last Name
❑ City
❑ Region
That’s all you need to do to make a basic report based on an SQL command, so click Finish to generate the
report, and your Report Designer should show these fields in the Details section of
sql_command.rpt.
You know how to preview your report now, but here is a reminder of the basic steps:
❑ Drag the
CrystalReportViewer (under Windows Forms in the Toolbox) to Form1.vb
❑ Drag ReportDocument (under Components in the Toolbox) to Form1.vb
230