Wrox Professional Crystal Reports for Visual Studio NET Second Edition phần 9 docx
Bạn đang xem bản rút gọn của tài liệu. Xem và tải ngay bản đầy đủ của tài liệu tại đây (1.63 MB, 38 trang )
09 557300 Ch09.qxd 3/24/04 9:42 AM Page 282
Chapter 9
If the PrinterName string is empty, the default printer is selected.
If you do change the page margins, you will need to use the
PrintOptions class’s
ApplyPageMargins method to apply your changes.
If you are migrating your code from Visual Basic 6.0, keep in mind that the Crystal Report Engine in
Visual Studio .NET no longer supports the
SelectPrinter method that was so handy in previous ver-
sions (it would pop up the standard Select Printer dialog for you). To use this functionality within
Crystal Reports.NET, you will need to open the Select Printer dialog yourself, get the name of the
printer, and then set the
PrinterName property of the PrintOptions class.
Exporting Your Report
In addition to printing your report without the viewer, you can also export your report without having
to use the export button available on the Crystal Report viewer.
Within the
ReportDocument methods, there is a method called Export, which can be used to export
directly from your application. Unlike the
PrintReport method, which would just print the report to
the default printer, there are a number of properties that need to be set before you can actually call the
Export method.
Here is a rundown of all of the properties and objects that are related to the
ExportOption class:
Property Description
DestinationOptions Returns or sets the DestinationOptions object, including
DiskFileDestinationOptions, ExchangeFolder
DestinationOptions,
and MicrosoftMailDestination
Options
ExportDestinationType
Returns or sets the export destination type
ExportFormatType Returns or sets the export format type
FormatOptions Returns or sets the FormatOptions object, including
ExcelFormatOptions, HTMLFormatOptions, and
PdfRtfWordFormatOptions
So, in another example, we could add another button to our form to export the report, as shown in
Figure 9-3:
282
09 557300 Ch09.qxd 3/24/04 9:42 AM Page 283
Working with the Crystal Reports Engine
Figure 9-3
Name the button
Export_Button, and change the Text property to Export Report.
The code behind the button sets all of the properties and collections of information required. It then uses
the
ExportReport method to export our report. The first thing we need to do in our code is actually set
up some variables to hold the different property collections that we will be setting, including properties
for the
ExportOptions, DiskFileDestinationOptions, and FormatTypeOptions.
Private Sub Export_Button_Click(ByVal sender As System.Object, ByVal e As
System.EventArgs) Handles Export_Button.Click
Dim myReport As New employee_listing()
myReport.Load()
Dim myExportOptions As New CrystalDecisions.Shared.ExportOptions()
Dim myDiskFileDestinationOptions As New
CrystalDecisions.Shared.DiskFileDestinationOptions()
Dim myFormatTypeOptions As New
CrystalDecisions.Shared.PdfRtfWordFormatOptions()
283
09 557300 Ch09.qxd 3/24/04 9:42 AM Page 284
Chapter 9
With some variables created, we now need to select where our exported file is going to be saved and
what format it is going to be available in:
myDiskFileDestinationOptions.DiskFileName =
“C:\CrystalReports\Chapter09\test.pdf”
myExportOptions = myReport.ExportOptions
With myExportOptions
.ExportDestinationType =
CrystalDecisions.Shared.ExportDestinationType.DiskFile
.ExportFormatType =
CrystalDecisions.Shared.ExportFormatType.PortableDocFormat
.DestinationOptions = myDiskFileDestinationOptions
.FormatOptions = myFormatTypeOptions
End With
Finally, we call the Export method to actually export our report:
myReport.Export()
MsgBox(“Your report has been exported in PDF format and saved to
C:\CrystalReports\Chapter09\test.pdf”)
When faced with a number of different property collection for destinations, format types and such, it can
get a bit messy trying to figure out which combination of properties you need (for example, to export a
report to an Exchange folder in RTF format but only the first two pages).
There are actually seven export formats available for Crystal Reports .NET:
❑ Adobe Acrobat (
.pdf)
❑ Crystal Reports within Visual Studio .NET, Crystal Reports 9.0 (
.rpt)
❑ HTML 3.2 and 4.0 (
.html)
❑ Microsoft Excel (
.xls)
❑ Microsoft Rich Text (
.rtf)
❑ Microsoft Word (
.doc)
and three destinations for the exported report:
❑ Disk file
❑ Microsoft Exchange public folders
❑ Microsoft Mail
284
09 557300 Ch09.qxd 3/24/04 9:42 AM Page 285
Working with the Crystal Reports Engine
For more information on the relationship between the objects involved in exporting,
as well as the classes and members associated with each of the export formats and
destinations, search the Visual Studio .NET Combined Help Collection using the
keywords CRYSTAL REPORT EXPORT.
Some of the classes and members that are used with the Crystal Reports Engine are actually part of a
CrystalDecisions.Shared namespace, which is shared between the Windows Forms Viewer, Web
Forms Viewer, and the Crystal Reports Engine to reduce duplication in these namespaces.
Working with Databases
The strength of Crystal Reports .NET is its ability to extract information from a database (or other data
source) and present the information in a report that users can view or print so it stands to reason that
most of your reports will be based on some database or data source within your application.
The Crystal Reports Engine provides a set of tools for working with databases by giving us the flexibility
to change the database login information, location, and other features at run time through the properties
and methods associated with the
Database object.
There are two classes associated with
Database. They are Tables and Links. The Tables class contains
all of the tables that are used in your report, and the
Links class contains all of the links between these
tables as created within the report. Using these two classes, you can set the login information for your
database, retrieve or change the location of tables, or change the table linking, among other functions.
We will start looking at these classes with one of the most common developer tasks — specifying the
database connection information for your report. If you have established database security, you will
want to pass the appropriate username and password for the user who is viewing the report, and the
following section will guide you through how this is done.
Logging on to a Database
When creating a report using Crystal Reports .NET, you can include data from multiple data sources in
your report. While this feature makes for information-rich reports and can eliminate the need for multi-
ple reports, it does pose a problem when customizing the report at run time.
It would be impossible to set one set of database credentials for all of the data sources in a report so the
Report Engine object model caters for these multiple data sources by allowing you to set the connection
information for individual tables that appear in your report through the
Tables class. This class has the
following members:
Property Description
Count Returns the number of Table objects in the collection
Item Returns the Table object at the specified index or with the
specified name
285
09 557300 Ch09.qxd 3/24/04 9:42 AM Page 286
Chapter 9
Each Table object in the Tables collection has the following properties:
Property Description
Fields Returns the DatabaseFieldDefinitions collection (which we’ll
look at a little later in this chapter)
Location Returns or sets the location of the database table
LogOnInfo Returns the TableLogOnInfo object
Name Returns the alias name for the database table used in the report
Now, at this point, you are probably wondering how the
TableLogOnInfo actually gets set. There is a
method associated with this class,
ApplyLogOnInfo, that is used to apply any changes to the database
login information for a table.
For collecting and setting the properties relating to
TableLogonInfo and connection information, the
CrystalDecisions.Shared namespace has a ConnectionInfo class that has the following properties:
Property Description
DatabaseName Returns or sets the name of the database
Password Returns or sets the password for logging on to the data source
ServerName Returns or sets the name of the server or ODBC data source where
the database is located
UserID Returns or sets a user name for logging on to the data source
We looked briefly at these properties and methods in Chapter 3, “Designing Reports,” but we didn’t
tackle looping through the database. We’ll look at that now.
Drag another button onto your Form, and call it
Database_Button. Change the Text property to
Northwind Report. We’ll create a new Form with this button so right-click the project name, select Add
→ Add New Item and then, out of the dialog that pops up, select Windows Form. The default name
will be
Form2.vb, which is as good as any.
Double-click our new button, and insert the following code:
Private Sub Database_Button_Click(ByVal sender As System.Object, ByVal e As
System.EventArgs) Handles Database_Button.Click
Dim Form2 As New Form2()
Form2.Show()
End Sub
Now, drag a CrystalReportViewer onto Form2 in the Design mode, right-click the project to Add →
Add Existing Item , Browse to
C:\Crystal.NET2003\Chapter09\worldsales_northwind.rpt (this
location will vary depending on where you have downloaded the sample code to), and add this report
to the project.
286
09 557300 Ch09.qxd 3/24/04 9:42 AM Page 287
Working with the Crystal Reports Engine
Next, drag a ReportDocument component onto the Form and, when the dialog opens, select
engine_basic.worldsales_northwind.
The next step is to add some additional code to set our
ConnectionInfo class.
Private Sub Form1_Load(ByVal sender As System.Object, ByVal e As
System.EventArgs) Handles MyBase.Load
Dim myReport As New worldsales_northwind()
CrystalReportViewer1.ReportSource = myReport
myReport.Load()
Dim myDBConnectionInfo As New CrystalDecisions.Shared.ConnectionInfo()
With myDBConnectionInfo
.ServerName = “localhost”
.DatabaseName = “Northwind”
.UserID = “sa”
.Password = “”
End With
If you are using a secured Microsoft Access, Paradox, or other PC-type database, the same method can
be used, except the
.ServerName and .DatabaseName are left blank.
Then, we can apply this
ConnectionInfo by looping through all of the tables that appear in our report:
Dim myTableLogOnInfo As New CrystalDecisions.Shared.TableLogOnInfo()
Dim myDatabase = myReport.Database
Dim myTables = myDatabase.Tables
Dim myTable As CrystalDecisions.CrystalReports.Engine.Table
For Each myTable In myTables
myTableLogOnInfo = myTable.LogOnInfo
myTableLogOnInfo.ConnectionInfo = myDBConnectionInfo
myTable.ApplyLogOnInfo(myTableLogOnInfo)
Next
End Sub
In this instance, we are looping through the tables using the table object. You can also loop through the
tables through the item and the table name or index.
For instance:
myReport.Database.Tables.Item(i).ApplyLogOnInfo()
But, it’s up to you.
Setting a Table Location
Another handy trick that the Report Engine provides is the ability to set the location for tables that appear
in our report. (This is the equivalent of going into the Report Designer, right-clicking, and selecting
Database → Set Location.)
287
09 557300 Ch09.qxd 3/24/04 9:42 AM Page 288
Chapter 9
This can be useful for occasions when you have to put historical data into another table or want to sepa-
rate out data in different tables for different business units, but the structure of the “source” and “target”
table have to be the same, or you will get errors when the report is run.
When working with the location of a table, the
Location property will both return and set where the
table resides.
The example that we are now going to build demonstrates how the location of a table in a report could
be changed to point to a “current” employee table. In your project, right-click the project name, select
Add → Add New Item , and choose Windows Form. The default name should be
Form3.vb. Click
Open. Drag a button onto the Design view of
Form1.vb, call the button Location_Button, and change
the Text property to Set Database Location. Double-click this button, and insert the following code:
Private Sub Location_Button_Click(ByVal sender As System.Object, ByVal e As
System.EventArgs) Handles Location_Button.Click
Dim Form3 As New Form3()
Form3.Show()
End Sub
We shall use employee_listing.rpt to demonstrate the point. This report is already attached to the
project so we do not need to add it. However, what we do need to do is to go into our Xtreme database
and create a copy of the
Employee table in Access. This copy should be named Employee_Current.
Add a few more employee rows onto the end of the table (just so that the information is slightly differ-
ent), and save it.
There are several versions of Xtreme supplied from various sources, including the
sure that the version you alter and the data source the report is referencing are the
same!
ones included with both Crystal Enterprise and Microsoft Visual Studio .NET. Make
The next thing to do is prepare
Form3.vb. In the Design view of this Form, drag on a CrystalReport
Viewer
and a ReportDocument component. When the dialog for the ReportDocument comes up, select
engine_basic.employee_listing.
All that remains is to insert the following code:
Private Sub Form3_Load(ByVal sender As System.Object, ByVal e As
System.EventArgs) Handles MyBase.Load
MsgBox(“Note: To make this sample work, open the Xtreme sample database in
Access and copy the Employee table to Employee_Current and change some
values. You should see these changes when you view the report,
indicating the set location worked correctly”)
Dim myReport As New employee_listing()
CrystalReportViewer1.ReportSource = myReport
myReport.Load()
Dim myDatabase = myReport.Database
288
09 557300 Ch09.qxd 3/24/04 9:42 AM Page 289
Working with the Crystal Reports Engine
Dim myConnectionInfo As New CrystalDecisions.Shared.ConnectionInfo()
Dim myTableLogonInfo As New CrystalDecisions.Shared.TableLogOnInfo()
Dim myTables = myDatabase.Tables
Dim myTable As CrystalDecisions.CrystalReports.Engine.Table
For Each myTable In myTables
MsgBox(“Before: “ & myTable.Location.ToString())
If myTable.Location.ToString() = “Employee” Then
myTable.Location = “Employee_Current”
End If
myTable.ApplyLogOnInfo(myTableLogonInfo)
MsgBox(“After: “ & myTable.Location.ToString())
Next
CrystalReportViewer1.ReportSource = myReport
CrystalReportViewer1.Refresh()
End Sub
We’re good to go. Run the application, and click the Set Database Location button. Various dialogs
should appear that advise you on the changes in the location since the tables cycle through the
For
loop. Eventually, the report will load, showing the changes you have made.
You could also use this feature to point to a table that resides on a completely different database plat-
form (from SQL Server to Oracle, for example), as long as the table definitions are compatible.
If you want to ensure that your report has the most recent instance of the data you are reporting from,
prior to your export, you can use the
Refresh method to refresh your report against the database.
Setting the Join Type
For reports that are based on more than one table, Crystal Reports .NET has a visual linking tool that
allows you to specify the links or joins between these tables, as shown in Figure 9-4:
To see this dialog, open the Report Designer, right-click your report, and select Database → Visual
Linking Expert
When working with these tables and links at run time, it can be confusing when working with all of the
different elements involved so we’ll break it down.
Similarly with
Tables, there is a TableLink object that is contained in a TableLinks collection, which
has one
TableLink object for every link that appears in your report.
Keep in mind that tables can have multiple links between them. For example, you may have only two
tables, but there may be three key fields that are linked together between those two tables.
289
09 557300 Ch09.qxd 3/24/04 9:42 AM Page 290
Chapter 9
Figure 9-4
A
TableLink has the following properties:
Property Description
DestinationFields Returns a reference to table link destination Database-
FieldDefinitions
collection
DestinationTable Returns a reference to the table link destination Table
object
JoinType Returns a summary of the linking used by the table
SourceFields Returns a reference to table link source
SourceTable Returns a reference to the table link source Table object
So, to determine the tables and database fields used in linking our tables together, we can loop through
all of the links used in our report. We’ll look at how we do this now.
Drag another button onto
Form1 in the Design view, and name it Links_Button. Change the Text prop-
erty to Show Links. Double-click the button, and add the following code:
290
09 557300 Ch09.qxd 3/24/04 9:42 AM Page 291
Working with the Crystal Reports Engine
Private Sub Links_Button_Click(ByVal sender As System.Object, ByVal e As
System.EventArgs) Handles Links_Button.Click
Dim myReport As New employee_listing()
myReport.Load()
Dim myDatabase = myReport.Database
Dim myTables = myDatabase.Tables
Dim myTable As CrystalDecisions.CrystalReports.Engine.Table
Dim myLinks = myDatabase.Links
Dim myLink As CrystalDecisions.CrystalReports.Engine.TableLink
For Each myLink In myLinks
MsgBox(“Destination Table: “ & myLink.DestinationTable.Name.ToString &
“.” & myLink.DestinationFields.Item(1).Name.ToString())
MsgBox(“Source Table: “ & myLink.SourceTable.Name.ToString & “.” &
myLink.SourceFields.Item(1).Name.ToString)
MsgBox(“Join Type: “ & myLink.JoinType.ToString)
Next
End Sub
Compile and run. The dialogs should now appear, one after the other, bearing the name of the source
and target links and also the join type, as shown in Figure 9-5.
Figure 9-5
Keep in mind that these properties are read-only. You will not be able to set the table linking using these
properties. If you do want to change the database linking that is used, you may want to consider push-
ing the data into the report using a dataset.
Pushing Data into a Report
Earlier in our discussion of the different ways you could deploy a report in Chapter 1, “Crystal Reports
.NET Overview,” we looked at “Push” and “Pull” type reports. Up until this point, we have been work-
ing exclusively with “Pull” reports in which we pull the information from the database and display it in
our report.
For “Push” reports, you actually create the report the same way, except that, when the report is run, you
can “Push” a dataset to the report, as we did in Chapter 6, “Creating SML Report Web Services.” This
works in a similar manner to actually setting the data source for an individual table, but, instead of
setting the property equal to another table, we are going to set it equal to another data source. In the
291
09 557300 Ch09.qxd 3/24/04 9:42 AM Page 292
Chapter 9
following example, we are using our sample report that we have been working with, but, instead of data
from the Xtreme sample database, we are actually connecting to the Northwind database on SQL Server
to get the data we need.
Dim query = “select * from Customer”
Dim MyOleConn As New System.Data.OleDb.OleDbConnection(conn)
Dim MyOleAdapter As New System.Data.OleDb.OleDbDataAdapter()
Dim MyDataSet As Data.DataSet
MyOleAdapter.SelectCommand = New System.Data.OleDb.OleDbCommand(query, MyOleConn)
MyOleAdapter.Fill(MyDataSet, “Customer”)
myReport.Database.Tables.Item(“Customer”).SetDataSource(MyDataSet)
So, instead of actually changing the links and tables that are used within the report, we are actually just
pushing another set of data into those structures. As you work with this feature, you are going to pick
up some tricks along the way, and one of the handiest tricks is to use a SQL command as the basis of
your report. This makes pushing data into the report easier since a report based on SQL command treats
the resulting data as if it were one big table.
From your application, you can then get a dataset that matches the fields in your SQL command and
then push the data into that one table (instead of having to loop through multiple tables).
Working with Report Options
Another basic task when working with data sources and Crystal Reports is the setting of some generic
database options for your report, which are set using the
ReportOptions class that relates to the report
you are working with. Some of these options correspond to the options available in the report designer
when you select Designer → Default Settings, but a few (like
EnableSaveDataWithReport) are not
available in the Report Designer, only through the object model.
Property Description
EnableSaveDataWithReport Returns or sets the Boolean option to automatically
save database data with a report
EnableSavePreviewPicture Returns or sets the Boolean option to save a
thumbnail picture of a report
EnableSaveSummariesWithReport Returns or sets the Boolean option to save the data
summaries you create with the report
EnableUseDummyData Returns or sets the Boolean option to use dummy
data when viewing the report at design time
(Dummy data is used when there is no data saved
with the report)
A common use of these types of properties is for saving a report with data to send to other users. These
properties can be used in conjunction with the
Refresh and SaveAs methods to save a report with data
that can be distributed to other users.
292
09 557300 Ch09.qxd 3/24/04 9:42 AM Page 293
Working with the Crystal Reports Engine
To test this, just alter the code in Print_Button code in Form1 as follows:
myReport.Export()
myReport.ReportOptions.EnableSaveDataWithReport = True
myReport.Refresh()
myReport.SaveAs(“c:\CrystalReports\Chapter09\saved.rpt”,
CrystalDecisions.[Shared].ReportFileFormat.VSNetFileFormat)
MsgBox(“Your report has been exported in PDF format and saved to
C:\CrystalReports\Chapter09\test.pdf and your original report has been
saved to C:\CrystalReports\Chapter09\saved.rpt”)
End Sub
Even if the user doesn’t have Crystal Reports or Crystal Reports .NET, a simple viewer application cre-
ated with Visual Studio .NET is all you need to view the report in its native format (or, if you export to
PDF, the Acrobat viewer). The code for a sample viewer is included in the code samples for this chapter.
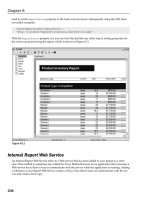
Setting Report Record Selection
When working with Crystal Reports, you will probably want to use record selection to filter the records
that are returned. This record selection formula translates to the
WHERE clause in the SQL statement that
is generated by Crystal Reports.
You can see the record selection formula for a report by right-clicking your report and selecting
Report → Edit Selection Formula → Records. This will open the formula editor, as shown in Figure 9-6,
and allow you to edit your record selection formula.
Figure 9-6
293
09 557300 Ch09.qxd 3/24/04 9:42 AM Page 294
Chapter 9
The record selection formula within Crystal Reports is written using Crystal Syntax so you may want
to review the section on Crystal Syntax in the previous chapter.
You can retrieve the report’s record selection and set it using the same property, as we saw in the exam-
ples in Chapter 4, “Report Integration for Windows-Based Applications”:
myReport.RecordSelectionFormula = “{Employee_Addresses.Country} = ‘USA’”
Whenever the report is run, this record selection formula will be applied, and the report will be filtered
using the formula specified.
You may look through the object model trying to find where to set the SQL statement that Crystal gen-
erates. At this point, your only two options for working with the SQL are to set the record selection
(using the method just discussed), which will set the
WHERE clause, or creating your own dataset using
your own SQL statement and then “pushing” the data into the report.
Working with Areas and Sections
Another often-used class is the ReportDefinition class, which is used to retrieve all of the areas, sec-
tions, and report objects shown in your report. An area within the context of a Crystal Report corre-
sponds to the types of sections we talked about earlier in Chapter 2, “Getting Started with Crystal
Reports .NET.” There are seven different types of areas, including:
❑
Detail
❑ GroupFooter
❑ GroupHeader
❑ PageFooter
❑ PageHeader
❑ ReportFooter
❑ ReportHeader
You may remember from Chapter 2 that all of these different types of areas can also have multiple sec-
tions within them (Details A, Details B, and so on), as shown in Figure 9-7:
All of the areas within your report are held within the
Areas collection of the ReportDefinition,
which can be accessed through the name of the area or by the number. For example, if you wanted to
work with the report header area, you could access it using:
myReport.ReportDefinition.Areas(“ReportHeader”)
Likewise, you could access it using its item number as well:
myReport.ReportDefinition.Areas(1)
294
09 557300 Ch09.qxd 3/24/04 9:42 AM Page 295
Working with the Crystal Reports Engine
Figure 9-7
So, to start looking at how we can control these areas and sections at run time, we will take a look at
areas first.
Formatting Areas
To get a feel for some of the formatting options that are available for sections, as shown in Figure 9-8,
open the
employee_listing report in the Report Designer, right-click a section heading, and select
Format Section :
Most of the formatting options shown in this dialog can be directly read or set using the properties asso-
ciated with the
AreaFormat class, including:
Property Description
EnableHideForDrillDown Returns or sets hide for drill down option
EnableKeepTogether Returns or sets the keep area together option
EnableNewPageAfter Returns or sets the new page after option
EnableNewPageBefore Returns or sets the new page before option
EnablePrintAtBottomOfPage Returns or sets the print at bottom of page option
EnableResetPageNumberAfter Returns or sets the reset page number after option
EnableSuppress Returns or sets the area visibility
295
09 557300 Ch09.qxd 3/24/04 9:42 AM Page 296
Chapter 9
Figure 9-8
So, to format our report so that we are suppressing the page header, the code would look something
like this:
myReport.ReportDefinition.Areas.Item(1).AreaFormat.EnableSuppress = True
Keep in mind that any properties we set for an area also apply for all of the sections within that area (for
example, any formatting applied to the “Report Header” would also apply to “Report Header A,”
“Report Header B,” and so on).
Formatting Sections
For sections within an area, we also have a number of properties within a SectionFormat class that can
control an individual section’s appearance, including:
Property Description
BackGroundColor Returns or sets the background color of the object using
System.Drawing.Color
EnableKeepTogether Returns or sets the option that indicates whether to keep
the entire section on the same page if it is split into two
pages
296
09 557300 Ch09.qxd 3/24/04 9:42 AM Page 297
Working with the Crystal Reports Engine
Property Description
EnableNewPageAfter Returns or sets the new page after options
EnableNewPageBefore Returns or sets the new page before option
EnablePrintAtBottomOfPage Returns or sets the print at bottom of page option
EnableResetPageNumberAfter Returns or sets the reset page number after option
EnableSuppress Returns or sets the area visibility
EnableSuppressIfBlank Returns or sets the option that indicates whether to
suppress the current section if it is blank
EnableUnderlaySection Returns or sets the underlay following section option
All of these properties work just like their counterparts within the
Area class. The only one that is not
Boolean is the
BackGroundColor property, which is set using the System.Drawing.Color palette. If
you haven’t used this palette before, you may want to review the constants for the different colors avail-
able by searching the combined help on “
System.Drawing.Color” and looking through its members.
So, to illustrate the use of these properties, we could change the color of our page header and also sup-
press the page footer for our report. To accomplish this, pull another button onto your form (the final
one!) and name it
Format_Button. Change the Text property to Format Header Color. In the code
behind this button, insert the following:
Private Sub Format_Button_Click(ByVal sender As System.Object, ByVal e As
System.EventArgs) Handles Format_Button.Click
Dim myReport As New worldsales_northwind()
myReport.Load()
myReport.ReportDefinition.Sections.Item(1).SectionFormat.BackgroundColor =
System.Drawing.Color.AliceBlue
CrystalReportViewer1.ReportSource = myReport
End Sub
Compile and run. The result should be that the section changes color. If you are unsure of what number
a particular section is, open the Report Designer and the section numbers will appear on the horizontal
divider that marks the top of the section.
Working with Report Objects
Within the sections of your report, there are a number of report objects. You are probably already famil-
iar with these objects since they are the fields, graphs, and cross-tab objects (among others) that appear
on your report.
These are:
❑
BlobFieldObject
❑ BoxObject
❑ ChartObject
297
09 557300 Ch09.qxd 3/24/04 9:42 AM Page 298
Chapter 9
❑ CrossTabObject
❑ FieldObject
❑ LineObject
❑ MapObject
❑ OlapGridObject
❑ PictureObject
❑ SubreportObject
❑ TextObject
Each of the particular object types within your report has its own unique formatting properties and may
also share common formatting options with other types of objects as well.
To determine what type of object you are working with (and subsequently understand what options are
available for each type), you can use the
Kind property of the ReportObject to determine the
ObjectType:
If section.ReportObjects(1).Kind = ReportObjectKind.FieldObject Then
MsgBox(“The first object is a Field Object”)
End If
To get started with looking at ReportObjects, we are going to look at the most common type,
FieldObjects.
Formatting Common Field Objects
The main content on a Crystal Report is usually a number of fields that have been inserted and shown
on your report. These could be database fields, formula fields, or parameter fields and are used to dis-
play the data returned by the report.
When working with these fields at run time, there are two different areas in which we can control the
field: the content of the field and the format of the field. As most fields share some of the same format-
ting options, we will look at the formatting first.
To start with, fields are contained within the
ReportDefinition object and can be referenced by either
the field name or an item number:
myReport.ReportDefinition.ReportObjects.Item(“Field1”)
or:
myReport.ReportDefinition.ReportObjects.Item(1)
You may be tempted to refer to these fields by their name within Crystal Reports (ReportTitle), but
keep in mind that you can add a field to your report multiple times so, in Crystal Reports .NET, when-
ever you add a field to your report, a unique number and name are assigned to that field.
You can see the name of the field by looking at its properties within the Crystal Report Designer, as
shown in Figure 9-9:
298
09 557300 Ch09.qxd 3/24/04 9:42 AM Page 299
Working with the Crystal Reports Engine
Figure 9-9
If your development follows a set naming convention, you also can change the name of the field to
something other than the default Field1, Field2, and so on. Keep in mind that there is no way to change
the default naming convention so you may find changing all of the names to be a bit tedious.
To reference the formatting options for a
FieldObject, we need to access common field properties by
referencing the
FieldObject class, which has the following basic members:
Property Description
Border Returns the Border object
Color Returns or sets the color of the object
DataSource Returns the FieldDefinition object, which can be used
to return and set format information specific to the kind
of field
FieldFormat Returns the FieldFormat object, which can be used to
get and set format information specific to the type of field
Table continued on following page
299
09 557300 Ch09.qxd 3/24/04 9:42 AM Page 300
Chapter 9
Property Description
Font Returns the Font object (Use the ApplyFont method to
apply the changes)
Height Returns or sets the object height
Left Returns or sets the object upper-left position
Name (inherited from ReportObject) Returns the object name
ObjectFormat Returns the ObjectFormat object that contains all of the
formatting attributes of the object
Top Returns or sets the object upper top position
Width Returns or sets the object width
So, we can set some of the common formatting properties (such as font and color) directly, as shown in
the code example here. It’s not included in the sample application, but you should play around with
these properties to see what they can do:
If section.ReportObjects(“field1”).Kind = ReportObjectKind.FieldObject Then
fieldObject = section.ReportObjects(“field1”)
fieldObject.Color = Color.Blue
End If
There are specific properties that apply to the FieldFormat, depending on what type of field you are
working with. When you retrieve the
FieldFormat, you will be able to set options that are specific to
that field. There are five format types (in addition to a “common” type):
Property Description
BooleanFormat BooleanFieldFormat Gets the BooleanFieldFormat object
DateFormat DateFieldFormat Gets the DateFieldFormat object
DateTimeFormat DateTimeFieldFormat Gets the DateTimeFieldFormat object
NumericFormat NumericFieldFormat Gets the NumericFieldFormat object
TimeFormat TimeFieldFormat Gets the TimeFieldFormat object
In the following sections, we are going to look at how to format the different types of fields using their
FieldFormat.
Formatting Boolean Fields
With Boolean fields and the BooleanFieldFormat formatting class, there is only one property,
OutputType, which can be set to the following values:
300
09 557300 Ch09.qxd 3/24/04 9:42 AM Page 301
Working with the Crystal Reports Engine
Value Description
OneOrZero Boolean value to be displayed as a 1 or 0 (1 = True, 0 = False)
TOrF Boolean value to be displayed as a T or F (T = True, F = False)
TrueOrFalse Boolean value to be displayed as True or False
YesOrNo Boolean value to be displayed as Yes or No
YOrN Boolean value to be displayed as a Y or N (Y = True, N = False)
So, to change a Boolean field that appears on your report from displaying a binary representation to the
text
True/False, we could set this property to:
fieldObject.FieldFormat.BooleanFormat.OutputType =
BooleanFormat.OutputType.TrueOrFalse
If you do need to see other values (such as On or Off, or Active or Inactive), you will probably want
to create a formula in your report that translates these values for you:
If {Customer.Active} = True then “Active” else “Inactive”
Formatting Date Fields
Date fields within Crystal Reports have their own unique set of formatting properties that can be viewed
in the Report Designer by right-clicking a date field and selecting Format. You can format date fields by
example (picking a date format that looks similar to what you want), or you can customize most aspects
of the date field using the dialog shown in Figure 9-10:
Figure 9-10
301
09 557300 Ch09.qxd 3/24/04 9:42 AM Page 302
Chapter 9
To bring this some of the same functionality at run time, the formatting of a date field has been broken
up into multiple classes, which are all members of the
DateFieldFormat class:
Property Description
DayFormat Returns or sets the day format
MonthFormat Returns or sets the month format
YearFormat Returns or sets the year format
All of the properties in these classes can be set separately so you don’t need to set the month format, for
example, if you only want to change how the years are displayed. To start building up a format for a
date field within our report, we are going look at the day format first. For the
DayFormat property, we
have three options:
❑
LeadingZeroNumericDay — A single digit day will be printed with a leading zero (for
example,
07).
❑
NoDay — A day is not printed.
❑
NumericDay — A day is printed in numeric format with no leading zero.
For the
MonthFormat, we have five options:
❑
LeadingZeroNumericMonth — The month is printed as a number with a leading 0 for single
digit months.
❑
LongMonth — The month is printed as text.
❑
NoMonth — The month is not printed.
❑
NumericMonth — The month is printed as a number with no leading 0.
❑
ShortMonth — The month is printed as text in abbreviated format.
There are also three options for the
YearFormat:
❑
LongYear — The year is printed in long format with four digits.
❑
NoYear — The year is not displayed.
❑ ShortYear — The year is printed in short format with two digits.
So, to put it all together, here are some examples of how these can produce some commonly requested
date formats. To display the date with the days and months with a leading zero and the full four-digit
year, the code would look like this. Again, the next two code snippets are for example only and not
included in a sample application of their own, but it is recommended that you experiment with these
properties:
With fieldObject.FieldFormat.DateFormat
.DayFormat = DayFormat.LeadingZeroNumericDay
302
09 557300 Ch09.qxd 3/24/04 9:42 AM Page 303
Working with the Crystal Reports Engine
.MonthFormat = MonthFormat.LeadingZeroNumericMonth
.YearFormat = YearFormat.LongYear
End With
The resulting date field would be displayed as “01/01/2003.” For displaying only the month and year,
we could change the code to read:
With fieldObject.FieldFormat.DateFormat
.DayFormat = DayFormat.NoDay
.MonthFormat = MonthFormat.LeadingZeroNumericMonth
.YearFormat = YearFormat.LongYear
End With
This in turn would display the date as “01/2003.” At this point, you have got to be asking yourself —
how do I change the separator character? Or, if you have looked at the formatting properties associated
with the field in the Report Designer, you might be wondering how you would set some of the other for-
matting features.
Unfortunately, the object model does not extend to cover all of the formatting features available for every
type of field. If you want to change the format of a particular field and don’t see the property listed, you
can always create a formula based on the formula field to do the formatting work for you instead.
Formatting Time Fields
For formatting the time fields, the same concept applies, except there is only one class,
TimeFieldFormat, which has the following properties:
Property Description
AMPMFormat Returns or sets the AM/PM type (either AMPMAfter or
AMPMBefore) for 12:00am or am12:00
AMString Returns or sets the AM string
HourFormat Returns or sets the hour type (NoHour, NumericHour,
NumericHourNoLeadingZero)
HourMinuteSeparator Returns or sets the hour-minute separator
MinuteFormat Returns or sets the minute type (NoMinute, NumericMinute,
NumericMinuteNoLeadingZero)
MinuteSecondSeparator Returns or sets minute-second separator
PMString Returns or sets the PM string
SecondFormat Returns or sets the seconds type (NumericNoSecond,
NumericSecond, NumericSecondNoLeadingZero)
TimeBase Returns or sets the time base (On12Hour, On24Hour)
303
09 557300 Ch09.qxd 3/24/04 9:42 AM Page 304
Chapter 9
So again, by combining all of these formatting properties, you can set the appearance for any time fields
that appear in your report. For example, if you wanted to display the time in 24-hour notation, you
could simply set the
TimeBase property, as shown here:
fieldObject.FieldFormat.TimeFormat.TimeBase = TimeBase.On24Hour
Or, to display any times that would normally be shown as “PM” as “-Evening,” you could set the
PMstring as shown:
fieldObject.FieldFormat.TimeFormat.PMString = “-Evening”
Which would cause the time field to read “07:13:42-Evening.”
Formatting Date-Time Fields
And finally, for date-time fields, all of the classes available for both date and time fields are consolidated
under the
DateTimeFieldFormat class. The only addition to this class that we haven’t looked at yet is
the separator character that will appear between the date and time, which can be set using the
DateTimeSeparator property, as shown here:
fieldObject.FieldFormat.DateTimeFormat.DateTimeSeparator = “=”
If your report uses date-time fields and you would prefer not to see the date or time component, there is
a setting available within the report designer to handle the way date-time fields are processed. Within
the Report Designer, right-click the report and select Report → Report Options to open the dialog shown
in Figure 9-11:
Figure 9-11
Use the first drop-down list to select how date-time fields should be interpreted in your report. You can
also set this option globally by right-clicking the report in the Report Designer and selecting Designer →
Default Settings. Within the Reporting tab, there is an option for converting date-time fields.
304
09 557300 Ch09.qxd 3/24/04 9:42 AM Page 305
Working with the Crystal Reports Engine
Formatting Currency Fields
Currency fields within Crystal Reports have a number of formatting properties that can be set to create
financial reports, statements, and other fiscal information and display the data in the correct format for
the type of report that is being created.
You can format a number or currency field in your report by right-clicking the field in the Report
Designer and selecting Format, which will open a dialog that will allow you to format the field, and
show a sample of the field in whichever format is chosen from the list. Or, you can click the Customize
button to control the granular properties associated with formatting, as shown in Figure 9-12.
Figure 9-12
Unfortunately, not all of these properties can be changed programmatically, but the following properties
of the
NumericFieldFormat class are supported:
Property Description
CurrencySymbolFormat Returns or sets the currency symbol type (FixedSymbol,
FloatingSymbol, or NoSymbol).
DecimalPlaces Returns or sets the number of decimal places
EnableUseLeadingZero Returns or sets the option to use a leading zero for decimal values
NegativeFormat Returns or sets the negative format type (Bracketed,
LeadingMinus, NotNegative, TrailingMinus).
RoundingFormat Returns or sets the rounding format type (To see all of the dif-
ferent types available, search the Visual Studio Combined Help
for “RoundingFormat Enumeration”)
305
09 557300 Ch09.qxd 3/24/04 9:42 AM Page 306
Chapter 9
So, to change the format of a numeric field, showing a fixed currency symbol with two decimal places
and rounding to the second decimal place (tenth), the code would look like this (again, for illustration
only and not included in the sample application):
With fieldObject.FieldFormat.NumericFormat
.CurrencySymbolFormat = CurrencySymbolFormat.FixedSymbol
.DecimalPlaces = 2
.RoundingFormat = RoundingFormat.RoundToTenth
End With
Keep in mind that we don’t have the ability to actually change the currency symbol itself through the
object model. You will need to set this in the report design itself or use a formula (for instance,
If
{Customer.Country} = “USA” then “US$” else “UKP”
) and position the formula immediately
before the numeric field (or use yet another formula to concatenate the currency symbol formula and
the field itself together).
Customizing Report Fields at Run Time
Another handy feature that is often overlooked is the ability to customize the report fields at run time.
This feature makes it possible to create “generic” reports with blank formula fields laid out on the report
design and then specify which database fields should be used to fill these fields at run time.
But, before we can dive in to learning this technique, we will need to create a new project within our
solution. To create a new project, select File → New → Project and, in this instance, create a Windows
application. We will call the project
engine_customize because, in the following sections, we are going
to be looking at customizing your report fields at run time.
We need a report object to work with. To add the sample reports to your project, select Project → Add
Existing Item and select the folder where you unzipped the sample project. You will also need to change
the file extension from VB Code Files to All files to see the report files we will be using in this walk-
though, which is named
Crystal.NET2003\Chapter09\customer_listing_blank.rpt.
With a report to work with, we now need to reference the Report Engine so we can use it in our applica-
tion. This reference may well add itself when you add the report to the project, but, if not or if you are
working with one of your custom reports, this will have to be added in Visual Studio .NET. To add a
reference, select Project → Add Reference.
Highlight the
CrystalDecisions.CrystalReports.Engine namespace, and click the Select button
and then the OK button to add the reference. The reference to the Crystal Report Engine should now
appear in your project in the Solutions Explorer, under the References folder. We are now ready to go.
If you have a look at the report we have added to our solution, it features a very simple design, as
shown in Figure 9-13.
To create the report, I have created six blank formula fields and placed them across the page. If you were
to preview this report as it stands now, it would be a blank page. In order to specify which fields need to
be shown in these formula fields, we need to pass the database table and field name using the Report
Engine.
306