Writing Enterprise Applications with Java™ 2 SDK, Enterprise Edition phần 3 ppsx
Bạn đang xem bản rút gọn của tài liệu. Xem và tải ngay bản đầy đủ của tài liệu tại đây (82.66 KB, 12 trang )
LESSON 1 A SIMPLE SESSION BEAN
SEPTEMBER 27, 2000 21
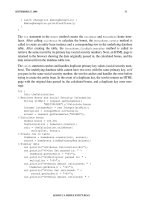
Figure 8 Add bonus.html
• Click Finish.
WAR File General Properties dialog box:
• Click
Next.
Choose Component Type dialog box:
• Select Servlet (if it is not already selected)
• Click
Next.
Component General Properties dialog box:
• Make sure BonusServlet is selected for the Servlet Class.
LESSON 1 A SIMPLE SESSION BEAN
22 SEPTEMBER 27, 2000
• Enter a display name (BonusServlet) and description.
• You can ignore the
Startup and load sequence settings here because this example
uses only one servlet.
Component Initialization Parameters dialog box:
• Click
Next. BonusServlet does not use any initialization parameters.
Component Aliases dialog box:
• Click
Add.
• Type
BonusAlias and press Return. This is the same alias name you put in the ACTION
field of the HTML form embedded in the bonus.html file.
• Click
Finish.
In the Content pane, you can see that the WAR file contains an XML file with structural and
attribute information on the web application, the
bonus.html file, and the BonusServlet
class file. The WAR file format is such that all servlet classes go in an entry starting with
Web-INF/classes. However, when the WAR file is deployed, the BonusServlet class is
placed in a Context Root directory under
public_html. This placement is the convention for
Servlet 2.2 compliant web servers.
To change the display name or description:
• Put your cursor in the appropriate field in the window
• Change them as you wish.
• Press the
Return key for the edits to take effect.
Specify JNDI Name and Root Context
Before you can deploy the BonusApp application and its components, you have to specify the
JNDI name
BonusServlet uses to look up the CalcBean session bean, and specify a context
root directory where the deployer will put the web components.
JNDI Name:
• Select the
BonusApp file in the Local Applications window. The Inspecting window
displays tabs at the top, and one of those tabs is JNDI Names.
• Select JNDI Names. The Inspecting window shows a three-column display with one
row. CalcBean is listed in the middle column.
• In the far rightcolumn under JNDI name, type calcs. This JNDI name is the same JNDI
name passed to the BonusServlet.lookup method.
• Press the Return key.
Context Root:
• Click the
Web Context tab at the top of the Inspecting window. You will see
BonusWar in the left column.
• Type
BonusRoot in the right column
LESSON 1 A SIMPLE SESSION BEAN
SEPTEMBER 27, 2000 23
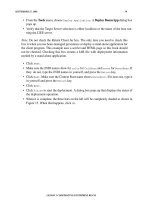
• Press the Return key. During deployment the BonusRoot directory is created under
the
public_html directory in your J2sdkee1.2 installation, and the bonus.html
file and BonusServlet class are copied into it as shown in Figure 9.
Figure 9 Context Root Directory Structure
Aliases:
• In the
LocalApp window, click BonusWar and then click BonusServlet
• Click the Aliases tab at the top of the Inspecting window. You should see Bonu-
sAlias
in the field.
•If
BonusAlias is not there, type it in and press Return.
Verify and Deploy the J2EE Application
Before you deploy the application, it is a good idea to run the verifier. The verifier will pick
up errors in the application components such as missing enterprise bean methods that the
compiler does not catch.
Verify:
• With BonusApp selected, choose
Verifier from the Tools menu.
• In the dialog that pops up, click
OK. The window should tell you there were no failed
tests.
BonusRoot
WEB-INF
classes
bonus.html
public_html
BonusServlet.class
j2sdkee1.2
LESSON 1 A SIMPLE SESSION BEAN
24 SEPTEMBER 27, 2000
• Close the verifier window because you are now ready to deploy the application.
Note: In the Version 1.2 software you might get a
tests app.WebURI error. This
means the deploy tool did not put a
.war extension on the WAR file during WAR file cre-
ation. This is a minor bug and the J2EE application deploys just fine in spite of it.
Deploy:
• From the
Tools menu, choose Deploy Application.ADeploy BonusApp dialog box
pops up. Verify that the Target Server selection is either localhost or the name of the
host running the J2EE server.
Note: Do not check the Return Client Jar box. The only time you need to check this
box is when you deploy a stand-alone application for the client program. This example
uses a servlet and HTML page so this box should not be checked. Checking this box
creates a JAR file with the deployment information needed by a stand-alone applica-
tion.
• Click
Next. Make sure the JNDI name shows calcs. If it does not, type it in yourself,
and press the
Return key.
• Click
Next. Make sure the Context Root name shows BonusRoot. If it does not, type it
in yourself and press the
Return key.
• Click
Next.
• Click
Finish to start the deployment. A dialog box pops up that displays the status of
the deployment operation.
• When it is complete, the three bars on the left will be completely shaded as shown in
Figure 10. When that happens, click
OK.
LESSON 1 A SIMPLE SESSION BEAN
25 SEPTEMBER 27, 2000
Figure 10 Deploy Application
Run the J2EE Application
The web server runs on port 8000 by default. To open the bonus.html page point your
browser to
http://localhost:8000/BonusRoot/bonus.html, which is where the Deploy
tool put the HTML file.
Note: If you need to use a different port because port 8000 is being used for something
else, edit the
web.properties file in the ~/J2EE/j2sdkee1.2/config directory and
restart the J2EE server.
• Fill in a social security number
• Fill in a multiplier
• Click the
Submit button. BonusServlet processes your data and returns an HTML
page with the bonus calculation on it.
LESSON 1 A SIMPLE SESSION BEAN
26 SEPTEMBER 27, 2000
Bonus Calculation
Soc Sec: 777777777
Multiplier: 25
Bonus Amount 2500.0
Updating Component Code
The Tools menu has two menu options of interest. they are Update Application Files and
Update and Redeploy Application. These options let you change code and redeploy your
application with ease. Simply make your code changes, recompile the code, and choose one
of these menu options.
• Update Application Files updates the application files with your new code. At this
point you can either verify the application again or deploy it.
• Update and Redeploy Application updates the application files with your new code
and redeployes the application without running the verifier.
LESSON 2 A SIMPLE ENTITY BEAN
SEPTEMBER 27, 2000 27
Lesson 2
A Simple Entity Bean
This lesson expands the Lesson 1 example to use an entity bean. BonusServlet calls on the
entity bean to save the social security number and bonus information to and retrieve it from a
database table. This database access functionality adds the fourth and final tier to the thin-
client, multitiered example started in Lesson 1.
The J2EE SDK comes with Cloudscape database, and you need no additional setup to your
environment for the entity bean to access it. In fact in this example, you do not write any
SQL or JDBC code to create the database table or perform any database access operations.
The table is created and the SQL code generated with the Deploy tool during assembly and
deployment. Lesson 7 JDBC Technology and Bean-Managed Persistence (page 97) shows
you how to write the SQL code for an entity bean.
• Create the Entity Bean (page 28)
• Change the Servlet (page 32)
• Compile (page 34)
• Start the Platform and Tools (page 35)
• Assemble and Deploy (page 35)
• Run the J2EE Application (page 43)
LESSON 2 A SIMPLE ENTITY BEAN
28 SEPTEMBER 27, 2000
Create the Entity Bean
An entity bean represents persistent data stored in one row of a database table. When an
entity bean is created, the data is written to the appropriate database table row, and if the data
in an entity bean is updated, the data in the appropriate database table row is also updated.
The database table creation and row updates all occur without your writing any SQL or
JDBC code.
Entity bean data is persistent because it survives crashes.
• If a crash occurs while the data in an entity bean is being updated, the entity bean data
is automatically restored to the state of the last committed database transaction.
• If the crash occurs in the middle of a database transaction, the transaction is backed out
to prevent a partial commit from corrupting the data.
BonusHome
The main difference between the CalcHome session bean code from Lesson 1 and the
BonusHome entity bean code for this lesson (below) is the findByPrimaryKey method. This
finder method takes the primary key as a paramete. In this example, the primary key is a
social security number, which is used to retrieve the table row with a primary key value that
corresponds to the social security number passed to this method.
The
create method takes the bonus value and primary key as parameters. When
BonusServlet instantiates the home interface and calls its create method, the container
creates a
BonusBean instance and calls its ejbCreate method. The BonusHome.create and
BonusBean.ejbCreate methods must have the same signatures, so the bonus and primary
key values can be passed from the home interface to the entity bean by way of the entity
bean's container. If a row for a given primary key (social security) number already exists, a
java.rmi.RemoteException is thrown that is handled in the BonusServlet client code.
package Beans;
import java.rmi.RemoteException;
import javax.ejb.CreateException;
import javax.ejb.FinderException;
import javax.ejb.EJBHome;
public interface BonusHome extends EJBHome {
public Bonus create(double bonus, String socsec)
throws CreateException, RemoteException;
public Bonus findByPrimaryKey(String socsec)
throws FinderException, RemoteException;
}
LESSON 2 A SIMPLE ENTITY BEAN
SEPTEMBER 27, 2000 29
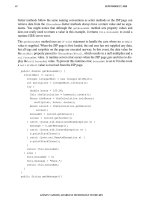
Bonus
After the home interface is created, the container creates the remote interface and entity
bean. The
Bonus interface declares the getBonus and getSocSec methods so the servlet can
retrieve data from the entity bean.
package Beans;
import javax.ejb.EJBObject;
import java.rmi.RemoteException;
public interface Bonus extends EJBObject {
public double getBonus() throws RemoteException;
public String getSocSec() throws RemoteException;
}
Browser
bonus.html
Servlet
BonusServlet.class
Component
Session Bean
CalcBean.class
Calc.class
CalcHome.class
Component
Entity Bean
BonusBean.class
Bonus.class
BonusHome.class
Component
Database
LESSON 2 A SIMPLE ENTITY BEAN
30 SEPTEMBER 27, 2000
BonusBean
BonusBean is a container-managed entity bean. This means the container handles data per-
sistence and transaction management without your writing code to transfer data between the
entity bean and the database or define transaction boundaries.
If for some reason you want the entity bean to manage its own persistence or transactions,
you would provide implementations for some of the empty methods shown in the
BonusBean
code below. The following references take you to documents that describe bean-managed
persistence and transactions.
• Chapter 3 of the Writing Advanced Applications tutorial.
developer.java.sun.com/developer/onlineTraining/Programming/JDCBook
• Chapter 4 of the Java 2 Enterprise Edition Developer's Guide.
java.sun.com/j2ee/j2sdkee/techdocs/guides/ejb/html/DevGuideTOC.html
When BonusServlet calls BonusHome.create, the container calls the BonusBean.setEnti-
tyContext
method. The EntityContext instance passed to the setEntityContext method
has methods that let the bean return a reference to itself or get its primary key.
Next, the container calls the
ejbCreate method. The ejbCreate method assigns data to the
bean's instance variables, and then the container writes that data to the database. The
ejb-
PostCreate
method is called after the ejbCreate method and performs any processing
needed after the bean is created. This simple example does no post-create processing.
The other empty methods are callback methods called by the container to notify the bean
that some event is about to occur. You would provide behavior for some of these methods if
you are using bean-managed persistence, and others if you need to provide bean-specific
cleanup or initialization operations. These cleanup and initialization operations take place at
specific times during the bean's lifecycle, and the container notifies the bean and calls the
applicable method at the appropriate time. Here is a brief description of the empty methods:
• The
ejbPassivate and ejbActivate methods are called by the container before the
container swaps the bean in and out of storage. This process is similar to the virtual-
memory concept of swapping a memory page between memory and disk.
• The container calls the
ejbRemove method if the home interface has a corresponding
remove method that gets called by the client.
• The
ejbLoad and ejbStore methods are called by the container before the container
synchronizes the bean's state with the underlying database.
The
getBonus and getSocSec methods are called by clients to retrieve data stored in the
instance variables. This example has no
set<
type
> methods, but if it did, clients would call
them to change the data in the bean's instance variables. Any changes to the instance vari-
ables result in an update to the table row in the underlying database.
LESSON 2 A SIMPLE ENTITY BEAN
SEPTEMBER 27, 2000 31
package Beans;
import java.rmi.RemoteException;
import javax.ejb.CreateException;
import javax.ejb.EntityBean;
import javax.ejb.EntityContext;
public class BonusBean implements EntityBean {
public double bonus;
public String socsec;
private EntityContext ctx;
public double getBonus() {
return this.bonus;
}
public String getSocSec() {
return this.socsec;
}
public String ejbCreate(double bonus,
String socsec)
throws CreateException{
//Called by container after setEntityContext
this.socsec=socsec;
this.bonus=bonus;
return null;
}
public void ejbPostCreate(double bonus,
String socsec) {
//Called by container after ejbCreate
}
//These next methods are callback methods that
//are called by the container to notify the
//Bean some event is about to occur
public void ejbActivate() {
//Called by container before Bean
//swapped into memory
}
public void ejbPassivate() {
//Called by container before
//Bean swapped into storage
}
LESSON 2 A SIMPLE ENTITY BEAN
32 SEPTEMBER 27, 2000
public void ejbRemove() throws RemoteException {
//Called by container before
//data removed from database
}
public void ejbLoad() {
//Called by container to
//refresh entity Bean's state
}
public void ejbStore() {
//Called by container to save
//Bean's state to database
}
public void setEntityContext(EntityContext ctx){
//Called by container to set Bean context
}
public void unsetEntityContext(){
//Called by container to unset Bean context
}
}
Change the Servlet
The BonusServlet code for this lesson is very similar to the Lesson 1 version with changes in
the
init and doGet methods. The init method for this lesson looks up both the CalcBean
session bean, and the BonusBean entity bean.
public class BonusServlet extends HttpServlet {
CalcHome homecalc;
BonusHome homebonus;
Bonus theBonus, record;
public void init(ServletConfig config)
throws ServletException{
try {
InitialContext ctx = new InitialContext();
Object objref = ctx.lookup("bonus");
Object objref2 = ctx.lookup("calcs");
homebonus=(
BonusHome)PortableRemoteObject.narrow(
objref, BonusHome.class);
homecalc=(CalcHome)
PortableRemoteObject.narrow(
objref2, CalcHome.class);