Writing Enterprise Applications with Java™ 2 SDK, Enterprise Edition phần 4 ppt
Bạn đang xem bản rút gọn của tài liệu. Xem và tải ngay bản đầy đủ của tài liệu tại đây (89.37 KB, 13 trang )
LESSON 2 A SIMPLE ENTITY BEAN
SEPTEMBER 27, 2000 33
} catch (Exception NamingException) {
NamingException.printStackTrace();
}
}
The try statement in the doGet method creates the CalcBean and BonusBean home inter-
faces. After calling
calcBonus to calculate the bonus, the BonusHome.create method is
called to create an entity bean instance and a corresponding row in the underlying database
table. After creating the table, the
BonusHome.findByPrimaryKey method is called to
retrieve the same record by its primary key (social security number). Next, an HTML page is
returned to the browser showing the data originally passed in, the calculated bonus, and the
data retrieved from the database table row.
The
catch statement catches and handles duplicate primary key values (social security num-
bers). The underlying database table cannot have two rows with the same primary key, so if
you pass in the same social security number, the servlet catches and handles the error before
trying to create the entity bean. In the event of a duplicate key, the servlet returns an HTML
page with the original data passed in, the calculated bonus, and a duplicate key error mes-
sage.
try {
Calc theCalculation;
//Retrieve Bonus and Social Security Information
String strMult = request.getParameter(
"MULTIPLIER");//Calculate bonus
Integer integerMult = new Integer(strMult);
multiplier = integerMult.intValue();
socsec = request.getParameter("SOCSEC");
//Calculate bonus
double bonus = 100.00;
theCalculation = homecalc.create();
calc = theCalculation.calcBonus(
multiplier, bonus);
//Create row in table
theBonus = homebonus.create(calc, socsec);
record = homebonus.findByPrimaryKey(socsec);
//Display data
out.println("<H1>Bonus Calculation</H1>");
out.println("<P>Soc Sec passed in: " +
theBonus.getSocSec() + "<P>");
out.println("<P>Multiplier passed in: " +
multiplier + "<P>");
out.println("<P>Bonus Amount calculated: " +
theBonus.getBonus() + "<P>");
out.println("<P>Soc Sec retrieved: " +
record.getSocSec() + "<P>");
out.println("<P>Bonus Amount retrieved: " +
LESSON 2 A SIMPLE ENTITY BEAN
34 SEPTEMBER 27, 2000
record.getBonus() + "<P>");
out.println("</BODY></HTML>");
//Catch duplicate key error
} catch (javax.ejb.DuplicateKeyException e) {
String message = e.getMessage();
//Display data
out.println("<H1>Bonus Calculation</H1>");
out.println("<P>Soc Sec passed in: " +
socsec + "<P>");
out.println("<P>Multiplier passed in: " +
multiplier + "<P>");
out.println("<P>Bonus Amount calculated: " +
calc + "<P>");
out.println("<P>" + message + "<P>");
out.println("</BODY></HTML>");
} catch (Exception CreateException) {
CreateException.printStackTrace();
}
}
Compile
First, compile the entity bean and servlet. Refer to Lesson 1 for path and classpath settings,
and information on where to place the source files.
Compile the Entity Bean
Unix
#!/bin/sh
cd /home/monicap/J2EE
J2EE_HOME=/home/monicap/J2EE/j2sdkee1.2.1
CPATH=.:$J2EE_HOME/lib/j2ee.jar
javac -d . -classpath "$CPATH" Beans/BonusBean.java
Beans/BonusHome.java Beans/Bonus.java
Windows
cd \home\monicap\J2EE
set J2EE_HOME=\home\monicap\J2EE\j2sdkee1.2.1
set CPATH=.;%J2EE_HOME%\lib\j2ee.jar
javac -d . -classpath %CPATH% Beans/BonusBean.java
Beans/BonusHome.java Beans/Bonus.java
LESSON 2 A SIMPLE ENTITY BEAN
SEPTEMBER 27, 2000 35
Compile the Servlet
Unix:
cd /home/monicap/J2EE/ClientCode
J2EE_HOME=/home/monicap/J2EE/j2sdkee1.2.1
CPATH=.:$J2EE_HOME/lib/j2ee.jar:/home/monicap/J2EE
javac -d . -classpath "$CPATH" BonusServlet.java
Windows:
cd \home\monicap\J2EE\ClientCode
set J2EE_HOME=\home\monicap\J2EE\j2sdkee1.2.1
set CPATH=.;%J2EE_HOME%\lib\j2ee.jar;
\home\monicap\J2EE
javac -d . -classpath %CPATH% BonusServlet.java
Start the Platform and Tools
To run this example, you need to start the J2EE server, the Deploy tool, and Cloudscape
database. In different windows, type the following commands:
j2ee -verbose
deploytool
cloudscape -start
If that does not work, type this from the J2EE directory:
Unix
j2sdkee1.2.1/bin/j2ee -verbose
j2sdkee1.2.1/bin/deploytool
j2sdkee1.2.1/bin/cloudscape -start
Windows
j2sdkee1.2.1\bin\j2ee -verbose
j2sdkee1.2.1\bin\deploytool
j2sdkee1.2.1\bin\cloudscape -start
Assemble and Deploy
The steps in this section are:
LESSON 2 A SIMPLE ENTITY BEAN
36 SEPTEMBER 27, 2000
• Update Application File
• Create Entity Bean
Update Application File
The web archive (WAR) file contains BonusServlet and bonus.html. Because you have
changed
BonusServlet, you have to update the J2EE application with the new servlet code.
• Local Applicatons Window: Highlight the
BonusApp application.
• Tools Menu: Select Update Application Files.
Note: The
BonusApp application from the previous lesson is automatically uninstalled
Create Entity Bean
The steps to creating the EJB JAR for the entity bean are very similar to the steps for the ses-
sion bean covered in Lesson 1. There are a few differences, however, and those differences
are explained here.
Note:
In this lesson, the entity bean goes in a separate JAR file from the session bean
to continue the example from Lesson 1 with the least number of changes. Because
these beans have related functionality, however, you could bundle and deploy them in
the same JAR file. You will see how to bundle related beans in the same JAR file in
Lesson 3.
File Menu:
• Select New Enterprise Bean.
Introduction:
• Read and click
Next.
EJB JAR:
• Make sure
BonusApp shows in the Enterprise Bean will go in field.
• Specify
BonusJar as the display name.
• Click
Add (the one next to the Contents window).
Add Contents to JAR:
• Toggle the directory so the beans directory displays with its contents.
• Select
Bonus.class
• Click Add.
LESSON 2 A SIMPLE ENTITY BEAN
SEPTEMBER 27, 2000 37
• Select BonusBean.class
• Click Add.
• Select
BonusHome.class
• Click Add.
• Click
OK.
Figure 11 Adding Classes to BonusJar
EJB JAR:
• Click
Next.
General:
LESSON 2 A SIMPLE ENTITY BEAN
38 SEPTEMBER 27, 2000
• Beans.BonusBean is the classname
•
Beans.BonusHome is the Home interface
•
Beans.Bonus is the Remote interface.
• Enter
BonusBean as the display name.
• Click Entity.
• Click
Next.
Entity Settings:
• Select
Container-Managed persistence.
• In the bottom window, check
bonus and socsec.
• Specify
java.lang.String for the primary key class. Note that the primary key has
to be a class type. Primitive types are not valid for primary keys.
• Specify
socsec for the primary key field name.
• Click
Next.
Environment Entries:
• Click
Next. This simple entity bean does not use properties (environment entries).
Enterprise Bean References:
• Click
Next. This simple entity bean does not reference other enterprise beans.
Resource References:
• Click
Next. This simple entity bean does not look up a database or JavaMail session
object.
Security:
• Click
Next. This simple entity bean does not use security roles.
Transaction Management:
• Select
Container-managed transactions (if it is not already selected.
• In the list below make
create, findByPrimaryKey, getBonus and getSocSec
required. This means the container starts a new transaction before running these meth-
ods. The transaction commits just before the methods end. There is more information
on these transaction settings in Enterprise JavaBeans Developer's Guide, Chapter 6
(
java.sun.com/j2ee/j2sdkee/techdocs/guides/ejb/html/DevGuideTOC.html).
LESSON 2 A SIMPLE ENTITY BEAN
SEPTEMBER 27, 2000 39
Figure 12 Transaction Management
• Click Next.
• Click
Finish.
Local Applications:
• Select
BonusApp.
• In the Inspecting window, select
JNDI names
•GiveBonusBean the JNDI name of bonus
• Press the Return key
Before the J2EE application can be deployed, you need to specify deployment settings for
the entity bean and generate the SQL. Here is how to do it:
LESSON 2 A SIMPLE ENTITY BEAN
40 SEPTEMBER 27, 2000
Local Applications window:
• Select
BonusBean.
Inspecting window:
• Select
Entity
• Click the Deployment Settings button to the lower right.
Deployment Settings:
• Specify
jdbc/Cloudscape (with a capital C on Cloudscape) for the Database JNDI
name
• Press Return
• Make sure the
Create table on deploy and Delete table on Deploy boxes are
checked.
• Click
Generate SQL now.
Note: If you get an error that the connection was refused, start the database as
described in Start the Platform and Tools (page 35).
LESSON 2 A SIMPLE ENTITY BEAN
SEPTEMBER 27, 2000 41
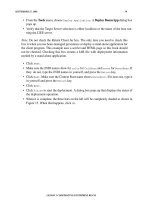
Figure 13 Generate SQL and Database Table
• When the SQLgeneration completes, selectthe findByPrimaryKey method in the EJB
method box. To the right a SQL statement appears. It should read
SELECT “socsec”
FROM “BonusBeanTable” WHERE “socsec”=?
. The question mark (?) represents the
parameter passed to the
findByPrimaryKey method.
• Click
OK.
LESSON 2 A SIMPLE ENTITY BEAN
42 SEPTEMBER 27, 2000
Verify and Deploy the J2EE Application
Verify:
• With BonusApp selected, choose
Verifier from the Tools menu.
• In the dialog that pops up, click
OK. The window should tell you that no tests failed.
• Close the verifier window because you are now ready to deploy the application.
Note: In the Version 1.2 software you might get a
tests app.WebURI error. The J2EE
application deploys in spite of it.
Deploy:
• Tools Menu: Select
Tools.Deploy Application.
Note: Do not check the Return Client Jar box. The only time you need to check this
box is when you use bean-managed persistence or deploy a stand-alone application for
the client program. This example uses a servlet and HTML page so this book should
not be checked. Checking this box creates a JAR file with deployment information
needed by a stand-alone application.
• Click
Next. Make sure the JNDI names show calcs for CalcBean and bonus for
BonusBean. Type any missing JNDI names in yourself, and press the Return key.
• Click
Next. Make sure the Context Root name shows BonusRoot. If it does not, type it
in yourself and press the
Return key.
• Click
Next.
• Click
Finish to start the deployment.
• When deployment completes, click
OK.
LESSON 2 A SIMPLE ENTITY BEAN
SEPTEMBER 27, 2000 43
Run the J2EE Application
The web server runs on port 8000 by default. To open the bonus.html page point your
browser to
http://localhost:8000/BonusRoot/bonus.html, which is where the Deploy
tool put the HTML file.
Fill in a social security number and multiplier, and click the
Submit button. BonusServlet
processes your data and returns an HTML page with the bonus calculation on it.
Bonus Calculation
Soc Sec passed in: 777777777
Multiplier passed in: 25
Bonus Amount calculated: 2500.0
Soc Sec retrieved: 7777777777
Bonus Amount retrieved: 2500.0
If you go back to bonus.html and change the multiplier to 2, but use the same social secu-
rity number, you see this:
Bonus Calculation
Soc Sec passed in: 777777777
Multiplier passed in: 2
Bonus Amount calculated: 200.0
Duplicate primary key.
LESSON 2 A SIMPLE ENTITY BEAN
44 SEPTEMBER 27, 2000
LESSON 3 COOPERATING ENTERPRISE BEANS
SEPTEMBER 27, 2000 45
Lesson 3
Cooperating Enterprise Beans
In Lesson 2 A Simple Entity Bean (page 27), the servlet looks up and creates a session bean
to perform a bonus calculation, and then looks up and creates an entity bean to store the
bonus value and related social security number. This lesson modifies the example so the ses-
sion bean looks up and creates the entity bean. Because the session and entity bean work
together, they are bundled into one JAR file for deployment.
• Change the Session Bean (page 46)
• Change the Servlet (page 49)
• Compile (page 50)
• Start the Platform and Tools (page 51)
• Assemble the Application (page 52)
• Verify and Deploy the J2EE Application (page 58)
• Run the J2EE Application (page 60)
Note: Some people have trouble getting this lesson to work with 2 beans in one JAR
file. If this happens to you, delete the JAR file with the two beans and put each bean in
its own JAR file. You might need to stop and restart the server and tools before you can
generate SQl and deploy.