Writing Enterprise Applications with Java™ 2 SDK, Enterprise Edition phần 6 ppsx
Bạn đang xem bản rút gọn của tài liệu. Xem và tải ngay bản đầy đủ của tài liệu tại đây (43.64 KB, 12 trang )
LESSON 3 COOPERATING ENTERPRISE BEANS
SEPTEMBER 27, 2000 59
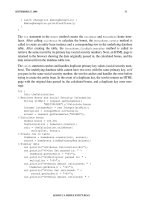
• From the Tools menu, choose Deploy Application.ADeploy BonusApp dialog box
pops up.
• Verify that the Target Server selection is either localhost or the name of the host run-
ning the J2EE server.
Note: Do not check the Return Client Jar box. The only time you need to check this
box is when you use bean-managed persistence or deploy a stand-alone application for
the client program. This example uses a servlet and HTML page so this book should
not be checked. Checking this box creates a JAR file with deployment information
needed by a stand-alone application.
• Click
Next.
• Make sure the JNDI names show for
calcs for CalcBean and bonus for BonusBean.If
they do not, type the JNDI names in yourself, and press the
Return key.
• Click
Next. Make sure the Context Root name shows BonusRoot. If it does not, type it
in yourself and press the
Return key.
• Click
Next.
• Click
Finish to start the deployment. A dialog box pops up that displays the status of
the deployment operation.
• When it is complete, the three bars on the left will be completely shaded as shown in
Figure 15. When that happens, click
OK.
LESSON 3 COOPERATING ENTERPRISE BEANS
60 SEPTEMBER 27, 2000
Figure 15 Deploy Application
Run the J2EE Application
The web server runs on port 8000 by default. To open the bonus.html page point your
browser to
http://localhost:8000/BonusRoot/bonus.html, which is where the Deploy
tool put the HTML file.
• Fill in a social security number and multiplier.
• Click the
Submit button. BonusServlet processes your data and returns an HTML
page with the bonus calculation on it.
Bonus Calculation
Soc Sec retrieved: 777777777
Bonus Amount Retrieved: 200.0
If you supply the same social security number twice, you will see something similar to this:
Bonus Calculation
Soc Sec passed in: 777777777
Multiplier passed in: 2
Duplicate primary key
LESSON 4 JAVASERVER PAGES TECHNOLOGY
SEPTEMBER 27, 2000 61
Lesson 4
JavaServer Pages Technology
JavaServer Pages (JSP) technology lets you put segments of servlet code directly into a
static HTML page. When the JSP Page is loaded by a browser, the servlet code executes and
the application server creates, compiles, loads, and runs a background servlet to execute the
servlet code segments and return an HTML page or print an XML report.
This lesson changes the WAR file from Lesson 3 Cooperating Enterprise Beans (page 45) to
use a JSP Page instead of
BonusServlet.
• Create the JSP Page (page 62)
• Change bonus.html (page 66)
• Start the Platform and Tools (page 67)
• Remove the WAR File (page 67)
• Create New WAR FIle (page 67)
• Verify and Deploy the J2EE Application (page 68)
• Run the J2EE Application (page 70)
• More Information (page 71)
LESSON 4 JAVASERVER PAGES TECHNOLOGY
62 SEPTEMBER 27, 2000
Create the JSP Page
A JSP Page looks like an HTML page with servlet code segments embedded between vari-
ous forms of leading (
<%) and closing (%>) JSP tags. There are no HttpServlet methods
such as
init, doGet,ordoPost. Instead, the code that would normally be in these methods
is embedded directly in the JSP Page using JSP scriptlet tags.
The following JSP Page (
Bonus.jsp) is equivalent to BonusServlet from Lesson 3 Cooperat-
ing Enterprise Beans (page 45). A more detailed description of the JSP tags follows the code
listing. Note that JSP tags cannot be nested. For example, you cannot nest a JSP comment
tag within a JSP scriptlet tag.
<HTML>
<HEAD>
<TITLE>Bonus Calculation</TITLE>
</HEAD>
<% Comment
Scriptlet for import statements
<%@ indicates a jsp directive %>
<%@ page import="javax.naming.*" %>
<%@ page import="javax.rmi.PortableRemoteObject" %>
<%@ page import="Beans.*" %>
<% Comment
Scriptlet to get the parameters,
convert string to Integer to int for bonus
calculation, and declare/initialize bonus
variable. <% indicates a jsp scriptlet %>
<%! String strMult, socsec; %>
<%! Integer integerMult; %>
<%! int multiplier; %>
<%! double bonus; %>
<%
strMult = request.getParameter("MULTIPLIER");
socsec = request.getParameter("SOCSEC");
integerMult = new Integer(strMult);
multiplier = integerMult.intValue();
bonus = 100.00;
%>
<% Comment
Scriptlet to look up session Bean %>
<%
InitialContext ctx = new InitialContext();
Object objref = ctx.lookup("calcs");
CalcHome homecalc = (CalcHome)
PortableRemoteObject.narrow(
objref, CalcHome.class);
%>
LESSON 4 JAVASERVER PAGES TECHNOLOGY
SEPTEMBER 27, 2000 63
<% Comment
Scriptlet to create session Bean,
call calcBonus method, and retrieve a database
record by the social security number
(primary key) %>
<%
try {
Calc theCalculation = homecalc.create();
Bonus theBonus = theCalculation.calcBonus(
multiplier,
bonus,
socsec);
Bonus record = theCalculation.getRecord(socsec);
%>
<% Comment
HTML code to display retrieved data
on returned HTML page. %>
<H1>Bonus Calculation</H1>
Social security number retrieved:
<%= record.getSocSec() %>
<P>
Bonus Amount retrieved: <%= record.getBonus() %>
<P>
<% Comment
Scriptlet to catch DuplicateKeyException %>
<%
} catch (javax.ejb.DuplicateKeyException e) {
String message = e.getMessage();
%>
<% Comment
HTML code to display original data passed to JSP
on returned HTML page %>
Social security number passed in: <%= socsec %>
<P>
Multiplier passed in: <%= strMult %>
<P>
Error: <%= message %>
<% Comment
Scriptlet to close try and catch block %>
<%
}
%>
<% Comment
HTML code to close HTML body and page %>
</BODY>
</HTML>
LESSON 4 JAVASERVER PAGES TECHNOLOGY
64 SEPTEMBER 27, 2000
Comments
The first seven lines of Bonus.jsp show straight HTML followed by a JSP comment. JSP
comments are similar to HTML comments except they start with
<% instead of <! ,
which is how they look in HTML. You can use either JSP or HTML comments in a JSP file.
HTML comments are sent to the client’s web browser where they appear as part of the
HTML page, and JSP comments are stripped out and do not appear in the generated HTML.
Note: I found that putting a colon in a JSP comment as in
<% Comment: Scriptlet
for import statements
created a runtime error that went away when I took
the colon out.
<HTML>
<HEAD>
<TITLE>Bonus Calculation</TITLE>
</HEAD>
<% Comment
Scriptlet for import statements
<%@ indicates a jsp directive %>
Directives
JSP directives are instructions processed by the JSP engine when the JSP Page is translated
to a servlet. The directives used in this example tell the JSP engine to include certain pack-
ages and classes. Directives are enclosed by the
<%@ and %> directive tags.
<%@ page import="javax.naming.*" %>
<%@ page import="javax.rmi.PortableRemoteObject" %>
<%@ page import="Beans.*" %>
Declarations
JSP declarations let you set up variables for later use in expressions or scriptlets. You can
also declare variables within expressions or scriptlets at the time you use them. The scope is
the entire JSP Page, so there is no concept of instance variables. That is, you do not have to
declare instance variables to be used in more than one expression or scriptlet. Declarations
are enclosed by the
<%! and %> declaration tags. You can have multiple declarations. For
example,
<%! double bonus; String text; %>.
<%! String strMult, socsec; %>
<%! Integer integerMult; %>
<%! int multiplier; %>
<%! double bonus; %>
LESSON 4 JAVASERVER PAGES TECHNOLOGY
SEPTEMBER 27, 2000 65
Scriptlets
JSP scriptlets let you embed java code segments into the JSP page. The embedded code is
inserted directly into the generated servlet that executes when the page is requested. This
scriptlet uses the variables declared in the directives described above. Scriptlets are enclosed
by the
<% and %> scriptlet tags.
<%
strMult = request.getParameter("MULTIPLIER");
socsec = request.getParameter("SOCSEC");
integerMult = new Integer(strMult);
multiplier = integerMult.intValue();
bonus = 100.00;
%>
Predefined Variables
A scriptlet can use the following predefined variables: session, request, response, out,
and
in. This example uses the request predefined variable, which is an HttpServletRe-
quest
object. Likewise, response is an HttpServletResponse object, out is a Print-
Writer
object, and in is a BufferedReader object.
Predefined variables are used in scriptlets in the same way they are used in servlets, except
you do not declare them.
<%
strMult = request.getParameter("MULTIPLIER");
socsec = request.getParameter("SOCSEC");
integerMult = new Integer(strMult);
multiplier = integerMult.intValue();
bonus = 100.00;
%>
Expressions
JSP expressions let you dynamically retrieve or calculate values to be inserted directly into
the JSP Page. In this example, an expression retrieves the social security number from the
Bonus entity bean and puts it on the JSP page.
<H1>Bonus Calculation</H1>
Social security number retrieved:
<%= record.getSocSec() %>
<P>
Bonus Amount retrieved: <%= record.getBonus() %>
<P>
LESSON 4 JAVASERVER PAGES TECHNOLOGY
66 SEPTEMBER 27, 2000
JSP-Specific Tags
The JavaServer Pages 1.1 specification defines JSP-specific tags that let you extend the JSP
implementation with new features and hide a lot of complexity from visual designers who
need to look at the JSP page and modify it. The JSP example in this lesson does not use any
JSP-specific tags, but you will see an example of these tags in the next lesson. The JSP-spe-
cific tags defined in the 1.1 specification are the following:
jsp:forward and jsp:include to instruct the JSP engine to switch from the current page to
another JSP page.
jsp:useBean, jsp:setProperty, and jsp:getProperty let you embed and use JavaBeans
technology inside a JSP Page.
jsp:plugin automatically downloads the appropriate Java Plug-In to the client to execute an
applet with the correct Java platform.
Change bonus.html
The only change you need to make to bonus.html is to have the ACTION parameter in the
HTML form invoke
Bonus.jsp instead of BonusServlet.
<HTML>
<BODY BGCOLOR = "WHITE">
<BLOCKQUOTE>
<H3>Bonus Calculation</H3>
<FORM METHOD="GET" ACTION="Bonus.jsp">
<P>
Enter social security Number:
<P>
<INPUT TYPE="TEXT" NAME="SOCSEC"></INPUT>
<P>
Enter Multiplier:
<P>
<INPUT TYPE="TEXT" NAME="MULTIPLIER"></INPUT>
<P>
<INPUT TYPE="SUBMIT" VALUE="Submit">
<INPUT TYPE="RESET">
</FORM>
</FORM>
</BLOCKQUOTE>
</BODY>
</HTML>
LESSON 4 JAVASERVER PAGES TECHNOLOGY
67 SEPTEMBER 27, 2000
Start the Platform and Tools
To run this example, you need to start the J2EE server, the Deploy tool, and Cloudscape
database. In different windows, type the following commands:
j2ee -verbose
deploytool
cloudscape -start
If that does not work, type this from the J2EE directory:
Unix
j2sdkee1.2.1/bin/j2ee -verbose
j2sdkee1.2.1/bin/deploytool
j2sdkee1.2.1/bin/cloudscape -start
Windows
j2sdkee1.2.1\bin\j2ee -verbose
j2sdkee1.2.1\bin\deploytool
j2sdkee1.2.1\bin\cloudscape -start
Remove the WAR File
Because a JSP page is added to the Web component, you have to delete the WAR file from
the previous lesson and create a new one with the JSP page in it.
Local Applications:
• Click the
2BeansApp icon so you can see its application components.
• Select
BonusWar so it is outlined and highlighted.
• Select
Delete from the Edit menu.
Create New WAR FIle
File menu:
• Select
New Web Component
Introduction:
• Read and Click
Next.
LESSON 4 JAVASERVER PAGES TECHNOLOGY
68 SEPTEMBER 27, 2000
War File General Properties:
Note: There appears to be a bug in the Deploy tool. Make sure you add
Bonus.jsp first
followed by
bonus.html. If you add bonus.html first, Deploy tool puts bonus.html
where Bonus.jsp should go, andBonus.jsp where bonus.html should go. If this hap-
pens, you can manually fix the problem by copying them to their correct locations.
This is where they correctly belong after deployment:
~/j2sdkee1.2/public_html/JSPRoot/bonus.html
~/j2sdkee1.2/public_html/JSPRoot/WEB-INF/classes/Bonus.jsp
• Specify BonusWar for the display name.
• Click Add
• Go to the
ClientCode directory and add Bonus.jsp,
• Click
Next
• Go to the ClientCode directory and add bonus.html
• Click Finish.
War File General Properties:
• Click
Next.
Choose Component Type:.
• Make sure
Describe a JSP is selected. Click Next.
Component General Properties:
• Make
Bonus.jsp the JSP filename
• Make the display name
BonusJSP.
• Click
Finish.
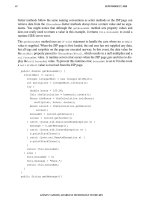
Inspecting window:
• Select Web Context
• Specify
JSPRoot.
Verify and Deploy the J2EE Application
Before you deploy the application, it is a good idea to run the verifier. The verifier will pick
up errors in the application components such as missing enterprise Bean methods that the
compiler does not catch.
Verify:
LESSON 4 JAVASERVER PAGES TECHNOLOGY
69 SEPTEMBER 27, 2000
• With 2BeansApp selected, choose Verifier from the Tools menu.
• In the dialog that pops up, click
OK. The window should tell you no tests failed.
• Close the verifier window because you are now ready to deploy the application.
Deploy:
• From the
Tools menu, choose Deploy Application.ADeploy BonusApp dialog box
pops up.
• Verify that the Target Server selection is either localhost or the name of the host run-
ning the J2EE server.
Note: Do not check the Return Client Jar box. The only time you need to check this
box is when you deploy a stand-alone application for the client program. This example
uses an HTML and JSP page so this book should not be checked. Checking this box
creates a JAR file with deployment information needed by a stand-alone application.
• Click
Next. Make sure the JNDI names show calcs for CalcBean and bonus for
BonusBean. If they do not show these names, type them in yourself, and press the
Return key.
• Click
Next. Make sure the Context Root name shows JSPRoot. If it does not, type it in
yourself and press the
Return key.
• Click
Next.
• Click
Finish to start the deployment. A dialog box pops up that displays the status of
the deployment operation.
• When it is complete, the three bars on the left will be completely shaded as shown in
Figure 16. When that happens, click
OK.
LESSON 4 JAVASERVER PAGES TECHNOLOGY
70 SEPTEMBER 27, 2000
Figure 16 Deploy Application
Run the J2EE Application
The web server runs on port 8000 by default. To open the bonus.html page point your
browser to
http://localhost:8000/JSPRoot/bonus.html, which is where the Deploy
tool put the HTML file.
Note: Deploy tool puts
Bonus.jsp under public_html/JSPRoot, and bonus.html
under public_html/JSPRoot/WEB-INF/classes, which is opposite of where they
really belong. Manually copy them to their correct locations as follows:
public_html/
JSPRoot/bonus.html
and public_html/JSPRoot/WEB-INF/classes/Bonus.jsp.
• Fill in a social security number and multiplier
• Click the
Submit button. Bonus.jsp processes your data and returns an HTML page
with the bonus calculation on it.