Flash CS3 For Dummies PHẦN 4 pptx
Bạn đang xem bản rút gọn của tài liệu. Xem và tải ngay bản đầy đủ của tài liệu tại đây (1.05 MB, 40 trang )
2. Select the number of steps, which means the number of curves that
Flash uses to create the softened edge.
Try the Flash default first and change it if you don’t like the result. You
can increase the number to get a smoother effect.
3. Select the Expand option to create the softened edge outside the
shape or the Inset option to create the softened edge within the shape.
4. Click OK to create the softened edge.
Your shape is still selected, so click anywhere outside it to see the
result. If you don’t like it, press Ctrl+Z (Windows) or Ô+Z (Mac) and try
again using different options.
You can create soft edges also by using gradients that blend into the Stage
color or with partially transparent colors. Chapter 3 explains more about
using colors. Flash also has a blur filter that you can use on text, movie clip
symbols, and buttons. Chapter 7 describes filters.
Converting lines to fills
Flash offers lots of great ways to fill a shape — for example, with gradients
and bitmap images. But what about those boring strokes or outlines? You can
convert lines to fills and make them fun, fun, fun. (See Chapter 3 for an expla-
nation of fills, including gradients and bitmap images.)
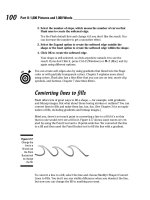
Mind you, there’s not much point in converting a line to a fill if it’s so thin
that no one would ever see a fill in it. Figure 4-17 shows some waves we cre-
ated by using the Pencil tool and a 10-point-wide line. We converted the line
to a fill and then used the Paint Bucket tool to fill the line with a gradient.
To convert a line to a fill, select the line and choose Modify➪Shape➪Convert
Lines to Fills. You don’t see any visible difference when you deselect the line,
but now you can change the fill to anything you want.
Figure 4-17:
Change the
line to a
fill and use
the Paint
Bucket tool
to change
the fill.
100
Part II: 1,000 Pictures and 1,000 Words
09_121009 ch04.qxp 4/10/07 6:18 PM Page 100
Transforming Fills
The Gradient Transform tool offers a unique way to edit gradient and bitmap
fills. You can perform the following changes to a fill:
ߜ Move its center point
ߜ Change its width or height
ߜ Rotate it
ߜ Scale it
ߜ Tile it
ߜ Change the radius of a radial gradient
ߜ Move the focus of a radial gradient
ߜ Skew (slant) it
From this list, you can see that there’s no point in fiddling with solid fills.
They would look the same no matter what direction, size, or scale they were.
(See the section in Chapter 3 on colors for colorful coverage of gradient and
bitmap fills.)
To edit a fill, choose the Gradient Transform tool. This tool is well hidden; you’ll
find it by clicking the Free Transform tool on the Tools toolbar to open a sub-
menu. Click any gradient or bitmap fill. Flash places an editing boundary and
editing handles around the fill, as shown in Figure 4-18. The editing boundary
varies with the type of fill — bitmap, linear gradient, or radial gradient.
After you have a fill with an editing boundary, you’re ready to go ahead and
fiddle with the fills. Here’s how to make changes:
ߜ Move the center of a fill: Drag the center point, marked by a small circle
at the center of the fill. You can move a center fill to move the center of a
Figure 4-18:
The
Gradient
Transform
tool places
an editing
boundary
around
the fill.
101
Chapter 4: You Are the Object Editor
09_121009 ch04.qxp 4/10/07 6:18 PM Page 101
radial gradient, move the stripes of a linear gradient, or place a bitmap
off center.
ߜ Move the focal point of a fill: Drag the focal point, marked by a triangle
along the center line of a radial gradient. Moving the focal point can
make the apparent direction of light move from side to side in a radial
gradient with a lightly colored center.
ߜ Change the width of a fill: Drag the square handle on one side of the
editing boundary. To change the height of a fill, drag the handle on the
bottom of the editing boundary. If a fill doesn’t have one of these han-
dles, you can’t edit the fill that way. Changing the width of a linear fill
that’s perpendicular to the direction of its stripes is the same as scaling
the fill — the stripes get wider (or narrower).
ߜ Rotate a fill: Drag the rotation handle, which is a small circle just out-
side the corner of the editing boundary. On a radial gradient, use the
bottom of the three handles on the circumference of the boundary.
Figure 4-19 shows a linear gradient rotated 45 degrees.
When rotating a fill, you can press and hold the Shift key while you drag
to constrain the rotation of the fill to multiples of 45 degrees.
ߜ Scale a bitmap fill: Drag the square handle at the corner of the editing
boundary — inward to scale down and outward to scale up. To scale a
circular gradient, drag the middle circular handle on the editing bound-
ary. Figure 4-20 shows a bitmap gradient at its original size and scaled
down. Flash tiles the bitmap if you scale down significantly.
If you scale down a bitmap so that you see many tiles, the next time that
you want to edit the bitmap, Flash places an editing boundary around
each tile so that you have to edit each one individually. That could take
a long time! If you want to edit a bitmap in several ways, save scaling
down for last.
Figure 4-19:
Rotate a
linear fill to
create
diagonal
fills.
102
Part II: 1,000 Pictures and 1,000 Words
09_121009 ch04.qxp 4/10/07 6:18 PM Page 102
ߜ Skew (slant) a fill: Drag one of the rhombus-shaped handles on the top
or side of the editing boundary. You can skew only if the fill is a bitmap.
Skewing is different from rotating because the bitmap is distorted. Figure
4-21 shows an example of a skewed bitmap.
Later in this chapter, we explain how to rotate, scale, and skew entire objects.
Transferring Properties
You can use the Eyedropper tool to copy outline and fill properties from one
object to another. (See the section on bitmap fills in Chapter 3 for instruc-
tions on using the Eyedropper tool to create bitmap fills.)
To transfer properties, follow these steps:
1. Click the Eyedropper tool.
2. Select an outline or a fill.
If you select an outline, Flash activates the Ink Bottle tool. If you select a
fill, Flash activates the Paint Bucket tool and turns on the Lock Fill modi-
fier. (For more information on the Lock Fill modifier, see the section in
Chapter 3 that discusses locking a fill.)
Figure 4-21:
You can
skew a
bitmap fill
for really
weird
results.
Figure 4-20:
You can
scale a
bitmap fill to
make it
larger or
smaller.
103
Chapter 4: You Are the Object Editor
09_121009 ch04.qxp 4/10/07 6:18 PM Page 103
3. Click another outline or fill.
Flash transfers the properties of the original outline or fill to the new
object.
Finding and Replacing Objects
One way to change an object is to change its properties. You can find graph-
ics objects by color or bitmap and then replace the color or bitmap. For
example, you can easily change every blue fill or stroke to red if your Web
color scheme changes.
You can find and replace according to color, bitmap, text, and font (Chapter
5); sound; or video (Chapter 11). You can also find and replace symbols
(Chapter 7).
To find and replace objects, choose Edit➪Find and Replace to open the Find
and Replace dialog box, as shown in Figure 4-22.
In the Search In drop-down list, choose to search in the entire Flash movie
document or only in the current scene. (See Chapter 9 for a full explanation
of scenes.)
In the For drop-down list, select what you want to find: text, font, color,
symbol, sound, video, or bitmap. The dialog box changes according to the
choice you make. For example, to find and replace a color, follow these steps:
Figure 4-22:
The Find
and Replace
dialog box
finds lost
sheep and
can change
their color.
104
Part II: 1,000 Pictures and 1,000 Words
09_121009 ch04.qxp 4/10/07 6:18 PM Page 104
1. Click the top Color button and select a color that exists in your
document.
2. Click the Replace with Color button and select the replacement color
that you want.
3. Mark one or more of the three check boxes — Fills, Strokes, and Text —
to define what type of objects you want to find.
4. Click Find Next to find the next occurrence of the color or click Find
All to find every object with that color.
5. Click Replace to replace the color of the currently selected object or
click Replace All to replace the color of every object.
6. Click the Close button of the dialog box to return to your movie.
Find and Replace is an efficient way to make mass changes of color, text, sym-
bols, sound, video, or bitmaps.
Transforming Objects
Earlier in this chapter, in the “Freely transforming and distorting shapes” sec-
tion, we explain how you can use the Free Transform tool to reshape objects.
You can do many of the same tasks by using the Transform command.
To scale, rotate, and flip objects, choose Modify➪Transform and then choose
one of the submenu commands. When you scale, rotate, or skew an object,
Flash kindly remembers the object’s qualities so that you can return the object
to the state it was in before you fiddled around with it.
Scaling, scaling . . .
Most of the time, scaling by using the Free Transform tool (as we describe
earlier in this chapter) is the easiest, fastest way to go. When you want more
precision, however, scale the selected object in the Property inspector.
(Choose Window➪Properties➪Properties. Change the value in the W (width)
box, the H (height) box, or both.
To make sure that the proportions of the object stay the same, click the pad-
lock next to the W and H text boxes so that it looks locked. When you change
either the W or the H text box, the other box adjusts proportionally.
For yet more scaling options, select an object and choose Window➪Transform
to open the Transform panel, as shown in Figure 4-23.
105
Chapter 4: You Are the Object Editor
09_121009 ch04.qxp 4/10/07 6:18 PM Page 105
The controls in the Transform panel work only if an object is selected. If you
forgot to select an object, you don’t need to close the panel; just select an object
To scale the selected object or objects, type a scale value between 1 and 1000
in the Width (left) text box. Any value less than 100 reduces the size of the
object, so a value of 10 creates a new object at 10 percent of the original
object, and a value of 1000 multiplies the object’s size by a factor of 10. Then
press Enter or Return. By default, the Constrain check box is selected, so
changing the width also changes the height.
To make a copy of an object at a scaled size, click the Copy button (the left
button in the lower-right corner of the panel) instead of pressing Enter or
Return. The copy appears on top of the original object but is selected so that
you can move it immediately if you want. Figure 4-24 shows an example of how
you can use scaling and copying together to create the impression of objects
at varying distances. After you make the copy, just move it to a new location.
When you’re finished, click the Close button of the Transform panel to close it.
’Round and ’round and ’round we rotate
Most of the time, you can probably use the Free Transform tool to rotate
objects, as we explain earlier in this chapter. If you want to rotate something
Figure 4-24:
The brain
creatures
are
attacking!
Figure 4-23:
The
Transform
panel lets
you scale,
rotate, and
skew
objects with
great
precision.
106
Part II: 1,000 Pictures and 1,000 Words
09_121009 ch04.qxp 4/10/07 6:18 PM Page 106
by an exact number of degrees, such as 20 degrees, use the Transform panel.
Select the object and choose Window➪Transform to open the Transform
panel (refer to Figure 4-23).
To rotate the selected object or objects clockwise, type a value between 1
and 359. To rotate counterclockwise, type a value between –1 and –359. Then
press Enter or Return.
If you don’t like the results, click the Reset button (the right button in the
lower-right corner of the panel) and try again.
To make a copy of an object at a different rotation, click Copy (the left button
in the lower-right corner of the panel). The copy appears on top of the origi-
nal object but is selected so that you can immediately move it.
If you want to rotate a section by 90 degrees by using the menu, do the
following:
ߜ To rotate right (clockwise): Choose Modify➪Transform➪Rotate 90° CW.
ߜ To rotate left (counterclockwise): Choose Modify➪Transform➪Rotate
90° CCW.
When you rotate, Flash rotates the object around its center. To rotate around
a different point on the object, you can convert the object to a group or symbol
and change its registration point, the point on an object that Flash references
when rotating. See the section later in this chapter on changing the registra-
tion point.
You can create groovy circular patterns by using the rotate and copy func-
tions, as shown in Figure 4-25. Unless the object you’re working with is com-
pletely symmetrical, you need to change the registration point.
Figure 4-25:
By rotating
and copying
an object at
the same
time, you
can add
flower
power
to your
Web site.
107
Chapter 4: You Are the Object Editor
09_121009 ch04.qxp 4/10/07 6:19 PM Page 107
Getting skewy
Skewing is a variation of rotating. Rather than rotate an entire object, you
slant it horizontally, vertically, or both. Skewing a square creates a rhombus
(diamond). In Figure 4-26, you see a simple arrow before and after skewing.
The easiest way to skew objects is by using the Free Transform tool. Just
select an object, choose the Free Transform tool, and drag along one of the
sides of the boundary.
Usually, you can eyeball the skewing process. If you want precision or to com-
bine skewing with scaling, use the Transform panel. Select the object and
choose Window➪Transform to open the Transform panel. To skew the
selected object or objects, click the Skew option.
Use the left box to skew horizontally. To skew clockwise, type a value between
1 and 89. To skew counterclockwise, type a value between –1 and –89. Then
press Enter or Return.
To skew vertically, type a value in the right box. Positive values skew clock-
wise, and negative values skew counterclockwise. If that sounds confusing,
just try something out and see whether you like it. If you don’t, click Reset
(the right button in the lower-right corner of the panel) and try again.
To make a copy of an object at a skewed angle, click the Copy button (the left
button in the lower-right corner of the panel). The copy appears on top of the
original object but is selected so that you can move it immediately.
Flippety, floppety
Flipping reverses an object so that you have a mirror image of your original
object. You can flip both horizontally (left to right or vice versa) and verti-
cally (up to down or vice versa). Flash flips objects about their center so that
they stay in their original position on the Stage.
Figure 4-26:
A skewed
arrow looks
like it’s in a
hurry.
108
Part II: 1,000 Pictures and 1,000 Words
09_121009 ch04.qxp 4/10/07 6:19 PM Page 108
Figure 4-27 shows a curlicue design in its original form, flipped horizontally,
and flipped vertically. If you flip an object horizontally and then vertically,
you end up with an object that has been mirrored in both directions.
To flip an object, select it and choose Modify➪Transform➪Flip Vertical or
Flip Horizontal. To flip an object in both directions, flip it in one direction and
then in the other.
To create symmetrical objects, you need to change the object’s registration
point from the center to one side or corner. Later in this chapter, in the
“Changing the Transformation Point” section, we explain how to use flipping
to create symmetrical objects.
Combining Objects
You can combine objects in various ways to create new and more interesting
shapes. You can perform the following actions:
ߜ Union: Combines two objects into one object. The effect is similar to
grouping objects, which we cover in the next section of this chapter. (In
fact, you can use the Ungroup command to separate the objects again.)
Combining two objects puts a boundary around them, like the boundary
you see when you use the object-drawing model. To combine objects,
select them and choose Modify➪Combine Objects➪Union.
See the section on keeping objects safe and secure in Chapter 3 for more
information on how to use the object-drawing model.
Original Flipped vertically
Flipped horizontally Flipped both horizontally
and vertically
Figure 4-27:
You can flip
objects
vertically,
horizontally,
or both.
109
Chapter 4: You Are the Object Editor
09_121009 ch04.qxp 4/10/07 6:19 PM Page 109
ߜ Intersect: Creates a shape that is the intersection of two overlapping
shapes; the shape that remains is from the top object. However, this
works only with objects that you create by using the object-drawing
model. (We explain the object-drawing model in Chapter 3.)
ߜ Punch: Removes the object on top from an object beneath it. This opera-
tion requires two objects that you drew by using the object-drawing
model. If you put a smaller circle on top of a larger circle, the Punch fea-
ture is like punching a hole in the larger circle (but it doesn’t hurt). Select
two overlapping objects and choose Modify➪Combine Objects➪Punch.
ߜ Crop: Creates a shape that is the intersection of two overlapping shapes
that you created by using the object-drawing model; the shape that
remains is from the bottom object. Select two overlapping objects and
choose Modify➪Combine Objects➪Crop.
Getting Grouped
When you know how to create objects, you can get carried away and create
so many objects on the Stage that they’re hard to manage. You might want to
move a number of objects at once. Although you can select them all and
move them, that technique might not be enough. For example, you might
inadvertently leave behind one piece and discover that it’s hard to move that
piece in the same way that you moved the rest. That’s why Flash provides
grouping. You select multiple objects and group them once. From then on,
you can select them with one click. If you move one of the grouped objects,
the rest come along for the ride.
In Flash, grouping has an additional advantage: If you put objects on top of
each other, they merge if they’re the same color or create cutouts if they’re
different colors, unless you draw them using the object-drawing model or a
primitive shape. One way that you can avoid such friendly behavior and keep
the integrity of objects is to group them. (You can also put them on different
layers, as we explain in Chapter 6, or turn them into symbols, as we explain
in Chapter 7.)
Grouping objects is easy. Select them and choose Modify➪Group. You short-
cut types can press Ctrl+G (Windows) or Ô+G (Mac). When you group objects
and select them, all the objects are surrounded by one blue selection border.
After you group objects, you can ungroup them at any time. Select the group
and choose Modify➪Ungroup. You can also break apart a group. See the dis-
cussion later in this chapter on breaking apart objects.
If you want to edit an element of the group without ungrouping first, Flash
lets you do so. To edit without ungrouping, follow these steps:
110
Part II: 1,000 Pictures and 1,000 Words
09_121009 ch04.qxp 4/10/07 6:19 PM Page 110
1. Using the Selection tool, double-click any object in the group.
Flash dims other objects on the Stage and displays the Group symbol
above the layer list.
2. Edit any of the group components.
3. Return to regular editing mode.
Double-click any blank area on the Stage with the Selection tool, click
the current Scene symbol to the left of the Group symbol, or click the
Back arrow to the left of the scene symbol. You can also choose Edit➪
Edit All.
Changing the Transformation Point
When Flash rotates or scales an object, it uses a transformation point as a ref-
erence. This point is generally the center of the object. For positioning and
certain transformations of lines and shapes, Flash uses the upper-left corner.
You might find that the point Flash uses isn’t suitable for your needs. For
example, you might want to rotate an object around its lower-left corner. For
a single rotation or scaling of a simple graphic object, use the Free Transform
tool and drag the transformation point — the little circle — to the desired
location. If you deselect and reselect the object, you see that the circle has
returned to its original central position.
Changing the transformation point is useful when you want to create symmet-
rical objects by flipping. To use flipping to create symmetrical objects, follow
these steps:
1. Select the object.
2. Click the Free Transform tool and drag the transformation point to
one edge of the object, from where you want to mirror the object.
3. Choose Edit➪Copy to copy the object to the Clipboard.
4. Choose Edit➪Paste in Place to paste the copy on top of the original.
5. Choose Modify➪Transform➪Flip Vertical or Flip Horizontal.
You see your original and the copy. The copy has been flipped so that
it’s a mirror image of its original.
6. (Optional) To create a four-way symmetrical object, group the original
and mirrored objects (as we explain in the previous section), and
change the transformation point to one side of the combined group.
Then repeat Steps 3, 4, and 5, this time flipping in the other direction.
Figure 4-28 shows a weird creature created by copying, changing the transfor-
mation point, and then flipping.
111
Chapter 4: You Are the Object Editor
09_121009 ch04.qxp 4/10/07 6:19 PM Page 111
Groups, symbol instances, text, and bitmaps have a registration point, which
Flash uses to animate and transform these objects. When you use the Free
Transform tool to move the circle on these objects, the circle keeps its posi-
tion even after you deselect and reselect it. To move an object’s registration
point, follow these steps:
1. Select a group, symbol instance, text object, or bitmap.
2. Click the Free Transform tool.
Flash displays a small circle at the transformation point.
3. Drag the circle to the desired location.
4. Click anywhere else on the Stage to hide the registration point.
To return the registration point to its original position, double-click it.
Breaking Apart Objects
With the Break Apart command, you can break apart text, groups, instances
of symbols, and bitmaps into separate objects that you can edit individually.
To break apart one of these types of objects, select it and choose Modify➪
Break Apart.
What happens to your objects when you break them apart? Do they splatter
all over the Stage? Here’s what happens when you break apart the following
objects:
ߜ Text: Flash divides the words into individual letters, each one a separate
object. If you use the Break Apart command a second time on one of the
letters, the letter becomes a shape that you can modify like any other
shape.
Figure 4-28:
Create
scary,
symmetrical
creatures
by manipu-
lating the
transforma-
tion point.
112
Part II: 1,000 Pictures and 1,000 Words
09_121009 ch04.qxp 4/10/07 6:19 PM Page 112
Break apart blocks of text and then use the Distribute to Layers com-
mand to animate individual letters. See Chapter 5 for more information
about text and Chapter 6 for more on layers.
ߜ Shapes created in the object-drawing model: The shape loses its
object-drawing model status, as if you had drawn it without using the
object-drawing model.
ߜ Groups: Flash breaks up the group into its component parts. The result
is the same as ungrouping.
ߜ Instances of symbols: The symbol becomes a shape. (Symbols are cov-
ered fully in Chapter 7.)
ߜ Bitmaps: Flash converts the bitmap to a fill. You can then erase parts of it.
Establishing Order on the Stage
Flash stacks objects in the order in which you create them. If you draw a
circle and then an overlapping square, the square looks like it’s on top of the
circle because you created it more recently.
If you place an object on top of another object, the two objects become one if
they’re the same color. If they’re different colors, the top object cuts out the
underlying object.
One exception is if you use the object-drawing model to draw the objects.
Oval and rectangle primitives are another exception. A different way to keep
the integrity of objects is by grouping them or turning them into symbols.
(Symbols are covered in Chapter 7.) Groups, object-drawing model shapes,
primitives, and symbols are always stacked on top of regular objects. Therefore,
to move objects above existing groups or symbols, you need to group them
or convert them to a symbol. You might also need to turn some imported
graphics into a symbol or group before you can move them in the stack.
If you draw an object and it immediately disappears beneath another object,
it’s often because you tried to draw the object on top of a group, primitive, or
symbol. Group the object or change it to a symbol if it must be on top.
Another way to reorder objects is to put them on different layers. You can
then reorder the objects by reordering their layers. (See Chapter 6 for the
details.)
As long as you have objects that can maintain their integrity, you can change
their stacking order. You can move them up or down in the stack or from the
top or bottom of the stack — all within the same layer. To change the stacking
113
Chapter 4: You Are the Object Editor
09_121009 ch04.qxp 4/10/07 6:19 PM Page 113
order of an object, select the object and choose Modify➪Arrange. Then
choose one of these options:
ߜ Bring to Front: Brings the selected object to the tippy-top of the stack.
ߜ Bring Forward: Brings the selected object up one level.
ߜ Send Backward: Moves the selected object down one level.
ߜ Send to Back: Sends the selected object down, down, down to the
bottom of the stack.
Figure 4-29 shows an example of two objects stacked in different ways.
Undoing, Redoing, and Reusing
Sometimes you do something in Flash and decide that it’s a mistake. Oops!
For this situation, you can undo actions. You can even redo the actions that
you undid. Finally, if you’re environmentally conscious, you can reuse earlier
actions to avoid wasting any more of your energy.
Undoing actions
To undo your last action, choose Edit➪Undo or press Ctrl+Z (Windows) or
Ô+Z (Mac). You can continue this process for a very long time. This is the
familiar — and default — type of undo, and Flash calls it document-level undo.
To set the number of undo steps that Flash remembers, follow these steps:
1. Choose Edit➪Preferences (Windows) or Flash➪Preferences (Mac).
The Preferences dialog box appears.
Figure 4-29:
The big, old-
fashioned
bitmap star
and the
small, up-
and-coming
vector star
vying to be
in front.
114
Part II: 1,000 Pictures and 1,000 Words
09_121009 ch04.qxp 4/10/07 6:19 PM Page 114
2. Click the General category.
3. In the Undo drop-down list, select Document-level Undo.
4. In the text box just below the Undo drop-down list, enter the number
of undo actions you want Flash to track.
The default is 100, and the maximum is 300.
Later in this chapter, in the “Reusing actions with the History panel” section,
we explain another way to undo actions.
Redoing actions
Maybe you were right the first time. After you undo an action, suppose that
you want to redo it. You can do that, too. To redo actions, choose Edit➪Redo
or press Ctrl+Y (Windows) or Ô+Y (Mac).
If you haven’t undone anything, you can use the same command (and key-
board shortcut) to repeat your last action, in which case it’s called the
Repeat command.
Using object-level undo and redo
Generally, undos and redos apply to every action you take in Flash. But some-
times you might find object-level undo and redo more helpful.
Object-level undo applies only to editing symbols, which we cover in Chapter 7.
When you use object-level undo and redo, Flash remembers actions by symbol.
Therefore, when you’re editing a symbol, using the Undo command applies only
to changes that you made to that symbol, even though you have made other
changes to your movie in the meantime. If you use a lot of symbols, object-level
undo offers you more flexibility. Object-level redo works in the same way.
You can use only one type of undo and redo at a time. To use object-level
undo and redo, choose Edit➪Preferences (Windows) or Flash➪Preferences
(Mac). Select the General category. In the Undo drop-down list, select Object-
level Undo. You see a message explaining that switching from one type of
undo to another will delete your current undo history. Flash can keep track of
only one stream at a time. Click OK to close the message and click OK again
to close the Preferences dialog box.
Deleting your current history is not generally a problem. But if you are in the
middle of a long, complicated experiment and might need to undo many
steps, choose another time to switch.
115
Chapter 4: You Are the Object Editor
09_121009 ch04.qxp 4/10/07 6:19 PM Page 115
Reusing actions with the History panel
If you make several changes to an object and would like to make the same
changes to other objects, you can save time and increase accuracy by saving
and reusing the steps for the operations that you perform. Flash tracks the
steps in the History panel.
The History panel lists every command that you perform in Flash during one
session. When you save and close the file, the history list isn’t saved for the
next time. To open the History panel, choose Window➪Other Panels➪History,
as shown in Figure 4-30. The shortcut is Ctrl+F10 (Windows) or Ô+F10 (Mac).
You can use the History panel to troubleshoot recent steps, repeat steps,
undo steps, or save steps as commands for future use.
By default, Flash records up to 100 steps in the History panel. You can change
the number of steps recorded by choosing Edit➪Preferences (Windows) or
Flash➪Preferences (Mac) to open the Preferences dialog box. On the General
tab, change the value for Undo levels. Valid settings are from 2–300. If you
want to be able to go back and save earlier steps as commands, you probably
need to record more than 100 steps.
Undoing steps
One of the simplest things that you can do in the History panel is to undo one
or more operations. You can also undo operations by choosing Edit➪Undo,
but you can see more specific descriptions of the operation. For example, the
Move operation appears in the History panel as Move {x:0, y:-103.6}.
To view the specifics, right-click (Windows) or Control+click (Mac) any his-
tory item and choose View➪Arguments in Panel. With these details, you can
more easily predict the result of undoing an operation.
You undo steps by using the slider on the left side of the History panel:
ߜ Undo the last operation that you performed: Drag the slider up one step.
ߜ Undo several steps: Drag the slider to the step above the first step that
you want to undo. For example, if you want to undo three steps, drag the
Figure 4-30:
The History
panel keeps
track of
everything
you do.
116
Part II: 1,000 Pictures and 1,000 Words
09_121009 ch04.qxp 4/10/07 6:19 PM Page 116
slider up three steps — it’s now next to the step previous to the one that
you undid. This is the last step that has still been executed. You can also
click to the left of a step. The slider scrolls up to that step and undoes
all the later steps.
When you undo a step, the step appears dimmed in the History panel.
Replaying a step
You can repeat any command from any time during a Flash session. For exam-
ple, if you filled an object with a specific color, you can fill another object with
the same color, even if you have performed other operations in the meantime.
To replay a step, click the step itself (not the left side of the step above the
slider) in the History panel. Then click the Replay button. If you want to
replay the step on a different object, first select that object, and then click
the Replay button.
Copying steps
You might want to keep a list of certain steps or use them in a different movie.
Select one or more steps in the History panel and click the Copy Selected Steps
to the Clipboard button.
To use these steps in another Flash movie, open the movie and choose Edit➪
Paste. To apply the steps to an object, select the object first.
Flash copies the step or steps as JavaScript code. Therefore, when you paste
the step or steps into a word processor or text editor, you see the JavaScript
code, which looks more complex than the step listed in the History panel.
Usually, you can figure out what it means, even if you don’t know JavaScript. For
example, Fill Color: ‘#0000ff’ appears as fl.getDocumentDOM().
setFillColor(‘#0000ff’);.
Saving commands
If you want to save a step or set of steps to use the next time that you open
the movie, save a command. Saving a command is even useful if you want to
re-execute some steps several times later in the same session because scrolling
back to find the exact steps that you want to reuse can be time consuming.
To save a command, follow these steps:
1. In the History panel, select the steps that you want to save.
You can drag along the step names (not along the left side, where the
slider is). You can also use the usual methods of selecting multiple
objects in a list — click the first object, press Shift and click the last, or
press and hold Ctrl (Windows) or Ô (Mac) and click each step that you
want to select.
117
Chapter 4: You Are the Object Editor
09_121009 ch04.qxp 4/10/07 6:19 PM Page 117
To see more details about the commands, click the Options menu button
(in the upper-right corner of the panel), and choose View ➪ Arguments in
Panel.
2. Click the Save Selected Steps as a Command button.
This button is in the lower-right corner of the History panel. The Save As
Command dialog box opens.
3. Enter a name for the command.
You can simply summarize the steps. For example, you might name a
command fill blue, rotate 90.
4. Click OK to close the dialog box.
When you save a command, it appears on the Commands menu. The menu in
Figure 4-31 shows the command fill blue, rotate 90, which fills any
selected shape with blue and rotates the shape 90 degrees. To use that com-
mand, you simply select a shape and then choose Commands➪Fill Blue,
Rotate 90. Presto! It’s all finished. As you can imagine, you can combine com-
plex commands and save them to automate the authoring process of creating
Flash movies.
Clearing the History panel
If you don’t want the History panel to record everything that you do — perhaps
it makes you feel as if you don’t have any privacy left anymore — you can clear
the history list. Clearing the history list doesn’t undo any steps. To clear the
History panel, click the Options menu button at the upper-right corner of the
panel, and choose Clear History. Then click Yes.
For good Commands menu housekeeping, choose Commands➪Manage Saved
Commands to open the Manage Saved Commands dialog box. In this dialog
box, you can delete or rename a command. When you’re finished, click OK to
close the Manage Saved Commands dialog box.
Figure 4-31:
Saved
commands
appear
on the
Commands
menu.
118
Part II: 1,000 Pictures and 1,000 Words
09_121009 ch04.qxp 4/10/07 6:19 PM Page 118
Chapter 5
What’s Your Type?
In This Chapter
ᮣ Creating, editing, and formatting text
ᮣ Using cool text effects
W
e assume that occasionally you want to say something on your Web
site, so this chapter covers text in all its forms and formats. You can
use Flash to create the text for your Web pages if you want (although you don’t
have to). But if you want flashy text effects, Flash is definitely the way to go.
Typography is the art or process of arranging text on a page, and basically
that’s what this chapter is all about. Many graphics programs call text type.
We use the words interchangeably here — we don’t care what you call it.
Presenting Your Text
The majority of text on most Web sites is formatted by using HyperText
Markup Language (HTML) coding that sets the font, size, and color of the
text. Using HTML code is ideal for larger amounts of text because the HTML
is simple to code and loads quickly.
For smaller amounts of text that you want to have special formatting or
effects, Flash offers more options than HTML. Of course, if you want to ani-
mate your text, you can use Flash. For example, an animated logo usually
includes not only the graphic art but also the name of the organization,
which is, of course, text.
Here are some innovative things you can do with text:
ߜ Rotate, scale, skew, or flip text without losing the ability to edit the text.
ߜ Turn text into shapes and modify them any way you want. However, after
you turn text into shapes, you can’t edit the text characters by simply
typing. Figure 5-1 shows some text that was modified in this way.
10_121009 ch05.qxp 4/10/07 6:19 PM Page 119
ߜ Create transparent type.
ߜ Create hyperlinked text that sends the user’s browser to another Web
page when the user clicks the text.
ߜ Enable viewers to control some aspect of the movie by entering text in a
text box
ߜ Load text, such as sports scores or current weather, dynamically from a
server.
Creating text
Creating text in Flash is simple. Follow these steps:
1. Click the Text tool on the Tools panel.
2. Specify the text starting point on the Stage.
• To specify the width of the text, click the Stage in the left edge
where you want your text to start and drag to the right until you
have the width that you want. Flash places a square block handle
in the upper-right corner of the text block.
• To create a text block that expands while you type, just click the
Stage at the desired starting point. Flash places a round block
handle in the upper-right corner of the text block.
3. Start typing.
To force a return to the left margin after you type one or more lines,
press Enter or Return. Otherwise, if you specified a width, the text wraps
to the next line when it fills up that width.
4. After you finish typing, click anywhere off the Stage to deselect
the text.
Congratulations — you’ve just said something! We hope it was worthwhile.
Figure 5-1:
You can turn
text into a
shape and
edit it to
your heart’s
content.
120
Part II: 1,000 Pictures and 1,000 Words
10_121009 ch05.qxp 4/10/07 6:19 PM Page 120
Editing text
After you type text, it never fails that you want to change it. Editing text is
easy in Flash, but first you have to select the text. Here are the selection
techniques:
ߜ To edit an entire text block: Click the Selection tool and then click the
text. Flash places a selection border around the text. You can move,
rotate, and scale all the text in a text block this way, just as you would
with any other object. For example, you can use the Free Transform tool
to scale the text.
ߜ To edit the content of the text itself: Double-click the text with the
Selection tool active. (Or click the Text tool and then click the text.)
Flash switches to the Text tool automatically and places the text cursor
where you clicked or double-clicked the text, more or less.
ߜ To select a character or characters individually: Click the Text tool and
drag across one or more characters. Do this when you want to edit only
those characters.
ߜ To select a word: Click the Text tool and double-click any word to
select it.
ߜ To select a string of words or block of text: Click the Text tool, click at
the beginning of the text you want to select, and then Shift+click at the
end of the desired selection.
ߜ To select all the text in a text block: Click the Text tool, click in a text
block, and then press Ctrl+A (Windows) or Ô+A (Mac).
To change the content of the text, select the characters or words that you
want to change, as we explain in the preceding list. Type to replace the
selected text. Other text-editing techniques are the same as in your word
processor. For example, you can press the Delete key to delete characters to
the right of the text cursor or press the Backspace key (Windows) or Delete
key (Mac) to delete characters to the left of the cursor.
Checking spelling
Spell checking works like the spell checker in your word processor, so you’ll
probably find it easy to use. This feature shows Adobe’s commitment to
reducing typos on the Web!
The first step is to set up the parameters for spell checking. Choose Text➪
Spelling Setup to open the Spelling Setup dialog box, as shown in Figure 5-2.
If the Check Spelling item isn’t available on the Text menu, you need to open
this dialog box and close it again.
121
Chapter 5: What’s Your Type?
10_121009 ch05.qxp 4/10/07 6:19 PM Page 121
The Spelling Setup dialog box has three sections:
ߜ Document Options: Choose which parts of a movie that you want to
check. For example, you may not want to spell check symbol and bitmap
names.
ߜ Personal Dictionary: You can change the location of the file that holds
words that you add to the dictionary. Click the Edit Personal Dictionary
button to add words directly. Otherwise, you add words when you are
checking the spelling of specific text.
ߜ Checking Options: Set options that define how spell checking works. For
example, you can choose to ignore words in uppercase or with numbers.
You can also choose which dictionaries you want to use in the Dictionaries
list. When you’re finished, click OK to return to your movie. You’re now ready
to check spelling.
To check spelling, you can select text if you want to check just that text or
leave all the text deselected to check the entire movie. Choose Text➪Check
Spelling to open the Check Spelling dialog box, as shown in Figure 5-3.
Figure 5-2:
Use the
Spelling
Setup dialog
box to
specify how
spell
checking
works.
122
Part II: 1,000 Pictures and 1,000 Words
10_121009 ch05.qxp 4/10/07 6:19 PM Page 122
If you selected text, Flash checks that text first and then asks whether you
want to check the rest of the document. Click Yes to continue or No to end
the spell check. For each misspelled word, you can do one of the following:
ߜ Choose one of the suggestions and click Change to change that instance
of the word.
ߜ Choose one of the suggestions and click Change All to change all
instances of the word.
ߜ Click Ignore to go to the next misspelled word.
ߜ Click Ignore All to ignore all instances of that word and go to the next
misspelled word.
ߜ Click Delete to delete the word.
ߜ Click Add to Personal to add the word to the Personal Dictionary so that
it won’t appear as misspelled in the future.
To finish spell checking, click Close. You may see a message asking whether
you want to start from the beginning of the document. Click Yes to do so.
When spell checking is complete, you see a Spelling Check Completed mes-
sage. Click OK to return to your movie.
Finding and replacing text
If you need to change all instances of the word big to large, for example,
you’re in luck. The Find and Replace feature comes to the rescue. In Chapter
4, we discuss how to find and replace color. Here we explain the steps (which
are similar) for finding and replacing text:
1. Choose Edit➪Find and Replace.
The Find and Replace dialog box appears.
Figure 5-3:
The Check
Spelling
dialog box.
123
Chapter 5: What’s Your Type?
10_121009 ch05.qxp 4/10/07 6:19 PM Page 123
2. In the For drop-down list, choose Text.
3. In the Search in Text box, enter the text that you want to find.
4. In the Replace with Text box, enter the replacement text.
5. (Optional) Enable one or more of the three check boxes on the left to
define what type of text you want to find: Whole Word, Match Case,
and Regular Expressions.
Regular expressions are formulas you use to locate specific text patterns
in a text string. Regular expressions are beyond the scope of this book,
but you can find a good tutorial at www.regular-expressions.info/
tutorial.html.
6. (Optional) Select one or more of the check boxes on the right to
define where you want Flash to look for text.
• Text Field Contents searches text objects.
• Frames/Layers/Parameters looks for frame labels and scene names
(see Chapter 9), layer names (see Chapter 6), and component param-
eters (see Chapter 10).
• Strings in ActionScript looks for text strings in ActionScript.
• ActionScript looks for all ActionScript code.
7. To edit each object on the Stage, select the Live Edit check box.
8. Click the appropriate button as needed:
• Click Find Next to find the next occurrence of the text.
• Click Find All to find all occurrences of the text.
• Click Replace to replace the currently selected object.
• Click Replace All to replace all instances of that text.
When Flash finds the specified text, the box at the bottom of the Find and
Replace dialog box displays its location and type along with the entire text so
that you can see the context of the text you’re replacing. You can resize the
Find and Replace dialog box as well as the columns in the list of found items.
When you’re finished, click the Close button in the Find and Replace dialog
box to return to your movie.
Setting character attributes
Of course, you don’t always want to use the Flash default font and size for
your Web site. Boring! You can set the attributes before you start typing or
edit the attributes of existing text. To edit existing text, double-click the text
block and then select the characters or words you want to format. To either
124
Part II: 1,000 Pictures and 1,000 Words
10_121009 ch05.qxp 4/10/07 6:19 PM Page 124