iphone user guide - part 8 pptx
Bạn đang xem bản rút gọn của tài liệu. Xem và tải ngay bản đầy đủ của tài liệu tại đây (664.63 KB, 21 trang )
Get a text message•
Get a voicemail message•
Get an email message•
Send an email message•
Have an appointment that you’ve set up to alert you•
Lock iPhone•
Type using the keyboard•
Brightness
Screen brightness aects battery life. Dim the screen to extend the time before you
need to recharge iPhone, or use Auto-Brightness.
Adjust the screen brightness: Choose Brightness and drag the slider.
Set whether iPhone adjusts screen brightness automatically: Choose Brightness
and turn Auto-Brightness on or o. If Auto-Brightness is on, iPhone adjusts the screen
brightness for current light conditions using the built-in ambient light sensor.
Wallpaper
You see a wallpaper background picture when you unlock iPhone. You can select one
of the images that came with iPhone, or use a photo you’ve synced to iPhone from
your computer.
Set wallpaper: Choose Wallpaper and choose a picture.
General
The General settings include date and time, security, network, and other settings that
aect more than one application. This is also where you can nd information about
your iPhone, and reset iPhone to its original state.
About
Choose General > About to get information about iPhone, including:
Name of your phone network•
Number of songs, videos, and photos•
Total storage capacity•
Space available•
Software version•
Serial and model numbers•
Wi-Fi and Bluetooth addresses•
142
Chapter 19 Settings
IMEI (International Mobile Equipment Identity) and ICCID (Integrated Circuit Card •
Identier, or Smart Card) numbers
Modem rmware version of the cellular transmitter•
Legal information•
Regulatory information•
Usage
Show battery percentage: Tap Usage and turn Battery Percentage on to display the
percentage of battery charge next to the battery icon in the upper-right corner of
iPhone (iPhone 3GS only).
See your usage statistics: Choose Usage. There, you can see:
Usage—Amount of time iPhone has been awake and in use since the last full •
charge. iPhone is awake whenever you’re using it—including making or receiving
phone calls, using email, sending or receiving text messages, listening to music,
browsing the web, or using any other iPhone features. iPhone is also awake while
performing background tasks such as automatically checking for and retrieving
email messages.
Standby—Amount of time iPhone has been powered on since its last full charge, •
including the time iPhone has been asleep.
Current period call time and lifetime call time.•
Amount of data sent and received over the cellular data network.•
Reset your usage statistics: Tap Usage and tap Reset Statistics to clear the data and
cumulative time statistics. The statistics for the amount of time iPhone has been
unlocked and in standby mode aren’t reset.
Network
Use the Network settings to congure a VPN (virtual private network) connection,
access Wi-Fi settings, or turn Data Roaming on or o.
Enable or disable 3G: Tap to turn 3G on or o.
Using 3G loads Internet data faster in some cases, but may decrease battery
performance. If you’re making a lot of phone calls, you may want to turn 3G o to
extend battery performance.
Turn Data Roaming on or o: Choose General > Network, then turn Data Roaming on
or o.
Data Roaming turns on Internet and visual voicemail access over a cellular data
network when you’re in an area not covered by your carrier’s network. For example,
when you’re traveling, you can turn o Data Roaming to avoid potential roaming
charges. By default, Data Roaming is turned o.
143
Chapter 19 Settings
Turn Internet Tethering on or o: Choose General > Network > Internet Tethering,
then turn Internet Tethering on or o.
Internet Tethering lets you share iPhone’s Internet connection with a computer
connected via USB or Bluetooth (not available in all regions). Follow the onscreen
instructions to complete the setup. Additional fees may apply. See “Using iPhone as a
Modem” on page 42.
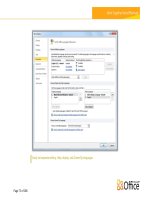
Add a new VPN conguration: Choose General > Network > VPN > Add VPN
Conguration.
VPNs used within organizations allow you to communicate private information
securely over a non-private network. You may need to congure VPN, for example, to
access your work email on iPhone.
iPhone can connect to VPNs that use the L2TP, PPTP, or Cisco IPSec protocols. VPN
works over both Wi-Fi and cellular data network connections.
Ask your network administrator which settings to use. In most cases, if you’ve set up
VPN on your computer, you can use the same VPN settings for iPhone.
Once you’ve entered VPN settings, a VPN switch appears in the Settings menu that you
can use to turn VPN on or o.
VPN may also be automatically set up by a conguration prole. See “Installing
Conguration Proles” on page 18.
Change a VPN conguration: Choose General > Network > VPN and tap the
conguration you want to update.
Turn VPN on or o: Tap Settings and turn VPN on or o.
Delete a VPN conguration: Choose General > Network > VPN, tap the blue arrow
to the right of the conguration name, and tap Delete VPN at the bottom of the
conguration screen.
Bluetooth
iPhone can connect wirelessly to Bluetooth devices such as headsets, headphones, and
car kits for music listening and hands-free talking. See “Bluetooth Devices” on page 55.
Turn Bluetooth on or o: Choose General > Bluetooth and turn Bluetooth on or o.
Location Services
Location Services allows applications such as Maps Camera, and Compass to gather
and use data indicating your location. Location Services doesn’t correlate the data
it collects with your personally identiable information. Your approximate location
is determined using available information from cellular network data, local Wi-Fi
networks (if you have Wi-Fi turned on), and GPS (iPhone 3G or later; GPS may not be
available in all locations).
144
Chapter 19 Settings
You can turn Location Services o if you don’t want to use this feature. If you turn
Location Services o, you’ll be prompted to turn it on again the next time an
application tries to use this feature.
Turn Location Services on or o: Choose General > Location Services and turn
location services on or o.
To conserve battery life, turn Location Services o when you’re not using it.
Auto-Lock
Locking iPhone turns o the display to save your battery and to prevent unintended
operation of iPhone. You can still receive calls and text messages, and you can adjust
the volume and use the mic button on the iPhone stereo headset when listening to
music or on a call.
Set the amount of time before iPhone locks: Choose General > Auto-Lock and
choose a time.
Passcode Lock
By default, iPhone doesn’t require you to enter a passcode to unlock it.
Set a passcode: Choose General > Passcode Lock and enter a 4-digit passcode, then
enter the passcode again to verify it. iPhone then requires you to enter the passcode
to unlock it or to display the passcode lock settings.
Turn passcode lock o: Choose General > Passcode Lock, enter your passcode, and
tap Turn Passcode O, then enter your passcode again.
Change the passcode: Choose General > Passcode Lock, enter your passcode, and
tap Change Passcode. Enter your passcode again, then enter and reenter your new
passcode.
If you forget your passcode, you must restore the iPhone software. See “Updating and
Restoring iPhone Software” on page 204.
Set how long before your passcode is required: Choose General > Passcode Lock and
enter your passcode. Tap Require Passcode, then select how long iPhone can be idle
before you need to enter a passcode to unlock it.
Turn Voice Dial on or o: Choose General > Passcode Lock and turn Voice Dial on
or o.
Erase data after ten failed passcode attempts: Choose General > Passcode Lock,
enter your passcode, and tap Erase Data to turn it on.
After ten failed passcode attempts, your settings are reset to their defaults and all your
information and media is erased:
• On iPhone 3GS: by removing the encryption key to the data (which is encrypted
using 256-bit AES encryption)
• On iPhone and iPhone 3G: by overwriting the data
145
Chapter 19 Settings
Important: You can’t use iPhone while data is being overwritten. This can take up to
two hours or more, depending on the model and storage capacity of your iPhone.
(On iPhone 3GS, the removal of the encryption key is immediate.)
Restrictions
You can set restrictions for the use of some applications and for iPod content on
iPhone. For example, parents can restrict explicit music from being seen on playlists,
or turn o YouTube access entirely.
Turn on restrictions:
1 Choose General > Restrictions, then tap Enable Restrictions.
2 Enter a four-digit passcode.
3 Reenter the passcode.
Turn o restrictions: Choose General > Restrictions, then enter the passcode.
Tap Disable Restrictions, then reenter the passcode.
If you forget your passcode, you must restore your iPhone software from iTunes.
See “Updating and Restoring iPhone Software” on page 204.
Set application restrictions: Set the restrictions you want by tapping individual
controls on or o. By default, all controls are on (not restricted). Tap an item to turn it
o and restrict its use.
Safari is disabled and its icon is removed from the Home screen. You cannot use Safari
to browse the web or access web clips. Other third-party applications may allow web
browsing even if Safari is disabled.
YouTube is disabled and its icon is removed from the Home screen.
The iTunes Store is disabled and its icon is removed from the Home screen. You cannot
preview, purchase, or download content.
The App Store is disabled and its icon is removed from the Home screen. You cannot
install applications on iPhone.
Camera is disabled and its icon is removed from the Home screen. You cannot take
pictures.
Location data isn’t provided to applications.
Restrict purchases within applications: Turn In-App Purchases o. When enabled,
this feature allows you to purchase additional content or features within applications
downloaded from the App Store.
Set content restrictions: Tap Ratings For, then select a country from the list. You can
then set restrictions using that country’s ratings system for the following categories of
content:
146
Chapter 19 Settings
Music & Podcasts•
Movies•
TV Shows•
Apps•
In the United States for example, to allow only movies rated PG or below, tap Movies,
then select PG from the list.
Note: Not all countries have rating systems.
Home
Choose General > Home to set preferences for double-clicking the Home button and
searching categories on the Spotlight page. You can set iPhone so that double-clicking
the Home button goes to the Home screen, Search, Phone Favorites, Camera, or iPod.
Set whether double-clicking the Home button shows iPod controls: Turn on iPod
Controls to display iPod controls when you’re playing music and double-click the
Home button. This feature works even when the display is turned o or iPhone is
locked.
Set what categories appear in search results: Tap Search Results. All search categories
in the list are selected by default. Tap an item to deselect it.
Set the order of search result categories: Tap Search Results, then drag next to a
search category to a new place in the list.
Date and Time
These settings apply to the time shown in the status bar at the top of the screen, and
in world clocks and calendars.
Set whether iPhone shows 24-hour time or 12-hour time: Choose General > Date &
Time and turn 24-Hour Time on or o. (Not available in all countries.)
Set whether iPhone updates the date and time automatically: Choose General >
Date & Time and turn Set Automatically on or o.
If iPhone is set to update the time automatically, it gets the correct time over the
cellular network, and updates it for the time zone you’re in.
Some carriers don’t support network time in all locations. If you’re traveling, iPhone
may not be able to automatically set the local time.
Set the date and time manually: Choose General > Date & Time and turn Set
Automatically o. Tap Time Zone and enter the name of a major city in your time zone.
Tap the “Date & Time” return button, then tap “Set Date & Time” and enter the date
and time.
147
Chapter 19 Settings
Keyboard
Turn Auto-Correction on or o: Choose General > Keyboard and turn Auto-Correction
on or o.
By default, if the default keyboard for the language you select has a dictionary, iPhone
automatically suggests corrections or completed words as you type.
Turn Auto-Capitalization on or o: Choose General > Keyboard and turn Auto-
Capitalization on or o.
By default, iPhone automatically capitalizes words after you type sentence-ending
punctuation or a return character.
Set whether caps lock is enabled: Choose General > Keyboard and turn Enable Caps
Lock on or o.
If caps lock is enabled and you double-tap the Shift key on the keyboard, all letters
you type are uppercase. The Shift key turns blue when caps lock is on.
Turn the “.” shortcut on or o: Choose General > Keyboard and turn “.” Shortcut on
or o.
The “.” shortcut lets you double-tap the space bar to enter a period followed by a space
when you’re typing. It’s on by default.
Turn international keyboards on or o: Choose General > Keyboards > International
Keyboards and turn on the keyboards you want.
If more than one keyboard is turned on, tap to switch keyboards when you’re
typing. When you tap the symbol, the name of the newly active keyboard appears
briey. See “International Keyboards” on page 35.
International
Use International settings to set the language for iPhone, turn keyboards for dierent
languages on or o, and set the date, time, and telephone number formats for your
region.
Set the language for iPhone: Choose General > International > Language, choose the
language you want to use, then tap Done.
Set the Voice Control language for iPhone: Choose General > International > Voice
Control, then choose the language you want to use (available only on iPhone 3GS).
Turn international keyboards on or o: Choose General > International > Keyboards,
and turn on the keyboards you want.
If more than one keyboard is turned on, tap to switch keyboards when you’re
typing. When you tap the symbol, the name of the newly active keyboard appears
briey. See “International Keyboards” on page 35.
Set date, time, and telephone number formats: Choose General > International >
Region Format, and choose your region.
148
Chapter 19 Settings
The Region Format also determines the language used for the days and months that
appear in native iPhone applications.
Accessibility
To turn on accessibility features (available only on iPhone 3GS), choose Accessibility
and choose the features you want. See Chapter 25, “Accessibility,” on page 182.
Resetting iPhone
Reset all settings: Choose General > Reset and tap Reset All Settings.
All your preferences and settings are reset. Information, such as your contacts and
calendars, and media, such as your songs and videos, aren’t deleted.
Erase all content and settings: Connect iPhone to your computer or a power adapter.
Choose General > Reset and tap “Erase All Content and Settings.”
This resets all settings to their defaults and erases all your information and media:
• On iPhone 3GS: by removing the encryption key to the data (which is encrypted
using 256-bit AES encryption)
• On iPhone and iPhone 3G: by overwriting the data
Important: You can’t use iPhone while data is being overwritten. This can take up to
two hours or more, depending on the model and storage capacity of your iPhone.
(On iPhone 3GS, the removal of the encryption key is immediate.)
Reset network settings: Choose General > Reset and tap Reset Network Settings.
When you reset network settings, your list of previously used networks and VPN
settings not installed by a conguration prole are removed. Wi-Fi is turned o and
then back on, disconnecting you from any network you’re on. The Wi-Fi and “Ask to
Join Networks” settings are left turned on.
To remove VPN settings installed by a conguration prole, choose Settings > General
> Prole, then select the prole and tap Remove.
Reset the keyboard dictionary: Choose General > Reset and tap Reset Keyboard
Dictionary.
You add words to the keyboard dictionary by rejecting words iPhone suggests as you
type. Tap a word to reject the correction and add the word to the keyboard dictionary.
Resetting the keyboard dictionary erases all words you’ve added.
Reset the Home screen layout: Choose General > Reset and tap Reset Home Screen
Layout.
Reset the location warnings: Choose General > Reset and tap Reset Location
Warnings.
149
Chapter 19 Settings
Location warnings are the requests made by applications (such as Camera, Compass,
and Maps) to use Location Services with those applications. iPhone stops presenting
the warning for an application the second time you tap OK. Tap Reset Location
Warnings to resume the warnings.
Mail, Contacts, Calendars
Use Mail, Contacts, Calendars settings to set up and customize accounts for iPhone:
Microsoft Exchange•
MobileMe•
Google email•
Yahoo! Mail•
AOL•
Other POP and IMAP mail systems•
LDAP accounts for Contacts•
CalDAV or iCalendar (.ics) accounts for Calendars•
Accounts
The Accounts section lets you set up accounts on iPhone. The specic settings that
appear depend on the type of account you’re setting up. Your service provider or
system administrator should be able to provide the information you need to enter.
For more information, see:
“• Setting Up Accounts” on page 16
“• Adding Contacts” on page 176
“• Subscribing to and Sharing Calendars” on page 93
Change an account’s settings: Choose “Mail, Contacts, Calendars,” choose an account,
then make the changes you want.
Changes you make to an account’s settings on iPhone are not synced to your
computer, so you can congure your accounts to work with iPhone without aecting
the account settings on your computer.
Stop using an account: Choose “Mail, Contacts, Calendars,” choose an account, then
turn Account o.
If an account is o, iPhone doesn’t display the account and doesn’t send or check email
from or sync other information with that account, until you turn it back on.
Adjust advanced settings: Choose “Mail, Contacts, Calendars,” choose an account,
then do one of the following:
150
Chapter 19 Settings
• To set whether drafts, sent messages, and deleted messages are stored on iPhone or
remotely on your email server (IMAP accounts only), tap Advanced and choose Drafts
Mailbox, Sent Mailbox, or Deleted Mailbox.
If you store messages on iPhone, you can see them even when iPhone isn’t
connected to the Internet.
• To set how long before messages are removed permanently from Mail on iPhone, tap
Advanced and tap Remove, then choose a time: Never, or after one day, one week,
or one month.
• To adjust email server settings, tap Host Name, User Name, or Password under
Incoming Mail Server or Outgoing Mail Server. Ask your network administrator or
Internet service provider for the correct settings.
• To adjust SSL and password settings, tap Advanced. Ask your network administrator or
Internet service provider for the correct settings.
Delete an account from iPhone: Choose “Mail, Contacts, Calendars,” choose an
account, then scroll down and tap Delete Account.
Deleting an account means you can no longer access the account with your iPhone.
All email and the contacts, calendar, and bookmark information synced with the
account are removed from iPhone. However, deleting an account doesn’t remove the
account or its associated information from your computer.
Fetch New Data
This setting lets you turn Push on or o for MobileMe, Microsoft Exchange, Yahoo!
Mail, and any other push accounts you’ve congured on iPhone. Push accounts
automatically deliver new information to iPhone when new information appears
on the server (some delays may occur). You might want to turn Push o to suspend
delivery of email and other information, or to conserve battery life.
When Push is o, and with accounts that don’t support push, data can still be
fetched—that is, iPhone can check with the server and see if new information is
available. Use the Fetch New Data setting to determine how often data is requested.
For optimal battery life, don’t fetch too frequently.
Turn Push on: Choose “Mail, Contacts, Calendars” > Fetch New Data, then tap to turn
Push on.
Set the interval to fetch data: Choose “Mail, Contacts, Calendars” > Fetch New Data,
then choose how often you want to fetch data for all accounts.
To conserve battery life, fetch less frequently.
Setting Push to OFF or setting Fetch to Manually in the Fetch New Data screen
overrides individual account settings.
151
Chapter 19 Settings
The Mail settings, except where noted, apply to all accounts you’ve set up on iPhone.
To turn alerts sounds for new or sent mail on or o, use the Sounds settings.
Set the number of messages shown on iPhone: Choose “Mail, Contacts, Calendars” >
Show, then choose a setting.
Choose to see the most recent 25, 50, 75, 100, or 200 messages. To download additional
messages when you’re in Mail, scroll to the bottom of your inbox and tap Load More
Messages.
Note: For Microsoft Exchange accounts, choose “Mail, Contacts, Calendars” and choose
the Exchange account. Tap “Mail days to sync” and choose the number of days of mail
you want to sync with the server.
Set how many lines of each message are previewed in the message list: Choose
“Mail, Contacts, Calendars” > Preview, then choose a setting.
You can choose to see up to ve lines of each message. That way, you can scan a list of
messages in a mailbox and get an idea of what each message is about.
Set a minimum font size for messages: Choose “Mail, Contacts, Calendars” > Minimum
Font Size, then choose Small, Medium, Large, Extra Large, or Giant.
Set whether iPhone shows To and Cc labels in message lists: Choose “Mail, Contacts,
Calendars,” then turn Show To/Cc Label on or o.
If Show To/Cc Label is on,
To
or
Cc
next to each message in a list indicates whether
the message was sent directly to you or you received a copy.
Set whether iPhone conrms that you want to delete a message: Choose “Mail,
Contacts, Calendars” and turn Ask Before Deleting on or o.
If Ask Before Deleting is on, to delete a message you must tap , then conrm by
tapping Delete.
Set whether iPhone automatically loads remote images: Choose “Mail, Contacts,
Calendars” and turn Load Remote Images on or o. If Load Remote Images is o, you
can load images manually when reading a message.
Set whether iPhone sends you a copy of every message you send: Choose “Mail,
Contacts, Calendars,” then turn Always Bcc Myself on or o.
Set the default email account: Choose “Mail, Contacts, Calendars” > Default Account,
then choose an account.
This setting determines which of your accounts a message is sent from when you
create a message from another iPhone application, such as sending a photo from
Photos or tapping the email address of a business in Maps. To send the message from
a dierent account, tap the From eld in the message and choose another account.
Add a signature to your messages: Choose “Mail, Contacts, Calendars” > Signature,
then type a signature.
152
Chapter 19 Settings
You can set iPhone to add a signature—your favorite quote, or your name, title, and
phone number, for example—to the bottom of every message you send.
Contacts
Set how contacts are sorted: Choose “Mail Contacts, Calendars,” then under Contacts
tap Sort Order and do one of the following:
• To sort by rst name rst, tap First, Last.
• To sort by last name rst, tap Last, First.
Set how contacts are displayed: Choose “Mail Contacts, Calendars,” then under
Contacts tap Display Order and do one of the following:
• To show rst name rst, tap First, Last.
• To show last name rst, tap Last, First.
Import contacts from a SIM: Choose “Mail, Contacts, Calendars,” then tap Import SIM
Contacts.
The contact information on the SIM is imported to iPhone. If you have Contacts
enabled for both MobileMe and Microsoft Exchange, you’re prompted to choose which
account you want to add the SIM contacts to.
Calendar
Set alerts to sound when your receive meeting invitation: Choose “Mail, Contacts,
Calendars,” and under Calendar tap “New Invitation Alerts” to turn it on.
Set how far back in the past to show your calendar events on iPhone: Choose “Mail,
Contacts, Calendars” > Sync, then choose a period of time.
Turn on Calendar time zone support: Choose “Mail, Contacts, Calendars” > Time Zone
Support, then turn Time Zone Support on. Select a time zone for calendars by tapping
Time Zone and entering the name of a major city.
When Time Zone Support is on, Calendar displays event dates and times in the time
zone of the city you selected. When Time Zone Support is o, Calendar displays events
in the time zone of your current location as determined by the network time.
Important: Some carriers don’t support network time in all locations. If you’re traveling,
iPhone may not display events or sound alerts at the correct local time. To manually
set the correct time, see “Date and Time” on page 147.
Phone
Use Phone settings to forward incoming calls, turn call waiting on or o, change your
password, and other things. Additional fees may apply. Contact your carrier for pricing
and availability.
153
Chapter 19 Settings
Calling from Abroad
Set iPhone to add the correct prex when dialing from another country: In Settings,
tap Phone, then turn International Assist on. This lets you make calls to your home
country using the numbers in your contacts and favorites, without having to add a
prex or your country code. International Assist works for U.S. telephone numbers only.
For more information, see “Using iPhone Abroad” on page 56.
Call Forwarding
You can set iPhone to forward incoming calls to another number. For example, you
may be on vacation and want all calls to go somewhere else. If you’re going to an area
with no cellular coverage, you may want to forward calls to a place where you can be
reached.
Set iPhone to forward your calls:
1 Choose Phone > Call Forwarding and turn Call Forwarding on.
2 Tap Forwarding To and enter the phone number you want calls forwarded to.
When Call Forwarding is on, an icon appears in the status bar the top of the screen.
You must be in range of the cellular network when you set iPhone to forward calls, or
calls won’t be forwarded.
Call Waiting
Activate or deactivate call waiting: Choose Phone > Call Waiting, then turn Call
Waiting on or o. If you turn call waiting o and someone calls you when you’re
already on the phone, the call goes to voicemail.
Show My Caller ID
Show or hide your caller ID: Choose Phone > Show My Caller ID, then turn Show My
Caller ID on or o.
If Show My Caller ID is o, people you call can’t see your name or phone number on
their phone.
Using iPhone with a Teletype (TTY) Machine
In some regions, Teletype (TTY) machines are used by deaf or hearing-impaired people
to communicate by typing and reading text. You can use iPhone with a TTY machine
if you have the iPhone TTY Adapter cable, available for purchase separately in many
countries. Go to www.apple.com/store (not available in all countries).
Connect iPhone to a TTY machine: Choose Phone, then turn TTY on. Then connect
iPhone to your TTY machine using the iPhone TTY Adapter.
For information about using a TTY machine, see the documentation that came with
the machine.
154
Chapter 19 Settings
For more information about other accessibility features of iPhone, go
to Chapter 25, “Accessibility,” on page 182.
Changing Your Voicemail Password
A voicemail password helps prevent others from access your voicemail. You need to
enter the password only when you’re calling in to get your messages from another
phone. You won’t need to enter the password when using voicemail on iPhone.
Change your voicemail password: Choose Phone > Change Voicemail Password.
Locking Your SIM Card
You can lock your SIM card, so it can’t be used without a Personal Identication
Number (PIN). You must enter the PIN each time you turn iPhone o and turn it back
on again. Some carriers require a SIM PIN in order to use iPhone.
Important: If you enter the PIN incorrectly three times, you may need to enter a
Personal Unlocking Key (PUK) to enable your SIM card again. Refer to the SIM card
documentation or contact your carrier. Some cellular networks may not accept an
emergency call from iPhone if the SIM is locked.
Turn the SIM PIN on or o:
1 Choose Phone > SIM PIN, then turn SIM PIN on or o.
2 Enter your PIN to conrm. Use the PIN assigned by your carrier, or your carrier’s default
PIN.
Change the PIN for your SIM card:
1 Choose Phone > SIM PIN.
2 Turn SIM PIN on, then tap Change PIN.
3 Enter your current PIN, then enter your new PIN.
4 Enter your new PIN again to conrm, then tap Done.
Accessing Your Carrier’s Services
Depending on your carrier, you may be able to access some of your carrier’s services
directly from iPhone. For example, you may be able to check your bill balance, call
directory assistance, and view how many minutes you have left.
Access your carrier’s services: Choose Phone. Then scroll down and tap the button for
your carrier’s services.
When you request information such as your bill balance, your carrier may provide the
information in a text message. Contact your carrier to nd out if there are any charges
for these services.
155
Chapter 19 Settings
Safari
Safari settings let you select your Internet search engine, set security options, and for
developers, turn on debugging.
General
You can use Google or Yahoo! to perform Internet searches.
Select a search engine: Choose Safari > Search Engine and select the search engine
you want to use.
You can set Safari to automatically ll out web forms using contact information, names
and passwords you previously entered, or both.
Enable AutoFill: Choose Safari > AutoFill, then do one of the following:
• To use information from contacts, turn Use Contact Info on, then choose My Info and
select the contact you want to use.
Safari uses information from Contacts to ll in contact elds on web forms.
• To use information from names and passwords, turn Names & Passwords on.
When this feature is on, Safari remembers names and passwords of websites you
visit and automatically lls in the information when you revisit the website.
• To remove all AutoFill information, tap Clear All.
Security
By default, Safari is set to show features of the web, such as some movies, animation,
and web applications. You may wish to change security settings to help protect iPhone
from possible security risks on the Internet.
Change security settings: Choose Safari, then do one of the following:
• To set whether you’re warned when visiting potentially fraudulent websites, turn Fraud
Warning on or o.
Fraud warning protects you from potentially fraudulent Internet sites. When you
visit a suspicious site, Safari warns you about its suspect nature and doesn’t load the
page.
• To enable or disable JavaScript, turn JavaScript on or o.
JavaScript lets web programmers control elements of the page—for example, a
page that uses JavaScript might display the current date and time or cause a linked
page to appear in a new pop-up page.
• To enable or disable plug-ins, turn Plug-ins on or o. Plug-ins allow Safari to play some
types of audio and video les and to display Microsoft Word les and Microsoft
Excel documents.
• To block or allow pop-ups, turn Block Pop-ups on or o. Blocking pop-ups stops only
pop-ups that appear when you close a page or open a page by typing its address.
It doesn’t block pop-ups that open when you tap a link.
156
Chapter 19 Settings
• To set whether Safari accepts cookies, tap Accept Cookies and choose Never, “From
visited,” or Always.
A cookie is a piece of information that a website puts on iPhone so the website can
remember you when you visit again. That way, webpages can be customized for you
based on information you may have provided.
Some pages won’t work correctly unless iPhone is set to accept cookies.
• To clear the history of webpages you’ve visited, tap Clear History.
• To clear all cookies from Safari, tap Clear Cookies.
• To clear the browser cache, tap Clear Cache.
The browser cache stores the content of pages so the pages open faster the next
time you visit them. If a page you open doesn’t show new content, clearing the
cache may help.
Developer
The debug console can help you resolve webpage errors. If it’s turned on, the console
appears automatically when a webpage error occurs.
Turn the debug console on or o: Choose Safari > Developer, and turn Debug
Console on or o.
Messages
Use Messages settings to adjust settings for SMS and MMS messages.
Note: MMS is available only on iPhone 3G or later. The MMS Messaging and Show
Subject Field settings doesn’t appear if MMS isn’t supported by your carrier.
Choose whether or not to see a preview of messages on the Home screen: Choose
Messages and turn Show Preview on or o.
Choose whether or not to repeat message alerts: Choose Messages and turn Repeat
Alert on or o. If you ignore a message alert, you’ll be alerted two more times.
Turn MMS messaging on or o: Choose Messages and turn MMS Messaging on or
o. If MMS messaging is turned o, you won’t be able to receive MMS le attachments
such as images or audio.
Show a subject line for messages you send or receive: Choose Messages and turn
Show Subject Field on.
157
Chapter 19 Settings
iPod
Use iPod Settings to adjust settings for music and video playback on your iPod.
Music
The Music settings apply to songs, podcasts, and audiobooks.
Turn Shake to Shue on or o: Choose iPod, then turn Shake to Shue on or o.
When Shake to Shue is on, you can shake iPhone to turn shue on and immediately
change the currently playing song.
Set iTunes to play songs at the same sound level: In iTunes, choose iTunes >
Preferences if you’re using a Mac, or Edit > Preferences if you’re using a PC, then click
Playback and select Sound Check.
Set iPhone to use the iTunes volume settings (Sound Check): Choose iPod and turn
Sound Check on.
Use the equalizer to customize the sound on iPhone: Choose iPod > EQ and choose
a setting.
Set a volume limit for music and videos: Choose iPod > Volume Limit and drag the
slider to adjust the maximum volume.
Tap Lock Volume Limit to assign a code to prevent the setting from being changed.
Setting a volume limit only limits the volume of music (including podcasts and
audiobooks) and videos (including rented movies), and only when headphones,
earphones, or speakers are connected to the headset jack on iPhone.
WARNING: For important information about avoiding hearing loss, see the Important
Product Information Guide at www.apple.com/support/manuals/iphone.
Video
Video settings apply to video content, including rented movies. You can set where to
resume playing videos that you previously started, turn closed captioning on or o,
and set up iPhone to play videos on your TV.
Set where to resume playing: Choose iPod > Start Playing, then select whether
you want videos that you previously started watching to resume playing from the
beginning or where you left o.
Turn closed captioning on or o: Choose iPod and turn Closed Captioning on or o.
158
Chapter 19 Settings
TV Out
Use these settings to set up how iPhone plays videos on your TV. For more information
about using iPhone to play videos on your TV, see “Watching Videos on a TV” on
page 84.
Turn widescreen on or o: Choose iPod and turn Widescreen on or o.
Set TV signal to NTSC or PAL: Choose iPod > TV Signal and select NTSC or PAL.
NTSC and PAL are TV broadcast standards. NTSC displays 480i and PAL displays 576i.
Your TV might use either of these, depending on where you bought it. If you’re not
sure which to use, check the documentation that came with your TV.
Photos
Use Photos settings to specify how slideshows display your photos.
Set the length of time each slide is shown: Choose Photos > Play Each Slide For and
select the length of time.
Set a transition eect: Choose Photos > Transition and select a transition eect.
Set whether to repeat slideshows: Choose Photos and turn Repeat on or o.
Set photos to appear randomly or in order: Choose Photos and turn Shue on or o.
Store
Use Store settings to change or create an iTunes Store account. By default, the iTunes
account you’re signed in to when you sync iPhone with your computer appears in
Store settings. You can change accounts on iPhone to purchase music or applications
from another account. If you don’t have an iTunes account, you can create one in Store
settings.
Sign in to an account: Choose Store and tap Sign in, then enter your user name and
password.
View your iTunes Store account information: Choose Store and tap View Account,
then type your password and follow the onscreen instructions.
Sign in to a dierent account: Choose Store and tap Sign out, then tap Sign in and
enter your username and password.
Create a new account: Choose Store and tap Create New Account, then follow the
onscreen instructions.
Nike + iPod
Use Nike + iPod settings to activate and adjust settings for the Nike + iPod application
(iPhone 3GS only). See Chapter 24, “Nike + iPod,” on page 180.
159
Chapter 19 Settings
iTunes Store
20
About the iTunes Store
You can search for, browse, preview, purchase, and download music, ringtones,
audiobooks, TV shows, movies, and music videos from the iTunes Store directly to
iPhone. You can listen to audio or watch video podcasts from the iTunes Store, either
by streaming them from the Internet or by downloading them directly to iPhone.
Note: The iTunes Store is not available in all regions, and iTunes Store content may
vary across regions.
To access the iTunes Store, iPhone must be connected to the Internet. See “Connecting
to the Internet” on page 40.
To purchase songs or write reviews, you need an iTunes Store account. By default,
iPhone gets your iTunes Store account settings from iTunes. If you don’t have an iTunes
Store account, or if you want to make purchases from another iTunes Store account,
go to Settings > Store. See “Store” on page 15 9.
You don’t need an iTunes Store account to play or download podcasts.
160
Finding Music, Videos, and More
Browse content: Tap Music, Videos, Ringtones, or Podcasts. Or tap More to browse
by Audiobooks, iTunes U, or Downloads. Choose a sorting method at the top of the
screen to browse by lists such as Featured, Top Tens, or Genres.
Search for content: Tap Search, tap the search eld and enter one or more words,
then tap Search. Search results are grouped by category, such as Movies, Albums,
or Podcasts.
Tap an item in a list to see more details on its Info screen. You can read reviews, write
your own review, or email a link about the item to a friend. Depending on the item,
you can also buy, download, or rent it.
Note: If you join a Starbucks Wi-Fi network in a select Starbucks location (available
in the U.S. only), the Starbucks icon appears at the bottom of the screen. You can
preview and purchase the currently playing and other songs from featured Starbucks
Collections.
161
Chapter 20 iTunes Store
Purchasing Ringtones
You can preview and purchase ringtones from the iTunes Store and download them to
iPhone.
Note: Ringtones may not be available in all countries.
Browse for ringtones: Tap Ringtones or use Search to nd a specic song in the
iTunes Store.
Preview a ringtone: Tap the item to preview. Double-tap the item for more
information.
Purchase and download ringtones:
1 Tap the price, then tap Buy Now.
2 Sign in to your account as requested, then tap OK.
When you purchase a ringtone, you can set it as your default ringtone, or assign it to a
contact.
If you don’t have an iTunes Store account, tap Create New Account to set one up.
Your purchase is charged to your iTunes Store account. For additional purchases made
within the next fteen minutes, you don’t have to enter your password again.
You can change your default ringtone or assign individual ringtones to contacts in
Settings > Sounds. See “Sounds and the Ring/Silent Switch” on page 141.
Ringtones you purchase on iPhone are synced to your iTunes library when you
connect iPhone to your computer. You can sync purchased ringtones to more than one
iPhone, if they’re all synced to the same account you used to purchase the ringtones.
You can’t edit ringtones you purchase from the iTunes Store.
You can create custom ringtones in Garage Band. For information, see Garage Band
Help.
Purchasing Music or Audiobooks
When you nd a song, album, or audiobook you like in the iTunes Store, you can
purchase and download it to iPhone. You can preview an item before you purchase it
to make sure it’s what you want.
Preview a song or audiobook: Tap the item.
Purchase and download a song, album, or audiobook:
1 Tap the price, then tap Buy Now.
2 Sign in to your account as requested, then tap OK.
If you don’t have an iTunes Store account, tap Create New Account to set one up.
162
Chapter 20 iTunes Store