Tài liệu Microsoft Office 2010 Product Guide part 11 pptx
Bạn đang xem bản rút gọn của tài liệu. Xem và tải ngay bản đầy đủ của tài liệu tại đây (310.72 KB, 10 trang )
Page 103 of 188
Features and Benefits Description Where to Find
New and
Improved!
Picture editing tools
Be your own graphic artist and edit photos
without using additional photo-editing
programs. Explore Color and Correction
galleries for Color Saturation, Color Tone,
Recolor, Sharpen and Soften, and Brightness
and Contrast. Add an artistic flair with effects
such as photocopy, marker, line drawing, glass,
pastels and more. Or, use the improved crop
and new remove background features to
display exactly what you want to show for
every picture in your workbooks.
Select a picture. Or, to insert a picture, on
the Insert tab, in the Illustrations group,
click Picture. The Picture Tools Format
tab appears automatically when a picture
is selected.
Find Artistic Effects, Remove
Background, Corrections, and Color
tools on the Picture Tools Format tab,
in the Adjust group. Find Crop on the
same tab, in the Size group.
Improved!
Additional Office
themes
Enjoy a wide range of additional,
professionally-designed Office themes. Apply a
coordinated set of fonts, colors, and graphic
effects with just one click.
On the Page Layout tab, in the Themes
group, click Themes.
Improved!
Additional SmartArt
graphics
Create professional-quality diagrams as easily
as typing a bulleted list. Office 2010 adds
dozens of additional SmartArt layouts for even
more choices to help you convey related ideas
and non-linear concepts with greater visual
impact. Additionally, explore improved tools
for working with picture diagrams and the
ability to convert SmartArt diagrams to shapes.
On the Insert tab, in the Illustrations
group, click SmartArt and then select a
SmartArt layout.
Page 104 of 188
Features and Benefits Description Where to Find
New!
Insert Screenshot
Quickly insert screenshots in your workbooks
without leaving your Excel application.
On the Insert tab, in the Illustrations
group, click Screenshot.
New!
64-bit version
Excel 2010 offers 64-bit scalability for the Excel
guru or analyst working with massive, memory-
intensive datasets, and provides support for
gigabyte-sized spreadsheets.
Note: This option can only be installed on 64-bit
systems. For installation instructions and more
information visit:
Improved!
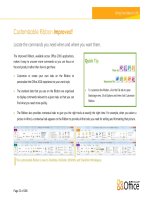
Ribbon
The enhanced Ribbon is available across Office
2010 applications so you can access more
commands quickly. Customize or create your
own tabs on the Ribbon to personalize the
Office 2010 experience to your work style.
The Ribbon appears at the top of the
screen.
To customize the Ribbon, in Backstage
view, click Options and then click
Customize Ribbon.
New!
Backstage view
Get to the tasks you need and complete your
work more efficiently. Backstage view, available
across Office 2010 applications, replaces the
File menu from previous Microsoft Office
versions.
Click the File tab to open Backstage view.
Page 105 of 188
Features and Benefits Description Where to Find
New!
Web based co-
authoring
Simultaneously edit workbooks at the same
time with others from different locations and
no longer worry about someone locking you
out of a workbook while they edit it.
This feature is automatically enabled in
Excel Web App. To see this feature, save
your workbook to a SharePoint
Foundation 2010 site or a Windows Live
SkyDrive folder, and then have someone
else open the workbooks while you are
still in it.
Improved!
Streamlined
communications
Wherever you see presence information ,
you can point to the person’s name for a
contact card and initiate a conversation directly
from within Excel.
For example, from within any workbook, hover
your mouse pointer over workbook properties
for people names, such as Author or Last
Modified By in Properties pane, available from
the Info tab in Backstage view, to display the
new contact card.
Wherever you see presence information,
point to the person’s name for a contact
card from which you can initiate a
conversation.
Note: Instant messaging and presence
information requires one of the following:
Office Communications Server 2007 R2 with
Office Communicator 2007 R2, Windows Live
Messenger, or another instant messaging
application that supports IMessenger. Voice
calls require Office Communications Server
2007 R2 with Office Communicator 2007 R2 or
an instant messaging application that supports
IMessengerAdvanced.
Page 106 of 188
Features and Benefits Description Where to Find
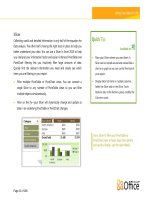
Improved!
Publish to Excel
Services
Share your analysis and results, including
workbooks with Sparklines and Slicers, across
the organization by publishing workbooks and
dashboards to the Web.
Click the File tab to open Backstage view.
Click Save & Send, click Save to
SharePoint and then click Publish
Options.
Note: This feature requires SharePoint Server 2010.
Microsoft Office Professional Plus 2010, Microsoft
Office Professional Academic 2010, or Microsoft
Excel 2010 when purchased as an individual
application is required for publishing to Excel
Services from Excel 2010.
New!
Accessibility Checker
Can your workbook be read by those with
disabilities? The new Accessibility Checker
inspects your workbook for accessibility issues
and provides explanations along with step-by-
step instructions for making corrections.
Click the File tab to open Backstage view.
On the Info tab, click Check for Issues
and then click Check Accessibility.
Page 107 of 188
Features and Benefits Description Where to Find
New!
Protected View
Spreadsheets received in e-mail or
downloaded from the Web automatically open
in Protected View so that you can make a more
informed decision before exposing your
computer to potential vulnerabilities.
Opening in Protected View is automatic
when you open a file that originated
from an Internet location. A message bar
appears below the Ribbon to indicate
that your file has been opened in
Protected View and gives you the option
to enable editing.
To manage Protected View settings, click
the File tab to open Backstage view and
then click Options. Click Trust Center
and then click Trust Center Settings.
Find options for working with Protected
View on both the Protect View and File
Block Settings tabs of the Trust Center
dialog box.