ADOBE PHOTOSHOP LIGHTROOM 3 - CLASSROOM IN A BOOK Part 2 pps
Bạn đang xem bản rút gọn của tài liệu. Xem và tải ngay bản đầy đủ của tài liệu tại đây (2.62 MB, 36 trang )
ptg
22 LESSON 1 A Quick Tour of Photoshop Lightroom
A typical workflow
ese are the basics of the Lightroom workflow:
t Import digital images into your library.
t Organize and sort your photos using keywords, flags, and ratings, and group
them in image collections.
t Adjust, correct, retouch, and apply effects to your images. Optionally, launch an
external image editor from within Lightroom for additional pixel-based editing.
t Present your photos in a slide show or web gallery, share them via the Publish
Services feature, or output them for print.
t Export pictures and presentations as e-mail attachments, or create backups on
CD or DVDROM.
Importing photos
You can import photos into your Lightroom library from your hard disk, your
camera, a memory card reader, or from external storage media. During the import
process you can choose from many options to help you manage and organize your
files. For the purposes of this Quick Tour we will ignore most of these advanced
options; Lesson 3, “Importing,” will go into more details.
Before you begin, make sure that you have correctly copied the Lessons folder from
the CD in the back of this book onto your computer’s hard disk and created the
LR3CIB Library Catalog file as detailed in “Copying the Classroom in a Book files”
on page 2 and “Creating a catalog file for working with this book” on page 3.
1 Start Lightroom. In the Adobe Photoshop Lightroom - Select Catalog dialog
box, make sure the file LR3CIB Library Catalog.lrcat is selected under Select A
Recent Catalog To Open, and then click Open.
ptg
ADOBE PHOTOSHOP LIGHTROOM 3 CLASSROOM IN A BOOK 23
2 Lightroom will open in the screen mode and workspace module that were active
when you last quit. If necessary, click Library in the Module Picker to switch to
the Library module.
3 Choose File > Import Photos.
If the Import dialog box appears in compact
mode, click the Show More Options button at the
lower left of the dialog box to see all the options in
the expanded Import dialog box.
4 Under Source at the left of the expanded Import
dialog box, navigate to the Lessons folder that you
copied into the LR3CIB folder on your hard disk.
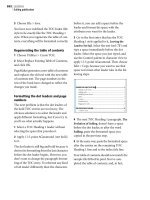
5 Select the Lesson 1 folder. Ensure that all nine images in the Lesson 1 folder are
checked for import.
6 In the import options above the thumbnail previews, click Add to add the
imported photos to your catalog without moving or copying them. Under File
Handling at the right of the expanded Import dialog box, choose Minimal
from the Render Previews menu and ensure that the Don’t Import Selected
Duplicates option is activated. Under Apply During Import, choose None from
both the Develop Settings menu and the Metadata menu and type Lesson 1
in the Keywords text box. Make sure your settings are exactly as shown in the
illustration below, and then click Import.
Tip: If you can’t see
the Module Picker, choose
Window > Panels >
Show Module Picker, or
press the F5 key. Note
that on Mac OS the
function keys are
assigned to specific
operating system
functions by default
and may not work as
expected in Lightroom.
If you find this to be the
case, either press the
fn key (not available on
all keyboard layouts)
together with the F5 key,
or change the keyboard
behavior in the system
preferences.
ptg
24 LESSON 1 A Quick Tour of Photoshop Lightroom
Congratulations! You’ve just imported the first photos into your library. You can see
thumbnails of the nine Lesson 1 images in the Grid view of the Library module and
in the Filmstrip. You’re now ready to start the exercises in this lesson.
Reviewing and organizing
When you work with a library containing many images, you need to be able to find
exactly what you’re looking for quickly. Lightroom delivers numerous tools to make
finding and organizing your files intuitive and enjoyable. You’ve already begun to
structure your catalog by applying the keyword tag “Lesson 1” to the images that
you imported. Keyword tags enable you to find or group image files based on any
description you associate with them, independent of how they are named or where
they are stored. You should make it a working habit to go through a few cycles of
reviewing and organizing your files each time you import new images. is makes
it much easier to retrieve the photos you want when you need to work with them.
Working while watching a slideshow
As a convenient way to review the images you’ve just imported, you can now sit
back and enjoy an impromptu slideshow:
1 In the Library module, make sure the Grid view is displaying the thumbnails
from the previous import, and then choose Window > Impromptu Slideshow, or
press Ctrl+Enter / Command+Return. is will play a slideshow in full-screen
Tip: If you don’t see
the Filmstrip across
the bottom of the
Lightroom workspace,
press the F6 key or
choose Window >
Panels > Show Filmstrip.
ptg
ADOBE PHOTOSHOP LIGHTROOM 3 CLASSROOM IN A BOOK 25
mode using the settings current in the Slideshow module. e slideshow will
repeat until you return to the Library module by pressing the Esc key.
2 While the slideshow is playing, press the spacebar to pause and resume
playback. Press the left arrow key to return to the previous image or the right
arrow key to advance to the next image.
Even as the slideshow plays, you can assign star ratings to rank your photos. You
can then use a search filter to sort your images on this basis.
3 To quickly assign a rating to the image currently displayed in your slideshow,
press a number between 1 (for 1 star) and 5 (for 5 stars) on your keyboard.
To remove the rating, press 0. You can attach only one rating to each photo;
assigning a new rating will replace the old one.
Rating stars are displayed under the thumbnail images in all of the Library module
views and in the Filmstrip, as shown in the illustration at the right.
About keyword tags
Keyword tags are labels (such as “Sculpture” or “New York”) that you attach to your
images to make them easy to find and organize. There’s no need to painstakingly
sort your photos into subject-specific folders or rename files according to their
content; simply assign one or more keyword tags to each image and you can easily
retrieve it by searching the images in your library with the Metadata and Text filters
located in the Filter bar across the top of the work area. You can create keyword tags
for photographic categories, people, places, events, colors, or even moods.
Attach multiple keyword tags to a photo to make retrieving it even easier; you could
quickly find all the images that you’ve tagged with the keyword Sculpture, and then
narrow the search to return only those that are also tagged New York—regardless of
how the photos are named or where they are stored.
For more detail on using keyword tags, see Lesson 5, “Organizing and Selecting.”
ptg
26 LESSON 1 A Quick Tour of Photoshop Lightroom
Another way to mark your images for searching and sorting is to flag them.
4 Press the P key on your keyboard to flag the image currently displayed in your
slideshow as a pick (
), press the X key to flag it as a reject ( ), or press the
U key to remove any flags.
You have the option to display flags—along
with other information—in the thumbnail
image cells in the Library views and in the
Filmstrip. Images that are flagged as rejects
are grayed out.
Use color labels to mark photos for specific purposes or projects. You might use a
red label for images you intend to crop, green for those that need color correction,
or blue to identify photos you wish to use in a particular presentation.
5 To assign a color label to the image currently displayed in your slideshow, use
the number keys. Press 6 on your keyboard to assign a red color label, 7 for
yellow, 8 for green, or 9 for blue. ere’s no keyboard shortcut to assign a purple
color label. To remove a color label simply press the same number again.
In the Grid View of the Library module and in the Filmstrip,
a photo with a color label will be framed in that color when
it’s selected, and will be surrounded by a tinted image cell
background when it’s not, as shown in the illustration at the
right. If you prefer, you can change the view options so that
the color label will appear only under the thumbnail image
in the Grid view. You’ll learn about customizing view options
and more about assigning ratings, flags, and color labels,
using both menu commands and the controls in the Toolbar,
in Lesson 5, “Organizing and Selecting.”
6 Press the Esc key to stop the slideshow and return to the Grid view in the
Library module.
In the Library module, you can user the Filter bar above the thumbnail grid to
search your images by text or metadata content, and then refine your search by
specifying one or more common attributes—star rating, flag status, color label, and
file type—so that only those photos you wish to work with are displayed in the Grid
view and the Filmstrip.
Tip: To help you
remember the meaning
you’ve attached to each
color, you can assign
your own names to the
color labels by choosing
Metadata > Color Label
Set > Edit. In fact, you
can create several
presets, each with a
different set of names
for the color labels, and
switch between them
as needed. For example,
you could customize
one set for working
in the Library module
and another to suit
your workflow in the
Develop module.
ptg
ADOBE PHOTOSHOP LIGHTROOM 3 CLASSROOM IN A BOOK 27
7 If the Filter bar is not already visible above the work area, open it by choosing
View > Show Filter Bar. Click the Attribute filter. Click the third star, and choose
Rating Is Greater an Or Equal To from the Rating menu. Lightroom will now
display only those photos with at least a 3 star rating.
When you’re working with only a few images, as you are in this lesson, rating, flag-
ging, and filtering seems unnecessary, but as your photo library grows to contain
hundreds or even thousands of photos you’ll find these tools invaluable. e objec-
tive of this step in your workflow is to organize your images, ready for processing in
the Develop, Slideshow, Print, and Web modules.
Creating a collection
Once you’ve reviewed and sorted your library, searched your photos by keywords
or text, and filtered out unwanted images using the attributes filters, you can group
the remaining photos as a collection, so that you can easily retrieve the same selec-
tion at any time without repeating your search. To group your photos in a collec-
tion you can choose between several options:
t e Quick Collection: a temporary holding collection in the Catalog panel,
where you can assemble a selection of images.
t A “standard” Collection: a permanent grouping of photos that will be listed in
the Collections panel.
t A Smart Collection: a selection of images automatically filtered from your
library according to whatever criteria you specify.
t A Publish Collection: a selection of images intended for publishing that will
be listed in the Publish Services panel. A Publish Collection will keep track of
images you’ve published, enabling you to check at a glance whether the versions
you’re sharing are up-to-date.
1 If the star rating filter is still active in the Grid view, clear this setting by
choosing Library > Filter by Rating > Reset is Filter, or simply click None in
the Filter bar above the Grid view to disable all active filters.
ptg
28 LESSON 1 A Quick Tour of Photoshop Lightroom
2 Ensure that Previous Import is selected in the Catalog panel; the Grid view and
the Filmstrip should display all nine images.
When you select a folder in one of the panels in the left group, the Grid view and
the Filmstrip display the images in that folder. Right now, you have the Previous
Import folder in the Catalog panel selected. e next time you import photos, the
Previous Import folder will contain those new images. In this case, you would still
be able to retrieve the current selection of images by choosing the Lesson 1 folder
in the Folders panel, but what if you need to retrieve a group of photos that are not
all located in the same folder, or if you want only a selection of all the images in one
folder? Simply create a collection. You’ll now save the group of 9 images from the
Previous Import folder as a new collection. Your new collection will be listed in the
Collections panel, so you’ll be able to retrieve your images at any time.
3 Choose Edit > Select All; then
choose Library > New Collection.
In the Create Collection dialog
box, type My First Collection as
the collection name. Select None
from the Set menu, activate Include
Selected Photos, disable Make New
Virtual Copies; then click Create.
Your new collection is now listed in the Collections panel. e listing includes an
image count showing that the collection My First Collection contains nine photos.
#
Note: A selected
image is highlighted in
the Grid view and the
Filmstrip by a thin white
border (or a colored
border if the image
has a color label) and
a lighter background
color. If more than
one photo is selected,
the active photo is
indicated by an even
lighter background.
Some commands affect
only the active photo
while others affect all
selected photos.
Tip: Folders in the
Collections panel can
be nested. For example,
you could create a
Portfolio folder, and
then create subfolders
named Portraits,
Landscape, Product
shots, Black &White, etc.
Each time you import
an outstanding image,
add it to one of these
collections to slowly
build up your portfolio.
ptg
ADOBE PHOTOSHOP LIGHTROOM 3 CLASSROOM IN A BOOK 29
Rearranging and deleting images in a collection
Once you’ve grouped a selection of images as a collection you can do things with
them in the Grid view and the Filmstrip that you couldn’t do before, such as rear-
ranging their order and removing them from the working view without deleting
them from the catalog.
1 If your new collection is not already selected
in the Collections panel, click to select it now.
Although nothing has changed in the Grid view or the Filmstrip—because for
the moment the My First Collection folder contains the same set of images as the
Previous Import folder—you’re now working with a collection, where you are free
to rearrange the order of your images.
2 Choose Edit > Select None. If necessary, scroll down in the Grid view and
Ctrl-click / Command-click to select the last two images. Drag the selected
images towards the top of the view. As you drag, the view will automatically
scroll up as necessary. Drag your selection between the second and third photos
and release the mouse button when the vertical black insertion line appears.
e selected photos snap to their new position in the Grid view and the Filmstrip.
3 Choose Edit > Select None. Right-click / Control-click the fourth image in the
Grid view and choose Remove From Collection from the context menu.
In the Collections panel (and in the header bar
of the Filmstrip) the image count shows that
My First Collection now contains only 8 images.
Tip: You need to
drag the thumbnail of
one of your selected
images, rather than the
image cell frame.
ptg
30 LESSON 1 A Quick Tour of Photoshop Lightroom
Although you’ve removed a photo from the collection, it hasn’t been deleted from
your catalog. e Previous Import folder and the All Photographs folder in the
Catalog panel still contain all nine images. A collection contains only references to
the files in your catalog; deleting the reference does not affect the file in the catalog.
You can include a single image in any number of collections—each collection will
then contain its own reference to the same file. If you apply a modification to a
photo in a collection, the modification will be visible in each folder and collection
that references the same photo. is is because Lightroom stores only one entry
for each image file in its library catalog, and a record of modifications is associated
with that entry; any collection including that image links to the same catalog entry,
and therefore displays the modified photo. Although the original image file itself
remains untouched, its catalog entry has changed to include your modifications.
For more information on collections, please refer to “Using collections to organize
images” in Lesson 5.
Comparing photos side by side
Often you’ll have two or more similar photos that you’d like to compare side by
side. e Library module features a Compare view for exactly this purpose.
1 If you have any images selected in the Grid view, choose Edit > Select None.
2 Click the Compare View (
) button in the Toolbar to switch to the Compare
view. Alternately, choose View > Compare, or press C on your keyboard.
By default, Lightroom selects the first two images in the collection for comparison.
Tip: Should you
wish to edit the same
image differently in two
collections, you’ll first
need to make a virtual
copy—an additional
catalog entry for the
image—for inclusion in
the second collection.
You’ll learn about this in
Lesson 6, “Developing
and Editing.”
Tip: If you see only
part of each image in
the Compare view in
the work area, choose
Fit from the zoom
options in the header of
the Navigator panel.
ptg
ADOBE PHOTOSHOP LIGHTROOM 3 CLASSROOM IN A BOOK 31
3 Press the Tab key on your keyboard to quickly hide the side panel groups so that
your photos can be displayed at a larger size in the Compare view.
4 Click the Candidate pane at the right to select it, and then press the right arrow
key on your keyboard to select the next candidate photo from the Filmstrip.
5 Click the Make Select button (
) in the Toolbar to choose the Candidate
photo as the new Select image; then continue to use the arrow keys to compare
the new Select photo with other candidates from the collection.
6 When you’ve made your choice, click the Done button at the right end of the
Toolbar. e Select image will appear in the Loupe view.
7 Press the Tab key on your keyboard to show the hidden side panel groups.
Comparing several photos
e Survey view lets you compare and select from several photos at the same time;
you can narrow your selection one by one, until only the best photo remains.
1 Choose Edit > Select None. In the Filmstrip, Ctrl-click / Command-click three
or four images that you’d like to compare, and then click Survey view (
) in
the Toolbar. Alternatively, choose View > Survey, or press N on your keyboard.
e Survey view will display all the selected images; the more images you select the
smaller the individual preview images in the Survey view. You can make more room
for the images you’re reviewing by hiding the Filmstrip and side panel groups as
necessary, though the right panel group can be useful for viewing additional infor-
mation about the active photo—from a histogram to information in the Metadata
Tip: Even while
you’re working in the
Compare view or the
Survey view, you can
use menu commands
and the controls in the
Toolbar to assign star
ratings, flags, and color
labels to your photos.
If necessary, use the
Toolbar Content menu
to show the controls
you need.
ptg
32 LESSON 1 A Quick Tour of Photoshop Lightroom
panel about what camera, lens, and ISO settings were used. e active image is
indicated by a thin white border; to activate a different photo, you can either click
its thumbnail in the Filmstrip or click the image directly in the work area.
2 Drag any of the images to reposition it in the Survey view. e other images will
automatically be shuffled to accommodate your action.
3 As you move the pointer over each of
the images, a Deselect Photo icon
( )
appears in the lower right corner.
Click this icon to remove a photo from
the selection in the Survey view.
4 Continue to eliminate photos from the Survey view until you’ve narrowed
your selection to a single image, and then press E on your keyboard to switch to
the Loupe view.
As you eliminate candidates the remaining photos are progressively resized and
shuffled to fill the space available in the work area. Eliminating a photo from the
Survey view does not remove it from the collection.
Tip: If you have
eliminated a photo
accidentally, choose
Edit > Undo to return
it to the selection, or
simply Ctrl-click /
Command-click its
thumbnail in the
Filmstrip. You can easily
add a photo to the
selection in the Survey
view in the same way.
ptg
ADOBE PHOTOSHOP LIGHTROOM 3 CLASSROOM IN A BOOK 33
Developing and editing
Once you’ve selected the photos you wish to work with, you can make use of the
comprehensive set of tools and features in Lightroom to correct and enhance your
images. e Quick Develop panel in the right panel group enables you to do some
quick, but effective, adjustments without even having to leave the Library module.
Additional adjustment tools as well as a more convenient editing environment are
available in the Develop module.
Using Quick Develop in the Library module
e Quick Develop panel offers simple controls for making basic adjustments to
color and tone, and a choice of develop settings presets. In the following example
you’ll quickly brighten up an underexposed image using the Auto Tone button.
1 If you are not already in the Loupe view from the previous exercise, press E on
your keyboard to switch to it now.
2 If the Filmstrip is not visible, choose Window > Panels > Show Filmstrip. In the
Filmstrip, select the file DSC_0244.JPG. You can see the name of the file in the
tooltip that appears when you hold the pointer over its thumbnail, and also in
the status bar above the Filmstrip when the image is selected.
As you can see from both the image
preview in the Loupe view, and the
Histogram panel (in the right panel
group) this photo is much too dark.
You’ll fix that in the next few steps.
3 To make more space available for a larger preview of this photo in portrait
format, you can hide the Filmstrip by pressing the F6 key or by disabling the
menu option Window > Panels > Show Filmstrip.
ptg
34 LESSON 1 A Quick Tour of Photoshop Lightroom
4 In the Quick Develop panel, click the Auto Tone button and you’ll notice an
immediate and substantial improvement in the image.
5 Click the triangle to the right of the Auto
Tone button to reveal more controls for
fine-tuning the tonal balance. Experiment
with the settings for Exposure, Recovery,
Fill Light, Blacks, Brightness, and Contrast.
6 Click the Reset All button in the lower right
corner of the Quick Develop panel to return
the image to its original, un-edited state.
Working in the Develop module
e controls in the Quick Develop panel let you change settings but don’t indicate
absolute values for the adjustments you make to your images. In our example there
is no way to tell which parameters were changed by Auto Tone to improve the
photo, or how much they were changed. For that level of control, and a far more
comprehensive editing environment, you need to move to the Develop module.
ptg
ADOBE PHOTOSHOP LIGHTROOM 3 CLASSROOM IN A BOOK 35
1 Switch to the Develop module now by doing one of the following:
t Click Develop in the Module Picker.
t Choose Window > Develop.
t Press Ctrl+Alt+2 / Command+Option+2.
2 In the Basic panel in the right panel group, click the Auto button in the Tone
settings—the equivalent of clicking Auto Tone in the Quick Develop panel.
Notice that for this image clicking Auto Tone increases Brightness significantly,
decreases Contrast slightly, and nudges Blacks up by 1 unit. Applying Auto Tone
to another photo will produce different adjustment values. Note that once you’ve
clicked the Auto button it becomes disabled for this image; the automatic adjust-
ments needed in this photo have already been made.
3 In the Toolbar (View > Show Toolbar), make sure the View Modes controls are
selected in the Toolbar Content menu. From the menu beside the Before/After
button select Before/After Left/Right.
4 Press the F7 key to hide the left panel group and make more space in the work
area for the two images side by side.
ptg
36 LESSON 1 A Quick Tour of Photoshop Lightroom
Auto Tone did a great job of lightening the image, but you can improve it even
more by making further adjustments manually.
5 Drag the Brightness slider to about +100, or click the number beside the slider,
type 100, and then press Enter on your keyboard. Increase the Contrast to +7.
Your adjustments have improved the image considerably but in some places the
white marble of the portal has become too bright and detail has been lost. Using
the Recovery slider you can tone down these clipped highlights while only slightly
changing the brightness of the image as a whole.
6 Drag the Recovery slider to the right until you see the detail reappear in the
marble above the portal. We used a value of 88.
Rather than experimenting with every slider in the right panel group, you can try
some of the Develop module presets to quickly apply different combinations of
settings and achieve a wide range of effects. You can use the Lightroom develop
presets as a starting point, and then create your own.
7 Move your pointer close to the left edge of the Lightroom window. e left
panel group should appear and remain visible until you move the pointer away.
8 If necessary, expand the Presets panel and the Lightroom Presets folder within
that panel. Move the pointer slowly down the list of presets in the Lightroom
Presets folder. e Navigator panel displays a preview of how each preset would
affect your image. Scroll further down the list using the scroll bar at the left.
Click General - Punch. e General - Punch preset adds depth and improves
the perceived sharpness of the photo by increasing the Clarity and Vibrance
values, whilst leaving your Tone settings unchanged.
Tip: If the left panel
group doesn’t appear
and disappear auto-
matically, press the F7
key to manually show
and hide it; you’ll learn
how to set the behavior
of the panel groups in
Lesson 2, “Introducing
the Workspace.”
ptg
ADOBE PHOTOSHOP LIGHTROOM 3 CLASSROOM IN A BOOK 37
By comparing the Before and After images, you can see how dramatically you’ve
improved the picture with just a few clicks.
ere’s much more to learn about the tools and features in the Develop module,
but we’ll leave that for later. For now you’ll straighten this slightly tilted photo, and
then crop it.
Using the Crop Overlay tool
1 Press D on your keyboard to activate the Loupe view in the Develop module,
and then press the F7 key to show the left panel group again.
2 Click the Crop Overlay Tool button
( ),
located below the Histogram in the right
panel group. e Crop Overlay Tool enables
you to both crop and straighten your image.
3 Additional controls are now available below
the Crop Overlay Tool button. Click to
select the Straighten tool
( ). e pointer
changes to a cross-hair, and the spirit level
icon of the Straighten tool follows your
movement across the preview.
#
Note: For the
purposes of this illustra-
tion, the Lightroom
Presets menu has been
abridged. You’ll actually
find many more varied
and versatile develop
presets listed.
ptg
38 LESSON 1 A Quick Tour of Photoshop Lightroom
4 Look for a line in the image that
should be either true horizontal or
vertical. For this image we can use
the vertical axis that runs through
the center of the portal and the
hanging lights.
Starting at the apex of the portal,
drag downward with the Straighten
tool, aligning the white plumb line
with the lights.
Release the mouse button; the image
is rotated so that your plumb line
becomes vertical, and the Straighten
tool returns to its tool well in the
Crop Overlay Tool controls.
e image is now straight, but it needs
to be cropped slightly so that the round
opening above the portal is centered in the frame. To crop an image you can either
use the Crop Frame tool—located above the Straighten tool—or simply drag the
handles of the cropping rectangle already overlaid on your image, as you’ll do next.
5 Drag the left handle of the cropping
rectangle slightly to the right so that
the oval opening in the image sits
centered in the picture frame.
6 (Optional) While you’re in the
process of cropping your image,
press the L key on your keyboard
(Window > Lights Out > Lights
Dim) to dim everything around the
cropping rectangle. Press L again
to darken the workspace altogether
(Lights Off). Now press L a third
time to return to normal Light
Mode (Lights On). Choose a differ-
ent grid overlay from the Tools >
Crop Guide Overlay menu, or turn
the grid off altogether by choosing
Tools > Tool Overlay > Never Show.
7 When you’re done, exit the Crop Overlay mode by clicking the Close button in
the lower right corner of the panel with the crop tool controls.
Tip: You can crop
the image either by
dragging any of the
six handles on the
cropping rectangle,
or by dragging the
image itself to change
its position within the
cropping rectangle. To
maintain the original
aspect ratio of the
image when you crop it,
make sure that Original
is selected from the
cropping Aspect menu.
ptg
ADOBE PHOTOSHOP LIGHTROOM 3 CLASSROOM IN A BOOK 39
Correcting lens distortion
e combination of perspective and the characteristics of the lens you use to cap-
ture a photograph may result in any of several types of distortion in an image.
First we’ll look at keystone distortion, which occurs when an object is photographed
from an angle rather than from a straight-on view. You can see keystone distortion
in a picture of a tall building taken from ground level—the edges of the building
appear closer to each other at the top than they do at the bottom.
1 Expand the Lens Corrections panel and click Manual at the top of the panel.
2 Drag the Vertical slider to the left to set a value of -80.
3 Undo the last step
is image also shows barrel distortion—a lens
distortion effect that causes straight lines to
bow out toward the edges of the image. e
opposite of this effect is known as pincushion
distortion—where straight lines bend inward.
This image is a particu-
larly extreme example,
but the adjustment we
made might be accept-
able if you intended to
crop the shot to feature
the central portal. You
can see that the change
has given the image a
very different feel; all
of the distortion sliders
can be used not only to
“correct” an image, but
also to create effects.
ptg
40 LESSON 1 A Quick Tour of Photoshop Lightroom
4 In the Lens Corrections panel, drag the Distortion slider to the extreme left, and
then to the right to see the effect on the image. To effectively correct the barrel
distortion making the pillars in our image curve outwards, set the value to 40.
e edges of the image are drawn inwards, leaving curved gray areas showing on all
four sides. ese artifacts can be cropped automatically.
5 Click the checkbox just below the five Transform sliders to activate the
Constrain Crop option.
6 Undo the last two steps and experiment with the other four Transform sliders,
with and without the Constrain Crop option. Try combinations of settings.
ptg
ADOBE PHOTOSHOP LIGHTROOM 3 CLASSROOM IN A BOOK 41
Using Fill Light
In a previous exercise you adjusted the Recovery control to darken highlights. For
this exercise you will use the Fill Light feature to lighten areas that are too dark
without affecting the rest of the tonal range.
1 If You are still in Before /After view, click the Loupe view button in the Toolbar.
Press F6 to show the Filmstrip; then click to select the photo DSC_0265.JPG.
2 Collapse the Lens Corrections panel or scroll upwards in the right panel group
to see the Basic panel. In the Basic panel, drag the Fill Light slider to the right
until you see the lost detail reappear in the marble on the side of the plinth; we
set a value of 70.
The statue at the right
of the image is much
too dark—but you may
be surprised how much
detail is still available
in the image data and
how easily it can be
retrieved and enhanced
by yet another powerful
Lightroom feature.
ptg
42 LESSON 1 A Quick Tour of Photoshop Lightroom
Adjusting the Exposure and Blacks settings
Although there is much more detail visible, the photo now appears a little dull
overall. In this exercise you’ll improve the tonal range—the spread between dark
and light tones—without losing the gains you made in the last exercise.
A glance at the histogram at the top of the right
panel group make the reason for the “flat” look
of the photo quite clear: there is a lack of image
data at both ends of the curve.
1 In the Basic panel, drag the Exposure slider to the right, or type in the text
box, to set a value of 0.5. Note the change in the histogram. Now watch the
histogram as you set the Blacks value to 10.
2 In the History panel in the left panel group, right-click / Control-click the entry
for the Fill Light adjustment you made in the previous exercise and choose Copy
History Step Settings To Before from the context menu. is sets the Fill Light
step as the Before image for the Before & After view.
3 From the menu beside the Before/After button in the Toolbar, choose
Before/After Top/Bottom to assess the results of the adjustments you have
made in this exercise.
is short exercise completes the section of this lesson that deals with the Develop
module. Lesson 6, “Developing and Editing,” will cover the Develop module in
much more detail.
#
Note: You’ll get even
better results with the
tools in the Develop
module when working
with Raw images.
ptg
ADOBE PHOTOSHOP LIGHTROOM 3 CLASSROOM IN A BOOK 43
Sharing your work
Now that you’ve edited and enhanced your photos, the next step is to present them
to your client, share them with your friends and family, or display them for the
world to see on a photo-sharing website or in your own web gallery. In Lightroom,
it takes only seconds to create a sophisticated slideshow, customize a print layout,
publish your photos online, or generate a stylish interactive gallery ready to be
uploaded directly to your web server from within Lightroom.
In the next exercise, you’ll use the images from your collection to create a web
gallery, with just a few clicks. Lesson 7, “Creating Slideshows,” Lesson 8, “Printing
Images,” and Lesson 9, “Publishing your Photos” will provide much more detail on
the many Lightroom tools and features that make it simple to create stylish presen-
tations, layouts, and galleries to showcase your photos.
Whether you’re working on a slideshow, a print layout, or a web presentation, the
workflow follows the same basic steps. You start by creating an image collection;
then choose a preset template, customize the settings, preview your work, and
generate the appropriate output—whether that’s a printed page, a slideshow in PDF
or video format, or an interactive web gallery ready to upload to a server.
Exploring the Web module
You should create a new collection for each presentation. Your layouts and settings
will be saved with the collection so you can return at any time to refine or add to
your work or to tweak the output settings. For this exercise you’ll use the collection
you created earlier in this lesson.
1 Click Web in the Module Picker to switch to the Web module.
2 In the left panel group, collapse the Template
Browser panel, or scroll down, if necessary, to see
the Collections panel. Ensure that the collection
My First Collection is selected in the list.
3 From the Use menu in the Toolbar, choose All Filmstrip Photos.
4 Press the F6 key to hide the Filmstrip.
Tip: As you create
more collections, you
can manage them
in the Collections
panel. Group related
collections—all
those assembled for
presentations made to
a particular client, for
example—as nested
subfolders.
ptg
44 LESSON 1 A Quick Tour of Photoshop Lightroom
e Gallery Editor view shows a preview of how your images will look in a web gal-
lery. You can now choose a new gallery template, and quickly customize the design
and layout.
5 In the left panel group, scroll up, if necessary, so that you can see the Template
Browser panel. Move the pointer slowly down the list of gallery templates in
the Lightroom Templates folder; the Navigator panel displays a preview of each
layout. Click a template in the browser to see your photos previewed in that
layout in the Gallery Editor view. Choose the template named “HTML gallery
(default).” e Layout Style panel in the right panel group reflects your choice.
6 e preview in the Gallery Editor view functions exactly as your published web
gallery will. Click a thumbnail to see a larger version of the image. Click the
Previous and Next buttons to navigate through the collection. Click the Index
button to return to the first page.
You can customize the text that appears on the HTML pages, and the design of
your gallery, using the various panels in the right panel group. You’ll examine these
in more detail in Lesson 9, “Publishing your Photos.”
As well as the templates available in the Template Browser, you can also select
from website templates developed by Airtight Interactive. ese templates are not
located in the Template Browser; you’ll find them in the Layout Style panel at the
top of the right panel group.
#
Note: For the
purposes of this illustra-
tion, the Lightroom
Templates menu has
been abridged. You’ll
actually find many more
varied and versatile web
gallery designs listed.
ptg
ADOBE PHOTOSHOP LIGHTROOM 3 CLASSROOM IN A BOOK 45
7 In the Layout Style panel, choose the Airtight PostcardViewer template. An
animated intro scatters your images across the screen as if they were postcards.
8 Click a postcard for a closer look. Click again to return to the index page.
Previewing in a browser
Of course, the Airtight galleries work not only in Lightroom but also in your regu-
lar web browser.
1 Choose Web > Preview In Browser or click the Preview In Browser button
below the left panel group.
Lightroom will generate the necessary files in a temporary location on your hard
disk and then launch your default web browser to display the website. While the
files are being generated, a progress bar is displayed at the top left of the workspace.
2 e Airtight PostcardViewer requires that Adobe Flash is installed on your
system. If your web browser displays a notification as shown in the illustration
at the top of the facing page, do the following:
t If you don’t yet have Adobe Flash, click Get Adobe Flash and follow the
installation instructions.
t Click the link Click To View Gallery.
ptg
46 LESSON 1 A Quick Tour of Photoshop Lightroom
3 Depending on the security settings on your computer, you might also see
a notification concerning running scripts or ActiveX controls. Click that
notification, and a menu will appear—choose Allow Blocked Content.
4 Finally, click Yes in the Security Warning dialog box.
5 Your browser will play the scattering postcards animation, and present your
gallery just as you saw it previewed in Lightroom. Click a thumbnail to see an
enlarged view. Use the arrow keys on your keyboard to navigate to the previous,
or next postcard, or to the picture above or below the current view.