Beginning SQL Server 2008 for Developers From Novice to Professional phần 9 potx
Bạn đang xem bản rút gọn của tài liệu. Xem và tải ngay bản đầy đủ của tài liệu tại đây (967.58 KB, 45 trang )
CHAPTER 10 ■ STORED PROCEDURES AND FUNCTIONS
335
Use the Specify Values for Template Parameters
command (Ctrl-Shift-M) to fill in the parameter
values below.
This block of comments will not be included in
the definition of the procedure.
================================================
SET ANSI_NULLS ON
GO
SET QUOTED_IDENTIFIER ON
GO
=============================================
Author: Robin Dewson
Create date: 24 Mar 2008
Description: This is to insert a customer
=============================================
CREATE PROCEDURE apf_InsertCustomer
Add the parameters for the stored procedure here
@FirstName varchar(50) = ,
@LastName varchar(50) =
AS
BEGIN
SET NOCOUNT ON added to prevent extra result sets from
interfering with SELECT statements.
SET NOCOUNT ON;
Insert statements for procedure here
SELECT @FirstName, @LastName
END
GO
6. We can now define the remaining parameters. There are one or two points to make before we progress. First of
all, the parameters can be in any order, although it is best to try and group parameters together. The second point
is that parameters like @CustTitle, @AddressId, @AccountNumber, and @AccountTypeId in this example
are showing the numerical reference values that would come from values defined in a graphical front end. You
may be wondering why the stored procedure is not generating these values from other information passed. For
example, why is the stored procedure not producing the title ID from Mr., Miss, etc.? It is likely that the operator
using the front end had a combo box with a list of possible values to choose from, with IDs corresponding to
titles. In the case of the address, the ID would link back to an external address database, so rather than holding
the whole address, we could receive just the ID selected when the operator used the address lookup. The code
with the remaining parameters is shown here:
CREATE PROCEDURE CustomerDetails.apf_InsertCustomer
Add the parameters for the function here
@FirstName varchar(50) ,
@LastName varchar(50),
@CustTitle int,
@CustInitials nvarchar(10),
@AddressId int,
@AccountNumber nvarchar(15),
@AccountTypeId int
Dewson_958-7.book Page 335 Monday, June 30, 2008 3:01 PM
336
CHAPTER 10
■ STORED PROCEDURES AND FUNCTIONS
7. Moving on to the remaining section of the stored procedure, we will take the values of our parameters and use
these as input to the relevant columns. The remaining code for the stored procedure is as follows:
AS
BEGIN
SET NOCOUNT ON added to prevent extra result sets from
interfering with SELECT statements.
SET NOCOUNT ON;
INSERT INTO CustomerDetails.Customers
(CustomerTitleId,CustomerFirstName,CustomerOtherInitials,
CustomerLastName,AddressId,AccountNumber,AccountType,
ClearedBalance,UnclearedBalance)
VALUES (@CustTitle,@FirstName,@CustInitials,@LastName,
@AddressId,@AccountNumber,@AccountTypeId,0,0)
END
GO
8. When you execute the preceding code, providing you have made no typing mistakes, you should see the fol-
lowing output:
Command(s) completed successfully.
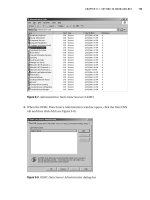
9. This will have added the stored procedure to the database. We can check this. Move back to Object Explorer,
right-click Stored Procedures, and select Refresh. After the refresh, you should see the stored procedure in the
Object Explorer, as shown in Figure 10-4.
Figure 10-4. Object Explorer with the stored procedure listed
10. We have completed our first developer-built stored procedure within the system. Inserting data using the stored
procedure will now be demonstrated so we can see the procedure in action. To execute this stored procedure, we
need to specify its name and pass the data in with parameters. There are two ways we can progress. The first method
is to pass the data across in the same order as the parameters defined within the stored procedure as follows:
CustomerDetails.apf_InsertCustomer 'Henry','Williams',
1,NULL,431,'22067531',1
11. If you execute this, you should see the following output:
(1 row(s) affected)
12. However, there is a downside to this method: if someone alters the stored procedure and places a new parameter
in the middle of the existing list or changes the order of the parameters, or perhaps you don’t know the order of
the parameters, then you are at risk for errors. The preferred method is to name the parameters and the values
as shown in the next example. Notice as well that the order has changed.
Dewson_958-7.book Page 336 Monday, June 30, 2008 3:01 PM
CHAPTER 10 ■ STORED PROCEDURES AND FUNCTIONS
337
CustomerDetails.apf_InsertCustomer @CustTitle=1,@FirstName='Julie',
@CustInitials='A',@LastName='Dewson',@AddressId=6643,
@AccountNumber='SS865',@AccountTypeId=6
13. Again, if you execute this, you should see the same results:
Command(s) completed successfully.)
You can check that the two customers have been entered if you wish. Let’s take a look at two different methods for
executing procedures next.
Different Methods of Executing
There are two different methods of executing a stored procedure. The first is to just call the stored
procedure, as you saw in the preceding example. The second method is to use the EXEC(UTE) command.
Both have the end result of invoking the stored procedure, but which is better for you to use depends
on the particular situation.
No EXEC
It is possible to call a stored procedure without prefixing the stored procedure name with the EXEC(UTE)
statement. However, the stored procedure call must be the first statement within a batch of state-
ments if you wish to exclude this statement.
With EXEC
As we have just indicated, if the stored procedure call is the second or subsequent statement within
a batch, then you must prefix the stored procedure with the EXEC(UTE) statement. On top of this, if
you are calling a stored procedure within another stored procedure, then you will need to prefix the
call with the EXEC(UTE) statement.
Using RETURN
One method of returning a value from a stored procedure to signify an error is to use the RETURN
statement. This statement immediately stops a stored procedure and passes control back out of it.
Therefore, any statements after the RETURN statement will not be executed.
It is not compulsory to have a RETURN statement within your code; it is only really necessary
when you either wish to return an error code or exit from a stored procedure without running any
further code from that point. A logical RETURN is performed at the end of a stored procedure, returning a
value of 0.
By default, 0 is returned if no value is specified after the RETURN statement, which means that the
stored procedure was successful. Any other integer value could mean that an unexpected result occurred
and that you should check the return code, although it is possible to return the number of rows
affected by the stored procedure, for example. Notice that the word “error” wasn’t mentioned, as it
may be valid for a nonzero return code to come out of a stored procedure.
Dewson_958-7.book Page 337 Monday, June 30, 2008 3:01 PM
338
CHAPTER 10
■ STORED PROCEDURES AND FUNCTIONS
In this example, we will create a stored procedure that will return two output parameters back
to the calling procedure or code, indicating the cleared and uncleared balances of a specific
customer.
We will also use the RETURN option to indicate whether the customer ID passed to the stored
procedure finds no rows. Note that this is not an error, as the stored procedure code will be working
as expected.
So you are probably wondering when to use output parameters and when to use RETURN. Output
parameters are used to return information back to a calling set of code and can handle any data type.
On the other hand, a RETURN can only return an integer numeric value and is used more often for indi-
cating success or failure.
Try It Out: Using RETURN and Output Parameters
1. The Template Explorer contains a template set up for output parameters. Navigate to this template, shown in
Figure 10-5, and double-click it.
Figure 10-5. Template Explorer with the OUTPUT stored procedure
2. This will open up a new Query Editor pane with the basics of the relevant stored procedure, which is shown,
reformatted, in the following code block. Take a moment to peruse this code. First of all, the first batch within the
template sets up checks to see whether the stored procedure already exists, and if it does, deletes the procedure
through the DROP PROCEDURE command. After running DROP PROCEDURE, just like after dropping any object,
all of the permissions associated with that object are lost when we re-create it as we discussed earlier.
===============================================
Create stored procedure with OUTPUT parameters
===============================================
Drop stored procedure if it already exists
IF EXISTS (
SELECT *
FROM INFORMATION_SCHEMA.ROUTINES
WHERE SPECIFIC_SCHEMA = N'<Schema_Name, sysname, Schema_Name>'
AND SPECIFIC_NAME = N'<Procedure_Name, sysname, Procedure_Name>'
)
DROP PROCEDURE <Schema_Name, sysname, Schema_Name>.
<Procedure_Name, sysname, Procedure_Name>
GO
CREATE PROCEDURE <Schema_Name, sysname, Schema_Name>.
<Procedure_Name, sysname, Procedure_Name>
<@param1, sysname, @p1> <datatype_for_param1, , int> =
<default_value_for_param1, , 0>,
<@param2, sysname, @p2> <datatype_for_param2, , int> OUTPUT
AS
SELECT @p2 = @p2 + @p1
Dewson_958-7.book Page 338 Monday, June 30, 2008 3:01 PM
CHAPTER 10 ■ STORED PROCEDURES AND FUNCTIONS
339
GO
=============================================
Example to execute the stored procedure
=============================================
DECLARE <@variable_for_output_parameter, sysname, @p2_output>
<datatype_for_output_parameter, , int>
EXECUTE <Schema_Name, sysname, Schema_Name>.
<Procedure_Name, sysname, Procedure_Name> <value_for_param1, , 1>,
<@variable_for_output_parameter, sysname, @p2_output> OUTPUT
SELECT <@variable_for_output_parameter, sysname, @p2_output>
GO
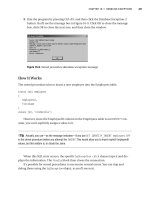
3. Now that we have seen the code, it is time to update the template parameters. Again, we find that the template
is not ideal for our final solution, as we only have one input parameter and two output parameters. However, we
have populated the template parameters we need. This stored procedure will belong to the CustomerDetails
schema. We have one integer input parameter for the customer ID, followed by the first of our output parameters
for cleared balances. Once you have entered these settings, as shown in Figure 10-6, click OK.
Figure 10-6. Template values for the OUTPUT stored procedure
4. Let’s look at the code that was generated. The first section of code checks whether the stored procedure exists.
If it does, then we delete it using the DROP PROCEDURE statement.
===============================================
Create stored procedure with OUTPUT parameters
===============================================
Drop stored procedure if it already exists
IF EXISTS (
SELECT *
FROM INFORMATION_SCHEMA.ROUTINES
WHERE SPECIFIC_SCHEMA = N'CustomerDetails'
AND SPECIFIC_NAME = N'apf_CustBalances'
)
DROP PROCEDURE CustomerDetails.apf_CustBalances
GO
Dewson_958-7.book Page 339 Monday, June 30, 2008 3:01 PM
340
CHAPTER 10
■ STORED PROCEDURES AND FUNCTIONS
5. Move on to the second section, which creates the contents of the stored procedure; we’ll go through each part
of it in turn. This stored procedure takes three parameters: an input parameter of @CustId, and two output
parameters that will be passed back to either another stored procedure or a program, perhaps written in C#, etc.
Don’t worry, it is possible to use Query Editor to see the value of the output parameter. When defining parameters
in a stored procedure, there is no need to specify that a parameter is set for input, as this is the default; however,
if we do need to define a parameter as an output parameter, we have to insert OUTPUT as a suffix to each parameter.
■Tip If we define an OUTPUT parameter but do not define a value within the stored procedure, it will have a value
of NULL.
CREATE PROCEDURE CustomerDetails.apf_CustBalances
@CustId int,
@ClearedBalance money OUTPUT, @UnclearedBalance money OUTPUT
AS
6. Take a look at the next section of code, which is very similar to what we have covered several times earlier in the
book where we are assigning values to variables:
SELECT @ClearedBalance = ClearedBalance, @UnclearedBalance = UnclearedBalance
FROM Customers
WHERE CustomerId = @CustId
7. The final section of the stored procedure returns a value from a system global variable, @@ERROR. We’ll look at
this variable in the next chapter, but in essence, this variable returns a number if an error occurred. From this, the
calling code can tell whether there have been problems and can then decide whether to ignore any values in the
OUTPUT parameter.
RETURN @@Error
GO
8. This completes the stored procedure definition. The template continues defining how to execute the stored pro-
cedure. The first part of this section defines the variables that hold the output values and the return value. We do
not need to define a variable for the input value, although you could if it was required. Then we move to the
EXECUTE section of code. When a value is returned from a stored procedure, it is set on the left-hand side of the
stored procedure call and is not a parameter value. Then the stored procedure is defined with the three param-
eters. Note that each output parameter has to have the OUTPUT keyword after it. The final section of the code is
a SELECT statement displaying the values returned and the output parameter.
=============================================
Example to execute the stored procedure
=============================================
DECLARE @ClearedBalance Money, @UnclearedBalance Money
DECLARE @RetVal int
EXECUTE @RetVal=CustomerDetails.apf_CustBalances 1,
@ClearedBalance OUTPUT,
@UnclearedBalance OUTPUT
SELECT @RetVal AS ReturnValue, @ClearedBalance AS ClearedBalance,
@UnclearedBalance AS UnclearedBalance
GO
Dewson_958-7.book Page 340 Monday, June 30, 2008 3:01 PM
CHAPTER 10 ■ STORED PROCEDURES AND FUNCTIONS
341
9. Now that the template has been altered with the changes we need, execute the template by pressing Ctrl+E or
F5 or clicking the execute button on the toolbar. This will create the stored procedure and run the examples at the
end to demonstrate the procedure. Of course, we can run this section of code as many times as we want because the
whole scenario, from dropping and losing the stored procedure through to re-creating the stored procedure, is all
there, ready for us. The stored procedure will pass back its output parameter value to the @ClearedBalance
and @UnclearedBalance variables defined within the execution batch and the return value to the @RetVal
variable. From there, once the variables are set, the values can be printed out using a SELECT statement. This
will produce the output shown in Figure 10-7 in the results pane.
Figure 10-7. Results after running the OUTPUT stored procedure
We have now built two very basic stored procedures in which we are performing an INSERT and a SELECT. Next we look
at control of flow.
Controlling the Flow
When working on a stored procedure, there will be times when it is necessary to control the flow of
information through it. The main control of flow is handled with an IF ELSE statement. You can
also control the flow with a WHILE BREAK statement.
■Note The GOTO statement can also control the flow of a stored procedure. You can use this statement to jump
to a label within a stored procedure, but this can be a dangerous practice and really is something that should be
avoided. For example, it might be better to nest the stored procedure calls.
Controlling the flow through a stored procedure will probably be required when a procedure
does anything more than working with one T-SQL statement. The flow will depend on your proce-
dure taking an expression and making a true or false decision, and then taking two separate actions
depending on the answer from the decision.
IF . . . ELSE
At times, a logical expression will need to be evaluated that results in either a true or false answer.
This is where an IF ELSE statement is needed. There are many ways of making a true or false condi-
tion, and most of the possibilities involve relational operators such as <, >, =, and NOT; however, these
can be combined with string functions, other mathematical equations, comparisons between values
in local variables, or even system-wide variables. It is also possible to place a SELECT statement within an
IF ELSE block, as long as a single value is returned.
A basic IF ELSE would perhaps look like the following:
IF A=B
Statement when True
ELSE
Statement when False
Dewson_958-7.book Page 341 Monday, June 30, 2008 3:01 PM
342
CHAPTER 10
■ STORED PROCEDURES AND FUNCTIONS
IF ELSE statements can also be nested and would look like the following; this example also
shows you how to include a SELECT statement within an IF decision:
IF A=B
IF (SELECT ClearedBalance FROM Customers WHERE CustomerId = 1) > $20000
Statement2 when True
ELSE
Statement2 when False
ELSE
Statement when False
As you can see, there is only one statement within each of the IF ELSE blocks. If you wish to
have more than one line of executable code after the IF or the ELSE, you must include another control-of-
flow statement, the BEGIN END block. Before we can try this out, let’s take a look at how to code for
multiple statements within an IF ELSE block.
BEGIN . . . END
If you wish to execute more than one statement in the IF or ELSE code block, you need to batch the
statements up. To batch statements together within an IF ELSE, you must surround them with a
BEGIN END block. If you try to have more than one statement after the IF, the second and subse-
quent statements will run no matter what the setting of the IF statement is.
So if you have
DECLARE @VarTest
SET @VarTest = 2
IF @VarTest=1
SELECT 1
SELECT 2
then the SELECT 2 statement would run no matter what value you have for @VarTest. If you only want
SELECT 2 to run when @VarTest is 1, then you would code the example, thus placing the code you
want to run within the BEGIN END block.
DECLARE @VarTest
SET @VarTest = 2
IF @VarTest=1
BEGIN
SELECT 1
SELECT 2
END
If you use an ELSE statement after a second or subsequent statement after an IF that has
no BEGIN END block, you would get an error message. Therefore, the only way around this is
to use BEGIN END.
WHILE . . . BREAK Statement
The WHILE BREAK statement is a method of looping around the same section of code from zero to
multiple times based on the answer from a Boolean test condition, or until explicitly informed to exit
via the keyword BREAK.
Dewson_958-7.book Page 342 Monday, June 30, 2008 3:01 PM
CHAPTER 10 ■ STORED PROCEDURES AND FUNCTIONS
343
The syntax for this command is as follows:
WHILE Boolean_expression
{ sql_statement | statement_block }
[ BREAK ]
{ sql_statement | statement_block }
[ CONTINUE ]
{ sql_statement | statement_block }
The code defined for the WHILE statement will execute while the Boolean expression returns a
value of True. You can have other control-of-flow statements such as an IF ELSE block within your
WHILE block. This is where BREAK and CONTINUE could be used if required. You may wish to test a condi-
tion and, if it returns a particular result, BREAK the loop and exit the WHILE block. The other option that
can be used is the CONTINUE statement. This moves processing straight to the WHILE statement again
and will stop any execution of code that is defined after it. The best way to illustrate these concepts
is to show a simple example of these three options in action.
Try It Out: WHILE BREAK
1. The first option demonstrates how to build a WHILE loop and then test the value of a variable. If the test returns
True, we will break out of the loop; if it returns False, we will continue processing. Within the example, there
are two SELECT statements before and after an IF ELSE statement. In this example, the first SELECT will
show the values of the variables, but the IF test will either stop the loop via BREAK or will move the code back
to the WHILE statement via the CONTINUE statement. Either of these actions will mean that the second SELECT
will not execute.
DECLARE @LoopCount int, @TestCount int
SET @LoopCount = 0
SET @TestCount = 0
WHILE @LoopCount < 20
BEGIN
SET @LoopCount = @LoopCount + 1
SET @TestCount = @TestCount + 1
SELECT @LoopCount, @TestCount
IF @TestCount > 10
BREAK
ELSE
CONTINUE
SELECT @LoopCount, @TestCount
END
2. When the code is executed, we don’t actually make it around the 20 loops due to the value of @TestCount
causing the break. The output is shown in Figure 10-8.
Dewson_958-7.book Page 343 Monday, June 30, 2008 3:01 PM
344
CHAPTER 10
■ STORED PROCEDURES AND FUNCTIONS
Figure 10-8. WHILE with BREAK and CONTINUE
3. If we change the code to remove the ELSE CONTINUE statement, the second SELECT statement will be executed.
The two rows changed have been highlighted. We are not going to execute the two lines because they have been
commented out by prefixing the code with two hyphens,
DECLARE @LoopCount int, @TestCount int
SET @LoopCount = 0
SET @TestCount = 0
WHILE @LoopCount < 20
BEGIN
SET @LoopCount = @LoopCount + 1
SET @TestCount = @TestCount + 1
SELECT @LoopCount, @TestCount
IF @TestCount > 10
BREAK
ELSE
CONTINUE
SELECT @LoopCount, @TestCount
END
A snapshot of some of the output from this is shown in Figure 10-9.
The third statement we’ll look at in this section is the CASE statement. While not a control-of-flow statement for your
stored procedure, it can control the output displayed based on decisions.
Dewson_958-7.book Page 344 Monday, June 30, 2008 3:01 PM
CHAPTER 10 ■ STORED PROCEDURES AND FUNCTIONS
345
Figure 10-9. WHILE with BREAK only
CASE Statement
When a query has more than a plain true or false answer—in other words, when there are several
potential answers—you should use the CASE statement.
A CASE statement forms a decision-making process within a SELECT or UPDATE statement. It is
possible to set a value for a column within a recordset based on a CASE statement and the resultant
value. Obviously, with this knowledge, a CASE statement cannot form part of a DELETE statement.
Several parts of a CASE statement can be placed within a stored procedure to control the state-
ment executed depending on each scenario. Two different syntax structures exist for the CASE statement
depending on how you want to test a condition or what you want to test. Let’s take a look at all the
parts to the first CASE statement syntax:
CASE expression
WHEN value_matched THEN
statement
[[WHEN value_matched2 THEN]
[Statement2]]
[[ELSE]
[catch_all_code]
END
First of all, you need to define the expression that is to be tested. This could be the value of a variable,
a column value from within the T-SQL statement, or any valid expression within SQL Server. This
expression is then used to determine the values to be matched in each WHEN statement.
You can have as many WHEN statements as you wish within the CASE condition, and you do not
need to cover every condition or possible value that could be placed within the condition. Once a
condition is matched, then only the statements within the appropriate WHEN block will be executed.
Of course, only the WHEN conditions that are defined will be tested. However, you can cover yourself
for any value within the expression that has not been defined within a WHEN statement by using an
Dewson_958-7.book Page 345 Monday, June 30, 2008 3:01 PM
346
CHAPTER 10
■ STORED PROCEDURES AND FUNCTIONS
ELSE condition. This is used as a catchall statement. Any value not matched would drop into the ELSE
condition, and from there you could deal with any scenario that you desire.
The second syntax is where you don’t define the expression prior to testing it and each WHEN
statement performs any test expression you desire.
CASE
WHEN Boolean_expression THEN result_expression
[ n ]
[
ELSE else_result_expression
]
END
As just indicated, CASE statements form part of a SELECT, UPDATE, or INSERT statement, therefore
possibly working on multiple rows of data. As each row is retrieved from the table, the CASE statement
kicks in, and instead of the column value being returned, it is the value from the decision-making
process that is inserted instead. This happens after the data has been retrieved and just before the
rows returned are displayed in the results pane. The actual value is returned initially from the table
and is then validated through the CASE statement; once this is done, the value is discarded if no longer
required.
Now that you are familiar with CASE statements, we can look at them in action.
Try It Out: Using the CASE Statement
1. Our first example will demonstrate the first CASE syntax, where we will take a column and test for a specific
value. The results of this test will determine which action will be performed. We will prepopulate the
TransactionDetails.TransactionTypes table first so that you can see how populating this table and the
CASE statement work.
INSERT INTO TransactionDetails.TransactionTypes
(TransactionDescription,CreditType,AffectCashBalance)
VALUES ('Deposit',1,1)
INSERT INTO TransactionDetails.TransactionTypes
(TransactionDescription,CreditType,AffectCashBalance)
VALUES ('Withdrawal',0,1)
INSERT INTO TransactionDetails.TransactionTypes
(TransactionDescription,CreditType,AffectCashBalance)
VALUES ('BoughtShares',1,0)
SELECT TransactionDescription,
CASE CreditType
WHEN 0 THEN 'Debiting the account'
WHEN 1 THEN 'Crediting the account'
END
FROM TransactionDetails.TransactionTypes
2. Execute this code, and you should see the output shown in Figure 10-10.
Dewson_958-7.book Page 346 Monday, June 30, 2008 3:01 PM
CHAPTER 10 ■ STORED PROCEDURES AND FUNCTIONS
347
Figure 10-10. Simple CASE statement output
3. A customer can have a positive or negative ClearedBalance. The CASE statement that follows will demon-
strate this by showing either In Credit or Overdrawn. In this case, we want to use the second CASE syntax.
We cannot use the first syntax, as we have an operator included within the test and we are not looking for a specific
value. The code is defined as follows:
SELECT CustomerId,
CASE
WHEN ClearedBalance < 0 THEN 'OverDrawn'
WHEN ClearedBalance > 0 THEN ' In Credit'
ELSE 'Flat'
END, ClearedBalance
FROM CustomerDetails.Customers
4. Execute the code. This produces output similar to what you see in Figure 10-11.
Figure 10-11. Searched CASE statement output
Bringing It All Together
Now that you have seen the control-of-flow statements, we can bring all of this together in our most
complex set of code so far. The aim of this stored procedure is to take a “from” and “to” date, which
can be over any period, and return the movement of a particular customer’s transactions that have
affected the cash balance. This mimics your bank statement when it says whether you have spent
more than you have deposited.
This example includes one topic that is not covered until the next chapter: joining data from
more than one table together. For the moment, just accept that when you see the statement JOIN, all
it is doing is taking data from another table and allowing you to work with it.
So let’s build that example.
Dewson_958-7.book Page 347 Monday, June 30, 2008 3:01 PM
348
CHAPTER 10
■ STORED PROCEDURES AND FUNCTIONS
Try It Out: Bringing It All Together
■Note In this example, we are performing a loop around rows of data within a table. This example demonstrates
some of the functionality just covered with decisions and control of flow. SQL Server works best with sets of data,
rather than a row at a time. However, there will be times that row-by-row processing like this happens. In SQL Server
2008, you have the option to write .NET-based stored procedures, and this example would certainly be considered a
candidate for this treatment. Our example works with one row at a time, where you would have a running total of a
customer’s balance so that you can calculate interest to charge or to pay.
1. First of all, let’s create our stored procedure. We have our CREATE PROCEDURE statement that we enter in an
empty Query Editor pane, and then we name the procedure with our three input parameters.
CREATE PROCEDURE CustomerDetails.apf_CustMovement @CustId bigint,
@FromDate datetime, @ToDate datetime
AS
BEGIN
2. We then need three internal variables. This stored procedure will return one row of transactions at a time while
we are still in the date range. As we move through each row, we need to keep a running balance of the amounts
for each transaction. We know that the data in the TransactionDetails.Transactions table has an ascending
TransactionId as each transaction is entered, so the next transaction from the one returned must have a
higher value. Therefore, we can store the transaction ID in a variable called @LastTran and use that in our fil-
tering. Once the variables are declared, we then set them to an initial value. We use @StillCalc as a test for
the WHILE loop. This could be any variable as we are using the CONTINUE and BREAK statements to determine
when we should exit the loop.
DECLARE @RunningBal money, @StillCalc Bit, @LastTran bigint
SELECT @StillCalc = 1, @LastTran = 0, @RunningBal = 0
3. We tell the loop to continue until we get no rows back from our SELECT statement. Once we get no rows, we
know that there are no more transactions in the date range.
WHILE @StillCalc = 1
BEGIN
4. Our more complex SELECT statement will return one row where the TransactionId is greater than the previous
TransactionId returned; the transaction would affect the customer’s cash balance; and the transaction is
between the two dates passed in. If there is a transaction, then we add or subtract the value from the @RunningBal
variable. We use a CASE statement to decide whether we need to make the value a negative value for adding to
the variable.
SELECT TOP 1 @RunningBal = @RunningBal + CASE
WHEN tt.CreditType = 1 THEN t.Amount
ELSE t.Amount * -1 END,
@LastTran = t.TransactionId
FROM CustomerDetails.Customers c
JOIN TransactionDetails.Transactions t ON t.CustomerId = c.CustomerId
JOIN TransactionDetails.TransactionTypes tt ON
tt.TransactionTypeId = t.TransactionType
Dewson_958-7.book Page 348 Monday, June 30, 2008 3:01 PM
CHAPTER 10 ■ STORED PROCEDURES AND FUNCTIONS
349
WHERE t.TransactionId > @LastTran
AND tt.AffectCashBalance = 1
AND DateEntered BETWEEN @FromDate AND @ToDate
ORDER BY DateEntered
5. If we get a row returned, then we continue the loop. Once we get no rows returned, we know that there are no
further transactions in the date range.
IF @@ROWCOUNT > 0
Perform some interest calculation here
CONTINUE
ELSE
BREAK
END
SELECT @RunningBal AS 'End Balance'
END
GO
6. We can now create the stored procedure and test our results. The example is going to check whether Vic McGlynn,
customer ID 1, has had a positive or negative movement on her cash balance in the month of August 2008. The
code to find this out follows. First of all, we insert some TransactionDetails.Transactions records to test
it out. We also prefix the stored procedure with an EXEC(UTE) statement, as this is part of a batch of statements.
INSERT INTO TransactionDetails.Transactions
(CustomerId,TransactionType,DateEntered,Amount,RelatedProductId)
VALUES (1,1,'1 Aug 2008',100.00,1),
(1,1,'3 Aug 2008',75.67,1),
(1,2,'5 Aug 2008',35.20,1),
(1,2,'6 Aug 2008',20.00,1)
EXEC CustomerDetails.apf_CustMovement 1,'1 Aug 2008','31 Aug 2008'
7. Execute the preceding code, which should return a value that we expect, as shown in Figure 10-12.
Figure 10-12. Complex stored procedure output
User-Defined Functions
As you have just seen, a stored procedure takes a set of data, completes the work as required, and
then finishes. It is not possible to take a stored procedure and execute it within, for example, a SELECT
statement. This is where user-defined functions (UDFs) come about. There are two methods of
creating UDFs: through T-SQL or .NET. Both provide the same functionality, which takes a set of
information and produces output that the query invoking the function can further use. UDFs are
very similar to stored procedures, but it is their ability to be used within another query that provides
their power. You have already seen a few system-defined functions within this book, including
GETDATE(), which gets today’s date and time and returns it within a query such as SELECT GETDATE().
Dewson_958-7.book Page 349 Monday, June 30, 2008 3:01 PM
350
CHAPTER 10
■ STORED PROCEDURES AND FUNCTIONS
■Tip If you want to learn more about .NET-based functions, take a look at Pro SQL Server 2005 Assemblies by
Julian Skinner and Robin Dewson (Apress, 2005).
Scalar Functions
Functions come in two types: scalar and table-valued. The following shows the basic syntax to define
a scalar function:
CREATE FUNCTION [ schema_name. ] function_name
( [ { @parameter_name _data_type [ = default ] [ READONLY ] } [ , n ] ] )
RETURNS return_data_type
[ WITH <function_option> [ , n ] ]
[ AS ]
BEGIN
function_body
RETURN scalar_expression
END
Note that zero, one, or more parameters can be passed in to the function. Prefix each parameter
in the definition with the local variable definition @ sign, and define the data type. Every parameter
can be modified within the function as part of the function’s execution, unless you place the keyword
READONLY after the data type. Also, as with stored procedures, it is possible to call a function without
specifying one or more of that function’s parameters. However, you can only do that if the parameters
that you omit have been defined to have default values. In that case, you can call the function with
the keyword DEFAULT in the location that the parameter is expected. The use of default values is
demonstrated within the example that follows.
A scalar function can only return a single value, and the RETURNS clause in the definition defines
the type of data that will be returned. All data types, with the exception of the timestamp data type,
can be returned.
The contents of a function are similar to a stored procedure, with the exceptions already discussed.
You must place a RETURN statement when you want the function to complete and return control to the
calling code.
Table-Valued Functions
The basic syntax for a table-valued function follows. Most of the syntax is similar; however, this time,
you’re returning a TABLE data type, and the data to return is defined in terms of a SELECT statement.
CREATE FUNCTION [ schema_name. ] function_name
( [ { @parameter_name parameter_datatype [ = default ] [ READONLY ] } [ , n ] ]
RETURNS TABLE
[ WITH <function_option> [ , n ] ]
[ AS ]
RETURN [ ( ] select_stmt [ ) ]
A table function is not built in this chapter, but will be completed in Chapter 12, as I want to
show more advanced T-SQL with this functionality, and you need to read Chapter 11 before I can do
that.
Dewson_958-7.book Page 350 Monday, June 30, 2008 3:01 PM
CHAPTER 10 ■ STORED PROCEDURES AND FUNCTIONS
351
■Note It is also possible to define a stored procedure to receive a TABLE data type as an input-only parameter.
Considerations When Building Functions
Functions must be robust. If an error is generated within a function, whether it is from invalid data
being passed in or from errors in the logic, then the function will stop executing at that point, and the
T-SQL calling the function will cancel. A function must also not alter any external resource such as a
table, and it must not execute a system function that alters resources, such as a function that sends
an e-mail. Finally, you need to know whether a function can be used in computed columns.
Once a column is added to a table, there are five Boolean value-based properties that you can
inspect, listed shortly, that are assigned to a function by SQL. The values of the properties can be
checked by using the COLUMNPROPERTY function once the function has been added to a column. However,
once a function has been built, you can check its suitability using the OBJECTPROPERTY function to
check whether it is deterministic. You will see the OBJECTPROPERTY soon.
If you wish to use OBJECTPROPERTY or COLUMNPROPERTY, the function call is the same. The syntax is
as follows:
SELECT COLUMNPROPERTY (OBJECT_ID('schema.table'),
'columnname', 'property')
SELECT OBJECTPROPERTY(OBJECT_ID('schema.object'), 'property')
Here are the five properties you can check against a computed column:
• IsDeterministic: If you call the function and it returns the same value every time, then you
can define the function as being deterministic. GETDATE() is not deterministic, as it returns a
different value each time.
• IsPrecise: A function returns this value to determine if it is precise or imprecise. For example,
an exact number is precise, but a floating-point number is imprecise.
• IsSystemVerified: If SQL Server can determine the values of the first two properties, this will
be set to true; otherwise, it will be set to false.
• SystemDataAccess: This is true if any system information is accessed.
• UserDataAccess: This is true if any user data from the local instance of SQL Server is used.
SQL Server defines whether a column is deterministic and whether the result from the function
produces a precise value or an imprecise value. Also, unless you specify the PERSISTED keyword when
defining a column, the values will not be stored in the table but rather will be recalculated each time
the row is returned. There are, of course, valid scenarios for having the column computed each time,
but you have to be aware that there will be a small performance overhead with this. By defining the
column with the PERSISTED keyword, the value will be stored in the table and will only change when
a value in one of the columns used to perform the calculation alters. So there is a trade-off with space
and speed.
In the following exercise, you will build a scalar function to calculate an amount of interest either
gained or lost based on an amount, an interest rate, and two dates. Once the function is built, you will
then see a simple usage of the function and check its deterministic value. In Chapter 12, when your T-SQL
knowledge is advanced, you will then use this function against the TransactionDetails.Transactions
table to calculate interest for every transaction entered.
Dewson_958-7.book Page 351 Monday, June 30, 2008 3:01 PM
352
CHAPTER 10
■ STORED PROCEDURES AND FUNCTIONS
Try It Out: A Scalar Function to Calculate Interest
1. The first part of creating a function is to define its name, including the schema it will belong to, and then the para-
mater values that will be coming into it. This function will calculate the amount of interest from a defined rate,
and will use two dates for the number of days the interest shall last. The first parameter, the interest rate, has a
default value of 10, defining 10%.
CREATE FUNCTION TransactionDetails.fn_IntCalc
(@InterestRate numeric(6,3)=10,@Amount numeric(18,5),
@FromDate Date, @ToDate Date)
2. Next, you need to define what data type is to be returned. In this instance, it is a numeric data type with up to five
decimal places. This granularity may not be required for you, but it is defined here so that in an audit situation,
accurate global summation of interest can be accrued (recall the example about interest earlier?).
RETURNS numeric(18,5)
3. In this example, EXECUTE AS specifies that the function will execute in the same security context as the calling
code. This security context is determined by the AS CALLER clause. It is possible to alter the security context of
EXECUTE AS to another account. Doing so is ideal when you want to ensure that no matter what the account is
that is connected, the function can be called. Conversely, you can set up a function so that only specific accounts
can execute the code.
WITH EXECUTE AS CALLER
4. Now that the preliminaries have been dealt with, we can move on to building the remainder of the function. A
local variable that will hold the interest is defined using the same data type and size as the RETURNS definition.
Then the variable is set using the calculation required to calculate the interest.
AS
BEGIN
DECLARE @IntCalculated numeric(18,5)
SELECT @IntCalculated = @Amount *
((@InterestRate/100.00) * (DATEDIFF(d,@FromDate, @ToDate) / 365.00))
5. Finally, the RETURN statement returns the calculated value, taking into account whether a NULL value is
being returned.
RETURN(ISNULL(@IntCalculated,0))
END
GO
6. You can now test the function by executing it against a set of values. The interest rate default value demonstrates
how to specify default parameter values when invoking a function. The results are showing in Figure 10-13.
SELECT TransactionDetails.fn_IntCalc(DEFAULT,2000,'Mar 1 2008','Mar 10 2008')
Figure 10-13. Inline function results for interest
Dewson_958-7.book Page 352 Monday, June 30, 2008 3:01 PM
CHAPTER 10 ■ STORED PROCEDURES AND FUNCTIONS
353
7. It is now possible to check if the function is deterministic using the OBJECTPROPERTY function. This returns a
value of 0, or FALSE, because this function returns a different value each time. Therefore, this function could not
be used as a computed column.
SELECT OBJECTPROPERTY(OBJECT_ID('TransactionDetails.fn_IntCalc'),
'IsDeterministic');
GO
In Chapter 12, when you’ll see more advanced T-SQL, this function will be updated to calculate interest for customer trans-
actions. Also in Chapter 12, you will see how to build an inline table-valued function.
Summary
In this chapter, you have met stored procedures and functions, which are collections of T-SQL state-
ments compiled and ready to be executed by SQL Server. You have learned the advantages of a stored
procedure over an ad hoc query, encountered the basic CREATE PROCEDURE and CREATE FUNCTION
syntaxes, and created some simple stored procedures and functions.
The basics of building a stored procedure are very simple and straightforward. Therefore, building
a stored procedure within Query Editor may be as attractive as using a template. As stored procedures are
sets of T-SQL statements combined together, you will tend to find that you build up your query, and
then at the end surround it with a CREATE PROCEDURE statement.
You have seen both in-line and table T-SQL-based functions. To reiterate, it is possible to also
have functions that are written using .NET code, which provides you with more possibilities regarding
functionality and other processing abilities.
Probably the largest area of code creation outside of data manipulation and searching will be
through control-of-flow statements. We will look at other areas, such as error handling, in Chapter 11,
which aims to advance your T-SQL knowledge.
Dewson_958-7.book Page 353 Monday, June 30, 2008 3:01 PM
Dewson_958-7.book Page 354 Monday, June 30, 2008 3:01 PM
355
■ ■ ■
CHAPTER 11
T-SQL Essentials
Now that you know how to build and work with SQL Server objects, and insert, update, and delete
data as well as retrieve it, we can move on to more of the T-SQL essentials required to complete your
programming knowledge.
Potentially the most important area covered by this chapter is error handling. After all, no matter
how good your code is, if it cannot cope when an error occurs, then it will be hard to keep the code
stable and reliable. There will always be times that the unexpected happens, either from strange
input data to something happening in the server. However, this is not the only area of interest. You
will be looking at joining tables together, performing aggregations of data, and grouping data together.
Finally, there will be times that you wish to hold data either in a variable or within a table that you
only want to exist for a short period. Quite a great deal to cover, but this chapter and the next will be
the stepping stones that move you from a novice to a professional developer.
This chapter will therefore look at the following:
• Joining two or more tables to see more informational results
• Having a method of storing information on a temporary basis via variables
• How to hold rows of information in a nonpermanent table
• How to aggregate values
• Organizing output data into groups of relevant information
• Returning unique and distinct values
• Looking at and using system functions
• Error handling: how to create your own errors, trap errors, and make code secure
Using More Than One Table
Throughout this book, the SELECT and UPDATE statements have only dealt with and covered the use of
one table. However, it is possible to have more than one table within our SELECT or UPDATE statement,
but we must keep in mind that the more tables included in the query, the more detrimental the effect
on the query’s performance. When we include subsequent tables, there must be a link of some sort
between the two tables, known as a join. A join will take place between at least one column in one
table and a column from the joining table. The columns involved in the join do not have to be in any
key within the tables involved in the join. However, this is quite uncommon, and if you do find you
are joining tables, then there is a high chance that a relationship exists between them, which would
mean you do require a primary key and a foreign key. This was covered in Chapter 3.
It is possible that one of the columns on one side of the join is actually a concatenation of two
or more columns. As long as the end result is one column, this is acceptable. Also, the two columns
Dewson_958-7.book Page 355 Monday, June 30, 2008 3:01 PM
356
CHAPTER 11
■ T-SQL ESSENTIALS
that are being joined do not have to have the same name, as long as they both have similar data types.
For example, you can join a char with a varchar. What is not acceptable is that one side of the JOIN
names a column and on the other side is a variable or literal that is really a filter that would be found
in a WHERE statement.
Joining two tables together can become quite complicated. The most basic join condition is a
straight join between two tables, which is called an INNER JOIN. An INNER JOIN joins the two tables,
and where there is a join of data using the columns from each of the two tables, then the data is
returned. For example, if there is a share in the shares table that has no price and you are joining the
two tables on the share ID, then you would only see output where there is a share with a share price.
You will see this in action in this chapter.
It is possible to return all the rows from one table where there is no join. This is known as an
OUTER JOIN. Depending on which table you want the rows always to be returned from, this will either
be a LEFT OUTER JOIN or a RIGHT OUTER JOIN. Taking our shares example, we could use an OUTER JOIN
so that even when there is no share price, we can still list the share. This example will also be demon-
strated later in this chapter.
The final type of join is the scariest and most dangerous join. If you wish for every row in one
table to be joined with every row in the joining table, then you would use a CROSS JOIN. So if you had
10 rows in one table and 12 rows in the other table, you would see returned 120 rows of data (10×12).
As you can imagine, this type of join just needs two small tables to produce even a large amount of
output.
Although not the most helpful of syntax demonstrated within the book, the syntax for joining
two tables is as follows:
FROM tablea
[FULL[INNER|OUTER|CROSS]] JOIN tableb
{ON tableb.column1 = tablea.column2 {AND|OR tableb.column }}
The best way to look at the syntax is within a described example. We will use two tables to
demonstrate the inner join in this example: ShareDetails.Shares and ShareDetails.SharePrices.
Joining two tables could not be simpler. All the columns in both tables are available to be
returned through the query, so we can list the columns desired as normal. However, if there are two
columns of the same name, they must be prefixed with the name, or the alias name, of the table from
which the information is derived.
■Note It is recommended that whenever a join does take place, whether the column name is unique or not, all
columns be prefixed with the table or alias name. This saves time if the query is expanded to include other tables,
but it also clarifies exactly where the information is coming from.
Try It Out: Joining Two Tables
1. The first join we will look at is the INNER JOIN. This is where we have two tables, and we want to list all the
values where there is a join. In this case, we want to list all the shares where there is a share price, and we want
to see every share price for that share. Notice that we don’t need to define the word INNER. This is presumed if
nothing else is specified. Also take note that, like columns, we have defined aliases for the table names. This
makes prefixing columns easier. We are joining the two tables on ShareId, as this is the linking column between
the two tables. Enter the following code:
SELECT s.ShareDesc,sp.Price,sp.PriceDate
FROM ShareDetails.Shares s
JOIN ShareDetails.SharePrices sp ON sp.ShareId = s.ShareId
Dewson_958-7.book Page 356 Monday, June 30, 2008 3:01 PM
CHAPTER 11 ■ T-SQL ESSENTIALS
357
2. Once you have executed the code, you should see the output that appears in Figure 11-1. There is no output for
ShareIds 3, 4, and 5, as they have no share price.
Figure 11-1. First inner join
3. We can take this a stage further and filter the rows to only list the share price row that matches the
CurrentPrice in the ShareDetails.Shares table. This could be done by filtering the data on a WHERE
statement, and from a performance perspective it would be better, as neither of these columns are within an
index and there could be a large number of rows for ShareDetails.SharePrices for each share as time
goes on; but for this example, it demonstrates how to add a second column for the join.
SELECT s.ShareDesc,sp.Price,sp.PriceDate
FROM ShareDetails.Shares s
JOIN ShareDetails.SharePrices sp ON sp.ShareId = s.ShareId
AND sp.Price = s.CurrentPrice
4. Execute the preceding code, which returns two rows as shown in Figure 11-2. As you can see, an INNER JOIN
is very straightforward.
Figure 11-2. Inner join with multiple join columns
5. The next join we look at is an OUTER JOIN—more specifically, a LEFT OUTER JOIN. In this instance, we want
to return all the rows in the left table, whether there is any data in the right table or not. The left table in this case
is the ShareDetails.Shares table, as it is the left named table of the two we are concerned with. Enter the
following code:
SELECT s.ShareDesc,sp.Price,sp.PriceDate
FROM ShareDetails.Shares s
LEFT OUTER JOIN ShareDetails.SharePrices sp ON sp.ShareId = s.ShareId
6. Once you execute this code, you should see the missing shares from the previous example listed, as you see in
Figure 11-3. Notice that where no data exists in the ShareDetails.SharePrices table, the values are dis-
played as NULL. OUTER JOINS are a good tool when checking other queries. For example, the results in Figure 11-3
demonstrate that quite rightly, the bottom three shares should have been missing in the first example, as they did
not meet our criteria. This may not be so obvious when there are large volumes of data, though.
Dewson_958-7.book Page 357 Monday, June 30, 2008 3:01 PM
358
CHAPTER 11
■ T-SQL ESSENTIALS
Figure 11-3. Left outer join
7. To get around this problem, we can add a WHERE statement that lists those shares that do not have an item in
ShareDetails.SharePrices. This is one method of achieving our goal. We will look at the other later in the
chapter when we examine EXISTS. We know that when there is a missing share price, Price and PriceDate
will be NULL. It is also necessary to know that Price cannot have a NULL value inserted in any rows of data. If
it could, then we would need to use another method, such as EXISTS.
SELECT s.ShareDesc,sp.Price,sp.PriceDate
FROM ShareDetails.Shares s
LEFT OUTER JOIN ShareDetails.SharePrices sp ON sp.ShareId = s.ShareId
WHERE sp.Price IS NULL
8. This time we will only have three rows returned, as you see in Figure 11-4.
Figure 11-4. Left outer join for no share prices
9. The next example is a RIGHT OUTER JOIN. Here we expect the table on the RIGHT to return rows where there
are no entries on the table in the left. In our example, such a scenario does not exist, as it would break referential
integrity; however, we can swap the tables around, which shows the same results as our first LEFT OUTER
JOIN example. Take note that you don’t have to alter the column order after the ON, as it is the table definition
that defines the left and right tables.
SELECT s.ShareDesc,sp.Price,sp.PriceDate
FROM ShareDetails.SharePrices sp
RIGHT OUTER JOIN ShareDetails.Shares s ON sp.ShareId = s.ShareId
10. Executing this code gives you the results shown in Figure 11-5.
Dewson_958-7.book Page 358 Monday, June 30, 2008 3:01 PM
CHAPTER 11 ■ T-SQL ESSENTIALS
359
Figure 11-5. Right outer join
11. If you want a LEFT OUTER JOIN and a RIGHT OUTER JOIN to be available at the same time, then you need
to choose the FULL OUTER JOIN. This returns rows from both the left and right tables if there are no matching
rows in the other table. So to clarify, if there is a row in the left table but no match in the right table, the row from
the left table will be returned with NULL values in the columns from the right table, and vice versa. This time we
are going to break referential integrity and insert a share price with no share. We will then delete the row.
INSERT INTO ShareDetails.SharePrices
(ShareId, Price, PriceDate)
VALUES (99999,12.34,'1 Aug 2008 10:10AM')
SELECT s.ShareDesc,sp.Price,sp.PriceDate
FROM ShareDetails.SharePrices sp
FULL OUTER JOIN ShareDetails.Shares s ON sp.ShareId = s.ShareId
12. Once the preceding code has been executed, you will see the results that appear in Figure 11-6. Notice that we
have rows from the ShareDetails.Shares table when there is no share price, and vice versa.
Figure 11-6. Full outer join
Dewson_958-7.book Page 359 Monday, June 30, 2008 3:01 PM