Adobe Illustrator CS5 bible PHẦN 3 doc
Bạn đang xem bản rút gọn của tài liệu. Xem và tải ngay bản đầy đủ của tài liệu tại đây (1.18 MB, 68 trang )
Chapter 4: Understanding Drawing and Painting Techniques
109
l
Direction. This option lets you choose from four directions. The directions are relative to
how you drag the Paintbrush.
l
Flip. This option lets you flip your object along or across the path.
l
Colorization. You have four Colorization choices in the Method pop-up menu: None,
Tints, Tints and Shades, and Hue Shift. The key color is the color that the colorization
uses as a base. Colorization and colorization tips can be found later in this chapter.
FIGURE 4.34
The Art Brush Options dialog box allows you to create your own Art brush.
Creating tiles using the Pattern brush
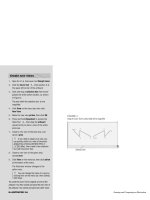
The Pattern brush repeats a tiled object along a path. The Pattern brush can have tiles to display
the sides, inner corner, outer corner, beginning, and end. If you think of a Pattern brush as you
would a regular pattern tile but keep in mind the corners, you’ll have no problem creating your
own interesting Pattern brushes. Figure 4.35 shows an example of one of the Pattern brushes.
These are your choices in the Pattern Brush Options dialog box, as shown in Figure 4.36:
l
Name. Type a new name or change an existing name (up to 30 characters).
l
Scale. This option allows you to increase or decrease the size of the pattern relative to its
original size.
08_584750-ch04.indd 10908_584750-ch04.indd 109 6/3/10 7:44 PM6/3/10 7:44 PM
Part I: Illustrator Basics
110
l
Spacing. This is the space between each tile of the pattern.
l
Tile buttons. This is where you choose which of the five tiles you want to create.
l
Flip. This option lets you flip the pattern along and/or across the path.
l
Fit. In this option, you can choose Stretch to fit, Add space to fit, or Approximate path.
Stretch lengthens or shortens a tile to fit your object. Add space adds a blank space
between the tiles to fit the path proportionately. Approximate path makes the tile fit as
close to the original path without altering the tiles.
l
Colorization. You have four Colorization choices in the Method popup menu: None,
Tints, Tints and Shades, and Hue Shift. The key color is the color that the colorization
uses as a base. Colorization and colorization tips can be found later in this chapter.
The list in the Pattern Brush Options dialog box allows you to choose from four existing patterns
instead of the selected artwork: None, Original, Polka Dot Pattern, and Waves Pattern. Any pattern
in your document is listed here.
FIGURE 4.35
The Pattern brush draws a stroke by using a repeating pattern.
08_584750-ch04.indd 11008_584750-ch04.indd 110 6/3/10 7:44 PM6/3/10 7:44 PM
Chapter 4: Understanding Drawing and Painting Techniques
111
FIGURE 4.36
The Pattern Brush Options dialog box allows you to create some very interesting brushes.
Painting with the Bristle Brush
The Bristle Brush tool attempts to mimic a realistic “natural edge” brush with soft brush edges. It
works in a very similar fashion to the Calligraphic Brush. “Attempts” because it doesn’t really
enable a natural brush look, but rather a slightly fuzzy, blurred, out-of-bounds look to your art-
work. If you want that sort of look, the Bristle Brush is most definitely for you, but Illustrator has
never been a tool for natural media artists, and that doesn’t change because of this tool (in fact, it
will cause Painter aficionados to roll their eyes repeatedly while waiting for the slower-than-molasses
effect to rasterize on-screen). Figure 4.37 shows a Bristle-brushed word (hint: don’t use a fill for
text after you’ve outlined it . . . just a 1-point stroke).
FIGURE 4.37
Created by outlining type, setting the Fill to None and the Stroke to 1 pt., and then applying a generic
Bristle Brush.
08_584750-ch04.indd 11108_584750-ch04.indd 111 6/3/10 7:45 PM6/3/10 7:45 PM
Part I: Illustrator Basics
112
Here are your choices for customizing a Bristle Brush (these options are all available in the Bristle
Brush options dialog box, shown in Figure 4.38):
l
Name. Type a new name or change an existing name (up to 30 characters).
l
Shape. Pick from one of ten different brush shapes.
l
Size. The width of the brush (at 1 pt. stroke).
l
Bristle Length. This controls how accurate the brush is.
l
Bristle Density. How sharp the blurry edge is.
l
Bristle Thickness. This is the amount of detail in the “roughness” of the edges.
l
Paint Opacity. This controls the opacity level of the brush.
l
Stiffness. This controls how far from the edges the brush edge strays.
FIGURE 4.38
The Bristle Brush options dialog box
Making a custom brush
You can customize a brush in several ways. If you like a brush but not all aspects of it, you can
duplicate that brush (by choosing Duplicate Brush from the Brushes panel menu) and edit its
options to make it as you like. To edit a brush, double-click the brush, choose Brush Options from
the popup menu, or click the Brush Options button at the bottom of the Brushes panel. You can
also create a brush by choosing New Brush from the pop-up menu or clicking the New Brush but-
ton at the bottom of the Brushes panel. This displays a dialog box asking you to choose the type of
brush you want to create.
Note
You can create a Calligraphic brush by filling in the text fields of the Calligraphic Brush dialog box. To create
any of the other brushes, you must have your art drawn first and then choose New Brush.
08_584750-ch04.indd 11208_584750-ch04.indd 112 6/3/10 7:45 PM6/3/10 7:45 PM
Chapter 4: Understanding Drawing and Painting Techniques
113
To create your own brush design, first create the object that you want to use. Next, select all the
parts of the object that you want as a brush and then choose New Brush from the Brushes panel’s
popup menu. Then choose the type of brush you want to create. The Brush Options dialog box
opens, and you see your new design there. Now all you have to do is set the rest of the options,
and you’re ready to use your new brush.
Understanding colorization tips
The Tips button in the Art, Scatter, and Pattern Brush dialog boxes displays a dialog box explain-
ing the different colorization options. Figure 4.39 shows the Colorization Tips dialog box, which
has four areas of colorization: None, Tints, Tints and Shades, and Hue Shift.
To see how the Colorization options work, first create four copies of a brush. For the first copy,
use the default of None. For the next three copies, change the stroke color (you won’t see anything
happen yet). Double-click the second copy and then choose Tint. Apply the stroke when asked to
do so in the dialog box. The color should change at this point. Double-click the third copy and
then choose Tints and Shades. Double-click the last copy and then choose Hue Shift. All the copies
should look different.
FIGURE 4.39
The Colorization Tips dialog box provides visual examples of the various colorization options.
08_584750-ch04.indd 11308_584750-ch04.indd 113 6/3/10 7:45 PM6/3/10 7:45 PM
Part I: Illustrator Basics
114
Checking out the Brush libraries
The Brush library that displays when you choose the Brushes panel is the default library. You have
additional libraries from which to choose. Adobe has really come up with some cool brushes for
your creative pleasures. The other libraries are found under the Window menu, as shown in
Figure 4.40.
To use a brush from another Brush library, choose the brush you want from the scrolling list.
Figure 4.41 shows just one of the many libraries that are included with Illustrator.
FIGURE 4.40
The Brush Library submenu in the Brushes palette contains many different libraries.
08_584750-ch04.indd 11408_584750-ch04.indd 114 6/3/10 7:45 PM6/3/10 7:45 PM
Chapter 4: Understanding Drawing and Painting Techniques
115
FIGURE 4.41
The Brush libraries include a variety of interesting brushes you can use.
08_584750-ch04.indd 11508_584750-ch04.indd 115 6/3/10 7:45 PM6/3/10 7:45 PM
Part I: Illustrator Basics
116
Using Variable Width Strokes
Another way to simulate using brushes is by using the Variable Width tool (shown in Figure 4.42)
on any existing stroke.
FIGURE 4.42
The Variable Width tool
To use the tool, select it and then click on any selected stroke. As you drag away from the stroke,
you’ll see the width of the stroke change at the point. Figure 4.43 shows how useful this tool is in
conjunction with the Arc tool for creating a banana.
FIGURE 4.43
The Banana-making tool, also known as the Variable Width tool, banana-izing a path
Summary
Illustrator’s drawing tools provide you with many powerful methods of quickly creating artwork.
In this chapter, you learned the following important points about using these tools:
l
Illustrator includes four anchor point types: straight corner points, combination corner
points, smooth points, and curved corner points.
l
Edit curves with the control handles.
l
Curves are based on the Bézier principle.
08_584750-ch04.indd 11608_584750-ch04.indd 116 6/3/10 7:45 PM6/3/10 7:45 PM
Chapter 4: Understanding Drawing and Painting Techniques
117
l
Use the Pencil tool to create paths quickly.
l
Use the Smooth and Path Eraser tools to edit your paths.
l
Although the Pen tool is the most difficult to learn, it yields the smoothest results.
l
The Paintbrush tool creates a free-formed stroked path.
l
A pressure-sensitive tablet can mimic hand-drawn art.
l
The Line Segment tool can create straight lines. Other tools grouped with the Line
Segment tool let you create arcs, grids, polar grids, and spirals.
l
The Scatter Brush repeats objects along a path rotated and sized differently.
l
The Art Brush stretches an object to the length of the path.
l
The Pattern Brush repeats a pattern on a path.
l
You can create a new brush in the Brushes panel.
08_584750-ch04.indd 11708_584750-ch04.indd 117 6/3/10 7:45 PM6/3/10 7:45 PM
08_584750-ch04.indd 11808_584750-ch04.indd 118 6/3/10 7:45 PM6/3/10 7:45 PM
119
CHAPTER
Creating Objects,
Graphs, and Symbols
IN THIS CHAPTER
Creating rectangles, ellipses,
polygons, and stars
Using the Flare tool
Understanding fills and strokes
Designing graphs, charts,
flowcharts, and diagrams
Using the Symbol Sprayer
tools
Editing and altering symbols
I
n this chapter, you learn how to create objects, such as rectangles,
ellipses, polygons, and stars. In addition, you find out how to create and
enhance graphs, add touches of light with the Flare tool, and create
really cool repeating effects with the Symbolism tools.
This is actually a very important chapter because it introduces the objects,
graphs, and symbols that you will often use in later chapters. Be sure to take
the time to understand the concepts that are presented in this chapter so that
you have an easier time later.
Making Basic Shapes
Drawing the most basic shapes—rectangles, ellipses, polygons, and stars—
is precisely what a computer is for. Try drawing a perfect ellipse by hand.
Troublesome, isn’t it? How about a square that doesn’t have ink bubbles or
splotches at the corners? A nine-pointed star? Drawing these objects and
then coloring them in Illustrator is so easy and so basic that after a few weeks
of using Illustrator, you never have to draw a shape by hand again without
wincing—and maybe even shuddering.
Illustrator exemplifies the true power of object-oriented drawing program-
ming. No matter what you draw, you can adjust and move each piece of the
drawing independently until it’s just right. Don’t like the sun so high in your
background? Pull it down and tuck it in just a bit behind those mountains.
Is the tree too small for the house in your illustration? Scale it up a bit. This
feature is great not only for artists but also for your pesky client (or boss)
who demands that everything be moved except that darned tree.
09_584750-ch05.indd 11909_584750-ch05.indd 119 6/3/10 7:47 PM6/3/10 7:47 PM
Part I: Illustrator Basics
120
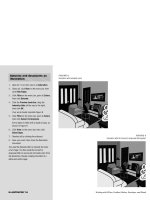
And after you create the shape, you can move, rotate, scale, and manipulate it in any way you
want. Figure 5.1 shows an illustration drawn one way and then modified in a matter of seconds by
moving existing elements and adding a few anchor points.
FIGURE 5.1
A basic square (top) becomes a more interesting shape (bottom) with a few simple modifications.
Remember these general concepts when you draw basic shapes:
l
Creating common shapes. You can draw common objects (or shapes) in Illustrator,
including squares and rectangles, rectangles with rounded corners, circles and ellipses,
polygons, and stars. Tools for creating these objects are found as popup tools in the Tools
panel under the Rectangle tool. You basically use all these tools in the same manner. So,
after you learn how to use the Rectangle tool later in this chapter, you’ll know how to use
the other tools.
09_584750-ch05.indd 12009_584750-ch05.indd 120 6/3/10 7:47 PM6/3/10 7:47 PM
Chapter 5: Creating Objects, Graphs, and Symbols
121
Cross-Reference
For more on paths, see Chapter 4. For more on selecting objects, see Chapter 6.
l
Lines and points that appear when you select an object. After you draw a shape, an
outlined closed path appears with blue points indicating the anchor points. The edge of
the path has thin blue lines surrounding it. These blue lines indicate that the object is
currently selected.
Tip
Note that the closed path appears in black unless you’ve changed the default fill and line colors. For more on
changing the fill or line color, see the section on this topic later in this chapter. Also, the anchor points appear
as blue points only if you’re in Preview mode, the default viewing mode. To learn more about the view modes
in Illustrator, see Chapter 2.
l
Changing an object’s shape. The initial click you make with any of the shape tools is
called the origin point. While you drag a shape, the origin point never moves, but the rest
of the shape is fluid, changing shape as you drag in different directions and to different
distances with your mouse. Dragging horizontally with almost no vertical movement
results in a long, flat shape. Dragging vertically with very little horizontal movement cre-
ates a shape that’s tall and thin. Dragging at a 45-degree angle (diagonally) results in a
regular (in the geometric sense) shape.
l
Typing exact dimensions in a shape’s dialog box. If you click with a tool on the art-
board without dragging it, the shape’s dialog box appears. Unlike manually drawing
(dragging) centered shapes, the dimensions you type are the actual dimensions of the
shape. The dimension is not doubled as it is when you drag a centered shape.
l
Changing units of measure. When you first run Illustrator, all measurements are set to
points. Therefore, the values inside the various shape dialog boxes appear in so many
points (12 points in a pica). To change the units of measure to something else (such as
millimeters or inches) and to see how different units of measure compare, see Chapter 8.
l
Moving shapes while you draw them. While drawing a shape, you may realize that you
want to move it. In Illustrator, you can move any shape being drawn by holding the
spacebar while depressing your mouse button and then dragging your shape to a new
location. When you let up on the spacebar, you can continue to draw your object.
l
Deleting shapes. Deleting the shape you’ve drawn is even easier than creating it—simply
delete it by pressing Backspace or Delete.
Note
Traditional bitmap paint applications don’t have the capability to move sections of a drawing (with the excep-
tion of the use of layers in software such as Photoshop and Painter). After you move a section of an image in a
bitmap program, a hole appears in the place where the section used to be. And if the new location already has
an object, you delete this section of the object, replacing it with the new image.
09_584750-ch05.indd 12109_584750-ch05.indd 121 6/3/10 7:47 PM6/3/10 7:47 PM
Part I: Illustrator Basics
122
Drawing shapes from their centers
When you draw a shape, Illustrator starts from the corner, and you have to move your mouse to
form your shape. However, if you often place shapes on top of or under other objects, you may
need to have an even amount of space between your shape and the object it surrounds. Instead of
drawing a shape from a corner, you can draw one from its center. Drawing from the corner forces
you to eyeball the space around the object, while drawing from the center of the other object
ensures that space surrounding the object is the same.
To draw a shape from its center, hold Alt (Option) and then click and drag. The origin point is
now the center of the shape. The farther you drag in one direction, the farther the edges of the
shape go out in the opposite direction. Drawing from the center of a shape lets you draw some-
thing twice as big as the same shape drawn from a corner. As long as you press Alt (Option), the
shape continues drawing from its center. If you release Alt (Option) before you release the mouse
button, the origin of the shape changes back to a corner. You can press and release Alt (Option) at
any time while drawing, toggling back and forth between drawing from a corner and drawing from
the center.
Drawing symmetric shapes
You can force Illustrator to create symmetrical shapes by holding Shift as you draw a shape. For
example, when you press Shift while drawing a rectangle, the rectangle constrains to a square.
Likewise, you can draw a perfect circle by holding Shift as you draw an ellipse. You can do this for
all the shape tools as well as the Line and Pencil tools.
You can also use the Rectangle (or Ellipse) dialog box to draw a perfect square (or circle) by typing
equal values for the width and height. Simply click without dragging to get the dialog box to
appear.
Tip
To draw shapes from their centers and to make them symmetrical at the same time, draw the shape while hold-
ing both Alt (Option) and Shift. Ensure that both keys are still pressed when you release the mouse button.
Drawing shapes at an angle
Usually, when you draw a shape with a tool, the shape orients itself with the document and the
document window. For example, the bottom of a rectangle aligns parallel to the bottom of the doc-
ument window.
But what if you want to draw shapes that are all angled at 45 degrees on the page? Well, one possi-
bility is to rotate them after you draw them by using the Transform Each command or the Rotate
tool. Better yet, you can set up your document so that every new shape automatically appears at
an angle.
09_584750-ch05.indd 12209_584750-ch05.indd 122 6/3/10 7:47 PM6/3/10 7:47 PM
Chapter 5: Creating Objects, Graphs, and Symbols
123
Cross-Reference
For more on the Transform Each command and Rotate tool, see Chapter 11.
The angle of a shape depends on the Constrain Angle value. Usually, the Constrain Angle is 0
degrees, where all shapes appear to align evenly with the borders of the document. To change the
Constrain Angle, choose Edit (Illustrator) ➪ Preferences ➪ General and then type a new value in
the Constrain Angle text field in the Preferences dialog box.
When you finish drawing these angled shapes, ensure that you change the Constrain Angle setting
back to 0 degrees or you create all new shapes at the altered Constrain Angle.
Tip
Constrain Angle affects shapes and other objects created in Illustrator, including type. In addition, dragging
objects while pressing Shift constrains them to the current Constrain Angle or to a 45- or 90-degree variation
of it. The Constrain Angle is much easier to see if you turn on Grids by choosing View ➪ Show Grid or pressing
Ctrl+" (Ô+"). When the grid option is turned on, it’s always aligned with the Constrain Angle.
Drawing rectangles using the Rectangle tool
The most basic shape you can draw is a rectangle. Although the following steps explain how to
draw a simple rectangle, you essentially use these same steps for all the other shape tools in
Illustrator.
1. Click the Rectangle tool. You can do this by clicking it in the Tools panel or by pressing
M on the keyboard. You find the Rectangle tool in the second column of the Tools panel
on the fourth row from the top.
2. Click your mouse on the artboard and then hold the mouse button. This sets the ori-
gin point of the rectangle. If you press Alt (Option) while you hold the mouse button,
you create the rectangle from the center instead of the corner.
3. Drag your mouse diagonally to the size you desire. You can draw rectangles from any
corner by clicking and dragging in the direction opposite from where you want that cor-
ner to be. For example, to draw a rectangle from the lower-right corner, click and drag
up and to the left.
4. Release the mouse button. Illustrator creates a rectangle, as shown in Figure 5.2. The
farther the distance from the initial click to the point where you release the mouse but-
ton, the larger the rectangle. As long as you have the Rectangle tool selected, dragging
with it in the document window produces a new rectangle.
Note
Press the tilde (~) key while drawing with the Rectangle tool (as well as all the other shape tools) for a mind-
bending, super-insta-duplication effect. Just be prepared to press Ctrl+Z (
Ô-Z) afterward to undo the mess.
09_584750-ch05.indd 12309_584750-ch05.indd 123 6/3/10 7:47 PM6/3/10 7:47 PM
Part I: Illustrator Basics
124
FIGURE 5.2
Click and drag to the opposite corner to draw a quick rectangle.
Defining properties with the Rectangle dialog box
If you want to create a rectangle with exact dimensions, all you have to do is open the Rectangle
dialog box and type the dimensions. The steps that follow also apply to the other basic shape tools
in Illustrator. To draw a rectangle of an exact size, follow these steps:
1. Click and release the Rectangle tool where you want to place the upper-left corner.
The Rectangle dialog box, as shown in Figure 5.3, opens.
FIGURE 5.3
Use the Rectangle dialog box to specify the exact dimensions of a rectangle.
09_584750-ch05.indd 12409_584750-ch05.indd 124 6/3/10 7:47 PM6/3/10 7:47 PM
Chapter 5: Creating Objects, Graphs, and Symbols
125
2. Type the width and height. When the Rectangle dialog box opens, values are usually
already inside the text fields. These numbers correspond to the size of the rectangle you
last drew. To create another rectangle of the same size, just click OK (or press Enter or
Return). To make the rectangle a different size, replace the values with your own mea-
surements. If a text field is highlighted, typing replaces the text in the text field and
deletes what had been highlighted.
Tip
To highlight the next text field in a dialog box, press Tab. You can also highlight the preceding text field in a
dialog box by pressing Shift+Tab. If you want to highlight any text field instantly, double-click the value or
click the label next to that value.
3. Click OK. Illustrator draws the rectangle using precisely the size that you specified. To
get out of the Rectangle dialog box without drawing a rectangle, click Cancel or just press
Esc (Ô+period). Anything you type in that dialog box is then forgotten. The next time
the dialog box opens, it still displays the size of the previously drawn rectangle.
Rectangles whose sizes are specified in the Rectangle dialog box are always drawn from the upper-
left corner. The largest rectangle you can draw is about 19 feet × 19 feet. It’s a wonder you can get
anything done at all with these limitations!
Drawing rounded rectangles and squares
Sometimes, straight corners just aren’t good enough. That’s when it’s time to create a rectangle
with rounded corners. Why? Maybe you want your rectangles to look less computery. A tiny bit of
corner rounding (2 or 3 points) may be just what you need.
Before getting into how to actually draw rounded rectangles, it helps to understand how Illustrator
sets the roundness of your corners. It performs this feat in one of three ways:
l
Using the most recently drawn rounded-corner rectangle. Illustrator sets the corner
radius value using the dimensions of the most recently drawn rounded-corner rectangle
and then places this value in the General Preferences dialog box. In other words, after you
draw a rectangle using the Rounded Rectangle tool, Illustrator saves those dimensions for
the next time that you draw a rounded rectangle.
l
Using the General Preferences dialog box. What if you don’t want to use the radius of
the last rounded rectangle? You use the value in the General Preferences dialog box, of
course. To do so, choose Edit (Illustrator) ➪ Preferences ➪ General or press Ctrl+K (Ô+K)
and then set the corner radius you desire. All rounded rectangles are now drawn with this
new corner radius until you change this value.
l
Using the Rounded Rectangle dialog box. Changing the value in the Corner Radius text
field in the Rounded Rectangle dialog box not only changes the current rounded rectan-
gle’s corner radius value but also changes the radius in the General Preferences dialog box.
Illustrator uses this corner radius for all subsequently drawn rounded rectangles until you
change the radius value again.
09_584750-ch05.indd 12509_584750-ch05.indd 125 6/3/10 7:47 PM6/3/10 7:47 PM
Part I: Illustrator Basics
126
Now that you understand how Illustrator works when you draw rounded rectangles, the next step
is to learn how to draw one. You can create a rounded rectangle in one of two ways: You can
accept the current radius and draw, or you can change the current radius and draw.
To draw a rounded rectangle with the current radius, use the Rounded Rectangle tool:
1. Click the Rounded Rectangle tool. Click and holding the Rectangle tool in the Tools
panel until a popup menu opens. Next, drag your mouse to the right to choose the
Rounded Rectangle tool.
2. Click and drag with the Rounded Rectangle tool as if you’re drawing a standard
rectangle. The only difference is that this rectangle has rounded corners. The point at
which you clicked is where the corner would be — if there were a corner. Of course,
with rounded corners, there’s no real corner, so the computer uses an imaginary point
called the origin point as its on-screen corner reference.
Alternatively, you can specify a corner radius value in the Rounded Rectangle dialog box by follow-
ing these steps:
1. Click the Rounded Rectangle tool as before.
2. Click the artboard with the Rounded Rectangle tool. The Rounded Rectangle dialog
box, as shown in Figure 5.4, opens.
FIGURE 5.4
The Rounded Rectangle dialog box includes a third text field for defining the corner
radius.
3. Specify a value in the Corner Radius text field. The third text field is for the size of the
corner radius. This option makes the corners of the rectangle curved, although leaving
the setting at a value of 0 keeps the corners straight. The corner radius in Illustrator is the
length from that imaginary corner (the origin point) to where the curve begins, as shown
in Figure 5.5. The larger the value you type in the Corner Radius text field of the
Rectangle dialog box, the farther the rectangle starts from the imaginary corner and the
bigger the curve. For example, if you set the corner radius at 1 inch, the edge of the rect-
angle starts curving 1 inch from where a real corner would normally appear.
09_584750-ch05.indd 12609_584750-ch05.indd 126 6/3/10 7:47 PM6/3/10 7:47 PM
Chapter 5: Creating Objects, Graphs, and Symbols
127
FIGURE 5.5
The corner radius defines the roundness of the corner.
Origin point Corner radius
4. Click OK. Illustrator applies your changes.
5. Click and drag with this tool as if you’re drawing a standard rectangle. Your rounded
rectangle appears.
Tip
If the corner radius is more than half the magnitude of either the length or width of the rectangle, the rectangle
may appear to have perfectly round ends on at least two sides. If the corner radius is more than half the magni-
tude of both the length or width of the rectangle, then the rectangle becomes an ellipse!
Tip
Need to draw a rounded rectangle from the center or create a rounded square? Use the Rounded Rectangle
tool and then follow the instructions presented earlier in this chapter.
Using the Round Corners command to
round straight corners
If you have an existing rectangle with straight corners and you want to make the corners round,
neither of the methods presented earlier in this chapter is going to help you. Instead, you must
choose Effect ➪ Stylize ➪ Round Corners and then type the value of the corner radius you want for
the existing rectangle in the Round Corners dialog box. Using this command allows you to change
straight-corner rectangles to rounded-corner rectangles. However, this effect is not recommended
for changing rounded-corner rectangles to straight-corner rectangles because it usually results in
an unsightly distortion.
09_584750-ch05.indd 12709_584750-ch05.indd 127 6/3/10 7:47 PM6/3/10 7:47 PM
Part I: Illustrator Basics
128
Furthermore, this command can’t change corners that you’ve rounded with either the Rounded
Rectangle tool or through previous use of the Round Corners dialog box.
Rounding corners backward
What if you want your corners to round inward instead of out? Initially, it would seem that you’re
out of luck because Illustrator doesn’t provide any way for you to type a negative value for a corner
radius. However, you can manipulate the corners manually. The following steps explain how to
create a reverse rounded-corner rectangle:
1. Draw a rounded rectangle with the dimensions that you desire. For more on drawing
rounded rectangles, see the section on this topic earlier in this chapter.
2. Select the leftmost point on the top of the rounded rectangle by dragging the Direct
Selection tool (the hollow arrow) over it. One control handle appears, sticking out to
the left.
3. Click and drag the control handle down below the anchor point while pressing Shift
and then release the mouse button. Holding Shift ensures that the control handle line
is perfectly vertical.
4. Select the topmost point on the left edge by dragging the Direct Selection tool over
it. A control handle appears, sticking straight up out of this anchor point.
For all you geometry buffs, the whole corner radius business works this way: The width of the Bounding
Box of any circle is called the diameter of that circle; half the diameter is the radius of the circle.
If you create a circle with a radius of 1 inch, the circle actually has a diameter of 2 inches. Put this
2-inch circle into the corner of the rectangle, as in the preceding figure, and the curve of the circle
matches the curve of the rounded rectangle that has a corner radius of 1 inch.
To realistically determine the way a rounded corner will look, use the method that measures the dis-
tance from the imaginary corner to the place where the curve starts.
How the corner radius really works
09_584750-ch05.indd 12809_584750-ch05.indd 128 6/3/10 7:47 PM6/3/10 7:47 PM
Chapter 5: Creating Objects, Graphs, and Symbols
129
5. Click and drag the control handle to the right while pressing Shift and then release
the mouse button.
6. Repeat these steps for each of the corners. After you get the hang of it, the points start
flying into position almost by themselves. Figure 5.6 shows an example of a rectangle
with backward-rounded corners on the left side.
FIGURE 5.6
The final product of creating backward-rounded corners on a rectangle
Drawing ellipses
Drawing an ellipse is harder than drawing a rectangle because the point of origin is outside the
ellipse. With a rectangle, the point of origin corresponds to a corner of the rectangle, which also
happens to be an anchor point. The ellipse is completely within the rectangle. Figure 5.7 shows
that the top edge of the ellipse is at the midpoint of the dragged rectangle.
Tip
Press Ctrl (Ô) while dragging to draw the ellipse from the edge of the ellipse itself, instead of the
imaginary corner.
Follow these steps (similar to those for drawing a rectangle) to create an ellipse:
1. Click the Rectangle tool and then choose the Ellipse tool. The Ellipse tool is housed
with the Rectangle tool.
2. Click and drag diagonally. The outline of an ellipse forms.
3. Release the mouse button. The ellipse appears on-screen. Ellipses, like rectangles, have four
anchor points, but the anchor points on an ellipse are at the top, bottom, left, and right.
09_584750-ch05.indd 12909_584750-ch05.indd 129 6/3/10 7:47 PM6/3/10 7:47 PM
Part I: Illustrator Basics
130
Tip
Draw a circle by pressing Shift while drawing your ellipse.
FIGURE 5.7
The curves of an ellipse extend to the boundaries of the dragged area.
Origin point Dragged area
Creating polygons
Although creating more and more ellipses, rectangles, and rounded rectangles is loads of fun,
sooner or later, you’re going to get bored. I dare say that you can create more interesting shapes
automatically by using some of the additional shape tools that come with Illustrator. Most of these
tools are located in the Rectangle tool slot in the Tools panel, as shown in Figure 5.8.
FIGURE 5.8
The Rectangle tool slot, which appears here as a tearaway, and the tools housed with it allow you to draw
many shapes.
09_584750-ch05.indd 13009_584750-ch05.indd 130 6/3/10 7:47 PM6/3/10 7:47 PM
Chapter 5: Creating Objects, Graphs, and Symbols
131
To create a polygon, you first want to specify the number of sides for your polygon and then you
can draw it following these steps:
1. Click the Polygon tool. This tool is located below the Ellipse tool in the Rectangle
tool slot.
2. Click the artboard with the Polygon tool. You want to do this before you draw the
polygon. Clicking the artboard displays the Polygon dialog box, as shown in Figure 5.9.
3. Specify values for the polygon. The Polygon dialog box has the following options, both
of which you must specify:
l
Radius. This is the distance from the center of the polygon to one of the vertices
of the polygon. For even-sided shapes (4, 6, 8, 10, and so on, sides), the radius is
half the width of the object, from one corner to the opposite corner. For odd-sided
shapes, the radius is the distance from the center of the polygon to any of the vertices.
Its diameter is twice that value.
l
Sides. This is the number of sides that you want for the polygon.
4. Click OK.
FIGURE 5.9
Use the Polygon dialog box to create regular polygons.
While drawing a polygon, you can change the number of sides on the fly without reopening the
Polygon dialog box. To increase or decrease the number of sides, press the up or down arrow as
you drag. Figure 5.10 shows different polygons drawn with the Polygon tool.
All polygons you create with the Polygon tool are regular polygons, meaning that they have sides
of equal length. For this reason, every four-sided object that you create is a square, and every six-
sided object is a perfect hexagon. You may find the square capabilities of the Polygon tool useful; it
can save you a step when you want to draw a square at an angle. You can’t do this with the
Rectangle tool unless you change the Constrain Angle in the General Preferences prior to drawing
the square or use the Rotate tool on the square after you draw it.
Cross-Reference
For more on the Rotate tool, see Chapter 11.
09_584750-ch05.indd 13109_584750-ch05.indd 131 6/3/10 7:47 PM6/3/10 7:47 PM
Part I: Illustrator Basics
132
FIGURE 5.10
The number of sides on polygons drawn with the Polygon tool can easily be adjusted as you drag by using
the up and down arrows.
If you press Shift while dragging your mouse, the polygon you create is upright. It aligns to the
current Constrain Angle (usually 0 degrees). Therefore, if you create a triangle and you press Shift,
the triangle has one side that’s perfectly horizontal (the bottom) unless you have a different
Constrain Angle, in which case one edge of the triangle aligns to that angle.
Note
Press the spacebar to move your polygon around when dragging with the Polygon tool. You can do this at any
time during the creation of a polygon. When you release the spacebar, the tool functions as before.
Seeing stars
To create stars, click the Star tool, which is in the Rectangle tool slot, and then drag in the docu-
ment. As you drag, a star is created. Several stars are shown in Figure 5.11.
Stars have several of the same controls as polygons when you’re drawing them: Pressing Shift
aligns the star to the Constrain Angle, the spacebar moves the star around, and the tilde (~) key
makes lots more stars. The up and down arrows work a bit differently; instead of adding and
removing edges, they add and remove entire points. So, in a way, they’re actually adding two
09_584750-ch05.indd 13209_584750-ch05.indd 132 6/3/10 7:47 PM6/3/10 7:47 PM
Chapter 5: Creating Objects, Graphs, and Symbols
133
edges. Stars must have an even number of sides or they’re not really stars; they’re the pointy lumps
you doodled during your poly-sci classes as a sophomore.
The Star tool adds two additional keys for other functions: Pressing Alt (Option) positions the
inner points relative to the outer points to produce a star with a corresponding side lying along the
same line. Illustrator refers to them as fixed stars. And in case it’s keeping you up at night, Alt
(Option) has no effect on stars with three or four points.
Perhaps the most versatile function associated with the Star tool (and the Rectangle, Polygon,
Spiral, and Ellipse tools) is what happens when using the tilde (~) key. When you press the tilde
key and draw, several shapes appear rapidly. As Figure 5.12 shows, this technique can create all
sorts of interesting designs.
FIGURE 5.11
Use the Star tool when you want to draw stars.
Stars can come in all shapes, not just the fixed and standard shapes. You create these shapes by
pressing Ctrl (Ô) when you drag the mouse. When you hold Ctrl (Ô), only the outer points are
extended; the interior points remain fixed. Using this feature allows you to build stars with long,
thin points.
09_584750-ch05.indd 13309_584750-ch05.indd 133 6/3/10 7:47 PM6/3/10 7:47 PM