Adobe Illustrator CS5 bible PHẦN 7 ppsx
Bạn đang xem bản rút gọn của tài liệu. Xem và tải ngay bản đầy đủ của tài liệu tại đây (1.73 MB, 81 trang )
Chapter 11: Applying Transformations and Distortions
401
Using Pucker & Bloat
Although the Pucker & Bloat command undoubtedly has the coolest sounding name that
Illustrator has to offer, this command is also one of the least practical. But Illustrator is a fun
program, right? And these commands make it lots of fun.
Puckering makes objects appear to have pointy tips sticking out everywhere, and bloating creates
lumps outside of objects. Puckering and bloating are inverses of each other; a negative pucker is a
bloat, and a negative bloat is a pucker. If you’re bewildered by these functions, stop reading right
here. The following information spoils everything.
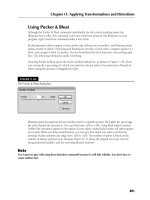
Choosing Pucker & Bloat opens the Pucker & Bloat dialog box, as shown in Figure 11.30, where
you can specify a percentage by which you want the selected paths to be puckered or bloated by
either typing the amount or dragging the slider.
FIGURE 11.30
The Pucker & Bloat dialog box
Bloating causes the segments between anchor points to expand outward. The higher the percentage,
the more bloated the selection is. You can bloat from -200 to +200. Using Bloat makes rounded,
bubble-like extrusions appear on the surface of your object; using Pucker makes tall spikes appear
on its path. When you drag toward Pucker, you can type how much you want to pucker the
drawing. Pucker amounts can range from -200 to +200. The number of spikes is based on the
number of anchor points in your drawing. Figure 11.31 shows the original text (top), the text
being puckered (middle), and the text being bloated (bottom).
Note
Text is great to play with using these distortion commands because it’s still fully editable. You don’t have to
create outlines first.
16_584750-ch11.indd 40116_584750-ch11.indd 401 6/3/10 7:56 PM6/3/10 7:56 PM
Part II: Putting Illustrator to Work
402
The Pucker & Bloat command moves anchor points in one direction and creates two independent
direction points on either side of each anchor point. The direction points are moved in the
opposite direction of the anchor points, and the direction of movement is always toward or away
from the center of the object.
The distance moved is the only thing that you control when you use the Pucker & Bloat command.
Typing a percentage moves the points that percentage amount.
Note
Nothing about the Pucker & Bloat command is random. Everything about it is 100% controllable and, to some
extent, predictable.
FIGURE 11.31
The original text (above) with Pucker applied (middle) and Bloat applied (below)
16_584750-ch11.indd 40216_584750-ch11.indd 402 6/3/10 7:56 PM6/3/10 7:56 PM
Chapter 11: Applying Transformations and Distortions
403
Roughening objects
Roughen adds anchor points and then moves them randomly by a percentage that you define. This
gives objects a rough-appearing outline.
Because the Roughen commands work randomly, you obtain different results when you apply the
same settings of the same command to two separate, identical objects. In fact, the results will
probably never be duplicated. The Roughen command is a good reason for having the Undo
command so you can apply the command, undo, and reapply using a different value until you
achieve the desired effect. Figure 11.32 shows an example of using the Roughen command.
Tip
Using the keyboard, you can continually reapply any command that works randomly and get different results.
Select the object and then apply the command by choosing the menu item and typing the values. If you don’t
like the result, press Ctrl+Z (Ô+Z) to undo it. Press Ctrl+Shift+E (Ô+Shift+E) to reapply the last effect using a
different random value.
One important limitation of the Roughen command is that it works on entire paths, even if only
part of the path is selected. The best way to get around this limitation is to use the Scissors tool to
cut the path into separate sections.
Cross-Reference
For more on the Scissors tool, see Chapter 6.
FIGURE 11.32
The original text (top) with Roughen applied to it (bottom)
16_584750-ch11.indd 40316_584750-ch11.indd 403 6/3/10 7:56 PM6/3/10 7:56 PM
Part II: Putting Illustrator to Work
404
The Roughen command does two things at once. First, it adds anchor points until the selection has
the number of points per inch that you defined. Second, it randomly moves all the points around,
changing them into straight corner points or smooth points, whichever you specified.
Choosing Roughen opens the Roughen dialog box, as shown in Figure 11.33, where you can type
information to roughen the illustration — literally.
FIGURE 11.33
The Roughen dialog box
Three options are available:
l
Size. How far points may move when roughened relative to the width or height (whichever
is greater) of the selected path. Choose higher values to increase the apparent roughness.
l
Detail. How many points are created per inch. Choose higher values to create more
points.
l
Smooth or Corner Points. If you click the Smooth radio button, all the anchor points
added are smooth points. If you click the Corner radio button, all the points added are
straight corner points. Use Smooth to create soft edges and Corner to create sharp edges.
Roughen never takes away points when roughening a path.
Tip
You can use the Roughen command as a very hip version of the Add Anchor Points command. If the Size text
field is set at 0%, the added points are added along the existing path all at once. Instead of going to Add
Anchor Points again and again, just try typing a value of 25 in the Detail text field of the Roughen dialog box.
You have instant, multiple Add Anchor Points. This technique is great for Tweak (explained later in this
chapter) or anything else where you need a bunch of anchor points quickly.
16_584750-ch11.indd 40416_584750-ch11.indd 404 6/3/10 7:56 PM6/3/10 7:56 PM
Chapter 11: Applying Transformations and Distortions
405
Transforming objects
You find the Transform command under the Distort & Transform submenu of the Effect menu.
The transform effect is similar to the Transform panel, except that you can go back and edit as well
as see the preview before applying.
Choosing Effect ➪ Distort & Transform ➪ Transform opens the Transform Effect dialog box, as
shown in Figure 11.34. One really cool feature of this dialog box is the copies text field. Here, you
can type a multiple number of copies, as shown in this duplication of a paper doll in Figure 11.35.
FIGURE 11.34
The Transform Effect dialog box
Tip
If the Transform effect doesn’t come out quite the way you want, double-click the name of the effect in the
Appearance panel to reopen the Transform Effect dialog box. Make any further changes you want and then
click OK to modify the effect.
Tweaking transforms
Choosing Tweak opens the Tweak dialog box, as shown in Figure 11.36. In this dialog box, you
define the amount of tweaking, including the horizontal and vertical percentages and which points
are moved (anchor points, in control points, or out control points). Clicking the Relative radio
button applies the effect to the Bounding Box edges of the object. Clicking the Absolute radio
button moves the points based on the absolute measurements that you type.
16_584750-ch11.indd 40516_584750-ch11.indd 405 6/3/10 7:56 PM6/3/10 7:56 PM
Part II: Putting Illustrator to Work
406
FIGURE 11.35
Paper dolls created with the Transform effect
FIGURE 11.36
The Tweak dialog box
Note
No anchor points are added with the Tweak dialog box.
If you type 0 in either text field, no movement occurs in that direction. Illustrator bases the
percentage on the width or height of the shape — whichever is longer. If you click the Anchor
Points check box, all anchor points on the selected path move a random distance corresponding to
the amounts set in the Horizontal and Vertical text fields. If you click either the “In” Control Points
16_584750-ch11.indd 40616_584750-ch11.indd 406 6/3/10 7:56 PM6/3/10 7:56 PM
Chapter 11: Applying Transformations and Distortions
407
or the “Out” Control Points check box, those points also move the specified distance. In control
points are the points on one side of the anchor point that lead into the path. Out control points are
the points on the other side of the anchor point that lead out of the path.
Tip
Consider using the Tweak option when you’re not sure of the size of the selected artwork or when you can
only determine that you want points moved a certain portion of the whole but can’t determine an absolute
measurement.
Figure 11.37 shows an object that has the Tweak effect applied with the Relative option chosen
(above) and the same values with the Absolute option chosen (below).
The percentages you type pertain to the Bounding Box dimensions and move points up to those
limits. If the Bounding Box is 5 inches wide and 2 inches tall and you type a value of 10% for
width and height, the points move randomly up to 0.5 inches horizontally and 0.2 inches vertically
in either direction.
Using the Twist command
The Twist command is found by choosing Effect ➪ Distort &Transform ➪ Twist. This cool command
rotates or twirls the selected object, with more action being in the center of the object. In the Twist
dialog box, as shown in Figure 11.38, you set the Angle of the twist.
You can twist paths and text (without converting to outlines) to create some really great effects.
One of my favorite looks is to take a starburst of lines and twist them into a flower or spirographic
shapes using the Twist and Tweak effects, as shown in Figure 11.39. The top-left image has no
Twist applied, but a 10° Twist is added to each consecutive image. A positive number twists the
object clockwise; a negative number twists the object counterclockwise.
Working with the Zig Zag effect
The Zig Zag effect (Effect ➪ Distort & Transform ➪ Zig Zag) changes normally straight paths into
zigzagged versions of those paths. When you first choose Zig Zag, the Zig Zag dialog box, as shown
in Figure 11.40, opens.
The Zig Zag dialog box allows you to specify various parameters of the Zig Zag effect, including
the Size, which is how large each zigzag is, and the Ridges per segment, which is the number of
zigzags. In addition, you can specify whether you want the zigzags to be curved (click the Smooth
radio button) or pointed (click the Corner radio button). Like most of the other Illustrator effects,
Zig Zag has a handy Preview check box. The Relative and Absolute options work just like the
similarly named options in the Tweak Effect. Figure 11.41 shows an example of zigzagged artwork.
16_584750-ch11.indd 40716_584750-ch11.indd 407 6/3/10 7:56 PM6/3/10 7:56 PM
Part II: Putting Illustrator to Work
408
FIGURE 11.37
The top object was tweaked using the Relative option; the bottom object was tweaked using the Absolute
option.
16_584750-ch11.indd 40816_584750-ch11.indd 408 6/3/10 7:56 PM6/3/10 7:56 PM
Chapter 11: Applying Transformations and Distortions
409
FIGURE 11.38
The Twist dialog box
FIGURE 11.39
A range from a 10-degree to a 110-degree Twist was added to the original object (top left).
16_584750-ch11.indd 40916_584750-ch11.indd 409 6/3/10 7:56 PM6/3/10 7:56 PM
Part II: Putting Illustrator to Work
410
FIGURE 11.40
The Zig Zag dialog box
FIGURE 11.41
Art with a zigzag applied to it
16_584750-ch11.indd 41016_584750-ch11.indd 410 6/3/10 7:56 PM6/3/10 7:56 PM
Chapter 11: Applying Transformations and Distortions
411
Using Warp Effects
Warp effects are also known as envelopes. Warp effects bend objects into a selected shape. Unlike
Free Distort, you have many points to work with and a variety of preset options. You can choose
from a variety of predefined warp effects: Arc, Arc Lower, Arc Upper, Arch, Bulge, Shell Lower,
Shell Upper, Flag, Wave, Fish, Rise, Fisheye, Inflate, Squeeze, and Twist.
You can find all these warp effects by choosing them from the Effect ➪ Warp submenu. Each of
these predefined styles for Warp can also be altered into your own design in the Warp Options
dialog box, as shown in Figure 11.42.
In all the preset options, you have Warp Options to edit to your heart’s desire. You can set these
options:
l
Style. Pick from 15 predefined warps.
l
Horizontal or Vertical. This affects either the horizontal areas or the vertical areas of the
shape.
l
Bend. Change how much of an effect is applied in percentage.
l
Distortion Horizontal. This option allows you to increase or decrease the horizontal
distortion in percentage.
l
Distortion Vertical. This option allows you to increase or decrease the vertical distortion
in percentage.
FIGURE 11.42
The Warp Options dialog box
16_584750-ch11.indd 41116_584750-ch11.indd 411 6/3/10 7:56 PM6/3/10 7:56 PM
Part II: Putting Illustrator to Work
412
Understanding Warp types
This section provides more information on the 15 Warp Style presets:
l
Arc. Bends a shape’s top and bottom into an arc
l
Arc Lower. Bends just the lower half of the shape into an arc
l
Arc Upper. Bends just the upper half of the shape into an arc
l
Arch. Bends the upper, middle, and lower areas into an arch
l
Bulge. Pushes out the top and bottom of the shape
l
Shell Lower. Squeezes in the middle and bulges out the lower area of the shape
l
Shell Upper. Squeezes in the middle and bulges out the upper area of the shape
l
Flag. Pushes the shape on the top and bottom into an upper and lower curve
l
Wave. Pushes the shape on the top, middle, and bottom into an upper and lower curve
l
Fish. Squeezes the shape into a fish shape
l
Rise. Pushes the shape upward from lower left to upper right
l
Fisheye. Bulges out just the center of the shape
l
Inflate. Bulges out the whole shape instead of just the center
l
Squeeze. Pushes in the left and right sides of the shape
l
Twist. Twists the object around the center
Figure 11.43 shows all 15 presets applied to text.
16_584750-ch11.indd 41216_584750-ch11.indd 412 6/3/10 7:56 PM6/3/10 7:56 PM
Chapter 11: Applying Transformations and Distortions
413
FIGURE 11.43
Each warp style is shown in its own name.
16_584750-ch11.indd 41316_584750-ch11.indd 413 6/3/10 7:56 PM6/3/10 7:56 PM
Part II: Putting Illustrator to Work
414
Summary
Distortions and transformations are some of the most fun effects that are built in to Illustrator. In
this chapter, you learned the following:
l
You can transform an object multiple ways. You can use the transformation tools, the
Transform menu, the Transform panel, or the transform effects.
l
Add awesome effects by using the Liquify tools in a brush-like fashion.
l
The Distort effects work by moving points around selected paths.
l
The Pucker and Bloat features create spiked and bubbled effects, respectively.
l
Roughen can be used to intelligently add anchor points.
l
Use either the Twist effect alone or with the Twirl tool to twist artwork.
l
Twirling adds anchor points as needed when twirling.
l
Tweak is used to randomly move existing points and control handles.
l
The Zig Zag effect creates wavy or spiky paths.
l
Warps push an object into a specific shape.
16_584750-ch11.indd 41416_584750-ch11.indd 414 6/3/10 7:56 PM6/3/10 7:56 PM
415
CHAPTER
Using Path Blends,
Compound Paths, and
Masks
IN THIS CHAPTER
Creating path blends
Using Blend options
Making a color blend
Creating shape blends
Using stroke blends
Creating compound paths
Figuring out path directions
Creating clipping masks
T
hree of the more difficult areas of Illustrator to master are path
blends, compound paths, and masks. Of course, these are also three
of the more powerful functions in Illustrator. A blend is a bunch of
paths created from two original paths. Compound paths consist of two or
more separate paths that Illustrator treats as a single path. You use a mask to
hide portions of an image or mask them out. This chapter shows you how to
get to know these three functions so that you can use them in your documents.
Understanding the Difference
between Blends and Gradients
In Illustrator, a blend is a series of paths that Illustrator creates based on two
other paths. A series of paths transforms from the first path into the second
path, changing fill and stroke attributes as it moves. A gradient is a smooth
blend of colors between two or more colors. The big difference is that the
gradient appears as a box rather than a series of paths, as in a blend. With a
gradient, you use a panel to signify where the colors start and stop.
At first glance, blends and gradients seem to do the same things but in
different ways — so why have both? The Blend tool, moreover, seems to be
much harder to use than the Gradient Vector tool. On the surface, it seems
that you can do more with gradients than with blends. Blends take a long
time to redraw; gradients take a fraction of the time.
After all, if gradients are so much easier to use and produce so much better
results, is it really necessary to have a Blend tool or a Blend function?
Students, clients, and the occasional passersby have asked me this question
17_584750-ch12.indd 41517_584750-ch12.indd 415 6/3/10 7:57 PM6/3/10 7:57 PM
Part II: Putting Illustrator to Work
416
quite often, and they seem to have a good point at first. Upon further study, however, it becomes
apparent that blends are quite different from gradients, both in form and function.
You use gradients only as fills for paths. You can make gradients either linear or radial, meaning
that color can change from side to side, top to bottom, or from an interior point to the outside.
Every gradient can have as many distinct colors in it as you can create. Gradients are simply an
easier way to create blends that change only in color, not in shape or size.
Cross-Reference
For more on gradients, see Chapter 7.
Blends, on the other hand, are a series of transformed paths between two end paths. The paths
between the end paths mutate from one end path into the other. All the attributes of the end paths
change throughout the transformed paths, including shape, size, and all paint style attributes. The
major benefit is that you can blend multiple colors at one time.
Blends can be incredibly flexible when it comes to creating photorealistic changes in color if you
plan ahead. Changes to blends aren’t really changes at all; instead, they’re deletions of the transformed
objects and changes in the attributes of the end paths. If you know what you want, blending colors
can take on an incredibly realistic look by changing the shapes of the blend’s end paths just
slightly.
But even more useful than creating realistic changes in color is blending’s capability to transform
shapes from one shape to another (this is typically called morphing), as shown in Figure 12.1. With
a bit of practice (and the information in this chapter), you can transform any illustration into
another illustration. There’s a limit to the complexity of the illustrations that you can transform,
but the limit is due more to the time it takes to create the blends than to limitations inherent in
Illustrator.
FIGURE 12.1
Blending to transform (or morph) a shape
Because blends work on both stroke and fill attributes of objects, you can create some really
exciting effects that aren’t possible by using any other technique, electronic or traditional.
17_584750-ch12.indd 41617_584750-ch12.indd 416 6/3/10 7:57 PM6/3/10 7:57 PM
Chapter 12: Using Path Blends, Compound Paths, and Masks
417
Creating Path Blends
Originally, Adobe marketed the Blend tool as a tool whose primary purpose was to transform
shapes, not blend colors. Instead, designers used the tool for blending colors to create what were
known as vignettes or what traditional artists called gradients.
The Blend tool creates in-between steps in the area between two paths, where the paint style and
shape of one path transform themselves into the paint style and shape of the second path.
Version 8 of Illustrator dramatically enhanced the Blending function. The big change was that
blends became live, or editable. This huge change allows users to change the color, shape, and
location of the blend shapes. The blend instantly reblends to the new changes. Another great
change was the capability to blend along a path.
Although any blend takes into account both color and shape, I treat color and shape separately in
this chapter because people using the Blend tool are often trying to obtain either a color effect or a
shape effect rather than both at once.
You use the Blend tool to create blends, which are a group of paths (commonly referred to as blend
steps) that change in shape and color as each intermediate path comes closer to the opposite end
path. Follow these steps to create a blend:
1. Using a shape tool, create a small (1-inch) vertical shape. This example uses a rectangle.
For more on creating shapes, see Chapter 5.
2. With the Selection tool, click on the rectangle, press Alt (Option), and then drag a
few inches to the right. This copies the path a few inches to the side. Press Shift as you
drag horizontally to constrain the movement of the path.
3. On the left shape, change the fill and stroke to desired values. This example uses a
fill of Black and a stroke of None. For more on changing the fills and strokes for shapes,
see Chapters 4 and 5.
4. For the right rectangle, change the fill and stroke to desired values. This example
uses a fill of White and a stroke of None.
5. Select the Blend tool by pressing W, click the top-left point of the left path, and
then click the top-left point of the right path. This step tells Illustrator to blend
between these two paths, and it uses the top-left points as reference. The Blend tool
cursor changes from x to + in the lower-right corner. Illustrator creates a spine between
the two end paths, which are now transparent. Figure 12.2 shows the resulting blend.
6. Press Ctrl+Shift+A (Ô+Shift+A). This deselects all previously selected paths. The
default Blend Option creates smooth color between the two shapes. The blend consists of
256 paths, including the two end paths. In the example, each path is a slightly different
tint of black.
17_584750-ch12.indd 41717_584750-ch12.indd 417 6/3/10 7:57 PM6/3/10 7:57 PM
Part II: Putting Illustrator to Work
418
FIGURE 12.2
This blend moves from black to white.
Defining Linear Blends
You create color blends by making two end paths, usually identical in shape and size, giving each
path different paint style attributes, and generating a series of steps between them with the Blend
tool. The more end paths you create, the more colors you can create.
Note
The examples in this chapter are easier to understand when you work in Preview mode. For more on Preview
mode, see Chapter 2.
Follow these steps to create a basic linear blend:
1. Draw a curved path with the Pen tool, filling and stroking it as desired. The example
has a fill of None and a stroke of 2-point Black.
2. Alt+copy (Option+copy) the path to the right, filling and stroking the copied path
as desired. The example gives the new path a stroke of 2-point Yellow.
3. With the Blend tool, click the path on the left and then the path on the right.
Alternately, you can select both objects and then choose Object ➪ Blend ➪ Make.
4. Deselect all by pressing Ctrl+Shift+A (Ô+Shift+A) to see the result, as shown in
Figure 12.3.
Note
The blend shown in Figure 12.3 demonstrates one of the hazards of creating blends — something often
referred to as banding. See the sidebar on banding later in this chapter to learn what to do to reduce or
eliminate banding.
17_584750-ch12.indd 41817_584750-ch12.indd 418 6/3/10 7:57 PM6/3/10 7:57 PM
Chapter 12: Using Path Blends, Compound Paths, and Masks
419
You have a variety of ways to blend objects. Keep in mind these suggestions when blending
objects:
l
You can edit blends by using the Selection, Rotate, or Scale tools.
l
You can perform blending with any number of objects, colors, opacities, and gradients.
l
You can’t apply blending with mesh objects.
l
You can’t edit the path (or spine, as it’s called) that the blend creates.
l
The fill of the topmost object is used when blending patterns.
l
When intermixing process and spot colors, the blend is colored with process colors.
l
When blending with transparent objects, the topmost object’s transparency is used.
l
You can blend symbols.
l
You can change the number of steps that Illustrator uses in the Blend Options dialog box.
l
Blends create a knockout with transparency groups. (If you don’t want this, change it in
the Transparency panel by deselecting the Knockout Group option.)
FIGURE 12.3
The final result is a linear blend.
17_584750-ch12.indd 41917_584750-ch12.indd 419 6/3/10 7:57 PM6/3/10 7:57 PM
Part II: Putting Illustrator to Work
420
Working with Blend Options
Adobe has enhanced the Blending functions of Illustrator by making the Blend tool easier to use
and faster and by adding a Blend submenu under the Object menu. The Blend options are Make,
Release, Blend Options, Expand, Replace Spine, Reverse Spine, and Reverse Front to Back. With
Illustrator’s Blend capability, you may not need to release a blend to change it. You can use the
Direct Selection tool to select the end paths and edit the paths or change their color, and the blend
instantly updates. Live Blending is the capability to change the shape or color of a blend and
update it automatically.
Using the Blend option
The Blend Options dialog box lets you change the Spacing and Orientation aspects. Select the
blend that you want to adjust, and either double-click the Blend tool or choose Object ➪ Blend ➪
Blend Options to open the dialog box to change the settings.
Figure 12.4 shows the Blend Options dialog box. The three Spacing choices are Smooth Color,
Specified Steps, and Specified Distance. The Orientation options are Align to Page and Align to
Path.
FIGURE 12.4
The Blend Options dialog box allows you to set up blends the way you want.
These are the Blend options:
l
Smooth Color. This option automatically determines the best number of steps needed to
make this blend look very smooth.
l
Specified Steps. This option lets you choose the number of intermediate steps you want
in the blend.
l
Specified Distance. This option allows you to type the distance between steps.
l
Align to Page. This option runs the blend vertically or horizontally, depending on your
page orientation.
l
Align to Path. This option runs the blend perpendicular to the path.
17_584750-ch12.indd 42017_584750-ch12.indd 420 6/3/10 7:57 PM6/3/10 7:57 PM
Chapter 12: Using Path Blends, Compound Paths, and Masks
421
Blending multiple objects
Illustrator has the capability to blend multiple objects in one step. Long gone are the days of
blending, hiding, blending, hiding, and so on. Select all the objects that you want to blend and
then choose Object ➪ Blend ➪ Make, or use the Blend tool to click all the objects that you want to
blend. Figure 12.5 shows a blend that uses four different-shaped rectangles. To create this effect, I
first drew four rectangles, each with a different fill. You need to use different fills in the objects to
see a blend effect like this one.
FIGURE 12.5
Blends can use multiple objects.
Editing a blended object
Blend functionality lets you change the colors of a blend without having to redo the whole blend.
With the Direct Selection tool, select the path whose color you want to change in the blended
shape. Choose a new fill and/or stroke color. The blend updates instantly with the new color.
Another great aspect of Live Blend is the capability to edit the blend at any time and have it
automatically update on the fly. As mentioned before, Illustrator creates a path, or spine, when
you create a blend. With the Direct Selection tool, you can select an anchor point on the spine and
move it. This changes the location of that point, and the blend updates accordingly.
Now you can edit lines by adding, deleting, or moving any part of your blend, and it updates
automatically. You can delete and add points or change the shape of a path with the Direct
Selection tool. Figure 12.6 shows a figure before and after editing the blend. In this case, the
17_584750-ch12.indd 42117_584750-ch12.indd 421 6/3/10 7:57 PM6/3/10 7:57 PM
Part II: Putting Illustrator to Work
422
meeple (board game piece) that begins the blend was modified in the lower blend by dragging the
point at the top of his head up.
FIGURE 12.6
The original figure (top) and the edited blend (bottom) show how a simple modification can create a vastly
different object.
Releasing a blend
If you want to redo a blend, you have to release it first by choosing Object ➪ Blend ➪ Release. This
command eliminates the intermediate objects and leaves you with just the original ones.
Expanding blends
If you want to retain the intermediate objects, choose Object ➪ Blend ➪ Expand. Choosing Object ➪
Blend ➪ Expand expands the blend into a series of individual shapes. You can then move or edit
these shapes independently of the other shapes.
Replacing the spine
The Replace Spine option allows you to make a blend follow a selected path. Follow these steps to
apply this effect:
1. Create the blend as described earlier in this chapter. For example, create a blend that
blends a mostly vertical ellipse into a mostly horizontal ellipse.
17_584750-ch12.indd 42217_584750-ch12.indd 422 6/3/10 7:57 PM6/3/10 7:57 PM
Chapter 12: Using Path Blends, Compound Paths, and Masks
423
2. Draw a path in the shape that you want the spine of the blend to follow. In this case,
draw a large diameter circle to use as the path for the blend.
3. Select the blend with the spine that you want to change and the path that you want
to become the new spine.
4. Choose Object ➪ Blend ➪ Replace Spine. The blend updates automatically, in this case
adding a new step, with the objects distributed evenly from their centers. Figure 12.7
shows before and after a blend has been applied to a path. In this case, the path used in
the lower instance is a circle.
FIGURE 12.7
This demonstrates how the original blend (top) is changed after applying Replace Spine
(bottom).
17_584750-ch12.indd 42317_584750-ch12.indd 423 6/3/10 7:57 PM6/3/10 7:57 PM
Part II: Putting Illustrator to Work
424
Reversing the spine
This menu option reverses the sequence of the objects that you’re blending. If you have a rectangle
on the right blended to a circle on the left, choosing Object ➪ Blend ➪ Reverse Spine places the
circle on the right and the rectangle on the left. Reversing the spine flips the position of the shapes
on the spine, as shown in Figure 12.8.
Reversing front to back
The Reverse Front to Back option reverses the order in which your paths were drawn when you
created your blend. If you drew a small circle first and a large circle second, choosing Object ➪
Blend ➪ Reverse Front to Back places the small circle underneath and the large circle on top, as
shown in Figure 12.9.
FIGURE 12.8
Reversing the spine changes the original (top) by swapping the position of the shapes (bottom).
17_584750-ch12.indd 42417_584750-ch12.indd 424 6/3/10 7:57 PM6/3/10 7:57 PM
Chapter 12: Using Path Blends, Compound Paths, and Masks
425
FIGURE 12.9
Reversing the spine front to back changes the stacking order of the original (top), creating the effect shown
(bottom).
Using nonlinear blends
End paths on a blend with two endpoints (linear segments) used to make blends don’t have to be
just horizontal or vertical. And when you create multiple color blends, you don’t have to align the
intermediate end paths the same way as you align the end paths. Careful setup of intermediate
blends can create many interesting effects, such as circular and wavy appearances, all created with
straight paths.
17_584750-ch12.indd 42517_584750-ch12.indd 425 6/3/10 7:57 PM6/3/10 7:57 PM