Adobe Photoshop CS4 for Photographers phần 7 pps
Bạn đang xem bản rút gọn của tài liệu. Xem và tải ngay bản đầy đủ của tài liệu tại đây (8.58 MB, 71 trang )
Martin Evening
Adobe Photoshop CS4 for Photographers
400
1
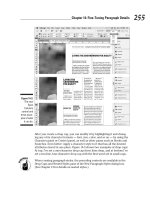
This scanned photograph serves as a good example with which to demonstrate the
history brush spotting technique, as there are a lot of dust marks clearly visible in the
enlarged detail views shown in this picture.
Replacing fi lm grain
You may encounter a problem if the
photographic original contains noticeable
fi lm grain, since even with the selective
application of the Dust & Scratches fi lter
you may end up with some softening
where you retouch the image. To
counteract this it may help to apply a small
amount of noise after you have applied
the Dust & Scratches fi lter. Add enough
noise to match the grain of the original
(usually around 2–3%). This will enable
you to better disguise the history brush
retouching.
Alternative history brush spotting technique
This spotting method has evolved from a technique that
was fi rst described by Russell Brown, Senior Creative
Director of the Adobe Photoshop team. It revolves around
using the Remove Dust & Scratches fi lter, which is found
in the Filter
➯ Noise submenu. If this fi lter is applied
globally to the whole image, you can easily end up with
a very soft-looking result. So ideally, this fi lter should be
applied selectively to the damaged portions of a picture.
The technique shown here has the advantage of applying
the fi ltered information via the history brush such that
only the pixels which are considered too dark are painted
out. This modifi ed approach to working with the Dust &
Scratches fi lter avoids destroying the tonal values in the
rest of the picture.
As you can see, the technique works well when you
have a picture that is very badly damaged and where using
the clone stamp would be a very tedious process. What is
really clever is the way that the Lighten (and Darken) blend
modes can be used to target which pixels are repaired from
the stored Dust & Scratches history state.
401
Image retouching
Chapter 8
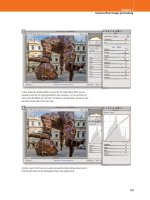
3
I then went to the History panel and clicked on the previous unfi ltered image
history state, but set the Dust & Scratches fi ltered version as the history source to
paint from. I then selected the history brush and in the tool Options bar changed the
history brush blending mode to Lighten. As I painted over the dark spots, the history
brush lightened only those pixels that were darker than the sampled history state. All
other pixels remained unchanged. I continued using the history brush in this way
until I had painted out all the dust spots in the photograph.
Before
After
Lighten/Darken blend mode
The Lighten blend mode was used to
remove the dark marks in the image.
Similarly, one can use the Darken blend
mode to remove any light blemish marks.
For example, if you were to retouch a
scanned color negative, the dust spots
there would show up as white marks.
2
I went to the Filter menu and chose Noise
➯
Dust & Scratches, checked the Filter
dialog preview and adjusted the Radius and Threshold settings until I could verify
that most of the dust marks would be removed. I then clicked OK to apply this fi lter
to the image.
Martin Evening
Adobe Photoshop CS4 for Photographers
402
Portrait retouching
Here is an example of a restrained approach to retouching,
where only a minimal amount of Photoshop editing was
used. Of course you can retouch portraits as if they were
fashion shots, and some publications may demand this, but I
thought I would start off with something more subtle.
1
The top photograph shows the unretouched before version and the version below
this shows the results of the initial retouching in which I mainly used the healing
brush to remove some of the skin blemishes. The key thing here was to not overdo
the retouching. I regard what I did here as being more like ‘tidying and grooming’
rather than ‘digital surgery’.
403
Image retouching
Chapter 8
2
For this next step I wanted to lighten the eyes. To do this, I used the lasso tool to
defi ne the outline of the pupils. In the Adjustments panel I clicked to add a Curves
adjustment and adjusted the curve shape to lighten the selected area. I then selected
the whites of the eyes and applied a separate Curves adjustment. My aim here was to
add more contrast to the pupils making the eyes slightly lighter overall.
3
Lastly, I wanted to adjust the shapes of the eyes. To do this, I used the
COSe LASe command to create a merged copy layer at the
top of the la
yer stack. I made a marquee selection to include the eyes, inverted the
selection and hit D (this was done to keep the fi le size down). I then went to the
Filter menu and chose Liquify (described later in this c
hapter), where I made the left
eye smaller, opened up the eye on the right and raised the eyebrow slightly. I then
clicked OK to complete the retouching shown here.
Martin Evening
Adobe Photoshop CS4 for Photographers
404
Beauty retouching
Beauty photographs require more intense retouching, and
the objective is usually to produce an image where the
model’s features appear to look fl awless. This can be done
through a combination of healing and painting brush work.
Client: ET Nail Art
Model: Karen Gillan @ Bookings
Makeup: Camilla Pascucci
1
The top photograph here shows the before version and the one below shows how
the same image looked after I had added a new empty layer and carried out some
basic spotting work (mostly using the healing brush) to clean up the nails, removed
some spots and got rid of unwanted stray hairs.
Getting the balance right
The main thing I show on these pages
is how to use the paint brush to smooth
the skin tones on the face and hands.
I happen to prefer using the manual
painting approach (rather than relying on
a blur fi lter), because the painting method
offers more control over the retouching.
An important issue here is ‘how much to
retouch?’ This is mostly down to personal
taste. My own personal view is that it is
better to fade any painting work that’s
done and let the natural skin texture show
through – let there be a few wrinkles and
fl aws! It is possible to retouch to produce
a clean-looking image, but still keep the
model looking vaguely human.
405
Image retouching
Chapter 8
2
After that I used the COSe LASe command to create a
merged copy layer at the top of the layer stack and worked with the paint brush on the
merged layer. The trick here was to hold down the O A key to sample a skin tone
color and gentl
y paint using low opacity brush strokes with the blend mode set to
‘Lighten’. This meant the paint strokes only affected those colors that were darker than
the sample color. Similarly, I switched to Darken mode when I wished to darken only
those pixels lighter than the paint sample color. This selective method of painting can
produce more controlled results compared to using the Normal blend mode.
3
This shows the fi nished retouched version in which I faded the opacity of the
painted layer to 60% and added a layer mask so that I could carefully mask the areas
where the paint retouching had spilled over. Lastly, I added a Curves adjustment to
lighten the eyes slightly.
Martin Evening
Adobe Photoshop CS4 for Photographers
406
Liquify
The Liquify fi lter is designed to let you carry out freeform
pixel distortions. When you choose Filter
➯
Liquify, you
are presented with what is called a modal dialog, which
basically means you are working in a self-contained dialog
with its own set of tools and keyboard shortcuts, etc. It is
therefore operating like a program within the Photoshop
program. To use Liquify effi ciently, I suggest you make a
marquee selection fi rst of the area you wish to manipulate
before you select the fi lter and, once the dialog has opened,
use the
C0 L0 shortcut to enlarge the dialog to fi t
the screen.
Basically, you select one of the Liquify tools to
manipulate the image preview and when you are happy
with your liquify work, click
E or R to OK the
pixel manipulation. This will then calculate and apply the
liquify adjustment to the main image.
The Liquify tools are all explained in the column on the
left and the chart shown in Figure 8.10 also summarizes
the effect each of these tools will have on an image. The
easiest of these to get to grips with is the warp tool, which
allows you to simply click and drag to push the pixels in
the direction you want them to go in. However, I also like
working with the push left tool, because it lets me carry
out some quite bold warp adjustments. Note that when you
drag with the push left tool it shifts the pixels 90° to the left
of the direction you are dragging in and when you O A
drag with this tool it will shift the pixels 90° to the right.
The puck
er tool is sometimes useful for correcting over-
distorted areas and squeezing the pixels inwards again.
The refl ection tool is perhaps the most unwieldy of all, as
it copies pixels from 90° to the direction you are dragging
and therefore acts like an inverting lens, which if you are
not careful will easily rip an image apart! Apparently,
retouchers who work on adult magazines are fond of
working with the turbulence tool. This is for reasons I have
yet to fathom and probably inappropriate for me to enquire
about further in this book!
Liquify tools
Warp tool (W)
Provides a basic warp distortion with
which you can stretch the pixels in any
direction you wish.
Reconstruct tool (R)
Used to make selective undos and restore
the image to its undistorted state.
Twirl clockwise tool (C)
Twist the pixels in a clockwise direction.
Hold down the O A key to switch tool
to twirl in a countercloc
kwise direction.
Pucker tool (S)
Shrinks pixels and produces an effect
similar to the ‘Pinch’ fi lter.
Bloat tool (B)
Magnifi es pixels and is similar to the
‘Bloat’ fi lter.
Push left tool (O)
Shifts the pixels 90° to the left of the
direction in which you are dragging.
Mirror tool (M)
Copies pixels from 90° to the direction
you are dragging and therefore acts as an
inverting lens.
Turbulence tool (T)
Produces random turbulent distortions.
Freeze mask tool (F)
Protects areas of the image. Frozen
portions are indicated by a Quick Mask type
overlay. These areas are protected from any
further liquify distortions.
Thaw mask tool (D)
Selectively or wholly erases the freeze tool
area.
Hand tool (H)
For scrolling the preview image.
Zoom tool (Z)
Use to magnify or zoom out.
407
Image retouching
Chapter 8
Bloat toolPucker tool
Twirl tool (with
O A key held down
)
Freeze mask tool
Thaw mask tool
Figure 8.10
These illustrations give you an
idea of the range of distortion effects that can
be achieved using the Liquify tools described
on page 406.
Warp tool
Twirl tool
Reconstruct tool
Push left tool
Mirror tool
Turbulence tool
Martin Evening
Adobe Photoshop CS4 for Photographers
408
Figure 8.11
The Liquify dialog options.
The Reconstruct Options are shown circled here.
Liquify tool controls
Once you have selected a tool you will want to check out
the associated tool options, which are shown in Figure
8.11. All the tools (apart from the hand and zoom tool)
are displayed as a circular cursor with a crosshair in the
middle. The tool options are applied universally to all
the tools and these include: Brush Size, Brush Density,
Brush Pressure and Brush Rate. If you mouse down on the
double-arrow icon next to the fi eld entry box, this will pop
a dynamic slider which can be used to adjust the settings.
You can also use the square bracket keys
[ ] to enlarge
or reduce the tool cursor size, and the rate of increase/
decrease can be accelerated by holding down the
S key.
I highly recommend that you use a pressure-sensitive pen
and pad such as the Wacom system and, if you do so, make
sure that the Stylus Pressure option is checked and set the
brush pressure to around 10–20%. Note that the Turbulent
Jitter control is only active when the turbulence tool is
selected. In this context the jitter refers to the amount
of randomness that will be introduced in a turbulence
distortion applied with this tool.
Reconstructions
Next we have the Reconstruct Options. The standard mode
is Revert and if you apply a Liquify distortion and click on
the Reconstruct button, the image will be restored to
its undistorted state in gradual stages each time you click
the button (while preserving any areas that have been
frozen with the freeze tool). If you click on the Restore
All button the entire image will be restored in one step
(ignoring any frozen areas). The default Revert mode
produces scaled reversions that return you to the original
image state in the preview window. However, there are
some alternative options which are more relevant once
you have created a frozen area. For example, the Rigid
mode provides one-click reconstruction. Stiff, Smooth and
Loose provide varying speeds of continual reconstruction,
producing smoother transitions between the frozen and
unfrozen areas as you revert the image. You can use
‰ or
One step at a time
The key to working successfully with
the Liquify fi lter is to use gradual brush
movements to build up a distortion. This is
why I prefer to set the ‘Brush Pressure’ at
an extremely low setting and use a Wacom
pad to apply the liquify brush strokes, with
the Stylus Pressure option selected.
Liquify shortcut
Prior to CS4 you could access Liquify
using the CSx LSx
shor
tcut. T
his has now been removed in
CS4, but you can easily reset this as a
custom keyboard shortcut.
811
Th Li if di l ti
409
Image retouching
Chapter 8
C. L. to halt the reconstruction at an intermediate
stage (but do avoid applying this shortcut twice, as this
will exit the Liquify dialog and you’ll lose all your work!)
Another way to reconstruct the image is to click on the
options triangle in the Reconstruct Options and select one
of the options from the list. This will pop a dialog control
like the one shown in Figure 8.12, which will allow you to
use a slider to determine what percentage of reconstruction
you would like. The reconstruction can also be achieved
using the reconstruct tool to selectively restore the image.
Mask options
The mask options can utilize an existing selection, layer
transparency or a layer mask as the basis of a mask to
freeze and constrain the effects of any Liquify adjustments.
The fi rst option is ‘Replace Selection’ and this replaces any
existing freeze selection that has been made. The other four
options allow you to modify an existing freeze selection by
‘adding to’, ‘subtracting from’, ‘intersecting’ or creating
an ‘inverted’ selection. You can then click on the buttons
below. Choosing ‘None’ clears all freeze selections,
choosing ‘Mask All’ freezes the entire area, and choosing
‘Invert All’ inverts the current frozen selection.
Figure 8.12
You can control the exact amount
by which an image is reconstructed to its original
state by going to the Reconstruct Options and
selecting the desired reconstruction mode.
Multiple undos in Liquify
Don’t forget that you also have multiple
undos at your disposal while inside the
Liquify dialog. Use Cz Lz to
undo or redo the last step; COz
LAz to go back in history, and
CSz LSz to go forward
in histor
y
.
Figure 8.13
Freeze masks can be used to
protect areas of a picture before you commence
doing any liquify work. In the example shown
here a freeze mask was loaded from a layer
mask. When you freeze an area in this way it is
protected from subsequent distortions so you
can concentrate on applying the Liquify tools
to just those areas you wish to distort. Frozen
mask areas can be unfrozen by using the thaw
mask tool.
Martin Evening
Adobe Photoshop CS4 for Photographers
410
View options
The freeze mask can be made visible or hidden using the
Show Mask checkbox in the View options, where you can
also set the color of the mask (Figure 8.14).
The mesh grid can be displayed at different sizes using
different colors. This provides you with an indication of the
underlying warp structure and will readily help pinpoint the
areas where a distortion has been applied. You can use the
checkboxes in this section to view the mesh on its own or
have it displayed overlaying the Liquify preview image.
The Show Backdrop option is normally left unchecked.
If the Liquify image contents are contained on a layer, then
it is possible to check the ‘Show Backdrop’ option and
preview the liquifi ed layer against the Background layer,
all layers or specifi c layers in the image. Here is how this
option might be used. Let’s say that you want to apply
a liquify distortion to a portion of an image and you are
starting out with just a fl attened image. Make a selection
of the area you wish to work on and make a copy layer
via the selection contents using
Cj Lj. As you
apply the Liquify fi lter you can check the Show Backdrop
checkbox and set the mode to ‘Behind’. At 100% opacity the
Liquify layer will cover the Background layer completely,
but as you reduce the opacity you can preview the effect
of your liquify distortion at different opacity percentages.
This technique can prove useful if you wish to compare the
effect of a distortion against the original image or a target
distortion guide (see Figure 8.16).
Saving the mesh
If you are working on an extremely large image then it may
take a long time to carry out a liquify distortion. This is
where the ‘Save Mesh ’ and ‘Load Mesh ’ buttons can
come in useful. If you carry out your Liquify distortions on
a scaled-down version of the master image fi rst, you can
save the mesh as a separate fi le. Later, you can open up the
master fi le, load the mesh you saved earlier and apply it to
the master image.
Liquify and Smart Filters
Note that the Liquify fi lter cannot be
applied to a Smart Object as a Smart Filter.
Figure 8.14
The Liquify dialog View options.
411
Image retouching
Chapter 8
Figure 8.15
This shows the Liquify dialog with the mesh view switched on.
Figure 8.16
If you have a predetermined idea of what the fi nal distortion should
look like you can create an empty layer, draw the target distortion shape on this layer
and use the ‘Show Backdrop’ options discussed here to select that specifi c layer, and
have the ability to switch the guide Layer visibility on or off.
Martin Evening
Adobe Photoshop CS4 for Photographers
412
1
The objective here was to straighten the
model’s fringe using Liquify. First I used the
COSe LASe command
to create a merged cop
y layer at the top of the
layer stack, then made a selection of the area of
interest, inverted the selection and hit D.
2
I then chose Filter
➯
Liquify and selected the
freeze mask tool to protect the eyes from being
edited. I then selected the warp tool and with
a succession of low pressure brush strokes,
gradually moved the fringe line into better shape.
Straightening a fringe with Liquify
413
Image retouching
Chapter 8
3
When I was happy with the way the fringe
looked, I clicked OK. This screen shot shows
how the fringe appeared after applying the Liquify
fi lter.
4
Finally, I wanted to even up the eyes and
make the left eye bigger. With the layer selection
still active, I chose ‘Liquify’ again. This time
there was no need to apply a freeze mask, so I
simply selected the warp tool and used more
low pressure brush strokes to carefully push the
edges of the eye outwards and make the left eye
a little bit bigger. When I was done, I clicked OK
again to apply the Liquify fi lter.
Martin Evening
Adobe Photoshop CS4 for Photographers
414
Warp Transforms
The Liquify fi lter is ideal for applying intricate distortions
such as the example shown on the previous two pages. This
is because you have a large selection of tools to work with
and various options for modifying the liquify distortions. If
you need to distort larger areas of a picture and create more
continuous distortion shapes, then the warp transform tool
is a better tool to use. I’ll be discussing this in more detail
in Chapter 9, but in Figure 8.17 you can see an example of
a transform applied to a copied layer where I was able to
smoothly distort the shape of the strap and the necklace.
Figure 8.17
The Warp transform command offers an effective way to transform
larger objects such as the straps in this picture. What I did here was to make a copy
layer of the area of interest. I then went to the Edit menu, chose Free Transform
(Ct Lt) and clicked on the Warp mode button in the Options bar (circled).
This allow
ed me to adjust the Transform handles and segments to achieve the desired
warp effect.
415
Layers, Selections
and Masking
F
or a lot of people the real fun starts when you
can use Photoshop to swap parts of one
photograph with another and make composite
photographs using different image elements.
This chapter explains the different tools that can be used
making composites as well as the intricacies of working
with the Layers panel, Channels and the pen tool. But to
begin with, let us focus on some of the basic principles of
how to make a selection and the interrelationship between
selections, alpha channels, masks and the Quick Mask
mode.
Chapter 9
Martin Evening
Adobe Photoshop CS4 for Photographers
416
Selections and channels
When you read somewhere about masks, mask channels,
image layer mask channels, alpha channels, quick masks
and saved selections, these are basically all the same thing:
an active, semipermanent or permanently saved selection.
Selections
There are many ways you can create a selection in
Photoshop. You can use any of the main selection tools
such as the Select
➯ Color Range command, or convert
a channel or path to a selection and, when you use a
selection tool to defi ne an area within an image, you will
notice that the selection is defi ned by a border of marching
ants (Figure 9.1). Selections are only temporary though,
because if you make a selection and accidentally click
outside the selected area with the selection tool, it will
disappear. Although, you can restore a selection by using
the Edit
➯ Undo command (Cz Lz).
During a typical Photoshop session, you will typically
use selections to defi ne the areas of the image where you
wish to carry out image edits or copy the pixels, and when
you are done, deselect them. If you end up spending any
length of time preparing a selection, you will usually want
to save such selections by storing them as alpha channels
(also referred to as ‘mask channels’). To do this, go to the
Select menu and choose Save Selection. The Save Selection
dialog box (Figure 9.2) will then ask if you want to save
Figure 9.1
A selection is represented in
Photoshop using marching ants.
Figure 9.2
To save a selection as a new alpha channel you can choose Select
➯
Save Selection and select the New Channel button option.
417
Layers, selections and masking
Chapter 9
Figure 9.3
When you save a selection it is added as a new alpha channel in the
Channels panel. An alpha channel can be viewed by clicking on the channel name. If
you keep the composite channels selected and click on the empty space next to the
channel (circled), you can preview an alpha channel as if it were a quick mask.
Recalling the last used selection
The last used selection will often be
memorized in Photoshop. Just go to
the Select menu and choose ‘Reselect’
(CSd LSd).
Omitting channels in a save
As was pointed out in the text, channels
are automatically saved when you save an
image. However, if you choose Save As
you do have the option to exclude saving
alpha channels with an image.
the selection as a new channel. If you select a pre-existing
channel from the Channel menu you will have the option
to add, subtract or intersect with the selected channel.
You can also create new alpha channels by clicking on the
‘Save selection as a channel’ button at the bottom of the
Channels panel, which will convert a selection to a channel.
If you look at the Channels panel shown in Figure 9.3, you
will notice how a saved selection is added as a new alpha
channel (this will be channel #6 in RGB mode, or #7 if
in CMYK mode). Also, you can click on the ‘Create new
channel’ button, then fi ll the empty new channel with a
gradient or use the brush tool to paint in the alpha channel
using the default black or white colors. New channels are
always stored when you save the image.
To load a saved channel as a selection, choose ‘Load
Selection’ from the Select menu and select the appropriate
channel number from the submenu. Alternatively, you can
C L-click the alpha channel in the Channels panel,
or select a channel and click on the ‘Load channel as a
selection’ button.
Save selection as a channel
Load channel
as a selection
Toggle channel
visibility
Delete channel
Composite channel
Channels panel
options menu
Alpha channel
Blue channel
Green channel
Red channel
Create new channel
Martin Evening
Adobe Photoshop CS4 for Photographers
418
Figure 9.4
The left half of the image shows a
feathered selection and the right half shows the
Quick Mask mode equivalent display.
Figure 9.5
The Quick Mask Options.
In marching ants mode, a selection is active and ready
for use. Any image modifi cations you carry out will be
applied within the selected area only, but remember,
selections are only temporary and can be deselected by
clicking outside the selection area with a selection tool or
by choosing Select
➯ Deselect (Cd Ld). If you
simply want to temporarily hide the marching ants, then
use
Ch Lh.
Quick Mask mode
You can also preview and edit a selection in Quick
Mask mode where the selection will be represented as a
transparent colored mask overlay. To switch to Quick Mask
mode from a selection, click the quick mask icon in the
Tools panel (Figure 9.6) or use the keyboard shortcut
q
to toggle back and forth between the selection and Quick
Mask modes. Whether you are working directly on an alpha
channel or in quick mask, modifi cations can be carried
out using any of the fi ll, paint or selection tools even. You
can also use any combination of Photoshop paint tools or
image adjustments to modify the alpha channel content. If
you double-click the quick mask icon, this opens the Quick
Mask Options shown in Figure 9.5, where you can alter
the masking behavior and choose a different color from the
Color Picker (this might be useful if the quick mask color is
too similar to the colors in the image you are editing).
Figure 9.6
The Quick Mask mode button is in the Tools panel just below the
foreground/background swatch colors. Shown here are the two modes: Selection
mode (left) and Quick Mask mode (right). You can switch between these by clicking
on this button. Double-click to adjust the Quick Mask color settings.
419
Layers, selections and masking
Chapter 9
1
I thought I would start with a straightforward example where I selected the
elliptical marque tool and dragged it to defi ne the shape of the mirrored sculpture. In
order to preserve the selection, I saved it as a new channel, which was then added to
the Channels panel list.
2
It’s all very well making a selection, but what do you do with it once you have made
it? Well, in this example I used the selection to modify the image. Here, I loaded the
selection, went to the Adjustments panel and added a new Curves adjustment using
the settings shown here. This applied the adjustment to the selected area only. I then
went to the Masks panel and clicked on the Invert button to invert the selection and
set the mask Feather to 2 pixels.
Creating an image selection
Martin Evening
Adobe Photoshop CS4 for Photographers
420
Modifying selections
You can modify the content of a selection using the
modifi er key methods discussed earlier in Chapter 1 (see
pages 34–35). Just to recap, you hold down the
S key to
add to a selection, hold down the
O A key to subtract
from a selection and hold down the
OS AS keys
to intersect a selection as you drag with a selection tool.
The magic wand is a selection tool too, but all you have
to do is to click (not drag) with the magic wand, holding
down the appropriate keys to add or subtract from a
selection. Note also that if you select either the lasso or one
of the marquee tools, placing the cursor inside the selection
and dragging moves the selection boundary position, but
not the selection contents.
Alpha channels
An alpha channel is effectively the same thing as a mask
channel and if you choose Select
➯ Save Selection, you
can save any selection as a new alpha channel; these are
stored by default in numerical sequence below the main
color channels. Just like normal color channels, an alpha
channel can contain up to 256 shades of gray in 8-bits per
channel mode or up to 32,000 shades of gray in 16-bits per
channel mode.
You can select channels by going to the Channels panel
and clicking on the desired channel. Once selected, it can
be viewed on its own as a grayscale mask and manipulated
almost any way you like inside Photoshop. An alpha
channel can also effectively be viewed in a ‘Quick Mask’
type mode. To do this, fi rst select an alpha channel and then
click on the eyeball icon next to the composite channel,
which is the one at the top of the Channels panel list (see
Figure 9.3). You will then be able to edit the alpha channel
mask with the image visible through the mask overlay.
There are several ways to convert an alpha channel back
into a selection. You can go to the Select menu, choose
Load Selection and then select the name of the channel. A
simpler method is to drag the channel down to the Make
Selection button at the bottom of the Channels panel, or
C L-click a channel in the Channels panel.
Reloading selection shortcuts
To reload a selection from the saved mask
channel, go to Select ➯ Load Selection.
C L-clicking a channel is the other
shor
tcut f
or loading a selection and, by
extension, combining CO c
hannel
#
LA channel # (where # equals the
channel number) does the same thing.
One thing to be aware of here is
that in CS4 the usual shortcut numbers
have been shifted along by two. I have
mentioned this a couple of times already,
but it is worth repeating since this is
something that is likely to catch people
out who are used to working with previous
versions of Photoshop. Basically,
C0
L0 is used (as before) to zoom
the imag
e to fi
t the screen and C1
L1 is now used to zoom to 100%.
Where C` L` was once used
to select the composite c
hannel, the
ne
w shortcut is now C2 L2.
T
his means that you should use C3
L3
to select the red channel, C4
L4 to select the green channel,
C5 L5 to select the blue channel
and subsequent numbers to select any
additional mask/alpha c
hannels that are
stored in an imag
e.
421
Layers, selections and masking
Chapter 9
Adding to an image selection
1
Let’s add an extra step to the example shown on page 419. Here, I started off
with an elliptical selection. I then selected the rectangular marquee tool and dragged
across the image with the S key held down in order to add to the elliptical
selection.
2
I did actually refi ne the selection a little more than that, because I also selected the
polygon lasso tool and again, with the S key held down, clicked a few more times
to add the outline of the b
uilding on the left. As with the previous example I added
a Curves adjustment and clicked on the Invert button in the Masks panel so that the
adjustment darkened the areas outside the selection. I then added a 2 pixel feather to
the selection edge to obtain a smoother edge blend.
Martin Evening
Adobe Photoshop CS4 for Photographers
422
Convert to vector mask
Convert to mask
Convert to selection
Convert to selection
Convert to Quick Mask
Convert to path
Convert to selection
Rasterize Vector mask
Figure 9.7
The above diagram illustrates the interrelationship
between pen paths, vector masks, alpha channels, selections and
quick masks. For example, you can convert a selection to a mask
and a mask back into a selection, and a selection can temporarily
be displayed and edited in Quick Mask mode and switched back to
Selection mode again. The red arrows indicate that some data loss
will incur during the conversion from one state to the other.
423
Layers, selections and masking
Chapter 9
Selections, alpha channels and masks
As was pointed out at the beginning of this chapter,
there is always an intertwined relationship between
selections, quick masks and alpha channel masks. This
interrelationship also extends to the use of vector paths and
vector masks (vector paths are discussed towards the end
of this chapter). The accompanying diagram in Figure 9.7
illustrates these relationships more clearly.
Starting at the top left corner, we have a path outline
that has been created with the pen tool in Photoshop. A pen
path outline can be saved as a path and an active path can
be used to create a vector mask, which is a layer masked
by a pen path mask (see pages 480 and 484–486). A vector
mask can also be rasterized to make a layer mask (a layer
that is masked by an alpha channel). Meanwhile, a pen
path can be converted to a selection and a selection can be
converted back into a work path. If we start with an active
selection, you can view and edit a selection as a quick
mask, and a selection can also be converted into an alpha
channel and back into a selection again.
When preparing a mask in Photoshop, most people will
start by making a selection to defi ne the area they want to
work on and save that selection as an alpha channel mask.
This will allow you to convert the saved alpha channel back
into a selection again at any time in the future. The other
way to prepare a mask is to use the pen tool to defi ne the
outline fi rst and then convert the pen path to a selection. If
you think you will need to reuse the pen path again, such
as to convert to a selection again at a later date, then it is
worth remembering to save the work path as a named path
via the Paths panel.
The business of using vector masks and layer masks is
covered in more detail later on, but basically, a layer mask
is an alpha channel applied to a layer which defi nes what
is shown and hidden on the associated layer, and a vector
mask is a pen path converted to a vector mask that defi nes
what is shown and hidden on the layer.
Converting vectors to pixels
In Figure 9.7 I mention that some of the
conversion processes will incur a loss of
data. This is because when you convert
vector data to become a pixel-based
selection, what you end up with is not
truly reversible. Drawing a pen path and
converting the path to a selection is a very
convenient way of making an accurate
selection. However, if you attempt to
convert the selection back into a pen path
again you will not end up with an identical
path to the one that you started with.
Basically, converting vectors to pixels is a
one-way process.
Converting a vector path into a pixel-
based selection is a good thing to do, but
you should be aware that converting a
pixel-based selection into a vector path
will potentially incur some loss of data.
More specifi cally, a selection or mask can
contain shades of gray, whereas a pen
path merely describes an outline where
everything is either selected or not.
Martin Evening
Adobe Photoshop CS4 for Photographers
424
1
The objective here was to make a simple soft-
edged selection based on blue color values and
change the color of the background slightly. I
used the magic wand tool to make a selection of
the backdrop. A tolerance setting of 20 was used
and I enlarged the selection by choosing Select
➯
Grow. Note that the amount of growth was
governed by the Tolerance value set in the magic
wand tool options.
Expanding and shrinking selections
To expand or shrink a selection choose Select ➯ Modify
➯ Expand/ Contract, where you can modify the selection
size up to a maximum of 100 pixels. Although the most
accurate way to expand or contract an active selection
is to choose Select ➯ Transform Selection and use
the bounding box handles to scale the selection more
accurately.
Smoothing a selection
Other options include Border and Smooth. The border
modifi cations are rather crude, but they can sometimes
be improved by feathering the border selection or saving
the selection as an alpha channel and then applying the
Gaussian Blur fi lter.
If you create a selection using the magic wand, the
chances are that the selection won’t be as smooth as you
think. You will mostly notice this when you view such a
selection in Quick Mask mode. The Smooth option in the
Select
➯ Modify submenu addresses
this by letting you
adjust the level of tolerance and thereby determine how much
to smooth out the pixels that are included in the selection.
Grow and Similar
The Grow and Similar options enlarge the
selection using the same criteria as used
with the magic wand tool, regardless of
whether the original selection was created
with the wand or not. To determine the
range of color levels you want the selection
to expand by, enter a tolerance value in
the Options bar for the magic wand tool. A
higher tolerance value means that a wider
range of color levels will be included in the
enlarged selection.
The Select
➯ Grow option expands
the selection, adding contiguous pixels,
i.e. those immediately surrounding the
original selection of the same color values
within the specifi ed tolerance. The Select
➯ Similar option selects more pixels from
anywhere in the image that have the same
color values within the specifi ed tolerance.
1
The objective here was to make a simple soft
-