Adobe Photoshop CS4 for Photographers phần 8 ppt
Bạn đang xem bản rút gọn của tài liệu. Xem và tải ngay bản đầy đủ của tài liệu tại đây (8.38 MB, 71 trang )
471
Layers, selections and masking
Chapter 9
1
The easiest way for me to illustrate the power of the Warp
transform is to take a made-up fl ag layer and use the custom warp
controls to distort the fl ag shape to make it appear as if it were
fl apping in the wind. In the Layers panel view shown here, you can
see that I had the fl ag layer and a shadow layer above it. I began
by selecting both these layers before converting them into a Smart
Object.
2
I then went to the Edit menu and selected Edit
➯
Transform
➯
Warp. The default option is the Custom mode, where I had
access to the bezier control handles at the four corners of the warp
bounding box. These could be adjusted in the same way as you
would manipulate a pen path to control the outer shape of the
warp. Here, I was able to drag the corner handles and click inside
any of the nine sectors and drag with the mouse to manipulate the
fl ag Smart Object layer, just as if I were stretching the image on a
rubber canvas.
3
I was able to adjust the warp so that the fl ag was twisted in on itself
to reveal the reverse side of the fl ag. You will notice below how the
distorted fl ag existed as a Smart Object layer, where the two layers
that make up the fl ag design were both warped in unison.
2
I
t
h
e
n w
e
n
t
to
t
h
e
E
d
i
t
m
e
n
u
a
n
d
se
l
ected
E
d
i
t
➯
Tr
a
n
sfo
rm
Martin Evening
Adobe Photoshop CS4 for Photographers
472
Figure 9.41
The Layer
➯
Arrange submenu.
Figure 9.42
The Layer
➯
Align submenu.
Figure 9.43
This shows the move tool Options bar in alignment/distribution
mode. Note that the alignment options (shaded blue) will only become available when
two or more layers are selected, and the distribution options (shaded green) are only
available when three or more layers are selected.
Arrange, Align and Distribute shortcuts
Note here that all the Layer menu and
Layers panel shortcuts are listed in a
separate appendix which is available on the
DVD as a PDF document.
Transforms and alignment
When you have more than one layer in an image, the layer
order can be changed via the Layer
➯ Arrange submenu
(Figure 9.41), which you can use to bring a layer forward
or send it further back in the layer stacking order (you can
also use the keyboard shortcuts shown here).
If two or more layers are linked, these can be aligned in
various ways via the Layer
➯ Align Linked menu (Figure
9.42). To use this feature, fi rst make sure the layers you
want to align are selected, are linked together, or are in a
layer group. The Align commands can then be used to align
the linked layers using the different rules shown in the
submenu list. i.e. you can align to the Top, Vertical Centers,
Bottom, Left, Horizontal Centers or Right Edges, and the
alignment will be based on whichever is the top-most or
left-most layer, etc. There is also the Distribute submenu,
which contains an identical list of options to the Align
menu but is only accessible if you have three or more
layers selected, linked, or in a layer group. The Distribute
commands allow you to distribute layer elements evenly
based on either the Top, Vertical Centers, Bottom, Left,
Horizontal Centers or Right axes. So for example, if you
had three or more linked layer elements and you wanted
them to be evenly spread apart horizontally, and you also
wanted the distance between the midpoints of each layer
element to be equidistant, you would select all the layers
and choose Layer
➯ Distribute ➯ Horizontal Centers.
Rather than use the layer menu options you can also
click on the Align and Distribute buttons in the move tool
Options bar (Figure 9.43). Generally, I would say the Align
and Distribute features are perhaps more useful for graphic
designers, where they might want to precisely align image
or text layer objects in a Photoshop layout.
F
igure
9
.
4
3
This shows the move tool Options bar in alignment/distribution
473
Layers, selections and masking
Chapter 9
1
The following steps show how I created a kaleidoscope image from a single shoe
image that was cut out using a vector mask (see pages: 484–486).
2
I dragged and placed this layer in a new image document, with the layer aligned
to the guides shown here. I then converted the layer to a Smart Object (I did this by
going to the Layers panel fl y-out menu and chose ‘Convert to Smart Object’).
Photograph by Davis Cairns. Client: Red or Dead.
Using transforms to create a kaleidoscope pattern
Martin Evening
Adobe Photoshop CS4 for Photographers
474
3
I duplicated the Smart Object layer by dragging it to the New Layer button in the
Layers panel. I then selected ‘Free Transform’ from the Edit menu and positioned the
central axis point on the point where the two guides cross, and dragged outside the
bounding box to rotate the layer. I held down the S key as I did this, to constrain
the rotation to 4 x 15° increments (i.e. rotated it 60°).
4
I repeated this exercise four more times until I ended up with the kaleidoscope
pattern image shown here. You can also apply such Repeat Transforms using the
CSt LSt
keyboard shortcut.
475
Layers, selections and masking
Chapter 9
5
I then clicked on the Add New Adjustment/Fill button in the Layers panel (circled)
to add a radial Gradient Fill layer just above the Background layer, using the colors
shown here.
6
Lastly, just for fun, I selected all the shoe layers and clicked on the Align Bottom
Edges button in the move tool Options bar. This aligned all the shoe layers to the
layer with the bottom-most edge.
Martin Evening
Adobe Photoshop CS4 for Photographers
476
Smart Objects
One of the main problems you face when editing
pixel images is that every time you scale an image or
the contents of an image layer, the pixel information
becomes degraded, and if you make cumulative transform
adjustments the image quality degrades quite rapidly. If
you convert a layer or a group of layers into a Smart Object
(Figure 9.44), this stores the layer (or layers) data as a
separate image document within the master image. The
Smart Object data is therefore ‘referenced’ by the parent
image and edits that are applied to the Smart Object layer
(such as a transform adjustment) are applied to the proxy
only instead of to the pixels that actually make up the layer.
With Smart Object layers you can use any of the
transform adjustments described so far (including warp
transforms) plus you can also apply fi lters to a Smart
Object layer (known as Smart Filtering). What you can’t
do is edit a Smart Object layer directly using, say, the clone
stamp tool or paint brush, but you can double-click a Smart
Object layer to open it as a separate image document,
where you can then apply all the usual edit adjustments
before closing it, after which the edit changes are updated
in the parent document.
Figure 9.44
You can promote a layer or group of layers to become a Smart
Object. A Smart Object becomes a fully editable, separate document within a
Photoshop document. The principal advantage is that you can repeatedly scale,
transform or warp a Smart Object in the parent image without affecting the integrity of
the pixels in the original Smart Object document.
Edit Contents
Save Smart Object
Smart Filters
If you go to the Filter menu, there is an
option there called ‘Convert for Smart
Filters’. What this does is to convert a
selected layer to a Smart Object, which
this is no different from choosing ‘Convert
to Smart Object from the Layers panel
fl y-out menu. With Smart Objects you can
apply most Photoshop fi lters (including
some third-party fi lters), but not all.
However, you can enable all fi lters to
work with Smart Objects by loading the
‘EnableAllPluginsforSmartFilters.jsx’
script. I’ll be explaining how this is done
later, in Chapter 10.
477
Layers, selections and masking
Chapter 9
1
We’ll now examine in more detail how you would use a Smart Object in Photoshop.
Here is a photograph of a book that shows a couple of my promotional photographs,
where let’s say I wanted to place the male portrait image so that it matched the scale,
rotation and warp shape of the photograph on the right-hand page.
2
I used the move tool to drag the photograph across to add it as a new layer and then
went to the Layers panel options and chose ‘ Convert to Smart Object’. This action
preserved all the image data on this layer in its original form. I then went to the Edit
menu and chose Free Transform. Because the layer boundary exceeded the size of
the Background layer, I had to zoom out in order to access the corner handles of the
Transform box.
Quick tip
In these situations it is useful to remember
that you can use the C0 L0
keyboard shortcut to quickly zoom out
just far enough to reveal the transf
or
m
bounding box handles.
Martin Evening
Adobe Photoshop CS4 for Photographers
478
3
I then scaled the Smart Object layer down in size so that it more closely matched
the size of the photograph on the page. I also dragged the cursor outside the
transform bounding box, in order to rotate the photograph roughly into position.
4
After that, I clicked on the Warp button in the Options bar (circled). This allowed
me to fi ne-tune the position of the Smart Object layer, by using the corner curve
adjustment handles to modify the outer envelope shape. I then moused down inside
some of the inner sections and dragged them so that the inner shape also matched
the curvature of the page.
479
Layers, selections and masking
Chapter 9
5
I was then able to edit the Smart Object layer any way I liked. To do this, I went
to the Layers panel fl y-out menu and selected ‘ Edit Contents’. An alternative option
was to simply double-click on the Smart Objects layer in the Layers panel. In the
example shown here, I added a Text layer plus a Curves adjustment layer to turn the
photograph blue. I then closed the window and as I did so this popped the prompt
dialog shown here, reminding me to click ‘Save’ in order to save and update the
master Smart Object layer.
6
Here is the fi nal image in which I added a Curves adjustment layer in a clipping
group with the Smart Object layer so that the shading matched that of the original
photograph on the page.
Martin Evening
Adobe Photoshop CS4 for Photographers
480
Photoshop paths
The selection tools are nice and easy to use and many
people will quite happily use Color Range and the quick
select tool to make selections of the bits they wish to edit
in a photograph. Other times, you might get by painting
on a quick mask to defi ne a selection. However, if you are
editing anything other than low resolution images there will
be times when the standard selection tools just won’t give
you the precision you are after. It’s times like these when
you really need a more accurate way to defi ne an outline,
and this is where the pen tools and vector paths come in.
Granted, it’s not easy to master the pen tool, but if
you are planning to work with large fi les, you will fi nd it
quicker to draw a path and convert this to a selection rather
than rely on the selection and paint tools alone. Figure 9.45
shows a summary of how a pen path can be converted to a
selection or a vector mask that isolates an object.
Figure 9.45
An active path can be converted to make a selection. You can also
use a path to make a vector mask (from the Layer menu choose Add Vector Mask
➯
Current Path).
Selections to paths
An active selection can also be converted
to a path by clicking on the ‘Make work
path from selection’ button at the bottom
of the Paths panel. Alternatively, choose
the ‘Make work path’ option from the Paths
panel fl y-out menu.
481
Layers, selections and masking
Chapter 9
Path modes
The pen tool has three operating modes, of which there are
only two modes that we are interested in. If the pen tool is
in Shape layers mode (Figure 9.46), when you draw with
the pen tool it will create a vector mask path outline that
masks a solid fi ll layer fi lled with the current foreground
color. If you click on the Paths mode button in the pen tool
Options bar this will allow you to create a pen path without
adding a fi ll layer to the document. You can of course use
any path outline to generate a vector mask, so I usually
suggest you switch the pen tool to Paths mode and leave it
set like this.
Drawing paths with the pen tool
Unless you have had previous experience working with
a vector-based drawing program like Adobe Illustrator,
drawing with the pen tool will probably be an unfamiliar
concept. It is diffi cult to get the hang of at fi rst, but I
promise you this is a skill that’s well worth mastering! It’s
a bit like learning to ride a bike – once you have acquired
the basic techniques, everything will start to fall into place.
Paths are useful in several ways: either for applying a stroke
with one of the paint tools, for saving as a clipping path, or
defi ning complex shapes, which in turn can be converted to
a selection or applied as a vector mask to mask a layer.
Guidelines for drawing pen paths
We shall start with the task of following the simple
contours illustrated in Figure 9.47. You will fi nd a copy of
this image as a layered Photoshop fi le on the DVD – this
image contains saved path outlines of each of the shapes.
The Background layer contains the Figure 9.47 image
and above it there is another layer of the same image but
with the pen path outlines and all the points and handles
showing. Make this layer visible and fade the opacity as
necessary so that you can follow the handle positions when
trying to match the paths yourself. Start at the basic level
with the ‘d’ shape (Figure 9.48). If you have learnt how to
draw with the polygon lasso tool, you will have no problem
drawing this path outline. Click on the corner points one
Figure 9.47
The Path tutorial fi le which can be
found on the DVD.
Figure 9.48
Simply click with the pen tool to
create straight line segments.
Figure 9.46
The Shape layers mode has in
the past been the default setting in the pen tool
options. I usually recommend that you click on
the Paths mode button and leave this as your new
default.
Paths
Shape layers
Martin Evening
Adobe Photoshop CS4 for Photographers
482
after another until you reach the point where you started.
As you approach this point you will notice a small circle
appears next to the cursor, which indicates you can now
click to close the path. Actually this is better than drawing
with the polygon lasso, because you can zoom in if
required and precisely reposition each and every point. To
do this, hold down the
C L key to temporarily switch
the pen tool to the direct selection tool and drag a point to
realign it precisely. After closing the path, hit
CE
LE t
o convert the path to a selection, or click E
on its own to deselect the path.
Now try to follow the ‘h’ shape (Figure 9.49). This
will allow you to concentrate on the art of drawing curved
segments. Note that the beginning of any curved segment
starts by you dragging the handle outward in the direction
of the intended curve. (To understand the reasoning behind
this, imagine you are trying to defi ne a circle by following
the imagined edges of a square box that contains the
circle). To continue a curved segment, click and hold the
mouse down while you drag to complete the shape of the
end of the previous curve segment (and predict the initial
curve angle of the next segment). This last statement is
written assuming that the next curve will be a smooth
continuation of the last. If there happens to be a sharp
change in direction of the shape you are trying to follow,
you will need to add a corner point. You can convert a
curved anchor point to a corner point by holding down the
O A
key and clicking on it. Click to place another point
and this will create a straight line segment between the two
points. Now, if you hold down the C L key you can
temporarily access the
direct selection tool and reposition
the points.
When you click on a point or a segment with this
tool, the handles are displayed and you can use the direct
selection tool to adjust these and refi ne the curve shape.
With the ‘v’ shape (Figure 9.50) you can further
practice making curved segments and adding corner points.
These should be placed whenever you intend the next
segment to break with the angle of the previous segment. In
the niches of the ‘v’ shape, hold down the
O A key and
drag to defi ne
the predictor handle for the next curve shape.
Figure 9.49
To draw a curved segment,
instead of clicking, mouse down and drag as you
add each point. The direction and length of the
handles defi ne the shape of the curve between
each path point.
Figure 9.50
When you create a curved
segment the next handle will continue to predict a
curve, continuing from the last curved segment.
To make a break, you need to modify the curve
point by converting it to a corner point. To do
this, hold down the
O A
key, click on the
path point and drag to create a new predictor
handle going off in a new direction.
483
Layers, selections and masking
Chapter 9
Figure 9.51
The easiest way to get accustomed to working with the pen tool is to
go to the Pen Options in the Options bar, mouse down on the Pen Options (circled)
and check the ‘Rubber Band’ option.
Pen tool shortcuts summary
To edit a pen path, you use the C L key to temporarily
convert the pen tool to the direct selection tool, which you
use to click on or marquee anchor points and reposition
them. You use the
O A key to convert a curve anchor
point to a corner anchor point and vice versa. If you want
to convert a corner point to a curve,
O A+mouse down
and drag. To change the direction of one handle only, you
O A
drag on a handle. To add a new anchor point to an
active path, simply click on a segment with the pen tool,
and to remove an anchor point, you click on it again.
Rubber Band mode
There are a number of occasions where I fi nd it necessary
to use the pen tool to defi ne an outline and then convert
the pen path to a selection. In the end, the pen tool really
is the easiest way to defi ne many outlines and create a
selection from the path. One way to make the learning
process somewhat easier is to switch on the ‘Rubber Band’
option which is hidden away in the Pen Options on the pen
tool Options bar (Figure 9.51). In Rubber Band mode, you
will see the segments you are drawing take shape as you
move the mouse cursor, and not just when you mouse down
again to defi ne the next path point. As I say, this mode of
operation can make path drawing easier to learn, but for
some people it can become rather distracting once you
have got the basic hang of how to follow a complex outline
using the various pen tools.
Editing path segments
You can edit a straight line or curved
segment by selecting the direct selection
tool, clicking on the segment and
dragging. With a straight segment the
anchor points at either end will move in
unison. With a curved segment, the anchor
points will remain fi xed and you can
manipulate the shape of the curve as you
drag with the direct selection tool.
Martin Evening
Adobe Photoshop CS4 for Photographers
484
Hiding/showing layer/vector masks
You can temporarily hide/show a layer
mask by S-clicking on the layer mask
icon. Also
, c
licking a vector mask’s icon in
the Layers panel hides the path itself. Once
hidden, hover over it with the cursor and
it will temporarily become visible. Click it
again to restore the visibility.
Figure 9.52
A vector mask can be created from a currently active path such as the
one displayed here in the image on the left. The path mode infl uences what is hidden
and what is revealed when the path is converted into a vector mask. If a path has been
created in the ‘Subtract from path area’ mode (as in the middle example), the area
inside the path outline is hidden. If the path is created in the ‘Add to path area’ mode
(as in the right-hand example) the gray fi ll in the path icon represents the hidden
areas, where everything outside the path outline is hidden. However, it is very easy
to alter the path mode. Select the path selection tool (shown above), and click on the
path to make all the path points active. You can then click on the path mode buttons
in the Options bar to switch between the different path modes.
Vector masks
A vector mask is just like an image layer mask, except
the mask is described using a vector path (Figure 9.52). A
vector mask is therefore resolution-independent and can be
transformed or scaled in size without any loss in quality,
and the mask can be edited using the pen path or shape
tools. To add a vector mask from an existing path, go to
the Paths panel, select a path to make it active, and choose
Layer
➯ Add Vector Mask ➯ Current Path. Alternatively,
you can go to the Masks panel and click on the Add Vector
Mask button (see Figure 9.21 on page 434).
F
igu
r
o
ne di
s
a
nd w
h
c
reate
d
inside
(
as in
t
a
reas,
to alte
r
path t
o
in
t
h
e
O
485
Layers, selections and masking
Chapter 9
1
I used the pen tool here to defi ne the outline of the train and the mono rail. Note that
the pen tool was in the Path mode (circled in green in the Options bar). Also, because I
wanted to create a path that selected everything outside of the enclosed path, I checked
the Subtract from Path Area button (circled in red) before I began drawing the path.
When the path was complete, I went to the Paths panel and dragged the work path
down to the Create New Path button, which converted it into a permanent path that
could be saved with the image. It is important to remember here that a work path is
only temporary and will be overwritten as soon as you deselect the work path and try to
create a new work path.
Isolating an object from the background
Let’s now look at a practical example of where you might
use a vector path to mask an object in preference to using
a pixel layer mask. Remember, one of the benefi ts of using
a vector mask is that you can use the direct path selection
tool to manipulate the path points and fi ne-tune the outline
of the vector mask
.
Martin Evening
Adobe Photoshop CS4 for Photographers
486
2
With the work path active and white as the foreground color in the tools panel, I
clicked on the Add New Adjustment Layer button in the Layers panel and selected
the Gradient Fill option. I chose the foreground color (white) to transparency gradient
and added this as a linear gradient using the settings shown here. This added a fog
effect to the scene and, as you can see, the vector mask prevented the Gradient Fill
adjustment from being applied to the train and the mono rail.
3
To make the scene look a little more like winter, I added a Photo Filter adjustment
sandwiched between the Background layer and the Gradient Fill layer, then selected a
cooling fi lter from the Filter menu options.
487
O
ne of the key factors that can be attributed to
Photoshop’s success has been the program’s
support for plug-in fi lters. A huge industry of
third-party companies has grown in response
to the needs of users wanting extra features within Photoshop.
Instead of covering all the hundred or more fi lters that are
in Photoshop, I have concentrated here on just those fi lters
that I believe are useful for photographic work, everyday
production jobs and creative output. I will also show you
ways you can use the Smart Filters feature to extend your
fi ltering options.
Essential Filters for
Photo Editing
Chapter 10
Martin Evening
Adobe Photoshop CS4 for Photographers
488
Filter essentials
Most Photoshop fi lters provide a preview dialog with
slider settings that you can adjust, while some of the more
sophisticated plug-ins (such as the Lens Correction fi lter)
are like applications operating within Photoshop. These
have a modal dialog interface, which means that whenever
the Filter dialog is open Photoshop is pushed into the
background, which can usefully free up already-assigned
keyboard shortcuts. With so many effects fi lters to choose
from in Photoshop, there are plenty enough to experiment
with. The danger is that you can all too easily get lost
endlessly searching through all the different fi lter settings.
There is not enough room to describe every Photoshop
fi lter here, but we shall look at a few of the ways fi lters can
enhance an image, highlighting some of the more useful
ones plus a few personal favorites.
Blur fi lters
There are 11 different blur fi lters in the Filter ➯ Blursub-
menu and each will allow you to blur an image differently.
You don’t really want to bother with the basic Blur and
Blur More fi lters, but what follows is a brief description
of some of the blur fi lters and why I think you will fi nd
them useful.
Adding a Radial Blur or Spin Blur to a photo
The Radial Blur can do a very good job of creating blurred
spinning motion effects. For example, the Zoom blur
mode, shown in Figure 10.1, can do a neat simulation of a
zooming camera lens, while the Spin blur mode, shown in
Figure 10.2, can be used to apply a circular spin effect (I
also used a Spin Radial Blur to add movement to the car
wheels in Step 3 on page 491). The Radial Blur fi lter may
sometimes appear to be sluggish, but it is after all carrying
out major distortions of the image. For this reason you are
offered a choice of render settings. For top quality results,
select the Best mode, but if you just want to see a quick
preview of the whole image area select the Draft mode
option.
RGB only fi lters
You will notice that most of the effects
fi lters work in RGB mode only. This is
because they can have such a dramatic
effect on the pixel values, and would easily
send colors way out of the CMYK gamut.
To unleash the full creative power of
Photoshop plug-ins, you really do need to
edit in RGB mode.
16-bit fi lters
Photoshop supports a limited number
of fi lters in 16-bit. However, most of
the essential fi lters, such as those used
to carry out standard production image
processing routines, can all run in 16-bit.
489
Essential fi lters for photo editing
Chapter 10
Figure 10.1
When using the Radial Blur fi lter in Zoom mode, you can create fast
zoom lens effects such as in the example shown here on the right. You can also
drag the center point in the fi lter preview dialog to approximately match the center of
interest in the image you are about to fi lter.
Figure 10.2
When you use the Radial Blur fi lter in Spin mode, you can apply a
circular spin blur effect such as the example shown on the right. Again, you can drag
the center point in the Filter dialog to match the center of interest of the image you are
about to fi lter.
Martin Evening
Adobe Photoshop CS4 for Photographers
490
Gaussian Blur
The Gaussian Blur is a good general purpose blur fi lter
which can be used for many purposes from blurring areas
of an image to softening the edges of a mask.
Average Blur
The Average Blur simply averages the colors in an image
or a selection. At fi rst glance it doesn’t do a lot, but it is a
useful fi lter to have at your disposal. Let’s say you want to
analyze the color of some fabric to create a color swatch
for a catalog. The Average fi lter merges all the pixels in a
selection to create a solid color and you can then use this
to sample with the eyedropper tool to create a new Swatch
sample color (see Figure 10.3).
Motion Blur
The Motion Blur fi lter can be used to create an effective
impression of blurred movement. It adds a linear blur
that spreads in both directions and you can use the Filter
dialog sliders to control the angle of the blur as well as
the distance of the blur spread. In the example shown on
these pages, I used the Motion Blur fi lter to add blurred
movement to a static photograph of a car.
Figure 10.3
The Average Blur can be used
to merge the pixels within a selection to create
a solid color which can then be used to take a
sample color measurement of the average color
within that selection area.
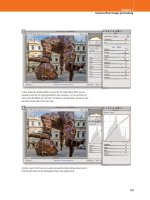
1 This shows a photograph of a car that has been cut out and placed as a new layer
against a street scene. While the perspective and shadowing may look correct, we
don’t get any sense of movement in this picture.
491
Essential fi lters for photo editing
Chapter 10
2 Next, I converted the Background layer to a Smart Filter layer (essentially a
Smart Object), chose Filter ➯ Blur ➯ Motion Blur and applied a 236 pixel blur
at an angle of −3°. This blurred the entire backdrop layer and began to give the
impression of movement in the picture.
3 To get the car movement to look more realistic, I did several more things. I
applied a gradient mask to the background Smart Object layer so that the motion
blur appeared strongest in the distance. I then duplicated the car cut-out layer and
applied a 100 pixel Motion Blur fi lter. I also duplicated this layer and applied a
400 pixel Motion Blur fi lter. I moved both layers slightly so that they trailed behind
the car, faded the opacity of the softer blur layer and added a layer mask to each
so that I could selectively remove some of the Motion Blur areas. Lastly, I selected
each of the wheels, copied each one to a new layer, used a Free Transform to make
them circular and then used the Spin Radial Blur fi lter to add circular movement.
I then reversed the transform on each layer so that I ended up with a convincing
circular spin on each wheel.
Martin Evening
Adobe Photoshop CS4 for Photographers
492
Figure 10.4
This shows, from top to bottom, the Surface Blur, Box Blur and Shape
Blur fi lters.
Surface Blur
Box Blur
Shape Blur
493
Essential fi lters for photo editing
Chapter 10
Surface Blur
This might be considered an edge preserving blur fi lter. The
Radius adjustment is identical to that used in the Gaussian
Blur fi lter; the higher the Radius, the more blurred the
image will become. But it is the Threshold slider that
determines the weighting given to the neighboring pixels
and whether these become blurred or not. Basically, as
you increase the Threshold this extends the range of pixels
(relative to each other) that become blurred. So as you
increase the Threshold, the fl atter areas of tone are the fi rst
to become blurred and the high contrast edges remain less
blurred (until you increase the Threshold more).
Box Blur
The Box Blur uses a simple algorithm to produce a square
shape blur. It is a fairly fast fi lter and could be useful for
creating certain special effects.
Shape Blur
The Shape Blur fi lter allows you to specify any shape you
like as a kernel with which to create a blur effect. You can
then adjust the blur radius accordingly. In Figure 10.4
(bottom image) I selected a lightning bolt shape and this
enabled me to simulate a camera shake effect with this fi lter.
The Shape Blur is no match for the power of the Lens Blur
fi lter, but it is nonetheless a versatile and creative tool.
Figure 10.5
The best way to learn how to use
the blur fi lters discussed here is to experiment
with an image like the one shown here (which is
available on the DVD). In this night-time scene
there are lots of small points of light; you can use
this image example to get a clear idea of how the
Specular Highlights and Iris controls work, and
observe how they affect the appearance of the
blur in the photograph.
Fade command
Filter effects can be further refi ned by
fading them after you have applied the
fi lter. The Fade command is referred to at
various places in the book (you can also
fade image adjustments and brush strokes,
etc.). Choose Edit ➯ Fade Filter and
experiment with different blending modes.
The Fade command is almost like an
adjustment layer feature, but without the
versatility and ability to undo later. It
makes use of the fact that the previous
undo version of the image is stored in the
undo buffer and allows you to calculate
many different blends but without the time-
consuming expense of having to duplicate
the layer fi rst. Having said all that, history
offers an alternative approach whereby
if you fi lter an image, or make several
fi ltrations, you can return to the original
state and then paint in the future (fi ltered)
state using the history brush or make a fi ll
using the fi ltered history state (providing
Non-linear History has been enabled in the
History panel options).
Before
Lens Blur fi lter
Martin Evening
Adobe Photoshop CS4 for Photographers
494
Smart Filters
For years now Photoshop users have requested the ability
to apply live fi lters, the same way as you can apply image
adjustments as adjustment layers. Now that we have Smart
Filters, I do wonder just how many people actually use this
feature on a regular basis. Having said that, Smart Filters
can be particularly useful when working with the blur
fi lters discussed in this chapter, because you may very often
want the ability to re-edit the blur amount. I have already
shown a couple of examples of Smart Filters in use with
the Spin Blur and Motion Blur fi lters, plus there is a further
example coming up later on pages 500–501 where I show
how to apply the Lens Blur fi lter as a Smart Filter. You
can switch Smart Filters on or off, combine two or more
fi lter effects, mask the overall Smart Filter combination as
well as adjust the Smart Filter blending options. These allow
you to control the opacity and blend modes for individual
fi lters. As I have shown below in Figure 10.6, you can also
group one or more layers into a Smart Object and fi lter the
combined layers as a single Smart Object layer.
Smart Filters/Smart Objects
When you go to the Filter menu and
choose ‘Convert for Smart Filters’, you
are basically doing the same thing as
when you create a Smart Object. So, if a
layer or group of layers have already been
converted to a Smart Object, there is no
need to choose ‘Convert for Smart Filters’.
Figure 10.6
You can make a selection of more than one layer in a document and
convert these into a Smart Object. From there you can add fi lter effects that will be
applied as Smart Filters to a composite version of all the selected layers. The multi-
layered image can still be accessed and edited by double-clicking the Smart Object
thumbnail.
Open Blending
options
Smart Filter
visibility
Double-click to edit a Smart Object
Third-party plug-ins
With third-party plug-ins, you will
fi nd that those plug-ins that have been
recently updated for CS4 should have an
embedded smart fi lter marker that will
automatically make them compatible with
Smart Filters in CS4. If that is not the case,
then enabling all fi lters (as described on
page 498) will help your get around such
restrictions, but with the proviso that any
fi lter you apply as a Smart Filter must
be a ‘value-based’ fi lter if it is to fi t in
successfully with a Smart Filter workfl ow.
495
Essential fi lters for photo editing
Chapter 10
Applying Smart Filters to pixel layers
Smart Filters are essentially fi lter effects that are applied
to a Smart Object. The process begins with you converting
a layer or group of layers to a Smart Object, or selecting
a layer and choosing Filter ➯ Convert for Smart Filters.
Smart Filters allow you to apply most types of fi lter
adjustments non-destructively. The following steps provide
a brief introduction to working with Smart Filters in
which I show how you can also use Smart Filters to apply
Shadows/Highlights adjustments non-destructively.
1
To apply a Shadow/Highlight adjustment as a non-destructive Smart Filter, the
Background layer (or a group of layers) must fi rst be converted to a Smart Object.
To do this I went to the Filter menu and chose ‘Convert for Smart Filters’. This
converted the Background layer to a normal, Layer 0 layer.
Pros and cons of Smart Filters
The appeal of Smart Filters is that you
can apply any fi lter non-destructively to
an image in Photoshop, but this fl exibility
comes at the cost of larger fi le sizes (4 to 5
times bigger), a slower workfl ow switching
between the Smart Object and parent
documents, and longer save times. Or at
least this has been my experience when
working with a fairly fast computer with
lots of RAM memory. This is not the fi rst
time we have come across speed problems
like this: some Photoshop techniques are
a little ahead of themselves and we have to
wait for the computer hardware to become
faster before we can use them comfortably.
While Smart Filtering does offer true
non-destructive fi ltering, it is a technique
you probably want to use sparingly. In
this book I have highlighted a few of the
situations where Smart Filters may offer
some benefi t, like the example shown
on pages 500–501 where I blurred the
Backdrop layer.