adobe production premium for final cut studio editors 2009 phần 10 potx
Bạn đang xem bản rút gọn của tài liệu. Xem và tải ngay bản đầy đủ của tài liệu tại đây (2.2 MB, 29 trang )
273
Our industry today is confronting two divergent, driving
technologies: the burgeoning growth of high-definition, large-
screen video and the explosion in small, portable devices that
play video.
We’ve looked at the high-end of this scale. In this chapter, we
look at the other end – creating video for mobile phones.
We’ll start with a look at what Apple has released in its lat-
est version of Final Cut Studio, then wrap up our look at Adobe
Production Premium with a tour of Device Central – a program
that has no peer within the Apple suite.
What’s a Mobile Device?
For the purposes of this chapter, I’ll define a mobile device
as something small enough to fit in your pocket that can play
videos, either downloaded to the device or streamed from the
Internet.
These devices have a wide variety of screen shapes and sizes.
And, while it may be convenient to think of all them as iPhones,
the truth of the matter is that the iPhone has a very small portion
of the market. What this means is that there is no single video
solution that plays perfectly on all devices. As we have come to
expect, the situation is more complex than that.
However, unlike wrestling with the many flavors of HD video,
creating videos for mobile devices comes down to two choices:
video for Apple devices and video for everything else.
For Apple devices, the options are easily met with the new
Share feature in Final Cut Pro and recent versions of Compressor.
For non-Apple devices, Adobe has come to the rescue with Adobe
Media Encoder (AME) and Device Central.
Let’s first take a look at the design challenges of creating a
video for very small screens, then look at each of these two deliv-
ery options, starting with Apple.
11
THE NEW FRONTIER: MOBILE
DEVICES
274 Chapter 11 THE NEW FRONTIER: MOBILE DEVICES
Design Considerations for Mobile Video
Entire books are written on design considerations when creat-
ing images for video, or the Web, for that matter. And there are
always exceptions to every rule.
The key thing to keep in mind is that mobile screens are
small, often viewed under poor lighting conditions, and are
best suited for viewing short segments rather than long fea-
tures. This means that the image you are editing will be signifi-
cantly reduced – squeezed many times smaller – so what you
easily see while you are editing is much less visible in the final
product.
While screen sizes vary, no mobile device even comes close
to providing the resolution of an SD image. Most are far smaller.
So, if your goal is to create movies for mobile devices, there’s no
real call to shoot HD video – since no mobile device’s screen size
exceeds SD video image sizes.
HD is the preferred format for projects that need to be viewed
on larger screens, but there is no reason to shoot a 1920 3 1080
image, when the final output may be 27 times smaller at 320 3
180. My preferred image size for projects that need to go to
mobile devices, the Web, and HD is 720p. The progressive format
removes the need to deinterlace, while the image size provides
lots of image detail for HD distribution, while still compressing
well for the Web and phone use.
That being said, here are some of my thoughts on how to
improve the look of your mobile videos. (By the way, before the
shouting starts, this list is not exhaustive, and all are welcome to
their own opinions. These are mine.)
Camera
The key thought here is to frame your shots tight. The play-•
back screen is so small that anything with lots of detail, or
very small size, will be lost.
Shoot your actors using a variety of close-ups. Emotions •
reside principally in the face, shooting close-ups makes
those emotions easier to see.
Keep the background simple and avoid lots of detail, espe-•
cially moving detail; like leaves fluttering.
Avoid hand-held, shaky shots. These are hard to compress •
well.
Avoid wide, panning shots that have lots of fine detail, but •
no central subject.
In fact, just avoid wide shots with lots of fine detail. •
Medium shots and close-ups are always better.
Chapter 11 THE NEW FRONTIER: MOBILE DEVICES 275
Lighting
The key thought here is that most mobile devices are •
watched in adverse lighting conditions, with reflections
and sunlight washing out the screen.
Make the important subject in the frame bright. Putting •
key subjects in shadows makes them hard to see.
Light for high contrast; the more washed out your image, •
the harder it is to see.
Use shadows and highlights to add texture to your image.•
Use lots of color, but avoid highly saturated, bright colors.•
Audio
The key thought here is that most phones have poor audio. •
They are not being listened to in quiet environments.
Keep audio levels reasonably loud. However, don’t raise •
your audio levels so loud that they distort.
Avoid extreme dynamic ranges. Shifting from very soft to •
very loud is hard to understand on small speakers.
Avoid very soft audio. This will be inaudible when listening •
in a moving car or an outdoor environment.
Most bass sounds will be lost on small speakers. Assume •
for the purpose of mixing that your mobile device has a
frequency range of 350–7000 Hz.
Text, Graphics, and Transitions
The key thought here is that text that looks good on a big •
screen will disappear as the screen size shrinks.
Always scale and place fonts using the Controls tab in Final •
Cut Pro, not the Motion tab. The Controls tab scales the text
itself, whereas the Motion tab scales the frame containing the
text. The Controls tab provides much higher quality results.
Slightly thick fonts without serifs look best. Consider fonts •
such as Gill Sans, Optima, Futura Medium, Hobo, Lucida
Grande Bold, Impact, Stone Sans, and others like them.
Avoid fonts with “Light” in their names or with very thin •
lines, like Century Gothic.
Avoid fonts with very thin bars or serifs at the end of char-•
acters, such as Didot, Caslon, Baskerville, or Times Roman.
These serifs often get lost, making text hard to read when
the image size is reduced. Or the bar of the letter “e” disap-
pears, making the letter look like a “c.”
If you use curly fonts, like Brush Script, use thicker weights. •
Avoid very thin, curly fonts, like Edwardian Script.
Keep point sizes large. I use 30 points or larger for HD, •
when it’s going to be compressed to very small image sizes.
276 Chapter 11 THE NEW FRONTIER: MOBILE DEVICES
Always add drop shadows. Drop shadows make text much •
easier to read. However, given the choice, bigger text is bet-
ter than smaller text with drop shadows.
Vertically-aligned text is almost impossible to read quickly, •
use horizontally-aligned text instead. As a design element,
vertical text is fine.
Avoid horizontal lines thinner than four pixels. Thin lines •
disappear when the image size is reduced. Six-pixel lines
are better when working with HD.
Avoid lines that are almost horizontal or almost vertical. •
They will stair-step and look jagged.
Keep text on screen long enough for you to read it twice. •
Remember, you are paying attention. Most of the time, the
attention of your audience will be distracted.
Avoid lingering transitions. Cross dissolves are hard to •
compress because the image changes on every frame.
As producers and editors, the challenge we face is figuring
how to make our projects look as good as possible on a very, very
small screen. These ideas can help.
Once we finish editing our project, we need to compress it for
a mobile device – whether iPhone, iPod, or the cell phone of your
choice. Apple provides new compression opportunities with the
Share option in Final Cut Pro 7. So, let’s take a look at Apple’s solu-
tions first, then move to the much larger mobile phone market
better served with Adobe’s Media Encoder and Device Central.
Creating Videos for Apple Mobile Devices
Apple devices range from current model iPhones to first-
generation iPods. Screen sizes also range from 480 3 360 on
the iPhone to 172 3 132 for first- and second-generation iPods.
Earlier devices provided a 4:3 frame size for their screen, whereas
newer devices use 3:2.
In other words, there’s no assurance at what screen size your
final video will be viewed. (Your image, though, will not be
stretched to fill the screen; instead, it will be displayed letter-
boxed or pillar-boxed, as necessary.)
Because it uses a variety of different screens, Apple selected a
compression codec that does a nice job scaling between the vari-
ous screen sizes: H.264.
Apple recommends creating your videos at a size slightly larger
than the image size of the device playing them back. In fact, it
recommends 640 3 480. (Before you panic, as long as you use
one of the Apple presets in Compressor, it automatically adjusts
the compressed image size to properly display 4:3 video at 640 3
480, or 16:9 video at 640 3 360.)
Letter-Boxing and
Pillar-Boxing
Letter-boxing
means that black
bars are added at
the top and bottom of an
image – just outside the
image area, so your video
is not affected – so that a
16:9 movie will properly
fill a 4:3 frame.
Pillar-boxing means
that black bars are added
to the sides of an image –
again, outside the image
area – so that a 4:3 movie
will display properly on a
16:9, or 16:10 frame.
This black framing is
done automatically by
the device, based on the
image size of your video.
Chapter 11 THE NEW FRONTIER: MOBILE DEVICES 277
The main difference in Apple presets between compressing
for an iPhone vs. an iPod is the data rate of the video. iPhones
support higher data rates, which means that for the same video,
iPhone quality will be higher than iPod quality; meaning the
higher setting displays movement more clearly.
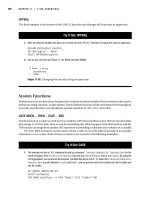
Compressing Using Final Cut Pro
There are several ways to create videos for Apple mobile
devices within Final Cut Pro. If you have the latest version of Final
Cut, select the sequence you want to export in either the Browser
or Timeline, then select File > Share.
In the Share window, as we discussed in the last chapter on cre-
ating videos for the Web, select the compression preset from the
pop-up menu. Both the iPhone and iPod have their own presets.
As Fig. 11.1 illustrates, both the iPhone and iPod presets use
the H.264 codec with the same audio and video settings, except
for data rate. The iPhone compresses data at 1500 kbps, whereas
the iPod (Fig. 11.2) at 600 kbps. This means that, for the same
video, iPod file sizes are smaller while the image quality of the
iPhone version will be higher.
The benefit of using Share is that your videos export in the
background, allowing you to continue editing in Final Cut while
the export is continuing.
Earlier versions of Final Cut, which don’t have access to
the Share window, can use File > Export > Using QuickTime
Conversion to create a version of their movie for one of these
devices. There are three setting windows you need to adjust,
which are illustrated below.
Figure 11.1 Click the Show
Info box to see the compression
settings for iPhone videos. Note
that the final image size is 640 3
480. This setting can be used for
both 16:9 and 4:3 video, because
Compressor sets the correct
image size automatically during
compression.
Figure 11.2 Compare the iPod
data rate of 600 kbps versus the
iPhone data rate of 1500 kbps.
Higher data rates generally
mean higher quality and better
compression of movement.
278 Chapter 11 THE NEW FRONTIER: MOBILE DEVICES
Open the sequence you want to export into the Timeline.1.
Select 2. File > Export > Using QuickTime Conversion.
In the 3. Format pop-up, you can select presets specifically
for the iPod or the iPhone (Fig. 11.3), or you can create a
custom setting. Try the presets first. If they work, great. The
problem with them is that you can’t adjust their settings. If
your video doesn’t look good enough to you, check out the
rest of this procedure, detailed below.
In the next dialog, give the file a name and location, then 4.
click the Option button.
In the Movie Settings window (5. Fig. 11.4) is a summary of
the current compression settings. These are most often
Figure 11.3 File > Export >
Using QuickTime Conversion
has presets for iPod and iPhone,
as well as custom settings.
Figure 11.4 The Movie Settings
window summarizes your
compression settings and allows
you to make changes.
Chapter 11 THE NEW FRONTIER: MOBILE DEVICES 279
incorrect, so here are the settings that match the Apple
recommendations.
Check 6. Prepare for Internet streaming.
Click the 7. Settings button for audio and set them according
to the illustration in Fig. 11.5. If you only have one speaker,
for example a video podcast, set the Channels to Mono
and the Rate to 22.050 kHz.
Click 8. OK when you are satisfied with your settings.
Click the 9. Settings button for video. Figure 11.6 illustrates
the video settings to compress a movie for the iPhone.
Note that the Compression Type is preset to H.264. If you
want to create smaller files for use on iPod, change Data
Rate > Restrict to 600 kbps.
Figure 11.5 Audio settings
for a movie containing stereo
sound. There are no perceptual
differences between 44.1 kHz and
48 kHz audio, but the 44.1 file will
be smaller.
Figure 11.6 Video compression
settings for an iPhone. Note that
the codec in the top pop-up menu
is set to H.264.
280 Chapter 11 THE NEW FRONTIER: MOBILE DEVICES
Click 10. OK when you are satisfied with your settings.
Click the 11. Size button to adjust the size of your image.
Figure 11.7 illustrates appropriate settings for a 16:9
video. Deinterlacing video for mobile devices is correct,
leave this checked.
Click 12. OK when you are satisfied with your settings.
The Movie Settings window now shows a summary of your cor-
rected settings. Click OK when everything is ready, and Final Cut
will export and compress your video.
Unlike using Share, Export > Using QuickTime Conversion
takes longer than real time to output your sequence. During the
export process, Final Cut is tied up, meaning you won’t be able to
edit until the export is complete.
Compressing Using Compressor
For me, a much better way to compress files for any device, not
just Apple devices, is Apple’s Compressor. This is an application
that is optimized for compression, with much greater flexibility
than Final Cut alone provides.
In the latest version of Final Cut, Apple added a Send to
Compressor option. This is often the best choice for exporting
because it renders and exports the file in the background, allow-
ing you to continue working with Final Cut Pro.
For those with earlier versions of Final Cut, I illustrated in
Chapter 9 how to export files using File > Export > QuickTime
Movie. This is the fastest and the best way to export files for all
earlier versions of Final Cut. If you need a detailed review of that
process, please refer to the steps in that chapter.
Here’s a quick summary:
Open the sequence you want to export into the Timeline.1.
Select 2. File > Export > QuickTime Movie.
Give the file a name and location.3.
Be sure settings is set to 4. Current Settings.
Figure 11.7 Here are the image
size settings for a 16:9 video. If
you are compressing a 4:3 video
change the settings to 640 3 480.
Chapter 11 THE NEW FRONTIER: MOBILE DEVICES 281
If you are planning on immediately compressing the file, 5.
uncheck Make Movie Self-Contained.
Click 6. Save to start the export process. Figure 11.8 illus-
trates these settings.
Once the master file is created, load it into Compressor for final
processing. I wrote earlier about how to use Compressor to com-
press files. Here, let me point out the specific settings you can use
for a variety of Apple devices.
When Compressor opens, dismiss the Job Action window 1.
by clicking Cancel.
Import your movie into Compressor by clicking the 2. Add
File icon in the top-left corner of the Compressor window.
In the Settings tab, twirl down the Apple folder, then twirl 3.
down the Apple devices folder. As Fig. 11.9 illustrates, there
are three choices: Apple TV, H.264 for iPod at 320 3 240,
and H.264 for iPod at 640 3 480. For compression to the
iPhone, use the 640 3 480 option (see Fig. 11.9).
Once you determine the best compression setting for your 4.
video, drag the setting on top of the movie in the Task win-
dow and compress it as you would any other file.
The advantage of using Compressor is that it does a much bet-
ter job of resizing, retiming, and deinterlacing the images than
Final Cut, as well as providing the ability to add filters, water-
marks, and automation using droplets.
Figure 11.8 Summary of the
settings I use when selecting File >
Export > QuickTime Movie. As
the file is going to be immediately
compressed, there is no reason to
make it self-contained.
640 3 480 for
16:9 . . . Really??
Yup. Because
Compressor is
smart enough to
tell the difference between
4:3 and 16:9 video.
Even when you select the
640 3 480 option, if you
send it 16:9 video, the
compressed file comes out
640 3 360, perfectly in
proportion, automatically.
(This adjustment works the
same for the 320 3 240
setting as well.)
282 Chapter 11 THE NEW FRONTIER: MOBILE DEVICES
Chapter 9 showed how to create Flash movies for the Web. Cell
phones require different presets, with far smaller files. And, then
comes the process of testing your video. Testing is important
because, just as we have eight billion different versions of HD, we
have 17 kajillion different cell phone formats. (Well, OK, maybe
that’s a bit of an exaggeration, but not by much.)
This is where Adobe provides some answers.
Putting Video on Mobile Devices
If the Internet seems like a bit of a free-for-all, it is civility itself
compared to the rugby scrum of the cell phone industry. All
manufacturers are looking for ways to differentiate their phones
from the competition. Screen sizes, file formats, features, and
functionality vary widely even between phones from the same
manufacturer.
Worse, there was no central clearing house for developers to go
to that provided information on all the different options.
To solve this situation, in March 2007, Adobe released the first
version of Device Central as part of the CS3 software suite. Its pri-
mary purpose, as Wikipedia reports, “is to offer both professional
and individual creative professionals, Web designers, and mobile
developers an easier way to preview and test Flash Lite, bitmap,
Web, and video content for mobile devices. It is accessible from
all of the Creative Suite editions.”
Device Central is software for testing movies on cell phones.
By far, the most popular video format is 3GPP. As the iPhone
and iPod Touch only support QuickTime, you won’t find them in
Device Central. But, you will find everything else.
Figure 11.9 The Apple presets
for creating mobile video using
Compressor.
Chapter 11 THE NEW FRONTIER: MOBILE DEVICES 283
Device Central allows you to preview and test the appearance,
performance, and behavior of mobile content on a computer. It
simulates the behavior of cell phones, without requiring you to
purchase hundreds of different phones for testing.
You can also simulate various display conditions, such as back-
light timeout and sunlight reflections. In other words, this allows
you to get a much better feel for how your videos look in the real
world.
The largest market for Device Central are Flash developers who
need to test and debug their mobile-enabled Web sites. So, there
are emulation features in the software that video producers don’t
need to worry about.
But, the ability to see how our videos will look is a great advan-
tage, and once you understand how Device Central works, testing
your projects before release isn’t hard to do.
Device Central
Adobe’s Device Central is a great application that answers three
critical questions when preparing video for cell phones:
What image size should I use?1.
What codec should I use to compress it?2.
How will it look in real life?3.
The only way we can learn these answers is using Device
Central. And the way we do this takes three steps:
Select the devices you want to test and determine what 1.
video formats they support.
Compress your video to match those specs.2.
Test your video to see how the final results are likely to look 3.
in reality.
The first and last steps are handled by Device Central; step 2 is
the realm of the Adobe Media Encoder.
New with the CS4 version of Device Central is a dynamically
updated library of mobile devices, improved video support and
integration, tighter integration with all of Adobe’s CS4 software,
higher-quality video playback, and the ability to upload files from
Device Central to the FTP site of your choice.
Step 1: Selecting the Devices You Want to Use
When you first start Device Central, it displays the Welcome
screen (see Fig. 11.10).
In this case, we want to do some browsing to figure out what
kind and size of files to create to meet the common characteris-
tics of the phones we want to support. So, click Browse Devices
284 Chapter 11 THE NEW FRONTIER: MOBILE DEVICES
to display the main screen. In the center is an empty window,
which will soon contain device profiles. On the left are three tabs:
Device sets•
Local Library•
Online Library•
Inside the Local Library is a set titled: Flash Lite. Click it to dis-
play a series of generic Adobe devices in the main window (see
Fig. 11.11).
On the lower left side is a tab titled: Online Library. This is a
listing of all the different manufacturers and their phones. This is
dynamically updated via the Web by Adobe so as new phones are
released, they are automatically added to your list.
As an example, scroll down to Motorola, click the twirl-down
triangle, and click Motorola RAZR V3m. Specs on the phone are
displayed in the main window.
Figure 11.10 Upon starting
Device Central, the welcome
screen appears. Click Browse
Devices to get started.
Figure 11.11 This is the main
interface for Device Central. Click
the Flash Lite folder on the left to
display these generic devices.
Chapter 11 THE NEW FRONTIER: MOBILE DEVICES 285
Click the Video tab along the top, and the video settings for
this phone are displayed (see Fig. 11.12).
Each phone has a vast array of technical specifications, but the
portion we are concerned with is in the Video tab. Specifically, we
want to know the following:
The addressable size of its screen•
The video formats it supports•
What it uses as a video player•
In the case of this Motorola phone, Fig. 11.13 shows that it has
an addressable screen size of 176 3 144; it supports 3GPP, 3GPP2,
and MPEG4 video formats; and it uses a standalone player to dis-
play video.
Select different phones from the Online Library and see how
the specs differ from phone to phone. If the specific phone you
are looking for isn’t here (and remember, the iPhone won’t be on
this list because it doesn’t support Flash), click the Refresh but-
ton (see Fig. 11.14) at the top of the Online Library to check for
updated phone profiles.
However, since we aren’t developing interactive phone appli-
cations using Flash, but, rather, trying to figure out how to
compress our videos to work on the greatest number of phones,
twirl down the Flash Lite collection in the Local Library tab.
This is a listing of generic devices, assembled by Adobe, that
represents common settings for phones that implement different
versions of Adobe Flash for cell-phone playback.
For example, as Fig. 11.15 illustrates, select three devices: Flash
Lite 1.1 32 176 3 208, Flash Lite 2.0 32 240 3 320, and Flash
Lite 2.1 32 240 3 320. (To select more than one device, press the
Command key while clicking.)
Figure 11.12 Click the name of a
phone to display its specs.
Display Size versus
Addressable Screen
Size
The Display size,
listed next to the
phone name in
the Online Library, is the
total size in pixels of its
display. The addressable
screen size is the total
size, in pixels, that can
be used for video. Width
is always listed first, and
not all phone screens are
oriented horizontally. As
an example, look at many
of the Nokia phones, such
as the 3600.
286 Chapter 11 THE NEW FRONTIER: MOBILE DEVICES
Figure 11.14 Click the Refresh
button to update Device Central
with any new phone releases or
changes.
Figure 11.15 Command-click to
select multiple phones to compare
specs between devices.
Figure 11.13 The Video tab
displays the key settings we need
to know to properly compress our
videos: screen size, video formats,
and player.
Chapter 11 THE NEW FRONTIER: MOBILE DEVICES 287
The main window displays a comparison between the selected
devices. Twirl down Video > Standalone Player and make note of
the following specs:
Whether the device supports video•
The addressable size of the screen in pixels•
All supported video formats•
For example, Fig. 11.16 shows the specs for one of the phones.
Figure 11.16 While all
these specs are important,
at the bottom is the
Recommended Export
Preset, which provides a
minimum standard.
Compressing for Cell Phones Using Final Cut Pro
You can also take the Device Central information and
use it to create settings for direct export from Final Cut with
File > Export > Using QuickTime Conversion select the
3G format and have access to 3GPP or 3GPP2 compression,
which pretty much covers every non-iPhone mobile device
(see the screen shot below). There are also 3GPP and 3GPP2
presets in Compressor. These can be accessed from the Share
module selecting Other > Apple > Other Workflows >
Mobile Devices.
While using either Final Cut or Compressor to create
3G files works, what I like about using Adobe Media
Encoder, however, is how easily it allows me to test my
videos using Device Central.
288 Chapter 11 THE NEW FRONTIER: MOBILE DEVICES
So, on the basis of our research, we see that all three support
video playback using a standalone player (see Fig. 11.17). Also,
there is a common setting supported by all three that we can use
to compress our video:
Format: 3GPP•
Screen: 176 • 3 144 15 fps
Codec: H.264 (this is also called MPEG-4)•
This screen gives us the information we need to go to step 2:
com-pressing our video so it fits on these phones.
Step 2: Compressing Video Using Adobe Media
Encoder
Cell phones, even more than the Web, demand microscopic
files containing very small image sizes. Many people pay per
downloaded byte, so they certainly don’t want to pay for any
more data than absolutely necessary. And, even if your viewers
are on an “all-you-can-eat” plan, the bandwidth used by phones
is not as fast as a hard-wired Internet connection.
For all these reasons, we need to squeeze our videos down as
small as possible. To do this, we will use Adobe Media Encoder to
create the files we need.
So, leave Device Central running in the background and launch
Adobe Media Encoder. Whether creating videos for the Web or for
cell phones, the process is the same, except for the settings.
Here is the summary of this process:
Open Adobe Media Encoder.1.
Import the file(s) you want to compress into the Source 2.
window.
Figure 11.17 By comparing the
Recommended Export Preset for
multiple phones, you can quickly
determine the minimum specs
your video needs to support.
Chapter 11 THE NEW FRONTIER: MOBILE DEVICES 289
Go to 3. Settings and select a Format and Preset to match
the require ments of phones on which you want to view
your video.
As part of the Settings panel, be sure the 4. Open in Device
Central checkbox is checked, so the compressed video
opens directly into Device Central, allowing you to review
it before posting.
With that as an overview, let’s go through the specific steps.
Launch Adobe Media Encoder and when it opens, click the
Add button in the top-right corner to import your video (see Fig.
11.18). In this example, we’ll work with an XDCAM HD video
shot by Jody Eldred about the helicopters used by the LA Police
Department. You can also add videos by dragging them directly
into the central window.
The default compression settings are not designed for cell-
phone video; we need to change them. To do this, select the video
and click Settings.
The Export Settings window opens (Fig. 11.19). While this
allows us to set In and Out points, preview our source footage,
Figure 11.18 Click the Add
button to import your videos, or
just drag them into the central
window. Then, click Settings to
change compression settings.
Figure 11.19 This window
allows complete customization of
compression settings. However,
the area we are most interested
in is the top-right corner.
290 Chapter 11 THE NEW FRONTIER: MOBILE DEVICES
add Flash cue points and all kinds of other cool stuff, we want to
focus on compressing our video for cell phones. To do that, we
need to refer to the notes we made in Device Central.
We learned that the phones all supported MPEG-4. So, change 1.
the Format pop-up (Fig. 11.20), from FLV/F4V to H.264.
In the Preset pop-up, change the setting to 2. 3GPP, which is
one of the video formats supported by the phones.
But, which 3GPP format? Again, the research we did in 3.
Device Central comes to the rescue. Remember the screen
sizes of the phones? It determines which version of 3GPP
to use. In this case, 176 3 144 15 fps (Fig. 11.21).
Be sure that Open in Device Central is checked. Normally,
selecting a cell-phone format automatically checks Open in
Device Central. It tells Adobe Media Encoder to automatically
open the compressed file into Device Central for testing.
Click the orange letters in Output Name (4. Fig. 11.22) and give
your file a name and location. I usually save this into my
Compressed Files folder, which I created on my second drive.
Click OK to apply these settings to the file.
Click Start Queue to begin the compression.
During the compression, a status bar shows how much time
remains, and, depending upon how you set the preferences in
Adobe Media Encoder, it also shows images of your video during
compression (Fig. 11.23).
Figure 11.20 The default Format
setting should be changed
to H.264, which is the video
format used by the cell phones
we examined earlier in Device
Central.
Figure 11.21 Change the Preset
to match the specs we wrote
down earlier when looking at the
minimum specs for the phones
we want to support: 3GPP 176 3
144 15 fps.
Figure 11.22 Click the orange
letters next to Output Name to
give your file a name and location.
Chapter 11 THE NEW FRONTIER: MOBILE DEVICES 291
Now, here’s the cool part. The instant your video is compressed,
Adobe Media Encoder opens the video automatically in Device
Central and places it into the last selected phone. And that brings
us to the last step in this process.
Step 3: Testing Mobile Phones Using Device Central
Without any help from me, when compression is done, Adobe
Media Encoder opens the file in Device Central and starts playback
of my video in the last selected phone (Fig. 11.24). Very, very cool.
Figure 11.23 During
compression, Adobe Media
Encoder displays a status bar
showing time remaining as well
as images of your video.
Figure 11.24 Here is the finished
video playing inside a simulated
phone in Device Central.
292 Chapter 11 THE NEW FRONTIER: MOBILE DEVICES
You are viewing your actual compressed video using a simulated
device showing how it would look in a cell phone in the real world.
This is a great way to check your compression and image quality.
The controls at the bottom of the window (Fig. 11.25) allow us to
control playback, rotate the phone, (which does not automatically
rotate the video because not all phones support that feature) take
snapshots of the screen, and zoom in or out of the phone itself.
The image may not fill the frame because not all pixels are address-
able and the screen shape is not optimized for video playback.
Here’s another cool feature. Want to see what your video looks
like on other phones? Just double-click the name of the phone
you want, and it instantly replaces the phone you are currently
examining. For instance, try the Motorola RAZR V3m (Fig. 11.26).
Figure 11.25 The controls at the
bottom of the screen allow us to
control playback of our video.
Figure 11.26 Double-click the
name of a different phone and it
replaces the currently displayed
phone. This is a great way to
check how your video looks on
different phones.
Chapter 11 THE NEW FRONTIER: MOBILE DEVICES 293
Now that our video is compressed and loaded into the phone
of our choice, check out what the simulator can really do.
Click the 1. Rotate Counter-clockwise arrow in the Controls
panel below the phone.
In the Scaling tab, click 2. Fullscreen Mode (Fig. 11.28).
Ta-DAH! Your video is playing as big as the phone will
allow. Different phones support different scaling options.
Go to the Display tab and change the Reflections setting to 3.
Indoor (Fig. 11.29). This adds reflections to the screen of the
phone similar to lighting in a typical office (Fig. 11.30). (Yes,
I know, it’s very discouraging. The “Sunshine” display setting
is far worse – don’t show the results to your lighting designer.)
Why Are Some
Phones Grayed Out?
As you look
through the phone
lists, some phones
have their names grayed
out. This is because the
screen size of the phone
is too small to display the
video you have currently
loaded into Device Central
(Fig. 11.27).
Figure 11.27 Other
phones.
Figure 11.28 Your video is
now playing as large as that
particular phone supports.
Figure 11.29 Changing the
display setting simulates the
effect of different lighting
conditions on the screen of your
selected phone.
294 Chapter 11 THE NEW FRONTIER: MOBILE DEVICES
Some phones allow alignment changes. However, in gen-4.
eral, just assume your video will play in the middle of the
screen.
When you are done testing, quit Device Central. This is testing-
and-simulation software, so there’s nothing to save. By the way,
my original XDCAM HD video was 159 MB, and the 3GPP com-
pressed version was 1.6 MB.
Summary
Mobile devices are becoming increasingly important in get-
ting people to watch the videos we create. So, this means we
need to make sure our projects look good on really, really small
screens.
This chapter shows that we can edit our videos using Final Cut
Pro and export them to the iPhone using Share or Compressor.
For all other phones, we now have a very fast way to export from
Final Cut, compress in Adobe Media Encoder and make sure they
look great using Device Central.
This chapter illustrates the central tenet of this book. Video
technology is exploding, and no one application should be
expected to meet all our needs. Using the power of Final Cut Pro,
we can edit professional grade programs. When you combine
the power of Final Cut with the extended reach and capability of
Figure 11.30 These simulated
reflections show what your video
would look like under normal
office lighting.
Chapter 11 THE NEW FRONTIER: MOBILE DEVICES 295
Adobe CS4 Production Premium, we can meet the needs of more
clients, in less time, with the quality we expect.
And that translates into money in the bank.
My Story: Creating Flash Videos
Simon Walker
Principal
On a Deadline
www.onadeadline.com
I’m a freelance shooter, editor, and graphic designer. My daily
challenge is to create videos to be viewed on clients’ Web sites.
I’m also an Apple certified trainer (in Final Cut, Motion, and
Color), and so as well as running the Apple certified classes,
I teach courses on video compression and filming techniques.
While having to solve deadline problems late at night (and then
having to solve students’ problems when they ring even later at
night!), I’ve found a number of practical techniques that help to
keep the video quality high.
My clients are increasingly moving from just hiring me to shoot
and edit videos, to wanting to edit some of the videos themselves,
and to be involved in the production process. So, these days I find
myself troubleshooting clients’ systems and workflows. They usu-
ally buy Final Cut Studio and Adobe Production Premium, and
the discipline I use is the concept of only using these two pack-
ages when producing the project.
The end video format of choice is, of course, Flash, or rather
FLV files. But Final Cut and Compressor don’t export FLV files out
of the box. I know that you can buy plug-ins to do this (CRAM
Compressor, for example, is a great plug-in for Compressor),
but once my clients have shelled out for two expensive software
296 Chapter 11 THE NEW FRONTIER: MOBILE DEVICES
packages, they are reluctant to have to buy any more software to
complete the job.
The advantage of FLV videos wrapped in an SWF player
embedded in a Webpage is that the video starts playing immedi-
ately, while still downloading the rest of the content. But this only
happens if your broadband speed is higher than the data rate of
the FLV file. And if you reduce the data rate of the file, the quality
also reduces.
So, lots of movement needs bandwidth, and the more band-
width you have, the larger the video, and the longer it takes to
download. From all the tests I’ve done, based on the average
broadband speed of clients and the people who’ll view their Web
sites, the thing to do is to encode the videos at between 400 and
700 kbps.
The usual horse-trading that happens when dealing with cli-
ents is that they want as much movement on the screen as pos-
sible, and I’m trying to make the video look as good as possible.
Both of these techniques need bandwidth. Keeping the camera
still helps keep the quality up, so I try to include a number of
static shots in the video to compensate.
So, the workflow is shoot the video, capture, and edit in Final
Cut Pro, and then use Compressor to resize the video to the cor-
rect size for the Web site (keeping up the data rate all through the
process). The last stage is to transcode to an FLV file. The best
way I’ve found is to then use the Adobe Flash CS3 Video Encoder.
It’s an easy-to-use interface, and you have the option of typing in
exactly which data rate you want to use.
Adobe renamed the software with the release of CS4, to Adobe
Media Encoder and this does a better job of encoding, as it uses
the H.264 codec.
Adobe Bridge, 74
adding metadata in, 28–33
file management in, 24–27
finding files in, 33–37
integrating with Fi nal Cut
Studio, 37–38
interface, 10, 11
keyboard shortcuts for, 38
navigating in, 15–16
previewing files in, 17–24
running modes of, 15
tabs in, 14
Adobe Encore
Blu-ray production using,
235–246
Build tab, 266
for creating Web videos,
263–270
Adobe Illustrator file, modifying,
101–106
Adobe Media Encoder (AME)
benefit of, 263
compressing mobile video
using, 287–291
for creating Watch folder,
261–263
for creating Web videos,
260–263
file compression in, 95
transcription process in,
94, 95
Adobe OnLocation
audio and video alerts, 55–56
clips reviewing, 58
keyboard shortcuts for, 60
in preproduction, 43–51
list creation, 44
recording modes, 43–44
working with projects, 43
in production, 51
camera calibration, 51
monitor calibration, 52
video capturing, 56
video monitoring, 52–55
strengths and weaknesses,
59–60
workspaces for, 41–42
After Effects
exporting movie from,
112–114
importing Premiere Pro
project into, 109
AI. See Adobe Illustrator
Alpha channel in PS, 168
creating, using Quick
Selection tool, 170–171
definition of, 187
including in video clips,
163–164
premultiplying, 211
Alpha matte in FCP, 204
AME. See Adobe Media Encoder
Apple mobile devices, creating
videos for
by compressing using
Compressor, 276–280
by compressing using FCP,
276–278
Aspect ratio, 119, 124, 131, 138,
145
Audio
Adobe OnLocation by
alerts, 55
distortion, 53–55
pop, 53
format, selecting, 61–64
settings, 279
Audio fidelity and sample rate,
from Soundbooth manual,
62
Authoring, 237
Automatic Duck, 116
Automatic encoding, 232
Bicubic sharper in PS, 126
Bitmapped images, 124–126
Blu-ray Discs, 217
burning speed, 234
compressing using
Compressor, 237–239
creating, 246–247
duplication, 218
replication, 218
using Adobe Encore,
235–236, 240–246
using DVD media, 227–235
using FCP 7, 221–225
using Roxio Toast, 235
encode settings for, 236
hardware choice, 219–220
media used for, 220
player types, 219, 220
storage of, 218
Transcode Settings for, 264
workflows for production,
220
Blue-violet laser, 227
Broadcast safe filter in FCP, 149
Cache files in Soundbooth, 74
Calibration, using Abobe
OnLocation in, 42
camera, 51
monitor, 52
Cell phones. See Mobile phones
Chapter markers in FCP, 229
Check Project window in Adobe
Encore, 266
Chroma-key, definition of, 187
Clone Source panel in PS
advantage of, 177
options, 174–177
Cloning in PS
options, 174–177
retouching using, 172–174
Collection, creating in Adobe
Bridge, 26
regular, 25
smart, 25, 36
Color profile setting in PS,
126–128
Color spaces in PS, 198
INDEX