css web sites with dreamweaver mx 2004 - Phần 1 pdf
Bạn đang xem bản rút gọn của tài liệu. Xem và tải ngay bản đầy đủ của tài liệu tại đây (982.21 KB, 15 trang )
CSS Web Sites with Dreamweaver MX
(Everything you ever wanted to know about web standards, CSS and Dreamweaver
but were afraid to ask)
Rachel Andrew
Molly E. Holzschlag
© 2003, 2004 DMXzone.com
Published by DMXzone.com
Dynamic Zones International
Hengelosestraat 705
7521 PA Enschede
The Netherlands
All rights reserved. No part of this book may be reproduced or transmitted in any form or
by any means, electronic or mechanical, including photocopying, recording or by any
information storage and retrieval system, without prior written permission in writing from the
publisher, except in the case of brief quotations embodied in critical articles or review.
The authors and publisher have made every effort in the preparation of this book to ensure
the accuracy of the information. However, the information contained in this book is sold
without warranty, either express or implied. Neither the authors, DMXzone, nor its dealers or
distributors will be held liable for any damages caused or alleged to be caused either
directly or indirectly by this book.
No font tags were harmed during the making of this book.
Trademark Acknowledgements
DMXzone has endeavoured to provide trademark information about all the companies
and products mentioned in this book by the appropriate use of capitals. However,
DMXzone cannot guarantee the accuracy of this information.
Dreamweaver, Dreamweaver MX and Dreamweaver MX 2004 are trademarks of
Macromedia.
1
Table of Contents
Introduction 5
CSS is news and becoming mainstream. 5
What this book does, and who it’s for 5
Authors 7
Rachel Andrew 7
Molly E. Holzschlag 7
1. Tables to CSS: A hybrid layout 8
The layout 8
Cleaner table-based layouts with CSS 8
Navigation 15
Taking it further 19
2. Tables to CSS: Cleaning nested tables and using styled lists for Navigation. 20
The layout 20
Cleaning up the tables 21
Using a list for navigation 26
Two tables to one 32
Final touches 35
3. Page layout with CSS: Layers and CSS Positioning 36
CSS Layouts in Dreamweaver 37
CSS Positioning in an External Style sheet 41
CSS Positioning Techniques 50
4. Borders, Backgrounds, Blocks & Boxes 54
Working with CSS in Dreamweaver MX 54
Setting a Background 55
Setting A Border 57
Block Properties 60
Box Properties 62
5. CSS Design with Dreamweaver MX: Working with Type, Lists, Positioning and CSS
Extensions
64
CSS Text Styling with Dreamweaver MX 64
Setting List Properties 69
Positioning 71
Setting Extensions 72
6. Creating a Two-Column Layout, the Box Model Hack and Using @import to hide styles
from Netscape 4
74
Setting up the Markup 76
2
Linking the Default Styles Sheet 77
Importing the Layout Styles 79
Add Divisions 80
Go Forth and Modify 85
7. Creating A Three-Column Layout 90
Defining the Site 90
Linking and Importing the Site Style 90
Defining Your Divisions 94
Adding Content 95
Adding the Logo 96
Adding Navigation 96
Adding Content to the Right Column 99
Adding the Footer 100
Cleaning Up and Testing Your Documents 100
Modify Away 103
8. Creating a Weblog Layout, and using a horizontal navigation list 104
About the Design 104
Creating the Markup 105
Styling the Page 109
Horizontal Lists for Navigation 112
Creating Alternative Designs 115
9. Switching Styles: Users-selected style sheets. 118
About Style Switching 118
Setting Up 119
Using the Style Switcher for Alternative Designs 121
Linking to the JavaScript 123
Adding Hooks to the HTML Document 124
10. Using the Float Property: an all-CSS Photo Album layout 126
Old-style layout using tables 126
Photo Album layout using CSS 128
Creating the document 132
Creating space 137
Adding a border to the image 139
Setting the width of the layout 140
Centering the layout 141
11. Centering Designs with CSS 144
The Issue in Detail 144
Centering the Right Way 145
Centering the Wrong Way 150
One Right and One Wrong Equals Compatibility 153
The Good News 155
3
12. Styling forms with CSS 156
Styling form elements – what can we change? 156
The form tag 156
The input tag 160
Select menus 166
Textarea 169
What about old browsers? 172
13. Using Design-Time Stylesheets to Create a Print Stylesheet 174
Getting Started 174
Using Design-time Stylesheets while creating a stylesheet 175
Printing only relevant areas of the page 178
Using a different font style for print 181
Converting to grayscale 183
Display page information on printed versions 184
Attach the stylesheet to the document 186
Summary 187
Appendix A: CSS and Old Browsers 190
Hiding styles from Netscape 4 190
The 'Netscape Resize Fix' 200
Appendix B: DOCTYPE switching in 202
About DTDs and DOCTYPEs 202
Days of DOCTYPEs Past 203
The Box Model Nightmare 203
The Hopeful Solution 205
Not So Fast 205
Modifying DOCTYPEs in Dreamweaver MX 206
Making the Switch 207
Where Now? 208
About DMXzone 210
History of DMXzone 210
What do we do 210
4
Each chapter is a project, so you’ll learn by doing. We look at the basics of cutting down
presentational HTML, then removing tables, move on to CSS for positioning, and then the
techniques used to make some common layouts (two columns, three columns, and so on),
and then how to use CSS to style boxes, borders, margins, lists and so on. Both authors are
established Dreamweaver experts, and both are members of the Web Standards project.
Let’s meet them.
6
Font tags
Firstly, let's create a new style sheet in Dreamweaver and put all the font information into it.
In the CSS Styles Panel of the Design Panel Group click 'new CSS style'.
In the dialogue that opens select Tag – 'body'; select - 'Redefine HTML Tag'; Define In 'New
Style Sheet File'.
Click OK and you will be prompted to save the style sheet. Save it into your site directory.
Once you have saved your style sheet, you will be presented with the CSS Style Definition
Dialogue. Here you can reproduce your font tags with CSS declarations as in the image
below.
9
After creating the rules for body you will need to return to the CSS Panel and create rules
(in exactly the same way) for p, td, li – this time however, in the initial dialog choose to
define your styles in the style sheet that you created when defining the body tag and not
in a New Style Sheet.
Once you have defined CSS replacements for your main text, you can remove the font
tags from within the mark-up.
Custom Classes for Text
In our layout we have a boxed out area below the nav box, on the lower left of the
screen, in which the text is smaller than the text on the rest of the page. Using font tags we
would just set that text to a smaller size than we did for the main text. However, the CSS
styles are applied across all text so if you have removed the font tags from that area it will
have changed to the size of the rest of the body text. To set this area to use smaller text we
need to use a custom class.
Launch the New Style Dialogue again and this time select 'Make Custom Class', again
defining in our style sheet. In the first box type the name of your class, '.smallbox'. Click OK
and set the rules for the fonts in this class.
Once you have set your rules and clicked OK you will see your class appear in the CSS
Styles Panel. It won't format your box just yet because we need to apply that class to the
box.
10
Before we do that, have a quick look at your Property Inspector. If it looks like this:
Click on the little yellow 'A' and your Property Inspector will transform into the CSS Property
Inspector - you can always change it back if you need to by clicking the funny 's' thing –
but when working in CSS you will find this mode very useful, and we will use it now to apply
our class.
Select the td that contains the boxout text. With this selected, go to the Property Inspector
and you will see a drop-down list that currently says 'No CSS Style'. Click on this and you
should see the custom class that you created listed here. Select it and the text in the box
will automagically transform to take on the styles you set for it.
If the end result doesn't look quite right simply double-click on the name of the class in the
CSS Styles Panel to edit the rules.
11
Using these two techniques you should be able to easily replace all the font tags in your
site. Redefine your headings – or create custom classes if you need different styles of
heading – create a class for your footer text, and so on.
Cleaning up the body
Having removed all those font tags from the page, let's turn our attention to the body tag
because there are some deprecated elements in there that can, and should, be replaced
with CSS.
When an HTML tag is described as deprecated it has been flagged up to be removed
from future versions of (X)HTML. You can still use deprecated tags in valid pages with
transitional HTML and XHTML DOCTYPEs (the defaults used by Dreamweaver), but their
days are numbered. For maximum 'future-proofing' your pages, it's a good idea to stop
using deprecated tags now - especially because the deprecated elements at this point
tend to be those that can easily be replaced with CSS.
Go to Modify > Page Properties and delete everything from the boxes there (apart from
Title and encoding):
If you are working through with my example layout you will notice that, once you click OK
or Apply, page margins appear, the background goes white (which is Dreamweaver's
default background color; in reality the background would be the color the user had set
as their default page background color) and links turn to default link colors. We can now
set these properties using CSS.
12
In the CSS Styles Panel double-click on 'body' which opens up the dialog containing the
rules that we set earlier for the body tag. We can now add to this to set the background
color and page margins – just as we used to do with attributes of the body tag itself.
To set the background color, select 'Background' in the Category list on the left, then
browse for or type in your background color in the first field on that dialog.
Now select the category 'Box', here you can set the margins and padding for the page,
set Padding – Top to 0 pixels and check 'Same for All' and do the same for Margin – Top.
Click OK to get rid of your page margins.
Links
We now can change our links from something other than the default colors set by the
browser, and there is a way to do this using CSS in Dreamweaver too. Links, or more
correctly anchor tags, can be styled by styling the various states of the tag – link, visited,
hover, active.
Create a new CSS Style, this time in the dialog choose the radio button 'Use CSS Selector'
and then in the drop down at the top choose 'a:link'.
13
Click OK and in the dialog set the text properties to how you wish your default link colors to
appear.
Click OK and then repeat the process for a:visited, a:hover, a:active.
It is important that you create the states in this order LINK, VISITED, HOVER, ACTIVE.
One page – many link styles
With CSS it is possible to set up different sets of link styles for different places on a page – for
instance in my demo page I have an email link in the footer which is a little bit dark in the
default orange. To create a different scheme for this:
Create a new style and select 'Use CSS Selector' as before and choose 'a:link' in the menu.
This time, before clicking OK, type .footer in front of a:link in the first box. '.footer' is the
14
You will find that you can't apply this class using the Property Inspector in Dreamweaver
MX). However, there are two other ways to apply classes. You can right click on the tag in
the tag selector, choose 'Set Class' and then select your class name, or you can select the
element in the document window, then select the Radio button 'Apply Styles' in the CSS
Styles Panel, and then click on the class name in the panel.
The Buttons
Be ruthless and delete those images out of the cells of our navigation table. Then select
each cell of the table in turn and delete the background color. What you will end up with
is a grey box with 4 rows. Dreamweaver may or may not tidy up after itself. Finally if you
switch into Code View and notice any JavaScript in the head of my example document,
feel free to delete it – there's no need for it any more!
Create a new style, this time select 'Use CSS Selector' as we did for the links, but type '.nav
td' into the box. Click OK and define a background color for this class as #ffffff. In the 'Box'
category, give the cell a height of 24 pixels.
Click OK and watch all the cells of your table turn white again.
Type into each cell the navigation menu items – Home, Photographs, Resume, Links. Select
each one and type '#' into the link field of the Property Inspector to create a dummy link,
the links should take on your default link color.
Remember back to when we created the footer link? We can apply the same principles
to making navigation links – with just a few extra touches.
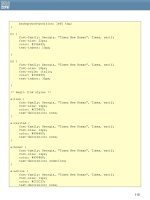
Create a new CSS Style, and as with the footer link select 'Use CSS Selector' and in the box
at the top type '.nav a:link'. Click OK and then in the dialog set how you wish these
navigation links to appear. Below are the settings I have used in the type category to
reproduce the image buttons.
16
Before clicking Ok, select the 'block' category and in the last item on the list of options,
select Display 'block'.
17
Finally, in the box category, you can set the padding and margins. Setting padding-left to
6 pixels will mean that the text does not bump up right against the side of the cell. You can
change the other padding settings until the buttons look as you want them to.
Now you need to create rules for each of the other states as before – to create the hover
effect, when you do .nav a:hover set the color to a different shade (in my case #999999)
and the text will change to this color when someone holds their mouse over the button.
18