css web sites with dreamweaver mx 2004 - Phần 3 potx
Bạn đang xem bản rút gọn của tài liệu. Xem và tải ngay bản đầy đủ của tài liệu tại đây (719.32 KB, 22 trang )
margin-bottom: 1px;
padding-left: 2px;
line-height: 18px;
}
.navlist {
list-style-type: none;
margin-left: 0px;
border-top: 1px solid #cccccc;
border-right: 2px solid #cccccc;
border-bottom: 1px solid #cccccc;
border-left: 2px solid #cccccc;
padding-left: 0px;
margin-top: 30px;
margin-right: 0px;
margin-bottom: 0px;
}
.navlist li {
background-color: #ffffff;
display: block;
border-top-width: 1px;
border-bottom-width: 1px;
border-top-style: solid;
border-right-style: none;
border-bottom-style: solid;
border-left-style: none;
border-top-color: #CCCCCC;
border-right-color: #CCCCCC;
border-bottom-color: #CCCCCC;
border-left-color: #CCCCCC;
}
.navlist a:link {
font-family: Georgia, "Times New Roman", Times, serif;
font-size: 16px;
color: #666666;
text-decoration: none;
font-weight: bold;
display: block;
padding-left: 6px;
padding-top: 4px;
padding-bottom: 2px;
}
.navlist a:visited {
font-family: Georgia, "Times New Roman", Times, serif;
font-size: 16px;
44
color: #666666;
text-decoration: none;
display: block;
padding-left: 6px;
font-weight: bold;
padding-top: 4px;
padding-bottom: 2px;
}
.navlist a:hover {
font-family: Georgia, "Times New Roman", Times, serif;
font-size: 16px;
font-weight: bold;
color: #999999;
display: block;
padding-left: 6px;
padding-top: 4px;
padding-bottom: 2px;
}
.navlist a:active {
font-family: Georgia, "Times New Roman", Times, serif;
font-size: 16px;
font-weight: bold;
color: #666666;
text-decoration: none;
display: block;
padding-left: 6px;
padding-top: 4px;
padding-bottom: 2px;
}
.imgborder {
border: 1px solid #000033;
}
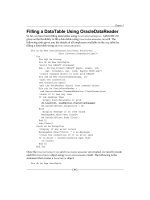
Open up the style sheet in the Code View.
In the Code View for the page that we created with the layer, select the rules that are
attached to the div tag. This is everything between the quotation marks of style.
The rules select in the Code View
45
Copy this to your clipboard and switch to your style sheet. Type the following into your style
sheet:
#content {
}
then paste the rules that you copied in between the curly brackets:
#content {
position:absolute; left:0px; top:0px; width:100%; height:100%; z-
index:1; background-color: #eeeeee; layer-background-color: #eeeeee;
border-top: 50px solid #333366; border-left: 100px solid #333366; border-
right: 100px solid #333366; border-bottom: 20px solid #333366;
}
Return to your page and delete the style attribute and all the rules so you are simply left
with:
<div id="content"></div>
Save your page, view it in Dreamweaver or in a browser and you should see that the page
remains the same, except that now the mark-up for the layer (or 'div' as it really should be
known) is in your external style sheet.
You could continue on adding elements to this page in the same way – using layers and
then pasting the rules into your external style sheet – or you can simply set up your divs in
the Code View and then work on the CSS to add the rules yourself.
To add the divs by hand simply switch into Code View and type them in – for example: in
my layout the main content area is split into two, a left hand column for navigation and a
right hand column which is for text. These are inside the div 'content'. In Code View, add
two div tags inside the content div. Put some dummy text in there just so you can see
where they are.
<div id="content">
<div id="side">navigation here</div>
<div id="main">page content here</div>
</div>
In Design View you will see that these just appear one under the other as you would
expect, as the divs have no rules applied to them to tell them how to behave.
46
Now switch to your style sheet and add the following:
#side {
}
#main {
}
Save the style sheet, switch back to the page and you will see that these areas are now
showing up in the CSS Styles Panel which means you can now set their properties from the
CSS dialogue.
The CSS Styles Panel
Edit the definitions for #main. In the Box category give it a left margin of 200px:
47
Editing the CSS Style Definitions for #main
Click ok, the text for the content area will move over to the right.
Now edit the definitions for #side. In the Box category set the width to 192pixels, Float to
'left' and padding left to 10pixels.
Editing the CSS Style Definition for #side
48
In the #side div, I have added the mark-up for the navigation and small boxout that I used
in the last chapter, and also some dummy content for the text area. I then switched to my
style sheet and removed the attributes set on #content for height and width. This left me
with a layout that looks like this.
The layout in the Design View
The HTML mark-up for this page is below (filler text removed for brevity!).
<!DOCTYPE HTML PUBLIC "-//W3C//DTD HTML 4.01 Transitional//EN">
<html>
<head>
<title>CSS Layout</title>
<meta http-equiv="Content-Type" content="text/html; charset=iso-8859-1">
<link href="global.css" rel="stylesheet" type="text/css">
</head>
<body>
<div id="content">
<div id="side">
<ul class="navlist">
<li><a href="#">Home</a></li>
<li><a href="#">Photographs</a></li>
<li><a href="#">Resume</a></li>
<li><a href="#">Links</a></li>
</ul>
<div class="boxout">
49
<p>Lorem ipsum dolor sit amet, consectetuer adipiscing elit. Nam
sit amet
lorem. Ut sed nulla ut libero tempor egestas. Phasellus blandit,
purus
in facilisis tempus, leo arcu tempor elit, in bibendum lacus sem
at nunc.</p>
</div>
</div>
<div id="main">
<h1>Heading One</h1>
<p>Main page text here<p>
</div>
</div>
</body>
</html>
CSS Positioning Techniques
d a variety of CSS positioning techniques. The CSS that
he
or example, in a new document draw a layer using Dreamweaver and type some text
To create this layout we have use
controls the positioning of our main page area (the grey box) is positioned using absolute
positioning. Absolute positioning is the technique used by Dreamweaver to position its
"layers". When positioning something using absolute positioning you take it right out of t
flow of the document.
F
into it, drag it to the center of the document. Now click your mouse cursor at the top of
the Design View window and type a sentence. The sentence will remain at the top of the
document.
The text and layer in the Design View of Dreamweaver
50
If you switch into Code View you can see that the sentence outside the layer comes after
the content of the layer.
<div id="Layer1" style="position:absolute; left:149px; top:117px;
width:208px; height:248px; z-index:1">this
is layer one</div>
<p>This is some text </p>
If you delete the style attribute of this div while in Code View, so that you end up with the
following mark-up:
<div id="Layer1">this
is layer one</div>
<p>This is some text </p>
Then switch back into Design View you will see that the content has returned to the logical
e
Float
ve also used float to position our side bar area. Float is often used to allow text to
e
o see an example of float, open a new document in Dreamweaver and type:
his is my logo
his is some banner text
look like:
order in which it is found within the html. In complex layouts you can use this to your
advantage as you can order the actual content in the most appropriate way for thos
using devices and browsers that have no support for CSS, but lay the page out for
graphical browsers exactly as you want it to display.
We ha
wrap around images within a paragraph (in the way we used to use align="right" on imag
tags). However it can be used on any item that you want to position within its container
without having to absolutely position it.
T
T
T
In Code View this should
<p>This is my logo</p>
<p>This is some banner text</p>
Create a new CSS style (Custom Style), name it logo, and in the Box Category select Float:
reate another CSS style and call this one bannertext, in the Box category select Float:
ow apply the CSS class logo to the <p> tag of the "this is my logo" text and the
bannertext class to the other text. You should see the two elements end up at either side
left.
C
right.
N
51
of the top of the document. Here is the complete document - I have inserted the
the head of the document so you can see just how little mark-up goes into creating this.
CSS in
<!DOCTYPE html PUBLIC "-//W3C//DTD XHTML 1.0 Transitional//EN"
"
<html xmlns="
<head>
<title>Float Demo</title>
<meta http-equiv="Content-Type" content="text/html; charset=iso-8859-1"
/>
<style type="text/css">
<!
.logo {
float: left;
}
.bannertext {
float: right;
}
>
</style>
</head>
<body>
<p class="logo">This is my logo</p>
<p class="bannertext">This is some banner text</p>
</body>
</html>
By positioning images, or CSS styled text in this way, you can replace the need to use a 2
ell table to get this kind of effect. For the user reading the page with a text only device,
using CSS. As
lways, experimenting with these ideas is the best way to learn how these techniques work
c
as long as you use alt text on your logo, they will be able to read your company name
and strapline in the banner easily and understand exactly where they are.
There are huge amounts of ways in which you can position page elements
a
- with just these simple techniques you can begin to create interesting layouts, doing things
that wouldn't be possible using tables as well as replacing tables.
52
53
4. Borders, Backgrounds, Blocks & Boxes
CSS is the language of Web design a language that transcends the limitations of
presentational markup and offers new opportunities. Designers are just now getting to
explore those opportunities. The support for CSS in Dreamweaver MX is fairly decent, better
in MX 2004, and especially helpful for the designer just starting out with CSS as you can use
a range of dialogs to set numerous useful properties. However, if you're working with more
complicated CSS layouts or want to edit your CSS all at once it does mean doing a lot of
hand-authoring.
Before we get into the actual creation of designs, I want to provide you a two-part
foundation overlook that combines a look at some great CSS designs and describes what
Dreamweaver MX offers by way of its CSS related tools, and how you can use
Dreamweaver to style many aspects of your designs such as borders, backgrounds,
blocks, boxes, and lists culminating in a terrifically well-optimized yet fully visual design.
Working with CSS in Dreamweaver MX
While you can create inline styles using Dreamweaver MX, I'm going to focus on how you
can define the styles you need for your page or site.
To create a new style, follow these steps:
1. From the CSS Styles panel, click the New Style button.
2. The New CSS Style dialog box appears. In the Define In field, choose to add the
new style to an external style sheet.
3. Select a style type:
• Make Custom Style (Class) - Creates a class style. If you select this option, you
need to name the class in the Name field above the style type selector. If you
don't precede the class name with a period (.), as is required by the style
sheet, Dreamweaver adds it for you.
• Redefine HTML Tag - Applies a style to an HTML tag. When you select this
option, you also must select a tag from the Tag field above the style type
selector. These styles are automatically applied to the appropriate tags after
they're defined.
• Use CSS Selector - Applies a style to one of the link types listed in the Selector
field above the style type selector. These styles enable you to remove the
underlining from links and otherwise change the appearance of the various
link states. They're automatically applied after they're defined.
54
4. Click OK.
5. The Style Definition dialog box opens. Set the style rules by choosing from the
various style categories and options
6. Click OK to complete the style definition and return to the Document window.
After you create a style, it's easy to apply. Styles defined for an HTML tag are automatically
applied when viewed in a browser. Class styles are applied by doing the following:
1. In the Document window, select the content to which you want to apply the
class style.
2. In the CSS Styles panel, select a style from the list.
If the selection is only a small portion of content within a tag, the <span> tag is used with
the class attribute. If the selection extends across multiple paragraphs or tag pairs, the
style is applied using the <div> tag.
Setting a Background
The Background offers control over background images and colors. Not only do these
styles ensure consistency throughout the site, but they also offer greater control over the
repeating and scrolling of background images.
The properties in this category are:
• Background Color - Sets the background color for an element. This style can be
applied to the <body> tag to set a color for the entire page. It can also be applied
to <p> and other tags to set a background color only for that particular selection.
Using this style with link tags makes them stand out on the page.
• Background Image - Sets a background image for the page or element. This is most
commonly used with the <body> tag or table cells (<td>).
• Repeat - Sets the repeat tiling for a background image. No Repeat sets the image to
display from the upper-left corner of the element to which it's applied and not
repeat at all. Repeat tiles the image horizontally and vertically as needed to fill the
entire area used by the element. Repeat-x tiles the image horizontally, but not
vertically. Repeat-y does the opposite.
• Attachment - Sets the scrolling for the background image. A fixed image remains
anchored to its original position, even as the text is scrolled. This creates the effect of
the text moving over the background image and also enables you to set a
background image to specific dimensions to avoid tiling. A scrolling image scrolls
with the text, which is the default.
55
• Horizontal Position - Sets the initial horizontal position of the background image. The
position can be set with numerical coordinates or relative to the positioning of the
element to which the style is applied.
• Vertical Position - Sets the initial vertical position of the background image.
So let's say you wanted to create a background like Joseph Mathew did on his new site,
Local Foreigner (Figure 1).
Figure 1: The image of the woman walking is positioned in the background using CSS
The image of the woman walking is managed by CSS. If you sneak a peak at the style
sheet, you'll find the background is integrated with the document using the body selector,
as shown in Listing 1.
body {
background-color: #F4F4F4;
background-image: url(woman_crossing.jpg);
background-repeat: no-repeat;
background-position:675px 340px;
background-attachment: scrolling;
}
Listing 1: Positioning a background graphic
56
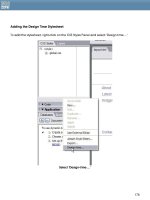
To create this CSS using Dreamweaver MX, follow these steps:
1. From the Design Panel, choose CSS Styles.
2. Bring up the context menu by right (shift) clicking in the panel.
3. Choose New CSS Style. The New CSS Style dialog appears.
4. Under Type, select "Redefine HTML Tag"
5. In the Tag drop-down box, select "body"
6. Select Define In "New Style Sheet File"
7. Click OK.
You'll be asked to save your CSS file. Give the file a name such as style.css, click Save. The
Style Dialog appears. Once it does, select Background under the Category list. Figure 2
shows the Background Style dialog filled out with the information in Listing 1. Once you've
added your own selections, Click OK. Your styles will be saved to the external style sheet,
and you can continue working on your current design.
Figure 2: Using Dreamweaver MX to set background styles
Setting A Border
Border styles are used to set borders to surround any element. Each side of the rectangular
border can have a unique line thickness and color. Borders can also be applied to select
sides of the element, creating text surrounded on top and bottom while the sides remain
open, or similar combinations. Along with thickness and color, eight border styles exist,
giving the border a specific appearance.
57
Figure 3. Backgrounds and borders on Meyerweb.Com
The properties of the Dreamweaver Borders styles are:
• Style - Sets the style of the border. The eight border options are:
o Dotted
o Dashed
o Solid
o Double
o Groove
o Ridge
o Inset
o Outset
• Width - Sets the thickness of the border for each of the sides.
• Color - Sets the color for the border.
Remember, you can set any border for any element. So, if you want all of your level 1
headers to have a bottom, colored, dotted border only, you can set that up using the CSS
dialog. To do so, bring up the CSS dialog (described in the last section) and select the
Border category. Then, fill in the parameters.
58
To get the effect I just described, you'd fill in the dialog as I have in Figure 4.
Figure 4: Setting a Bottom Border on an H1 selector in Dreamweaver MX
h1 {
border-bottom-width: thin;
border-bottom-style: dotted;
border-bottom-color: #996600;
}
Listing 2 - The CSS Dreamweaver generates for the border styles
Figure 5 shows the visual results.
Figure 5 - Header style results
As you can imagine using borders in a variety of ways, applied to other elements such as
anchors, paragraphs, and divisions. Using border styles are an excellent way to style great
data tables, too.
59
Block Properties
Block styles are used to control the alignment and spacing of text blocks. D. Keith
Robertson's "asterisk" Web log uses aspects of block styles (Figure 6).
Figure 6 - Text blocks can be managed using CSS block properties
The block style properties are as follows:
• Word Spacing - Sets the space between words. The default unit of measure for word
spacing is an em, which is the space taken up by the m character, although the unit
of measure can be changed. Positive values increase the spacing between words,
whereas negative values set words closer together.
• Letter Spacing - Sets the space between letters.
• Vertical Alignment - Sets the alignment of the element relative to the elements near
it.
60
• Text Align - Aligns text relative to the elements surrounding it. Text can have left,
right, center, or justified alignment.
• Text Indent - Sets the indentation of the first line of the text block by the specified
value. To outdent text, use a negative value.
• Whitespace - Sets the control of spaces and tabs within an element. Normal causes
the text block to be formatted in the same way as a default paragraph tag, where
extra whitespace is ignored. The Pre value preserves whitespace. The Nowrap value
causes text to extend horizontally until a <br> tag is encountered, rather than
wrapping to conform to the browser window.
Block properties are set in Dreamweaver MX using the Block dialog found under
"Category" in the CSS dialog, as shown in Figure 7.
Figure 7 - Defining CSS Styles in the Dreamweaver MX Block dialog
The resulting CSS can be found in Listing 3.
p {
letter-spacing: normal;
text-align: right;
text-indent: 10px;
vertical-align: text-bottom;
word-spacing: normal;
white-space: normal;
}
Listing 3 - Setting block properties for a paragraph
61
Box Properties
Box styles are used to control the positioning and spacing of elements, much in the same
way as tables.
The Box style properties are:
• Width - Sets the width of the element.
• Height - Sets the height of the element.
• Float - Sets the positioning of the element. Floating elements are positioned against
the margin for which they are set, with the other elements of the page flowing
around them.
• Clear - Clears the area around the box and doesn't let other elements flow around
it.
• Padding - Sets the amount of space between the element and its border or margin.
• Margin - Sets the spacing between the element and other page elements.
Owen Briggs' CSS: A guide for the unglued reference page uses a combination of floating
and fixed position boxes to achieve its design (Figure 8).
Figure 8 - This clean, crisp design uses CSS floats and positioning for its layout
62
63
5. CSS Design with Dreamweaver MX: Working with
Type, Lists, Positioning and CSS Extensions
In this chapter, we don’t just look at how to make CSS mimic stuff we’ve been doing for
ages with HTML, we look at things that cannot be achieved without CSS. This chapter
focuses on working with type, lists, and positioning features. I'll also show you the Extensions
dialog and how you can use CSS extensions to style your pages, teaching you to use CSS
as a primary means of presenting and visual enhancing your pages far beyond the
limitations of HTML and XHTML.
CSS Text Styling with Dreamweaver MX
As so many designers are aware, typography is a major factor in making or breaking a
design. One of the real difficulties with the Web has been the limitations on typography.
And, while there were early attempts to create embedded font technologies to allow
fonts to be downloaded to browsers upon reaching a page, this technology has never
really emerged. As a result, Web designers interested in creating interesting typographic
designs for their pages use a combination of HTML formatted text, CSS, and graphics.
Flash, of course, offers designers extended opportunities to work with type.
Most readers are well aware by now that the use of font tags and similar HTML formatting
for text is considered problematic for a variety of reasons. On the other hand, CSS is
especially powerful in its typographic options. Firstly, there are numerous options for sizing
type that don't exist in HTML or XHTML. Secondly, you can use multiple style sheets for
different needs - one document can have styles that differ for screen, print, and small
screens. (See the chapter “
Creating A Print Stylesheet” later for the process of making
most common alternate stylesheet). From a typographic standpoint, that means you can
set up a style for your document that is suitable for screen while at the same time having
different type styles and sizes suitable for print. Perhaps the most important aspects of CSS
typography is that it is mostly part of CSS1 and is therefore widely supported by Web
browsers - even Netscape 4.x versions can manage aspects of typographic style, making
CSS for type a much, much better option than those available in HTML.
64
Figure 1 - Sardonic, an attractively designed page whose type has been styled using CSS.
The line spacing, font sizing, and link effects on this page simply could not have been
created with presentational HTML or XHTML.
To access the CSS type editor in Dreamweaver MX, follow these steps:
1. From the Design panel, select the CSS styles tab and click the New Style button at
the bottom of the panel.
2. The New CSS Style dialog box appears. In the Define In field, choose to add the new
style to an external style sheet.
3. Select a style type:
a. Make Custom Style (Class) - Creates a class style. If you select this option, you
need to name the class in the Name field above the style type selector. If you
don't precede the class name with a period (.), Dreamweaver adds it for you,
65