Linux For Dummies 6th Edition phần 6 potx
Bạn đang xem bản rút gọn của tài liệu. Xem và tải ngay bản đầy đủ của tài liệu tại đây (1.39 MB, 46 trang )
The three triads are read as follows:
ߜ The first triad consists of the second, third, and fourth characters in the
long format file listing. This triad sets the permissions for the user, or
owner, of the file. (Owners are discussed in the “Beware of owners” sec-
tion, later in this chapter.)
ߜ The second triad consists of the fifth, sixth, and seventh characters in
the long format file listing. This triad sets the permissions for the group
that is assigned to the file. (Groups are discussed in the “Hanging out in
groups” section, later in this chapter.)
ߜ The third triad consists of the eighth, ninth, and tenth characters in the
long format file listing. This triad sets the permissions for other, or
everyone who isn’t the file’s owner or a member of the owning group.
Although each triad is often different from the others, the internal structure
of each one is made up in the same way. Focus specifically on how to read
one triad before looking at the set of them together. Each triad includes three
characters:
ߜ The first character is either an
r or a dash. The r stands for read permis-
sion. If
r is set, the triad allows the entity it stands for (user, group, or
other) to view the directory or file’s contents.
ߜ The second character is either a
w or a dash. The w stands for write per-
mission. If
w is set, the triad allows the entity it stands for to add or edit
items to, or in, this directory or file.
ߜ The third character is either an
x or a dash. The x stands for execute
permission. If
x is set, the triad allows the entity it stands for to run
programs contained in this directory or to run the particular program
in this file.
In all cases, if the dash sits in place of
r, w, or x, the triad doesn’t allow the
entity the read, write, or execute permission.
The following sections describe owners and groups in more detail.
Beware of owners
You may have noticed by now that I talk a great deal about owners (users)
and groups in Linux. Every file and directory has both of these components: a
user from the
/etc/passwd file that’s assigned as its owner and a group from
/etc/group assigned as the group.
Although an everyday user probably doesn’t need to change file ownerships
often, the root user does so regularly. If you add the file
comments, for exam-
ple, to
/home/tom while you’re logged on as the superuser (another term for
the administrator, who is the person who owns the root account), root owns
that file. The user
tom can’t do anything with it unless you have set the last
212
Part III: Getting Up to Speed with Linux
16_579371 ch10.qxd 12/27/04 8:33 PM Page 212
triad’s permissions to allow the other folks (those who aren’t the file’s owner
or in the specified group) to read and write to the file. But this method is a
pretty sloppy way of doing things because the whole idea of permissions is to
reduce access, not to give everyone access. Instead, remember to change the
file’s owner to the user
tom. You do this with the chown (change owner) com-
mand. For example, by typing
chown tom comments, root changes the own-
ership over to
tom. Then tom can work with this file and even change its
permissions to something he prefers.
Hanging out in groups
Groups are more interesting to work with than owners. You use groups to
allow the root user to assign to multiple users the ability to share certain file
system areas. For example, in many versions of Linux, all users are added to
a group named users (SuSE does this, for example). Then, rather than a long
format file listing such as the one shown in earlier in this chapter, you may
see the following:
total 20
drwx 2 dee users 4096 Jul 29 07:48 .
drwxr-xr-x 5 root root 4096 Jul 27 11:57
-rw-r r 1 dee users 24 Jul 27 06:50 .bash_logout
-rw-r r 1 dee users 230 Jul 27 06:50 .bash_profile
-rw-r r 1 dee users 124 Jul 27 06:50 .bashrc
-rw-rw-r 1 dee users 0 Jul 29 07:48 lsfile
In other distributions (such as Fedora) a unique group is created for every
user, which is why the earlier listings showed the owner and group items as
identical (
dee dee).
Comprehending file types
The first letter in any long format file listing tells you which type of file you’re
dealing with. In Table 10-1, I list the types you’re likely to run into.
Table 10-1 Linux File Types
Label Type Description
- Regular file The item is an everyday file, such as a
text file or program.
b Block device The item is a driver (control program) for
a storage medium, such as a hard drive
or CD-ROM drive.
(continued)
213
Chapter 10: Manipulating Files and Directories
16_579371 ch10.qxd 12/27/04 8:33 PM Page 213
Table 10-1 (continued)
Label Type Description
c Character device The item is a driver (control program) for
a piece of hardware that transmits data,
such as a modem.
d Directory The item is a container for files, also
referred to as a folder in some operating
systems’ lingo.
In addition to this, you find lots more different file types out there in the
Linux world. By types, I’m not referring to extensions, such as
.exe or .doc.
Linux sees everything within its file system — even directories and hardware
like your monitor — as “files.” As a result, assigning a type to a file is merely a
Linux machine’s way of keeping track of what’s what.
The main thing Windows users in particular want to know when they move to
Linux is how to recognize programs. Rather than looking for files with partic-
ular extensions (like
.exe) programs have (or need to have) an executable
permission set so the system knows they are allowed to run. You can view or
set this permission for a file by going to the Nautilus or Konqueror section
and looking up how to do so.
214
Part III: Getting Up to Speed with Linux
16_579371 ch10.qxd 12/27/04 8:33 PM Page 214
Chapter 11
Checking Out the Linux Filesystem
In This Chapter
ᮣ Discovering the root directory and subdirectories
ᮣ Discerning partitions from directories
ᮣ Adding removable media to the filesystem
ᮣ Caring for your filesystem
ᮣ Accessing shared files on Windows computers
I have an existential map. It has “You are here” written all over it.
— Steven Wright
O
ne of the most frustrating things about learning a new operating
system can be figuring out where it keeps files. Rather than keep all
important system files in a single directory, such as the
C:\Windows direc-
tory in Microsoft Windows, Linux follows the lead of its Unix cousins and
spreads things out a bit more. Although the Linux and Windows setups
involve different methods, they are both logical, though it may not feel
that way until you understand where to look.
Another issue you come across is adding new media — hard drives, floppy
disks, CD-ROMs, DVD-ROMs, zip disks, and more — to the existing filesystem.
In this chapter, I focus on how the filesystem is organized and other handy
topics, such as how to access data on a floppy disk. (In Chapter 10, you can
find hints on how to do this when looking through the file managers.)
Introducing the Linux Filesystem
Linux may be all by itself on your hard drive, or maybe it’s sharing your
hard drive with another operating system, such as Microsoft Windows. All
the hard drive space you allocated for Linux during the installation process
17_579371 ch11.qxd 12/27/04 8:36 PM Page 215
is the majority of your Linux filesystem. Because you’re running your own Linux
machine, you need to be familiar with how it’s put together — especially the
sections that are dangerous to mess with!
Meet the root directory
Everything in the Linux filesystem is relative to the root directory, which is
referred to as
/ and is the file-system base, a doorway into all your files —
don’t confuse this with the
root user, which is the system administrator. The
root directory contains a mostly predictable set of subdirectories. Each dis-
tribution varies slightly, but certain standards exist to which they all con-
form. The standards keep us all sane.
If you’re interested in these standards, go to
www.pathname.com/fhs and
look at the latest version of the rules.
Rather than flood you with everything at once, I start by talking about the
base directories, meaning the items you find in
/. Table 11-1 lists what you
might find in this base location. (This list can vary some from distribution
to distribution.) An asterisk (*) at the end of a description indicates that
you shouldn’t mess with this directory unless you have a really good reason
because it contains files that are very important to the functioning of your
system.
Table 11-1 Standard / Contents in Linux
Directory Contains
/bin Essential commands that everyone needs to use at any time*
/boot The information that boots the machine, including your kernel*
/dev The device drivers for all the hardware that your system needs
to interface with*
/etc The configuration files for your system*
/home The home directories for each of your users
/lib The libraries, or code that many programs (and the kernel) use*
/media A spot where you add temporary media, such as floppy disks
and CD-ROMs; not all distributions have this directory
/mnt Another spot where you add temporary media, such as floppy
disks and CD-ROMs, along with networked drives and other
items you aren’t permanently adding to your filesystem
216
Part III: Getting Up to Speed with Linux
17_579371 ch11.qxd 12/27/04 8:36 PM Page 216
Directory Contains
/opt The location that some people decide to use (and some pro-
grams want to use) for installing new software packages, such
as word processors and office suites
/root The superuser’s (root user’s) home directory
/sbin The commands the system administrator needs access to*
/srv Data for your system’s services (the programs that run in the
background)*
/tmp The place where everyone and everything store temporary files
/usr A complex hierarchy of additional programs and files
/var The data that changes frequently, such as log files and your mail
Some of these directories have some equally important subdirectories, which
I cover in the upcoming sections.
Meet the /etc subdirectories
Although the exact subdirectories that exist in /etc can change from distrib-
ution to distribution, the following two are fairly standard:
ߜ The
/etc/X11 directory contains configuration details for the X Window
System (X), which runs your Graphical User Interface (GUI). See Chap-
ter 15 for more on the GUI.
ߜ The
/etc/opt directory contains configuration files for the programs in
the
/opt directory, if you decide to use it.
An important addition in Fedora is
/etc/sysconfig, which contains configu-
ration information for the services that start at boot time, including things
like your networking.
Meet the /mnt and /media subdirectories
You may or may not have any subdirectories in /media or /mnt by default
(and you may not have both of these directories at the same time). Typically,
however, you do have the following:
ߜ The
/mnt/floppy or /media/floppy directory is used for adding a
floppy disk to your filesystem — instead of the word
floppy, you might
see
fd0 instead.
217
Chapter 11: Checking Out the Linux Filesystem
17_579371 ch11.qxd 12/27/04 8:36 PM Page 217
ߜ The /mnt/cdrom directory is used for adding a CD-ROM to your filesys-
tem in some distributions, and others use
/media/cdrom (or /media/
dvd
, /media/cdrecorder, and so on, depending on what type of hard-
ware you have).
In the “Adding Media to Your Filesystem” section, later in this chapter, I show
you how to add these items for each of the distributions.
Meet the /usr subdirectories
The /usr directory is often referred to as its own miniature filesystem hierar-
chy. This directory has lots of important or interesting subdirectories, as
shown in Table 11-2. An asterisk (*) at the end of a description indicates that
you need to leave that directory alone unless you have good reason to mess
with it — after you gain lots of experience with Linux and know exactly what
changes you need to make — so that you don’t accidentally alter something
your system needs in order to function correctly. An important thing to
remember about this segment of the filesystem is that many advanced
Linux users often use
/usr to store programs that can be shared with
other machines.
Table 11-2 Standard /usr Subdirectories
Subdirectory Contents
/usr/X11R6 The files that run the X Window System (the wireframe for
your GUI)*
/usr/bin The commands that aren’t essential for users but are
useful*
/usr/games The games that you install on your system, except for
those that you can choose to place in /opt
/usr/include
The files that the C programming language needs for the
system and its programs*
/usr/lib The code used by many of the programs in this /usr sub-
hierarchy*
/usr/local The programs and other items that you want to keep
locally, even if you’re sharing everything else in /usr
/usr/sbin The commands that aren’t essential for administrators but
are useful*
218
Part III: Getting Up to Speed with Linux
17_579371 ch11.qxd 12/27/04 8:36 PM Page 218
Subdirectory Contents
/usr/share The information that you can use on any Linux machine,
even if it’s running incredibly different hardware from
what this one is running*
/usr/src The source code that you use to build the programs on
your system
Finding CDs and More in Your GUI
Chapter 10 covers how to use the file managers that come with the distribu-
tions covered with this book (and most other Linux desktop-based distribu-
tions, for that matter) — Nautilus and Konqueror. In this section, I take a look
at how to use these tools to find your way around the filesystem. Some distri-
butions make this process more intuitive than others, mostly due to tons of
handy shortcuts that mean you have to know less of what’s happening under
the hood — a pretty handy thing for desktop users.
Navigating the filesystem in Fedora
Because Fedora’s default GUI is GNOME (see Chapter 6), which is different
from all the other distributions discussed in this book, you use Nautilus
(see Chapter 10) to find your way around. Some things are made pretty
easy for you:
ߜ When you insert a data CD-ROM or DVD-ROM, an icon may or may not
appear on your desktop. If it doesn’t appear, double-click the Computer
icon and then the drive’s icon within the Nautilus window in order to
access the CD-ROM’s or DVD-ROM’s contents and add an icon to your
desktop. You can later remove these items by right-clicking and choos-
ing Eject from the shortcut menu.
ߜ When you plug in a USB storage device such as a keychain, Fedora auto-
matically adds an icon onto your desktop for that item, which you can
double-click to open. Once you’re finished working with the USB device,
close all of the windows that were using it, right-click its icon on the
desktop, and choose Unmount. Now it’s safe to remove the keychain.
ߜ When you insert a music CD, Fedora opens a music player and begins
playing it.
ߜ When you insert a video DVD, Fedora is not configured to auto-run its
contents. See Chapter 18 for more on watching DVDs.
219
Chapter 11: Checking Out the Linux Filesystem
17_579371 ch11.qxd 12/27/04 8:36 PM Page 219
To turn on or off auto-run or auto-loading for these various items, from
the main menu, choose Preferences➪Removable Storage. If you shut off
auto-loading for something, you can access a device’s contents from any
Nautilus window by choosing Places➪Computer and double-clicking the
appropriate icon in there. This action adds an icon onto your desktop as
well.
ߜ When you insert a blank CD or DVD writeable or re-writeable, Fedora
opens Nautilus to the CD/DVD Creator window. (You can find out more
about burning in Chapter 18.)
ߜ When it comes to floppies, the computer can’t reliably detect that a
floppy was put into the drive. So, put the floppy into the drive and then,
from any Nautilus window, choose Places➪Computer➪Floppy to access
its contents and add a floppy icon on your desktop. To remove the
floppy, right-click the floppy icon on your desktop or in your Nautilus
Computer window and then choose Unmount Volume. Wait until the
floppy drive light is off before removing the floppy.
ߜ If you want to access a network drive from Windows or that someone
has set up on another Linux computer, double-click the Computer icon
on your desktop (or choose Places➪ Computer) from any Nautilus
window) and then double-click the Network icon. This action lets you
browse through your network to the computers that are offering files.
ߜ If you want to access part of your Linux filesystem, double-click the
Computer icon on your desktop (or choose Places➪ Computer) from
any Nautilus window) and then double-click the Filesystem icon.
ߜ If you want to access something on one of your hard drives that isn’t
part of your Linux installation (maybe a Windows drive).
For the last option listed, follow these steps:
1. Open a command line terminal.
See Chapter 14 if you’re not sure how to do so.
2. Type
su - to become the root (administrative) user.
3. Type
fdisk -l to see all your hard drives and partitions.
If you’re looking for a Windows partition, then you can find it right here.
Ignore the items that have text similar to Windows 95 Ext’d; they’re not
really a data partition. Anything that has NTFS or FAT32 or VFAT is a
Windows partition and is what you’re interested in. If you’re looking for
a Linux partition (maybe you have more than one distribution installed
on your system), then you want the ones that have the word Linux in
their description and not the word swap.
220
Part III: Getting Up to Speed with Linux
17_579371 ch11.qxd 12/27/04 8:36 PM Page 220
4. If you need to access an NTFS partition, see Chapter 12 for how to use
yum to add NTFS support.
You can search to see whether you have NTFS support in your current
set of yum repositories by typing
yum search ntfs. If no matches are
found, then you may need to add another repository.
5. When you think you know what partition you want to try, type
mount
-t type /dev/partition /mnt
to add it to your filesystem, where
type is the filesystem type as shown in Table 11-3 and partition is the
letter and number combination you saw in
fdisk (such as hde2).
So, for example, after adding NTFS support, you might type
mount -t
ntfs /dev/hde2 /mnt
. Once you do so, you can find all of that parti-
tion’s contents under the
/mnt directory.
Table 11-3 Common Filesystem Types
Type Description
ext2 “Older” Linux filesystem type
ext3 “Newer” Linux filesystem type, used by default in Fedora and
Red Hat, among others
ntfs “Newer” Windows filesystem type, started with Windows NT
and commonly used in Windows XP
reiserfs Another “newer” Linux filesystem type, used by default in
Mandrake and SuSE, among others
vfat “Older” Windows filesystem type, such as FAT32 and MS-DOS
6. Browse as you need to.
You may find that you have read-only access to your NTFS partition and
can’t change anything on it.
7. When you’re finished, type
umount /mnt to remove the partition’s
contents from your filesystem.
The preceding steps work for all distributions, except for Step 4. You just
need to find out how your distribution handles NTFS.
Navigating the Filesystem in Knoppix
Knoppix is another distribution that makes things as easy as possible, with a
few little bumps along the way. When your system starts up, it automatically
221
Chapter 11: Checking Out the Linux Filesystem
17_579371 ch11.qxd 12/27/04 8:36 PM Page 221
has icons along the left of your desktop for every drive and partition it finds.
To help you find your way around:
ߜ It’s important to realize that because Knoppix is a bootable distribution,
you already have a CD-ROM in use in the drive! If you only have one
CD/DVD-ROM drive, you’re stuck. You can’t eject Knoppix, because the
CD is acting as your hard drive, containing all your programming. Here’s
where a portable drive can come in handy.
ߜ To use a floppy, place it in your floppy drive and then click the floppy
icon to access its content. (If you’re using a machine without a floppy
drive, Knoppix fools you and puts a floppy icon on the desktop anyway!)
You can then right-click the floppy and choose Actions➪Unmount to
save everything before removing it from the drive.
ߜ To access drives on your network:
1. Click the monitor icon on your panel to open a command line
terminal window.
2. In the terminal, type
su
You are now in Knoppix as the root user. There’s no password by
default, but you can set one if you want.
3. Type
/etc/init.d/lisa start.
This action starts one of the two programs necessary to get easy
network browsing working.
4. Click any of the drive icons on your desktop.
The Konqueror file browser opens.
5. Look to the left panel of icons on your Konqueror window and
click the bottom one (Services).
The Services section of Konqueror appears.
6. Click LAN Browser.
Now you have access to the computers that are offering shared
folders on your network!
7. Browse away.
ߜ To access your Linux filesystem:
1. Click any of the drive icons on your machine.
The Konqueror file browser opens.
2. Look to the left panel of icons on your Konqueror window and
click the icon above the bottom one (Root Folder).
Your root folder’s contents appear.
3. Navigate at will!
222
Part III: Getting Up to Speed with Linux
17_579371 ch11.qxd 12/27/04 8:36 PM Page 222
ߜ To access partitions and drives on your machine that aren’t part of your
Linux installation (like a Windows drive), click the various Hard Disk
Partition icons until you find the one you’re looking for.
Navigating the filesystem in Linspire
Because Linspire is designed for the absolute newcomer, you expect its
filesystem navigation to be a point-and-click snap, and indeed they’ve made it
pretty easy on you. To navigate your filesystem in this distribution:
ߜ When you insert a data CD, CD-ROM, DVD, or DVD-ROM, Linspire opens
a file browsing window with the item’s contents. To remove the item
from your system, right-click its icon on the desktop and choose Eject.
ߜ When you insert a music CD, the CD player launches with the CD loaded.
ߜ When you insert a video DVD, if you don’t have the (commercial) DVD
player installed, Linspire opens a CNR window where you can purchase
this player. If you’re a CNR member, the price is less than $5!
ߜ When you insert a blank CD or DVD writeable or re-writeable, Linspire
doesn’t do anything automatically. See Chapter 18 for how to burn CDs
and DVDs.
ߜ When you insert a floppy, you need to double-click the Floppy icon to
access its contents — this icon exists even if you don’t have a floppy
drive. When you’re finished with the floppy, right-click the icon and
choose Unmount before you remove the disk. Don’t remove the disk
until the drive light turns off, when you can be sure that all the data is
saved properly.
ߜ To access something on your network, double-click the Network
Browser icon and browse away. Another option is to double-click the My
Computer icon and then double-click Network Shares.
ߜ To access something in your Linux filesystem, double-click the My
Computer icon and then the System icon.
ߜ To access something on one of your other partitions (maybe a Windows
partition), double-click the My Computer icon and then the appropriate
drive.
Navigating the filesystem in Mandrake
Mandrake doesn’t offer quite as many obvious shortcuts as the others. To
find your way around:
ߜ When you insert a data CD, CD-ROM, DVD, or DVD-ROM, Mandrake adds
an icon to your desktop. You can then double-click that icon to access
223
Chapter 11: Checking Out the Linux Filesystem
17_579371 ch11.qxd 12/27/04 8:36 PM Page 223
the item’s contents. To remove the item from the drive, right-click the
icon and choose Eject.
ߜ When you insert a music CD, the CD player launches with the CD loaded.
ߜ When you insert a video DVD, nothing happens. See Chapter 18 for more
on multimedia.
ߜ When you insert a blank CD or DVD writeable or re-writeable, burning
software opens. See Chapter 18 for more details.
ߜ When you insert a floppy, you need to double-click the Floppy icon —
one of two filesystem icons on your desktop — to access its contents. To
remove it, right-click the icon and choose Unmount.
Accessing files on your network is a bit more complex:
1. Open the Mandrake Software Installer (see Chapter 12).
2. In the Search text box, type
lisa and then click Search.
The installer shows you all packages that have the text “lisa” in their
name.
3. Click the lisa box and click Install.
The program asks you for the appropriate CD.
4. Place the CD into the drive, close the drive, and click OK.
The installer adds the
lisa program to your system.
5. Close the installer.
6. Click the monitor icon on your panel to open a command line termi-
nal window.
7. In the terminal, type
su -
You’re now in Mandrake as the root user. There’s no password by default
but you can set one if you want.
8. Type
/etc/init.d/lisa start
This action starts one of the two programs necessary to get easy net-
work browsing working.
9. Open the Konqueror file browser from anywhere (see Chapter 10).
10. Choose Settings➪Toolbars➪Show Extra Toolbar.
A new toolbar appears.
11. In the new toolbar, click the leftmost icon (Show Navigation Panel).
The Navigation Panel appears. You can get rid of the extra toolbar now if
you want.
12. In the Navigation Panel, click the bottom icon (Services).
224
Part III: Getting Up to Speed with Linux
17_579371 ch11.qxd 12/27/04 8:36 PM Page 224
The Services section appears.
13. Click LAN Browser.
The contents of your LAN appear.
14. Browse away.
Continuing through the list of how to access various parts of your
filesystem:
• To access something in your Linux filesystem, open the Konqueror
file browser. In its Location text box, type a
/ and press Enter.
• To access something on one of your other partitions (maybe a
Windows partition), open the Konqueror file browser and type
/dev/hd and select the appropriate option from the list. This may
take some trial and error at first (and it makes more sense in the
section “Partitions versus Directories,” later in this chapter).
Navigating the filesystem in SuSE
SuSE is another distribution that offers some handy icons to make the brows-
ing process more intuitive. To find your way around in SuSE:
ߜ When you insert a data CD, CD-ROM, DVD, or DVD-ROM, a Konqueror
window opens with the item’s contents. You can remove the CD by clos-
ing the window and pressing the eject button on your computer.
ߜ When you insert a music CD or a video DVD, SuSE recognizes it as such
and asks whether it should open the item with a particular tool. Click
Yes if you want it to do so, and No if not. If you want your choice to be
your default answer, make sure to click the Do Not Ask Again check box
to add the X. You may receive a message that DVD playback for all or
particular DVDs is disabled due to legal reasons. If so, see Chapter 18.
ߜ When you insert a blank CD or DVD writeable or re-writeable, burning
software opens. See Chapter 18 for more on burning CDs and DVDs.
ߜ When you insert a floppy, click the My Computer icon on your desktop,
and then the Floppy icon, to access its contents. When you’re finished,
close the window and press the ejection button on your computer to
remove the floppy.
ߜ To access something on your network, click the Network Browsing icon
on your desktop.
ߜ To access something in your Linux filesystem, click the My Computer
icon on your desktop and look to the left hand vertical row of icons on
the window. Click the second up from the bottom (Root).
225
Chapter 11: Checking Out the Linux Filesystem
17_579371 ch11.qxd 12/27/04 8:36 PM Page 225
ߜ To access something on one of your other partitions (maybe a Windows
partition) click the My Computer icon on your desktop and then browse
through the contents of your hard drive(s) — which are represented
here with a separate icon for each partition. It may take some trial and
error to figure out, but you’ll find what you’re looking for.
Navigating the filesystem in Xandros
Because Xandros is another distribution aimed at newcomers, you expect it
to be easy to navigate. Here’s how to find your way around in this one:
ߜ When you insert a data CD, CD-ROM, DVD, or DVD-ROM, the Xandros
File Manager opens to its contents. You can remove this item by closing
the window and pressing the eject button on your computer.
ߜ When you insert a music CD, a music player opens.
ߜ When you insert a video DVD, a video player may or may not open. See
Chapter 18 for more on using multimedia.
ߜ When you insert a blank CD or DVD writeable or re-writeable, a CD cre-
ation window appears.
ߜ When you insert a floppy, to access its contents, open the Xandros File
Manager (see Chapter 10) and click the Floppy entry on the left. When
you’re finished, close the window and eject the floppy using the button
on the computer.
ߜ To access something on your network, open the Xandros File Manager
(see Chapter 10). Either select Windows Network or NFS (Unix/Linux)
network on the left.
ߜ To access something in your Linux filesystem, open the Xandros File
Manager (see Chapter 10) and choose Go➪All File Systems.
ߜ To access something on one of your other partitions (maybe a Windows
partition), look for it on the left.
Partitions versus Directories
One very important thing to understand about the Linux filesystem is that it
may not all be on one single hard drive or hard drive partition, and yet you
don’t have to keep track of what drive or partition it’s on like you do in other
operating systems. In the Microsoft Windows world, if you use separate hard
drives or partitions, you have a specific letter designation for each one. The
primary hard drive is C, the next is D, and so on. Under Linux, each of these
drives and partitions quietly blends together.
226
Part III: Getting Up to Speed with Linux
17_579371 ch11.qxd 12/27/04 8:36 PM Page 226
If you partitioned your hard drives on your own, you know that you needed
to specify a mount point for each partition — which is like an empty spot in a
puzzle, where the outside partition or media can be plugged into the rest of
the filesystem. In the case of a hard drive partition that’s part of your primary
filesystem and added at boot time, the mount point isn’t in the
/mnt or /media
part of the filesystem. It’s an item in the root directory — maybe /boot or / or
/usr — or anywhere else in your directory hierarchy (like /usr/share). Later,
when you’re working on the computer, you don’t need to know or care about
whether the directories or files are all on one drive or are on multiple drives.
You just do your thing.
The times you do need to know how Linux sees the hardware are when you’re
trying to add new hard drives, install the machine while not using automatic
partitioning, or access temporary media. Table 11-4 lists a common breakdown
of popular hardware designations. Note that these designations aren’t in
/mnt
or
/media;
they’re in /
dev
. They’re the actual device driver shortcuts — which
point to the real drivers. These names are typically used for convenience so
that you don’t have to remember exactly which driver to deal with.
Table 11-4 Common Drive Designations
Designation Description
/dev/cdrom CD-ROM drive; if you have more than one, then you may
have
/dev/cdrom1 and so on, and you also may see
/dev/cdwriter, /dev/dvd, or even a hard drive des-
ignation such as /dev/hda
/dev/fd0 Floppy drive 1
/dev/fd1 Floppy drive 2
/dev/hda First IDE hard drive
/dev/hda1 First IDE hard drive, first primary or extended partition
/dev/hda2 First IDE hard drive, second primary or extended partition
/dev/hdb Second IDE hard drive
/dev/hdb1 Second IDE hard drive, first primary or extended partition
/dev/hdb2 Second IDE hard drive, second primary or extended
partition
/dev/sda First SCSI hard drive
/dev/sda1 First SCSI hard drive, first primary or extended partition,
and often also a small USB drive like a thumbnail/keyring
storage device
227
Chapter 11: Checking Out the Linux Filesystem
17_579371 ch11.qxd 12/27/04 8:36 PM Page 227
You probably see a pattern by now. A hard drive has a three-letter
designation:
ߜ An IDE drive’s designation starts with
/dev/hd; the first drive of this
type is
a, the second is b, and so on. The third IDE drive looks like this:
/dev/hdc. If you’re using something like a Promise controller that
bypasses the main IDE controllers (I know, this is technical stuff), then
your first IDE hard drive will, in fact, show up as
/dev/hde. I know this
one from personal experience!
ߜ A SCSI drive’s designation starts with
/dev/sd; the first drive of this
type is also
a, the second is b, and so on. The fourth SCSI drive looks like
this:
/dev/sdd. USB drives are also seen as SCSI devices. A little item
like a USB keychain is often seen as
/dev/sda1 by your system if you
don’t have any permanent SCSI drives attached.
The number that follows the three-letter designation represents the partition
you’re referring to. I cover partitioning your hard drive in Chapter 2.
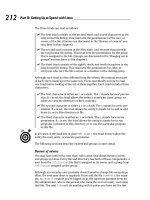
In Figure 11-1, I break down this concept, hopefully making it a bit more
accessible. In this case, the user created three partitions for Linux. The first
IDE drive is a single partition, allocated for the
root partition. The second
IDE drive is broken into two partitions. The first was given
/usr; and the
second,
/var.
If you move around the filesystem, you can’t tell (and don’t need to know)
which of these directories is on which drive. The prompt, for example, doesn’t
change based on which drive each directory is on; the commands used for
moving around the filesystem (see Appendix A) don’t care about the underly-
ing hard drive or drives.
Windows
A: Floppy
B: CDROM
First
partition
Second
partition
First IDE
drive
C:
Second
IDE
drive
D: E:
Linux
/mnt/floppy Floppy
/mnt/cdrom CDROM
First
partition
Second
partition
First IDE
drive
/dev/hda1
/
Second
IDE
drive
/dev/hdb1
/usr
/dev/hdb2
/var
Figure 11-1:
Linux versus
Windows in
handling
partitions
and hard
drives.
228
Part III: Getting Up to Speed with Linux
17_579371 ch11.qxd 12/27/04 8:36 PM Page 228
Formatting Disks
A floppy disk, USB keychain, and any other small(ish) storage device often
comes as a blank slate or formatted for Windows or Macintosh use (most
often these days they come formatted for Windows). If the item is a blank
slate, no computer can use it for anything. You can actually just use the item
in Windows format with no problem, or you can format — change its base
setup — for Linux. (The handy thing about leaving it as a Windows disk is
that you can then use it to share things with Windows users).
To format a floppy, place the floppy into your floppy drive and do the following:
ߜ Fedora: Choose Applications➪System Tools➪Floppy Formatter.
ߜ Knoppix: Right-click the floppy icon on the desktop and choose
Actions➪Format Floppy Disk.
ߜ Linspire: From the main menu, choose Programs➪Utilities➪Floppy
Formatter.
ߜ Mandrake: From the main menu, choose System➪Configuration➪
Hardware➪KFloppy.
ߜ SuSE: From the main menu, choose System➪Filesystem➪KFloppy.
ߜ Xandros: Open the Xandros File Manager (see Chapter 10), right-click
the Floppy entry in the left section, and choose Format. You may have to
click the Floppy item first to open its contents before you can format it.
Typically, the defaults are what you’ll want to choose. If you want to format
the disks for Linux, use the Linux Native (ext2) format. To share disks with
Windows users, choose DOS (FAT). Another setting you may want to choose
is Thorough rather than Quick.
Care and Feeding of Your Filesystem
Regardless of which operating system you’re using, you need to keep your
filesystem healthy and happy. Everything that you need to operate the
machine and do your work (or play) on it exists in that filesystem. Keep it in
good shape, and it’s sure to treat you well in return. Fortunately, Linux does
some of it automatically for you.
If your machine fails to reboot
If your machine didn’t shut down cleanly (a nice euphemism meaning that it
either crashed or you shut the power off without properly telling the machine
to shut down, as discussed in Chapter 5), the system checks the filesystem if
229
Chapter 11: Checking Out the Linux Filesystem
17_579371 ch11.qxd 12/27/04 8:36 PM Page 229
necessary at boot time, taking the need to do this out of your hands.
Sometimes, however, if something went really wrong, you get this unnerving
prompt that tells you to enter your password or press Control-D to continue.
If this prompt appears, type your root (administrative) password, press
Enter, and the follow these steps. Don’t worry; more often than not, you can
actually fix this problem:
Because it’s a bit of an art at times trying to figure out which partition may be
damaged, I walk you through a process where you check the most likely ones
to bring you to this state and then work through the rest in turn.
1. Type
df -h to see a list of all your partitions.
The
df command lists the mounted partitions and media in addition to
some statistics about them. You may, for example, see something like
the following:
Filesystem Size Used Avail Use% Mounted on
/dev/hde2 54G 27G 24G 54% /
/dev/hde1 99M 6.0M 88M 7% /boot
none 506M 0 506M 0% /dev/shm
/dev/hdf3 54G 39G 13G 76% /mnt/FC1
2. Look for an item with /boot in the right column.
If you find one, great. Proceed to Step 3. Otherwise, skip to Step 10.
3. On that same line, look on the left column to see what partition
/boot
is on.
In this example,
/boot is on /dev/hde1.
4. Type
mount.
This command gives you something even more cryptic looking. In my
example, it may be
/dev/hde2 on / type ext3 (rw)
none on /proc type proc (rw)
none on /sys type sysfs (rw)
none on /dev/pts type devpts (rw,gid=5,mode=620)
usbdevfs on /proc/bus/usb type usbdevfs (rw)
/dev/hde1 on /boot type ext3 (rw)
none on /dev/shm type tmpfs (rw)
/dev/hdf3 on /mnt/FC1 type ext3 (rw)
sunrpc on /var/lib/nfs/rpc_pipefs type rpc_pipefs (rw)
5. Locate the line with /boot on it once again and look at what “type” is
being used.
In this case,
/boot on /dev/hde1 is formatted as type ext3. Keep this
in mind. You’ll need to use this information in Step 8.
6. Type
umount /boot.
This command should release the partition.
230
Part III: Getting Up to Speed with Linux
17_579371 ch11.qxd 12/27/04 8:36 PM Page 230
You never, never, never, never, never want to run the command I’m
about to use on a partition you’re using or you will mess it up badly!
7. Type
df -h again to make sure that this partition is no longer listed.
In the example, you should now see:
Filesystem Size Used Avail Use% Mounted on
/dev/hde2 54G 27G 24G 54% /
none 506M 0 506M 0% /dev/shm
/dev/hdf3 54G 39G 13G 76% /mnt/FC1
See, no /boot partition!
8. What you type now depends on what type setting /boot had:
• ext2 or ext3: Type
e2fsck -fy partition, such as e2fsck -fy
/dev/hde1
• reiserfs: Type reiserfsck fix-fixable partition, such
as
reiserfsck fix-fixable /dev/hde1, and if this gives
you more errors, follow with
reiserfsck rebuild-tree
partition
, such as reiserfsck –rebuild-tree /dev/hde1
9. Type exit and let the machine try to reboot.
If the machine can reboot, you’re done, yay! If not, return to Step 6 and
run through the process again. Sometimes, you actually need to try
the fix more than once. If you reboot again at the end and it still fails,
proceed.
10. Repeat Steps 1 and 4, but this time look for the lines that correspond
to the / directory.
In my example,
/ is mounted from /dev/hde2 and is formatted using
ext3. Unfortunately, you can’t remove the / filesystem since it’s got all of
your commands! But, there is still a safe way to do this.
11. Type
mount -o remount,ro /.
This command releases the root (/) partition and then adds it again, but
this time as read-only so things won’t be changing as you’re working on
it. That makes what you’re about to do safe.
12. Repeat Step 8 for the / partition.
So, for my example, the / partition is
/dev/hde2, so you’d be starting
with
ext2fsck -fy /dev/hde2 or reiserfsck fix-fixable
/dev/hde2
13. Repeat Step 9.
Again, if it fails to reboot, repeat Steps 10 through 12 to see whether that
fixes things.
Unfortunately, at this point, if the problem still occurs, it could be many,
many things. Now is a good time to go to your local Linux Users’ Group (see
Chapter 4) or online help site.
231
Chapter 11: Checking Out the Linux Filesystem
17_579371 ch11.qxd 12/27/04 8:36 PM Page 231
Don’t run out of room!
One of the most insidious problems that all computer users run into from time
to time is a lack of disk space. The scope of this problem really depends on a
number of things. The primary issue is that, if your
root partition becomes 99
or 100 percent full, you need to use emergency rescue techniques (refer to
Chapter 5) to boot the machine and clean it out. That’s no fun, is it?
In the beginning, you’re probably not in danger of filling the drives, unless
you barely had enough room to install Linux in the first place. However, over
time, you may forget about watching the drives for remaining space. Even
experienced administrators run into this problem, so certainly you’re for-
given if you do it too!
Really do try to make doing the following a habit:
1. Open a command prompt window (see Chapter 14).
2. Type
df -h.
That’s it! As you can see earlier in the section “If your machine fails to
reboot,” though you ignored it at the time, the columns include
ߜ Size: How big the partition is.
ߜ Used: How much of the partition has been used already.
ߜ Avail: How much is left.
ߜ Use%: So we don’t have to do mental math, a % of how much of the par-
tition has been used up.
When you start reaching 90 percent, it’s time to start doing some
housecleaning!
232
Part III: Getting Up to Speed with Linux
17_579371 ch11.qxd 12/27/04 8:36 PM Page 232
Chapter 12
Adding Software to Linux
In This Chapter
ᮣ Recognizing tarballs, RPMs, and compressed files
ᮣ Creating tarballs and archives
ᮣ Compressing files
ᮣ Opening tarballs, archives, and compressed files
ᮣ Installing and removing RPMs
I will make you shorter by the head.
— Queen Elizabeth I
W
hen you start using a new operating system, one of the most frustrating
things is trying to figure out all the goofy file extensions. The Windows
world has
.exe and .zip. The Macintosh world has .bin and .hqx. What
about the Linux world? It certainly has its fair share of bizarre extensions,
but, really, they make a great deal of sense after you know the programs that
make them. In this chapter, you find out all about
.tar, .gz, .tar.gz, .tgz,
.bz2, and .rpm. Anyone up for a game of Scrabble with alphabet soup?
After you’ve got the letter jumble all figured out, you’ll be happy to find that
Linux offers a number of cool tools for working with these crazy files, updat-
ing your system, adding new software, and more.
Opening Downloaded Files
The Linux and Unix worlds are full of strange terms and acronyms. For exam-
ple, if someone comes up to you out of the blue and starts talking about tar-
balls, you probably get a mental image of sticky, smelly balls of tar, maybe
rolled in feathers. Yet a tarball is something you run into regularly in the Linux
world, especially when you’re looking for software or you need to save your-
self some space. A tarball is a bunch of files (and possibly directories) pack-
aged together in a
tar file and then compressed by using the gzip utility.
18_579371 ch12.qxd 12/27/04 8:37 PM Page 233
WinZip can open tarballs with no problem on a Windows computer.
Fortunately, all you need to know is how to double-click a file in order to
access the many types listed in Table 12-1. Once you double-click the file,
your File Manager shows you what’s inside.
While Table 12-1 mentions operating systems, ‘it doesn’t contain hard and
fast rules. People tend to use whatever kind of programs they’re comfortable
with no matter what operating system they’re on.
Table 12-1 Potential Formats for Downloaded Files
Extension Meaning Program(s)
Involved
.bz Older form of .bz2. bzip, bunzip
.bz2 Extensive Linux and Unix compressed file. bzip2, bunzip2
.deb Not a file to “open;” see the “Installing New apt
Software” section, later in this chapter.
.gz Typical compressed file for Linux and Unix. gzip, gunzip
.iso A CD-ROM or DVD-ROM “image,” which is a See Chapter 18.
single file that contains a CD or DVD’s entire
contents. You have to tell your CD or DVD burner
software that this file is an image so that it knows
not to just place a copy of this file onto the media.
.rpm Not a file to “open;” ‘“”see the “Installing rpm
New Software” section, later in this chapter.
.tar A bunch of files bundled together. tar
.tar.bz2 A tarball, which in this case is a .tar file inside tar, bzip2,
a .bz2 file. bunzip2
.tar.gz A traditional tarball, which is a .tar file tar, gunzip, gzip
inside a .gz file.
.tgz A traditional tarball, which is a .tar file tar, gunzip, gzip
inside a .gz file.
.Z Old-style Unix compressed file. compress,
uncompress
.zip Windows ZIP file. zip, unzip
WinZip (
www.winzip.com) can handle .gz, .tgz, and .tar.gz files (along with
the .bz2 versions) for Windows users.
234
Part III: Getting Up to Speed with Linux
18_579371 ch12.qxd 12/27/04 8:37 PM Page 234
Compressing and Packaging
Files to Share
Life isn’t all about “take, take, take” (or at least I should hope not!) Sometimes
you’ve just gotta give. Creating care packages to share with other folks
involves learning how to tell Nautilus (GNOME users) or Konqueror (KDE
users) that you want to do so. However, because the overall process is so
similar, I don’t break these steps down into separate sections.
To package up and compress files for sending off to other people, navigate to
the location where you’ve stored the file(s) — see Chapter 10 for how to
move about — and then:
1. Determine whether you want to compress or package a single file, a
group of files, or a whole folder.
If the files and folders that you want to bundle together are flung all over
the place in your folders, you may want to create a new folder and copy
the items you want to bundle together into it. Chapter 10 shows you
how to do so.
2. Select the item(s) you want to package.
Chapter 10 explains how to do so. If you want to select a whole folder,
navigate into its parent folder and just select the folder’s icon instead of
entering it.
3. Right-click over the item(s) (or if you’re using Nautilus, you can also
choose the Edit menu).
The context menu appears if you right-clicked or, in Nautilus, the Edit
menu opens.
4. Create your archive.
How you create your archive depends on what distribution you’re using:
• Fedora: In the context or Edit menu, choose Create Archive. In
both cases, the Create Archive dialog box appears, suggesting a
tarball (see Table 12-1) version of the file. If this is what you want,
leave it alone, or change the file extensions (as discussed in the
table) to match what you want. Then click Create, and you’re fin-
ished with these steps.
• Knoppix and Mandrake: In the context menu, select Actions and
then the appropriate Create option as guided by Table 12-1: Create
gzipped tar Archive means to make a .tar.gz or .tgz file; Create
bzipped tar Archive means to make a .tar.bz2 or .tbz2 file; and
Create zip Archive means to make a .zip file.
• Linspire: You cannot use the file browser in Linspire 4.5 to create
an archive. Instead, you’ll have to go to the main menu➪Programs➪
235
Chapter 12: Adding Software to Linux
18_579371 ch12.qxd 12/27/04 8:37 PM Page 235
Utilities➪Archiving Tool to open the Ark program (which is avail-
able with most of the distributions listed here as well).
• SuSE: In the context menu, select Compress➪Compress As. See
Table 12-1 to help you determine which format you want to use.
• Xandros: In the context menu, choose Add to ZIP Archive if you’re
sharing with Windows users, or Create TGZ Archive to make a tar-
ball, as discussed in Table 12-1.
5. If you want to rename the file or change where it should go in your
filesystem, do so now.
Leave the
.tar.gz or .gz part alone. Just change the first part. For
example, if you’re archiving the Files folder, then the suggested name
might be
Files.tar.gz. If you wanted to use Files100305.tar.gz for
the actual name, you would just add the date into the existing name.
6. Click OK.
The archive is created.
Updating Your Software
In the last couple of years, updating your operating system and software in
Linux has become easier and easier. Each Linux distribution has its own way
of handling updates, so I cover how to do update each one in its own section.
The cool thing is that you’re actually updating your operating system and its
software all at once. Be sure to be connected to the Internet before you try to
update!
I don’t cover how to update Knoppix, however, because if you’re using
Knoppix, you didn’t install anything to update! If you’re interested in
installing and updating Knoppix, see Chapter 21.
Updating Fedora
If you look to the right of your upper Fedora panel, you see a big red circle
with a white exclamation point inside or a blue circle with a checkmark. This
is your updater, and once you configure it, the red circle warns you that
you’ve got updates available that you haven’t applied yet. Click this icon,
and the Red Hat Network (RHN) Alert Notification Tool dialog box appears
(see Figure 12-1). You can see the updates available in the main (Available
Updates) tab, where you can decide whether you want to launch the updater.
To update your system from the RHN Alert Notification Tool:
1. Click Launch up2date.
236
Part III: Getting Up to Speed with Linux
18_579371 ch12.qxd 12/27/04 8:37 PM Page 236