A+ NETWORK+ SECURITY+ EXAMSIN A NUTSHELL phần 2 pps
Bạn đang xem bản rút gọn của tài liệu. Xem và tải ngay bản đầy đủ của tài liệu tại đây (536.55 KB, 82 trang )
70
|
Chapter 2: A+ Essentials Study Guide
Taskbar.
The bottommost part on the Windows desktop is known as the Taskbar.
It contains the Start menu and the System Tray (systray). The System Tray
includes the Quick Launch area on the lefthand side and the Notification Area on
the righthand side. The Start menu is used to run programs as well as to configure
system settings. In the middle of the Taskbar, Windows displays buttons for
programs that are currently running. When you right-click an empty area on the
Taskbar, a menu appears from where you can configure the following settings:
• Change the Properties of the Start Menu and the Taskbar
• Launch the Task Manager utility
• Automatically hide the Taskbar when not in use
• Cascade Windows or tile them horizontally or vertically
• Lock the Taskbar at its position
Start menu.
When you click the Start button located on the lefthand bottom corner
of the Windows screen, the Start menu appears, which displays the name of the
user who is currently logged on to the computer. The Start menu includes short-
cuts to installed programs, the Control Panel, a Settings button, and folders such
as My Documents, My Recent Documents, My Pictures, My Music, My
Computer, My Network Places, and so on. The appearance of the Start menu can
be changed to classic style from the Start menu tab of the Taskbar Properties.
Some of the common menu items are listed in the following paragraphs:
Shut Down
Depending on whether you are using Windows 2000 or Windows XP, the
Shut Down button gives several options, such as log off the current user,
switch user, shut down the computer, activate the Standby mode, or restart
the computer.
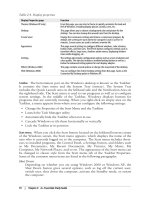
Table 2-4. Display properties
Display Properties page Function
Themes (Windows XP only) From this page, you can select a theme to quickly customize the look and
feel of Windows, including display picture, sounds, icons, etc.
Desktop This page allows you to choose a background color and picture for the
desktop. You can also cleanup the unused icons from the desktop.
Screen Saver Change the screensaver settings and choose a screensaver program. By
default, the screensaver starts when the computer is not in use for 10
minutes. Screen savers are used to enhance monitor life.
Appearance This page several settings to configure different windows, color schemes,
button styles, and font sizes. The Effects button configures settings such as
transition effects, large icons, shadows under menus, displaying window
items while dragging, etc.
Settings Thesettings tabincludes configurationoptions suchas screenresolution and
color quality. This tab also includes a troubleshooting button as well as a
button for advanced setting options for each display adapter.
Effects (Windows 2000) This page contains several options to change the visual look of the desktop.
Web (Windows 2000) You can configure the Active Desktop settings from this page. Same as the
Customize My Desktop option in Windows XP.
Operating Systems | 71
A+ Essentials
Study Guide
Programs/All Programs
Installed application programs can be launched from the Programs/All
Program icon on the Start menu. When you see an arrow pointing towards
the righthand side, this means that the selected menu contains submenus.
Help (Windows 2000)/Help and Support (Windows XP)
The Help window is displayed in Windows 2000 when you select the Help
option in the Start menu. In Windows XP, the Help and Support shortcut in
the Start menu launches the Help and Support Center which is very helpful
for getting help with using, configuring, and troubleshooting the operating
system. The Help and Support center in Windows XP also includes online
help options from Microsoft support. You can also use the Remote Assistant
to get help from an expert when connected to the network.
Search
The Search option opens a search window where you can find files or folders
stored on the hard disk.
Run
The Run option opens the Run dialog box where you can enter a command
or the name of an executable file to launch the program. You must use the
correct path of the executable file when using the Run option.
Desktop icons.
Some standard icons are available on both Windows 2000 and
Windows XP. Some of the icons have been removed from the desktop in
Windows XP and placed inside the Start menu. The following is a summary of
these icons:
My Computer
The My Computer icon is used to explore the computer (including the disk
drives) and view their contents. These drives include floppy drives, hard disk
drives and their partitions, and CD and DVD drives. You can double-click
any drive to view its contents. You can configure your computer by right-
clicking this icon and selecting Manage from the context menu. The Manage
option opens the Computer Management console.
My Network Places (Windows XP)/Network Neighborhood (Windows 2000)
This icon is used to browse the Windows network. You can view or connect
to any computer on the network where you have appropriate permissions. In
Windows XP, the My Network Places icon is available in the Start menu. The
Properties pages allow you to configure your network, wireless, or dial-up
connections.
Recycle Bin
The purpose of the Recycle Bin is to collect all files or folders that you delete
from the computer. It is actually a separate folder on the hard disk that stores
the deleted objects. The main advantage of the Recycle Bin is that you can
restore a file or folder that you might have accidentally deleted. When you no
longer need a deleted file or are running out of disk space, you can right-click
the Recycle Bin icon and select the Empty Recycle Bin option to permanently
delete the objects.
72
|
Chapter 2: A+ Essentials Study Guide
The Windows operating system is made up of several components, including the
Windows Registry, Control Panel, Virtual memory, and File Systems. The
following sections explain the purpose and characteristics of these components.
Control Panel
The Control Panel in Windows is the utility that you can use for most of the
configuration tasks related to the operating system itself as well as to the devices
and drives. To access it, click Start and select Control Panel. In Windows XP, you
will first see a list of categories, while in Windows 2000, you will go directly to the
Control Panel folder. The Control Panel further contains icons for various utili-
ties. Table 2-5 lists some of the common utilities available in the Control Panel.
The System Control Panel
The System utility in the Control Panel is used to configure most of the system
settings such as computer name/identification, virtual memory, startup and
recovery options, remote desktop/remote assistance, hardware devices, user
profiles, and network options. Different tabs included in the System Properties
Table 2-5. Control Panel utilities
Utility Function
Add Hardware or Add/Remove Hardware Used to add and configure hardware.
Add or Remove Programs or Add/Remove Programs Used to install or uninstall application software.
Administrative Tools Used to perform administrative tasks on the computer.
Date/Time or Date And Time Used to change system date and time and sets the time
zone.
Display Used to change display settings.
Folder Options Used to configure folder settings. You can change how
folders are displayed and whether or not to display
hidden and/or system files.
Fonts Used to add or remove fonts.
Internet Options Used to configure Internet connections and security
settings.
Keyboard Used to configure keyboard settings.
Mouse Used to configure mouse settings.
Sound and Audio Devices or Multimedia or Scanners and
Cameras
Used to configure audio, video, and sound settings.
Network And Dial-up Connections or Network Connec-
tions
Used to configure networking options such as protocols,
clients, and services.
Phone and Modem Options or Modems Used to configure phone and modem settings.
Power Options Used to configure power options such as power schemes
and UPS settings.
Printers and Faxes Used to add, remove, and configure printers and fax
machines.
System Used to configure system settings.
Windows Firewall (Windows XP with SP2) Used to configure Windows Firewall in Windows XP,
which is added when Service Pack 2 is installed.
Operating Systems | 73
A+ Essentials
Study Guide
page are General, Computer Name/Network Identification, Hardware, Advanced,
System Restore (XP), Remote (XP), Automatic Updates, etc. Figure 2-8 shows the
System Properties window in the Control Panel utility.
The General tab displays information about the computer, installed operating
system, system memory, and registration information. The configuration options
in other tabs are summarized in the following discussion.
Computer Name (Windows XP)/Network Identification (Windows 2000)
This tab allows you to change the name of the computer and whether the
computer is a part of a workgroup or an Active Directory domain.
Hardware
This page includes several tools to manage hardware devices and drivers
installed on the system. The Device Manager button opens the Device
Manager snap-in where you can view and manage all hardware devices. The
Driver Signing option allows you to configure system behavior when
unsigned device drivers are installed. The Hardware Profiles button allows
you to enable/disable devices for specific hardware profiles. You can add,
delete, copy, or change user profiles. In Windows XP, the User Profiles
button is available in the Advanced tab.
Figure 2-8. System Properties in Control Panel
74
|
Chapter 2: A+ Essentials Study Guide
Advanced
This tab includes buttons to fine-tune system performance, system startup,
and recovery options and environment variables. The Settings button in the
Performance section provides options to configure virtual memory settings.
The Settings button in the User Profiles section (Windows XP) provides
options to add, delete, copy, or change user profiles. The Settings button in
the Startup and Recovery section provides options to configure system
startup and recovery options. You can change the default operating system to
load for a multiboot system. You can also edit the BOOT.INI file.
System Restore (Windows XP)
This utility is new to Windows XP and can be used to configure system
restore points that are used to restore the operating system to a working
condition in case it becomes unstable.
Remote (Windows XP)
This tab includes buttons to enable or disable Remote Desktop and Remote
Assistance. You can select users that will be allowed to make remote connec-
tions with the computer. These features are not available in Windows 2000
Professional.
Automatic Updates (Windows XP)
This tab is used to enable or disable Automatic Updates for the operating
system. You can choose how the updates are downloaded and whether they
are installed automatically or require user action.
Windows Registry
Windows Registry is a collection of system configuration settings stored in a hier-
archical data file. This data includes the operating system settings, user specific
settings, application data, hardware components, and installed device drivers. The
hierarchy is organized into keys and subkeys, each of which can have one or more
values. The value can be a text identifier, string, binary, word, a multiple string, or
an expandable string. There are five main subtrees in the Registry hierarchy and
are as follows:
HKEY_CLASSES_ROOT
This subtree mainly stores Object Linking and Embedding (OLE) data and
file associations. File associations link files to the programs used to run them.
HKEY_CURRENT_USER
This subtree contains data about the currently logged-on user that is taken
from her user profile.
HKEY_LOCAL_MACHINE
This subtree contains all the hardware-specific configuration data for the
machine that essentially includes OS and hardware configuration.
HKEY_USERS
This subtree contains a default set of settings as well as data for each user
profile.
HKEY_CURRENT_CONFIG
This subtree contains data about the currently loaded hardware profile.
Operating Systems | 75
A+ Essentials
Study Guide
Registry Editor.
Under extreme circumstances, if you require changes to the
Registry, you should first make a backup copy of the existing Registry files. The
Registry Editor (REGEDIT.EXE or REGEDT32.EXE) program is located in the
%SystemRoot%\System folder. It can either be run from the command prompt or
from the Run option in the Start menu.
With most of the systems settings and configurations made easy
using the Windows Wizards, you will hardly need to edit the Regis-
try directly. Unless you do not have another way to configure your
system, you should not edit the Registry to change any configura-
tion values. Improperly editing the Registry may render your sys-
tem unable to boot or generate unexpected errors.
You must have advanced level knowledge of the Windows OS and Registry keys
in order to configure the registry correctly. If you are unsure of your actions, do
not attempt to edit the Registry. Otherwise, you may damage the operating
system and may have to reinstall it.
Virtual memory
Virtual memory is a part of the hard disk that the operating system uses as tempo-
rary storage. This memory is also known as swap file or paging file. Windows
treats this hard disk space as RAM and uses it as and when the system runs out of
RAM. The operating system automatically configures the size of the paging file
during installation.
Windows system files
Several files are critical for the Windows 2000 or Windows XP operating system
to start successfully. By default, all of these files are marked as system files and are
hidden. You will need to change folder options to view these files. These files are
protected so that a user won’t delete them accidentally. While some of these files
are stored in the root of the system partition, others are located in the System32
subfolder in the drive where you installed the operating system. The most impor-
tant of all system startup files are listed in Table 2-6.
Table 2-6. Windows system startup files
Filename Function
NTLDR This file starts loading the operating system.
BOOT.INI This file contains information as to which operating system is to be loaded and from which
disk partition.
BOOTSECT.DOS This file is used in dual-boot systems and contains a copy of MS-DOS or Windows 9x OS.
NTDETECT.SYS This fileis usedto detectthe hardwareinstalled onthe systemand alsoloads the hardware
profile.
NTBOOTDD.SYS This file is used to detect and load the SCSI interface.
NTOSKRNL.EXE This file loads the Windows operating system kernel.
HAL.DLL The hardware abstraction layer file.
76
|
Chapter 2: A+ Essentials Study Guide
Managing disks
Hard disks are the primary data storage devices used in computers. Hard disks are
treated as fixed storage devices and are connected to IDE or SCSI interfaces. USB
disks, CD-ROMS, and DVDs are called removable storage media. Windows OS
supports two types of hard disks for data storage: Basic disks and Dynamic disks.
Basic disks.
Basic disks are the traditional type of disks used in computer systems.
Windows OS treats all disks as Basic unless they are converted to Dynamic using
the Disk Management utility. The disks are divided into one or more partitions,
each of which can be a logical storage unit accessible by a drive letter. Windows
XP Professional stores partition information in a partition table that is not a part
of the operating system and can be accessed from any operating system besides
Windows. Partitions in Basic disks can be Primary or Extended.
Primary Partition
Each Basic disk can have up to four primary partitions, or three primary and
one extended partition. One of the primary partitions is marked as the Active
Partition and is used to boot the system. There can be only one active parti-
tion on a computer. The primary partition is formatted using one of the file
systems: FAT, FAT32, or NTFS.
Extended Partition
An Extended Partition is created on unallocated space on the hard disk. You
then create logical drives on this partition and assign them drive letters.
Extended Partitions cannot be formatted with any filesystem, and they
cannot be assigned drive letters.
Logical Partition
Logical Partitions are created inside the Extended Partitions. Logical drives
cannot be marked as active and cannot be used to boot the system. These
partitions are used to organize files and folders on the hard disk.
Dynamic disks.
Dynamic disks are the disks that are specifically converted from
Basic disks using the Disk Management utility. Dynamic disks treat the entire disk
as a single partition and you can create volumes on the disk to organize your files
and folders. Dynamic volumes can be extended on single or multiple Dynamic
disks and offer fault tolerance features. You can create the following types of
volumes on Dynamic disks:
Simple volume
A Simple volume contains space from all or part of a single Dynamic disk.
They are similar to a partition on a Basic disk.
Spanned volume
A Spanned volume contains space from a single or multiple Dynamic disks.
You can add unallocated space from 2 to 32 Dynamic disks to create a large
Spanned volume. Each disk can be of any size.
Operating Systems | 77
A+ Essentials
Study Guide
Striped volume
A Striped volume combines space from 2 to 32 Dynamic disks to make a
single Dynamic volume. Data is stored on Spanned volumes in stripes
(chunks of 64 KB) on each disk in turns so that each disk has an equal
amount of disk space. Striped volumes cannot be extended and are not fault-
tolerant. If one of the disks in a Striped volume fails, all data is lost.
Disk drives are managed using the Disk Management utility found within the
Computer Management console. Right-click the My Computer icon and select
Manage to open the Computer Management console. The Disk Management tool
is located under the Storage folder.
Creating partitions.
To create a partition, right-click a disk and click Create Parti-
tion. The New Partition Wizard guides you through the process of creating a
primary, an extended, or a logical drive. Once you have created a partition, you
can format it with FAT, FAT32, or NTFS filesystem. Right-click the partition and
select Format. Existing volumes can also be formatted from Windows Explorer.
This action destroys all data on the partition. The Format option also allows you
to assign a volume label and drive letter to the partition.
Converting from Basic disk to Dynamic disk.
To convert a Basic disk to Dynamic, you
must have at least 1 MB of free space at the end of the disk, and the sector size
must not be larger than 512 bytes. Right-click the disk and select Convert To
Dynamic Disk. This action does not cause any loss of data.
If the Convert To Dynamic option is not available for a particular
disk, the disk is either already a Dynamic disk or you are trying to
convert the disk on a portable computer. Remember that Dynamic
disks are not supported on portable computers. This option is also
not available on removable disks such as CD-ROMS, floppy drives,
and Zip drives.
Converting from Dynamic disk to Basic disk.
Converting a disk from Basic to Dynamic is a
one-way process. Conversion from Dynamic disk back to a Basic disk destroys all
data on the disk. You must first back up all the data on the disk before attempting
to perform this conversion. To convert a disk back to Basic, right-click the disk in
Disk Management and select Convert To Basic Disk.
Filesystems.
Filesystems refer to the method operating systems use to manage disk
partitions and data storage. Filesystems help the OS keep track of files and folders
on the disk. You will need to decide on a filesystem when partitioning and format-
ting a disk. The following are the main filesystems used in Windows operating
systems:
FAT
The File Allocation Table (FAT) was implemented in DOS operating systems.
Its main characteristics include:
• Supports only 8-character filenames with a 3-character extension, known
as 8.3 file format.
78
|
Chapter 2: A+ Essentials Study Guide
• No spaces are allowed in filenames.
• The maximum partition size is 2 GB in Windows 95, Windows 98, and
Windows ME. In Windows NT 4.0, Windows 2000, and Windows XP,
the maximum supported FAT partition size is 4 GB.
FAT32
FAT32 is an improved version of FAT and is supported in Windows 95
(OSR2) and later operating systems. Windows XP, Windows ME, and
Windows 95 OSR2 also support the FAT32 filesystem. Main characteristics
of FAT32 include:
• More reliable storage than FAT.
• Not compatible with FAT.
• Uses smaller disk cluster sizes to prevent wasting disk space.
• Support for long filenames of up to 255 characters.
• Extended disk partition size of up to 2 TB (Terabytes) or 2048 GB.
NTFS
NTFS is the preferred filesystem for Windows XP Professional, Windows
Server 2003, Windows 2000, and Windows NT operating systems. Some of
the benefits of using NTFS are as follows:
• It supports long file names of up to 255 characters.
• It supports disk sizes of up to 16 EB (Exabytes).
• It supports file- and folder-level security.
• NTFS Encrypting File System (EFS) secures files and folders from unau-
thorized access.
• It supports Disk Quotas to limit the use of disk space on a per-user basis.
• It supports files larger than 4 GB in size.
• It provides file compression to save disk space.
• It supports Dynamic disks to efficiently use and manage disks and
partitions.
CDFS
CDFS stands for Compact Disk File System, which is used on compact disks
(CDs).
UDF
UDF stands for Universal Disk Format, which is used on digital versatile
disks (DVDs).
Managing files and folders
Files and folders are managed using Windows Explorer in both Windows XP and
Windows 2000. The Windows Explorer utility is located in the Accessories folder
in Programs/All Programs in the Start menu. The following tasks can be
completed using this utility:
• Viewing and navigating files and folders.
• Copying and moving files and folders from one location to another.
Operating Systems | 79
A+ Essentials
Study Guide
• Creating new folders and subfolders.
• Deleting files or folders.
• Viewing or changing file or folder attributes.
• Executing (running) program files.
• Searching for a particular file or folder.
• Sharing folders and setting permissions.
• Formatting a disk.
A simple way to perform any of the given file or folder task is to right-click it and
select the desired action such as copy, cut (and paste at another location), delete,
rename, etc. You can select the Properties from the context menu to open the
Properties window to view or change permissions, sharing, and file/folder
attributes.
File extensions.
Each file is associated with an extension. Windows operating
systems use file associations to open files with specific extensions. Common file
extensions are as follows:
.EXE
Executable files
.DLL
Dynamic link library files
.SYS
System files
.LOG
Log files
TXT
Text files
DOC
Document files
.HTM and .HTML
Web page files
.AVI, .MPG, .MP3
Audio video files
.BMP, .TIF, and .JPG
Picture files
File attributes.
File and folder attributes determine the type of actions a user can
perform on them. For example, if a file attribute is set as read-only, a user cannot
delete the file or make changes to it. You can use the Properties page of a file or
folder in Windows Explorer to view or change attributes. The types of attributes
supported in Windows XP and Windows 2000 are described next.
80
|
Chapter 2: A+ Essentials Study Guide
Read-only
A file or folder with the Read-only attribute cannot be deleted or its contents
cannot be changed.
Hidden
A file or folder with the Hidden attribute is not visible when navigating in the
Windows Explorer. It cannot be deleted or copied.
System
A file or folder with the System attribute is used by the operating system. It is
marked as both Hidden and Read-only.
When you click the Advanced button, the following attributes can be viewed or
changed:
Archiving
The file or folder has been changed after the last backup. The Windows
Backup utility uses this archive to select files and folders for backing up data.
Indexing
A file or folder marked with the Index attribute is used by Windows Indexing
Service for a faster search. This attribute is available on NTFS volumes only.
Compression
The Compression attribute is used for compressed files and folders to save
disk space. This attribute is available on NTFS volumes only.
Encryption
The Encryption attribute is used to store files and folders in encrypted format
for security purposes. This attribute is available on NTFS volumes only.
In both Windows XP and Windows 2000, encryption and compres-
sion are mutually exclusive. This means that an encrypted file can-
not be compressed and a compressed file cannot be encrypted.
The following exercise explains the procedure to view or change attributes:
1. Open Windows Explorer and navigate to the file or folder.
2. Right-click and select Properties.
3. Examine the file/folder attributes in the Attributes area.
4. Click the checkbox for the Read-only, Hidden, or System attribute, as
required. Click OK.
5. Click the Advanced button if you want to change the Archiving, Indexing,
Compression, or Encryption attributes.
6. Click the appropriate checkbox and click OK.
7. Click OK or the Apply button.
8. If you are changing the attributes of a folder, a dialog box prompts you to
select whether you want to change the attributes of the selected folder only or
all subfolders and files under the folder.
9. Make your selection and click OK.
10. Close Windows Explorer.
Operating Systems | 81
A+ Essentials
Study Guide
File permissions.
File permissions are used to control access to files. Permissions
determine which users are allowed to access files. Windows XP and Windows
2000 support two types of permissions: NTFS file permissions and share permis-
sions. The share permissions can be configured on NTFS as well as FAT volumes,
while the NTFS permissions are supported only on disk partitions formatted with
NTFS filesystem. File and folder permissions can be assigned to individual users
as well as user groups. The following is a list of standard NTFS permissions:
Full Control
The Full Control permission grants the user all rights on the resource.
Modify
The Modify permission allows a user to change the contents of the file.
Read and Execute
The Read and Execute permission allows a user to read the file and execute
(run) it.
List Folder Contents
The List Folder Contents permission allows the user to list the files and
subfolders inside a folder.
Read
The Read permission allows a user to read a file.
Write
The Write permission allows a user to write files to a folder.
When both NTFS and share permissions are assigned for a user or
for a group, the more restrictive of the two becomes effective.
To assign share permissions on a folder, open Windows Explorer and navigate to
the folder. Right-click the folder and select the Sharing and Security option. This
opens the Sharing tab of the folder properties. You can share the folder and click
the Permissions button to assign share permissions.
To assign NTFS permissions, open Windows Explorer and navigate to the file or
folder. Right-click it and select the Sharing and Security option. Click the Security
tab, which opens the NTFS permissions page as shown in Figure 2-9. Click the
Add button to select a user or a group. Select the user or group in the upper
Group or user names box. Click the appropriate checkbox in the Permissions box
to assign the desired permission.
Installing and Configuring Operating Systems
Computers are useless without the operating system or software applications. As a
PC technician, you must have good hands-on knowledge of installing operating
systems. Since Windows XP and Windows 2000 are the most widely used oper-
ating systems, the A+ exams mainly cover these two operating systems. In this
section, we will take a look at a variety of tasks involved in installing and config-
uring the Windows operating system.
82
|
Chapter 2: A+ Essentials Study Guide
Installing the operating system
Before you start installing the operating system or upgrading an existing one, you
will be required to make some preparations that include checking the minimum
hardware requirements, verifying compatibility of components, deciding on disk
partitions, selecting the filesystem, and determining whether the computer will
join a workgroup or a domain. Next, you will decide on an installation method,
which can be CD-based or from the network, and whether the installation will be
attended or unattended. In this section, we will take a look at various installation
and upgrade scenarios.
Minimum hardware requirements.
Before starting the actual installation process, you
will need to ensure that your computer meets the minimum hardware require-
ments. Although many new computers will surpass these requirements, older
computers will need to be checked against these minimum requirements. The
minimum hardware requirements for Intel-based computers are shown in
Table 2-7.
Figure 2-9. Assigning NTFS permissions
Operating Systems | 83
A+ Essentials
Study Guide
Hardware compatibility.
The components of the computer should be compatible with
the operating system you have selected to install. You can check the compatibility
with Windows 2000 Professional from the Hardware Compatibility List (HCL),
which contains a list of hardware tested with the OS. With the release of
Windows XP, Microsoft changed the name of this list to Windows Catalog, which
includes software applications as well.
Installation methods.
You can choose from a variety of installation methods for
installing or upgrading the operating system. Unlike Windows 98 and older
versions, which were available on floppy disks, Windows XP and Windows 2000
are distributed on bootable CD-ROMs. If you want to start the installation process
from the CD-ROM, you must first change the BIOS settings to make the CD drive
as the first boot drive. The following is a summary of installation methods:
Attended installation
When you install Windows XP/2000 from a CD-ROM and are physically
present to answer the questions prompted by the setup program, the installa-
tion is known as attended. This installation can be started from the setup CD-
ROM or from a shared network folder where all setup files are already copied.
Unattended installation
In the unattended installation method, an answer file provides answers to
most of the questions that are prompted during the installation. The answer
file contains answers to most common parameters required by the setup
program. You must first create an answer file using Notepad or the Setup
Manager utility. The answer file is usually named unattend.txt.
Table 2-7. Minimum and recommended hardware requirements for Windows XP and
Windows 2000 Professional
Hardware
Component
Windows XP
Professional
Recommended for
Windows XP
Professional
Windows 2000
Professional
Recommended for
Windows 2000
Professional
Processor Pentium 233 MHz Pentium II 350 MHz
or faster
Pentium 133 Pentium II or higher
Memory 64 MB 128 MB (4GB
maximum
supported)
64 MB 128 MB
Free Disk Space 1.5 GB Free 2 GB 2 GB with 650 MB
free space
2 GB or 4 GB
Display VGA Adapter and
Monitor
Super VGA (SVGA)
Monitor and PnP
Monitor
VGA SVGA
Network Adapter Not Necessary
(required if
installing over the
network)
Any Network
Adapter (required if
installing over the
network)
Not Necessary
(required if
installing over the
network)
Any Network
Adapter (required if
installing over the
network)
CD or DVD Required Required Required Required
Keyboard and
Mouse
Required Required Required Required
84
|
Chapter 2: A+ Essentials Study Guide
SysPrep installation
The System Preparation (SysPrep) utility is actually a disk duplication
method. It is used to prepare a master image of an existing Windows XP/
2000 Professional installation. This image can then be copied to other
computers with identical hardware. The Sysprep utility removes the
computer-specific information from the image. This method can only be used
for clean installations. The computer used for this purpose is known as the
master or reference computer and can have any number of applications
installed besides the OS. After running SysPrep, you must use a third-party
utility to create the actual image of the disk.
Remote Installation Service (RIS)
You can use the RIS for unattended large-scale deployments of Windows XP
and Windows 2000 Professional. RIS requires that the computer must be
connected to a Windows domain; a domain controller running Active Direc-
tory service, and a DNS server, and that a DHCP server is available during
installation.
Installation options.
The Windows setup program gives you several options for the
installation. These include the installation method, a choice of the filesystem for
the disk partition, network configuration, and provision for multibooting the
computer (installing two or more operating systems on the same computer).
Installation type
You can choose from typical, full, minimal, or custom. The typical installa-
tion installs most common components while the full installation installs all
mandatory as well as optional components. If you are experienced in installa-
tions, you can customize the installation using the custom installation option.
Network configuration
Installing the network components is optional at the time of initial setup. You
can install these components later. Even when you have selected to include
the networking components, you can initially let the setup join the computer
to a workgroup and later change it to a domain membership.
Multiple-boot system
You can install Windows XP or Windows XP Professional with any other
Windows OS and keep the system as a multiboot system. At the time of
installation, you are given the option of whether you want to delete the
existing OS, upgrade it, or keep the system as dual or multiboot.
Disk partition.
One of the most important decisions when installing the operating
system is about disk partitions. A partition is a logical section of the hard disk where
the system can store data. When you start installing the operating system, the setup
program lets you install the operating system on an existing hard disk partition, or
you can create a new partition. If you decide on using the existing partition to
creatre a new one, all previously stored data on that partition will be lost
Microsoft recommends that you should create only one partition during installation
that is to be used for installing the operating system and that you make other parti-
tions after the installation is complete. When you partition the disk, you must also
Operating Systems | 85
A+ Essentials
Study Guide
format it using the FAT or NTFS filesystem. In case you are dual-booting the system
with Windows XP/2000 Professional and another operating system, you should
install each operating system in a separate disk partition. It is recommended that
you use the NTFS filesystem for all disk partitions due to its efficiency and advanced
security features. In case you are dual-booting Windows XP/2000 with an old oper-
ating system such as Windows 95 or Windows Me, which do not recognize NTFS
partitions, you must keep the boot partition as FAT.
Installing Windows XP Professional
Windows XP Professional comes on a single CD-ROM with a product key that
will be used during the installation. If your computer BIOS supports booting from
the CD-ROM, simply insert the Windows XP Professional CD in the CD-ROM
drive and start the computer. The setup process starts with text mode, during
which the hard disk is prepared and necessary installation files are copied to the
hard disk. Setup then enters the GUI phase, when the user is prompted for infor-
mation about the computer, username, and password, etc. This phase includes
the network phase where the setup program detects the network adapter and
collects information about networking components. The installation completes
when the setup program copies final files to the hard disk, creates Start menu
items, registers components, removes temporary setup files, and restarts the
computer.
Text mode.
The text mode phase copies the initial setup files to the computer,
creates hard disk partitions, and then copies setup files to the hard disk. The
following steps are completed:
1. If the computer BIOS supports booting from the CD-ROM, you can start the
text mode by inserting the Windows XP Professional CD-ROM into the CD-
ROM drive. Restart the computer, and the text mode of installation begins.
2. If you are already running an operating system, simply insert the CD-ROM
and choose whether you want to upgrade the previous operating system or
perform a clean installation from the Welcome screen.
3. If you wish to install any third-party device drivers, such as a SATA disk
controller, press F6.
4. Installation continues with copying initial setup files into memory. A
Welcome screen appears. Press Enter to continue.
5. Press the F8 key to accept the Licensing Agreement.
6. In the Disk Partitioning section, select the disk partition you wish to use for
Windows XP Professional. Press C to create a new partition or press D to
delete an existing partition.
7. The setup program checks the selected partition for errors and formats the
partition with the selected filesystem. Setup then copies necessary files to the
hard disk partition.
8. The computer restarts and enters the GUI phase, as explained in the next
section.
86
|
Chapter 2: A+ Essentials Study Guide
GUI mode.
After the computer restarts, the setup wizard starts. This is known as
the GUI phase or GUI mode. The following steps explain the procedure:
1. Press Enter to continue installation. During this time, setup detects and
installs various devices and drivers. This takes several minutes before the next
screen is displayed.
2. The Regional and Language Options screen appears. Make your selections
appropriately and click Next.
3. In the Personalize Your Software page, fill in the correct information and
click Next. Enter the correct 25-digit Product Key and click Next.
4. In the Computer Name and Administrator Password screen, enter a name for
the computer and enter the password that you wish to assign to the
computer’s local administrator. Click Next.
5. In the Date and Time screen, check and, if required, correct the date, time,
and time zone settings and click Next.
6. The setup now enters the Network Phase. Networking components are
detected and installed. Choose Typical if you wish to proceed with auto-
matic configuration; otherwise, choose Custom. Typical networking
components include Client for Microsoft Networks, File and Print Sharing for
Microsoft Networks, and TCP/IP protocol with automatic IP addressing.
Click Next.
7. The Workgroup or Computer Domain name screen appears next. If you
select a domain name, you will be asked about the domain administrator’s
username and password. Enter the correct information and click Next. Setup
copies several files to the hard disk.
8. Setup completes the installation by installing the Start menu items, registers
various components you selected, saves your configuration to the registry,
removes temporary installation files, and restarts the computer.
When the computer restarts, the Welcome screen appears if you selected to join a
workgroup. If you selected to join a domain during installation, the Logon to
Windows screen appears instead.
Installing over the network.
When installing Windows XP Professional over the
network, the installation files are stored on a network file server known as the
distribution server. The setup process is started using either the winnt.exe or
winnt32.exe command, depending on the operating system currently in use.
• If you are using MS-DOS or Windows 3.x versions, run winnt.exe to start the
installation process.
• If you are currently using Windows 95, Windows 98, Windows Me, Win-
dows NT 4.0, or Windows 2000 Professional operating systems, run the
winnt32.exe to start the installation.
The following are some essential steps that you must take before starting the
installation:
1. Locate the distribution server and the correct path to connect to the shared
folder.
Operating Systems | 87
A+ Essentials
Study Guide
2. Create a FAT partition on the computer where you want to install Windows
XP Professional.
3. Install necessary network client software in order to enable the computer to
connect to the distribution software. If the computer does not have any oper-
ating system, you can use a boot floppy disk that contains network client
software to communicate on the network.
4. Start the computer either using the currently installed operating system or
from the network client boot disk.
5. Connect to the shared folder (/i386) on the distribution server.
6. Start the installation by running the winnt.exe or winnt32.exe from the
command prompt.
Both the winnt.exe and winnt32.exe utilities include a number of parameters.
Tables 2-8 and 2-9 list some of the commonly used parameters for these
commands respectively.
Table 2-8. Parameters for the winnt.exe command
Parameter Function
/r[folder]
Copies and saves an optional folder.
/rx[:folder]
Copies an optional folder. The folder is deleted after installation.
/s[:sourcepath]
Specifies the location of source files in the format \\server\share\
[path].
/t[:tempdrive]
Specifies the temp drive to contain installation files.
/u[:answer file]
Specifies an answer file for unattended installation. This parameter
must be used with the /s parameter.
/udf:id[,UDF_file]
Specifies the identifiers that setup uses to see how a uniqueness
database file (UDF) modifies the answer file.
Table 2-9. Parameters for the winnt32.exe command
Parameter Function
/checkupgradeonly
Only checks whether the computer can be upgraded to Windows XP
Professional.
/cmd:command_line
Specifies a command that should be run immediately after
installation.
/cmdcons
Installs Recovery Console as a startup option.
/copydir:foldername
Creates an additional folder with the %systemroot% folder.
/debug[level] [:filename]
Creates a debug file for troubleshooting.
/dudisable
Disables dynamic updates during installation.
/makelocalsource
Copies all installation files to the local hard drive.
/noreboot
Executes another command before restartingthe computer when the
text phase is complete.
/s:sourcepath
Specifies the location of source files for Windows XP Professional
installation.
/tempdrive:driveletter
Copies installation files on this temporary drive and installs the oper-
ating system on that drive.
88
|
Chapter 2: A+ Essentials Study Guide
Installing Windows 2000 Professional
Start from the Windows 2000 Professional installation CD-ROM. Make sure that
the CD-ROM is set to start before the hard disk does. Insert the CD-ROM, and
then when you are prompted, press any key to start the Windows 2000 Profes-
sional installation. The following steps explain the installation process:
1. Setup inspects computer's hardware configuration, and installation begins.
When the Microsoft Windows 2000 Professional screen appears, press Enter.
2. Press the F8 key to accept the terms of the license agreement.
3. When the Windows 2000 Professional Setup screen appears, either press
Enter to install on the selected partition, or press C to create a new partition.
4. You may choose to leave the current partition as is, format it using FAT,
convert it to NTFS, or format it using NTFS. Press Enter after you make your
selection. Setup examines the existing hard disks and then copies the
required files for installation. The computer is then restarted.
5. Installation enters the GUI mode. Click Next to start the GUI wizard. Setup
detects and installs necessary devices such as the keyboard and the mouse.
6. The Regional Options page appears. Customize your installation for locale,
number format, currency, time, date, and language, if necessary. Click Next.
7. The Personalize Your Software dialog box appears. Type your name and the
name of your organization, and then click Next.
8. In the Product ID dialog box, type the 25-character product key, and then
click Next.
9. The Computer Name and Password dialog box is displayed. Either accept the
default name or type a different name for the computer. You are prompted
for an administrative password—type a password for the Administrator
account. Click Next.
10. The Date and Time Settings dialog box appears. Set the correct date and time
for your computer and select a time zone. Click Next.
11. The installation now enters the networking phase. Setup detects network
settings and installs the networking software. Choose Typical to set default
network settings such as File and Print Sharing for Microsoft Networks,
/udf:id[,UDF_file]
Specifies the identifiers that setup uses to see how a uniqueness
database file (UDF) modifies the answer file. If you do not specify a
UDF file, you are prompted to insert a disk containing the $UNIQUE$.
UDB file.
/unattend
Used to upgrade previous versions of Windows 98, Windows ME,
Windows NT 4.0, and Windows 2000 without any user input. Copies
all user settings from previous version of Windows.
/unattend[num]:[answerfile]
Used to perform a fresh installation of Windows XP Professional in
unattended mode using the specified answer file. The
num option
specifies thetime thatmust lapseafter copyingof filesand therestart
of the computer. Dynamic updates are downloaded and included in
installation files.
Table 2-9. Parameters for the winnt32.exe command (continued)
Parameter Function
Operating Systems | 89
A+ Essentials
Study Guide
Client for Microsoft Networks, and TCP/IP protocol. Choose Custom to
specify the network components that you require for network environment,
and then click Next.
12. In the next dialog box, specify whether to join the computer to a workgroup
or domain. If you indicate that you are part of a domain, you will need to
specify your domain username and password. Click Next.
13. The setup enters the final phase. It installs Start menu items, registers compo-
nents, saves settings, and removes temporary files. Remove the Windows
2000 CD-ROM, and then click Finish to restart the computer.
14. After the computer restarts, click Next in the Welcome to the Network Iden-
tification Wizard dialog box. Specify whether users must enter a username
and password or whether Windows 2000 should automatically log on a
specific user when the computer starts. Click Finish.
Completing post-installation tasks.
After the installation is complete, you must perform
a number of tasks such as product activation (Windows XP), updating device
drivers, copying user data files, and verifying the installation. These tasks are
explained in the following paragraphs:
Product activation (Windows XP)
The retail and evaluation copies of Windows XP Professional must be acti-
vated within 30 days of installation. Activation is not required if the copy of
Windows XP Professional is a part of volume licensing plan. After 30 days,
the Windows XP Professional ceases to work and does not allow you to log
on to the system.
Update OS and device drivers
Once the basic installation is complete, you might need to update the drivers
for certain devices such as the network adapter or a printer. Some vendors
might have updated their drivers after the release of the operating system.
You must also check whether Microsoft itself has updated the OS. For
Windows 2000 Professional, you need to install Service Pack 4. In the case of
Windows XP Professional, you need Service Pack 2 if it is not included on the
setup CD-ROM.
Copy user data files
After the installation is complete, you will need to install application soft-
ware and restore data files for the user who works on the computer. You will
also need to restore his desktop settings as well. You can use the File and
Settings Transfer Wizard in Windows XP to copy user settings and files from
another computer. This wizard is located in the System Tools subfolder in the
Accessories folder in the Start Menu. This wizard can copy application
settings and user data files as well as several other settings such as Internet
Explorer settings, Outlook settings, desktop settings, folder options, etc.
Verifying installation
After the installation is complete, you must verify that the OS and the appli-
cations work as expected. Reboot the computer and examine the
functionality of different devices. Make sure that it is able to connect to the
network and printers. Run a couple of applications and verify that they do
not produce unexpected errors.
90
|
Chapter 2: A+ Essentials Study Guide
Upgrading an operating system
In some situations, you might be required to upgrade a previously installed
version of Windows to Windows XP or Windows 2000 Professional. You will
need to make certain checks to perform a successful upgrade installation. These
checks include verifying that an upgrade path exists, the new OS supports the
computer hardware and the applications are compatible. When you decide to
perform the upgrade, you will also be required to back up the existing data files.
In the discussion that follows, we will take a look at these aspects.
Available upgrade paths.
Not all previous versions of Windows can be directly
upgraded to Windows XP or Windows 2000 Professional. Table 2-10 lists the
options available for performing an upgrade installation for both of these oper-
ating systems.
Memorize the details given in Table 2-10 because questions on
upgrading OS generally make their way into the A+ exams. Also
make it a point to figure out a tricky question where you would be
asked to upgrade a previous server operating system (Windows NT
4.0 Server to Windows 2000 Professional or a Windows 2000
Server to Windows XP Professional). Remember that only client
operating systems can be upgraded to new client operating systems.
Checking hardware compatibility.
Both Windows XP and Windows 2000 Professional
setup programs include an option to test whether the current computer hardware
and software can be upgraded or not. Run the following command from the /i386
folder on the CD-ROM drive:
winnt32 /checkupgradeonly
When the test is complete, it displays the compatibility report. This report is
saved as the file UPGRADE.TXT.
Checking application compatibility.
You will need to ensure that the currently installed
applications are compatible with the new OS. If they are not compatible, choose
whether you will need to obtain newer versions of applications or apply updates
to make them so.
Table 2-10. Upgrade paths for Windows XP and Windows 2000
Previous operating system
Upgrade to Windows XP
Professional
Upgrade to Windows 2000
Professional
Windows 95 No; upgrade to Windows 98 first Yes
Windows 98 Yes Yes
Windows ME Yes No
Windows NT Workstation 4.0 with SP4 Yes Yes
Windows 2000 Professional Yes N/A
Operating Systems | 91
A+ Essentials
Study Guide
Installing additional Windows components.
When upgrading a previous version of
Windows to a newer version, you might need to apply OS updates before starting
the installation. The updates can be in the form of a service pack (SP), hotfixes, or
patches. For example, if you want to upgrade a Windows 2000 Professional
computer to Windows XP Professional, you will first need to install Windows
2000 Service Pack 4 (SP4).
Network compatibility.
If the computer is connected or will be connected to a
network, ensure that the new OS supports the network adapter and its driver. You
might also need to obtain information on protocol configuration such as TCP/IP
addresses.
Upgrade utility.
You must decide on a built-in utility to perform the upgrade.
Depending on the currently installed OS on the computer, you can use one of the
following utilities:
• Use winnt.exe to upgrade from a 16-bit OS such as Windows 95 and MS-
DOS.
• Use winnt32.exe to upgrade from a 32-bit OS such as Windows 98 and later.
Backing up user data.
Considering that the upgrade installation is successful, the user
data, desktop, and application settings will be migrated to the new OS. But you
should not take chances and always plan to back up at least user data files before
starting the installation.
Performing the upgrade.
Performing an upgrade install is fairly simple compared to a
fresh installation. Start the computer with its currently installed OS and insert the
bootable setup CD for Windows XP or Windows 2000, as required. You will see
an option to upgrade the currently installed OS. Click Yes and click the setup
program.
The upgrade wizard for Windows 2000 Professional guides you through the
process as follows:
License agreement and product key
You will be prompted to accept the End User License Agreement (EULA) and
enter a valid 25-digit product key.
Providing upgrade packs
This option provides an opportunity to apply upgrade packs for applica-
tions. You can still apply the upgrade packs after the upgrade is complete.
Upgrading to NTFS File System
You may choose to upgrade the disk filesystem to NTFS or leave the current
filesystem as is. Microsoft recommends that you upgrade the filesystem to
NTFS if not already using it. If you are dual-booting the new OS with another
OS that is not compatible with NTFS, select No for this option.
Upgrade the PnP driver files
You are given an option to update driver files for PnP devices. If you do not
have these files handy, you can install them after the upgrade is complete.
92
|
Chapter 2: A+ Essentials Study Guide
Upgrade report
The setup program prepares an upgrade report that includes compatibility
issues with currently installed hardware and software. You have the option to
continue with the upgrade process or exit it in order to obtain necessary
updated software for applications of device drivers.
Once these steps are complete, the setup program proceeds with the installation
(which is more or less automated), and you are not required to answer any further
questions.
When upgrading to Windows XP, you will need to accept the EULA and enter a
25-digit product key after you choose the Upgrade option. If the computer is
connected to the Internet, the setup program checks for update files on
Microsoft’s web site and automatically downloads them to install them during the
upgrade. The upgrade to Windows XP is also a simple process, and you are not
asked many questions. After the installation is complete, you will need to activate
the product with Microsoft within 30 days of installation.
Installing devices and drivers
Once the basic installation of the OS is complete, you might be required to install
or upgrade devices and their drivers to enhance the capabilities of the computer.
These may include input/output (I/O) devices such as printers, scanners, mouse
devices, monitors, modems, or network adapters. Some of the essential tasks asso-
ciated with installing devices are covered in the following sections.
Identifying the PnP and non-PnP devices.
Computer devices can be classified into two
main categories: Plug and Play (PnP) and non-Plug and Play. While PnP devices
are automatically detected and configured by the computer BIOS and the OS, the
non-PnP devices need to be manually configured. For a PnP device to function
properly, the computer BIOS and the OS should support the PnP functionality.
Almost every device on the market these days is PnP-compatible.
Permissions and rights.
You must have adequate permissions in order to install
devices and drivers on Windows XP and Windows 2000 computers. If you are
logged on as an administrator or a member of the administrators group, you can
perform the installation without any problems. Otherwise, you will need to have
the load and unload device drivers right on the computer. If the device driver has
a digital signature, any user can install the device, provided that no user interac-
tion is required during installation.
Driver signing.
The driver signing feature in Windows ensures that only those
drivers are installed that are verified by Windows Hardware Quality Labs
(WHQL). These drivers carry a digital signature that verifies that the driver has
been tested and approved by Microsoft or the vendor to work with the operating
system. Windows XP Professional includes another utility known as Signature
Verification (signverif.exe) to verify that the installed device drivers have digital
signatures. Only administrators or members of administrators can install unsigned
device drivers.
Operating Systems | 93
A+ Essentials
Study Guide
Obtaining device drivers.
Most device driver files are distributed on CD-ROMs that
come with the device. You will need to obtain the driver and check its compati-
bility with the OS before installing it on the computer. In case you have lost the
original driver CD or are updating a currently installed driver, you may also
download the driver from the vendor’s web site, if it is available.
Connecting the device.
The device must be connected to the computer before you
install its driver. In case the device is PnP, it will be automatically detected when
you start the computer. In case of USB devices, you will install the drivers first and
then can connect them while the computer is powered on. In any case, you must
follow the manufacturer’s instructions for the correct installation process.
Installing and configuring the driver.
You can use the CD-ROM that contains the device
driver, download it from the manufacturer’s web site or have the Add Hardware
wizard install the driver. After the installation is complete, you must restart the
computer so that the new device can be used. This action is not necessary for
devices that are hot-swappable, such as the USB devices.
PnP devices are automatically configured to use appropriate system resources
such as IRQ, I/O port, and DMA address during installation. For some other
devices, you must go through a series of steps to fully configure it. For example,
printers, scanners, and cameras must be configured for optimum performance and
requirements.
Adding devices in Windows 2000.
The following steps explain the device installation
process in Windows 2000 Professional:
1. Turn off the computer and physically install the device in an appropriate
expansion slot or to an external port.
2. If the device is detected, Windows will try to locate an appropriate driver for
it. If it cannot find one, it will prompt for the location of driver files.
3. If the device is not detected, you can use the Add/Remove Hardware utility in
the Control Panel to manually install the driver.
4. The wizard prompts you whether you want to Add/Troubleshoot a device or
Uninstall/Unplug a device. Choose the Add/Troubleshoot option.
5. The OS searches for PnP devices that do not have a driver installed yet. You
are prompted to choose a device from a list of devices. Click the Add a New
Device option on top of the list.
6. You are prompted to have Windows search for a suitable driver, or you can
click the Have Disk button to install the driver from the CD or from another
location on the hard disk.
Adding devices in Windows XP.
The following steps explain the device installation
process in Windows XP:
1. Turn off the computer and physically install the device in an appropriate
expansion slot or in an external port.
94
|
Chapter 2: A+ Essentials Study Guide
2. Restart the computer and wait for Windows XP to detect the hardware
device. You can either choose to let Windows search for and install a suitable
driver or choose to install the driver manually. With the first option,
Windows tries to search for an appropriate driver. If you insert the driver CD,
Windows will locate the driver files automatically.
3. Once the driver files are located, Windows XP checks whether the driver is
digitally signed or not. You are given an option to stop the installation in case
the driver is found to be unsigned.
4. Once you click the Continue Anyway button, the driver is installed and the
device is ready to use.
Verifying device driver installation.
Once the device is installed and the driver is loaded,
you can verify it from the Device Manager. A device with an incorrect driver is
flagged with a big yellow question mark (?). A black exclamation point (!) on a
yellow field indicates the device is in a problem state. Note that a device that is in
a problem state can be functioning. You can double-click the device and view its
properties.
Optimizing performance
Optimizing Windows is the process of fine-tuning its performance. Both Windows
XP and Windows 2000 include some utilities that help optimize the OS perfor-
mance. In this section, we will discuss how the OS can be fine-tuned for optimum
performance.
Virtual memory.
Windows operating systems use virtual memory to temporarily store
data when it is running out of the physical memory (RAM) in the computer. This
data is stored in a file on the hard disk (which is known as swap file or paging
file). For most Windows installations, the OS automatically manages the size of
the paging file. You can manually increase or decrease the size of this file or split
the file across multiple hard disks depending on your requirements.
If you feel that the system performance is poor, you can increase the size of this
file or divide the file into multiple disks. The following steps explain how you can
change the virtual memory settings in Windows XP:
1. Click Start
➝ Control Panel ➝ System.
2. Click the Advanced tab.
3. Click the Settings button in the Performance area.
4. Click Advanced.
5. Click Change in the Virtual Memory area.
6. Enter the “Initial size” and “Maximum size” and click Set. Refer to
Figure 2-10.
7. Close all windows.
In Windows 2000, the virtual memory can be fine-tuned with the following steps:
1. Click Start
➝ Control Panel ➝ System.
2. Click the Advanced button.
3. Click the Performance Options button.