Microsoft Press transitioning your mcsa mcse to windows server 2008 2009 phần 8 ppt
Bạn đang xem bản rút gọn của tài liệu. Xem và tải ngay bản đầy đủ của tài liệu tại đây (1.87 MB, 97 trang )
Lesson 1: Confi guring Web Applications CHAPTER 13 651
MORE INFO .NET FRAMEWORK 3.0
For more information about .NET Framework 3.0, see />/netframework/default.aspx.
Using the Default Web Site and Adding Web Sites
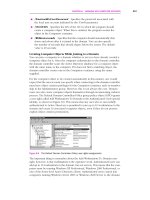
When you install the Web Server server role, the installation includes a site called Default
Web Site that is confi gured to respond to requests, using HTTP (port 80) and HTTPS (port
443). You can view the site bindings, shown in Figure 13-2, by right-clicking Default Web Site
in IIS Manager and selecting Edit Bindings. You can also use the Bindings link in the Actions
pane to open the same dialog box.
FIGURE 13-2 Viewing the site bindings for Default Web Site.
When you launch a Web browser and connect to a simple URL that does not specify direc-
tories or virtual directories, for example, ernal, you view the contents
of Default Web Site. IIS7 receives the request on HTTP port 80 and returns the appropriate
content from the Web site.
You can add a new site binding for the Default Web Site by clicking the Add button in
the Site Bindings dialog box. You can specify the protocol type, IP address, port information,
and (optionally) hostname. If you attempt to add a site binding that is already in use, you are
reminded that you must confi gure a unique binding.
Adding Web Sites
You can add a new Web site by right-clicking the Sites container in IIS Manager and selecting
Add Web Site. Figure 13-3 shows the Add Web Site dialog box.
In addition to specifying the default protocol binding for the site, you must provide the
site name. This setting is a logical name that users do not see on the site. By default, IIS
Manager creates a new application pool with the same name you provide for the Web site.
You can also select an existing application pool by clicking the Select button. You learn more
about application pools and their purpose later in this lesson.
MORE INFO
.NET FRAMEWORK 3.0
For more information about .NET Framework 3.0, see
/>/netframework/default.aspx
.
/netframework/default.aspx./netframework/default.aspx
6 5 2 CHAPTER 13 Configuring a Web Services Infrastructure
FIGURE 13-3 The Add Web Site dialog box.
In the Content Directory section of the dialog box, you can specify the full physical path
to the folder that is the root of the Web site. The default root location for IIS7 Web content
is %SystemDrive%\Inetpub\wwwroot. The initial files for Default Web Site are located in this
folder. You can create a new folder (either within this path or in another one) to store the con-
tent of the new Web site. You use the Connect As button to specify the security credentials
that IIS7 requires to access the content. The default setting is Pass-Through Authentication,
which means that the security context of the requesting Web user is used. You learn more
about securing Web site content later in this chapter. Before you click OK to accept the Web
site settings, you can specify whether you want the site to be started immediately.
If the Web site binding information is already in use, you are given a warning. Otherwise,
the site is created and is displayed in the left pane of IIS Manager. You can start and stop Web
sites individually by selecting them and using the commands in the IIS Manager Actions pane
or by right-clicking and selecting the Manage Web Site menu. You can also use the appcmd
.exe utility, which is discussed later in this lesson. Other settings, such as site bindings, can
be modified at any time. This enables you to create, reconfigure, and stop sites individually
without affecting other sites on the same server.
Configuring Web Site Limits
You can use Web Site Limits settings to specify maximum limitations on the amount of
bandwidth and the number of connections that a Web site can support. You configure these
settings to ensure that one or more sites on a server do not use excessive network bandwidth
or consume too many resources. To configure Web site limits, you select the relevant Web site
Lesson 1: Configuring Web Applications CHAPTER 13 653
and click Limits in the IIS Manager Actions pane. Figure 13-4 shows the default limit settings
for a new Web site.
FIGURE 13-4 Default Web Site limits.
You can enable and use the Limit Bandwidth Usage option (which is initially disabled) to
configure the maximum number of bytes per second that the Web server supports. If this
limit is exceeded, the Web server throttles responses by adding a time delay.
Use the Limit Number of Connections setting to specify the maximum number of user
connections that can be active on the site. Each user connection times out automatically if
a new request is not received within the time you specify. (The default is 120 seconds.) You
can also configure the maximum number of connections allowed to the site. If this number is
exceeded, users who attempt to make a new connection will receive an error message stating
that the server is too busy to respond.
Configuring Site Logging
You configure site logging properties by selecting the relevant Web site in IIS Manager and
double-clicking Logging in Features View. Figure 13-5 shows the default logging options.
The options available depend on which role services are installed on the Web server.
By default, each new site is configured to store text-based log files in the %SystemDrive%\
Inetpub\Logs\LogFiles
path on the local server. Each Web site is assigned its own folder that
contains one or more log files. The default log file format is W3C, which you can use to com-
pare log information from different Web server platforms. You use the Select Fields button
to specify what information is stored in the log file. The default settings generally provide a
good balance between performance and useful information. If you add too many fields, this
can adversely affect performance, so log only the information you need.
Because log files are text-based, it can be difficult to manage and analyze large files. The
settings in the Log File Rollover section enable you to specify when IIS7 should create a new
log file. (The default is daily.) You can also specify the maximum size of each log file or use
only a single log file.
6 5 4 CHAPTER 13 Configuring a Web Services Infrastructure
FIGURE 13-5 Default logging options.
Creating and Managing Web Applications
You can create Web applications within Web sites to point to the physical location of content
files. For example, a site might include two Web applications, one for registered users and
one for nonregistered users. Each Web application typically points to a separate physical
folder on the computer so IIS7 can determine how to process requests. Web applications can
also ensure that the common content
is available to both sites.
Creating Web Applications
To create a new Web application, right-click the relevant Web site in IIS Manager and click
Add Application. Figure 13-6 shows the Add Application dialog box. You can specify the alias
to be used for the site. This is the name that users will type as part of their URL to connect
to the content. For example, if you create a Web application with the alias Marketing on the
Web server Glasgow in the contoso.internal domain, users will use toso
.internal/marketing to access the content. You can also specify the application pool in which
the application will be placed. You learn about application pools later in this lesson
.
You configure the Physical Path option to specify the folder in which the Web applica-
tion content is stored. This file system location should be unique and not shared with other
Web applications. You can use the Connect As setting to specify a username and password
or accept the default setting of Pass-Through Authentication. Use the Test Settings button to
verify the connection details you have specified.
When you click OK to create a new Web application, the application is listed under the
site object in IIS Manager. You can modify settings for the Web application by using the IIS
Manager Features View.
Lesson 1: Configuring Web Applications CHAPTER 13 655
FIGURE 13-6 The Add Application dialog box.
Managing Web Applications
Many of the settings for a new Web application are inherited automatically by default from
the Web site in which it was created. This enables you to use the same default settings easily
for each new site. You can also (usually) override settings at the Web application level, based
on specific application needs. To do this, double-click items in Features View and make the
corresponding changes.
Using Application Pools
Application pools address one of the primary concerns involved in managing Web Serv-
ers—when one Web site or
application affects operations of others on the same computer.
Memory leaks and application bugs can cause a loss of service or reduced performance in
apparently unrelated Web applications. Application pools isolate different
sites from each
other so that failures and other problems can be contained. Within each application pool,
worker processes service Web requests. Each
application pool contains its own set of worker
processes, so problems in
one pool do not affect processes in another. In addition, you can
start and stop application pools independently of each other
.
By default, IIS includes the Classic .NET AppPool and DefaultAppPool application pools
along with an application pool that takes the same name as the application itself. Classic .NET
AppPool supports applications that require .NET Framework 2.0, using Classic Managed Pipe-
line Mode. DefaultAppPool supports Default Web Site. It also supports .NET Framework 2.0,
but it uses the new Integrated Managed Pipeline Mode.
By default, IIS Manager creates a new application pool when you create a new Web site.
The
application pool takes the same name as the site. This enables the processes within each
Web site to run independently of each other. When
you create a new Web application, you
have the option of selecting from any of the available application pools.
656 CHAPTER 13 Configuring a Web Services Infrastructure
For example, your network contains a Windows Server 2008 Web server that hosts mul-
tiple Web sites and you want to release memory for a single Web site. You want to configure
the server to release memory automatically without affecting other Web sites hosted on the
same server. To do this, you create a new application pool and associate the Web site with
that application pool. If you add an application to a specific pool or associate a Web site
with that pool, the application and Web site settings never affect applications in or Web sites
associated with other pools. If the application process crashes or you reconfigure the Web site
settings, only the new application pool is affected.
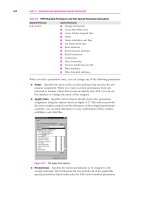
Creating Application Pools
You can use IIS Manager to create and manage application pools. As shown in Figure 13-7,
you can view details of the application pools currently on the server.
FIGURE 13-7 Application pools on the server.
To create a new application pool, right-click Application Pools and select Add Application
Pool. Figure 13-8 shows the available options. You can use the Name option to identify the
purpose of the application pool and, if relevant, the Web site it supports. The .NET Frame-
work version options will be based on which versions are available on the local computer. By
default, the .NET Framework 2.0 and No Managed Code options are available. If you select
No Managed Code, .NET functionality will not be available for Web applications that are part
of the pool.
Managed Pipeline Mode specifies the supported method for code that needs to intercept
and modify Web request processing. The Classic option supports ASP.NET applications writ-
ten for previous versions of IIS that depend on integrating with request pipeline events. The
Integrated mode provides better performance, and Microsoft recommends it for those Web
applications that do not depend on Classic Managed Pipeline Mode. Before clicking OK, you
can choose whether you want to start the application pool immediately.
Lesson 1: Confi guring Web Applications CHAPTER 13 657
FIGURE 13-8 Available application pool options.
NOTE USING THE APPCMD ADD APPPOOL COMMAND
You can add an application pool to a server by using the appcmd add apppool command
from an elevated command prompt, for example, %systemroot%\system32\inetsrv
\appcmd add apppool /name:Sales. You can use the appcmd command to add an applica-
tion pool that uses settings other than the default settings to a Web server. For example,
to add an application pool named Marketing that does not run managed code and that
uses classic mode, enter the %systemroot%\system32\inetsrv\appcmd add apppool
/name:Marketing /managedRuntimeVersion: /managedPipelineMode:Classic command.
MORE INFO ADDING APPLICATION POOLS
For more information about adding application pools with both IIS Manager and
command-line tools, see />Stopping Application Pools
Each application pool on a Web server can be started and stopped without affecting any
of the other pools. When you stop an application pool, this prevents any applications that
are part of that pool from processing requests. Users that attempt to access content from
these sites will receive an HTTP Error 503 message, “Service Unavailable.” To verify which
applications are using an application pool, right-click the application pool and select View
Applications.
In addition to being stopped manually by an administrator, an application pool might
stop automatically if application failures occur. After a certain number of failures, Rapid Fail
Protection, a WAS feature, triggers. This feature is designed to stop application pools with a
persistent failure condition and thus avoid an endless loop of failing to start worker processes.
At this point, any requests to applications within the stopped application pool will result in
the 503 error. The long-term solution is to repair or debug the failing application, but you can
restart the application pool manually by running the %systemroot%\system32\inetsrv\appcmd
NOTE
USING THE
NOTE USING THE NOTE
APPCMD ADD APPPOOL
COMMAND
You can add an application pool to a server by using the
appcmd add apppool
command
appcmd add apppool command appcmd add apppool
from an elevated command prompt, for example,
%systemroot%\system32\inetsrv
\appcmd add apppool /name:Sales
.
You can use the
appcmd
command to add an applica-
appcmd command to add an applica-appcmd
tion pool that uses settings other than the default settings to a Web server. For example,
to add an application pool named Marketing that does not run managed code and that
uses classic mode, enter the
%systemroot%\system32\inetsrv\appcmd add apppool
/name:Marketing /managedRuntimeVersion: /managedPipelineMode:Classic
command.
MORE INFO
ADDING APPLICATION POOLS
For more information about adding application pools with both IIS Manager and
command-line tools, see
/>.
/> 6 5 8 CHAPTER 13 Configuring a Web Services Infrastructure
start apppool command from an elevated command prompt on the Web Server. You must
specify the name of the application pool in this command.
Recycling Application Pools
Rather than stopping an application pool, you can recycle it using the Recycle command in
the Actions pane. This instructs IIS7 to retire any current worker process automatically after it
has executed existing requests. Users do not see a service disruption, and the worker process
is replaced by a new one as quickly as possible. Typically, you recycle application pools when
you encounter memory leaks or when resource usage increases significantly over time and
you suspect a defect in the application code. The long-term solution is to correct the code,
but you can address the symptoms by recycling the application pool.
You can configure recycling options by selecting an application pool in IIS Manager and
then clicking the Recycling link under Edit Application Pool in the IIS Manager Actions pane.
Figure 13-9 shows the recycling options available.
FIGURE 13-9 Configuring Application Pool recycling settings.
You can select either Fixed Intervals or Memory Based Maximums, depending upon the
specific problems you are trying to troubleshoot. Recycling application pools too quickly can
reduce performance, but if a Web application has serious problems, you should address them
by recycling worker processes before users see slowdowns or errors on the Web site.
Keep track of application pool recycle events to ensure that your Web server and its appli-
cations are running as expected. For example, if you choose the Memory Based Maximums
setting, you want to know how often the application pool has been recycled.
Lesson 1: Configuring Web Applications CHAPTER 13 659
When the worker process terminates, a new one is started simultaneously. This type of
recycling is called overlapped recycling and is the default for application pools. If an applica-
tion cannot run in a multi-instance environment, configure only one worker process for an
application pool, which is the default value. In this case, disable overlapped recycling by set-
ting the Disable Overlapped Recycling option to True.
Advanced Application Pool Settings
You can configure additional application pool settings to control the behavior of worker
processes. To do this, select an application pool in IIS Manager and click Advanced Settings
in the Actions pane. In the Advanced Settings dialog box shown in Figure 13-10, configure
the detailed parameters related to CPU and memory resource usage. In general, you should
not change these parameters unless you are sure you need to. Some settings can result in
reduced application processing speed, and others can reserve too many system resources for
a particular pool.
FIGURE 13-10 Application pool Advanced Settings dialog box.
Understanding .NET Framework
The .NET Framework is available with Windows Server 2008. It includes a library of pre-coded
solutions to common programming problems and a virtual machine that manages the execu-
tion of programs written specifically for the framework. Most new applications created for the
Windows Server 2008 platform use the .NET Framework.
Programs written for the .NET Framework execute in the CLR environment that manages
the program’s requirements. This run-time environment simulates an application virtual
machine, so programmers need not consider the capabilities of the specific hardware that
6 6 0 CHAPTER 13 Configuring a Web Services Infrastructure
executes the program. CLR also provides services such as security, memory management, and
exception handling.
Windows Server 2008 includes .NET Framework 3.0. Version 3.5 is available as a download
at />508d977d32a6&DisplayLang=en and, at this time of writing, .NET Framework 4.0 for parallel
computing has been recently announced. However, any examination questions are likely to be
based on .NET Framework 3.0.
.NET Framework Components
.NET Framework 3.0 includes a set of application programming interfaces (APIs) integrated
into Windows Server 2008 operating systems. It consists of the following components:
n
Windows Presentation Foundation (WPF) This is a user interface subsystem and API
based on eXtended Markup Language (XML) that uses 3D computer graphics hard-
ware and Direct3D technologies.
n
Windows Communication Foundation (WCF) This is a service-oriented messaging
system that enables programs to interoperate locally or remotely.
n
Windows Workflow Foundation (WF) This enables you to build task automation
and integrated transactions, using workflows. A workflow is a model that, for example,
could describe a repeatable sequence of operations.
n
Windows CardSpace This is a software component that securely stores a user’s digital
identities and provides an interface for choosing an identity for a particular transac-
tion, for example, logging on to a Web site.
ASP.NET is a Web application framework you can use to build dynamic Web sites, Web
applications, and Web services. It is the successor to the Microsoft ASP technology. ASP.NET
is built on CLR, enabling programmers to write ASP.NET code, using any supported .NET
language. ASP.NET pages, known as Web forms, are used for application development. They
are contained in files with an .aspx extension. They define server-side Web controls and user
controls in which the developers place all the required static and dynamic content for the
Web page.
.NET components are defined by the .NET initiative, which aims to make interoperable
software services available over the Internet anywhere and on any device. The initiative is
based on the .NET Framework, which combines a managed run-time environment with a
comprehensive class library to facilitate building and deploying Web-enabled applications.
.NET components support programming models embodied in the .NET Framework, including
Windows Forms, Web Forms, and XML Web services.
Lesson 1: Confi guring Web Applications CHAPTER 13 661
.NET Framework Permissions
I
f you want a .NET Framework application to run without creating content or
accessing system components, you might need to confi gure the .NET Framework
Web site trust level to Full.
Suppose, for example, you have installed the Web Server server role on a Windows
Server 2008 server, and you install and enable the .NET Framework on a Web site
hosted on the server. You must ensure that all applications run on a minimum
permission level as specifi ed by company security policy. You want to confi gure the
Web site application with permissions that execute without creating other content
or accessing Windows Server 2008 system components.
In this case, the Web site application needs to have permissions to execute without
creating other content or accessing Windows Server 2008 system components. You
therefore confi gure the .NET Framework Web site trust level to Full. This confi gures
the Web site application to have permission to execute without creating other con-
tent or accessing Windows Server 2008 system components.
PracticE Installing the Web Server Server Role and the ASP.NET
Role Service
In this practice, you install the Web Server server role on the Glasgow computer (if necessary).
You then install the ASP.NET role service. The Web Server server role and the ASP.NET role
service might already be installed on this computer, depending on the roles installed in previ-
ous chapters, so the exercises might only identify these settings.
ExErcisE 1 Install the Web Server Role (If Necessary)
In this exercise, you check whether the Web Server (IIS) server role is installed on the Glas-
gow server. (It likely is.) If it is not, you install it. You install the service with only the basic role
services that are enabled by default
.
1. Log on to glasgow.contoso.internal, using the Kim_Akers account.
2. If necessary, open Server Manager. Right-click Roles in the Tree pane and select Add
Roles to open the Add Roles Wizard. Click Next on the Before You Begin page if it is
displayed.
3. On the Select Server Roles page, determine whether the Web Server (IIS) server role
is available or is selected and dimmed, as shown in Figure 13-11. If the Web Server
.NET Framework Permissions
I
f you want a .NET Framework application to run without creating content or
accessing system components, you might need to confi gure the .NET Framework
Web site trust level to Full.
Suppose, for example, you have installed the Web Server server role on a Windows
Server 2008 server, and you install and enable the .NET Framework on a Web site
hosted on the server. You must ensure that all applications run on a minimum
permission level as specifi ed by company security policy. You want to confi gure the
Web site application with permissions that execute without creating other content
or accessing Windows Server 2008 system components.
In this case, the Web site application needs to have permissions to execute without
creating other content or accessing Windows Server 2008 system components. You
therefore confi gure the .NET Framework Web site trust level to Full. This confi gures
the Web site application to have permission to execute without creating other con-
tent or accessing Windows Server 2008 system components.
6 6 2 CHAPTER 13 Configuring a Web Services Infrastructure
(IIS) server role is selected and dimmed, it is already installed. In this case, click Cancel,
click Yes to confirm you want to cancel the wizard, and proceed to Exercise 2 in this
practice.
FIGURE 13-11 The Web Server (IIS) server role is already installed.
4. Otherwise, on the Web Server (IIS) page, read the basic introductory information
about IIS and c
lick Next.
5. On the Confirm Installation Selections page, verify the role service selections.
Optionally, you can choose to print, e-mail, or save the information to record which
components were installed.
6. When you are ready to begin the installation process, click Install.
7. When the installation process has completed, verify the installed roles and services on
the Installation Results page. To complete the process, click Close.
ExErcisE 2 Install the ASP.NET Role Service
In this exercise, you install the ASP.NET role service and its dependencies. The Web Server
server role must be installed before you can install this role service.
1. If necessary, log on to glasgow.contoso.internal, using the Kim_Akers account, and
start Server Manager.
2. Expand Roles and select Web Server (IIS).
3. Click Add Role Services.
The Select Role Services page appears, as shown in Figure 13-12. If the ASP.NET role
service is selected and dimmed, the service is already installed.
Lesson 1: Configuring Web Applications CHAPTER 13 663
4. If this is the case, click Cancel, and then click Yes to confirm that you want to cancel the
wizard.
The practice session is now complete.
FIGURE 13-12 The Select Role Services page.
5. Otherwise, select the ASP.NET check box.
The Add Role Services Required For ASP.NET dialog box will likely appear, as shown in
Figure 13-13. The role services you need to add (and whether this dialog box appears
at all) depend on the services that are already installed on the Glasgow computer.
6. Click Add Required Role Services.
FIGURE 13-13 The Add Role Services Required For ASP.NET dialog box.
7. Click Next, and then click Install on the Confirm Installation Selections page.
Installation can take some time.
8. Click Close to close the Installation Results page when installation completes.
9. If required to do so, reboot the Glasgow computer.
Lesson Summary
n
The Web Server server role provides access to Web site content, using the HTTP pro-
tocol. The Application Server server role provides support to applications that require
features of .NET Framework 3.0, COM+, and Distributed Transactions. You can install
role services associated with these server roles as you require them.
n
You can use IIS Manager and the appcmd.exe command-line utility to configure
Default Web Site, add and manage Web sites, and configure application pools.
6 6 4 CHAPTER 13 Confi guring a Web Services Infrastructure
n
.NET Framework 3.0 includes a set of APIs integrated into Windows Server 2008
operating systems.
Lesson Review
You can use the following questions to test your knowledge of the information in Lesson 1,
“Confi guring Web Applications.” The questions are also available on the companion DVD if
you prefer to review them in electronic form.
NOTE ANSWERS
Answers to these questions and explanations of why each answer choice is correct or incor-
rect are located in the “Answers” section at the end of the book.
1. All servers on the A. Datum Corporation network run Windows Server 2008. The
Galveston Web Server hosts a Web application called StockControl that uses a custom
application pool, which is set to recycle every 720 minutes. The StockControl appli-
cation does not support multiple worker processes. Which of the following options
should you choose to confi gure the application pool so that users can access Stock-
Control after the application pool is recycled?
A. Set the Disable Overlapped Recycling option to True.
B. Confi gure Application Pool Recycling settings and select Fixed Intervals.
C. Confi gure Application Pool Recycling settings and select Memory Based
Maximums.
D. Set the application pool to recycle every 1,440 minutes.
2. You are installing the ASP.NET role service on a Windows Server 2008 server that has
the Web Server server role installed. What additional role services are you prompted
to install (assuming they have not been previously installed) when you install ASP.NET?
(Choose three. Each correct answer presents part of a complete solution.)
A. ISAPI Extensions
B. ASP
C. ISAPI Filters
D. .NET Extensibility
E. CGI
3. Your organization provides Web hosting services. A Windows Server 2008 Web server
on your network hosts multiple Web sites. You must confi gure a Web site for a new
client on the Web server. While deploying the Web site, you discover that the Web site
looks like an FTP download site instead of a normal HTTP page. You must confi gure
the Web site to present the content through HTTP and ensure that the fi les are not
downloaded by users. Which of the following actions must you perform? (Choose two.
Each correct answer presents part of a complete solution.)
NOTE
ANSWERS
NOTE ANSWERSNOTE
Answers to these questions and explanations of why each answer choice is correct or incor-
rect are located in the “Answers” section at the end of the book.
Lesson 1: Configuring Web Applications CHAPTER 13 665
A. Configure a Domain Name System (DNS) zone for the domain that hosts the Web
site and create a CNAME record.
B. From an elevated command prompt, enter the %systemroot%\system32\inetsrv
\appcmd set config/section:directoryBrowse/enabled: False command.
C. Create a new application pool and configure the Web site to use it.
D. Configure the directory that hosts the Web site to grant Allow, Read, and Execute
permission to Web site users.
E. Configure the default document setting to match the Web page file to the
Web site.
666 CHAPTER 13 Confi guring a Web Services Infrastructure
Lesson 2: Managing Web Sites
In this lesson, you learn how to migrate sites and Web applications, publish IIS Web sites and
FTP sites, and confi gure virtual directories. This lesson also discusses the command-line utili-
ties available for Web site management.
After this lesson, you will be able to:
n
Migrate Web sites to Windows Server 2008 and IIS7.
n
Publish Web sites and FTP sites.
n
Confi gure virtual directories.
Estimated lesson time: 30 minutes
Migrating and Upgrading Web Sites and Applications
At the time of this writing, Windows Server 2008 does not support cross-machine migration
of down-level IIS versions to IIS7; however, the IIS team expects to provide an IIS7 migration
tool that enables you to move existing Web sites cross-machine to IIS7 on Windows Server
2008. You can keep track of this situation by accessing the Microsoft IIS team Web site
mentioned earlier in this chapter and, in particular, />/understanding-setup-in-iis-70/.
While this situation exists, a migration from, for example, an IIS6 Web site to IIS7 can be
considered as an upgrade. IIS7 is backward compatible with IIS6 and generally supports IIS6
Web sites and Web applications with little or no modifi cation. Upgrade considerations are
discussed later in this section. To migrate an IIS7 Web site on one computer to another com-
puter on which IIS7 is already installed involves moving content and settings manually and is
typically accomplished by using the backup and restore process.
Migrating a UNIX Web Site
Migration is possible from non-Microsoft Web sites, for example, from a UNIX Web site on an
Apache server to IIS7. In this case, you can use the IIS Migration Wizard.
First, download the IIS Migration Wizard Setup fi le from the Microsoft Download Center.
The iismigrationwizard_setup.exe fi le is available for download at rosoft
.com/download/win2000platform/iismigwz/1.00.0.1/nt5/en-us/iismigrationwizard_setup.exe.
This fi le was originally written for Microsoft Windows 2000 Server and IIS5, but it works fi ne in
Windows Server 2008 and IIS7.
Choose to save the installation program to disk and then run it from Windows Explorer.
The Iismigrationwizard_setup.exe fi le is a self-extracting executable (.exe) fi le. If you run the
fi le, it places installation packages and documentation on your computer. Each of these pack-
ages requires additional installation, as described in the tool’s documentation.
After this lesson, you will be able to:
n
Migrate Web sites to Windows Server 2008 and IIS7.
n
Publish Web sites and FTP sites.
n
Confi gure virtual directories.
Estimated lesson time: 30 minutes
Lesson 2: Managing Web Sites CHAPTER 13 667
Your next step is to prepare the source computer, which must have the Perl programming
language installed. Note that this is not a Microsoft procedure, and you cannot test it on your
test network. It is also unlikely that the upgrade examinations will test you on the procedure
except to assess whether you know it exists.
To prepare the source computer, log on as root. Then open the folder on the destination
computer onto which you extracted the IIS Migration Wizard files and use FTP to transfer the
IISv5MigrationUtility-ApacheSource.tar file to a temporary folder on the source computer.
On the source computer command line (either locally or from telnet), enter the tar -x <
iisv5migrationutility-apachesource.tar command. Then, in the temporary folder into which you
copied the .tar file, enter the perl install.pl command. Follow the screen instructions to select
the configuration file and turn on the source service.
When you have configured the source computer, install the target component from the
source to the target computer running Windows Server 2008 and IIS7. You must be logged
on to this computer as an administrator.
Open Microsoft Internet Explorer and connect to http://<source>/iismu/welcome.htm,
where <source> is either the computer name or the IPv4 address of the source computer.
The IIS Migration Wizard starts. Click Next and then click the link to the target platform.
Click Open to run the installer directly from the Web site. Alternatively, you can save the file
and run it later. When the installation of the target component is complete, you can return to
the IIS Migration Wizard in Internet Explorer and click Next to start a migration, or you can
close the wizard and carry out the migration later. Before you start the migration process,
Default Web Site must be configured and running.
After you install the source component and the target component, you can start the
migration process (assuming you chose to close it and migrate later) by selecting Microsoft
IIS v.5 Migration Wizard on the Programs menu. When the wizard starts, click Next. You will
see a message telling you that the IIS Migration Wizard has already been installed on your
computer. Click Next.
Click the option indicating that you have already installed the source software on your
source host, type the IPv4 address of the source host in the Computer text box, and then click
Next. You are prompted for the password you used to log on to the Apache server.
Open the root program folder for Apache and then type the name of the folder that
contains the configuration files in the Server Mask text box. (Typically, the configuration files
are in the Conf folder.) When you are prompted, select the server content, the settings, and
the MIME information that you migrate for each virtual server, and then click Next to start the
migration process.
The migration process takes from a few minutes to longer than an hour, depending on the
size of the Web site you are migrating. When the migration is complete, the wizard displays
a list of warnings and any additional steps necessary to complete the migration. To save the
activity log or the migration archive file that contains migrated content and settings, click the
appropriate link at the bottom of the wizard page. Click Finish.
6 6 8 CHAPTER 13 Confi guring a Web Services Infrastructure
EXAM TIP
The procedure for migrating a UNIX Web site is described for the benefi t of readers who
have Apache servers on their production network. The upgrade examinations are unlikely
to test this in detail. It is probably suffi cient for you to know that you can carry out such a
migration and that the IIS Migration Wizard is the tool you use.
Upgrading an IIS6 Web Site
If you upgrade a Windows Server 2003 Web server with IIS6 installed to a Windows Server
2008 Web server with IIS7 installed, Web sites on the server are supported and upgraded,
generally without user intervention. Any fi le system content not created or owned by
Windows remains intact through the upgrade process, and all Web content on the original
operating system remains present and supported after the upgrade. The process occurs in the
following stages:
n
Detect and gather During an operating system upgrade to Windows Server 2008,
IIS detection components run on the existing operating system before the operating
system upgrade begins. If IIS is detected on the existing Windows operating system, all
metabase and IIS state information is gathered.
n
Installation First the new operating system is installed and then server roles such as
Web Server install, provided that equivalent functionality was detected on the original
operating system. The choice of IIS updates to install is based on the IIS state informa-
tion gathered from the original operating system.
n
Apply settings After the OS installation and optional feature installations such as IIS7
have completed, the state information gathered from the original operating system
is applied. At this point, the metabase settings from the original IIS are translated and
updated into the new IIS7 confi guration store, ApplicationHost.confi g.
IIS 7.0 Components Installed During Upgrade
During the detect and gather phase, IIS upgrade checks for the presence of key IIS services
and fi les and installs the following IIS7 updates:
W3SVC (installed as a service), IS-ASP, IIS-BasicAuthentication, IIS-CGI, IIS-ClientCertifi cate-
MappingAuthentication, IIS-CustomLogging, IIS-DefaultDocument, IIS-DigestAuthentication,
IIS-DirectoryBrowsing, IIS-HttpCompressionDynamic, IIS-HttpCompressionStatic, IIS-Http Errors,
IIS-HTTPLogging, IIS-HttpRedirect, IIS-HttpTracing, IIS-IISCertifi cateMapping Authentication,
IIS-IPSecurity, IIS-ISAPIExtensions, IIS-ISAPIFilter, IIS-LegacyScripts, IIS-Logging Libraries,
IIS-ManagementScriptingTools, IIS-ManagementService, IIS-ODBCLogging, IIS-Request-
Filtering, IIS-RequestMonitor, IIS-ServerSideIncludes, IIS-StaticContent, IIS-URLAuthorization,
IIS- WindowsAuthentication, IIS-WMICompatibility, WAS-Confi gurationAPI, WAS-NetFx-
Environment, WAS-ProcessModel, MSFTPSVC (installed as a service), IIS-FTPServer, INETMGR.
EXE, IIS-FTPManagement, IIS-LegacySnapIn, IIS-Management Console, IISAdmin (installed
as a service), IIS-Metabase.
Lesson 2: Managing Web Sites CHAPTER 13 669
Because the installation of updates during an upgrade is not as granular as is possible in
an IIS7 clean installation, almost all Web Server features are installed during the upgrade.
Microsoft advises revisiting your application dependencies on IIS functionality and uninstall-
ing the IIS updates you do not need.
Quick Check
n
What tool should you download and use if you want to migrate a UNIX Web
site on an Apache server to IIS7?
Quick Check Answer
n
The IIS Migration Wizard
Using Virtual Directories
Often, a Web site needs to include content from folders that are located external to the Web
site’s primary folder structure. For example, multiple Web sites that share
a set of images
might need to access fi les from a single path. Virtual directories are designed to meet this
requirement. You can create virtual directories at either the Web site level or within a specifi c
Web application. A virtual directory includes an alias name (used in the requesting URL) and
points to a physical fi le path.
You can create a virtual directory in IIS Manager by right-clicking the appropriate parent
Web site or Web application and then selecting Add Virtual Directory. Provide security cre-
dentials, an alias for the virtual directory, and the physical path to the virtual directory. When
a user request for this alias is received, IIS7 looks in the appropriate fi le system location for
the requested content.
You can also create a virtual directory by using the appcmd.exe utility. For example, to cre-
ate a virtual directory called Illustrations on the Default Web Site and specify a physical path
D:\Illustrations on the Web server, enter the following command from the elevated command
prompt:
%systemroot%\system32\inetsrv\appcmd add vdir /app.name:"Default Web Site/" /path:/Illustrations /
physicalPath:D:\Illustrations
When you move the location of a virtual directory’s content in the fi le system, you must
also update the physical path in IIS7 to ensure that users can access the content of the virtual
directory. For example, the Windows Server 2008 Web Server Detroit hosts a Web application
named DemoClips within the TechVideos Web site, which in turn uses the virtual directory
with the physical path \\Detroit\MOV\Videos. Detroit is running out of hard disk space, and
you install a new server named Denver on the network and move the contents of the virtual
directory to the \\Denver\Movies\MOVData folder. You need to ensure that users can access
the contents of the
\\Denver\Movies\MOVData folder.
Because you must update the physical path in IIS7 to ensure users’ access to the content
of the virtual directory when you move the location of a virtual directory’s content in the fi le
Quick Check
n
What tool should you download and use if you want to migrate a UNIX Web
site on an Apache server to IIS7?
Quick Check Answer
n
The IIS Migration Wizard
Quick Check
670 CHAPTER 13 Confi guring a Web Services Infrastructure
system, you must change the path to the virtual directory’s content. You therefore run the
%systemroot%\system32\inetsrv\appcmd set vdir/ vdir.name:”TechVideos/MOV/Videos”
/physical path:\\Denver\Movies\MOVData command.
NOTE SETTING PERMISSION OPTIONS ON VIRTUAL DIRECTORIES
Because of the security settings in IIS7, generic ASP, ASP.NET, ISAPI, and CGI extensions
cannot execute unless the extension is explicitly enabled. For example, you add a Web site
to a Windows Server 2008 Web server that uses a virtual directory called MyVirtDir. The
virtual directory holds an ISAPI application. You test the Web site and the ISAPI application
fails. To confi gure the handler permission to enable the ISAPI application while fulfi lling the
policy permission requirements, you need to enable the Execute option on the MyVirtDir
virtual directory.
Using the World Wide Web Publishing Service
FTP and World Wide Web (WWW) sites depend on the relevant publishing services, which
present a number of functions and features that support IIS7 sites. The FTP Publishing Service
is discussed in Chapter 14, “Confi guring FTP and SMTP Services.” This chapter discusses the
IIS World Wide Web Publishing Service (W3SVC), sometimes known as the WWW Service.
This service manages the HTTP protocol and HTTP performance counters. To work correctly,
W3SVC must be free of any I/O errors involving fi le access, memory availability, and network
connections. In addition, scripts must be accessible and running, and included fi les must be
confi gured correctly.
W3SVC requires the WAS and the HTTP service to be working correctly; if the HTTP service
is not available, W3SVC cannot process HTTP requests. You can confi gure W3SVC to collect
performance data and to carry out HTTP compression, provided you specify a valid compres-
sion directory that resides on an NTFS volume.
W3SVC is a managed entity that includes the IIS Web site and ASP entities and contains
the following aspects:
n
ISAPI functionality ISAPI extensions and fi lters extend and modify the request-
processing capabilities of IIS. Although ISAPI fi lters can still be used in IIS7, it is easier
for developers to add managed or native modules that integrate into the modular
architecture of IIS7.
n
W3SVC logging You can confi gure an IIS7Web Server for site, central binary, or cen-
tral World Wide Web Consortium (W3C) logging. If you select central W3C logging, all
client requests for all sites are logged to a single log fi le in W3C centralized format on
the server. Central binary logging also logs all sites centrally to a single fi le but does so
in centralized binary format. If you specify site logging, all client requests are logged at
the site level rather than centrally at the server level.
n
W3SVC module confi guration IIS7 enables developers to easily confi gure native
and managed code modules that process requests made to the Web server. Module
NOTE
SETTING PERMISSION OPTIONS ON VIRTUAL DIRECTORIES
Because of the security settings in IIS7, generic ASP, ASP.NET, ISAPI, and CGI extensions
cannot execute unless the extension is explicitly enabled. For example, you add a Web site
to a Windows Server 2008 Web server that uses a virtual directory called MyVirtDir. The
virtual directory holds an ISAPI application. You test the Web site and the ISAPI application
fails. To confi gure the handler permission to enable the ISAPI application while fulfi lling the
policy permission requirements, you need to enable the Execute option on the MyVirtDir
virtual directory.
Lesson 2: Managing Web Sites CHAPTER 13 671
confi guration requires you to specify a unique name and a valid type or path for the
module. With managed modules, you can specify whether they should be invoked only
for requests to ASP.NET applications or managed handlers. This setting can optimize
performance.
n
W3SVC performance counters W3SVC enables HTTP-specifi c performance counters
for Web sites. It initializes the counters and receives them from HTTP.sys, the proto-
col listener for HTTP. If W3SVC is not available, you cannot gather HTTP performance
counter data
.
Disabling Directory Browsing
A
problem that sometimes occurs when you publish and deploy a new Web site
is that it looks like an FTP download site. Instead of presenting their content,
fi les such as default.htm are listed as hyperlinks for downloading. In this case, you
must present the content through HTTP and disable directory browsing to ensure
that users do not download fi les.
To do this, set up the Web site to present the content through HTTP. Then use the
appcmd.exe command-line utility from an elevated command prompt to ensure that
the fi les, for example, .jpg fi les that display illustrations, perform the functions they
should perform rather than appearing as fi le names on a download list.
To carry out these tasks, fi rst match the Web page fi le to the Web site by confi gur-
ing the Default Document setting in IIS Manager. Enter the %systemroot%
\system32\inetsrv\appcmd set confi g/section: directoryBrowse/enabled: false
command from an elevated command prompt. This command disables directory
browsing on the Web site.
You can obtain more information about the Default Document setting by accessing
You can obtain more infor-
mation about the appcmd utility by accessing />/getting-started-with-appcmdexe/.
Using the Command Line
Rather than use a graphics tool such as IIS Manager, you can perform most Web site and
Web application creation, deletion, and confi guration operations from an elevated command
prompt. This is especially useful in Server Core installations. The command-line utilities you
use are the servermanagercmd.exe Server Manager command-line tool and the appcmd.exe
utility.
Disabling Directory Browsing
A
problem that sometimes occurs when you publish and deploy a new Web site
is that it looks like an FTP download site. Instead of presenting their content,
fi les such as default.htm are listed as hyperlinks for downloading. In this case, you
must present the content through HTTP and disable directory browsing to ensure
that users do not download fi les.
To do this, set up the Web site to present the content through HTTP. Then use the
appcmd.exe
command-line utility from an elevated command prompt to ensure that
the fi les, for example, .jpg fi les that display illustrations, perform the functions they
should perform rather than appearing as fi le names on a download list.
To carry out these tasks, fi rst match the Web page fi le to the Web site by confi gur-
ing the Default Document setting in IIS Manager. Enter the
%systemroot%
\system32\inetsrv\appcmd set confi g/section: directoryBrowse/enabled: false
command from an elevated command prompt. This command disables directory
browsing on the Web site.
You can obtain more information about the Default Document setting by accessing
/> /> You can obtain more infor-
mation about the
appcmd
utility by accessing
appcmd utility by accessing appcmd
/>/getting-started-with-appcmdexe/
/getting-started-with-appcmdexe/./getting-started-with-appcmdexe/
6 7 2 CHAPTER 13 Confi guring a Web Services Infrastructure
Server Manager Commands
You can use the Server Manager command-line tool from the elevated command prompt
to install or remove roles, role services, and features. The options associated with the server-
managercmd.exe utility enable users to view logs and run queries to display lists of roles, role
services, and features that are both installed and available for installation on a computer.
MORE INFO SERVERMANAGERCMD ANSWER FILE
You can use Servermanagercmd.exe with an XML answer fi le to expedite repetitive au-
tomated installations or removals of roles or features. For more information about the
answer fi le that you can use with servermanagercmd.exe, see
/en-us/library/cc766357.aspx.
Servermanagercmd accepts parameters that install or remove a role, role service, or
feature. When you want to install or remove more than one role, role service, or feature on a
server by using a single command instance, you can use an XML answer fi le.
The command can take the -query (-q), -logpath, -inputpath (-p), -install, -remove, -help,
and -version parameters. You can use role, role service, and feature command identifi ers to
specify entities you want to install or remove. For example, the following command installs
Web Server (IIS) and all its role services; under the context of the administrator, it exports the
results of the installation to an XML fi le called MyWebServer.xml, and it restarts the computer
automatically when installation is complete.
servermanagercmd.exe -install web-server -allsubfeatures -resultpath C:\Admin\MyWebServer.xml -restart
MORE INFO SERVERMANAGERCMD.EXE
For more information about the servermanagercmd.exe utility, see rosoft
.com/en-us/library/cc722408.aspx and follow the links.
The Appcmd.exe Utility
Appmd.exe is the principal command-line tool for managing IIS7. It enables you to control a
Web server without using graphical administration tools and to automate server manage-
ment tasks without writing code. You can do the following with appcmd:
n
Create and confi gure sites, Web applications, application pools, and virtual directories.
n
Start and stop sites and recycle application pools.
n
List running worker processes and examine currently executing requests.
n
Search, manipulate, export, and import IIS7 and ASP.NET confi guration.
The appcmd.exe utility uses a set of top-level server management objects such as Site and
Application. You can use appcmd to perform actions on those objects and expose properties
that can be inspected and manipulated.
MORE INFO
SERVERMANAGERCMD
ANSWER FILE
You can use
Servermanagercmd.exe
with an XML answer fi le to expedite repetitive au-
tomated installations or removals of roles or features. For more information about the
answer fi le that you can use with
servermanagercmd.exe
, see
/en-us/library/cc766357.aspx
.
/en-us/library/cc766357.aspx./en-us/library/cc766357.aspx
MORE INFO
SERVERMANAGERCMD.EXE
For more information about the
servermanagercmd.exe
utility, see
rosoft
.com/en-us/library/cc722408.aspx
and follow the links.
.com/en-us/library/cc722408.aspx and follow the links com/en-us/library/cc722408.aspx
Lesson 2: Managing Web Sites CHAPTER 13 673
For example, the Site object enables you to list, create, and delete site instances and stop
and start sites. Each site instance contains properties, such as site name and site ID, that can
be inspected, searched for, or set. The output of each command is always a list of object
instances.
NOTE SPECIFY THE PATH TO APPCMD.EXE
Appcmd.exe is located in the %systemroot%\system32\inetsrv\ directory. Because it is
not part of the PATH automatically, you must use the full path to the executable when
executing commands, for example, %systemroot%\system32\inetsrv\appcmd.exe list sites.
Alternatively, you can add the inetsrv directory to the path on your machine so that you
can access appcmd.exe directly from any location.
Appcmd executes a command on one of the supported management objects, with
optional parameters used to further customize the behavior of the command. The command
syntax is as follows:
appcmd (command) (object-type) <identifier> < /parameter1:value1 >
Most objects support the following basic set of commands:
n
List Displays the objects on the machine. An optional object ID can specify a unique
object, or one or more parameters can be matched against object properties.
n
Add Creates a new object and sets the specifi ed object properties during creation.
n
Delete Deletes the specifi ed object.
n
Set Sets the specifi ed parameters on an object.
An object often supports additional commands; for example, the Site object supports Start
and Stop. Table 13-1 lists the management objects and the purpose for which each is used.
TABLE 13-1 Management Objects Used by Appcmd
OBJECT PURPOSE
Site Administration of virtual sites
App Administration of applications
VDir Administration of virtual directories
Apppool Administration of application pools
C o n fi g Administration of general confi guration sections
Backup Management of server confi guration backups
WP Administration of worker processes
Request Display of active HTTP requests
Module Administration of server modules
Trace Management of server trace logs
NOTE
SPECIFY THE PATH TO
NOTE SPECIFY THE PATH TO NOTE
APPCMD.EXE
Appcmd.exe
is located in the %systemroot%\system32\inetsrv\ directory. Because it is
not part of the PATH automatically, you must use the full path to the executable when
executing commands, for example,
%systemroot%\system32\inetsrv\appcmd.exe list sites
.
Alternatively, you can add the inetsrv directory to the path on your machine so that you
can access
appcmd.exe
directly from any location.
6 7 4 CHAPTER 13 Confi guring a Web Services Infrastructure
For example, to list all the sites on a Web server, enter the following command:
%systemroot%\system32\inetsrv\appcmd list sites
To give a slightly more complex example, the Windows Server 2008 Web server Boston in
the tailspintoys.com domain hosts the www.tailspinstoys.com Web site. You want to create a
virtual directory called Marketing with a physical path of C:\websites\marketing and access
this through To do this, use the following command:
%systemroot%\system32\inetsrv\appcmd add vdir /app.name:tailspintoys /path:/marketing
/physicalPath:c:\websites\marketing
More examples of the use of the appcmd.exe utility are given at the appropriate points in
this chapter.
MORE INFO APPCMD.EXE
For more information about the appcmd.exe utility, see />/library/cc772200.aspx and follow the links.
PracticE Creating Virtual Directories
In this practice, you use IIS Manager and appcmd.exe to create virtual directories. If your Glas-
gow computer has more than one hard disk, consider placing the directories on the second
hard disk. If so, amend the procedures accordingly. The practice assumes that IIS7 has default
settings for Default Web Site.
ExErcisE 1 Set Up Virtual Directory Content
In this exercise, you create paths to two virtual directories, VirD1 and VirD2, and create default
pages that identify the virtual directories.
1. Log on to the Glasgow domain controller with the Kim_Akers account.
2. Create a folder named C:\Vdirs.
3. Create folders named C:\Vdirs\VirD1 and C:\Vdirs\VirD2.
4. Open Windows Notepad.
5. Type a message to identify VirD1 and save this as default.htm in C:\Vdirs\VirD1, as
shown in Figure 13-14.
MORE INFO
APPCMD.EXE
For more information about the
appcmd.exe
utility, see
/>/library/cc772200.aspx
and follow the links.
Lesson 2: Managing Web Sites CHAPTER 13 675
FIGURE 13-14 Message identifying VirD1.
6. Repeat the previous step but change the text to This is the second virtual directory.
Save the file as default.htm in C:\Vdirs\VirD2.
ExErcisE 2 Create a Virtual Directory Using IIS Manager
In this exercise, you use IIS Manager create the VirD1 virtual directory on the Default Web
Site. Complete Exercise 1 before carrying out this exercise.
1. If necessary, log on to the Glasgow domain controller, using the Kim_Akers account.
2. In the Administrative Tools menu, select Internet Information Server (IIS) Manager.
3. In IIS Manager, right-click Default Web Site and select Add Virtual Directory, as shown
in Figure 13-15.
FIGURE 13-15 Adding a virtual directory.