Manga Studio For Dummies phần 8 pps
Bạn đang xem bản rút gọn của tài liệu. Xem và tải ngay bản đầy đủ của tài liệu tại đây (1.11 MB, 39 trang )
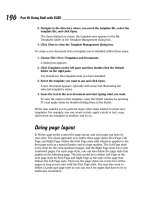
6. Select what parts of the page you want printed in the Output Data
Settings section.
You can select by not only layer type, but also by output attribute. This
is where it’s good you set your drawing layers to be either Finish or
Sketch. (Flip to Chapter 6 for the details on layers.)
You have the following options to choose from. (Keep in mind that you
can select multiple options in this section.)
•
Output Sketch Image: Any image layers where the output attribute
is set to Sketch.
•
Output Sketch: Any sketch layers you imported onto the page. (See
Chapter 5 if you aren’t sure what I mean.)
•
Output Finished Image: Any image layers where the output attribute
is set to Finish.
•
Output Text: Any text layers on the page.
•
Output Tone: Any tone layers on the page.
EX users can also fine-tune the Raster and Tone Settings, which are
explained in further detail in the “Additional Print and Export Settings”
section of the chapter.
7. Select any additional information you’d like printed in the Page
Settings section:
• Output Print Guide: The area of the print guide that delineates the
bleed area and page edge is printed. This option is available only
if you’re planning on printing the entire page.
•
Output Basic Frame: The area of the print guide that designates the
safe area of the page (the area that is safest from being trimmed
when prepping for the final book) is printed.
•
Output Grid: The Grid Layer overlays the artwork when printed.
•
Output Pagination: If you’re printing a page within a story file, the
user-formatted page number is printed. (Check out Chapter 4 for
more information on how to paginate your story.)
•
Output Page Number: If you’re printing a page within a story file, the
page number is printed in an area of your choosing on the paper.
•
Output Title/Episode/Author: If you’re working from a story file and
fill in the requisite information, the title, episode number, and
author are printed in an area of your choosing on the paper.
8. If you use Manga Studio EX, select any other special settings you’d like
for your page in the Special Settings section:
• Rotate 90 Degrees: The paper the page is printed on is rotated 90
degrees from vertical (Portrait mode) to horizontal (Landscape
mode). The artwork’s orientation remains the same. (That is, it
stays vertical.)
255
Chapter 13: Printing and Exporting
19_129869 ch13.qxp 11/29/07 12:02 PM Page 255
• Page Format/Split and Print: If you’re looking to print a page that’s
larger than the paper available, you can choose to have the image
span over more than one page (up to four pages). Simply select the
Page Format check box and select the number of pages you want
to use from the Split and Print drop-down list.
If you’re printing a story file, only the Split and Print drop-down list is
shown.
9. Click OK to exit.
If you’re using Manga Studio EX, you can optionally click the Print
button, which starts the printing process.
10. When you’re happy with the page settings, choose File➪Print from the
main menu.
This brings you back to the Printer Setup dialog box you saw back in Step
1. If you made changes to the printer setup back then, you can simply
click the OK button to begin printing. If you didn’t and aren’t sure what
are the best settings, check out the “Optimal Settings for Your Work”
section, later in this chapter.
Exporting Your Work to an External File
Whether it’s to send to friends or family, to post on the World Wide Web,
or to colorize in Photoshop, sometimes you need to save your work in a file
format that isn’t Manga Studio-exclusive. Fortunately, you have that option.
Using the Export function, you can export your work to one of several
common image file formats, including the Photoshop PSD file. Even more,
you can choose to export by either physical size (in centimeters) and resolu-
tion or by pixel size. Each has its own advantages over the other, depending
on the medium you’re looking to use the image. The good news is that both
methods of exporting files are practically identical to work with.
To export a page or story to a file, follow these steps:
1. From the main menu, choose either File➪Export➪Export by Pixel
Specification or File
➪Export➪Export by Size Specification.
Both types share the same kind of dialog box (shown in Figure 13-3), so to
save time and words, I’m going to combine explanations. If there are any
differences between the two, I’ll point them out. (Granted, there’s really
only one difference between them, and I bet you can guess what it is.)
256
Part III: Refining and Exporting Your Work
19_129869 ch13.qxp 11/29/07 12:02 PM Page 256
2. Enter the size of the page you want to export in the Output Image Size
section.
This section has several text boxes that you can use to set the size of the
image, either in pixels or in centimeters. Three of them (Width, Height,
and Pixel Ratio to Original) are locked to each other; so, you can adjust
the value of any one of them, and the other two adjust automatically.
The only one that’s independent of the others is the Resolution drop-
down list. When exporting by size specification, choosing the right resolu-
tion depends on what you’re planning on doing with the file. Check out
the “Optimal Settings for Your Work” section, later in this chapter, to find
out which resolution is best for you.
When exporting by pixel size, the resolution you choose actually doesn’t
matter, as a file exported at 72 dpi is the same size as one exported at
1200 dpi. So, you can ignore the Resolution drop-down list if you want.
3. If you’re a Manga Studio EX user working off of a two-page spread,
select which page (or both) you want printed.
If you want to print out that wild two-page battle scene you concocted,
you can select the Left Page or Right Page option button to export each
page separately, or you can select the Dual Page option button to export
both pages together on a single page.
Figure 13-3:
The Export
Image
dialog box
(exporting
by pixel size,
Debut
version).
257
Chapter 13: Printing and Exporting
19_129869 ch13.qxp 11/29/07 12:02 PM Page 257
You should keep in mind that if you choose to export the whole spread
on one page, it will be smaller, and you may need to rotate the image.
4. Select how much of the page you want exported in the Output Area
section:
• Image within Print Guide: Only the main image is exported. Anything
beyond artwork from the bleed area and beyond is ignored.
•
Include Bleed: The image up to the edge of the bleed is exported.
Anything drawn beyond the bleed is ignored.
•
Entire Page: Everything drawn on the page is exported.
•
Selection Only: Anything you select with the Rectangular Marquee
tool is exported. Anything beyond the selection is ignored. If you
haven’t selected anything, this option is unavailable.
5. Select an option in the Output Color Depth section.
You really have only two choices here: RGB Color and Monochrome.
Select one or the other from their respective radio buttons.
If you’re planning on exporting the page as a JPG or PNG file for the Web,
I highly suggest selecting RGB Color. This will produce much better-qual-
ity inks and screentones (or gray colors) on a smaller-sized page than if
you select Monochrome.
6. Select what parts of the page you want printed in the Output Data
Settings section.
You can select your output settings by not only layer type, but also by
output attribute. This is where it’s good you set your drawing layers to
be either Finish or Sketch (if you read Chapter 6, that is).
You have the following options to choose from. (Keep in mind that you
can select multiple options in this section.)
•
Output Sketch Image: Any image layers where the output attribute
is set to Sketch.
•
Output Sketch: Any sketch layers you imported onto the page. (See
Chapter 4 if you aren’t sure what I mean.)
•
Output Finished Image: Any image layers where the output attribute
is set to Finish.
•
Output Text: Any text layers on the page.
•
Output Tone: Any tone layers on the page.
EX users can also fine-tune the Raster and Tone Settings, which are
explained in further detail in the “Additional Print and Export Settings”
section of the chapter.
7. Select any additional information you’d like printed in the Page
Settings section:
258
Part III: Refining and Exporting Your Work
19_129869 ch13.qxp 11/29/07 12:02 PM Page 258
• Output Print Guide: The area of the Print Guide that delineates the
bleed area and page edge will be included on the exported page.
This option is available only if you’re planning on printing the
entire page. (It is grayed out otherwise.)
•
Output Basic Frame: The area of the print guide that designates the
safe area of the page (the area that is safest from being trimmed
when prepping for the final book).
•
Output Grid: The Grid Layer overlays the artwork when exported.
•
Output Pagination: If you’re exporting a page within a story file, the
user-formatted page number is exported. (Check out Chapter 4 for
more information on how to paginate your story.)
•
Output Page Number: If you’re exporting a story file, the page
number appears in the image.
•
Output Title/Episode/Author: If you’re working from a story file and
fill in the requisite information, the title, episode number, and
author appear in the image.
8. If you’re planning on saving the page as a Photoshop (PSD) file, select
how you want your page saved in the Photoshop File Export Settings
section:
• Export Merged Layer Only: Only layers that have been merged are
exported.
•
Use Layer Set: If you have nested Image Layer folders (that is, fold-
ers that are stored within other folders), you can maintain that file
structure in an exported Photoshop file. You can have as many
Layer folders as you want, but Manga Studio lets you export
nested folders up to only five layers deep. (Any folders nested
deeper are merged into the fifth layer.)
This feature is good only for users of Photoshop CS or later; earlier
versions don’t support nested folders and treat them (and image
layers within them) as image layers and place them within the
top-most layer folder.
9. Click OK when you’re done.
10. When the Save As dialog box appears, enter a name for your page in
the File Name text box.
11. Choose the type of file you want created from the Save As Type drop-
down list.
You can export the page as a BMP, JPG, or PSD file. (EX users can also
export as a PNG or TGA file.) For more information about which file type
to choose, see the “Optimal Settings for Your Work” section, later in this
chapter.
12. Click OK when done.
259
Chapter 13: Printing and Exporting
19_129869 ch13.qxp 11/29/07 12:02 PM Page 259
Additional Print and Export Settings
You may have noticed in the earlier steps in the “Printing Your Work” and
“Exporting Your Work to an External File” sections that I ignore a set of but-
tons on the right side of the Print Setup and Export Image dialog boxes.
You can use those buttons (or button, if you’re a Debut user) to make some
additional tweaks to the final display of your pages. I don’t know if I would
say these functions will make any
vital adjustments to your work. However,
you may find that they can add just the right touch to make your work look
that much better.
Color settings
The Advanced Settings dialog box (shown in Figure 13-4) gives you the option
to change the color options of your text and imported sketch images, as well
as any story information and guides you want included on the page.
You have three options to choose from for each object type (though some
provide only two options):
ߜ Layer Color: The object type retains the original color information. If you
want the exported file to look like you currently have it set on the page,
this is the option to use. (This is also the Default option, so technically
you don’t need to make any adjustments.)
ߜ Cyan: The object type is displayed in cyan. This option can be useful if
you want to visually separate certain objects (such as the title and
author info or the page number) from the artwork.
ߜ Black: The object type is displayed in black. This option can be useful if
you want to force certain objects (such as the text on the page or the
print guide) to be black on the exported file.
Figure 13-4:
The
Advanced
Settings
dialog box.
260
Part III: Refining and Exporting Your Work
19_129869 ch13.qxp 11/29/07 12:02 PM Page 260
Raster settings
A Manga Studio EX function, the Detailed Raster Settings dialog box (shown
in Figure 13-5) lets you adjust how layers set to 8-bit with no color subtrac-
tion (gray layers) are printed or exported.
There are two options to choose from in this section:
ߜ Conform to the Layer Settings: The gray layer settings remain as they are.
ߜ Subtract Color Using the Settings Below: This option allows you to
change how gray layers are displayed in the final exported image.
•
Subtractive Method: You can convert the display settings for the gray
layers by selecting from the drop-down list. (It doesn’t subtract
colors, Threshold, Dither, or Convert to Tone.)
•
Threshold: If you select the Threshold Subtractive Method, you can
set the threshold level by entering a value between 0 and 255 in its
numeric field.
Tone settings
A Manga Studio EX function, the Detailed Tone Settings dialog box (shown in
Figure 13-6) adjusts how the tone layers display either when printed or when
exported to a file.
Figure 13-6:
The Detailed
Tone
Settings
dialog box.
Figure 13-5:
The Detailed
Raster
Settings
dialog box.
261
Chapter 13: Printing and Exporting
19_129869 ch13.qxp 11/29/07 12:02 PM Page 261
ߜ The Density Settings section adjusts the thickness of the tone dots.
To adjust the density of either the White or Black tones you have on the
page, follow these steps:
1. Select the check box of the tone you wish to adjust (the Black Tone or
the White Tone check box).
2. Enter a value between -20% (to increase density) and 20% (to
decrease density) in its respective text box.
ߜ The Output Settings section adjusts how the tones are displayed when
printed.
In this section, you can choose to:
•
Conform to the Layer Settings: All tone layers remain as they are,
depending on how you set them in the Layer Properties palette.
(See Chapter 11.)
•
Output All in Gray: All tone layers are displayed as gray layers,
regardless of what you set in the Tone Properties.
•
Output All in Tone: All tone layers are displayed as screen tones,
regardless of what you set in the Layer Properties palette. (See
Chapter 11.)
ߜ The Set Number of Lines section adjusts how the tones are printed or
exported.
You have two options to choose from in this section:
•
Conform to the Layer Settings: The Tone Layer properties remain
the same regardless of how large or small you make the page. This
means that a tone layer will retain the same size and shape if it’s
700 pixels wide or 3000 pixels wide.
•
Adjust According to Output Resolution: The Tone Layers adjust
relative to the size of the page being printed or exported.
Optimal Settings for Your Work
Sadly, it isn’t enough to simply print or export the file and be done with it.
You need to make sure that the settings you’ve adjusted are the right ones for
the medium. Otherwise, you could end up with poor-quality pages, and that’s
not going to please any of your readers.
Tips for exporting for the Web
It can be tricky to get your work to look the way you want it to in a Web-
compatible format. When I started using Manga Studio and tried to export
262
Part III: Refining and Exporting Your Work
19_129869 ch13.qxp 11/29/07 12:02 PM Page 262
for the Web, I ended up with pages that flat-out looked terrible; either the
lines were too jagged or the tones weren’t coming out how I wanted them. It
was certainly frustrating at first to get things to look how I wanted them to.
So, to save yourself the initial headaches I went through, here are some
suggestions for what I think are the best settings for creating a file for
the Web:
ߜ Export your file by pixel size by choosing File➪Export➪Export by
Pixel Specification.
Unlike the physical world, where images are measured in centimeters or
inches, on your computer monitor, images (and most everything else)
are measured in
pixels (dots on the screen). So, to avoid confusion about
what size and resolution you want for the computer screen, work with
the units of measurement that matter digitally.
ߜ Keep the file size as small as possible.
While the percentage of people using broadband Internet connections is
growing, there are still a good number of users in the United States that
don’t have broadband Internet connections. So, you’re not going to win
any fans from the dialup camp if you create a file that’s more than 500K
in size.
Manga Studio does a pretty good job optimizing the exported file. Still,
you should be mindful of the file size and be prepared to reduce the
physical size of the page (while still maintaining quality and legibility,
of course) to reduce the number a bit.
ߜ Save your exported file as a JPG file.
Web browsers these days can read only a handful of image types. You
can export your work to two of those types: BMP and JPG (and PNG if
you own Manga Studio EX).
ߜ Save your exported file in RGB color.
When you’re working on a file that’s full size and is eventually going to
be put in a book (either by yourself or a printing company), you want to
use monochrome, as it produces the sharpest lines and tones possible.
However, when you’re exporting a file to be shown on the Web (which
needs to be shrunk down from its original size), exporting in monochrome
actually hurts the quality of the line, which you can see in Figure 13-7 on
the left.
What exporting the file as an RGB file does is add some anti-aliasing to
the lines and tones (adding shades of gray to soften them slightly), which
helps the artwork shrink down to Web size while basically maintaining
the same quality as the full-size image (which you can see in Figure 13-7
on the right).
263
Chapter 13: Printing and Exporting
19_129869 ch13.qxp 11/29/07 12:02 PM Page 263
ߜ Avoid making a page larger than the monitor’s width.
This is a tricky one, as most people have their monitors set up differently.
The average user’s display resolution is 1024 pixels by 768 pixels (1024 x
768), although some people still prefer to use 800 x 600. The point is, you
really don’t have a clue who’s reading your comic at what resolution, so,
you should prepare your page for the lowest resolution.
What you consider the lowest resolution is up to you. For example,
some have sworn off 800 x 600 entirely and have set 1024 x 768 as the
lowest resolution to read their webcomic. Whatever you decide to be
the lowest resolution, the thing that you have to make absolutely sure
is that the page you create fits within that resolution’s width (and also
the dimensions of the web page design, should you decide to include
navigation and/or advertisements along the sides of the page). Unless
the page is designed to read that way, you don’t want the reader to
scroll horizontally. It’s just going to irritate them if they have to scroll
along two axes to read your page.
Personally, I suggest having an image no larger than 650-700 pixels, as
it’s a good compromise of page dimensions on the screen, as well as the
size of the file itself (which means it will load faster on the Web site for
the reader).
Tips for printing (locally or professionally)
I think when you either print your own comics or have them done profession-
ally, you want any judgments on your work to be based on your own artistic
merits, not on a technical glitch or bad print job. I’ve flipped through many
Figure 13-7:
The
difference
between
RGB color
(left) and
Monochrome
(right) can be
pretty drastic
when
exporting for
the Web.
264
Part III: Refining and Exporting Your Work
19_129869 ch13.qxp 11/29/07 12:02 PM Page 264
books from small press and self-publishers over the years, and more than a
few times I’ve been taken out of the story because they produced some
extremely shoddy prints of their art work.
Taking your reader out of the experience is,
I think, the kiss of death for any
repeat patronage. While it’s extremely important to have a gripping story,
you need to keep in mind that comics and manga are a visual medium. So,
you need to make sure that the pages you print or have printed for you are as
professional-looking as possible.
The good news is that Manga Studio tries to make creating the best-quality
prints and images you can get as foolproof as possible. That said, things can
still get messed up if you don’t have the correct settings. So, the following two
lists provide tips that I think are helpful, along with suggestions to ensure that
your work is accurately represented, whether you print the pages on your
own desktop printer or use a professional printing service.
Getting the best prints with your desktop printer
If you’re printing your pages on a desktop printer (such as an inkjet or laser
printer), keep these tips in mind:
ߜ When you first create your new page or story file, make sure the
resolution is at a minimum of 300 dpi.
Optimally, the higher the resolution, the smoother and crisper the line
work is on the page. But not everyone has a fast enough system to work
at 1200 dpi. So, you should try to work at a minimum of 300 dpi, as it’s
the lowest resolution to work at before the quality of your line work
begins to take a hit.
ߜ Keep in mind the size of the book you want to create.
It isn’t going to do you much good if you’re creating a book that’s going
to be larger than the 8.5-x-11-inch standard printing paper you have
available. You may need to go to your local print shop if you’re looking
to create a large-format comic.
ߜ When printing, set the highest ink quality for your printer (and use
black ink only if you’re printing a black-and-white manga).
ߜ If your comic is black and white, save or print your file in monochrome.
ߜ When printing, match your printer’s resolution to the page resolution.
This helps to keep things consistent between your page and the printer.
Getting the best results from a professional printing service
If you’re exporting files to send them to a professional printing service (local
or out-of-town) to be printed, keep these tips in mind:
265
Chapter 13: Printing and Exporting
19_129869 ch13.qxp 11/29/07 12:02 PM Page 265
ߜ Don’t be afraid to shop around and ask questions.
If you have only one print shop in town, your choices are going to be
more limited than those who have a couple shops to select from. Still,
it never hurts to find out more information on the print shop (or shops)
you’re considering using to print your comic.
Try to talk to them over the phone or pay them a visit in person. This
way, you can get a good grasp on their process, what they can or can’t
do, and what you’ll need to provide to make the process easier for both
you and them (aside from the pages themselves). Plus, you can find out
better which shop will best fit what you need or want.
Above all else, don’t be afraid to ask questions. If this is the first time
you’ve ever done this and you aren’t sure exactly what to do, they may
be able to provide suggestions you never thought of before. It may save
you a lot of time, headache, and money in the long run.
ߜ Find out the print shop’s requirements for file specifications and
adjust your export settings to match.
To make sure that you and your printer are on the same page (no pun
intended), it’s good to find out exactly what requirements the printer
has for your work to look its best. This may include the minimum
requirements for file resolution (at least 300 dpi, for example) or how
large they’d like the bleed area to be. (See Chapter 1 if you don’t know
what the bleed area of the page is.)
ߜ When sending files out to be professionally printed, make sure you
save the
entire page (including print guide) in the file.
The print shop needs to know what areas of your pages are important
and what they can trim from the final product. So, printing the print
guide along with your artwork helps them avoid accidentally cutting off
a vital part of the page.
If you’ve drawn outside of the safe area of your page, you want to make
sure that the Basic Frame is deselected from the Print or Export Setup
dialog boxes, unless you want that printed in the middle of your page.
266
Part III: Refining and Exporting Your Work
19_129869 ch13.qxp 11/29/07 12:02 PM Page 266
Part IV
Advanced Tips
and Tricks
20_129869 pt04.qxp 11/29/07 12:02 PM Page 267
In this part . . .
I
f you’ve already looked through the first three parts of
this book, you have a pretty good grasp of what you
can do with Manga Studio. Or do you?
This part is all about the more advanced tips, tricks, and
functions in Manga Studio, with a heavy emphasis on the
EX version of the program.
Chapter 14 covers advanced features of both Manga Studio
Debut and EX, while Chapter 15 focuses on the many
exclusive EX tools that help make things just that much
easier for you.
This part shows you what you can
really do with Manga
Studio!
20_129869 pt04.qxp 11/29/07 12:02 PM Page 268
Chapter 14
General Tips, Tricks,
and Shortcuts
In This Chapter
ᮣ Tweaking the program preferences
ᮣ Adjusting the Drawing tool’s advanced settings
ᮣ Creating your own custom brushes
ᮣ Removing tones with drawing tools
ᮣ Creating custom tone patterns
ᮣ Coloring your work
ᮣ Using the focus line, speed line, and vanishing point filters
I
f you’re reading this chapter, odds are you’ve either worked through all
the basics covered earlier this book and you’re looking to see what else
you can do with Manga Studio. If that’s the case, you’re gong to be pleased,
as I really only scratched the surface of what you can do with the program
in Chapters 1–13.
For users of both Manga Studio Debut and EX, this is a good chapter to start
learning some of the more advanced functions and tricks of the program, as
it covers everything that both programs can do. Granted, EX users have even
more functions to learn than Debut, and I cover those in the next chapter.
But, everyone has to start
somewhere.
System Preferences Tips
Here’s some good news for those that like to tweak program settings: You
aren’t married to the default system preferences of Manga Studio. You can
adjust parts of the program to best suit your needs. These can range from
21_129869 ch14.qxp 11/29/07 12:02 PM Page 269
changing the computer’s memory allocation to the system to changing the
color of your rulers. All of this is located in the Preferences dialog box,
accessible from the main menu by choosing File
➪Preferences.
It would take way too many pages to cover every single option in the
Preferences dialog box, so instead I go over some of what I think are the
important performance and comfort tweaks you can set to help make your
experience with Manga Studio just that much more enjoyable.
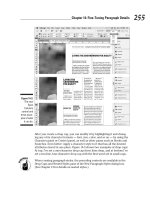
Increasing the display quality
By default, Manga Studio has the page display set at a standard quality.
However, if you have a strong enough system (and really, you’d need a pretty
weak system for this not to work well), you can increase the display quality a
bit so that lines don’t look quite as jagged as you rotate a page.
On the Page tab of the Preferences dialog box, shown in Figure 14-1, the first
option you see is the Display Quality drop-down list. When you click the list,
you see three options (Standard, High, and Maximum). Try each of them out
and see how your system likes the adjustments.
You don’t see any major difference in quality when the page is in its normal
(zero-degree) position. The only time you see any difference is when you use
the Rotate tool to turn the page as you work. As you can see in Figure 14-2,
the differences are slight, but you might find it more comfortable to work at
High or Maximum quality than at Standard.
Figure 14-1:
Check out
the Page
menu in the
system
Preferences
to change
the display
quality.
270
Part IV: Advanced Tips and Tricks
21_129869 ch14.qxp 11/29/07 12:02 PM Page 270
Changing the Drawing tool’s cursor
If you aren’t happy with the default cursors for your drawing tools, don’t use
them! Manga Studio provides several different cursors that you can use in
place of what the Pen, Pencil, Marker, Eraser, Airbrush, and Pattern Brush
tools offer initially.
Follow these steps to change the cursors:
1. Choose File➪Preferences; in the Preferences dialog box, click the +
to expand the Page tree on the left and select Cursor (as shown in
Figure 14-3).
2. From the Tool drop-down list, select the drawing tool you wish to
change.
3. From the Select Cursor drop-down list, select the cursor you wish to
use in place of the default one.
You can see the cursor options available to you in Figure 14-4.
4. Repeat as necessary for the other tools in the list.
5. Click OK when you’re done.
Rotated page at
standard quality
Rotated page at
maximum quality
Figure 14-2:
Use the
Rotate tool
to best see
differences
in display
quality.
271
Chapter 14: General Tips, Tricks, and Shortcuts
21_129869 ch14.qxp 11/29/07 12:02 PM Page 271
Maximizing your undos
I do say earlier in the book to be careful to not become too dependent on the
Undo function, as it can result in you tweaking your page more than is proba-
bly necessary. That said, it never hurts to maximize the number of undos
available, just in case.
To change the number of undos, follow these steps:
1. Choose File➪Preferences; in the Preferences dialog box, click the +
to expand the Page menu tree and select the Undo menu.
Default
Tool
Cursor
Arrow
Dot
Cross Sniper Brush size
Figure 14-4:
You have
several
cursor
options
available in
place of the
default ones
for your
drawing
tools.
Figure 14-3:
Use the
Cursor tab
to change
the default
cursors.
272
Part IV: Advanced Tips and Tricks
21_129869 ch14.qxp 11/29/07 12:02 PM Page 272
2. Enter a value between 1 and 20 in the Undo Levels text box.
If you’re looking to maximize the number of undos, enter 20.
3. Click OK when you’re done.
Changing your default layer settings
If you find yourself constantly changing the settings of any new layers you
create, it’s safe to say you aren’t too happy with the default settings.
Changing those settings is easy to do in Manga Studio.
To change the default layer settings, follow these steps:
1. Choose File➪Preferences; in the Preferences dialog box, select Layer
palette on the left. (See Figure 14-5.)
2. If you want to simply change the layer type, select a new layer type
from its respective drop-down list.
3. To change all of the default layer settings, click the Default Options
button.
The Layer Properties dialog box appears, as shown in Figure 14-6.
4. (Optional) Enter a name for the layer in the Layer Name text box.
Figure 14-5:
You can
change the
default layer
settings
from the
Layer
palette
menu.
273
Chapter 14: General Tips, Tricks, and Shortcuts
21_129869 ch14.qxp 11/29/07 12:02 PM Page 273
5. From the Resolution drop-down list, select the resolution you wish the
default layer to use.
You have four options in this list:
•
Low Resolution (150 dpi)
• Medium Resolution (300 dpi)
• High Resolution (600 dpi)
• Maximum Resolution (the page file’s resolution up to 1200 dpi)
6. From the Expression Mode drop-down list, select the expression mode
of the layer (1bit, 2bit, or 8bit).
Check out Chapter 6 for an explanation of the various expression modes.
7. Adjust the opacity of the layer by entering a value between 0% and
100% in the Opacity text box.
8. From the Display Color radio buttons, choose whether you want to
display the layer in grayscale or color by selecting one option.
9. If you choose to display in color, select your foreground and back-
ground colors by clicking the Alternative Color to Black/White color
boxes and picking the new color from the Color Settings dialog box.
10. Click the Palette Color box and select the color the layer will appear
in the Layers palette from the Color Settings dialog box.
11. From the Output Attribute radio buttons, select whether the layer will
be a Sketch or Finish layer.
Figure 14-6:
The default
Layer
Properties
dialog box.
274
Part IV: Advanced Tips and Tricks
21_129869 ch14.qxp 11/29/07 12:02 PM Page 274
12. Set whether the layer-specific rulers are created on the image layer or
on its own by selecting the Convert to Layer check box.
13. Set whether you want the rulers visible by selecting the Hide check
box.
14. If you chose an 8-bit expression mode, select the subtractive method
(Does Not Subtract, Threshold, Dither, or Convert to Tone) from the
Subtractive Method dialog box.
Check out Chapter 6 for more info on subtractive methods.
15. If you chose the Threshold subtractive method, set its threshold by
entering a value between 0 and 255 in the Threshold text box.
16. Click OK when you’re done.
Drawing Tool Tips
Whenever I talk about the drawing tool settings in this book, I mention that
you should check out the advanced tips chapter, as I go over the additional
settings you can use to tweak things further. Well, here we are!
Adjusting the brush settings
The default brushes work just fine as is. But there’s the possibility that they
don’t feel “right” to you. Maybe you’d like to increase the pressure sensitivity
of the Thin Pencil tool or remove the tapering from the brush Pen tool?
Well, there’s nothing stopping you from customizing these tools to better suit
your style of working. After all, you’re going to be using them to create your
next great masterpiece, so why not make them comfortable to use? The good
news is that it’s quite easy to adjust the settings of your drawing tools.
Follow these steps to adjust your brush settings:
1. Select the drawing tool you want to change (Pen, Pencil, Marker,
Eraser, Airbrush, or Pattern Brush).
2. Open the Tool Options palette. (Press F3 on your keyboard.)
3. Click the Show Menu button and select Advanced Settings Mode.
The advanced options vary, depending on the drawing tool you’re
adjusting. The [Pencil] Tool Options palette is shown in Figure 14-7.
275
Chapter 14: General Tips, Tricks, and Shortcuts
21_129869 ch14.qxp 11/29/07 12:02 PM Page 275
Depending on the tool you’re adjusting, you see some, if not all, of the
following options:
•
Thickness: Entering a value between 0% and 100% in the text box
adjusts the roundness of the brush.
•
Direction: If you’ve adjusted its roundness, you can change the
angle the brush sits at by entering a value between 0 and 360
degrees in this text box.
•
Pressure Settings: If you think this option looks a lot like a graph,
you’re right. The curve you see sets the size of the line drawn rela-
tive to the pressure sensitivity of your drawing tablet. This allows
you to adjust how much pressure you need to place on your tablet.
The lower you set the curve, the more pressure you need to exert,
and vice versa. (Compare settings between the Magic Marker and
the G Pen, for example; try each of them out on the canvas to see
and feel the difference.)
•
Affect Tip Size: You can set whether the line drawn with the tool
is affected by the pressure settings graph. When selected, the size
of the brush adjusts according to the amount of pressure you place
on the tablet. When deselected, the line width remains constant.
If you’re using the Pencil Tool, only the opacity is affected by the
pen pressure.
Figure 14-7:
The Pencil
Drawing
tool options
in Advanced
Mode.
276
Part IV: Advanced Tips and Tricks
21_129869 ch14.qxp 11/29/07 12:02 PM Page 276
Tweaking the Pattern Brush
tool’s advanced options
The Pattern Brush has a completely different set of advanced options, as
shown in Figure 14-8, than the other drawing tools. As I mention in Chapter
10, it would almost take forever to go over the available options for each type
of Pattern Brush, so I list all of the options you see on the palette. Keep in
mind that not all of the options are available, depending on the type of
Pattern Brush you’re adjusting — options you can’t use will be grayed out.
To adjust the Pattern Brush tools advanced options, follow these steps:
1. Select the Pattern Brush tool on the Tools palette.
2. Open the Tool Options palette by pressing F3.
3. Click the Show Menu button and select Advanced Settings Mode.
The [Pattern Brush] Tool Options palette offers the following advanced
settings:
•
Thickness: Entering a value between 0% and 100% in the text box
adjusts the roundness of the pattern.
Figure 14-8:
The Pattern
Brush
advanced
options.
There’s a lot
to choose
from.
277
Chapter 14: General Tips, Tricks, and Shortcuts
21_129869 ch14.qxp 11/29/07 12:02 PM Page 277
• Direction: If you’ve changed the pattern’s Thickness, you can
change the angle the pattern sits at by entering a value between 0
and 360 degrees.
•
Direction Range: If you want the pattern to rotate depending on the
angle of your stylus, you can set the rotation angle by entering a
value between 0 and 180 degrees. This option is available if you set
the Brush Control for Direction to anything but None. (I explain
this in the “Brush control” section of this chapter.)
•
Direction Unit: If the pattern rotates as you draw, you can set the
rotation interval by entering a value between 0.1 and 90 degrees.
This option is available if you set the Brush Control for Direction to
anything but None. (I explain this in the “Brush control” section of
this chapter.)
•
Spray Area: If the Pattern Brush is airbrush-based, you can set the
size of the spray area by entering a value between 1.0 mm and
100 mm.
•
Minimum Spray: If the airbrush-based pattern is pressure sensitive,
entering a value between 1% and 100% sets the minimum amount
of spray when you lightly draw on the canvas. This option is avail-
able if you set the Brush Control for Spray Area to anything but
None. (I explain this in the “Brush control” section of this chapter.)
•
Density: This sets the density of the airbrush-based pattern. You
can enter a value between 1 and 16 in its text box.
•
Minimum Density: If the airbrush-based pattern is pressure sensi-
tive, you can enter a value between 1% and 100% to set the mini-
mum amount of density as you lightly draw on the canvas. This
option is available if you set the Brush Control for Density to any-
thing but None. (I explain this in the “Brush control” section of this
chapter.)
Brush control
The Size, Opacity, Thickness, Direction, Interval, Spray Area, and Density of
the pattern brush can be adjusted even further if you want to. If you look
closely at the titles of these options, they’re actually buttons you can click
with your mouse or stylus. Clicking any of them brings up the Brush Control
dialog box. You can switch between any of the options by clicking on their
respective tab.
The controls you can set vary, depending on the option you’re adjusting. So I
compiled a list covering the various controls you can adjust the option with:
278
Part IV: Advanced Tips and Tricks
21_129869 ch14.qxp 11/29/07 12:02 PM Page 278
ߜ None: The option is left unchanged.
ߜ Stroke Speed: The option is affected by how fast or slow you draw
a line.
ߜ Pressure: The option is affected by the amount of pressure placed on
the tablet by the stylus. This works only with tablets that support pen
pressure. The pressure can be further tweaked by adjusting the Fixed
settings graph, located to the right of the Select Control list.
ߜ Tilt: The option is affected by the way the stylus is tilted on the drawing
tablet. The tilt can be further tweaked by adjusting the Fixed settings
graph, located to the right of the Select Control list. This control works
only with tablets that support pen tilt.
ߜ Orientation: The option is affected by the orientation of the pen on the
tablet. This works only with tablets that support pen orientation.
ߜ Rotation: The option is affected by the rotation of the stylus on the
drawing tablet. This works only with tablets that support pen rotation.
ߜ Stroke Direction: The option is affected by the direction you draw.
ߜ Random: The option is altered randomly. If you’re working with a mouse
or a tablet that doesn’t support the above options, you can always
select this to try and simulate a tablet that can support them.
Creating a custom brush
If you want to keep the default brushes as they are, but you’d still like to have
a few custom ones to work with, you can easily create new brushes.
Follow these steps to create a custom brush:
1. From the Tools palette, click the drawing tool you’d like to create a
new brush from.
For example, you may want to select the Pen or Magic Marker tool.
2. Open the Tool Options palette (F3 on your keyboard).
3. Click the Show Menu button and select New Tool Option Settings.
4. When the New Tool Option Settings dialog box appears, enter a name
for your new brush in the Name text box.
5. Optionally, if you want to use a custom icon for your new brush, click
the Browse button and navigate to the icon file.
Keep in mind that the icon has to be either a bitmap (BMP) or jpeg (JPG)
file and should be kept to a reasonable size.
6. Click OK when you’re done.
279
Chapter 14: General Tips, Tricks, and Shortcuts
21_129869 ch14.qxp 11/29/07 12:02 PM Page 279