mcts training kit 70 - 652 70-622 Configuring Microsoft Exchange Server 2010 phần 2 ppsx
Bạn đang xem bản rút gọn của tài liệu. Xem và tải ngay bản đầy đủ của tài liệu tại đây (2.67 MB, 92 trang )
Lesson 2: Address List Conguration CHAPTER 2 65
Lesson 2: Address List Conguration
An address list is a collection of recipient and other AD DS objects. It can contain one or more
types of objects, such as users, contacts, groups, public folders, conferencing, and other
resources. Address lists also provide a mechanism to partition mail-enabled objects in Active
Directory for the benet of specic groups of users. In this lesson, you will see how to create
and congure an address lists and OABs.
After this lesson, you will be able to:
n
Create and congure address lists.
n
Create and congure OABs.
n
Add address lists to and remove them from OABs.
Estimated lesson time: 40 minutes
Creating and Conguring an Address List
You need to be assigned to the Organization Management role group to create an address
list. You can create an address list using either the EMC or the EMS.
The procedure to create an address list in the EMC is as follows:
1. In the console tree, click Mailbox under Organization Conguration.
2. In the Action pane, click New Address List.
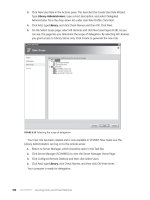
3. On the Introduction page of the New Address List Wizard, shown in Figure 2-8, type
the name for the new address list in the Name box. The name can contain up to 64
characters, including wildcard characters, but cannot contain the backslash character (\).
FIGURE 2-8 The New Address List Wizard Introduction page
66 CHAPTER 2 Exchange Databases and Address Lists
4. In the Display Name box, type the display name for the address list. This is the name
displayed to users when they view the address list from, for example, a Microsoft
Outlook 2010 client. This eld is automatically populated with the name you type in
the Name box, but you can modify it if you want to.
5. In the Container box, you can type the path to the container for the address list, but
typically you click Browse and select it. If you want to add the address list as a child to
an existing address list, click the existing address list and then click OK. To create a new
parent address list, click All Address Lists and then click OK. Note that if you specify All
Address Lists as the container, the default (\) symbol is shown in the Container box.
6. Click Next. On the Filter Settings page, shown in Figure 2-9, select the recipient
container where you want to apply the lter. The recipient container denes the OU
lter for an address list. Click Browse to open the Select Organizational Unit dialog
box. Use this dialog box to specify the OU from which to select the recipients.
FIGURE 2-9 The Filter Settings page
7. You can select All Recipient Types or The Following Specic Types. If you select The
Following Specic Types, you can select one or more of the following:
n
Users With Exchange Mailboxes You should select this check box if you want
the address list to apply to users that have a user domain account and a mailbox
in the Exchange organization.
Lesson 2: Address List Conguration CHAPTER 2 67
n
Users With External E-Mail Addresses You should select this check box if you
want the address list to apply to users that have user domain accounts in Active
Directory but use email accounts that are external to the organization. This enables
them to be included in the global address list (GAL) and added to distribution lists.
n
Resource Mailboxes You should select this check box if you want the address list
to apply to Exchange resource mailboxes, which allow you to administer company
resources, such as a conference room or video equipment, through a mailbox.
n
Contacts With External E-Mail Addresses You should select this check box if
you want the address list to apply to contacts that have external email addresses.
These contacts do not have user domain accounts in AD DS, but their external
e-mail address is available in the GAL.
n
Mail-Enabled Groups You should select this check box if you want the address
list to apply to security groups or distribution groups that have been mail-enabled.
Note that you must convert any nonuniversal distribution groups to universal
distribution groups to ensure that all distribution groups are displayed. Email
messages that are sent to a mail-enabled group account are delivered to several
recipients.
8. Click Next. The Conditions page is shown in Figure 2-10. Complete the following elds:
n
Step 1: Select Condition(s) You can use this section to select one or more
conditions for your address list. If you do not want to set a list condition, you do
not need to select any of the following check boxes:
•
Recipient is in a State or Province Select this check box if you want the
address list to include only recipients from specic states or provinces.
•
Recipient is in a Department Select this check box if you want the address list
to include only recipients in specic departments.
•
Recipient is in a Company Select this check box if you want the address list to
include only recipients in specic companies.
•
Custom Attribute equals Value You can specify up to 15 custom attributes for
each recipient. If you want the address list to include only recipients that have
a specic value set for a specic custom attribute, select the check box that
corresponds to that custom attribute.
NOTE SPECIFYING SOME CONDITIONS EXCLUDES MAIL-ENABLED
DISTRIBUTION GROUPS
The State or Province, Department, and Company conditions are based on attributes
that are applicable only to mailboxes, mail users, and mail contacts and do not apply
to mail-enabled distribution groups. If you congure any of these conditions for
an address list, you will in effect be excluding all mail-enabled distribution groups
from that address list.
68 CHAPTER 2 Exchange Databases and Address Lists
n
Step 2: Edit the Conditions by Selecting an Underlined Value If you select any
conditions in step 1, each condition you select will append to the denition of the
address list. For example, if you select the Recipient Is In A State Or Province check
box in step 1, you will see Address List Contains: All Recipient Types In The Specied
State Or Province(s) condition in step 2. You click the underlined term (in this case
Specied) to dene the condition. You can add a new value, edit an existing value,
or remove a value. You cannot specify a duplicate value. You can specify only one
value for a custom attribute condition.
FIGURE 2-10 The Conditions page
NOTE VALUES MUST BE EXACT
The values you enter must exactly match those that appear in the recipient properties.
For example, if you enter Pennsylvania in the Specify State Or Province dialog box but
the Address and Phone tab in the recipient properties lists the state as PA, the condition
will not be met.
9. Optionally, click Preview to view the recipients that will be contained in the address list.
10. Click Next. On the Schedule page, shown in Figure 2-11, you can specify whether
you want to create the address list but do not want to apply it to recipients, whether
you want to apply the address list immediately, or whether you want to apply
it at a specied time. You can also specify that tasks that are still running after
a congurable amount of time (by default eight hours) will be canceled.
Lesson 2: Address List Conguration CHAPTER 2 69
FIGURE 2-11 The Schedule page
MORE INFO APPLYING AN ADDRESS LIST
If you choose not to apply an address list to the selected recipients, you can then use
the Update-AddressList cmdlet in the EMS or the Apply Address List Wizard to do so
retrospectively. For more information, see />aa996375.aspx.
11. Click Next and review your conguration settings on the New Address List page.
Click New to create the address list or click Back to make conguration changes.
12. Click Next. A status of Completed on the Completion page indicates that the wizard
completed the task successfully. In this case, click Finish. If the status is Failed,
review the summary for an explanation and then click Back to make the required
conguration changes.
You use the New-AddressList cmdlet in the EMS to create an address list. For example,
the following command creates the address list PennsylvaniaAddressList by using the
RecipientFilter parameter and includes recipients that are mailbox users and have
StateOrProvince set to Pennsylvania:
New-AddressList -Name PennsylvaniaAddressList -RecipientFilter {((RecipientType -eq
'UserMailbox') -and (StateOrProvince -eq 'Pennsylvania'))}
70 CHAPTER 2 Exchange Databases and Address Lists
The following command creates the child address list PittsburghAddressList in the
PennsylvaniaAddressList parent container:
New-AddressList -Name "PittsburghAddressList" -Container "\PennsylvaniaAddressList"
-ConditionalCustomAttribute1 "Pittsburgh"
If you create an address list in the EMS, you need to apply it using the Update-AddressList
cmdlet in the EMS or the Apply Address List Wizard in the EMC.
MORE INFO NEW-ADDRESSLIST AND UPDATE-ADDRESSLIST
For more information about the New-AddressList cmdlet, see rosoft
.com/en-us/library/aa996912.aspx. For more information about the Update-AddressList
cmdlet, see />Removing an Address List
You can use the EMC or the EMS to remove an address list. To use the EMC, click Mailbox
under Organization Conguration. In the Result pane, on the Address List tab, click the
address list that you want to remove. If you want to remove an address list that has one or
more child address lists, you need to hold down the Ctrl key and select the parent list and all
its children. Next, click Remove in the Action pane. A warning appears, asking if you are sure
that you want to remove the address list. Click Yes.
To remove an address list through the EMS, you use the Remove-AddressList cmdlet. For
example, the following command removes an address list named Marketing Department that
does not contain child address lists:
Remove-AddressList -Identity "Marketing Department"
The following command removes an address list named Sales Department and all of the
child address lists it contains:
Remove-AddressList -Identity "Sales Department" -Recursive
In both cases, you need to enter Y to conrm that you want to remove the address list.
MORE INFO REMOVE-ADDRESSLIST
For more information about the Remove-AddressList cmdlet, see http://technet
.microsoft.com/en-us/library/bb124342.aspx.
Conguring Address List Properties
You can use either the EMC or the EMS to congure the properties of an address list. There
are, however, limitations to using the EMC. You cannot use it to edit GALs or to move an
address list from its container. Nor can you use the EMC to edit the conditions or recipient
types of the default address lists All Contacts, All Groups, All Rooms, All Users, and Public
Folders.
Lesson 2: Address List Conguration CHAPTER 2 71
Editing an address list using the EMC uses wizard pages that are very similar to those
described earlier in this lesson when you were creating the address list. You click on Mailbox
under Organization Conguration in the Console tree, click the Address List tab in the Result
pane, select the address list you want to congure, and then click Edit in the Action pane.
The Edit Address List Wizard has the same Introduction, Filter Settings, Conditions,
and Schedule pages as does the Create Address List Wizard. The settings congured for the
address list appear on these pages, and you can modify them. On the Edit Address List page,
you review your conguration settings and click Edit to apply these changes or click Back if you
are not satised with them. On the Completion page, you can click Finish to close the wizard.
You can use the Set-AddressList cmdlet in the EMS to congure an address list. Commands
that use this cmdlet can have a lengthy syntax, principally because of the multiple custom
attributes you can dene. The syntax is as follows:
Set-AddressList -Identity <AddressListIdParameter> [-ConditionalCompany
<MultiValuedProperty>] [-ConditionalCustomAttribute1 <MultiValuedProperty>]
[-ConditionalCustomAttribute10 <MultiValuedProperty>] [-ConditionalCustomAttribute11
<MultiValuedProperty>] [-ConditionalCustomAttribute12 <MultiValuedProperty>]
[-ConditionalCustomAttribute13 <MultiValuedProperty>] [-ConditionalCustomAttribute14
<MultiValuedProperty>] [-ConditionalCustomAttribute15 <MultiValuedProperty>]
[-ConditionalCustomAttribute2 <MultiValuedProperty>] [-ConditionalCustomAttribute3
<MultiValuedProperty>] [-ConditionalCustomAttribute4 <MultiValuedProperty>]
[-ConditionalCustomAttribute5 <MultiValuedProperty>] [-ConditionalCustomAttribute6
<MultiValuedProperty>] [-ConditionalCustomAttribute7 <MultiValuedProperty>]
[-ConditionalCustomAttribute8 <MultiValuedProperty>] [-ConditionalCustomAttribute9
<MultiValuedProperty>] [-ConditionalDepartment <MultiValuedProperty>]
[-ConditionalStateOrProvince <MultiValuedProperty>] [-Confirm [<SwitchParameter>]]
[-DisplayName <String>] [-DomainController <Fqdn>] [-ForceUpgrade <SwitchParameter>]
[-IncludedRecipients <Nullable>] [-Name <String>] [-RecipientContainer
<OrganizationalUnitIdParameter>] [-RecipientFilter <String>] [-WhatIf
[<SwitchParameter>]]
In practice, the commands are seldom as complex as the syntax suggests. For example,
the following command congures the address list Adatum Miami Branch to include
recipients that work in Adatum’s Miami ofce:
Set-AddressList -Identity "Adatum Miami Branch" -ConditionalCompany Adatum
-ConditionalStateorProvince Miami
As previously stated, if you want to recongure the properties of one of the default
address lists, you need to use the Set-AddressList cmdlet and cannot use the EMC. However,
you seldom need to recongure a default address list.
MORE INFO SET-ADDRESSLIST
For more information about the Set-AddressList cmdlet, see rosoft
.com/en-us/library/aa998847.aspx.
72 CHAPTER 2 Exchange Databases and Address Lists
You also cannot use the EMC to move an address list. Instead, you should use the
Move-AddressList cmdlet in the EMS. For example, the following command moves
the address list with GUID c3ffed6e-028a-22b6-88a4-8c21697bb8ad to a new location
under the parent address list \All Users\Sales\:
Move-AddressList -Identity c3ffed6e-028a-22b6-88a4-8c21697bb8ad -Target "\All Users\
Sales\
MORE INFO MOVE-ADDRESSLIST
For more information about the Move-AddressList cmdlet, see rosoft
.com/en-us/library/bb124520.aspx.
MORE INFO OBTAINING ADDRESS LIST PROPERTIES AND VIEWING ADDRESS LIST
MEMBERS
You use the Get-AddressList cmdlet to obtain the distinguished name (DN) of an address
list and the Get-Recipient cmdlet to list address list members in the practice session later
in this chapter. For more information about these procedures, see http://technet
.microsoft.com/en-us/library/bb430757.aspx.
Creating and Conguring Global Address Lists
A global address list (GAL) is a directory that contains entries for every group, user,
and contact within an organization’s implementation of Microsoft Exchange. You cannot
use the EMC to create or congure a GAL but must instead use EMS cmdlets.
To create a GAL, you use the New-GlobalAddressList cmdlet. For example, the following
command creates a GAL named Adatum Global for recipients who are mailbox users and have
their company listed as Adatum:
New-GlobalAddressList -Name "Adatum Global" -IncludedRecipients MailboxUsers
-ConditionalCompany Adatum
MORE INFO NEW-GLOBALADDRESSLIST
For more information about the New-GlobalAddressList cmdlet, see http://technet
.microsoft.com/en-us/library/bb123785.aspx.
You can modify GAL properties by using the Set-GlobalAddressList cmdlet in the EMS.
You cannot, however, change the settings of the default GAL. For example, the following
command assigns the name Contoso to the GAL that has the GUID 98d0c625-eba8-6203-
be4f-687a1ee4ad7b:
Set-GlobalAddressList -Identity 98d0c625-eba8-6203-be4f-687a1ee4ad7b -Name Contoso
Lesson 2: Address List Conguration CHAPTER 2 73
The following command changes the recipients who will be included in the Contoso GAL
to mailbox users whose company is set to Contoso:
Set-GlobalAddressList -Identity Contoso -RecipientFilter {Company -eq "Contoso"}
It may be necessary to start the update process if additional recipients that conform to the
dened lter conditions are added. It can take considerable time for an update to complete,
but you can start the process by using the Update-GlobalAddressList cmdlet, for example:
Update-GlobalAddressList -Identity "Contoso"
You remove a GAL by using the Remove-GlobalAddressList cmdlet, for example:
Remove-GlobalAddressList –Identity MyGAL
MORE INFO ADDRESS LIST CMDLETS
For more information about the Set-GlobalAddressList cmdlet, see http://technet
.microsoft.com/en-us/library/bb123877.aspx. For more information about the
Update-GlobalAddressList cmdlet, see />aa998806.aspx. For more information about the Remove-GlobalAddressList cmdlet,
see />Working with Ofine Address Books
An ofine address book (OAB) is a copy of a collection of address lists generated on
an Exchange server and then downloaded to a client computer so that a Microsoft
Outlook user can access the information it contains while disconnected from the Exchange
organization. Exchange Server 2010 generates OAB les, compresses the les, and then places
them on a local share. You can choose which address lists are available to ofine users, and
you can congure the distribution method. An OAB can be distributed to client computers
using two methods:
n
Web-based distribution
n
Public folder distribution
Web-Based Distribution
Outlook 2007 and Outlook 2010 clients that are working in Cached Exchange Mode,
ofine, or through a dial-up connection can access the OAB using this distribution method.
Web-based distribution does not require public folders. When the OAB is generated,
the Client Access server replicates the les. Web-based distribution uses HTTPS and the
Background Intelligent Transfer Service (BITS).
MORE INFO BITS
For more information about BITS, see />aa362708.aspx.
74 CHAPTER 2 Exchange Databases and Address Lists
Web-based distribution supports more concurrent client computers and uses less
bandwidth than public folder distribution. It also provides more control over the OAB
distribution points. In web-based distribution, the HTTPS web address is the distribution
point from which client computers can download the OAB.
To generate or update the OAB, the OAB generation process, implemented by the
OABGen service, runs on the OAB generation server (typically an Exchange Server 2010
Mailbox server). The Microsoft Exchange File Distribution service runs on Client Access servers
to gather the OAB and keep its content synchronized with the content on the Mailbox server.
The OAB virtual directory provides the distribution point for the web-based distribution
method. When Exchange Server 2010 is installed, a new virtual directory named OAB is by
default created in the default internal web site in Internet Information Services (IIS). If you
have client-side users that connect to Outlook from outside your organization’s rewall, you
can add an external web site. You can also use the New-OABVirtualDirectory cmdlet in the
EMS to create a new virtual directory named OAB in the default IIS web site on the local
Exchange Server 2010 Client Access server.
MORE INFO CREATING AN OAB VIRTUAL DIRECTORY
For more information about creating an OAB virtual directory, see http://technet
.microsoft.com/en-us/library/aa996917.aspx.
The Autodiscover service in Outlook 2007, Outlook 2010, and some mobile devices
automatically congures clients for Exchange access. This service runs on a Client Access
server and returns the correct OAB URL for a specic client connection.
MORE INFO THE AUTODISCOVER SERVICE
For more information about the Autodiscover service, see />en-us/library/bb124251.aspx.
Public Folder Distribution
Outlook 2003 Service Pack 1 or earlier clients that are working ofine or through a dial-up
connection access the OAB through public folder distribution. The OAB generation process
places les directly in a public folder, and Exchange public folder replication copies the data
to other public folder distribution points.
Using this method, every request for a full OAB download is served immediately. This
can lead to a large volume of trafc that could potentially overload the network for an
extended period. To prevent this overload, you can set a bandwidth threshold to limit the
Lesson 2: Address List Conguration CHAPTER 2 75
network bandwidth that results from OAB downloads. This process is called throttling. By
default, throttling is disabled. You can activate throttling by editing the following registry key
on all public folder servers that host OAB system folders:
HKEY_LOCAL_MACHINE\System\CurrentControlSet\Services\MSExchangeIS\ParametersSystem
Hiding a Recipient from an Address List
The Microsoft Exchange System Attendant service running as Local System produces
OAB data. If an administrator uses the security descriptor to prevent users from viewing
certain recipients in AD DS, users who download the OAB will be able to view those hidden
recipients. Therefore, you might need to hide a recipient from an address list that is included
in an OAB. To do this, you congure the HiddenFromAddressListsEnabled parameter on
the Set-PublicFolder, Set-MailContact, Set-MailUser, Set-DynamicDistributionGroup,
Set-Mailbox, and Set-DistributionGroups cmdlets in the EMS. Alternatively, you can create
a new default OAB that does not contain the hidden recipients.
MORE INFO ADDING OR REMOVING ADDRESS LISTS FROM AN OAB
For more information about how to add or remove address lists from an OAB, see
/>MORE INFO UNDERSTANDING OABs
For more information about OABs, including some typical scenarios, see http://technet
.microsoft.com/en-us/library/bb232155.aspx.
Creating an OAB
You can use the EMC to create an OAB and specify either web-based or public folder
distribution. If you use the EMS, an OAB with web-based distribution is created by default.
To specify public folder distribution, you set the PublicFolderDistributionEnabled parameter
to a value of True.
To use the EMC to create an OAB, carry out the following procedure:
1. Open the EMC and click Mailbox under Organization Conguration in the Console tree.
2. Click New Ofine Address Book in the Action pane.
3. On the Introduction page of the New Online Address Book Wizard, specify a name
for the OAB, the location of the OAB generation Mailbox server, whether the GAL
is included, and what other address lists (if any) are included. Figure 2-12 shows the
Introduction page. Click Next.
76 CHAPTER 2 Exchange Databases and Address Lists
FIGURE 2-12 The Introduction page of the New Online Address Book Wizard
4. On the Distribution Points page, you can enable either web-based or public folder
distribution. If you choose web-based distribution, you can specify the OAB virtual
directory. If your organization uses both Outlook 2003 Service Pack 1 or earlier clients
and Outlook 2007 Service Pack 1 or later clients, you can specify both distribution
methods. Click Next.
5. On the Conguration Summary page, click New to create the new OAB.
6. If the wizard completes successfully, click Finish on the Completion page. Otherwise,
click Back and review your settings.
You use the New-OfineAddressBook cmdlet in the EMS to create an OAB. For example,
the following command creates the OAB WBD-OAB on VAN-EX1 that uses the web-based
distribution method and uses the default virtual directory:
New-OfflineAddressBook -Name "WBD-OAB" -AddressLists "\My Address List" -Server VAN-EX1
-VirtualDirectories "VAN-EX1\OAB (Default Web Site)"
The following command creates an OAB named PFD-OAB on VAN-EX1 that uses the public
folder distribution method and uses the public folder database MyPublicDatabase:
New-OfflineAddressBook -Name "PFD-OAB" -AddressLists "My Address List" -Server VAN-
EX1 -PublicFolderDatabase "MyPublicDatabase" -PublicFolderDistributionEnabled $true
-Versions Version3,Version4
Lesson 2: Address List Conguration CHAPTER 2 77
MORE INFO OAB VERSIONS
For more information on OAB versions, see “Understanding Ofine Address Books” at
This link was given earlier in this
section and contains a great deal of useful information.
MORE INFO NEW-OFFLINEADDRESSBOOK
For more information about the New-OfineAddressBook cmdlet, see http://technet
.microsoft.com/en-us/library/bb123692.aspx.
NOTE LEGACY OABs
OABs that use the public folder distribution method are sometimes termed Legacy OABs.
Creating an OAB Virtual Directory
The OAB virtual directory is the distribution point used by the OAB web-based distribution
method. A virtual directory named OAB is created by default in the default internal web site in
IIS when Exchange Server 2010 is installed. If you have client-side users that connect to Outlook
from outside your organization’s rewall, you can add an external web site. Exchange permits
only one OAB virtual directory, and you need to create this directory only if there is a problem
with the existing virtual directory. If you need to create a new OAB virtual directory, you use
the New-OABVirtualDirectory cmdlet in the EMS. In order to create an OAB virtual directory,
you rst need to remove the existing virtual directory, as described later in this lesson.
You can create an OAB virtual directory if no such directory exists, the local Exchange
Server 2010 server has the Client Access server role installed, and a default IIS web site
exists. When you have created a new OAB virtual directory, you need to edit the settings
on each OAB that uses web-based distribution to reconnect to the OAB virtual directory.
The following command creates an OAB virtual directory on a Client Access server named
DEN-CAS1 that has SSL enabled and has an external web site congured:
New-OABVirtualDirectory –Server DEN-CAS1 -RequireSSL $true -ExternalURL https://www
.adatum.com/OAB
MORE INFO REMOVING, RE-CREATING, AND RECONNECTING AN OAB VIRTUAL
DIRECTORY
For more information about removing, re-creating, and reconnecting an OAB virtual
directory, see />MORE INFO NEW-OABVIRTUALDIRECTORY
For more information about the New-OABVirtualDirectory cmdlet, see http://technet
.microsoft.com/en-us/library/bb123735.aspx.
78 CHAPTER 2 Exchange Databases and Address Lists
Adding or Removing an Address List to or from an OAB
You can use the EMC or the EMS to add or remove an address list from an OAB. By default,
there is an OAB named the Default Ofine Address Book that contains the GAL. OABs are
generated based on the address lists that they contain. To create custom OABs that users
can download, you can add or remove address lists from OABs.
To add or remove an address list from an OAB using the EMC, click Mailbox under
Organization Conguration in the Console tree, click the Ofine Address Book tab in the
Result pane, click the OAB that you want to edit, and then click Properties in the Action pane.
This accesses the OAB Properties dialog box.
In the Address Lists tab of the Properties dialog box shown in Figure 2-13, click the Add icon
(green +) to add an address list. If you want to remove an address list, click the address list. The
Remove icon (red x) then becomes active, and you click it. Click Apply to save your changes
without closing the dialog box or click OK to close the dialog box and save your changes.
FIGURE 2-13 The Address Lists tab of an OAB Properties dialog box
You can use the Set-OfineAddressBook cmdlet in the EMS to add or remove address lists
from an OAB. You need to take care when using this cmdlet. Basically, it lists the address lists
that should be in the OAB. So if you specify an address list that is not already in the OAB, that
address list is added, and if you omit an address list that is in the OAB from the command,
that address list is removed.
Suppose, for example, that you have an OAB named MyOAB that contains address lists
MyAddressList01 and MyAddressList02. To add the address list MyAddressList03, you would
enter the following command:
Set-OfflineAddressBook -Identity "MyOAB" -AddressLists
MyAddressList01,MyAddressList02,MyAddressList03
Lesson 2: Address List Conguration CHAPTER 2 79
If you subsequently wanted to remove MyAddressList01 from the OAB, you would enter
the following command:
Set-OfflineAddressBook -Identity "MyOAB" -AddressLists MyAddressList02,MyAddressList03
MORE INFO SET-OFFLINEADDRESSBOOK
For more information about the Set-OfineAddressBook cmdlet, see http://technet
.microsoft.com/en-us/library/aa996330.aspx.
Conguring OAB Properties
In addition to adding and removing address lists, you can use the OAB Properties box
accessed from the EMC, as described in the previous section, to congure other OAB
properties. For example, on the General tab, you can change the name of the OAB, select
a predened update schedule, or click Customize to create your own update schedule. On
the Address Lists tab, you can specify whether to include the GAL on the OAB.
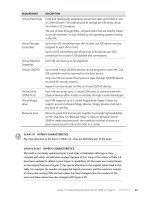
On the Distribution tab shown in Figure 2-14, you can specify client support, the OAB
distribution method (or methods), and OAB distribution points. An OAB distribution point
is the web address or public folder where client computers can download the OAB. The OAB
Properties dialog box permits you to specify only web address distribution points.
FIGURE 2-14 The Distribution tab of an OAB Properties dialog box
In the Client Support section, you can specify one or more OAB versions. As shown
previously in Figure 2-14, you can specify one or more of Versions 2, 3, or 4, depending
80 CHAPTER 2 Exchange Databases and Address Lists
on the Outlook clients used in your organization. If you do not specify client support, the
setting reverts to Version 4.
You can specify web-based distribution, public folder distribution, or both to distribute the
OAB. If you specify Web-based distribution, you can specify the virtual directory.
In the previous section, you saw that you could use the Set-OfineAddressBook cmdlet in
the EMS to add address lists to or remove them from an OAB. You can use the same cmdlet to
congure other OAB properties. For example, the following command modies the time and
date at which OAB generation occurs for MyOAB:
Set-OfflineAddressBook -Identity "MyOAB" -Schedule "Sat.2:00 AM-Sat.2:15 AM"
MORE INFO CONFIGURING OAB DISTRIBUTION POINT PROPERTIES
In addition to conguring OAB distribution properties, you may want to congure the
properties of individual distribution points. For more information on this topic, see
/>Moving an OAB Generation Server
OAB generation is the process by which Exchange Server 2010 creates and updates the OAB.
During this process, Exchange generates new OAB les, compresses them, and then places
them on a local share.
You sometimes need to move the generation task for an OAB from one server to
another. You can use the EMC or the EMS to perform this task. To use the EMC to move
an OAB generation server, carry out the following procedure:
1. Click Mailbox under Organization Conguration in the Console tree.
2. Click the Ofine Address Book tab in the result pane and select the OAB for which
you want to move the generation server.
3. Click Move in the Action pane. The Move Ofine Address Book Wizard starts.
4. On the Move Ofine Address Book page, click Browse, select the server to which you
want to move the OAB generation process, and click OK. Click Move to move the OAB
generation process to the selected server.
5. On the Completion page, determine whether the move occurred without errors. If
necessary, click Back to make any required changes. Otherwise, click Finish to close
the wizard.
If you choose to use the EMS to carry out this task, you should be aware that the
location of the generation server is not considered to be an OAB property, and you cannot
use the EMS Set-OfineAddressBook cmdlet to specify a different server. Instead, you use
the Move-OfineAddressBook cmdlet. For example, the following command moves the
generation task for a custom OAB named MarketingOAB to the server VAN-EX2:
Move-OfflineAddressBook -Identity "MarketingOAB" -Server VAN-EX2
Lesson 2: Address List Conguration CHAPTER 2 81
MORE INFO MOVE-OFFLINEADDRESSBOOK
For more information about the Move-OfineAddressBook cmdlet, see http://technet
.microsoft.com/en-us/library/aa998191.aspx.
Removing an OAB
You can use either the EMC or the EMS to remove an OAB. To use the EMC, click Mailbox
under Organization Conguration in the Console tree, click the Ofine Address Book tab
in the Result pane, click the OAB that you want to remove, and then click Remove in the
Action pane. You need to click Yes to conrm your action.
You can use the Remove-OfineAddressBook cmdlet in the EMS to remove an OAB. For
example, the following command removes the OAB MyOAB:
Remove-OfflineAddressBook -Identity "MyOAB"
You need to enter Y to conrm your action.
If you remove an OAB that is linked to a user or a mailbox database, the recipient
downloads the default OAB unless you assign a new OAB. If you remove the default OAB, you
must assign another OAB as the default.
MORE INFO CHANGING THE DEFAULT OAB
For more information about how to change the default OAB, see rosoft
.com/en-us/library/aa998569.aspx.
MORE INFO REMOVE-OFFLINEADDRESSBOOK
For more information about the Remove-OfineAddressBook cmdlet, see http://technet
.microsoft.com/en-us/library/bb123594.aspx.
Lesson Summary
n
An address list is a collection of recipient and other AD DS objects. You can use both
the EMC and the EMS to create and congure address lists.
n
An OAB is a collection of address lists that is copied to client computers so that
Outlook clients can access the information they contain ofine. You can use both the
EMC and the EMS to create and congure OABs.
n
OABs can be distributed using web-based or public folder distribution. Public folder
distribution makes OABs available to Outlook 2003 (or earlier) and other MAPI clients
that cannot use web-based distribution.
82 CHAPTER 2 Exchange Databases and Address Lists
Lesson Review
You can use the following questions to test your knowledge of the information in Lesson 2,
“Address List Conguration.” The questions are also available on the companion CD if you
prefer to review them in electronic form.
NOTE ANSWERS
Answers to these questions and explanations of why each answer choice is correct or
incorrect are located in the “Answers” section at the end of the book.
1. You have created a custom OAB named AdatumDenver. You want to move the
generation task for this OAB from the server DEN-EX1 to the server DEN-EX2. What
command do you enter in the EMS?
A. Set-OfineAddressBook -Identity “AdatumDenver” -Server DEN-EX2
B. Set-OfineAddressBook -Identity “AdatumDenver” -Server DEN-EX1,DEN-EX2
C. Move-OfineAddressBook -Identity “AdatumDenver” -Server VAN-EX2
D. Move-OfineAddressBook -Identity “AdatumDenver” -Server Server DEN-EX1,
DEN-EX2
2. You want to create the address list ColoradoStaff that includes recipients that are
mailbox users and have StateOrProvince set to Colorado. You then want to create the
child address list DenverStaff in the ColoradoStaff parent container. What commands
do you enter in the EMS? (Choose 2; each answer forms part of the solution.)
A. New-AddressList -Name ColoradoStaff -RecipientFilter {((RecipientType -eq
‘UserMailbox’) -and (StateOrProvince -eq ‘Colorado’))}
B. New-AddressList -Name “DenverStaff” -Container “\ColoradoStaff”
-ConditionalCustomAttribute1 “Denver”
C. New-AddressList -Name DenverStaff -RecipientFilter {((RecipientType -eq
‘UserMailbox’) -and (ConditionalCustomAttribute1 “Denver”))}
D. New-AddressList -Name “ColoradoStaff” -Container “\DenverStaff” -RecipientFilter
{((RecipientType -eq ‘UserMailbox’) -and (StateOrProvince -eq ‘Colorado’))}
3. You want to create an OAB named ColoradoOfine based on the ColoradoStaff
address list. This OAB should be generated on the server named DEN-EX1 and should
use web-based distribution. It should not be available to Outlook 2003 and other MAPI
clients. Which of the following EMS commands should you enter?
A. New-OfineAddressBook –Name “ColoradoOfine” –Server DEN-EX1 –AddressLists
ColoradoStaff –PublicFolderDistributionEnabled $true
B. New-OfineAddressBook –Name “ColoradoOfine” –Server DEN-EX1 –AddressLists
ColoradoStaff –VirtualDirectories “DEN-EX1\OAB (Default Web Site)”
Lesson 2: Address List Conguration CHAPTER 2 83
C. Set-OfineAddressBook –Name “ColoradoOfine” –Server DEN-EX1 –AddressLists
ColoradoStaff –PublicFolderDistributionEnabled $true
D. Set-OfineAddressBook –Name “ColoradoOfine” –Server DEN-EX1 –AddressLists
ColoradoStaff –VirtualDirectories “SYDNEYMBX1\OAB (Default Web Site)”
4. You want to create a GAL named Blue Sky Airlines – All Employees to include
all mailbox users employed by Blue Sky Airlines. What command do you enter in
the EMS?
A. Set-AddressList –Identity “Blue Sky Airlines – All Employees” -IncludedRecipients
MailboxUsers –ConditionalCompany “Blue Sky Airlines”
B. New-AddressList –Name “Blue Sky Airlines – All Employees” -IncludedRecipients
MailboxUsers –ConditionalCompany “Blue Sky Airlines”
C. Set-GlobalAddressList –Identity “Blue Sky Airlines – All Employees”
-IncludedRecipients MailboxUsers –ConditionalCompany “Blue Sky Airlines”
D. New-GlobalAddressList –Name “Blue Sky Airlines – All Employees”
-IncludedRecipients MailboxUsers –ConditionalCompany “Blue Sky Airlines”
PR AC TICE Creating and Conguring a Mailbox Database
In this practice session, you create a mailbox database and congure it using the EMS. You
then use the Edit Database Wizard in the EMC to view and modify the conguration. If
you are using virtual machines, both the Exchange Server 2010 Mailbox server VAN-EX1
and the domain controller VAN-DC1 need to be running and connected.
EX ER CI S E 1 Using the EMS to Create and Congure a Mailbox Database
To use the EMS to create and congure a mailbox database, carry out the following
procedure:
1. Log on to the Mailbox server VAN-EX1 using the Kim Akers account with the password
Pa$$w0rd.
2. Open Computer and create the folders C:\MyDatabaseFiles and C:\MyLogFolder.
Note that if you have a second hard drive, you can optionally create the folder
D:\MyLogFolder instead of C:\MyLogFolder and amend the command in step 5
accordingly.
3. Click Start, click All Programs, and then click Microsoft Exchange Server 2010.
4. Right-click Exchange Management Shell and click Run As Administrator.
5. To create a mailbox database named Research, enter the following command:
New-MailboxDatabase -Name Research –Server VAN-EX1 –EdbFilePath
C:\MyDatabaseFiles\Research.edb -LogFolderPath C:\MyLogFolder
84 CHAPTER 2 Exchange Databases and Address Lists
6. To congure the maintenance schedule, warning quota level, and deleted item
retention time for the Research mailbox database, enter the following command:
Set-MailboxDatabase –Identity Research -MaintenanceSchedule 6.21:00-6.23:15
–IssueWarningQuota 2GB –DeletedItemRetention 21
7. Check that the Research mailbox database has been created and congured, as shown
in Figure 2-15.
FIGURE 2-15 Creating and configuring the Research mailbox database
EX ER CI S E 2 Using the EMC to Edit a Mailbox Database
In this exercise, you use the Edit Mailbox Database Wizard to view and recongure the
Research database mailbox properties.
1. If necessary, log on to the Mailbox server VAN-EX1 using the Kim Akers account with
the password Pa$$w0rd.
2. Click Start, click All Programs, and then click Microsoft Exchange Server 2010.
3. Click Exchange Management Console. The EMC can take some time to open.
4. If necessary, expand the Console tree.
5. Click Mailbox under Organizational Conguration.
6. In the Result pane on the Database Management tab, click Research.
7. In the Action pane, click Properties.
8. On the General tab of the Research Properties dialog box, shown in Figure 2-16, check
that the Database Path is C:\MyDatabaseles\Research.edb.
9. On the Maintenance tab, check that the Maintenance Schedule setting is Use Custom
Schedule. Click Customize. As shown in Figure 2-17, maintenance occurs on a Saturday
between 9:00 PM and 11:15 PM. Click Cancel.
Lesson 2: Address List Conguration CHAPTER 2 85
FIGURE 2-16 The General tab of the Research Properties dialog box
FIGURE 2-17 Viewing the maintenance schedule
10. On the Limits tab, check that the Issue Warning At (KB) setting is 2 GB (2097152)
and that the Keep Deleted Items For (Days) setting is 21.
86 CHAPTER 2 Exchange Databases and Address Lists
11. Click Customize beside the Warning Message Interval box. In the Select Schedule box,
select 15 Minutes and select a second 15-minute interval after the interval already
highlighted, as shown in Figure 2-18. Click OK. Check that the setting in the Warning
Message Interval box is now Use Custom Setting.
FIGURE 2-18 Configuring the warning message interval
12. On the Client Settings tab, the public folder database on the VAN-EX1 server should
be specied, and no OAB should be selected. Click OK to close the Research Properties
dialog box.
PR AC TICE Creating an Address List
In this practice session, you congure the Company and Department properties for the user
Don Hall and then use these properties to specify that Don is included in an address list
you create.
EX ER CI S E 1 Conguring Properties for Don Hall
In this exercise, you congure organization properties for the mailbox user Don Hall.
1. Log on to the domain controller VAN-DC1 using the Kim Akers account with the
password Pa$$w0rd.
2. Click Start. Click Administrative Tools. Click Active Directory Users And Computers.
3. In the Console tree, expand Adatum.com. Click the Marketing OU.
4. In the Result pane, right-click Don Hall and click Properties.
5. On the Organization tab of the Don Hall Properties dialog box, specify Job Title,
Department, and Company, as shown in Figure 2-19. Click OK.
Lesson 2: Address List Conguration CHAPTER 2 87
FIGURE 2-19 The Organization tab of the Don Hall Properties dialog box
EX ER CI S E 2 Using the EMS to Create and Populate an Address List
In this exercise, you create an address list and populate it with mailbox users who are
members of the Adatum Marketing Department. Currently, only Don Hall meets this criterion.
In practice, the mailing list would be populated with a number of users.
1. Log on to the Mailbox server VAN-EX1 using the Kim Akers account with the password
Pa$$w0rd.
2. Click Start, click All Programs, and then click Microsoft Exchange Server 2010.
3. Right-click Exchange Management Shell and click Run As Administrator.
4. To create the address list AdatumMarketing, enter the following command:
New-AddressList -Name AdatumMarketing -ConditionalCompany Adatum
ConditionalDepartment Marketing -IncludedRecipients MailboxUsers
5. To populate the address list, enter the following command:
Update-AddressList –Identity AdatumMarketing
6. You can view the members of an address list by specifying its distinguished name (DN).
To obtain the DN of the AdatumMarketing address list, enter the following command:
Get-AddressList –Identity AdatumMarketing | FL DistinguishedName
88 CHAPTER 2 Exchange Databases and Address Lists
7. To use the DN to view the members of the AdatumMarketing address list, enter the
following command:
Get-Recipient -Filter {AddressListMembership -eq 'CN=AdatumMarketing,CN=All
Address Lists,CN=Address Lists Container,CN=AdatumOrg,CN=Microsoft Exchange,CN=Ser
vices,CN=Configuration,DC=Adatum,DC=extest,DC=com'}
8. Check that Don Hall is a member of the AdatumMarketing address list, as shown
in Figure 2-20.
FIGURE 2-20 Creating and populating an address list and checking its membership
Chapter Review CHAPTER 2 89
Chapter Review
To further practice and reinforce the skills you learned in this chapter, you can perform the
following tasks:
n
Review the chapter summary.
n
Review the list of key terms introduced in this chapter.
n
Complete the case scenarios. These scenarios set up real-word situations involving
the topics of this chapter and ask you to create a solution.
n
Complete the suggested practices.
n
Take a practice test.
Chapter Summary
n
You can congure your Exchange Organization environment by creating and editing
mailbox databases, public folder databases, address lists, and OABs.
n
For most creation and conguration tasks, you can use either the EMC or the EMS.
However, the EMS offers more functionality than the EMC and is the required tool for
certain tasks.
n
Typically, you need to be assigned the Organization Management role to create
and manage Exchange objects, such as databases.
Key Terms
Do you know what these key terms mean?
n
address list
n
global address list (GAL)
n
mailbox database
n
ofine address book (OAB)
n
public folder database
Case Scenarios
In the following case scenarios, you will apply what you have learned about subjects of
this chapter. You can nd answers to these questions in the "Answers" section at the end
of this book.
Case Scenario 1: Creating a Mailbox Database
James Seymour is an Exchange administrator at Blue Sky Airlines. He is tasked with creating
a mailbox database named Marketing on the Mailbox server BSA-EX1. The path to the
mailbox .edb le should be C:\DatabaseFiles\Marketing.edb. The transaction log les should
be stored on a separate hard disk in the D:\LogFiles\Marketing folder.