mcts training kit 70 - 652 70-622 Configuring Microsoft Exchange Server 2010 phần 3 pps
Bạn đang xem bản rút gọn của tài liệu. Xem và tải ngay bản đầy đủ của tài liệu tại đây (2.5 MB, 92 trang )
Lesson 1: Managing Recipients and Distribution Groups CHAPTER 4 157
3. Which of the following EMS cmdlets would you use to congure an additional proxy
address for a dynamic distribution group?
A. Set-Contact
B. Set-DistributionGroup
C. Set-DynamicDistributionGroup
D. Set-Group
4. You need to set an expansion server for a large dynamic distribution group. Each
server running Exchange Server 2010 in your organization hosts a separate role.
Which of the following servers should you congure as the expansion server for
the large dynamic distribution group?
A. VAN-MBX-1 (Mailbox server)
B. VAN-HT-1 (Hub Transport server)
C. VAN-ET-1 (Edge Transport server)
D. VAN-CAS-1 (Client Access server)
5. Which of the following cmdlets would you use to hide a sensitive distribution group
from Exchange address lists?
A. Set-MailboxPermission
B. Set-DynamicDistributionGroup
C. Set-Group
D. Set-DistributionGroup
158 CHAPTER 4 Distribution Groups and Public Folders
Lesson 2: Setting Up Public Folders
Public folders are an Exchange feature that provides shared access to content. Although
newer technologies, such as SharePoint, may be better suited to the role that public
folders play in most Exchange deployments, public folders are still an important for many
organizations. In this lesson, you will learn how to create public folders, modify public folder
permissions, and congure public folder limits. You will learn about making public folders
highly available through replication in Chapter 13, “Exchange High-Availability Solutions.”
After this lesson, you will be able to:
n
Create public folders.
n
Congure public folder permissions.
n
Congure public folder limits.
Estimated lesson time: 40 minutes
Exchange stores public folders in special databases known as public folder databases.
You learned about creating public folder databases in Chapter 2, “Exchange Databases and
Address Lists.” You can create public folders only if there is an existing public folder database.
When you install the rst mailbox server in an Exchange organization, the setup wizard will
prompt you as to whether computers running Outlook 2003 or Microsoft Entourage are
present in your organization. If you answer yes, Exchange setup creates the public folder
database and public folders necessary to support ofine address book (OAB) distribution for
these messaging clients. Computers running Outlook 2007 and Outlook 2010 do not require
public folder infrastructure support for OAB distribution.
Exchange allows for two public folder trees: the Default Public Folders tree and the System
Public Folders tree. These folder trees host the following folder types:
n
Default Public Folders (IPM_Subtree) The folders in this tree are commonly accessed
by users through applications such as Outlook. Administrators create folders under this
public folder tree.
n
System Public Folders (Non_IPM_Subtree) The folders in this tree are accessed
indirectly by users, such as clients using older versions of Outlook accessing the OAB.
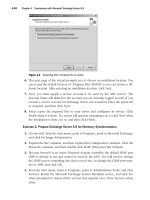
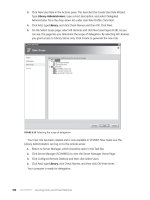
System folders hosted in this tree include EFORMS REGISTRY, OFFLINE ADDRESS BOOK,
and SCHEDULE+ FREE BUSY, as shown in Figure 4-13.
When designing a public folder hierarchy that will host a large number of public folders,
you should aim toward a deep hierarchy rather than a wide hierarchy. A deep hierarchy is one
that has many vertically nested folders. A wide hierarchy has many high-level folders but few
subfolders nested under each folder. You should favor deep hierarchies over wide hierarchies,
as deep hierarchies provide better performance during replication.
Lesson 2: Setting Up Public Folders CHAPTER 4 159
FIGURE 4-13 System public folders
Creating Public Folders
You use the Public Folder Management Console, which is located in the Toolbox node of the
EMC, to create and manage public folders. To create a public folder in the EMC, perform the
following general steps:
1. Open the Public Folder Management Console from the Toolbox node of the EMC.
2. In the Public Folder Management Console, navigate to Default Public Folders. If you
want to create a public folder within an existing folder, navigate to that folder under
the public folders node. Once you have selected the location in which you wish to
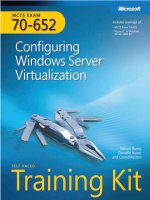
create the public folder, click New Public Folder in the Actions pane. This will bring
up the New Public Folder Wizard, shown in Figure 4-14. Enter the name of the public
folder and then click New.
To create a new public folder using the EMS, use the New-PublicFolder cmdlet. For
example, to create a new public folder named Child-Folder under the ExamplePublicFolder
on server van-ex2.adatum.com, execute the following command:
New-PublicFolder –Name 'Child-Folder' –Path '\ExamplePublicFolder' –Server 'van-ex2
.adatum.com'
MORE INFO CREATING PUBLIC FOLDERS
To learn more about creating public folders, consult the following article on TechNet:
/> 160 CHAPTER 4 Distribution Groups and Public Folders
FIGURE 4-14 Create a new public folder
Conguring Public Folder Permissions
You assign permissions to public folders by assigning roles. The Exchange 2010
predened public folder roles are Owner, PublishingEditor, Editor, PublishingAuthor, Author,
Non- EditingAuthor, Reviewer, and Contributor. These predened public folder roles are
collections of client user access rights. The Owner role includes all client user access rights,
whereas the Contributor role includes only two. The following is a list of client user access
rights and the roles that hold them:
n
ReadItems The user can read items in the public folder. The Owner, PublishingEditor,
Editor, PublishingAuthor, Author, Non-EditingAuthor, and Reviewer roles have this
right.
n
CreateItems The user can post items to the public folder. The user can send
email messages to the public folder if the public folder is mail-enabled. The
Owner, PublishingEditor, Editor, Publishing Author, Author, Non-EditingAuthor,
and Contributor roles have this right.
n
EditOwnedItems The user can edit items he or she owns in the public folder. The
Owner, PublishingEditor, Editor, Publishing Author, and Author roles have this right.
Lesson 2: Setting Up Public Folders CHAPTER 4 161
n
DeleteOwnedItems The user can delete items he or she owns in the public folder.
The Owner, PublishingEditor, Editor, Publishing Author, and Author roles have this
right.
n
EditAllItems The user can edit any items in the public folder. The Owner,
PublishingEditor, and Editor roles have this right.
n
DeleteAllItems The user can delete any items in the public folder. The Owner,
PublishingEditor, Editor, and PublishingAuthor roles have this right.
n
CreateSubfolders The user can create subfolders in the public folder. The Owner,
PublishingEditor, and PublishingAuthor roles have this right.
n
FolderOwner The user can view and move the folder, create subfolders,
and congure permissions. This access right does not allow the user to read, edit,
delete, or create items. Only the Owner role has this right.
n
FolderContact The user is the contact for the public folder. Only the Owner role
has this right.
n
FolderVisible The user can view the public folder but does not have read or edit
rights for items in the folder. All roles have this right.
You view and assign permissions to public folders using the EMS. You cannot use the EMC
to view information about or assign permissions to public folders. Depending on the type
of permission you are viewing, there are two different cmdlets you can use to view public
folder permissions. To view administrative permissions settings, use the Get-
PublicFolderAdministrativePermission cmdlet. To view client permissions settings, use the
Get-PublicFolderClientPermission cmdlet. For example, to view administrative access rights for
the Research public folder, issue the following command:
Get-PublicFolderAdministrativePermission –Identity "\Research" | Format-List
To view the list of client access permissions to the Research public folder, issue the
following command:
Get-PublicFolderClientPermission –Identity "\Research" | Format-List
To assign client permissions to a public folder, use the Add-PublicFolderClientPermission
cmdlet. For example, to congure Rooslan with the Publishing Editor permission to the
Research folder, issue the following command:
Add-PublicFolderClientPermission –Identity "\Research" –AccessRights PublishingEditor
–User Rooslan
There are two methods through which you can grant users administrative permissions to
a public folder. You can add the user to the Public Folder Management role group or you can
use the Add-PublicFolderAdministrativePermission cmdlet. For example, to add Oksana to the
Public Folder Management role group, use the following command:
Add-RoleGroupMember –Identity "Public Folder Management" –Member Oksana
162 CHAPTER 4 Distribution Groups and Public Folders
You can use the Add-PublicFolderAdministrativePermission cmdlet to assign more detailed
permissions than those provided through role group membership. For example, to add the
AllExtendedRights permission to Ian for the public folder Development and all folders under
it in the public folder hierarchy, issue the following command:
Add-PublicFolderAdministrativePermission –Identity "\Development" –User "Ian"
–AccessRights AllExtendedRights –InheritanceType SelfAndChildren
MORE INFO MANAGING PUBLIC FOLDER PERMISSIONS
To learn more about conguring permissions for public folders, consult the following
article on TechNet: />Mail-Enable Public Folder
Mail-enabling public folders allows people to post content to public folders by sending
an email message to a congured address. This allows users that are external to the Exchange
organization to post to the public folder. To mail-enable a public folder using the EMC,
perform the following general steps:
1. In the EMC, open the Public Folder Management Console from the Toolbox node.
2. Select the parent of the public folder that you wish to mail-enable and then select the
folder that you wish to mail-enable in the details pane. Click on Mail Enable on the
Actions pane.
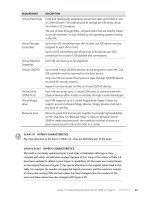
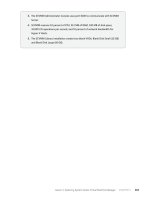
3. Right-click on the public folder in the Details pane and then click Properties. Verify
that the E-Mail Addresses tab and the Mail Flow Settings tab are present, as shown
in Figure 4-15. This indicates that the public folder is mail-enabled.
FIGURE 4-15 Mail-enabled public folder
Lesson 2: Setting Up Public Folders CHAPTER 4 163
You use the Enable-MailPublicFolder cmdlet to mail-enable a public folder from the EMS.
For example, to mail-enable the Sales public folder, issue the following command:
Enable-MailPublicFolder –Identity "\Sales"
MORE INFO MAIL-ENABLE PUBLIC FOLDER
To learn more about mail-enabling a public folder, consult the following article on Tech-
Net:
Quick Check
n
Which EMS cmdlet do you use to mail-enable an existing public folder?
Quick Check Answer
n
The Enable-MailPublicFolder cmdlet is used to mail-enable an existing public
folder.
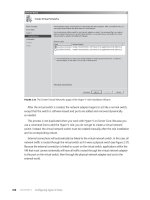
Conguring Public Folder Limits
Public folder limits allow you to congure limits on items posted to public folders, such as
maximum size and age. You congure maximum item size, deleted item retention, and item
age limits on the Limits tab of a public folder’s properties, as shown in Figure 4-16.
FIGURE 4-16 Public folder limits
164 CHAPTER 4 Distribution Groups and Public Folders
You congure message size limits using the Set-PublicFolder cmdlet with the MaxItemSize
parameter. For example, to set a 1 MB limit on the public folder \ExemplarFolder, issue the
following command:
Set-PublicFolder –Identity '\ExemplarFolder' –MaxItemSize 1MB –UseDatabaseQuotaDefaults
$false
You can congure the maximum receive size for a mail-enabled public folder through the
EMC by editing the Receiving Message Size setting in Message Size Restrictions on the Mail
Flow tab. This setting controls messages that are posted to the folder through email but does
not restrict posting through other methods. You can congure the maximum receive size for
a mail-enabled public folder using the Set-MailPublicFolder cmdlet with the MaxRecieveSize
parameter in the EMS. For example, to congure the ExemplarFolder public folder with a
maximum receive size of 1 MB for items sent to the folder through email, issue the following
command:
Set-MailPublicFolder –Identity '\ExemplarFolder' –MaxReceiveSize 1MB
To congure age limits from the EMS, use the Set-PublicFolder cmdlet with the AgeLimit
parameter and the UseDatabaseAgeDefaults $false option. For example, to set the age limit
for the ExemplarFolder public folder to 21 days, issue the following command:
Set-PublicFolder –Identity 'ExemplarFolder' –AgeLimit 21 –UseDatabaseAgeDefaults $false
MORE INFO SET-PUBLICFOLDER
To learn more about conguring public folder limitations using the Set-PublicFolder
cmdlet, consult the following article on TechNet: />library/aa998596.aspx.
EXAM TIP
Remember which public folder options can be congured using the Set-PublicFolder
cmdlet and which ones can be set using the Set-MailPublicFolder cmdlet.
Lesson Summary
n
Most public folder administrative tasks are accomplished using the EMS.
n
Use the Set-PublicFolder cmdlet to congure settings such as maximum item size
and maximum item age.
n
Use the Enable-MailPublicFolder cmdlet to mail-enable an existing public folder.
n
Use the Set-MailPublicFolder cmdlet to congure mail-specic public folder settings,
such as maximum item receive size.
n
Public folder permissions are managed through roles. The available roles are Owner,
PublishingEditor, Editor, PublishingAuthor, Author, Non-EditingAuthor, Reviewer, and
Lesson 2: Setting Up Public Folders CHAPTER 4 165
Contributor. You assign a role to a user for a specic public folder; for example, you
assign Ian the Editor role for the Research folder.
n
Use the Add-PublicFolderClientPermission cmdlet to assign PublishingEditor
and PublishingAuthor roles to specic public folders.
Lesson Review
You can use the following questions to test your knowledge of the information in Lesson 2,
“Setting Up Public Folders.” The questions are also available on the companion CD if you
prefer to review them in electronic form.
NOTE ANSWERS
Answers to these questions and explanations of why each answer choice is correct
or incorrect are located in the “Answers” section at the end of the book.
1. Which of the following EMS cmdlets allows you to mail-enable a public folder?
A. New-PublicFolder
B. Set-MailPublicFolder
C. Set-PublicFolder
D. Enable-MailPublicFolder
2. Which of the following EMS cmdlets can you use to assign the PublishingEditor role
for the Development public folder to Orin?
A. Add-PublicFolderClientPermission
B. Set-PublicFolder
C. Set-MailPublicFolder
D. Add-PublicFolderAdministrativePermission
3. Which of the following EMS cmdlets can you use to congure item age limit
settings on an existing mail-enabled public folder?
A. New-PublicFolder
B. Get-PublicFolder
C. Set-MailPublicFolder
D. Set-PublicFolder
4. Which of the following EMS cmdlets can you use to congure maximum message
size on a mail-enabled public folder? (Choose all that apply.)
A. Set-MailPublicFolder
B. Set-PublicFolder
C. Set-MailboxDatabase
D. Set-PublicFolderDatabase
166 CHAPTER 4 Distribution Groups and Public Folders
PR AC TI CE Mail-Enabled Users, Contacts, Distribution Groups,
and Public Folders
In this set of exercises, you will create and congure mail-enabled users, contacts, distribution
groups, dynamic distribution groups, and public folders.
EX E RC I S E 1 Congure Mail-Enabled Users and Contacts
In this exercise, you will create mail-enabled users as well as mail contacts. To complete this
exercise, perform the following steps:
1. Log on to computer VAN-EX2 with the Kim_Akers user account and open the EMC.
Verify that the Kim_Akers account has a mailbox. If one is not present, use the New
Mailbox Wizard to attach an Exchange mailbox in the default database to this account.
2. Right-click on the Recipient Conguration node and then click on New Mail Contact.
This will open the New Mail Contact Wizard. Ensure that New Contact is selected and
then click Next. Enter the details, as shown in Figure 4-17, and then click Edit and enter
the email address in the SMTP Address dialog box.
Click OK to close that dialog box and then click Next.
FIGURE 4-17 New Mail Contact Wizard
3. On the page that shows the conguration summary, click New and then click Finish.
4. Right-click on the Recipients node and then click on New Mail User. This will open
the New Mail User Wizard. Ensure that New User is selected and then click Next.
Lesson 2: Setting Up Public Folders CHAPTER 4 167
5. In the User Information dialog box, enter the information, as shown in Figure 4-18,
with Pa$$w0rd set as the user password and then click Next.
FIGURE 4-18 New Mail User Wizard
6. On the Mail Settings page, enter the alias anne.wallace. Click on Edit and enter the
external email address , click OK, and then click Next.
7. On the Conguration Summary page, click New and then click Finish.
8. Open the EMS and enter the following command:
New-MailContact –ExternalEmailAddress 'SMTP:' –Name
'Darren Waite' –Alias 'darren.waite' –FirstName 'Darren' –LastName 'Waite'
9. In the EMS, issue the following command:
New-MailUser –Name 'Rob Walters' –Alias 'Rob.Walters' –UserPrincipalName
'' –SamAccountName 'rob.walters' –FirstName 'Rob' –LastName
'Walters' –ExternalEmailAddress 'SMTP:'
10. When prompted by the EMS, enter the password Pa$$w0rd.
11. Verify the creation of the Anne Wallace and Rob Walters Mail Users by entering
the command Get-MailUser.
12. Verify the creation of the Roland Wacker and Darren Waite mail contacts by entering
the command Get-MailContact.
168 CHAPTER 4 Distribution Groups and Public Folders
EX E RC I S E 2 Create and Congure Distribution Groups
In this practice, you will mail-enable an existing security group, create a new distribution group, and
congure membership approval settings. To complete this exercise, perform the following steps:
1. Ensure that you are logged on to computer VAN-EX2 with the Kim_Akers user account.
From the Administrative Tools menu, open Active Directory Users And Computers.
In the Users container, create a new universal security group named Explorers. Close
Active Directory Users And Computers.
2. In the EMC, click on the Distribution Group node under the Recipient Conguration
node. In the Actions pane, click on New Distribution Group.
3. On the Introduction page of the New Distribution Group Wizard, select Existing Group
and then click Browse. In the Select Group dialog box, click on Explorers and then click
OK. Click Next.
4. On the Group Information page, enter the alias ExplorersDG and then click Next.
Click New and then click Finish.
5. Open the EMC and issue the following command:
New-DistributionGroup –Name "DirectorsDG" –OrganizationalUnit "adatum.com/Users"
–SAMAccountName "Directors" –Type "Distribution"
6. In the EMC, click on the Distribution Group node and then click on the DirectorsDG
distribution group. In the Actions pane, click Properties.
7. On the Group Information tab, click on Add. Click on Ann Wallace and then click on OK.
8. On the Membership Approval tab, ensure that the owner approval settings match
those in Figure 4-19 and then click OK.
FIGURE 4-19 Membership approval
Lesson 2: Setting Up Public Folders CHAPTER 4 169
EX E RC I S E 3 Create and Congure a Dynamic Distribution Group
In this practice exercise, you will create and congure a dynamic distribution group called
Research. To complete this exercise, perform the following steps:
1. Ensure that you are logged on to computer VAN-EX2 with the Kim_Akers user account.
Navigate to the Recipient Conguration node and select the Anne Wallace Mail User.
In the Actions pane, click on Properties. On the Organization tab of the Ann Wallace
Properties dialog box, enter Research in the Department text box, as shown in
Figure 4-20, and then click OK.
FIGURE 4-20 Configure Anne Wallace Organization attribute
2. Select the Rob Walters Mail User. In the Actions pane, click on Properties. On the
Organization tab of the Rob Walters Properties dialog box, enter Development in the
Department text box and then click OK.
3. Select the Recipient Conguration\Distribution Group node and then click on New
Dynamic Distribution Group in the Actions pane. This will open the New Dynamic
Distribution Group Wizard.
4. On the Introduction page, enter ResearchDDG in the Name and Alias text boxes and
then click Next. On the Filter Settings page, click Next.
5. On the Conditions page, select the Recipient Is In A Department condition. Click on
the underlined word Specied to open the Specify Department dialog box. Enter
170 CHAPTER 4 Distribution Groups and Public Folders
Research and then click Add and then click OK. Verify that the Conditions page
matches Figure 4-21 and then click Preview.
FIGURE 4-21 New Dynamic Distribution Group conditions
6. In the Dynamic Distribution Group Preview window, verify that Ann Wallace is listed
and then click OK. Click Next. On the Conguration Summary page, click New.
Click Finish when the group is created.
7. In the EMS, issue the following command:
New-DynamicDistributionGroup –Name 'DevelopDDG' –IncludedRecipients
'AllRecipients' –ConditionalDepartment 'Development' –Alias 'DevelopDDG'
8. In the EMC, right-click on DevelopDDG under Recipient Conguration\Distribution
Group and then click Properties.
9. On the Mail Flow Settings tab, click on Message Delivery Restrictions and then click
Properties.
10. On the Message Delivery Restrictions dialog box, select Only Senders In The Following
List and then click Add. In the Select Recipient dialog box, click DevelopDDG and then
click OK. Verify that the Message Delivery Restrictions dialog box matches Figure 4-22
and then click OK twice.
Lesson 2: Setting Up Public Folders CHAPTER 4 171
FIGURE 4-22 Message delivery restrictions
11. In the EMS, issue the following command:
Set-DynamicDistributionGroup –AcceptMessagesOnlyFromSendersOrMembers 'Adatum.com/
Users/ResearchDDG' –Identity 'adatum.com/Users/ResearchDDG'
EX E RC I S E 4 Create and Congure a Public Folder
In this practice exercise, you will create and congure a public folder. To complete this
exercise, perform the following steps:
1. Ensure that you are logged on to computer VAN-EX2 with the Kim_Akers user account.
Verify that there are no public folder databases present on VAN-EX2 by opening the EMS
and issuing the command Get-PublicFolderDatabase. The output from this command
should inform you that no public folder databases are present on server VAN-EX2.
WARNING EXISTING PUBLIC FOLDER DATABASE
You cannot perform this practice if you have already created a public folder data-
base on computer VAN-EX2. You may have done this to test commands when reading
through the text of Chapter 2, but creating a public folder database was not directly
part of any practice exercise.
2. From the EMS, issue the following command:
New-PublicFolderDatabase PublicFolderDB –Server VAN-EX2
172 CHAPTER 4 Distribution Groups and Public Folders
3. When the command listed in step 2 completes, enter the following command:
Mount-Database PublicFolderDB
4. Open the EMC. From the Toolbox node, open the Public Folder Management Console.
Click on the Default Public Folders node and then click on New Public Folder in the
Actions pane. This will open the New Public Folder Wizard.
5. In the Name text box, enter the name ExPublicFolder and then click New. When the
folder is created, click Finish.
6. Right-click on ExPublicFolder and then click on Mail Enable. This will enable the public
folder to receive email.
7. Right-click on EXPublicFolder and then click on Properties. In the
ExPublicFolderProperties dialog box, click on the E-Mail Addresses tab and verify
that it matches the information, as shown in Figure 4-23.
FIGURE 4-23 Mail-enable public folder properties
8. Click on the Limits tab. Congure the limits for the Public Folder, as shown in
Figure 4-24, and then click Apply.
9. On the Mail Flow Settings tab, click on Message Delivery Restrictions and then click
Properties. Select the Only Senders In The Following List option and then click Add.
In the Select Recipient dialog box, select DevelopDDG and then click OK twice.
Lesson 2: Setting Up Public Folders CHAPTER 4 173
10. Open the EMS and issue the following commands:
New-PublicFolder –Name 'PublicFolderTwo' –Path '\' –Server VAN-EX2
Enable-MailPublicFolder –Identity '\PublicFolderTwo'
Set-PublicFolder –Identity "\PublicFolderTwo" –Server VAN-EX2 -AgeLimit '5.00:00:00' –
MaxItemSize 2MB –RetainDeletedItemsFor '10.00:00:00' -UseDatabaseAgeDefaults
$False –UseDatabaseQuotaDefault $false –UseDatabaseRetentionDefaults $false
Set-MailPublicFolder –Identity "\PublicFolderTwo" –Server VAN-EX2
-AcceptMessagesOnlyFromSendersOrMembers 'adatum.com/Users/ResearchDDG'
FIGURE 4-24 Public folder limits
174 CHAPTER 4 Distribution Groups and Public Folders
Chapter Review
To further practice and reinforce the skills you learned in this chapter, you can perform the
following tasks:
n
Review the chapter summary.
n
Review the list of key terms introduced in this chapter.
n
Complete the case scenarios. These scenarios set up real-world situations involving
the topics of this chapter and ask you to create a solution.
n
Complete the suggested practices.
n
Take a practice test.
Chapter Summary
n
Mail contacts allow external addresses to be added to Exchange address books.
Mail-enabled users are Active Directory user accounts associated with an external
email address.
n
Distribution group membership is managed manually. Dynamic Distribution Group
membership is determined by a recipient lter. Security-enabled distribution groups
can be assigned permissions to objects, such as le shares.
n
Users can post items to mail-enabled public folders by emailing the public folder’s
email address.
n
Public folder settings, such as maximum item size and age, are managed with the
Set-PublicFolder cmdlet.
n
Public folder permissions are managed through the assignment of roles to users for
specic public folders.
Key Terms
Do you know what these key terms mean?
n
Dynamic distribution group
n
Moderation
n
Proxy address
n
Send as
Chapter Review CHAPTER 4 175
Case Scenarios
In the following case scenarios, you will apply what you’ve learned about subjects of this
chapter. You can nd answers to these questions in the “Answers” section at the end of
this book.
Case Scenario 1: Contacts and Distribution Groups at Contoso
You are the Exchange administrator at Contoso. The executive assistant to the company
president has asked you to create a group named Important_Announcements that she can
add users to manually. She does not want users to be able to add or remove themselves to
the group, as this will allow her to strictly manage group membership. You want to create
a separate group that includes all mailbox users in the Engineering Department. Group
membership should be updated automatically as people join and leave the department.
With these facts in mind, answer the following questions:
1. What type of group should you create for the Important_Announcements group?
2. What properties should you congure when creating the recipient lter for the
EngineersDD dynamic distribution group?
3. What steps can you take to stop people from leaving the Important_Announcements
group without authorization?
Case Scenario 2: Public Folders at Fabrikam
You are in the process of reviewing how public folders are used at Fabrikam. At the moment,
members of the customer service team must manually post customer feedback to the
Customer_Service public folder. You want to allow customers to be able to post messages to
this folder by sending emails to a specic address. You want to ensure that all items posted
to the Customer_Service public folder expire after 48 days. You also want to ensure that users
at Fabrikam can post items of any size to the public folder but that people sending email
messages to the folder are limited to sending messages that are 1,024 KB in size. With these
facts in mind, answer the following questions:
1. What step can you take to ensure that customers outside Fabrikam can post items
to the Customer_Service public folder?
2. What cmdlet should you use to ensure that the Customer_Service public folder
will not accept email messages greater than 1,024 KB in size?
3. What cmdlet should you use to ensure that messages in the public folder older than
48 days expire?
176 CHAPTER 4 Distribution Groups and Public Folders
Suggested Practices
To help you successfully master the exam objectives presented in this chapter, complete
the following tasks.
Congure Recipients and Distribution Groups
You can perform these practice exercises on VAN-EX1 after you complete the main practice
exercise at the end of Lesson 2.
n
Practice 1 Use the EMC to create a dynamic distribution group named
WesternAustralia that includes only the mail-enabled users in the adatum.com
Exchange organization. Congure the group with the proxy address
n
Practice 2 Use the EMS to create a moderated distribution group where users can
join or leave the group only with the permission of the group owner.
Congure Public Folders
You can perform these practice exercises on VAN-EX1 after you complete the main practice
exercise at the end of Lesson 2.
n
Practice 1 Use the EMC to create a dynamic distribution group named Tasmania
that includes only the mail-enabled users in the adatum.com Exchange organization.
Congure the group with the proxy address
n
Practice 2 Use the EMS to create a moderated distribution group where users can
join or leave the group only with the permission of the group owner.
Take a Practice Test
The practice tests on this book’s companion CD offer many options. For example, you can test
yourself on just one exam objective, or you can test yourself on all the 70-662 certication
exam content. You can set up the test so that it closely simulates the experience of taking
a certication exam, or you can set it up in study mode so that you can look at the correct
answers and explanations after you answer each question.
MORE INFO PRACTICE TESTS
For details about all the practice test options available, see the “How to Use the Practice
Tests” section in this book’s Introduction.
Chapter 5 177
C H A P T E R 5
Conguring Client Access
C
lient Access servers mediate user access to mailboxes. Users interact with the Client
Access server through protocols such as Remote Procedure Call (RPC), Post Ofce
Protocol (POP), Internet Message Access Protocol (IMAP), Outlook Anywhere, or ActiveSync
or indirectly through Outlook Web App (OWA). In this chapter you will learn how to
congure Exchange 2010 Client Access servers to support access to Client Access servers,
including securing access through Secure Sockets Layer (SSL) certicates and appropriate
authentication protocols. You will also learn how to congure Autodiscover, an Exchange
functionality that allows mobile devices and Outlook clients to have settings automatically
populated based on Active Directory logon information or user email address and
password. This chapter will teach you how to congure the POP3 and IMAP4 services, RPC
Client Access, and Exchange Control Panel settings and how to enable and disable features
for OWA.
Exam objectives in this chapter:
n
Congure POP, IMAP, and Microsoft ActiveSync.
n
Congure Outlook Anywhere and RPC Client Access.
n
Congure Outlook Web App (OWA).
Lessons in this chapter:
n
Lesson 1: IMAP, POP, and ActiveSync 179
n
Lesson 2: Outlook Anywhere and RPC Clients 193
n
Lesson 3: Outlook Web Access 199
Before You Begin
In order to complete the exercises in the practice sessions in this chapter, you need to have
done the following:
n
Installed VAN-DC, VAN-EX1, and VAN-EX2 as described in the Appendix.
Conguring Client Access
Before You Begin
Lesson 1: IMAP, POP, and Microsoft ActiveSync
Client Access Server Certicates
Assigning an External Name
Congure POP and IMAP
Autodiscover
ActiveSync
Lesson Summary
Lesson Review
Lesson 2: Outlook Anywhere and RPC Clients
Outlook Anywhere
Congure RPC Client Access
Congure Client Access Array
Client Throttling Policies
Lesson Summary
Lesson Review
Lesson 3: OWA
Congure File Access and WebReady
Document Viewing
Segmentation Settings
OWA Virtual Directory Properties
Exchange Control Panel
Lesson Summary
Lesson Review
Chapter Review
Chapter Summary
Key Terms
Case Scenarios
Case Scenario 2: OWA at Tailspin Toys
Suggested Practices
Congure ActiveSync
Congure Autodiscover
Congure OWA
Take a Practice Test
178 Chapter 5 Conguring Client Access
REAL WORLD
Orin Thomas
I
t is no secret that most organizations do not alter the default OWA page. It is
also not a secret that many people also ignore SSL certicate warnings. These
nonsecrets add up to OWA being a target for password harvesting. If an attacker
is able to trick a person into visiting a website that they believe is their company’s
OWA site, then that attacker is in a good position to collect that person’s logon
credentials. If you are using OWA in your organization, you should ensure that users
have to change their passwords frequently. You can ensure that users are unable to
change their passwords through OWA, as an attacker might once they have gained
a user’s password, by disabling that functionality through segmentation settings.
Although OWA provides organizations with convenient email access, you need to
keep in mind the security issues that it raises. In this chapter, you will learn about
the options available that enable you to lock OWA down so that even if an attacker
did get hold of someone’s authentication credentials, their access to attachments
stored on internal le servers would be minimized.
Lesson 1: IMAP, POP, and Microsoft ActiveSync Chapter 5 179
Lesson 1: IMAP, POP, and Microsoft ActiveSync
When you use SSL to secure a connection, third parties that might be intercepting your
transmission are unable to access the content of that communication. This is especially
important today when many clients are accessing sensitive organizational communication
over insecure networks such as the wireless access point at the local coffee shop. IT
departments must often support operating systems that do not support Microsoft Outlook.
Alternative mail clients often use either the IMAP4 or POP3 protocols to retrieve messages
from Exchange mailboxes, and you will learn how to congure that access in this lesson.
Autodiscover is an automatic conguration service designed for recent versions of Outlook
and mobile clients. In this lesson, you will learn how to congure SSL certicates for use with
Client Access servers, the steps that you take to congure ActiveSync, what you need to do
to allow clients to use the IMAP4 and POP3 protocols to access their mailboxes, and how
to congure Autodiscover.
After this lesson, you will be able to:
n
Congure POP and IMAP.
n
Manage certicates.
n
Congure mobile device policies.
n
Manage Autodiscover.
n
Congure ActiveSync.
Estimated lesson time: 40 minutes
Client Access Server Certicates
Secure Sockets Layer (SSL) certicates allow clients to establish an encrypted connection
to be established between a client and a Client Access server. SSL certicates, also called
server certicates, also have the added benet of verifying the identity of the Client Access
server to the client. When you install Exchange on a computer, it installs a default self-signed
certicate. As a trusted Certicate Authority (CA) did not create or sign this certicate, the
certicate will be trusted only by other Exchange servers in the same organization, not by
any clients in the same organization. Administrators need to take extra steps to get clients to
trust these certicates, and it is often easier to look for an alternative solution, such as getting
a certicate from an internal CA. The Exchange self-signed certicate will have Subject
Alternative Names (SANs) that correspond to the name of the Exchange server, including
the server name and the server’s fully qualied domain name.
SANs are a certicate functionality that allows a certicate to be mapped to multiple fully
qualied domain names. For example, Internet clients might access a server as owa.contoso
.com, and internal network clients might access the same server as owa.contoso.internal. If the
certicate did not support SANs, the SSL certicate would support only one name, and clients
180 Chapter 5 Conguring Client Access
accessing the server using the other name would encounter an error. You will congure Active
Directory Certicate Services to support the issuance of certicates that use SANs in the
practice exercise at the end of this chapter.
SSL certicates are usually signed by an internal or a trusted third-party CA. Certicates
signed by trusted third-party CAs are trusted by both internal and external clients, but
obtaining these certicates can cost money. Obtaining a certicate from an internal CA has
no associated charge, but clients outside your organization are unlikely to trust the certicate.
You obtain a certicate by running the New Exchange Certicate Wizard and submitting the
resulting certicate request le to your CA of choice.
To run the New Exchange Certicate Wizard, perform the following general steps:
1. In the Exchange Management Console (EMC), click on the Server Conguration node
and then click on New Exchange Certicate in the Actions pane. This will launch the
New Exchange Certicate Wizard.
2. Provide a friendly name for the certicate and click Next.
3. On the Domain Scope page, specify whether you want to apply this certicate to all
subdomains using wildcards. This option allows you to add subdomains at a later stage
without having to update an existing certicate.
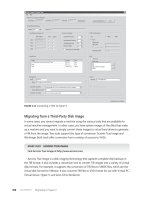
4. On the Exchange Conguration page, use the arrows to expand access so that you can ll
in details about the roles that you want the certicate to service. For example, for a Client
Access server where you wanted to support Exchange Web Services, Outlook Anywhere,
and Autodiscover, you would expand and congure the settings, as shown in Figure 5-1.
FIGURE 5-1 Certificate Request Wizard
Lesson 1: IMAP, POP, and Microsoft ActiveSync Chapter 5 181
5. You can use this page of the wizard to congure a request for all roles the server holds.
To do this, expand and complete each relevant section.
6. Review the Certicate Domains that the request will contain. On this page, you can add
additional SANs.
7. On the Organization and Location page, enter organization and location information.
You also specify the location to which the wizard should save the certicate request le.
When an appropriate CA has processed your certicate request, you can use the Complete
Pending Request option, available when the friendly name is selected within the EMC, to
install the newly requested certicate.
Once you have installed the certicate, you will be able to assign services to the certicate.
Assigning services congures specic services on the Exchange server to use the certicate for
identication and secure communication. To assign a specic certicate to Exchange services,
perform the following general steps:
1. In the EMC, select the certicate by selecting the Server Conguration node and then
select the Exchange server where you installed the certicate.
2. Select the certicate and then click on Assign Services to Certicate in the Actions
pane. This will bring up the Assign Services to Certicate Wizard. Select the servers
where you want to assign the certicate.
3. On the Select Services page, as shown in Figure 5-2, select each service to which you
want Exchange to assign the certicate.
FIGURE 5-2 Assign services to certificate