Photoshop CS4 for Dummies phần 8 pptx
Bạn đang xem bản rút gọn của tài liệu. Xem và tải ngay bản đầy đủ của tài liệu tại đây (3.65 MB, 42 trang )
ߜ Anti-Aliasing: Anti-aliasing soft-
ens the edges of each charac-
ter so that it appears smooth
on-screen. As part of this
process, anti-aliasing hides the
corners of the individual pixels
with which the text is created.
When outputting to a laser
printer or other PostScript
device, anti-aliasing isn’t
required. It is, however, critical
when printing to an inkjet or
when producing Web graphics.
Generally, the choices here
have little difference among
them (other than None, of
course). Smooth is a good
choice unless your text begins
to look blurry, in which case
you should switch to Crisp.
Use the Strong option with
very large type when the indi-
vidual character width must be preserved.
ߜ Alignment: The three alignment choices on the Options bar determine
how lines of type are positioned relative to each other. The buttons do a
rather eloquent job of expressing themselves, wouldn’t you say?
Note:
Don’t confuse the term alignment with justification, which straightens
both the left and right margins (and is selected in the Paragraph panel).
ߜ Type Color: Click the color swatch on the Options bar to open the Color
Picker and select a type color. You can select a color before adding text,
or you can change the color of the text later. If you start by selecting a
type layer from the Layers panel, you’ll change all the characters on that
layer when you select a new color in the Color Picker. Alternatively, use
a type tool to select one or more characters for a color change, as you
can see in Figure 13-9.
ߜ Warp Text: Warp Text, which I discuss later in this chapter, bends the
line of type according to any number of preset shapes, each of which
can be customized with sliders. (The text in Figure 13-9 uses the Arc
Lower warp style.) Keep in mind, however, that the Warp Text feature
isn’t available when the Faux Bold style is applied through the Character
panel. (I talk about faux styles later in this chapter.)
279
Chapter 13: Giving Your Images a Text Message
Figure 13-8: Some fonts have many styles
available.
19 327258-ch13.qxp 8/20/08 11:39 PM Page 279
280
Part III: Creating “Art” in Photoshop
Figure 13-9: Select any individual character and change its font, color, size, or any other
attribute.
Each character in a type layer can have its own attributes. Click and drag
over one or more characters with a type tool and then use the Options bar or
Character panel to change the text attributes. Color, font, style — just about
any attribute can be assigned, as you saw in Figure 13-9.
Like many word-processing programs, you can select an entire word in
Photoshop by double-clicking the word (with a type tool). Triple-click to
select the entire line. Quadruple-click to select the entire paragraph. Click
five times very fast to select all the text.
Taking control of your text with panels
For incredible control over the appearance of your text, use the Character
and Paragraph panels. In addition to all the text attributes available on the
Options bar, the panels provide a wide range of choices. With them, you can
customize the general appearance of the text or apply sophisticated typo-
graphic styling.
The Character and Paragraph panels can be shown and hidden by using the
Panels button on the Options bar or through the Window menu. By default,
the two panels are nested together, so choosing Window
➪Character or
Window
➪Paragraph makes both panels available.
19 327258-ch13.qxp 8/20/08 11:39 PM Page 280
You can use the Character panel to edit a single selected character, a series
of selected characters, or the entire content of a type layer. Figure 13-10
shows what you face when “building character” using this panel.
Figure 13-10: More choices than the Options bar!
Unless you’re a typographer, a number of the fields in the Character panel
might require explanation:
ߜ Leading: Leading (pronounced LED-ding rather than LEED-ing and which
refers to the lead strips of metal that typesetters used to place between
lines of type) is the vertical space between lines of text. Generally, you’ll
leave Leading set to Auto. However, you can select one or more lines of
text (select the whole line) and change the spacing. Adding more space
gives the text an airy, light appearance. Reducing the leading tightens up
the text, which enables you to fit more lines in the same area.
ߜ Kerning: The space between two characters is determined by the
kerning built into a font. You can, however, override that spacing. Click
with a type tool between two letters and then change the setting in the
Kerning field to change the distance between the letters. You might, for
example, want to reduce the kerning between a capital
P and a lower-
case
o to tuck the second character protectively under the overhang of
the taller letter. This can produce a cleaner and better-connected rela-
tionship between the two characters.
ߜ Scaling: Vertical and horizontal scaling modifies the height and width of
the selected character(s). You’ll find this useful primarily for customiz-
ing short bits of type rather than long chunks of text.
ߜ Baseline Shift: Produce subscript and superscript characters, such
as those used in H
2
O and E = mc
2
, with the Baseline Shift field. The
Character panel’s Baseline Shift option is best used in conjunction
with a slight reduction in the font size for the specific character(s).
Open palette menu
Font family
Font style
Font size
Leading
Kerning
Tracking
Horizontal scale
Vertical scale
Text color
Baseline shift
Faux styles
Anti-aliasing
Dictionary
281
Chapter 13: Giving Your Images a Text Message
19 327258-ch13.qxp 8/20/08 11:39 PM Page 281
282
Part III: Creating “Art” in Photoshop
ߜ Faux Styles: Use faux styles to apply the appearance of a character
style, even when they’re not built into the font. From the left, as the but-
tons show, the available faux styles are Bold, Italic, All Caps, Small Caps,
Superscript, Subscript, Underline, and Strikethrough. Generally speak-
ing, if a font offers a specific style in the Font Style menu, you’ll use the
font’s built-in style rather than the faux style.
ߜ Dictionary: Photoshop has almost three dozen dictionaries built in.
And, wonderfully or confusingly depending on your personal linguistic
talents, you can assign dictionaries on a word-by-word (or even charac-
ter-by-character) basis. You could, for example, insert a
bon mot into the
middle of your text in the language of your choice, assign the appropri-
ate language dictionary, and not have that phrase trigger an alert when
you run a spell check (Edit
➪Check Spelling).
Type warping isn’t available when Faux Bold is applied to any of the selected
characters. As warped as it might sound, that’s the only faux style that inter-
feres with Warp Text.
If you click in your image window and start typing but no characters appear,
check the Layers panel to make sure no layer is hiding your type layer and
verify that your text color isn’t the same as the background over which
you’re typing. If neither of those factors is the problem, it’s likely an invalid
setting in the Character panel. Press the Escape key, and then right-click on
the Type tool icon at the left end of the Options bar and select Reset Tool.
You’ll probably find yourself using certain sets of options pretty regularly in
Photoshop. Luckily for you, you don’t need to make changes on the Options
bar and Character panel every time you want (for example) Arial Bold, 24 pt,
Sharp anti-aliasing, 22 pt leading, and tracking +10. Set up the options once
and then click the Create New Tool Preset button in the panel at the left end
of the Options bar, as shown in Figure 13-11. The next time that you want
those specific text attributes, select the preset from that panel, and you’re
ready to type!
Figure 13-11: Tool presets can save you lots of time.
19 327258-ch13.qxp 8/20/08 11:39 PM Page 282
The Paragraph panel is used, not surprisingly, with paragraph type. The
alignment options that you see in the upper left of the Paragraph panel in
Figure 13-12 can be applied to both point type and type on a path, but you
can usually access your alignment options much more easily from the
Options bar.
Figure 13-12: Most of this panel is only for paragraph type.
I use the term type container when I discuss the Paragraph panel and para-
graph type. Think of it as a rectangular column of text, with the words flowing
from line to line, just as they do when you compose e-mail or use a word
processor. You drag a type tool to create the rectangle, and then you type
inside that rectangle. In contrast, when you simply click a type tool and start
typing, you need to press Return (Mac) or Enter (Windows) at the end of
each line.
You can find specific information about some of these options later in the
chapter (when I discuss paragraph type), but here’s a quick look at the
choices in the Paragraph panel:
ߜ Alignment: As the text flows from line to line in your type container, the
alignment option determines how the lines will stack. You can align the
text for a straight left edge, a straight right edge, or you can have the
lines stack centered upon each other. Which option is selected also
determines where text will be placed in relationship to the point in the
image where you click when adding
point type.
ߜ Justification: Unlike alignment, which balances lines of type based on a
point of origin (left, center, or right),
justification equalizes both the left
and right margins of a paragraph of type. As you can see by the icons,
the difference among the four options is the last line in the paragraph.
That last line can be aligned left, centered, aligned right, or stretched to
fit from left to right (called
full justification).
ߜ Indent Margins: Paragraphs of text can be indented from the left margin
or the right. Even if you have only a single word selected, the entire para-
graph is indented. Harkening back to that last term paper you wrote
(whenever that might have been), think in terms of a block quote. You
can also use negative numbers in the Indent Margin fields, which extends
the paragraph beyond the margin.
Justification options
Alignment options
Indent right margin
Indent left margin
Space after paragraph
Indent first line
Space before paragraph
Hyphen paragraph type
283
Chapter 13: Giving Your Images a Text Message
19 327258-ch13.qxp 8/20/08 11:39 PM Page 283
284
Part III: Creating “Art” in Photoshop
ߜ Indent First Line: You can indent the first line of your paragraphs
(or extend the first line to the left past the margin with a negative value)
without having to press the Tab key. The option can be set before you
start adding text and is applied to each paragraph.
ߜ Space Before/After: When your type container includes multiple para-
graphs (created by pressing the Return/Enter key), you can specify the
distance that’s automatically added between them. Rather than pressing
the Return/Enter key an extra time between paragraphs, set the spacing
in the Paragraph panel.
ߜ Hyphenation: If you’re using justification rather than alignment, I recom-
mend keeping the Hyphenate check box marked. When words at the
ends of lines of justified type aren’t hyphenated, the spacing within the
lines can get rather messy. If you don’t like the look of hyphens along the
right margin, clear the Hyphenate check box.
Keep in mind that after you drag a type tool to create a type container, you
can have as many paragraphs as fit. When you reach the end of a paragraph,
press Return/Enter. A new paragraph is created within the type container.
Consider the type container to be a column of text, such as you’d see in a
newspaper, magazine, or newsletter.
The panel menus — even more options
Like most of Photoshop’s panels, clicking the menu button in the upper-right
corner of the Character or Paragraph panel opens the Panel menu, which
holds a cornucopia of options you probably never need to see. (Consider this:
If it were a
really important option, it would be easier to get to, wouldn’t it?)
As you can see in Figure 13-13, not all menu options are available for all fonts.
Some of the options are merely command forms of the panel menus (such as
the faux styles), and other options are specific to Japanese fonts. A number
of the options apply only to
OpenType fonts, which include a much larger
selection of
glyphs (characters) than do other fonts.
Here are a couple of panel menu options with which you should be familiar:
ߜ Fractional Widths: When selected, Photoshop uses this option to adjust
the spacing between letters on an individual basis. Will you or I spot the
difference? Not with large type, but if you’re creating small text (espe-
cially for the Web), clear this option. How small is small? Generally 10 pt
or smaller.
ߜ System Layout: Unless you need to match the appearance of text in
TextEdit for Mac or Windows Notepad, leave this option deselected.
When might you need it? When designing interface items for a program
or game.
19 327258-ch13.qxp 8/20/08 11:39 PM Page 284
Figure 13-13: Not all options are used with all fonts.
ߜ No Break: When working with paragraph type, you can select one or
more words and choose No Break to prevent them from being hyphen-
ated. You might want to do this with words that are difficult to recognize
when split between two lines.
ߜ Roman Hanging Punctuation: Found on the Paragraph panel menu, this
option permits the smaller punctuation marks located at the left and
right margins of justified text to hang out past the margins. When
commas and the like are outside the margin, the margin itself has a
cleaner look. Don’t use this option if your layout can’t handle text that
extends past the edges of your column.
ߜ Adobe Composer: This choice is actually quite simple: Single-Line
Composer looks at one line of type to determine hyphenation. Every-
Line Composer looks at the entire block of text, generally producing a
more pleasing appearance.
285
Chapter 13: Giving Your Images a Text Message
19 327258-ch13.qxp 8/20/08 11:39 PM Page 285
286
Part III: Creating “Art” in Photoshop
ߜ Reset (panel name): If you’re seeing some strange behavior from your
type tools, you might want to invoke the Reset Character and Reset
Paragraph commands. They restore the settings in their respective
panels to the defaults, eliminating any errant setting that might be caus-
ing the problem.
Remember that you can right-click the tool icon at the left end of the Options
bar and select Reset Tool (or Reset All Tools) to immediately return to the
tool’s default settings. If the Type tool doesn’t seem to be working correctly,
reset and then reselect your options.
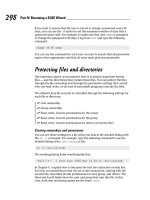
Putting a picture in your text
Enough of that heavy stuff for now — time to take a look at one of the coolest
things that you can do with text. Here’s an easy way to create a text-shaped
picture, one that’s fully editable.
1. Using File➪Open, Adobe Bridge, or by double-clicking an image file,
open a photo in Photoshop.
2. If the Layers panel has a layer named
Background, double-click the
layer name and rename the layer (as shown in Figure 13-14). If the
image has multiple layers, choose Layer
➪Merge Visible.
You want to work with a single regular (not background) layer for this
project. Background layers don’t support transparency, and no layers
can be placed below a Background layer.
Figure 13-14: Renaming a background layer converts it to a regular layer.
19 327258-ch13.qxp 8/20/08 11:39 PM Page 286
3. Add your type with the Horizontal Type tool.
4. Click the type layer in the Layers panel and drag it below the image
layer.
5. In the Layers panel, Option+click (Mac) or Alt+click (Windows) the
line between the two layers.
The two layers are joined together, as shown in Figure 13-15. When you
clip two layers, the lower layer serves as a
mask for the upper layer. The
upper layer is visible only where the lower layer has pixels and adopts
the opacity of those lower-layer pixels.
Figure 13-15: “Clip” the upper layer to the lower layer.
6. Finish the image with a layer style (applied to the lower layer) and
any other artwork that the project requires.
You can click the lower layer in the Layers panel and then click a
favorite layer style in the Styles panel. Or, of course, you can create a
custom layer style by choosing Layer
➪Layer Style. In Figure 13-16, you
see a stroke, a bevel, and a slight outer glow applied to the GARDENS
layer.
287
Chapter 13: Giving Your Images a Text Message
19 327258-ch13.qxp 8/20/08 11:39 PM Page 287
288
Part III: Creating “Art” in Photoshop
Figure 13-16: Add layer styles to the lower layer so that the effects are visible.
Creating Paragraphs with Type Containers
Although the vast majority of the text that you add to Photoshop artwork is
point type — that is, type that exists on just one or a couple of lines — you’ll
certainly find situations in which you need to use paragraph type in a type
container. The primary advantage of using paragraph type is
word wrap.
While you type, the text automatically starts a new line every time it reaches
the margin.
“Why is that a big deal?” you might ask. “I don’t mind pressing the Return or
Enter key at the end of each line.” Ah, but consider the ever-present (when
you type like me) typographical error! What if the very first sentence of your
manual-Return paragraph is missing a word? To insert that word and main-
tain a visually pleasing right margin, you’d need to go back and redo every
line of type. With paragraph type, the content of each line automatically
adjusts as you insert that forgotten word.
The difference between point type to create a column of type and paragraph
type is comparable with the difference between a typewriter and a word
processor. (If you’re old enough to remember Wite-Out and Liquid Paper,
raise your hand, but not for very long — I don’t want to tire you out.)
Adding a type container is simple. Click and drag with the Horizontal Type
tool (or, in some rare cases, you might want to use the Vertical Type tool),
and then start typing. The type automatically starts the next line as soon as
you press enough keys to reach the far margin. You can keep typing until you
fill the type container. Press Return or Enter whenever you want to start a
new paragraph within your type container.
19 327258-ch13.qxp 8/20/08 11:39 PM Page 288
You can also copy/paste text from a word-processing or text-editing program.
You can, for example, open a Microsoft Word document in Word, select the
text that you want by clicking and dragging, and then choose Edit
➪Copy to
place the text into the computer’s memory (on the
Clipboard). Switch to your
Photoshop document; select a font, font size, and other attributes; drag a
type container; and then choose Edit
➪Paste (or the assigned keyboard short-
cut) to place your text inside the container. When the text you need already
exists, you not only save time by using copy/paste, but you also eliminate the
possibility of introducing typos.
But what if you have more text than fits in the type container? Unlike
Illustrator and InDesign, you can’t
link two type containers, enabling the
excess text to automatically move to the next container. Photoshop does,
however, remind you that your text doesn’t fit by showing you a symbol in
the lower-right corner of the type container’s
bounding box — the dashed line
surrounding the type container. As you can see in Figure 13-17, the lower-
right anchor point of the bounding box has a plus sign in it.
Figure 13-17: A plus sign in the lower-right anchor point warns you that text doesn’t fit in the
type container.
289
Chapter 13: Giving Your Images a Text Message
19 327258-ch13.qxp 8/20/08 11:39 PM Page 289
290
Part III: Creating “Art” in Photoshop
When you have more text than the type container can hold, you have a
number of options:
ߜ Enlarge the type container. Click one of the bounding box’s anchor
points and drag to increase the size of the type container. Making a type
container a little bit wider often gives you an extra line or two of text at
the bottom.
ߜ Shrink the font. Select the text with a keyboard shortcut (Ô+A/Ctrl+A)
and select a smaller font size on the Options bar.
ߜ Decrease the space between lines. Select the text and decrease the
leading — the amount of space between lines of type — in the Leading
field found in the upper right of the Character panel. By default (the
Auto setting in the Leading field), Photoshop uses an amount equal to
120 percent of the font size. You can often reduce the leading to 1 or 2 pt
larger than the font size before you start overlapping lowercase letters
with descenders (
g, j, p, q, and y) and uppercase letters on the line
below.
ߜ Edit the text. Rephrase the text, using fewer words to convey the same
message. If you’re not the author, however, this option might not be
available.
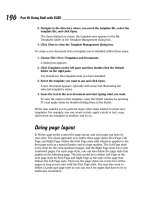
Selecting alignment or justification
Photoshop gives you several options for controlling the appearance of your
margins. In the “Taking control of your text with panels” section earlier in this
chapter, I outline a number of options that you can find on the Paragraph
panel menu. But let me go into more detail about a couple of options that you
have when adding paragraph type.
Perhaps the most important decision (other than font and font size) that you
make when preparing paragraph type is a choice of alignment or justification.
When text is
aligned left, the left margin is perfectly straight, and the right
margin is
ragged, with each line ending where it ends, without any relationship
to the lines of type above and below. A column of text that’s
aligned right has a
clean right margin and a ragged left margin. If you choose
center aligned, the
middle of each line of text is centered. Take a look at Figure 13-18 for a visual
comparison.
Unlike alignment, justification gives you straight margins on both sides of the
column of text. The four justification options at the top of the Paragraph
panel differ only in how they treat the last line of a paragraph. As you can see
from the Paragraph panel buttons, the last line can be independently aligned
left, center, or right; or it can be fully justified, spreading the last line from
margin to margin. You shouldn’t use the fourth option unless that last line
(of every paragraph) is rather full because it looks rather strange when just a
couple of words are stretched edge to edge.
19 327258-ch13.qxp 8/20/08 11:39 PM Page 290
Figure 13-18: Compare the left and right margins of each column of text.
Ready, BREAK! Hyphenating your text
When a word is too long to fit on the current line of text, either it can be
moved to the beginning of the next line (wrapped), or it can be broken into
two parts: one finishing the upper line and the other starting the next line
(hyphenated).
The hyphenation options are for the truly geeky,
my-typography-is-my-life types.
The defaults are excellent and can suffice for all but the most precise layouts
(which you should be doing in InDesign or perhaps Illustrator, anyway).
If you want to fine-tune how hyphen-
ation is applied (or have far too
much time on your hands), select
Hyphenate from the Paragraph
panel menu to open the options
shown in Figure 13-19. The
Hyphenation check box (upper left)
activates/deactivates hyphenation.
The top three fields govern which
words to hyphenate and what limits
to place on the hyphenation. (Think
of the second and third fields as
Hyphenate or cram into the line with-
out hyphenating.
) The lower two fields control the appearance of the margin,
limiting the number of consecutive lines that can be hyphenated and the
maximum distance from that margin that a hyphen can be placed.
291
Chapter 13: Giving Your Images a Text Message
Figure 13-19: Default hyphenation values give
you good results and a pleasing appearance.
19 327258-ch13.qxp 8/20/08 11:39 PM Page 291
292
Part III: Creating “Art” in Photoshop
Shaping Up Your Language with
Warp Text and Type on a Path
You can change the line along which your type flows either by using the Warp
Text feature or by typing on a path. Type warping uses predefined shapes to
which your type is formed (and can be used with both point and paragraph
type), and typing on a path uses a custom path (and is used only with
point type).
Warping type and placing type along a path are great ways to spice up your
message as long as you don’t overdo it and make the message illegible or dis-
tract from the overall appearance of your artwork. Warp Text is a quick and
easy way to bend text, and placing type on a path is a more complex — and
more controlled — technique.
Applying the predefined warps
With a type layer active in the Layers panel and a type tool selected, click the
button to the right of the color swatch on the Options bar. That opens the
Warp Text dialog box, as shown in Figure 13-20, in which you choose both the
distortion you want to apply as well as the settings.
Figure 13-20: The illustration uses two separate type layers, each with its own Warp Text
settings.
Photoshop offers 15 different Warp Text presets, each of which you can cus-
tomize by dragging any of three sliders. Negative numbers can be used, too,
reversing the warp. You can also set the Bend slider to 0 and adjust the lower
19 327258-ch13.qxp 8/20/08 11:39 PM Page 292
two sliders to create the appearance of depth or perspective for a type layer,
but keep in mind that the Horizontal and Vertical buttons aren’t available for
some of the styles. Warp Text is one of Photoshop’s truly fun features. The
best way to become familiar with it is to open the dialog box and test-drive
each of the variations. And don’t forget to try the Horizontal and Vertical but-
tons when they’re available!
Customizing the course with paths
You can use the shape tools or the Pen tool to create a custom path along
which you add your text. (You find full information about paths and shape
layers in Chapter 11.) To add type along a path, simply select the Horizontal
Type or Vertical Type tool, click the path, and type. The flow of the type from
the point on the path where you click is determined by the alignment option
that you select from the Options bar or the Paragraph panel. If the text is left-
aligned, characters are added to the right of the point where you click (called
the
point of origin for the type). Left alignment is great when adding type
along an open path, such as the upper path in Figure 13-21. You might, how-
ever, want to choose center alignment when adding type along the top of an
arc or circle, so you can click on the top of the arc and not worry about drag-
ging the type later to center it.
Figure 13-21: Text alignment determines where the text goes from the point where you click on
the path.
293
Chapter 13: Giving Your Images a Text Message
19 327258-ch13.qxp 8/20/08 11:39 PM Page 293
294
Part III: Creating “Art” in Photoshop
If you want type to go in two different directions — say, pointed upward along
both the top and the bottom of a circle — you need to create two separate
paths and two separate type layers, as shown in Figure 13-22.
After you add your type to the path, you can press the
Ô/Ctrl key and reposi-
tion the type along the path by dragging. When you press and hold
Ô/Ctrl,
the type tool’s cursor changes to an I-beam cursor with a heavy black arrow
on either side, indicating which way you can drag the type. You see the type’s
point of origin as a hollow diamond on the path (not to be confused with the
hollow squares that represent the path’s anchor points). Figure 13-23 gives
you a zoomed-in look at the converted cursor and a comparison of the point
of origin diamond and the anchor point square. Note, too, that not only can
you drag type along a path, but you can also drag it
across the path, flipping
over the type.
Figure 13-22: Sometimes you need to create two separate type layers, using two separate
paths, to achieve your artistic goals.
19 327258-ch13.qxp 8/20/08 11:39 PM Page 294
295
Chapter 13: Giving Your Images a Text Message
Figure 13-23: When you drag the cursor across the path a short distance, type flips over.
After flipping type across a path, you might need to adjust the tracking (the
space between characters), which is the second field from the top on the right
in the Character panel. And don’t be afraid to click in the type and press the
spacebar a few times to adjust the placement of words along the path.
19 327258-ch13.qxp 8/20/08 11:39 PM Page 295
296
Part III: Creating “Art” in Photoshop
A word about fonts
You already have a nice selection of fonts
installed on your computer. Some are installed
with the operating system (Windows or Mac), a
number of fonts may have been installed with
the Adobe Creative Suite, and other programs
could have tossed more morsels into the stew.
However, you might find that the more you work
with text, the more you crave additional fonts.
Although having lots of fonts can stretch your
options, too many fonts can lead to slowdowns
and other problems. If you do find yourself
someday with a massive collection of fonts (I
have over 7,500 fonts), none of which you could
bear to part with (okay, I could part with some
of them), use a font management utility. The
Mac OS has the built-in Font Book, and Extensis
(www.extensis.com) offers Suitcase Fusion
(Mac, about $100) and Suitcase (Windows,
about $80).
19 327258-ch13.qxp 8/20/08 11:39 PM Page 296
14
Painting in Photoshop
In This Chapter
ᮣ Adding color manually for complete control
ᮣ Discovering tools with and without brushes
ᮣ Traversing that amazing Brushes panel
ᮣ Creating do-it-yourself brushes
P
ainting. The word evokes images of brushes and palettes and color being
precisely applied to canvas. Or, perhaps, images of drop cloths, ladders,
rollers, and buckets — color being slopped on a wall and spread around. It
doesn’t generally bring to mind digital image editing. But painting certainly
has a place in your arsenal of Photoshop skills, even if you never create an
image from scratch.
In addition to painting landscapes and portraits (which you cer-
tainly can do in Photoshop, if you have the talent and train-
ing), you can use Photoshop’s painting tools for a variety
of other tasks. For example, you can paint to create
masks and layer masks, adjust tonality or sharpness in
specific areas, repair blemishes and other damage in
an image — even to create graphic elements and
special effects.
In this chapter, I concentrate on those editing-
related painting skills rather than fine art painting.
I introduce you to the basic concepts of painting in
Photoshop and also walk you through the basic brush-
related tools and the Brushes panel, concentrating on
those features that you most likely need (as well as a few
of the other, more artistic features). To wrap up the chapter,
I show you how to create custom brush tips and how to save
them for future use.
20 327258-ch14.qxp 8/20/08 6:59 PM Page 297
298
Part III: Creating “Art” in Photoshop
Discovering Photoshop’s Painting Tools
Nothing in Photoshop gives you more precise control of color in your image
than using the Pencil tool with a 1-pixel brush. Remember that your image
consists of a whole lot of little colored squares (pixels) and that the color of
those individual squares is what produces the appearance of a tree or a
sunset or even good ol’ Uncle Bob. If you zoom in really close on an image,
you can paint pixel by pixel — you could even create an entire image, one
pixel at a time!
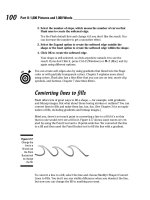
Whether you’re using a tiny brush
with the Pencil tool or a larger
one with the Brush tool, adding
color to your image with the painting
tools enables you to create beautiful
or whimsical imagery, such as what’s
shown in Figure 14-1 (with acknowl-
edgment to Picasso’s Woman with
Pears).
As you work in Photoshop, however,
you’ll find many very important roles
for the brush-using tools other than
creating imagery. From touching up
dust and scratches in a scan to
removing distant power lines from a
photo to perhaps adding wispy hairs
to soften the outline of a head, you
have lots of reasons to paint in
Photoshop (many of which you can
read about in Chapters 9 and 10).
When you’re capable and confident
using the Brush tool, you might even
find it the best way to make selec-
tions in your image. Selections with the Brush tool? That’s right — painting in
an alpha channel creates or refines a saved selection. (You can read about
alpha channels in Chapter 8.) Photoshop even has a tool that you can use
to make selections directly. The Quick Selection tool, like the Magic Wand,
selects areas of similar color. However, instead of Shift+clicking in a variety
of areas with the Magic Wand to add to your initial selection, you simply
drag the Quick Selection tool. The brush diameter, selected in the Options
bar, tells Photoshop the size of the area you want to search for similarly
colored pixels.
Original artwork © 2005 Peter Bauer
Figure 14-1: Painting with the Brush tool is yet
another way to create in Photoshop.
20 327258-ch14.qxp 8/20/08 6:59 PM Page 298
You have 18 tools that use brushes available in Photoshop. Here are just a
few of the things that you can do with these tools:
ߜ Add color (Brush, Pencil)
ߜ Adjust tonality (Burn, Dodge)
ߜ Sharpen, blur, and smear (Sharpen, Blur, Smudge)
ߜ Correct color and texture (Healing Brush, Spot Healing Brush, Color
Replacement)
ߜ Select areas of similar color (Quick Selection)
ߜ Copy/paste pixels (Clone Stamp)
In this section, I discuss the primary painting tools and introduce you to
some of the other brush-using tools. (Check Chapter 9 for additional informa-
tion on healing and cloning in your image.)
Painting with the Brush tool
You control where the Brush tool
works by selecting a brush tip of a
particular size, shape, and hardness
(the fuzziness, or lack thereof, along
the edges of a round brush tip).
Remember, too, that you can use
the Brush and other painting tools
to create subtle changes in existing
colors. By selecting an appropriate
blending mode and opacity, you can
mix the painting color into the exist-
ing colors in your image. Make these
basic decisions from the Options bar,
shown for the Brush tool in Figure 14-2.
As you see in Figure 14-2, the Options bar gives you access to a miniature
Brushes panel, from which you can pick a brush tip, change its size, and
adjust the hardness of the brush’s edges. (Only round brush tips use the
Hardness adjustment.) The five sample lines to the right show Hardness, from
0% to 100% in 25% increments, all using a 40-pixel brush. The Brush tool can
use any brush tip that you have in the Brushes panel — and, as you can read
later in this chapter, you can customize the brush tip in a variety of ways.
You’re actually ready to paint in Photoshop already! Select a foreground
color, select the brush size that you want, decide how hard or fuzzy the
299
Chapter 14: Painting in Photoshop
Figure 14-2: Make the primary decisions about
painting tool behavior from the Options bar.
20 327258-ch14.qxp 8/20/08 6:59 PM Page 299
300
Part III: Creating “Art” in Photoshop
edges should be, change the blending mode and opacity (if desired), and
drag the tool in your image. (And, perhaps best of all, no turpentine needed
for cleaning up — just switch tools in the Toolbox.)
As you work with the brush-using tools, always remember that the selected
brush tip is applied as a series of individual impressions, called instances.
Consider an instance to be a single impression of the brush tip, like tapping a
pen once on a piece of paper — it leaves a single dot. Take a look at the outer
borders in Figure 14-3. Changing the brush tip’s Spacing value (in the main
Brushes panel, opened through Photoshop’s Window menu) shows how
instances appear. In the upper left, the spacing is set to the default 25% and
a continuous line results. To the upper right, Spacing is set to 67%, and the
individual brush tip instances are visible as overlapping circles. To the lower
left, Spacing is set to 133% — this is a setting that you might use for a dotted
or dashed line — and each brush tip instance is visible individually.
Figure 14-3: Changing the Spacing makes the individual brush tip
instances
visible.
If, when you open the main Brushes menu, you see a Brushes panel that con-
tains only brush tips, click the menu button in the upper-right corner of the
panel and select Expanded View from the top of the panel menu.
20 327258-ch14.qxp 8/20/08 6:59 PM Page 300
If you know you have the cursor set to show the brush tip, but you’re seeing
the tiny little crosshairs instead, check the Caps Lock key on your keyboard.
Caps Lock toggles between precise and brush-size cursors for the brush-
using tools. (During the discussion of Photoshop’s Preferences in Chapter 3,
I showed a comparison of the three brush cursor options in Figure 3-13.)
When you change the Brush tool’s Opacity setting on the Options bar, you
change the appearance of the stroke as a whole. Changing the Flow setting
(also on the Options bar), on the other hand, changes the amount of color
applied with each instance of the brush tip. When the flow is reduced and the
spacing is set to less than 100%, the overlapping area of each brush instance
appears darker (or lighter when painting with, for example, white on black).
One last option for the Brush tool deserves a quick look. To the right of the
Flow field is the Airbrush button. When the Airbrush is on (the button turns
dark), the Flow value takes on more meaning. As you paint with the Brush in
Airbrush mode with a reduced Flow setting, pausing the cursor with the
mouse button down allows color to build up (become more opaque) as if you
were using a real airbrush. You can use the Airbrush both as a traditional air-
brush artist and to simulate spray paint. You can see both in Figure 14-4.
Figure 14-4: Airbrushing and spray painting with the Airbrush option for the Brush tool.
With Photoshop CS4’s support for OpenGL drawing, there’s a neat new trick on
board. If your computer has a processor and video card that support OpenGL
drawing too, you can rotate the image on screen for easier painting. Not rotate
the canvas, but rotate the on-screen image! As you see in Figure 14-5, this can
be great for fine-tuning a layer mask or doing other delicate painting tasks.
301
Chapter 14: Painting in Photoshop
20 327258-ch14.qxp 8/20/08 6:59 PM Page 301
302
Part III: Creating “Art” in Photoshop
Using the Rotate View tool (nested with the Hand tool and available in the
upper bar on your screen) permits you to arrange the artwork for your most
comfortable painting stroke. While dragging the Rotate View tool, the on-
screen compass’s red arrow always orients you to the top of the screen.
When you want the image oriented back to the top, simply double-click on
the Rotate View tool icon in the Tool panel.
Figure 14-5: Rotating the on-screen view can make painting much easier and more precise.
Adding color with the Pencil tool
The Pencil tool differs from the Brush tool in one major respect: Regardless
of the Hardness setting in the Brushes panel, the Pencil tool always uses a
hardness value of 100%. With the Pencil tool active, the Options bar offers
the miniature Brushes panel, choice of blending mode and opacity, and the
somewhat-misnamed Auto Erase option. When selected, Auto Erase lets you
paint over areas of the current foreground color using the current back-
ground color. Click an area of the foreground color, and the Pencil applies the
background color. Click any color other than the foreground color, and the
Pencil applies the foreground color. But remember, you’re not erasing, just
painting with the background color (even on layers with transparency).
Removing color with the Eraser tool
The third of your primary painting tools is the Eraser. On a layer that sup-
ports transparency, the Eraser tool makes the pixels transparent. On a layer
named Background, the Eraser paints with the background color. On the
Options bar, the Eraser tool’s Mode menu doesn’t offer blending modes, but
rather three behavior choices. When you select Brush (the default), the
20 327258-ch14.qxp 8/20/08 6:59 PM Page 302
Options bar offers you the same Opacity, Flow, and Airbrush options as the
Brush tool. You can also select Pencil, which offers an Opacity slider, but
no Flow or Airbrush option (comparable to the actual Pencil tool). When
Mode is set to Block, you have a set-size square Eraser tool. Regardless of
which mode is selected, the Options bar offers one more important choice:
To the right of the Airbrush button, you’ll find the Erase to History check
box. When selected, the Eraser tool paints over the pixels like the History
Brush, restoring the pixels to their appearance at the selected state in the
History panel.
A couple of variations on the Eraser tool are tucked away with it in the
Toolbox, too. The Background Eraser tool can, in fact, be used to remove a
background from your image. However, it’s not limited to something in your
image that appears to be a background. Remember that digital images don’t
really have backgrounds and foregrounds or subjects — they just have collec-
tions of tiny, colored squares. What does this mean for using the Background
Eraser? You can click and drag on any color in the image to erase areas of that
color. You can also elect to erase only the current background color and desig-
nate the foreground color as protected so that it won’t be erased even if you
drag over it.
The Magic Eraser, like the Magic Wand selection tool (see Chapter 8), isn’t a
brush-using tool, but this is a logical place to tell you about it. Click a color
with the Magic Eraser tool, and that color is erased, either in a contiguous
area or throughout the image, depending on whether you have selected the
Contiguous option in the Options bar. And, like the Magic Wand, you can set
the tool to work on the active layer or all layers in the Options bar, and you
can also set a specific level of sensitivity (Tolerance). Here is the one differ-
ence between the two: The Magic Eraser is, in fact, a painting tool in that you
can set an opacity percentage, which partially erases the selected pixels.
Picking a color
If you want to apply a specific color to your image with a painting tool, you
have to be able to select that color, right? Photoshop provides you with a
number of ways to select a color:
ߜ Click a saved color swatch in the Swatches panel.
ߜ Enter numeric values or drag sliders in the Color panel.
ߜ Click a color swatch at the bottom of the Toolbox or in the Color panel
to open the Color Picker.
ߜ Select the Eyedropper tool and click any color already in your image.
Heck, click in your image with the Eyedropper tool, hold the mouse
button down, and drag to any color anywhere on your screen — that
color doesn’t even have to be in Photoshop!
303
Chapter 14: Painting in Photoshop
20 327258-ch14.qxp 8/20/08 6:59 PM Page 303