User Interface Design for Mere Mortals PHẦN 4 potx
Bạn đang xem bản rút gọn của tài liệu. Xem và tải ngay bản đầy đủ của tài liệu tại đây (9.75 MB, 31 trang )
70 Chapter 3
•
The cost of developing the benefit
—These costs can be based on the
number of hours it will take for people to create the benefit and tangi-
ble items needed to realize the benefit, such as renting space and
equipment to perform usability tests.
•
The value proposition of the benefit
—This proposition explains how
the company will benefit from the investment. You can use much of
the information in this chapter to show the value of the benefit.
•
The dollar amount of
the benefit
—Provide your best estimate based on
the amount of money your company will save as well as how much
profit you expect to make. You should discuss this issue with other
stakeholders in the organization, such as the customer support man-
ager, to get some solid numbers so you can construct a solid dollar
amount estimate.
•
The l
ength of time until the benefit is realized
—This length of time is
calculated in years or a fraction of a year (such as 0.5 years for
a 6-month length of time). Provide your best estimate after you talk
with the project team. The project timeline will greatly affect this fig-
ure. You will factor this amount into calculating the dollar amount of
the benefit.
•
The interest rate for the particu
ular business for the same length of
time
—You may be able to get this information from your project team
or from your company’s financial officer.
Calculate the Dollar Amount
To calculate an accurate dollar amount of the benefit, you must first calculate
the net present value (NPV) amount,which discounts the benefit into today’s
dollars. If your ROI analysis shows you’ll make an amount of money two years
from now, that amount of money will be less valuable today because of infla-
tion during that period.
You can calculate the NPV amount by using the following equation (Mayhew
and Tremaine, 2005):
NPV amount = Future dollar amount × (n)/(1+k)
n
In the preceding equation,n is the number of periods, and k is the amount of
interest. For example, if you’re looking for returns one year from now, you
would use the number 1 for n. The interest rate is a fraction of 1. In this
Making the Business Case 71
example, we’ll use a 5-percent interest rate that will be represented in the
equation for k as 0.05.
If you project the future dollar amount to be $50,000,the NPV amount would
be as follows:
50000 × 1/(1+0.05)1 = $47,619.05
Next, you must calculate the ROI value. Use the following equation to calcu-
late the ROI value:
ROI = (NPV amount – cost) / cost
If the cost to develop the usability test is $10,000, the ROI calculated from
our example would be this:
(47619.05 – 10000) / 10000 = 3.76
So, in this example, the benefit will produce a 376 percent return, meaning
that for each dollar spent on your usability design and testing, the company
will get $3.76 back. If you were to send a figure similar to this example, it
would likely get the attention of your stakeholders.
The Usability Engineering Life Cycle
Bias and Mayhew (2005) created the Usability Engineering Life Cycle (UEL)
as a means to build a usability test plan. If you can integrate the UEL into your
product development cycle at the beginning, it will provide you with a rigor-
ous analysis and testing regimen that will help you get the most out of your
usability design, analysis, and testing.
The UEL is a cyclic model that incorporates three phases (Bias and Mayhew,
2005):
1.
Requirements analysis
—In this step, you establish your user character-
istics, what tasks the product requires for operation so you can deter-
mine what the users need to do, set your goals for the usability study,
and determine the usability study design guidelines.
2.
Design, testing, and development
—In this step, you create a struc-
tured, top-down approach to designing the product, be it a user inter-
face,Web site, documentation, or a combination of the three. This is the
step that requires the most feedback from your project team.
72 Chapter 3
3.
Installation
—In this step, you gather feedback from users during and
after the development process and share this feedback with the project
team to determine if you need to make any product changes.
If you and your team find that any changes do need to be made,you will likely
go back to Phase 2 and design,test,and develop the changes that your project
team made. However, user testing could also expose flaws in the require-
ments analysis that would require you to reanalyze your requirements and
then go through the steps again.
Mayhew and Tremaine (2005) assert that implementing the UEL to develop a
usable Web site or Web-enabled application takes 8 to 12 months to develop
and provide a decent ROI, but this assertion is an average estimate. My expe-
rience has shown that it doesn’t take 8 to 12 months to design and publish a
Web site, depending on how much programming is included in the site.
Therefore, for a Web site that doesn’t incorporate a great deal of program-
ming, more time may be needed to market the Web site and make incremen-
tal changes as needed. Web sites that require a lot of programming, such as
dynamically driven Web sites that use databases to manage and output infor-
mation, will take more time to develop. This could lengthen the amount of
time to realize a decent ROI or keep the amount of time the same and require
less time to realize ROI. The same is true of software development.
As the car commercials say, your mileage may vary. The UEL is only a guide-
line, and you can adapt the UEL to suit your needs, because every project is
different. You may also be constrained by tight schedules that don’t permit a
thorough usability test. However, it’s good to have a by-the-book description
of how to engineer a usability test ready to go, and the UEL is flexible enough
for you to select the tasks you need to perform a solid usability test. However,
you should keep the 8 to 12 month timeframe in mind when you implement
the UEL in your product development processes.
Phase 1: Requirements Analysis
You can gather your users’ requirements for your product in a number of
ways. For example,you can use paper prototyping to give people printed rep-
resentations of what your product will look like and how the system will
react to user input. You’ll learn more about paper prototyping in Chapter 4.
You can also observe the users and see how they work; you will learn more
about user observations in Chapter 9.
No matter how you decide to obtain your requirements, you should ensure
that you have covered the following points in your requirements analysis.
Even if you did create a paper prototype or observe the user at work, be sure
to review the following points to ensure that you have all the bases covered.
•
User profile
—A description of your users’ specific characteristics. There
is no standard set of characteristics to measure, but you should pay par-
ticular attention to any issues that the user has with using the software,
such as physical limitations.
•
Contextual text analysis
—A study of your users’ current tasks, work-
flow patterns, work environments, and conceptual frameworks. This
context will help you understand why the user reacts the way she does
to the software, hardware, or Web site being tested.
•
Usability goal setting
—You need to set specific, qualitative goals that
reflect the requirements you glean from the user profile. For example,
you may want to have the users complete a task within a certain period
and see if they can do that. If a user has some constraints that require a
different method for completing the task, you should reset the goal for
that user appropriately.
•
Platform capabilities and c
constraints
—You must define the scope of
possibilities for addressing usability needs by determining the capabili-
ties and constraints of the interface or product. This information can
also be affected by the usability needs of the users.
•
General design guidelines
—You must apply generally accepted design
guidelines for designing your interface. For example,there are guide-
lines for creating Web pages so that they appear correctly in every Web
browser. You will learn more about design guidelines for user interfaces
in Chapter 7,“Designing a User Interface,”and for Web sites in Chapter
8,“Designing a Web Site.”
Phase 2: Design, Testing, and Development
This phase is split into three levels of design work. Each level takes you from
designing the concepts in the requirements analysis to developing a working
product that users can test.
Making the Business Case 73
74 Chapter 3
Level 1 Design
Level 1 design is the conceptual design level, which is where you design
functionality, workflow, and rules. If you and your team have the time, you
should get as much information from the users as possible before you decide
how to design conceptual models. Models conceived from user input stand a
far better chance of being accepted by users during the design evaluation
stage in Level 3. The four steps in this level are as follows:
•
Work re-engineering
—Your project team organizes functionality and
workflow design based on the users’ tasks and streamlines work before
you begin design. No interface design is produced in this task.
•
Conceptual model design
—The team creates high-level design rules for
presenting information and interacting with the hardware, software, or
Web site interface. If you have product screens or Web pages, this task
doesn’t go into that level of detail.
•
Conceptual model mockups
—You can create paper prototype mock-
ups, as you will learn about in Chapter 4. You can also create wireframe
versions, which are small programs that show some functionality but
not the entire program, or you can even create a prototype with non-
operating functionality such as small colored paper squares that repre-
sent lights on a hardware prototype.
•
Iterative conceptu
ual model ev
aluation
—The project team evaluates the
mockups and modifies them through iterative evaluation processes. In
other words, if the team decides it doesn’t like one or more portions of
the mockups, it works on those portions repeatedly until it decides
that the portion looks good.
Level 2 Design
Level 2 design is where you create the standards for your project. Creating
standards is especially important because everyone on the team needs to
understand how the project will be put together. Having people creating
their own standards as you develop the user interface design is a recipe for
chaos. Four steps comprise this design level.
1.
Design standards
—Now that you have settled on a model, the project
team must construct a set of interface- or site-specific standards and
conventions that will apply to the design of the product.
2.
Design standards prototyping
—The project team applies the interface
standards to product functionality. This functionality can be presented
in specific screens or Web pages that you create to test the look and
feel as well as links to other screens or Web pages.
3.
Iterative design standards evaluation
—The project team conducts for-
mal usability testing or other types of evaluation to refine the screen
design standards in the interface. This process continues until major
usability issues have been resolved and usability goals are within reach.
You’ll learn more about usability testing in Chapter 9.
4.
Style guide development
—After you have a stable and validated set of
screen design standards, you document this information along with the
results of the requirements analysis in the product style guide and then
distribute the documented information to all project team members.
Other style guides, such as a general style guide for the company and
the documentation style guide, could also affect the product style
guide, and vice versa.
Level 3 Design
Level 3 design is the level at which you actually design the product after mak-
ing all your preparations in the previous two levels.
•
Detailed user interface design
—The project designers design the prod-
uct based on the style guide conventions created in Level 2 design. The
product that results is the “beta”version available for internal or exter-
nal testers to use and test and for which they can provide feedback for
the product team.
•
Iterative detailed user interface de
esign evaluation
—The project team
conducts formal usability testing or other types of evaluation to refine
the screen design standards in the interface. This process continues
until the project team validates the product against usability goals.
Phase 3: Installation and Feedback
After the product has been installed and used for a period of time, the com-
pany should gather feedback from users about what they like and don’t like
about the product and how they use it.
Making the Business Case 75
You can obtain feedback in any number of ways: by e-mail, phone, mail, or on
your Web site. You can send surveys to customers, and you may want to offer
prizes or special offers to entice customers to return the surveys, especially if
the surveys are long.You may also want to conduct focus groups either in per-
son at your company building or at the client, or online using a collaborative
software tool that employs real time videoconferencing such as WebEx,
Microsoft LiveMeeting, or Raindance.
The Never-Ending Process
One thing to keep in mind is that the UEL really never ends. Feedback during
the development process will ensure that you don’t have many problems to
fix after the product is out the door—and good feedback is always a feather in
your company’s cap. You will also need product feedback from your cus-
tomers after the development process ends.
In addition, you may have upgrades to your product that need to be pro-
duced—or updates to the documentation you may want to place on the com-
pany Web site. So be sure to include the additional costs of implementing
continual feedback as needed, especially between product releases, into your
ROI proposal and your business case.
The Case Study: Mike’s Bikes
This book uses a single example as a case study to illustrate the steps involved
in the usability design and testing processes. Other books in the For Mere
Mortals series use the case study approach,which enables the author to pres-
ent a process with some degree of continuity. In this book, I apply each tech-
nique to the process of designing a Web site and associated database
application for use by both internal and external customers.
You may remember Mike’s Bikes from Database Design for Mere Mortals by
Mike Hernandez. In that case study,Mike’s Bikes is a new bike shop located in
the Seattle suburb of Green Lake. This case study picks up three years later to
find that Mike’s Bikes is doing so well that Mike has opened eight other shops
in the greater Seattle area and now employs close to 120 employees. Given
this growth, Mike has discovered that his customers now want to customize
and order bikes and purchase other supplies online, and his employees want
a more robust application that they can access quickly to get the information
they need.
76 Chapter 3
Making the Business Case 77
Mike has a project team of 10 people dedicated to the creation of the new
Web site and database system. Following are the 10 team members:
• Mike, the owner
• Traci, the finance manager
• Jay, the marketing manager
• Laura, the production manager
• Michelle, the customer support manager
• Tony, the company Webmaster
• Maureen, the database and networking administrator
• Bruce and Travis, two database programmers
• Paul, the documentation writer
The team is excited to get going but not certain why a usability test is neces-
sary for this project. That’s why you and your assistant Evan are in the kickoff
meeting with the team: to create a business case framework.
The first step in the business case framework is to interview the project team
to learn what the business goals are. You let Evan conduct the interview.
Evan:“What are the business goals for this project?”
Mike: ”Make more money!” (The rest of the group laughs in appreciation.)
Jay:“The recognition from customers and competitors that Mike’s Bikes is
the best resource for bicycles and accessories.”
Michelle:“The capability for customers to order their bikes and supplies
from anywhere and have that information available immediately for produc-
tion.”
Laura:“My workers will have easier access to more information, so they will
be able to get their work done more quickly.”
Maureen:“My programmers and I can work on more important things
rather than enter information into the database from customers phoning
their orders in.”
After a discussion of the business goals, including the due date for comple-
tion of the project,the interview continues with a discussion of the customer
goals, and Evan continues to ask questions prompted by the discussions. For
example, the following discussion is concerned with what the users want to
get out of the user interface so that all users can specify and access the infor-
mation they need quickly.
Evan:“What do you think of the current database application you’re cur-
rently using?”
Mike: “What do you mean, exactly?”
Evan:“I’d like to know if there’s anything about the interface that drives you
crazy and what you would like to improve.”
Michelle:“I wish there was a page on the site that I could access from any
screen in the database to show me what parts are available in what stores
so a customer in one store that needs a part can find the part in another
one of our stores.”
Jay:“That would be huge. If a customer can’t find what she needs from us,
she won’t come back to us.”
Laura:“I think the database needs to tell us when a store is low on a part,
not just tell us when the store can’t send another store a part, because then
that store wouldn’t have a part available for its customers.”
Mike: “How do you suggest we do that?”
Laura:“We need to have another column in the product table that presents
a visual reminder, like a flag, to let me know that we need to order more
parts to keep the pipeline filled.”
Maureen:“That won’t be hard.”
Laura:“I also think we need to have a button next to the flag column to let
me order parts. The button would open up the manufacturer’s Web site so I
could order from them online.”
Traci:“If the manufacturer lets you order online.”
Evan:“Laura, what happens if the Web site is down or the manufacturer
doesn’t let stores order from them online?”
Laura:“Hmmm. Perhaps the button could open a small window that lists
contact information, and that contact information would also include a link
to the company’s Web site if we can access that site to order products.”
Evan:“But that adds an extra step to get to the Web site. How about creating
a separate button that connects to the manufacturer’s Web site?”
Laura:“Good idea. If the company lets you order online, then there can be a
second button with a different color that will take me directly to the Web
site order page.”
78 Chapter 3
Maureen:“We’d have to build another module in the database to manage the
contact information, but we could do it.”
Jay:“But how would you get the product to the store without making the
customer drive over to that store? Unless the customer needed the part
right away, she wouldn’t drive all the way across town to our store—she
would drive two blocks to Rob’s Cycle World.”
Mike: “We’d need to hire people, maybe high school and college students,
who would drive or bike to the store where the customer is and deliver the
part. That would mean that the application would have to provide an alert
for store managers that another store needs a part it has. I’ll have to think
about that.”
The roundabout discussions provide you and Evan with a good amount of
information you can use to create a list of objectives for both applications. For
example, here are a few interface objectives for the Mike’s Bikes Web site and
database application:
• The customer must be able to find what she needs on the Web site as
quickly as possible.
• The Web site must reflect accurate information, such as the number of
products available for purchase.
• The customer must be able to customize her order easily and order her
product(s) quickly and securely.
• If the customer gets lost, she must be able to go back to the home page
quickly and start over.
• The customer needs quick access to product and support documenta-
tion.
• We need to access customer, inventory, sales, supplier,and employee
information quickly.
You review the initial list of interface objectives with Mike and the rest of his
team. Afterward, you and Evan refine the list and present it to the team. You
and Evan present a report to the team that lists three key design objectives in
bullet form:
Making the Business Case 79
• The product availability page must be accessible from any window in
the database application. This page provides the following functional-
ity:
• It displays how many products are available in each store.
• It enables employees to find parts more easily and quickly.
• The “Parts Maintenance” page should display visual cues that indicate
key status points for each part. This page will provide employees with
the following functionality:
• Employees will be able to see alerts indicating that another
store needs a given part that is currently in stock.
• Employees will be able to determine how many parts are defec-
tive in each store.
• Employees will easily be able to determine which parts need to
be reordered.
• A search box must be accessible from any window in the database
application. This page will provide employees with the ability to find a
product, customer information, or order information.
With the initial list in hand, you then ask the team what it will take to develop
the product and interface. When you talk about what development will take,
include the associated costs such as combined employee hours dedicated to
the project and any future anticipated costs; for example, the company may
need to hire contract employees to finish the project by a certain date. You
and Evan also inquire about the interest rate for the business, about the profit
that the company expects to make, and about when the company will realize
that profit.
Armed with this information, you and Evan create an ROI statement that you
will review with Mike and Traci before your next team meeting. This ROI
statement is the equation you learned about earlier in this chapter:
NPV amount = Future dollar amount × (n)/(1+k)
n
Then you must plug the NPV amount into the ROI equation:
ROI = (NPV amount – cost) / cost
The NPV amount is the percentage return that the company will realize from
its investment in usability design and testing. You and Evan received esti-
80 Chapter 3
mates from Traci of $45,000 for the future dollar amount ($5,000 per store)
in 1 year at a 5.25 percent interest rate. You and Evan have estimated a cost
of $12,500 for the production of test materials and the final report as well as
paying testers to interview Mike’s employees, create a paper prototype, and
view how the employees use the current system as well as the new system as
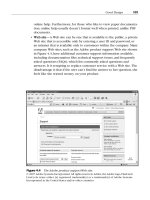
it’s being built. Those costs are documented in a worksheet, as shown in
Figure 3.1.
Making the Business Case 81
COST WORKSHEET
1. Combined employee hours dedicated to the project:
2. Future dollar amount: $5,000 ϫ 9 stores =
3. Years to profit:
4. Interest business rate:
5. Costs for developing test:
Producing paper prototype test and related materials:
Paying note takers and observers:
(3 note takers and 2 observers @ 35/hour
for 60 hours each)
Total:
20 hours
$45,000
1
5.25%
NAME DATE
$2,000
$10,500
$12,500.00
Figure 3.1 Cost Worksheet
Given the figures that you and Evan have, you calculate the NPV amount as
follows:
$45,000 × (1)/(1+0.0525)
1
= $42,755.34
Now you plug this NPV amount into the ROI equation:
($42,755.34 – $12,500.00) / $12,500.00 = 2.42
This follow-up team meeting will present not only your final list of objectives
but also your ROI statement that proves your case for profitability—and in
this case, a 242 percent return on Mike’s usability investment should make
him happy indeed.
Now that you have the ROI calculation, where do you store it? Place this ROI
statement in a written report that you circulate to the rest of the team,and be
sure that the written report contains the date you last updated the document.
If you need to update the report, be sure to save the old report as an archive
and place it in an archives directory either on your hard drive or on an exter-
nal drive (like a rewritable CD-ROM) so you have a traceable record of all
changes that have been made to the document. If you use Microsoft Word,
another way to keep track of your changes is to turn Track Changes on.
What’s more, when you distribute these changes to the team, be sure that
each team member has access to the latest version of the documents online,
such as through a folder on the network that is accessible only to team mem-
bers. You and Evan should each keep a copy of the printed reports that you
give to the rest of the team so that you have everything the team does and you
have reference material easily available in case the online versions aren’t avail-
able for some reason.
In the next chapter, you’ll see how to apply paper prototyping to Mike’s proj-
ect.
Summary
This chapter took you through the steps needed to create a business case for
good user design, usability design, and usability testing. The chapter began
with a discussion about why you should include usability studies when you
develop your user interface.
82 Chapter 3
Next, the section on gaps between stakeholders discussed who the stake-
holders are when it comes to your user interface design. This section also dis-
cussed the expectations that each stakeholder has regarding the interface and
the outcomes from good interface design, as well as usability design and test-
ing.
Then the chapter discussed building a business case framework and the five-
step user experience process that you should build your business case
around.You know that the process starts with the business goals and then fac-
tors in the customer goals. The appropriate project team members design the
user interface or documentation,and then the team participates in the testing
process to acquire feedback. The testers’ goals are satisfied after testing, and
that satisfaction leads to the satisfaction of your customer and business goals.
The section on the case for profitability listed eight guidelines for ensuring
that your argument for usability studies will win over the skeptics and help
your company’s bottom line. The first and most important guideline is to
drive the design and development of the user interface and usability design
closely against the business case. You also need to bring your team members
on board with the effort and share information with them constantly. You and
your team need to know what the customer’s needs, tasks,and goals are. From
that information, you can create a scalable user experience that only adds fea-
tures that blend value for the customer and value for the company. As you
meet your design goals,you must make one person responsible for measuring
the success of your design.
A discussion of calculating the return on investment for your usability studies
followed, which is crucial to your making a valid business case for good user
interface design,usability design,and usability testing.You learned how to use
the net present value amount equation to calculate the ROI percentage return
so you can present this return to your stakeholders and justify the usability
study.
The chapter ended with a discussion of the ongoing process of usability test-
ing and the Usability Engineering Life Cycle that places your usability testing
inside a rigorous and ongoing process. Then you can incorporate the costs of
that ongoing process into other product development as well as your product
if it will have future releases.
Making the Business Case 83
Review Questions
Now it’s time to review what you’ve learned in this chapter before you move
on to Chapter 4. Ask yourself the following questions, and refer to Appendix
A to double-check your answers.
1. Why is the satisfaction of customer goals important?
2. Who are the four stakeholders in a project?
3. What are the benefits of good design?
4. Why should you start the usability process at the same time as the proj-
ect design process?
5. What should be the first topic of discussion when starting your busi-
ness case?
6. How can you make sure that your customers’ goals are satisfied by the
user experience?
7. When should you add features and functionality into the product?
8. After you show stakeholders how good design, as well as usability
design and testing, will lower costs, what do you need to show them?
9. Why do you conduct an ROI study?
10. Why should you use the Usability Engineering Life Cycle?
11. What are the three phases of the Usability Engineering Life Cycle?
12. Why should you get feedback during the development process?
84 Chapter 3
4
Good Design
“It takes less time to do a thing right
than to explain why you did it wrong.”
—H.W. Longfellow
Topics Covered in This Chapter
Good Design Goals
Are Designers Against Users?
Paper Prototyping and Storyboarding
Good Documentation Design
As you put together your business case, your stakeholders may ask what you
mean by good design. What does good design mean, and why should they
care?
Users’ desires and constraints are different from those experienced by design-
ers. There is a disconnection between users and designers that you and your
project team need to bridge as you develop your interface. Good design is
presented as four goals that you should always adhere to when you design
your user interface: ethical, purposeful,pragmatic, and elegant. (The next sec-
tion discusses these goals in more detail.) Adopting the four goals of good
design as you create the user interface design is what you need to resolve this
disconnection.
One effective way to design your user interface to meet your goals is to
engage in paper prototyping and storyboarding, which allow you to create
mockups of the user interface designs that you and your team are discussing.
Paper prototyping is a form of usability testing that you can work on with
your team as well as with focus groups of users. Although paper prototyping
85
lets you quickly create tangible ideas that others on your team can look at and
think about, it is not the best tool for all situations. This chapter will look at
what paper prototyping is and when it is appropriate.
Finally, you’ll learn about good documentation design, which is another
important goal if your product is to succeed. A significant amount of docu-
mentation is now available as online help. A good design for which users can
find online help—or help of any kind—is your company’s first line of cus-
tomer support. You’ll also learn the steps you need to take to develop and rig-
orously review the documentation before your product is released to the
public.
This chapter ends with a reinforcement of what you learned about good
design in Chapter 3,“Making the Business Case.” It also explains why good
design doesn’t end with the first version of a product you’re developing. In
fact, if you’re creating subsequent versions of a product, adhering to good
design is vital if you don’t want to alienate your customers.
Good Design Goals
Robert Reimann, Hugh Dubberly, Kim Goodwin, David Fore, and Jonathan
Korman developed a list of the four top-level good design goals for general
design work (Cooper and Reimann,2003). These goals are important whether
you’re designing software or furniture. If you adhere to these four goals, what-
ever you’re designing has a better chance of being accepted by others:
• The design must be ethical.
• The design must be purposeful.
• The design must be pragmatic.
• The design must be elegant.
So how do these goals apply to user interface design? Cooper and Reimann
(2003) applied the four goals to user design as follows, and I’ve added a few
tips of my own:
•
Ethical
—The user interface design should do no harm—that is, it
shouldn’t make users’ lives harder than it already is. You should develop
your user interface so that it actually helps improve your users’ lives.
86 Chapter 4
For example, an interface should not include unnecessary information
that distracts the user and makes him less efficient in completing tasks.
•
Purposeful
—The user interface should help users achieve their goals in
using the software. Having a purpose not only means helping users
achieve goals but also understanding their limitations so that you can
strengthen your users as much as possible. You can learn about the pur-
pose of your users by understanding how users behave; you will
explore this further in Chapter 5,“How Users Behave,”in the process.
•
Pragmatic
—Create a user interface design as early as possible to meet
the requirements of the stakeholders that I discussed in Chapter 3. By
ensuring that you are aware of and regularly discuss the requirements
and needs of all the stakeholders—users, engineers, marketers, and
managers—you can create a design that meets all stakeholder needs. It
takes time to overcome the gap between users and designers, and I dis-
cuss that gap in greater detail later in this chapter.
•
Elegant
—The user interface design must be as efficient as possible. In
other words, if a function in your interface is accomplished with two
clicks, try to get the function down to one click. This is especially true
of Web site design, because visitors can lose interest in your site quickly
if they have to keep clicking to find something.
Elegance also means that all parts of your interface must feel like they
work together as part of a whole, not disparate parts cobbled together,
because incoherence can breed confusion and frustration among your
users. Later in this chapter, I discuss how paper prototyping and story-
boarding help you create a consistent interface for your product on
paper before you start the actual building process.
You’ll learn more about applying interface principles and patterns that adhere
to these good design principles in Chapter 7,“Designing a User Interface.”
Are Designers Against Users?
Designers and users have fundamentally different goals when it comes to
design of any kind,and that includes user design. For example,designers actu-
ally design the product,and they’re intimately involved with its development.
Users, on the other hand, don’t use the product until it’s finished, and
they may not agree with the designer’s sense of design. Ultimately, however,
Good Design 87
88 Chapter 4
it’s the users who decide whether to plunk down their money to purchase
the product.
These fundamentally different goals create a disconnection between users
and designers that must be addressed and overcome before you can create a
good user interface. Both users and designers have different constraints
placed upon them that the project team needs to recognize at the beginning
of the process so it can overcome them. If it’s not possible to be constrained
this way, the project will fail.
User Constraints
A user is faced with a number of constraints imposed by the physical world
(Norman, 2002). These constraints can be grouped into five areas:
•
Physical
—For example, you can sit in a car only one way.
•
Semantic
—The meaning of the situation causing the constraint. For
example, the driver’s area in a car is designed in such a way that the
driver can only drive the car by sitting in a certain position so she can
reach the pedals, the steering wheel, the transmission controls, and so
on.
•
Cultural
—For example, if you’re developing a car for international
markets, there are different cultural issues that have to be addressed,
such as the fact that drivers in some countries drive on the left side of
the road, and drivers in other countries drive on the right side of the
road.
•
Logical
—For example, my father and I put together a crafting table
from a kit for my mother’s craft room recently, and we logically con-
cluded that because the kit required assembly, all parts that came with
that table must be used to construct it.
•
Social
—This constraint might be pressure not to admit mistakes or
admit that you don’t know something in front of others because you
don’t want to look dumb in a social gathering.
Designer Constraints
Designers have constraints of their own to deal with, which may divert their
attention from users’ considerations and constraints. Designer constraints
include the following:
•
Time
—Designers may be facing only a limited amount of time to pro-
duce the product because of user expectations or because of an artifi-
cially imposed deadline set by others in the company.
•
Individuality
—The desire for individuality is strong within all of us, and
it’s easier to think about ourselves than about others even without
thinking about it. Therefore, the designer may think about designing a
product that he would find aesthetically pleasing.
•
Pressure from above
—Designers may be receiving directives and pres-
sure from others in the company to create “the next iPod” and bring the
company awards and recognition instead of something that he finds
functional and useful.
•
Serving a different user base
—The designer may not design the product
for external users directly but may only answer to internal users such as
the engineering department. The designer may also deal with only one
subset of customers, even though the product will be used by con-
sumers at large.
•
The designer think
ks he is a typica
l user
—The most important con-
straint is that the designer thinks of himself as a typical user; therefore,
he designs to what he thinks is the best design for him. The designer
doesn’t think or realize that he is not in a position to determine all
usability factors for all the product’s current and potential customers.
Bridging the Gap
The ideal method for overcoming these issues is to bring them up when the
product development process starts and resolve them before you begin
design work. This is not always feasible. For example,you may come into a sit-
uation where there are severe artificial time constraints to get the product out
the door quickly, and no amount of persuasion will get people to change their
minds. There could also be political issues involved, where some people
won’t be challenged about their assumptions and directives because of their
position within the company.
When you come into a situation in which there won’t be many changes in the
current development cycle,make sure you can obtain as much customer feed-
back about the product as possible. You can do this yourself, or you can talk
with other departments such as marketing about what feedback they’re
receiving from current customers and prospective customers at trade shows.
Good Design 89
90 Chapter 4
The more information you receive, the more you’ll know about whether you
or the designer(s) who designed the product accurately represented users’
needs. If they didn’t, you can come better prepared to make your case when
the product is upgraded and for the development of other products.
Paper Prototyping and Storyboarding
You may have heard or read about how movie studios create storyboards
that show the various scenes of a potential film,particularly an animated film.
A storyboard puts ideas on paper and then puts the papers in a certain
sequence to provide a concept of how the film will play out. It also gives the
production team an opportunity to look at the concept and make sugges-
tions for improving the film before it takes its final form.
In user interface design, there is a more interactive version of storyboarding
called paper prototyping. Paper prototyping involves creating a paper ver-
sion of a software program, hardware product, or Web site so you can learn
how users interact with the design before you develop the product. The
paper version is easier to create, and it gives you some additional flexibility,
such as the ability to move an object from one location to another on the
page in response to user suggestions.
Much of the material in this section is based on Carolyn Snyder’s 2003 book
Paper Prototyping. I’ve also added some information about other issues that
may also come up during the paper prototyping process,such as accessibility
and the needs of different user segments. These differences may require you
to produce several different paper prototype tests, or decide not to give a
paper prototype test at all.
Note
You can view Carolyn Snyder’s Web site about paper prototyping at
www.paperprototyping.com.
Paper prototyping offers you and your design team an opportunity to test the
design without expending a great deal of money. You will encounter skep-
tics, but this section will discuss how to overcome them.
What Paper Prototyping Is . . . and Isn’t
Snyder (2003) uses the following definition of paper prototyping as a varia-
tion of usability testing, where representative users perform realistic tasks by
interacting with a paper version of the interface. That interface can be any-
thing that requires human-computer interaction, or interaction between the
user and the hardware if the user is testing a hardware product.
The test is controlled and interactive. It can be given to several users at
the same time or to an individual user. The test is moderated by a facilitator,
who doesn’t explain to the representative users how the interface is sup-
posed to work before the test takes place; the test is designed to simulate a
real-life situation.
The paper interfaces can be hand drawn, printed screen shots with additions
or deletions, or even a hardware product with some added paper buttons
pasted on to mimic new functionality. One of the testing team members acts
as the computer or hardware product and provides feedback based on what
the user does with the paper interface.
Paper prototyping contrasts with similar activities that vary in interactivity,
including these:
• Producing mockups of the product you’re going to produce, either on
paper or in a graphics file. For example,you can create mockups that
show how different elements and different pages of a Web site will
look. Mockups are completely static—that is, you can only look at
them, not interact with them.
• Wireframes, which can be Web site page layouts or software window
layouts that show where text,graphics, links, buttons, and other ele-
ments will appear on the page. A wireframe page can include active
links to other wireframe pages or windows, thus providing a more
interactive idea of how the pages or windows will work together.
• Storyboarding, as discussed in the introduction of this section, where
you create different pieces of paper and show how each piece of paper
is related to the other, either in a linear fashion or in a decision tree
structure. Storyboarding is also a static tool.
Good Design 91
92 Chapter 4
Overcoming Skepticism
Stakeholders such as your project manager and designer may wonder why
you have to create a paper prototype to get user feedback. Snyder (2003)
asked this question to a number of her classes she teaches in paper prototyp-
ing, and the concerns fell into one of four categories:
•
Validity
—Does paper prototyping find the problems we hope to find?
And are there problems we can’t solve with paper prototyping that
require one or more additional or different tests?
•
Bias
—Does paper prototyping change user behavior in such a way that
we can’t trust the results? Will behavior change dramatically after the
user tests the design on the computer?
•
Professionalism
—Will paper prototyping result in the project team or
company looking unprofessional and sloppy?
•
Resources
—What’s the return on this investment (ROI) of time, money,
and resources?
The skeptics are not trying to make you look bad. You should show respect
to them because they are sincere in bringing their concerns to you. However,
be prepared to answer their questions and assuage their concerns. Snyder
(2003) suggests several ways to deal with your skeptics to address questions
in one or more of the following four categories:
• Create a sample paper prototype to show people how it works. After
people see what a paper prototype looks like, they can better under-
stand how the test works. After the skeptics see the prototype, they
may provide feedback that could make your prototype even better.
Also, be up front about the disadvantages of the paper prototype tests,
and provide suggestions for additional tests that can address problems
that paper prototyping cannot resolve.
• Have influential people in your company test your sample paper proto-
type as mock users. Walk through the paper prototype with those
influential people so they can experience the benefits of the paper
prototype test firsthand. Ask those people for feedback so you can
make changes to the prototype before the actual test. By testing your
paper prototype beforehand, you can identify any problems with bias
and ensure that the paper prototype tests meet your goals.
• Seek support from sympathetic departments, and invite anyone from
those departments to your paper prototyping activities. For example,
the sales and marketing department (or departments if they’re sepa-
rate) will likely be interested in your results and may want to partici-
pate in the paper prototype tests as subjects or observers. People who
are interested in your paper prototype will be willing to give you more
direct feedback and also work with you to provide the best ROI figures
to win over skeptics.
• Ask for feedback at the conclusion of the paper prototyping test to
help assuage the concerns of any skeptics who still aren’t sure about
the benefits of such a test. For example, to enforce the look of profes-
sionalism with your paper prototype, use heavier paper or cardstock to
make the prototype more resistant to wear and tear during testing.
Advantages
As you implement the feedback you received from the sample paper proto-
type test and report back to your stakeholders, be honest with them about
the advantages and disadvantages of paper prototyping.
Encourages Better Planning
The biggest advantage of paper prototyping is that you will have a better idea
of how your users use the product. However, you must also be aware of all
your potential customer segments when you create the test, because a num-
ber of factors affect interface use (Thatcher et al., 2002, Brinck et al., 2002).
These factors include the following:
•
Needs for people with disabilities
—Between 15 and 30 percent of the
general population have functional limitations that affect how they use
technology products—and that translates to more than 50 million peo-
ple.
•
Different market segments may have different needs
—For example,
there is the increasingly graying demographic in the United States as
the “baby boom” generation nears retirement age. Although these baby
boomers are computer savvy, there may also be functional limitations
here as well (such as eyesight issues) that can affect how you design
your product.
Good Design 93
•
Cultural issues
—If you’re designing your product for use in more than
one country, there are cultural issues like different conventions and
symbols used to communicate a concept, not to mention different
languages.
If you know these factors before you create the paper prototype test, you can
create a test that takes your customer base into account.
For example, if you’re developing a user interface for multiple cultures, you
can have the same interface on a piece of paper but have separate paper but-
tons with symbols attached with a piece of tape. When you use the paper pro-
totype with people from another culture, you can detach those buttons and
replace them with other buttons with culture-specific symbols, like the Cyril-
lic language for Russian speakers.
Resolves Problems and Encourages Creativity
Paper prototyping provides substantial advantages (Snyder, 2003). Paper pro-
totype tests produce substantive user feedback early in the development
process. A paper prototype also doesn’t require technical skills; the user can
simply manipulate the piece(s) of paper as necessary to perform a task.
Therefore, users find the process less intimidating, and they feel more com-
fortable giving feedback.
You can invite coworkers from multiple disciplines and departments to par-
ticipate in the test either as observers or as testers. This results in multidisci-
plinary communication earlier in the development process, which in turn
promotes greater collaboration and the exchange of ideas.
The user feedback from paper prototyping also helps your development team
by promoting communication between the development team and users tak-
ing the test, which in turn helps resolve design misconceptions and encour-
ages development creativity produced by user interaction. For example,if the
user finds a problem, the tester can quickly make changes to the interface,
such as erasing a design element on a piece of paper and redrawing it some-
where on the paper. The design team can then make a note of that for further
discussion.
The Results
When you approach the stakeholders, they will want to know what paper
prototyping will expose in the design. Following are problems that paper pro-
totyping is likely to find (Snyder, 2003):
94 Chapter 4