Beginning C# 2005 Databases From Novice to Professional phần 2 pot
Bạn đang xem bản rút gọn của tài liệu. Xem và tải ngay bản đầy đủ của tài liệu tại đây (2.86 MB, 52 trang )
16. Now try to execute the query in the SQL edit window (or try anything to access the
instance, if you’ve already shut the window). There will be no Results window, and
the Messages window will report an error, as in Figure 2-16.
CHAPTER 2 ■ GETTING TO KNOW OUR TOOLS 27
Figure 2-14. A database diagram
Figure 2-15. S
topping an SSE instance
777Xch02final.qxd 11/18/06 3:43 PM Page 27
17. To start SQLEXPRESS, right-click the instance node in Object Explorer, click Start,
and click Yes in the confirmation message box. Click the Northwind node and
retry the query. It should work fine.
18. To restore the Northwind database, right-click the Northwind node in Object
Explor
er, than click Tasks
➤ Restor
e
➤ Database… .
You’ll see the window in
Figure 2-17.
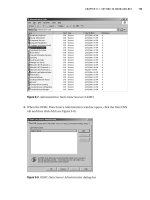
19. Click OK and you’ll get the message box in Figure 2-18. You can’t restore the
Northwind database, because the kind of restore you’re doing requires exclusive
access, and SSMSE is currently connected to Northwind through the query. Click
OK to close the message bo
x, then close the SQL edit window (click No when
prompted to save it).
20. Click OK again in the Restore Database window. You should get the message box
sho
wn in F
igure 2-19. To see that the database has been restored, try to expand
the Database Diagrams node under Northwind. You saved a diagram earlier, but
once again the plus sign disappears, since the database diagram was stored in
Northwind in step 14, but you backed up the database in steps 7 and 8, so you’ve
restored Northwind to a state before the diagram was saved. The same holds true
for any data in any SSE database.
CHAPTER 2 ■ GETTING TO KNOW OUR TOOLS28
Figure 2-16. Error on trying to query a stopped SSE instance
777Xch02final.qxd 11/18/06 3:43 PM Page 28
CHAPTER 2 ■ GETTING TO KNOW OUR TOOLS 29
Figure 2-17. Restoring the Northwind database
Figure 2-18. Restore-failure message box
Figure 2-19. M
essage bo
x stating the N
or
thwind database is restored
777Xch02final.qxd 11/18/06 3:43 PM Page 29
Configuring VCSE
VCSE offers a significant subset of Visual Studio 2005 functionality, limited to C# pro-
gramming and not including templates for building ASP.NET applications (for which
another Express IDE, Visual Web Developer 2005 Express, is available). We assume since
you know C# that you have some experience with either Visual Studio or VCSE, so we’ll
only cover the specific things you should do with VCSE to make the examples in this
book easiest to work with.
Let’s do these few simple things with VCSE:
1. To open VCSE, click Start ➤ All Programs ➤ Microsoft Visual C# 2005 Express Edi-
tion. You should see the screen shown in Figure 2-20.
CHAPTER 2 ■ GETTING TO KNOW OUR TOOLS30
Figure 2-20. Opening VCSE
777Xch02final.qxd 11/18/06 3:43 PM Page 30
2. VCSE is a highly configurable IDE that each user typically adapts to personal pref-
erences. We use it in a rather vanilla way and don’t at all try to exploit its many
features that can significantly enhance developer productivity, because what
seems the best way to one user may seem the worst way to another. But, we do
customize the configuration a bit, because we want to control how we indent code
and where we store our VCSE solutions. You don’t have to do this, but here’s what
we did, if you’d like to be consistent. Click Tools
➤ Options… to open the window,
as in Figure 2-21.
3. Check the “Show all settings” check box, then expand the Projects and Solutions
node. Click the General node and change the “Visual Studio projects location” to
C:\bcs2005db\solutions, as in Figure 2-22.
4. Expand the Text Editor node. Expand the All Languages node and click the Tabs
node
. Make the information consistent with Figure 2-23. This changes tabs and
indentations to thr
ee spaces. Click OK.
CHAPTER 2 ■ GETTING TO KNOW OUR TOOLS 31
Figure 2-21. Opening VCSE Options
777Xch02final.qxd 11/18/06 3:43 PM Page 31
5. You’ll need a connection to the SSE Northwind database, so let’s create one. Click
View
➤ Other Windows ➤ Database Explorer to open Database Explorer (which is
v
er
y similar to SSMSE’s Object Explorer). Notice in Figure 2-24 that there are no
D
ata C
onnections nodes.
CHAPTER 2 ■ GETTING TO KNOW OUR TOOLS32
Figure 2-22. Changing the default folder for VCSE projects
Figure 2-23. S
etting
VCSE tabs and indentations
777Xch02final.qxd 11/18/06 3:43 PM Page 32
6. Right-click the Data Connections node and click Add Connection… . The Add
Connection window appears, as in Figure 2-25. Note that the data source is a
SQL Server database file and will be accessed through
SqlClient (the .NET data
provider for SQL Server, to be covered in Chapter 4). The connection will use
W
indo
ws A
uthentication, meaning any user who can log in to the server machine
can connect to the N
or
thwind database
.
CHAPTER 2 ■ GETTING TO KNOW OUR TOOLS 33
Figure 2-24. Database Explorer with no connections
777Xch02final.qxd 11/18/06 3:43 PM Page 33
7. You need to specify a database to connect to. Browse to the Northwind database
in
C:\Program Files\Microsoft SQL Server\MSSQL.1\MSSQL\Data\northwnd.mdf, and
select it. Then click Test Connection. A message box should appear telling you
“Test connection succeeded.” Click OK to close it. Click OK to save the connec-
tion. A northwnd.mdf node will appear in Database Explorer. Expand the node,
and you’ll see nodes in Figure 2-26 that are very similar to the ones in Figure 2-14
for SSMSE.
CHAPTER 2 ■ GETTING TO KNOW OUR TOOLS34
Figure 2-25. Add Connection
Figure 2-26. An expanded connection in Database Explorer
777Xch02final.qxd 11/18/06 3:43 PM Page 34
8. Expand the Tables node and right-click the Employees node. You’ll see the menu
in Figure 2-27. Database Explorer basically offers the same features for database
access and management as SSMSE’s Object Explorer, but it doesn’t offer adminis-
tration functions for managing instances. VCSE’s New Query has a slightly differ-
ent format from SSMSE’s New Query, but it’s as powerful. VCSE’s Show Table Data
has the same format and functionality as SSMSE’s Open Table.
Using BOL
BOL is the
official source of SQL Server documentation. The documentation for SQL
S
erver Express is part of BOL. BOL is a hypertext application that is both a blessing and
a bane for SQL S
erver users. It’s an enormously rich source of tutorials as well as refer-
ence infor
mation, but despite the fact that it’s extensively indexed, finding what you need
to kno
w can sometimes be quite frustrating.
CHAPTER 2 ■ GETTING TO KNOW OUR TOOLS 35
Figure 2-27. An expanded table menu in Database Explorer
777Xch02final.qxd 11/18/06 3:43 PM Page 35
We’ll only point out a few things to help you get started:
1. To open BOL, click Start ➤ All Programs ➤ Microsoft SQL Server 2005 ➤ Docu-
mentation and Tutorials
➤ SQL Server Books Online. You should see the screen
in Figure 2-28.
2. There are five nodes in the Contents tree. The third one leads to SSE-specific doc-
umentation, but unless you plan to use SSE exclusively as a production server, you
probably won’t find this very useful. What you’ll find most useful is the first node,
SQL Server 2005 Books Online, so expand it. Then expand the SQL Server Lan-
guage Reference node and the Transact-SQL Reference node within it. Scroll up
to the top, and you’ll see a screen as in Figure 2-29. All T-SQL language compo-
nents are listed alphabetically.
CHAPTER 2 ■ GETTING TO KNOW OUR TOOLS36
Figure 2-28. Opening BOL
777Xch02final.qxd 11/18/06 3:43 PM Page 36
3. Click the Index tab below the Contents tree. You’ll see the screen in Figure 2-30.
The “Look for:” text box is where you specify what to search for. Above it is a “Fil-
tered by:” drop-down. Click the down arrow and click SQL Server Express, to keep
search results to a minimum (since SSE doesn’t support most of the other topics in
the list).
CHAPTER 2 ■ GETTING TO KNOW OUR TOOLS 37
Figure 2-29. T-SQL Language Reference Table of Contents
777Xch02final.qxd 11/18/06 3:43 PM Page 37
4. The index redisplays entries as you type, so if you enter “sel” (it’s not case sensi-
tive), you’ll see the screen in Figure 2-31.
CHAPTER 2 ■ GETTING TO KNOW OUR TOOLS38
Figure 2-30. BOL Index
777Xch02final.qxd 11/18/06 3:43 PM Page 38
5. Click on the “SELECT INTO statement” entry and you’ll see an Index Results win-
dow at the bottom of the screen offering alternatives to the first topic, which is
displayed in the window above it (see Figure 2-32). Filtering helps reduce your
having to deal with alternatives that may not be relevant to your needs, but alter-
natives do frequently occur. Clicking on an entry in the Index Results window
displays that topic. Now you’re able to search BOL as well as the rest of us. Good
luck!
CHAPTER 2 ■ GETTING TO KNOW OUR TOOLS 39
Figure 2-31. BOL Index entries for “sel”
777Xch02final.qxd 11/18/06 3:43 PM Page 39
Summary
In this chapter, we covered just enough about SSMSE to get you familiar with the kinds
of things you’ll do with it later in this book. Among other things, we showed how to exe-
cute T-SQL, back up and restore a database, and create database diagrams. We then
showed you how to configure a few VCSE options to be consistent with the ones we use
in writing our example programs in VCSE. We also showed you the basics of using BOL.
Now that your tools are installed and configured, you can start learning how to do
database programming by learning the basics of T-SQL.
CHAPTER 2 ■ GETTING TO KNOW OUR TOOLS40
Figure 2-32. Alternative BOL Index results
777Xch02final.qxd 11/18/06 3:43 PM Page 40
HOW TO RECOVER NORTHWIND, WHEN ALL ELSE FAILS
If you need to recover Northwind and can’t do it in SSMSE (see Figure 2-17), follow these steps:
1. In SSMSE Object Explorer, right-click the Northwind node and click Delete. The Delete Object win-
dow will appear. Check “Close existing connections” and click OK. The Northwind database will
be dropped from the SSE instance.
2. Right-click the SSE instance at the top of Object Explorer, click Restart, and click Yes when
prompted for confirmation.
3. In C:\Program Files\Microsoft SQL Server\MSSQL.1\MSSQL\Data, delete any files start-
ing with northwnd.
4. Re-create the Northwind database by running instnwnd.sql with sqlcmd, as described in
Chapter 1.
CHAPTER 2 ■ GETTING TO KNOW OUR TOOLS 41
777Xch02final.qxd 11/18/06 3:43 PM Page 41
777Xch02final.qxd 11/18/06 3:43 PM Page 42
Introducing SQL
In this chapter, we’ll cover the most common elements of SQL that you need to write
database programs in C#:
• Queries
•
INSERT statements
•
UPDATE statements
•
DELETE statements
• T-SQL data types
What Is SQL?
If you’ve ever worked with relational databases, you’ve probably used SQL. SQL is the
international standard database language. You can use SQL to create, retrieve, change,
or delete data (and a lot of other things).
The formal definition of SQL comes from the American National Standards Institute
(ANSI). It’s the same as the international standard specified by the International Organi-
zation for Standardization (ISO). T-SQL is the dialect of SQL provided by SQL Server.
Since we’re using SSE, we’ll focus on T-SQL rather than standard SQL, but unless we’re
discussing a feature not found in standard SQL, we’ll refer to both simply as “SQL.” We’ll
use “standard SQL” when referring specifically to the ISO/ANSI version of the language.
Each database vendor offers its own implementation of SQL, which conforms at some
level to the standard but typically extends it. T-SQL does just that, and some of the SQL
used in this book may not work if you try it with a database server other than SQL Server.
43
CHAPTER 3
■ ■ ■
777Xch03final.qxd 11/18/06 3:40 PM Page 43
■Tip Relational database terminology is often confusing. For example, neither the meaning nor the pro-
nunciation of SQL is crystal clear. IBM invented the language back in the 1970s and called it Structured
English Query Language (SEQUEL), changing it shortly thereafter to Structured Query Language (SQL) to
avoid conflict with another vendor’s product. SEQUEL and SQL were both pronounced “sequel.” When the
ISO/ANSI standard was adopted, it referred to the language simply as “database language SQL” and was
silent on whether this was an acronym and how it should be pronounced. Today, two pronunciations are
used. In the Microsoft and Oracle worlds (as well as many others), it’s pronounced “sequel.” In the DB2
and MySQL worlds (among others), it’s pronounced “ess cue ell.”We’ll follow the most reasonable practice.
We’re working in a Microsoft environment, so we’ll pronounce SQL as “sequel.”
Retrieving Data
A SQL query retrieves data from a database. Data is stored as rows in tables. Rows are
composed of
columns. In its simplest form, a query consists of two parts:
•A
SELECT list, where the columns to be retrieved are specified
•A
FROM clause, where the table or tables to be accessed are specified
■Tip We’ve written SELECT and FROM in capital letters, simply to indicate they’re SQL keywords. SQL isn’t
case sensitive, and keywords are typically written in lowercase in code. In T-SQL, queries are called
SELECT
statements, but the ISO/ANSI standard clearly distinguishes “queries” from “statements.” The distinction is
conceptually important. A
query is an operation on a table tha
t produces a table as a result;
statements may
(or may not) operate on tables and don’t produce tables as results. Further,
subqueries can be used in both
queries and statements. So, we’ll typically call queries “queries” instead of
SELECT statements. Call queries
whatever you prefer, but keep in mind that queries are special elements of SQL.
Performing Simple Queries
Using two keywords, SELECT and FROM, here’s the simplest possible query that gets all the
data from the
Employees table:
select
*
from
employees
CHAPTER 3 ■ INTRODUCING SQL44
777Xch03final.qxd 11/18/06 3:40 PM Page 44
The asterisk (*) means you want to select all the columns in the table. If you run
this query against the Northwind database, you’ll get all the rows and columns in the
Employees table.
■Tip Although most of the SQL you’ll see in this book is short and sweet, statements, and especially
queries, can be complex and require many lines (in extreme cases, hundreds) of code. Formatting SQL as
carefully as you format C# code is an excellent coding practice.
Try It Out: Running a Simple Query
We’ll use SSMSE to submit queries, since it’s a convenient interface to SQL Server. Here’s
how to submit a query to retrieve all employee data:
1. Open SSMSE and select the Northwind database (see Figure 3-1).
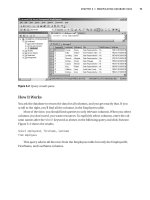
2. Click New Query. A tabbed window opens, in which you can enter SQL. Note that
the status bar below the window shows that you’re connected to the Northwind
database (see Figure 3-2).
CHAPTER 3 ■ INTRODUCING SQL 45
Figure 3-1. Selecting a database to query
777Xch03final.qxd 11/18/06 3:40 PM Page 45
3. Enter the query as shown in Figure 3-3, then click Execute (or press F5 or select
Query
➤ Execute).
CHAPTER 3 ■ INTRODUCING SQL46
Figure 3-2. A SQL edit window
Figure 3-3. Writing a query
777Xch03final.qxd 11/18/06 3:40 PM Page 46
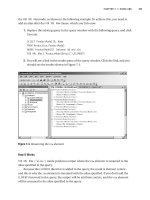
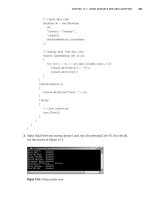
4. A Results window should open, as in Figure 3-4. Note that the status bar indicates
the query was successful and shows how many rows (nine) were retrieved.
How It Works
You asked the database to return the data for all columns
, which is exactly what has hap-
pened. If you scroll to the right, you’ll find all the columns in the
Employees table.
Most of the time
, you should limit queries to only relevant columns. When you select
columns you don’t need, you waste resources. To select columns explicitly, enter the col-
umn names after the
SELECT keyword (see Figure 3-5):
select
employeeid,
firstname,
lastname
from
employees
This query selects all the rows from the Employees table but only the EmployeeId,
FirstName, and LastName columns. (Use the splitter between the query and result windows
to expand/contract them.)
CHAPTER 3 ■ INTRODUCING SQL 47
Figure 3-4. Query Results window
777Xch03final.qxd 11/18/06 3:40 PM Page 47
Using the WHERE Clause
Queries can have WHERE clauses. The WHERE clause allows you to specify criteria for select-
ing rows. This clause can be complex, but we’ll stick to a simple example for now. The
syntax for our example is
WHERE <column1> <operator> <column2>
where <operator> is a comparison operator (for example, =, <>, >, or <). See Table 3-1,
which lists the T-SQL comparison operators.
Try It Out: Refining Your Query
T
o r
efine y
our quer
y:
1. Add the following WHERE clause to the query in Figure 3-5:
where
country = 'USA'
2. Run the query by pressing F5, and you should see results as in Figure 3-6.
CHAPTER 3 ■ INTRODUCING SQL48
Figure 3-5. Selecting specific columns
777Xch03final.qxd 11/18/06 3:40 PM Page 48
■Caution SQL keywords and table and column names aren’t case sensitive, but string literals (enc
losed
in single quotes) are. So, use 'USA', not 'usa', for this example.
How It Works
The new query means: Return the data for columns EmployeeID, FirstName, and LastName
from the Employees table, but only for rows where the Country column equals USA.
Using Comparison Oper
ators in a WHERE Clause
You can use a number of different comparison operators in a WHERE clause (see Table 3-1).
CHAPTER 3 ■ INTRODUCING SQL 49
Figure 3-6. Using a WHERE clause
777Xch03final.qxd 11/18/06 3:40 PM Page 49
Table 3-1. Comparison Operators
Operator Description Example
= Equals EmployeeID = 1
<
L
ess than
E
mployeeID < 1
> Greater than EmployeeID > 1
<=
Less than or equal to EmployeeID <= 1
>=
Greater than or equal to EmployeeID >= 1=
<>
,!= Not equal to EmployeeID <> 1
!<
Not less than EmployeeID !< 1
!> Not greater than EmployeeID !> 1
■Tip As mentioned earlier, every database vendor has its own implementation of SQL. This discussion is
specific to T-SQL; for example, standard SQL doesn’t have the
!= operator and calls <> the not equals oper-
ator
. In fact, standard SQL calls the expressions in a WHERE clause predicates; we’ll use that term because
predicates are either true or false,
but other expressions don’t have to be. If you work with another version
of SQL, please refer to its documentation for specifics.
In addition to these operators, the LIKE operator (see Table 3-2) allows you to match
patterns in character data. As with all SQL character data, strings must be enclosed in
single quotes (
').
Table 3-2. The LIKE Operator
Operator Description Example
LIKE Allo
ws y
ou to specify a pattern
WHERE Title LIKE 'Sales%' selects all r
o
ws where
the
Title column contains a value that starts with
the wor
d
Sales follo
w
ed by zero or more
characters.
You can use four different wildcards in the pattern (see Table 3-3).
CHAPTER 3 ■ INTRODUCING SQL50
777Xch03final.qxd 11/18/06 3:40 PM Page 50
Table 3-3. Wildcard Characters
Wildcard Description
% Any combination of characters.
_ A
ny one character.
W
HERE Title LIKE '_ales'
s
elects all rows where the
T
itle
c
olumn equals
A
ales
, a
ales
, B
ales
, b
ales
,
and so on.
[ ] A single character within a range [a-d] or set [abcd]. WHERE Title LIKE '[bs]ales'
selects all rows where the Title column equals either the word bales or sales.
[^] A single character not within a range [^a-d] or set [^abcd].
Sometimes it’s useful to select rows where a value is unknown. When no value has
been assigned to a column, the column is
NULL. (This isn’t the same as a column that con-
tains the value
0 or a blank.) To select a row with a column that’s NULL, use the IS NULL
operator (see Table 3-4).
Table 3-4. The IS [NOT] NULL Operator
Operator Description Example
IS NULL Allows you to select rows where WHERE Region IS NULL returns all rows where
a column has no value.
Region has no value.
IS NOT NULL Allows you to select rows where WHERE Region IS NOT NULL returns all rows
a column has a value. where Region has a value.
■Note You must use the IS NULL and IS NOT NULL operators (collectively called the null predicate
in standard SQL) to select or exclude NULL column values, respectively. The following is a valid query but
always produces zero rows:
SELECT * FROM employees WHERE region = NULL, because nothing
"equals" NULL (not even another NULL)
. If you change = to IS, the query will return rows where
regions have no value.
T
o select values in a range or in a set, you can use the
BETWEEN and IN operators (see
T
able 3-5).
Table 3-5. The BETWEEN and IN Operators
Operator Description Example
BETWEEN True if a value is within a range. WHERE extension BETWEEN 400 AND 500 returns
the r
o
ws wher
e
Extension is betw
een 400 and
500, inclusive.
IN True if a value is in a list. The list WHERE city IN ('Seattle', 'London') returns
can be the result of a subquery. the rows where City is either Seattle or London.
CHAPTER 3 ■ INTRODUCING SQL 51
777Xch03final.qxd 11/18/06 3:40 PM Page 51