Beginning Databases with Postgre SQL phần 3 pps
Bạn đang xem bản rút gọn của tài liệu. Xem và tải ngay bản đầy đủ của tài liệu tại đây (3.42 MB, 66 trang )
CHAPTER 4 ■ ACCESSING YOUR DATA
109
we need to use an extra table, the item table, to get at the item description. The rest of the query
however, is pretty much as before:
bpsimple=> SELECT customer.fname, customer.lname, orderinfo.date_placed,
bpsimple-> item.description, orderline.quantity
bpsimple-> FROM customer, orderinfo, orderline, item
bpsimple-> WHERE
bpsimple-> customer.customer_id = orderinfo.customer_id AND
bpsimple-> orderinfo.orderinfo_id = orderline.orderinfo_id AND
bpsimple-> orderline.item_id = item.item_id AND
bpsimple-> customer.fname = 'Ann' AND
bpsimple-> customer.lname = 'Stones';
fname | lname | date_placed | description | quantity
+ + + +
Ann | Stones | 2004-06-23 | Wood Puzzle | 1
Ann | Stones | 2004-06-23 | Tissues | 2
Ann | Stones | 2004-06-23 | Fan Large | 2
Ann | Stones | 2004-06-23 | Carrier Bag | 1
Ann | Stones | 2004-07-21 | Wood Puzzle | 1
Ann | Stones | 2004-07-21 | Linux CD | 1
(6 rows)
bpsimple=>
How It Works
Once you have seen how three-table joins work, it’s not difficult to extend the idea to more tables.
We added the item description to the list of columns to be shown, added the item table to the
list of tables to select from, and added the information about how to relate the item table to the
tables we already had, orderline.item_id = item.item_id. You will notice that Wood Puzzle is
listed twice, since it was purchased on two different occasions.
In this SELECT, we have displayed at least one column from each of the tables we used in
our join. There is actually no need to do this. If we had just wanted the customer name and
item description, we could have simply chosen not to retrieve the columns we didn’t need.
A version retrieving fewer columns is just as valid, and may be marginally more efficient
than our earlier attempt:
SELECT customer.fname, customer.lname, item.description
FROM customer, orderinfo, orderline, item
WHERE
customer.customer_id = orderinfo.customer_id AND
orderinfo.orderinfo_id = orderline.orderinfo_id AND
orderline.item_id = item.item_id AND
customer.fname = 'Ann' AND
customer.lname = 'Stones';
To conclude this example, let’s go back to something we learned early in the chapter: how
to remove duplicate information using the DISTINCT keyword.
MatthewStones_4789C04.fm Page 109 Tuesday, February 1, 2005 7:30 AM
110
CHAPTER 4
■ ACCESSING YOUR DATA
Try It Out: Add Extra Conditions
Suppose we want to discover what type of items Ann Stones bought. All we want listed are the
descriptions of items purchased, ordered by the description. We don’t even want to list the
customer name, since we know that already (we are using it to select the data). We need to select
only the item.description, and we also need to use the DISTINCT keyword, to ensure that Wood
Puzzle is listed only once, even though it was bought several times:
bpsimple=> SELECT DISTINCT item.description
bpsimple-> FROM customer, orderinfo, orderline, item
bpsimple-> WHERE
bpsimple-> customer.customer_id = orderinfo.customer_id AND
bpsimple-> orderinfo.orderinfo_id = orderline.orderinfo_id AND
bpsimple-> orderline.item_id = item.item_id AND
bpsimple-> customer.fname = 'Ann' AND
bpsimple-> customer.lname = 'Stones'
bpsimple-> ORDER BY item.description;
description
Carrier Bag
Fan Large
Linux CD
Tissues
Wood Puzzle
(5 rows)
bpsimple=>
How It Works
We simply take our earlier SQL, remove the columns we no longer need, add the DISTINCT
keyword after SELECT to ensure each row appears only once, and add our ORDER BY condition
after the WHERE clause.
That’s one of the great things about SQL: once you have learned a feature, it can be applied
in a general way. ORDER BY, for example, works with many tables in just the same way as it works
with a single table.
The SQL92 SELECT Syntax
You may have noticed that the WHERE clause actually has two slightly different jobs. It specifies the
conditions to determine which rows we wish to retrieve (customer.fname = 'Ann') but also specifies
how multiple tables relate to each other (customer.customer_id = orderinfo.customer_id).
This didn’t really cause anyone any problems for many years, until the SQL standards
committee tried to extend the syntax to help handle the increasingly complex jobs to which
SQL was being put. When the SQL92 standard was released, a new form of the SELECT statement
syntax was added to separate these two subtly different uses. This new syntax (sometimes
referred to as the SQL92/99 syntax, or the ANSI syntax) was surprisingly slow to catch on with
MatthewStones_4789C04.fm Page 110 Tuesday, February 1, 2005 7:30 AM
CHAPTER 4 ■ ACCESSING YOUR DATA
111
many SQL databases. Microsoft was an early adopter in SQL Server 6.5, and PostgreSQL added
support in version 7.1, but it took Oracle till version 9 to support the new syntax.
The new syntax uses the JOIN … ON syntax to specify how tables relate, leaving the WHERE
clause free to concentrate on which rows to select. The new syntax moves the linking of tables
into the FROM section of the SELECT statement, away from the WHERE clause. So the syntax changes
from this:
SELECT <column list> FROM <table list>
WHERE <join condition> <row-selection conditions>
to this:
SELECT <column list> FROM <table> JOIN <table> ON <join condition>
WHERE <row-selection conditions>
It’s easier than it looks—really! Suppose we wanted to join the customer and orderinfo
tables, which share a common key of customer_id. Instead of writing the following:
FROM customer, orderinfo WHERE customer.customer_id = orderinfo.customer_id
we would write this:
FROM customer JOIN orderinfo ON customer.customer_id = orderinfo.customer_id
This is slightly more long-winded, but it is both clearer and an easier syntax to extend, as we
will see when we look at outer joins in Chapter 7.
Extensions to more than two tables are straightforward. Consider our earlier query:
SELECT customer.fname, customer.lname, item.description
FROM customer, orderinfo, orderline, item
WHERE
customer.customer_id = orderinfo.customer_id AND
orderinfo.orderinfo_id = orderline.orderinfo_id AND
orderline.item_id = item.item_id AND
customer.fname = 'Ann' AND
customer.lname = 'Stones';
In the SQL92 syntax, this becomes:
SELECT customer.fname, customer.lname, item.description
FROM customer
JOIN orderinfo ON customer.customer_id = orderinfo.customer_id
JOIN orderline ON orderinfo.orderinfo_id = orderline.orderinfo_id
JOIN item ON orderline.item_id = item.item_id
WHERE
customer.fname = 'Ann' AND
customer.lname = 'Stones';
Both versions of the SELECT statement produce identical results.
MatthewStones_4789C04.fm Page 111 Tuesday, February 1, 2005 7:30 AM
112
CHAPTER 4
■ ACCESSING YOUR DATA
However, many users seem to have stuck with the earlier syntax, which is still valid and
slightly more succinct for many SQL statements. We present the newer SQL92 version here, so
you will be familiar with the syntax, but generally in this book, we will stick with the older-style
joins, except where we meet outer joins in Chapter 7.
Summary
This has been a fairly long chapter, but we have covered quite a lot. We have discussed the
SELECT statement in some detail, discovering how to choose columns and rows, how to order
the output, and how to suppress duplicate information. We also learned a bit about the date
type, and how to configure PostgreSQL’s behavior in interpreting and displaying dates, as well
as how to use dates in condition statements.
We then moved on to the heart of SQL: the ability to relate tables together. After our first
bit of SQL that joined a pair of tables, we saw how easy it was to extend this to three and even
four tables. We finished off by reusing some of the knowledge we gained early in the chapter to
refine our four-table selection to home in on displaying exactly the information we were searching
for, and removing all the extra columns and duplicate rows.
The good news is that we have now seen all the everyday features of the SELECT statement,
and once you understand the SELECT statement, much of the rest of SQL is reasonably straight-
forward. We will be coming back to the SELECT statement in Chapter 7 to look at some more
advanced features that you will need from time to time, but you will find that much of SQL you
need to use in the real world has been covered in this chapter.
MatthewStones_4789C04.fm Page 112 Tuesday, February 1, 2005 7:30 AM
113
■ ■ ■
CHAPTER 5
PostgreSQL Command-Line
and Graphical Tools
A PostgreSQL database is generally created and administered with the command-line tool,
psql, which we have used in earlier chapters to get started. Command-line tools similar to psql
are common with commercial databases. Oracle has one such tool called SQL*Plus, for example.
While command-line tools are generally complete, in the sense that they contain ways to
perform all the functions that you need, they can be a little user-unfriendly. On the other hand,
they make no great demands in terms of graphics cards, memory, and so on.
In this chapter, we will begin by taking a closer look at psql. Next, we will cover how to set
up an ODBC data source to use a PostgreSQL database, which is necessary for some of the tools
described in this chapter. Then we will meet some of the graphical tools available for working
with PostgreSQL databases. Some of the tools can also be used for administering databases,
which is the topic of Chapter 11. In this chapter, we will concentrate on general database tasks.
In particular, we’ll examine the following tools in this chapter:
• psql
•ODBC
• pgAdmin III
• phpPgAdmin
•Rekall
• Microsoft Access
• Microsoft Excel
psql
The psql tool allows us to connect to a database, execute queries, and administer a database,
including creating a database, adding new tables and entering or updating data, using SQL
commands.
MatthewStones_4789C05.fm Page 113 Monday, February 14, 2005 12:00 PM
114
CHAPTER 5
■ POSTGRESQL COMMAND-LINE AND GRAPHICAL TOOLS
Starting psql
As we have already seen, we start psql by specifying the database to which we wish to connect.
We need to know the host name of the server and the port number the database is listening on
(if it is not running on the default of 5432), plus a valid username and password to use for the
connection. The default database will be the one on the local machine with the same name as
the current user login name.
To connect to a named database on a server, we invoke psql with a database name, like this:
$ psql -d bpsimple
We can override defaults for the database name, username, server host name, and listening
port by setting the environment variables PGDATABASE, PGUSER, PGHOST, and PGPORT, respectively.
These defaults may also be overridden by using the –d, -U, -h, and -p command-line options
to psql.
■Note We can run psql only by connecting to a database. This presents a “chicken-and-egg” problem for
creating our first database. We need a user account and a database to connect to. We created a default user,
postgres, when we installed PostgreSQL in Chapter 3, so we can use that to connect to create new users
and databases. To create a database, we connect to a special database included with all PostgreSQL instal-
lations, template1. Once connected to template1, we can create a database, and then either quit and
restart psql or use the \c internal psql command to reconnect to the new database.
When psql starts up, it will read a startup file, .psqlrc, if one exists and is readable in the
current user’s home directory. This file is similar to a shell script startup file and may contain
psql commands to set the desired behavior, such as setting the format options for printing
tables and other options. We can prevent the startup file from being read by starting psql with
the -X option.
Issuing Commands in psql
Once running, psql will prompt for commands with a prompt that consists of the name of the
database we are connected to, followed by =>. For users with full permissions on the database,
the prompt is replaced with =#.
psql commands are of two different types:
• SQL commands: We can issue any SQL statement that PostgreSQL supports to psql, and
it will execute it.
• Internal commands: These are psql commands used to perform operations not directly
supported in SQL, such as listing the available tables and executing scripts. All internal
commands begin with a backslash and cannot be split over multiple lines.
MatthewStones_4789C05.fm Page 114 Monday, February 14, 2005 12:00 PM
CHAPTER 5 ■ POSTGRESQL COMMAND-LINE AND GRAPHICAL TOOLS
115
■Tip You can ask for a list of all supported SQL commands by executing the internal command \h. For help
on a specific command, use \h <sql_command>. The internal command \? gives a list of all internal commands.
SQL commands to psql may be spread over multiple lines. When this occurs, psql will
change its prompt to -> or -# to indicate that more input is expected, as in this example:
$ psql -d bpsimple
bpsimple=# SELECT *
bpsimple-# FROM customer
bpsimple-# ;
$
To tell psql that we have completed a long SQL command that might spread across multiple
lines, we need to end the command with a semicolon. Note that the semicolon is not a required
part of the SQL command, but is just there to let psql know when we are finished. For example,
in the SELECT statement shown here, we may have wanted to add a WHERE clause on the next line.
We can tell psql that we will never split our commands over more than one line by starting
psql with the -S option. In that case, we do not need to add the semicolon to the end of our
commands. The psql prompt will change to ^> to remind us that we are in single-line mode.
This will save us a small amount of typing and may be useful for executing some SQL scripts.
Working with the Command History
On PostgreSQL platforms that support history recording, each command that we ask psql to
execute is recorded in a history, and we can recall previous commands to run again or edit. Use
the arrow keys to scroll through the command history and edit commands. This feature is
available unless you have turned it off with the -n command-line option (or it has not been
compiled in the build for your platform).
We can view the query history with the \s command or save it to a file with \s <
file>. The
last query executed is kept in a query buffer. We can see what is in the query buffer with \p, and
we can clear it with \r. We can edit the query buffer contents with an external editor with \e.
The editor will default to vi (on Linux and UNIX), but you can specify your own favorite editor
by setting the EDITOR environment variable before starting psql. We can send the query buffer
to the server with \g, which gives a simple way to repeat a query.
Scripting psql
We can collect a group of psql commands (both SQL and internal) in a file and use it as a simple
script. The \i internal command will read a set of psql commands from a file.
This feature is especially useful for creating and populating tables. We used it in Chapter 3
to create our sample database, bpsimple. Here is part of the create_tables-bpsimple.sql script
file that we used:
MatthewStones_4789C05.fm Page 115 Monday, February 14, 2005 12:00 PM
116
CHAPTER 5
■ POSTGRESQL COMMAND-LINE AND GRAPHICAL TOOLS
CREATE TABLE customer
(
customer_id serial ,
title char(4) ,
fname varchar(32) ,
lname varchar(32) NOT NULL,
addressline varchar(64) ,
town varchar(64) ,
zipcode char(10) NOT NULL,
phone varchar(16) ,
CONSTRAINT customer_pk PRIMARY KEY(customer_id)
);
CREATE TABLE item
(
item_id serial ,
description varchar(64) NOT NULL,
cost_price numeric(7,2) ,
sell_price numeric(7,2) ,
CONSTRAINT item_pk PRIMARY KEY(item_id)
);
We give script files a .sql extension by convention, and execute them with the \i internal
command:
bpsimple=#\i create_tables-bpsimple.sql
CREATE TABLE
CREATE TABLE
bpsimple=#
Here, the script is located in the directory where we started psql, but we can execute a
script stored elsewhere by giving the full path to it.
Another use of script files is for simple reports. If we want to keep an eye on the growth of
a database, we could put a few commands in a script file and arrange to run it every once in a
while. To report the number of customers and orders taken, create a script file called report.sql
that contains the following lines and execute it in a psql session:
SELECT count(*) FROM customer;
SELECT count(*) FROM orderinfo;
Alternatively, we can use the -f command line option to get psql to execute the file and
then exit:
$ psql -f report.sql bpsimple
count
15
(1 row)
MatthewStones_4789C05.fm Page 116 Monday, February 14, 2005 12:00 PM
CHAPTER 5 ■ POSTGRESQL COMMAND-LINE AND GRAPHICAL TOOLS
117
count
5
(1 row)
$
If a password is required to access the database, psql will prompt for one. We can specify
a different database user with the -U option to psql.
We can redirect query output to a file by using the -o command-line option, or to a file or
filter program with the \o internal command from within a session. For example, from within
a psql session, we can create a text file called customers.txt containing all of our customers by
issuing the following commands:
bpsimple=# \o customers.txt
bpsimple=# SELECT * FROM customer;
bpsimple=# \o
The final command, \o without a filename parameter, stops the redirecting of query output
and closes the output file.
Examining the Database
We can explore the structure of our database using a number of internal psql commands. The
structure includes the names and definition of the tables that make up the database, any functions
(stored procedures and triggers) that may have been defined, the users that have been created,
and so on.
The \d command lists all of the relations—tables, sequences, and views, if any—in our
database. Here is an example:
bpsimple=# \d customer
Table "public.customer"
Column | Type | Modifiers
+ +
customer_id | integer | not null default nextval( )
title | character(4) |
fname | character varying(32) |
lname | character varying(32) | not null
addressline | character varying(64) |
town | character varying(32) |
zipcode | character(10) | not null
phone | character varying(16) |
Indexes:
"customer_pk" PRIMARY KEY, btree (customer_id)
bpsimple=#
The \dt command restricts the listing to tables only. See Table 5-2 in the “Internal Commands
Quick Reference” section for more internal psql commands.
MatthewStones_4789C05.fm Page 117 Monday, February 14, 2005 12:00 PM
118
CHAPTER 5
■ POSTGRESQL COMMAND-LINE AND GRAPHICAL TOOLS
psql Command-Line Quick Reference
The command syntax for psql is:
psql [options] [dbname [username]]
The psql command-line options and their meanings are shown in Table 5-1. To see the
complete list of options to psql, use the following command:
$ psql help
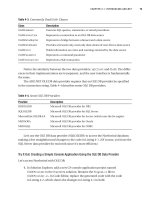
Table 5-1.
psql Command-Line Options
Option Meaning
-a Echo all input from script
-A Unaligned table output mode; same as -P format=unaligned
-c <query> Run only single query (or internal command) and exit
-d <dbname> Specify database name to connect to (default: $PGDATABASE or current
login name)
-e Echo queries sent to server
-E Display queries that internal commands generate
-f <filename> Execute queries from file, then exit
-F <string> Set field separator (default: |); same as -P fieldsep=<string>
-h <host> Specify database server host (default: $PGHOST or local machine)
-H Set HTML table output mode; same as -P format=html
help Show help, then exit
-l List available databases, then exit
-n Disable readline; prevents line editing
-o <filename> Send query output to filename (use the form |pipe to send output to a
filter program)
-p <port> Specify database server port (default: $PGPORT or compiled-in default,
usually 5432)
-P var[=arg] Set printing option var to arg (see \pset command)
-q Run quietly (no messages, only query output)
-R <string> Set record separator (default: newline); same as -P recordsep=<string>
-s Set single-step mode (confirm each query)
MatthewStones_4789C05.fm Page 118 Monday, February 14, 2005 12:00 PM
CHAPTER 5 ■ POSTGRESQL COMMAND-LINE AND GRAPHICAL TOOLS
119
psql Internal Commands Quick Reference
The supported internal psql commands are shown in Table 5-2. In many versions of PostgreSQL,
some of these commands have more legible longer forms (such as \list for \l).
-S Set single-line mode (end of line terminates query rather than semicolon)
-t Print rows only; same as -P tuples_only
-T <text> Set HTML table tag options (width, border); same as -P tableattr=<text>
-U <username> Specify database username (default: $PGUSER or current login)
-v name=value Set psql variable name to value
version Show version information and exit; also –V
-W Prompt for password (should happen automatically, if a password is required)
-x Turn on expanded table output; same as -P expanded
-X Do not read startup file (~/.psqlrc)
Table 5-2. psql Internal Commands
Command Meaning
\? List all available psql internal commands
\a Toggle between unaligned and aligned mode
\c[onnect] [dbname|- [user]] Connect to new database; use - as the database name to connect
to the default database if you need to give a username
\C <title> Set table title for output; same as \pset title
\cd <dir> Change the working directory
\copy Perform SQL COPY with data stream to the client machine
\copyright Show PostgreSQL usage and distribution terms
\d <table> Describe table (or view, index, sequence)
\d{t|i|s|v} List tables/indices/sequences/views
\d{p|S|l} List permissions/system tables/lobjects
\da List aggregates
Table 5-1. psql Command-Line Options (Continued)
Option Meaning
MatthewStones_4789C05.fm Page 119 Monday, February 14, 2005 12:00 PM
120
CHAPTER 5
■ POSTGRESQL COMMAND-LINE AND GRAPHICAL TOOLS
\db List tablespaces
\dc List conversions
\dC List casts
\dd [object] List comment for table, type, function, or operator
\dD List domains
\df List functions
\dg List groups
\dl List large objects; also \lo list
\dn List schemas
\do List operators
\dT List data types
\du List users
\e [file] Edit the current query buffer or file with external editor
\echo <text> Write text to standard output
\encoding <encoding> Set client encoding
\f <sep> Change field separator
\g [file] Send query to back-end (and results in file, or |pipe)
\h [cmd] Help on syntax of SQL commands; use * for detail on all
commands
\H Toggle HTML mode
\i <file> Read and execute queries from file
\l List all databases
\lo_export, \lo_import, \lo_list,
\lo_unlink
Perform large object operations
\o [file] Send all query results to file, or |pipe
\p Show the content of the current query buffer
\pset <opt> Set table output option, which can be one of the following:
format, border, expanded, fieldsep, footer, null, recordsep,
tuples_only, title, tableattr, pager
\q Quit psql
\qecho <txt> Write text to query output stream (see \o)
\r Reset (clear) the query buffer
\s [file] Print history or save it in file
Table 5-2. psql Internal Commands (Continued)
Command Meaning
MatthewStones_4789C05.fm Page 120 Monday, February 14, 2005 12:00 PM
CHAPTER 5 ■ POSTGRESQL COMMAND-LINE AND GRAPHICAL TOOLS
121
ODBC Setup
Several of the tools discussed in this chapter, as well as some of the programming language
interfaces discussed in later chapters, use the ODBC standard interface to connect to PostgreSQL.
ODBC defines a common interface for databases and is based on X/Open and ISO/IEC
programming interfaces. In fact, ODBC stands for Open Database Connectivity and is not (as
is often believed) limited to Microsoft Windows clients. Programs written in many languages—
like C, C++, Ada, PHP, Perl, and Python—can make use of ODBC. OpenOffice, Gnumeric,
Microsoft Access, and Microsoft Excel are just a few examples of applications that can use ODBC.
To use ODBC on a particular client machine, we need both an application written for the
ODBC interface and a driver for the particular database that we want to use. PostgreSQL has
an ODBC driver called psqlodbc, which we can install on our clients. Often, clients will be
running on machines that are different from the server, and possibly different from each
other, requiring us to compile the ODBC driver on several client platforms. For example, we
might have the database server on Linux and our client applications running on Windows
and Mac OS X.
The source code and a binary installation for Windows are available from the psqlODBC
project home page at
■Note The standard Windows installation of PostgreSQL also contains a version of the ODBC driver that can
be installed on a Windows server at the same time as the database.
Installing the ODBC Driver
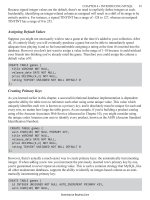
On Microsoft Windows, ODBC drivers are made available through the Control Panel’s Admin-
istrative Tools Data Sources applet, as shown in Figure 5-1.
\set <var> <value> Set internal variable
\t Show only rows (toggles between modes)
\T <tags> Set HTML table tags; same as \pset tableattr
\timing Toggle timing of commands
\unset <var> Unset (delete) internal variable
\w <file> Write current query buffer to file
\x Toggle expanded output
\z List access permissions for tables, views, and sequences
\! [cmd] Escape to shell or execute a shell command
Table 5-2. psql Internal Commands (Continued)
Command Meaning
MatthewStones_4789C05.fm Page 121 Monday, February 14, 2005 12:00 PM
122
CHAPTER 5
■ POSTGRESQL COMMAND-LINE AND GRAPHICAL TOOLS
Figure 5-1. The ODBC Data Sources applet
The Drivers tab of this applet lists the installed ODBC drivers, as shown in Figure 5-2.
Figure 5-2. Installed ODBC drivers
MatthewStones_4789C05.fm Page 122 Monday, February 14, 2005 12:00 PM
CHAPTER 5 ■ POSTGRESQL COMMAND-LINE AND GRAPHICAL TOOLS
123
To install the PostgreSQL ODBC driver, we need to perform two steps:
1. Download a suitable version of the driver from />psqlodbc. If you have a version of Windows that includes the Microsoft Windows Installer,
the MSI version of the drivers is the recommended choice, as it is much smaller; otherwise,
download the full installation. At the time of writing, both versions of the driver are located
in compressed archive files named psqlodbc-07_03_0200.zip.
2. Extract the driver installation file from the downloaded archive. It will be named either
psqlodbc.msi or psqlodbc.exe. Double-click the installation file and follow the instruc-
tions to install the PostgreSQL ODBC driver.
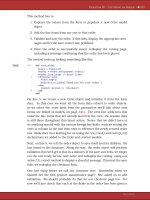
After performing these two steps, we can confirm that we have successfully installed the
driver by again selecting the Drivers tab in the ODBC applet and noting that PostgreSQL now
appears in the list, as shown in Figure 5-3.
Figure 5-3. PostgreSQL ODBC driver installed
Creating a Data Source
Now we will be able to use ODBC-aware applications to connect to PostgreSQL databases.
To make a specific database available, we need to create a data source, as follows:
1. Select User DSN in the ODBC applet to create a data source that will be available to the
current user. (If you select System DSN, you can create data sources that all users can see.)
2. Click Add to begin the creation process. A dialog box for selecting which driver the data
source will use appears, as shown in Figure 5-4.
MatthewStones_4789C05.fm Page 123 Monday, February 14, 2005 12:00 PM
124
CHAPTER 5
■ POSTGRESQL COMMAND-LINE AND GRAPHICAL TOOLS
Figure 5-4. Creating a PostgreSQL data source
3. Select the PostgreSQL driver and click Finish.
4. We now have a PostgreSQL driver entry that must be configured. A Driver Setup box will
appear for us to enter the details of this data source. As shown in Figure 5-5, give the
data source a name and a description, and set the network configuration. Here, we are
creating an ODBC connection to a copy of our bpsimple database running on a Linux
server using the IP address of the server. (If you are running a fully configured naming
service such as DNS or WINS, you can use a machine name for the server.) We also
specify the username and password to be used at the server to access the database we
have chosen.
Figure 5-5. Configuring a PostgreSQL data source
MatthewStones_4789C05.fm Page 124 Monday, February 14, 2005 12:00 PM
CHAPTER 5 ■ POSTGRESQL COMMAND-LINE AND GRAPHICAL TOOLS
125
■Tip Additional options are available under the Global and DataSource options in the ODBC Driver Setup
dialog box. If you will be using ODBC applications to update data or insert new data into the PostgreSQL data-
base, you may need to configure the data source to support this. To do this, click the DataSource button and
make sure that the Read Only box is not checked in the dialog box that appears.
5. Click Save to complete the setup.
We are now ready to access our PostgreSQL database from ODBC applications such as
Microsoft Access and Excel, as we will discuss later in this chapter. Next, we will look at some
open-source alternatives, starting with pgAdmin III.
pgAdmin III
pgAdmin III is a full-featured graphical interface for PostgreSQL databases. It is free software,
community-maintained at . According to the web site, pgAdmin is “a
powerful administration and development platform for the PostgreSQL database, free for any
use.” It runs on Linux, FreeBSD, and Windows 2000/XP. Versions for Sun and Mac OS X are
being developed.
pgAdmin III offers a variety of features. With it, we can do the following:
• Create and delete tablespaces, databases, tables, and schemas
• Execute SQL with a query window
• Export the results of SQL queries to files
• Back up and restore databases or individual tables
• Configure users, groups, and privileges
• View, edit, and insert table data
Let’s look at how to get up and running with this versatile tool.
Installing pgAdmin III
With the release of pgAdmin III, the developers have made installation of the program much
simpler. Previous versions require the PostgreSQL ODBC driver to be installed to provide
access to the database, but this dependency has been removed. If you have used an earlier
version of pgAdmin, we recommend that you consider upgrading.
MatthewStones_4789C05.fm Page 125 Monday, February 14, 2005 12:00 PM
126
CHAPTER 5
■ POSTGRESQL COMMAND-LINE AND GRAPHICAL TOOLS
■Note The standard Windows installation of PostgreSQL includes a version of pgAdmin III that can be
installed on a Windows server along with the database or on a client without a database.
Binary packages for Microsoft Windows 2000/XP, FreeBSD, Debian Linux, Slackware Linux,
and Linux distributions that use the RPM package format (such as Red Hat and SuSE Linux) are
available to download from />Download the appropriate package for the system you want to run pgAdmin III and install it.
The Windows package contains an installer to execute, packaged in a compressed archive ZIP file.
After installation, you should have a new program (pgAdmin III) in the Windows Start menu.
Using pgAdmin III
Before we can use pgAdmin III in earnest, we need to make sure that we can create objects in
the database we want to maintain. This is because pgAdmin III augments the database with
objects of its own that are stored on the server. To perform all of the maintenance functions
with pgAdmin III, we need to log on as a user that has complete privileges for the database—
a superuser, in other words. If we choose a user without superuser status, we will get an error.
■Tip We will be looking at users and permissions in Chapter 11. If your PostgreSQL database installation
was performed on Windows with the default settings, you should have a user postgres that is used to
control the database, and you can try to log on as that user. If you installed on Linux or UNIX following the
steps in Chapter 3, you will have created a suitable user; we used neil.
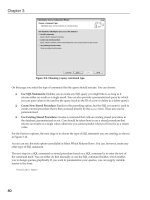
We can manage several database servers at once with pgAdmin III, so our first task is to
create a server connection. Select Add Server from the File menu to bring up a dialog box very
similar to the one we used to create an ODBC connection earlier. Figure 5-6 shows a connection
being made to a PostgreSQL database on a Linux server.
MatthewStones_4789C05.fm Page 126 Monday, February 14, 2005 12:00 PM
CHAPTER 5 ■ POSTGRESQL COMMAND-LINE AND GRAPHICAL TOOLS
127
Figure 5-6. Adding a server connection in pgAdmin III
Once the server connection has been created, we can connect to the database server and
browse the databases, tables, and other objects that the server is providing. Figure 5-7 shows
an example of pgAdmin III exploring the tables of the bpsimple database and examining the
lname attribute of the customer table.
MatthewStones_4789C05.fm Page 127 Monday, February 14, 2005 12:00 PM
128
CHAPTER 5
■ POSTGRESQL COMMAND-LINE AND GRAPHICAL TOOLS
Figure 5-7. Examining table properties with pgAdmin III
One feature of pgAdmin III that is potentially very useful is its backup and restore func-
tionality. This provides a simple interface to the PostgreSQL pg_dump utility, which we will cover
in Chapter 11. We can back up and restore individual tables or an entire database. There are
options to control how and where the backup file is created and what method will be used to
restore the database, if necessary (for example, by using the \copy command or SQL INSERT
statements).
To open the Backup dialog box, right-click the object (database or table) to back up and
select Backup. Figure 5-8 shows the Backup dialog box for the bsimple database.
MatthewStones_4789C05.fm Page 128 Monday, February 14, 2005 12:00 PM
CHAPTER 5 ■ POSTGRESQL COMMAND-LINE AND GRAPHICAL TOOLS
129
Figure 5-8. The pgAdmin III Backup dialog box
We will cover more of pgAdmin III’s features for managing databases in Chapter 11.
phpPgAdmin
A web-based alternative for managing PostgreSQL databases is phpPgAdmin. This is an appli-
cation (written in the PHP programming language) that is installed on a web server and provides a
browser-based interface for administration of database servers. The project home page is at
/>With phpPgAdmin, we can perform many tasks with our databases, including the following:
• Manage users and groups
• Create tablespaces, databases, and schemas
• Manage tables, indexes, constraints, triggers, rules, and privileges
• Create views, sequences, and functions
• Create and run reports
• Browse table data
• Execute arbitrary SQL
• Export table data in many formats: SQL, COPY (data suitable for the SQL COPY command),
XML, XHTML, comma-separated values (CSV), tab-delimited, and pg_dump
• Import SQL scripts, COPY data, XML files, CSV files, and tab-delimited files
MatthewStones_4789C05.fm Page 129 Monday, February 14, 2005 12:00 PM
130
CHAPTER 5
■ POSTGRESQL COMMAND-LINE AND GRAPHICAL TOOLS
Installing phpPgAdmin
Installing phpPgAdmin is very straightforward. The program is available as a download
package in several formats, including ZIP and compressed tarball (.tar.gz). The package
needs to be extracted into a folder served by a web server that supports the PHP programming
language. A popular choice for this is the Apache web server configured with the mod_php
extension. More information about Apache and PHP can be found at
and , respectively. Many Linux distributions provide a suitably configured
Apache installation.
The only configuration that phpPgAdmin requires is the setting of some variables in its
configuration file, conf/conf.inc.php. The following extract shows the lines in this file that
need to be configured to set up phpPgAdmin to manage a database on another server.
// Display name for the server on the login screen
$conf['servers'][0]['desc'] = 'Beast';
// Hostname or IP address for server. Use '' for UNIX domain socket.
$conf['servers'][0]['host'] = '192.168.0.111';
// Database port on server (5432 is the PostgreSQL default)
$conf['servers'][0]['port'] = 5432;
// Change the default database only if you cannot connect to template1
$conf['servers'][0]['defaultdb'] = 'template1';
Using phpPgAdmin
To demonstrate the cross-platform potential of phpPgAdmin, Apache, and PostgreSQL,
Figures 5-9 and 5-10 show a browser running on an Apple Mac, accessing an Apache web server
with phpPgAdmin installed running on Windows XP (at address 192.168.0.3), managing a database
on a Linux server called Beast at address 192.168.0.111. Figure 5-11 depicts the customer table
data being viewed. The URL for the browser is http://192.168.0.3/phpPgAdmin/index.php.
MatthewStones_4789C05.fm Page 130 Monday, February 14, 2005 12:00 PM
CHAPTER 5 ■ POSTGRESQL COMMAND-LINE AND GRAPHICAL TOOLS
131
Figure 5-9. phpPgAdmin login
Figure 5-10. phpPgAdmin main page
MatthewStones_4789C05.fm Page 131 Monday, February 14, 2005 12:00 PM
132
CHAPTER 5
■ POSTGRESQL COMMAND-LINE AND GRAPHICAL TOOLS
Figure 5-11. phpPgAdmin browsing table data
One feature of phpPgAdmin that is potentially very useful is its data import functionality.
If we have some data that we would like to import into a PostgreSQL table, phpPgAdmin can
help. One way of importing data is to make it available as a comma-separated values (CSV) file.
Applications such as Microsoft Excel are able to export data in this format.
Let’s consider a simple example. Suppose that from an Excel spreadsheet, we have saved
some rows for the item table in the bpsimple database, in a CSV with headings format. This
means that there are column names present in the first row, followed by the data, like this:
description,cost_price,sell_price
Wood Puzzle,15.23,21.95
Rubik Cube,7.45,11.49
Linux CD,1.99,2.49
We start the import process by selecting the table we want to import into, clicking Import,
and selecting the import file type (CSV in this example) and the import filename, as shown in
Figure 5-12. We can then click Import, and (assuming we have permission) the new rows will
be incorporated into our database table.
MatthewStones_4789C05.fm Page 132 Monday, February 14, 2005 12:00 PM
CHAPTER 5 ■ POSTGRESQL COMMAND-LINE AND GRAPHICAL TOOLS
133
Figure 5-12. Importing data with phpPgAdmin
Rekall
Rekall is a multiplatform database front-end originally developed by theKompany (http://
www.thekompany.com/) as a tool to extract, display, and update data from several different data-
base types. It works with PostgreSQL, MySQL, and IBM DB2 using native drivers, and other
databases using ODBC.
While Rekall does not include the PostgreSQL-specific administration features found in
pgAdmin III and phpPgAdmin, it does add some very useful user functionality. In particular,
it contains a visual query designer and a form builder for creating data-entry applications.
Furthermore, Rekall uses the Python programming language for scripting, allowing sophisti-
cated database applications to be constructed.
Rekall has been made available under a dual-license scheme. There is a commercial
version and also a community-developed open-source version released under the GNU Public
License (GPL). Both are available at The open-source version
MatthewStones_4789C05.fm Page 133 Monday, February 14, 2005 12:00 PM