Beginning microsoft Visual Basic 2010 phần 4 potx
Bạn đang xem bản rút gọn của tài liệu. Xem và tải ngay bản đầy đủ của tài liệu tại đây (3.38 MB, 72 trang )
182
❘
CHAPTER 6 EXTENSIBLE APPLICATION MARKUP LANGUAGE (XAML)
➤ Set
Width
to 95.
➤ Set
Margin
to 0,99,225,0.
➤ Set
FontFamily
to Segoe UI.
➤ Set
FontSize
to 11.
➤ Set
HorizontalAlignment
to Right.
5. Drag a TextBox control from the Toolbox and position it beneath the previous TextBox control.
Set the following properties:
➤ Set
Name
to txtLastName.
➤ Set
Width
to 185.
➤ Set
Margin
to 0,101,35,0.
➤ Set
FontFamily
to Segoe UI.
➤ Set
FontSize
to 11.
➤ Set
HorizontalAlignment
to Right.
6. Drag a Label control from the Toolbox and align it beneath the previous Label control. Set the
following properties:
➤ Set
Content
to Address.
➤ Set
Width
to 95.
➤ Set
Margin
to 0,129,225,0.
➤ Set
FontFamily
to Segoe UI.
➤ Set
FontSize
to 11.
➤ Set
HorizontalAlignment
to Right.
7. Drag a TextBox control from the Toolbox and position it beneath the previous TextBox control.
Set the following properties:
➤ Set
Name
to txtAddress.
➤ Set
Width
to 185.
➤ Set
Margin
to 0,131,35,0.
➤ Set
FontFamily
to Segoe UI.
➤ Set
FontSize
to 11.
➤ Set
HorizontalAlignment
to Right.
8. Drag a Label control from the Toolbox, align it beneath the previous Label control, and set the
following properties:
➤ Set
Content
to City.
➤ Set
Width
to 95.
Windows Presentation Foundation
❘
183
➤ Set
Margin
to 0,159,225,0.
➤ Set
FontFamily
to Segoe UI.
➤ Set
FontSize
to 11.
➤ Set
HorizontalAlignment
to Right.
9. Drag a TextBox control from the Toolbox, position it beneath the previous TextBox control, and
set the following properties:
➤ Set
Name
to txtCity.
➤ Set
Width
to 185.
➤ Set
Margin
to 0,161,35,0.
➤ Set
FontFamily
to Segoe UI.
➤ Set
FontSize
to 11.
➤ Set
HorizontalAlignment
to Right.
10. Drag a Label control from the Toolbox, align it beneath the previous Label control, and set the
following properties:
➤ Set
Content
to State.
➤ Set
Width
to 95.
➤ Set
Margin
to 0,189,225,0.
➤ Set
FontFamily
to Segoe UI.
➤ Set
FontSize
to 11.
➤ Set
HorizontalAlignment
to Right.
11. Drag a ComboBox control from the Toolbox, position it beneath the previous TextBox control,
and set the following properties:
➤ Set
Name
to cboState.
➤ Set
Width
to 95.
➤ Set
Margin
to 0,191,125,0.
➤ Set
FontFamily
to Segoe UI.
➤ Set
FontSize
to 11.
➤ Set
HorizontalAlignment
to Right.
12. Drag a Label control from the Toolbox, align it beneath the previous Label control, and set the
following properties:
➤ Set
Content
to Postal Code.
➤ Set
Width
to 95.
➤ Set
Margin
to 0,219,225,0.
184
❘
CHAPTER 6 EXTENSIBLE APPLICATION MARKUP LANGUAGE (XAML)
➤ Set
FontFamily
to Segoe UI.
➤ Set
FontSize
to 11.
➤ Set
HorizontalAlignment
to Right.
13. Drag a TextBox control from the Toolbox, position it beneath the previous ComboBox control,
and set the following properties:
➤ Set
Name
to txtPostalCode.
➤ Set
Width
to 95.
➤ Set
Margin
to 0,221,125,0.
➤ Set
FontFamily
to Segoe UI.
➤ Set
FontSize
to 11.
➤ Set
HorizontalAlignment
to Right.
14. Drag a Button control from the Toolbox, position it in the bottom-right corner of the window,
and set the following properties:
➤ Set
Name
to btnApplyNow.
➤ Set
Content
to Apply Now.
➤ Set
Margin
to 0,0,35,16.
➤ Set
FontFamily
to Segoe UI.
➤ Set
FontSize
to 11.
➤ Set
VerticalAlignment
to Bottom. (The default is Top, which is how the other controls
are vertically aligned.)
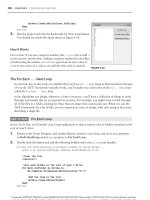
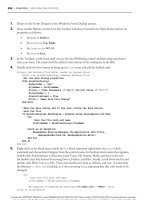
15. Save your project and then run it. Your completed form should look similar to Figure 6-5.
How It Works
Adding controls to a WPF window is no different from adding controls to a Windows form, as you discov-
ered. You simply drag the control from the Toolbox and drop it on the window. The difference is when
you try to position a control and align it to other controls.
In a Windows Forms application, you can drag a control from the Toolbox and align it to other controls
with snap lines before releasing the left mouse button. In a WPF application, you drag the control and
place it on the form first and then reposition the control before you see any snap lines when aligning it
with other controls.
A TextBox control in a WPF application has a
Text
property to specify the text displayed in the control,
just as it does in a Windows Form application. However, the Label and Button control do not use the
Text
property to specify the text displayed in the control as they do in a Windows Forms application; instead,
they use the
Content
property.
Windows Presentation Foundation
❘
185
FIGURE 6-5
You’ll undoubtedly have noticed that you must use the
Margin
property to reposition controls from within
the Properties window, unlike using the
Location
property in a Windows Forms application. The differ-
ences in the properties do not stop at being named differently. The
Location
property uses a set of X,Y
coordinates that position a control relative to the upper-left corner of the form.
The
Margin
property of a WPF control specifies the outer margins of the control as
Left
,
Top
,
Right
,and
Bottom
.
You may also have noticed that the Properties window does not provide as rich an interface as the Prop-
erties windows in a Windows Forms application. Case in point is the
FontFamily
property. In a Windows
Forms application, the
Font
property provides the Font dialog that enables you to choose the font, style,
and size desired.
Aside from these differences and limitations, WPF applications do enable you to create some stunning
graphics in your applications. Although WPF may not be the norm for most applications, it does have a
growing presence in desktop and browser applications.
186
❘
CHAPTER 6 EXTENSIBLE APPLICATION MARKUP LANGUAGE (XAML)
Wiring Up Events
When you write code using Visual Basic, you will be required to handle events. An event happens when
something, like clicking a button, happens. You will learn more about handling events in Chapter 7.
TRY IT OUT Wiring Up Events
Code file Credit Card.zip available for download at Wrox.com
In this Try It Out you will wire up some event handlers in the code to load the combo boxes on the form
and handle the button being clicked. This will enable you to see firsthand how similar events in WPF appli-
cations are compared to Window Forms applications and how to add code to make your WPF application
functional.
1. If your project is still running, stop it. Right-click
MainWindow.xaml
in the Solution Explorer and
choose View Code in the context menu. Add the following
Imports
statement at the top of the
class:
Imports System.Text
Class MainWindow
2. Declare a string array to hold the abbreviations of the states that will be loaded in the combo
boxes. To keep the code short, we’ve only included the first six state abbreviations in alphabetical
order. Add the following bolded code to your class:
Class MainWindow
‘Private variables
Private strStates() As String = {"AL", "AK", "AZ", "AR", "CA", "CO"}
3. You want to load the combo boxes with the data from the
strStates
array. The best time to do
this is when the window is loaded and after all the controls have been initialized. Select
(Windows1
Events)
in the Class Name combo box at the top of the Code Editor and then select the
Loaded
event in the Method Name combo box. Add the following bolded code to the event handler:
Private Sub MainWindow_Loaded(ByVal sender As Object, _
ByVal e As System.Windows.RoutedEventArgs) Handles Me.Loaded
‘Bind the combo box to the strStates array
cboState.ItemsSource = strStates
End Sub
4. When the user clicks the button on the window, you want the application to perform some action.
To keep the code simple, display a message box with some information from the window. Select
btnApplyNow
in the Class Name combo box and the
Click
event in the Method Name combo box.
Add the following bolded code to the event handler:
Private Sub btnApplyNow_Click(ByVal sender As Object, _
ByVal e As System.Windows.RoutedEventArgs) Handles btnApplyNow.Click
‘Declare and instantiate a StringBuilder object
Dim objStringBuilder As New StringBuilder
‘Add the question
objStringBuilder.AppendLine("Is your personal " & _
Windows Presentation Foundation
❘
187
"information listed here correct?")
objStringBuilder.AppendLine(String.Empty)
‘Add the personal information
objStringBuilder.AppendLine(txtFirstName.Text & " " & _
txtLastName.Text)
objStringBuilder.AppendLine(txtAddress.Text)
objStringBuilder.AppendLine(txtCity.Text & ", " & _
cboState.SelectedItem.ToString() & " " & txtPostalCode.Text)
‘Display a message box to verify the information
If MessageBox.Show(objStringBuilder.ToString, _
My.Application.Info.Title, MessageBoxButton.YesNo, _
MessageBoxImage.Question) = MessageBoxResult.Yes Then
‘Do some processing here
Else
‘Return to the window and let the user correct
‘their information
End If
End Sub
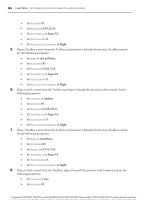
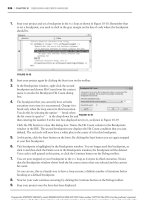
5. Save your project and then run it. Enter some data in the Personal Information section of the win-
dow and click the Apply Now button. You should see results similar to those shown in Figure 6-6.
FIGURE 6-6
188
❘
CHAPTER 6 EXTENSIBLE APPLICATION MARKUP LANGUAGE (XAML)
How It Works
In this example, you start the code by adding the following
Imports
statement, which is needed for the
StringBuilder
class:
Imports System.Text
The
strStates
variable is declared as a
String
array because of the parentheses after the variable name.
Next you set the array values in the string, enclosing each string value in double quotes and separating
each value with a comma. The entire list of values is enclosed in curly brackets:
‘Private variables
Private strStates() As String = {"AL", "AK", "AZ", "AR", "CA", "CO"}
The code in the
MainWindow_Loaded
event handles loading the combo boxes with the items contained in the
strStates
string array. The
ItemsSource
property of the
ComboBox
classisusedtosetthe
Items
collection
to a list of items. You use the
ItemsSource
property when you want to bind a list of items to a combo box,
such as items in a
String
array, a
DataSet
,ora
DataView
. You’ll learn about the
DataSet
and
DataView
in
Chapter 16.
Private Sub MainWindow_Loaded(ByVal sender As Object, _
ByVal e As System.Windows.RoutedEventArgs) Handles Me.Loaded
‘Bind the combo box to the strStates array
cboState.ItemsSource = strStates
End Sub
When a user clicks the Apply Now button, the
Click
event handler for this control is fired. The first thing
you do here is declare and instantiate a
StringBuilder
object. The
StringBuilder
object is an efficient
way to build large strings using fewer system resources than simply appending text to a
String
variable.
The
AppendLine
method of the
StringBuilder
class appends the text to the string and then automatically
appends a line terminator after the data. The first line of text that you specify is a question for the user,
and then you append a blank line by supplying an empty string. This provides a separation between the
question in the message box and the data that is displayed:
Private Sub btnApplyNow_Click(ByVal sender As Object, _
ByVal e As System.Windows.RoutedEventArgs) Handles btnApplyNow.Click
‘Declare and instantiate a StringBuilder object
Dim objStringBuilder As New StringBuilder
‘Add the question
objStringBuilder.AppendLine("Is your personal " & _
"information listed here correct?")
objStringBuilder.AppendLine(String.Empty)
Next, you start appending the information entered in the window to the string. First, you append the first
name and last name on a single line, and then append the address information on the next line. The city,
state, and postal code are added to the next line:
‘Add the personal information
objStringBuilder.AppendLine(txtFirstName.Text & " " & _
txtLastName.Text)
objStringBuilder.AppendLine(txtAddress.Text)
objStringBuilder.AppendLine(txtCity.Text & ", " & _
cboState.SelectedItem.ToString() & " " & txtPostalCode.Text)
Summary
❘
189
Next, you want to display the results of the string in a message box. Just as you’ve done before, you use
the
MessageBox
class and call the
Show
method. The first parameter to the
Show
method uses the
ToString
method of the
StringBuilder
class to output the string that has been built. The caption for the mes-
sage box is set in the next parameter to the
Show
method. Here you use the
Title
property from the
My.Application.Info
object. This object contains useful information about your application. You’ll learn
more about the
My
namespace in Chapters 10 and 11.
The next parameter to the
Show
method specifies the buttons that should be displayed on the message box.
Here you specify the
YesNo
constant from the
MessageBoxButton
enumeration. The last parameter to the
Show
method is the icon that should be displayed in the message box. In this parameter you specify the
Question icon, as you are asking the user a question.
The
Show
method will return a dialog result based on the buttons that you specify. Because you specify that
the Yes and No buttons be displayed, the
Show
method will return a dialog result of either
Yes
or
No
.You
handle this in an
If. . .Then
statement, checking for a dialog result of
Yes
.
The appropriate comments have been added in the following code to indicate where you provide your own
code to perform some processing. You’ll learn more about the
MessageBox
and how to use its buttons and
icons in the
If. . .Then
statement blocks in Chapter 8.
‘Display a message box to verify the information
If MessageBox.Show(objStringBuilder.ToString, _
My.Application.Info.Title, MessageBoxButton.YesNo, _
MessageBoxImage.Question) = MessageBoxResult.Yes Then
‘Do some processing here
Else
‘Return to the window and let the user correct
‘their information
End If
End Sub
SUMMARY
In this chapter you learned what XAML is and how it can be used to build WPF applications in Visual
Studio 2010. You have also seen firsthand the power of XAML and WPF in building applications
with interfaces that provide rich graphic manipulation that is not easily achieved with Windows Forms
applications.
In building the Credit Card application, you not only learned how to create a WPF application that
provides rich graphic manipulation, but you also learned how to wire events to the controls in a win-
dow. At this point you should realize the potential of WPF applications and understand how they differ
from Windows Forms applications. You’ll learn more about Windows Forms applications in the next
chapter, which will help to tie all this information together.
To summarize, you should now know:
➤ What XAML is
➤ What WPF is and how XAML relates to it
➤ How to build a WPF application using Visual Studio 2010
190
❘
CHAPTER 6 EXTENSIBLE APPLICATION MARKUP LANGUAGE (XAML)
➤ How to work with graphics in a WPF application
➤ How to work with control event handlers in a WPF application
EXERCISES
1. WPF makes it easy for organizations to separate which parts of software development?
2. XAML is based on another type of language. What is it?
3. What property do you set to position a WPF control in a Grid control?
4. In WPF design, you cannot place controls onto a window class, as the window does not have a
design surface. To place controls onto a form, Visual Studio adds what container by default?
Summary
❘
191
WHAT YOU HAVE LEARNED IN THIS CHAPTER
TOPIC CONCEPTS
XAML XML based language to define objects and values in a WPF application.
Basic WPF controls Grid, Label, TextBox, ComboBox, Image and Button controls are some
of the common controls you will use when building WPF applications
Creating a gradient To create a gradient, use the
LinearGradientBrush
and set the
GradientStops
to define how the gradient is shown.
Image Manipulation You can skew images, display a reflection and add borders to images
with ease in WPF using
SkewTransform, Border, ScaleTransform
and
other WPF elements.
My.Application
To get information about the application at runtime, you can use the
My.Application
class.
7
Building Windows Applications
WHAT YOU WILL LEARN IN THIS CHAPTER:
➤ How to add more features using buttons, text boxes, and radio
buttons
➤ How to create a simple toolbar and toolbar buttons to respond to
events
➤ How to create additional forms and windows in your applications
When Microsoft first released Visual Basic 1.0, developers fell in love with it because it made
building the user interface components of an application very simple. Instead of having
to write thousands of lines of code to display windows — the very staple of a Windows
application — developers could simply draw the window on the screen.
In Visual Basic (any version), a window is known as a form. With the .NET Framework, this
form design capability has been brought to all of the managed languages — as Windows Forms
in Windows Forms applications and as Windows in WPF applications. You’ve been using
Windows Forms over the course of the previous chapters, and in the last chapter you learned
about Windows in WPF applications. However, you haven’t really given that much thought to
them — focusing instead on the code that you’ve written inside them.
In this chapter, you’ll look in detail at Windows Forms and WPF applications and learn how
you can use Visual Basic 2010 to put together fully featured Windows applications using Win-
dows Forms Application projects and WPF Application projects.
RESPONDING TO EVENTS
Building a user interface using Windows Forms or Windows is all about responding to events
(such as the
Click
event), so programming for Windows is commonly known as event-driven
194
❘
CHAPTER 7 BUILDING WINDOWS APPLICATIONS
programming. To build a form, you paint controls onto a blank window called the Designer using
the mouse. Each of these controls is able to tell you when an event happens. For example, if you run
your program and click a button that’s been painted onto a form, that button will say, ‘‘Hey, I’ve been
clicked!’’ and give you an opportunity to execute some code that you provide to respond to that event.
You have already been using this feature.
Event-driven programming has two basic objects, a sender and a handler. In the next example, you will
use a Button as a sender and a procedure
(button_click)
as a handler. When you click the button,
it will raise or broadcast the event of clicking the Button and that event will be handled by the click
event procedure you create. Once the handler receives the event notification, the code you write inside
of the procedure will be executed. Your click event has sender and EvenTargs (RoutedEventArgs in
WPF) parameters. The sender will be the object that raised the event, which in this case, is a Button
object. The EventArgs may be nothing or a class derived from EventArgs like MouseEventArgs. The
EventArgs will contain information on what caused the event, and in the case of MouseEventArgs it
will have information like which button was clicked.
Setting Up a Button Event
A good way to illustrate the event philosophy is to wire up a button to an event. An example would
be the
Click
event, which is fired or raised whenever the button is clicked. You have more events than
just the
Click
event, although in day-to-day practice it’s unlikely you’ll use more than a handful of
these. Even though you’ve already seen the
Click
event in action, this next Try It Out goes into some
of the details of the Code Editor and new
Button
events that you have not seen up until this point.
In the real world, you’ll more than likely be tasked to work on multiple projects at the same time. When
you have down time in one project, you switch to the other project and work on it.
TRY IT OUT Using Button Events
Code file Button Events.zip is available for download at Wrox.com
In this Try It Out, you’ll work on multiple projects at one time: one Windows Forms Application project
and one WPF Application project. This will enable you to see firsthand how button events are handled in
both types of Windows application.
1. Start Visual Studio 2010. Select File ➪ New Project from the menu. In the New Project dialog,
select Visual Basic as the Project type and Windows Forms Application as the Templates type.
Enter a project name, Windows Forms Button Events, in the Name field and then click the OK
button.
2. Click the form in the Forms Designer. In the Properties window, change the
Text
property from
Form1 to Windows Button Events.
Responding to Events
❘
195
FIGURE 7-1
figure
3. From the Toolbox, drag a Button control onto the form.
Change its
Text
property to Hello World! and its
Name
property
to btnSayHello. Resize your button and form so that it looks
similar to the one shown in Figure 7-1.
4. Save your project by clicking the Save All button on the
toolbar.
5. Open a second instance of Visual Studio 2010, select File ➪ New Project from the menu. In the
New Project dialog, select Visual Basic as the Project type and WPF Application as the Templates
type. Enter the project name WPFButtonEventsin the Name field and then click the OK button.
FIGURE 7-2
figure
6. In the WPF Button Events project, click the top of the window
in the Forms Designer. In the Properties window, change the
Title
property to WPFButtonEvents.
7. From the Toolbox, drag a Button control onto the form.
Change its
Content
property to Hello World! and its
Name
property to btnSayHello. Resize your button and window so
that it looks similar to the one shown in Figure 7-2.
8. Save your project by clicking the Save All button on the
toolbar.
FIGURE 7-3
figure
9. At this point, run both projects to get an idea of how both
application types look very similar, as shown in Figure 7-3.
10. Stop both projects and return to the Forms Designer in the
Windows Forms Button Events project.
11. Double-click the button and add the following bolded code to the
Click
event handler:
Private Sub btnSayHello_Click(ByVal sender As System.Object, _
ByVal e As System.EventArgs) Handles btnSayHello.Click
MessageBox.Show("Hello World!", Me.Text)
End Sub
NOTE Visual Basic 2010 added the ability to continue a line without the
underscore (_) in many cases. Because this is not handled in every case and if
you use any version before 2010 which is most likely going to be true, we chose to
not add this into the examples. For the code above, you could have entered it
without the underscore (_) and it would not have an error. Be aware that this is
new to VB 2010 and take advantage of it when you can.
196
❘
CHAPTER 7 BUILDING WINDOWS APPLICATIONS
12. Drop down the list in the Class Name combo box at the top of the code window. You’ll see the
options shown in the top portion of Figure 7-4. The bottom portion of Figure 7-4 shows the class
members from the WPF Button Events project.
NOTE Visual Basic 2010 adds a small icon to the left of everything it displays in
these lists. These can tell you what the item in the list actually is. A small purple
box represents a method, a small blue box represents a member, four books
stacked together represent a library, three squares joined together with lines
represent a class, and a yellow lightning bolt represents an event.
Visual Studio may also decorate these icons with other icons to indicate the way
they are defined. For example, next to Finalize in Figure 7-5 you’ll see a small key,
which tells you the method is protected. The padlock icon tells you the item is
private. It’s not really important to memorize all these now, but Visual Basic 2010
is fairly consistent with its representations, so if you do learn them over time they
will help you understand what’s going on.
Notice that the last two items in the list are slightly indented. This tells you that
(Form1 Events)
and
btnSayHello
are all related to Form1. That is, the
btnSayHello
class is a member of
Form1
.As
you add more members to the form, they will appear in this list.
In the WPF Button Events project, this indentation tells you that
(MainWindow Events)
and
btnSayHello
are all related to MainWindow. Again, as you add more members to the window,
they will appear in this list.
Now select Form1 in this list.
FIGURE 7-4
FIGURE 7-5
Responding to Events
❘
197
13. Open the drop-down list from the Method Name combo box to the right of the Class Name
combo box and you’ll see the options shown in Figure 7-5; the top portion of the figure lists
the events in the Windows Form Button Events project and the bottom portion of the figure
lists the events in the WPF Button Events project. These options are described in the list that
follows the figure.
➤ The contents of the Method Name combo box vary according to the item selected in
the Class Name combo box. This list lets you navigate through the methods related to
the selected class. In this case, its main job is to show you the methods and properties
related to the class. This applies to both Windows Forms Applications and WPF Appli-
cations.
➤ The (Declarations) entry takes you to the top of the class, where you can change the
definition of the class and add member variables.
➤ The
New
method will create a new constructor for the class that you are working with.
The constructor should contain any initialization code that needs to be executed for the
class.
➤ The
Finalize
method creates a new method called
Finalize
and adds it to the class. It
will be called when your program ends, to release any unmanaged resources.
➤ The
Dispose
method (not available in WPF Applications) takes you to the
Dispose
method for the class that you are working with and allows you to add any additional
clean-up code for your class.
➤ The
InitializeComponent
method takes you to the code that initializes the controls for
the class you are working with. You should not modify this method directly. Instead,
use the Forms Designer to modify the properties of your form’s controls.
FIGURE 7-6
figure
14. Select
btnSayHello
in the Class Name combo
box. Now, drop down the Method Name
combo box, as shown in Figure 7-6. The list
on the left is from the Windows Forms Button
Events project and the list on the right is from
the WPF Button Events project.
Because you selected
btnSayHello
in the Class
Name combo box, the Method Name combo
box now contains items that are exclusively
related to that control. In this case, you have a
huge list of events. One of those events,
Click
,
is shown in bold because you provided a defi-
nition for that event. If you select
Click
, you’ll
be taken to the method in the form that pro-
vides an event handler for this method.
15. Now add another event handler to the Button control. With
btnSayHello
still selected in the Class
Name combo box, select the
MouseEnter
event in the Method Name combo box. A new event
handler method will be created, to which you need to add the following bolded code:
Private Sub btnSayHello_MouseEnter(ByVal sender As Object, _
ByVal e As System.EventArgs) Handles btnSayHello.MouseEnter
198
❘
CHAPTER 7 BUILDING WINDOWS APPLICATIONS
‘Change the Button text
btnSayHello.Text = "The mouse is here!"
End Sub
The
MouseEnter
event will be fired whenever the mouse pointer enters the control — in other
words, crosses its boundary.
16. To complete this exercise, you need to add another event handler. With
btnSayHello
still selected
in the Class Name combo box, select the
MouseLeave
event in the Method Name combo box.
Again, a new event will be created, so add the bolded code here:
Private Sub btnSayHello_MouseLeave(ByVal sender As Object, _
ByVal e As System.EventArgs) Handles btnSayHello.MouseLeave
‘Change the Button text
btnSayHello.Text = "The mouse has gone!"
End Sub
The
MouseLeave
event will be fired whenever the mouse pointer moves back outside of the control.
17. Switch over to the Forms Designer in the WPF Button Events project. Double-click the button and
add the following bolded code to the
Click
event handler:
Private Sub btnSayHello_Click(ByVal sender As System.Object, _
ByVal e As System.Windows.RoutedEventArgs) Handles btnSayHello.Click
MessageBox.Show("Hello World!", Me.Title)
End Sub
18. Now add another event handler to the Button control. With
btnSayHello
still selected in the Class
Name combo box, select the
MouseEnter
event in the Method Name combo box. A new event
handler method will be created, to which you need to add the following bolded code:
Private Sub btnSayHello_MouseEnter(ByVal sender As Object, _
ByVal e As System.Windows.Input.MouseEventArgs) _
Handles btnSayHello.MouseEnter
‘Change the Button text
btnSayHello.Content = "The mouse is here!"
End Sub
19. To complete this project, you need to add an event handler for the
MouseLeave
event. With
btnSayHello
still selected in the Class Name combo box, select the
MouseLeave
event in the
Method Name combo box. Add the bolded code to the event handler as shown:
Private Sub btnSayHello_MouseLeave(ByVal sender As Object, _
ByVal e As System.Windows.Input.MouseEventArgs) _
Handles btnSayHello.MouseLeave
‘Change the Button text
btnSayHello.Content = "The mouse has gone!"
End Sub
Responding to Events
❘
199
FIGURE 7-7
figure
20. Run both projects to compare how they look and perform.
Note that both forms look very similar and that both forms
behave exactly the same way.
The two forms in Figure 7-7 show the Windows Buttons Events
form and the WPF Button Events form. The WPF Buttons
Events form has focus and the mouse has been hovered over
the button.
The two forms in Figure 7-7 show that the mouse has left the
region of the button in the Windows Buttons Events form and has entered the button region in
the WPF Button Events form. As you compare the minor differences in how the forms look, you
should realize that both forms behave exactly the same way.
How It Works
Most of the controls that you use will have a dazzling array of events, although in day-to-day programming
only a few of them will be consistently useful. For the Button control, the most useful event is usually the
Click
event.
Visual Basic 2010 knows enough about the control to create the event handlers for you automatically
when you select them. This makes your life a lot easier and saves on typing!
You’ve seen the
Click
event handler for buttons in Windows forms in Chapters 1, 3, 4, and 5. The
one parameter that I want to point out in the
btnSayHello_Click
method is the parameter defined as a
System.EventArgs
.The
EventArgs
class is defined in the
System
namespace and is used for most common
controls in Windows Forms applications.
The
EventArgs
class will contain various data depending on the event being raised. For example, when
the button is clicked and the
Click
event is raised,
EventArgs
will contain
MouseEventArgs
, enabling
you to determine which mouse button was clicked and the X and Y coordinates of the mouse within the
button:
Private Sub btnSayHello_Click(ByVal sender As System.Object, _
ByVal e As System.EventArgs) Handles btnSayHello.Click
MessageBox.Show("Hello World!", Me.Text)
End Sub
Did you notice the class that was specified in the
Click
event handler in your WPF application
that corresponds to the
EventArgs
class is defined in a Windows Forms application? The param-
eter defined in the
Click
event handler for the button in your WPF application is defined as
System.Windows.RoutedEventArgs
.The
RoutedEventArgs
class is part of the
System.Windows
namespace,
and is derived from EventArgs.
200
❘
CHAPTER 7 BUILDING WINDOWS APPLICATIONS
In a WPF application, this class does not provide any useful information about the mouse button that was
clicked. This is one of the major differences between Windows Forms applications and WPF applications.
Private Sub btnSayHello_Click(ByVal sender As System.Object, _
ByVal e As System.Windows.RoutedEventArgs) Handles btnSayHello.Click
MessageBox.Show("Hello World!", Me.Title)
End Sub
If you look at the end of the
btnSayHello_MouseEnter
method definition for both application types, you’ll
notice the
Handles
keyword. This ties the method definition into the
btnSayHello.MouseEnter
event. When
the button fires this event, your code will be executed.
Private Sub btnSayHello_MouseEnter(ByVal sender As Object, _
ByVal e As System.EventArgs) Handles btnSayHello.MouseEnter
‘Change the Button text
btnSayHello.Text = "The mouse is here!"
End Sub
Private Sub btnSayHello_MouseEnter(ByVal sender As Object, _
ByVal e As System.Windows.Input.MouseEventArgs) _
Handles btnSayHello.MouseEnter
‘Change the Button text
btnSayHello.Content = "The mouse is here!"
End Sub
Although you set the button’s
Text
property (for the Windows Forms Button Event project) and the but-
ton’s
Content
property (for the WPF Button Events project) at design time using the Properties window,
here you can see that you can change those properties at runtime too.
NOTE As a quick reminder here, design time is the term used to define the
period of time when you are actually writing the program — in other words,
working with the Designer or adding code. Runtime is the term used to define the
period of time when the program is running.
Likewise, the
MouseLeave
event works in a similar way for both applications:
Private Sub btnSayHello_MouseLeave(ByVal sender As Object, _
ByVal e As System.EventArgs) Handles btnSayHello.MouseLeave
‘Change the Button text
btnSayHello.Text = "The mouse has gone!"
End Sub
Private Sub btnSayHello_MouseLeave(ByVal sender As Object, _
ByVal e As System.Windows.Input.MouseEventArgs) _
Handles btnSayHello.MouseLeave
‘Change the Button text
btnSayHello.Content = "The mouse has gone!"
End Sub
Building a Simple Application
❘
201
BUILDING A SIMPLE APPLICATION
Visual Studio 2010 comes with a comprehensive set of controls that you can use in your projects. For
the most part, you’ll be able to build all your applications using just these controls, but in Chapter 14
you look at how you can create your own controls.
In this section, you use some of the provided controls to put together a basic application.
Building the Form
The first job in creating your application is to start a new project and build a form. This form will
contain a multiline text box in which text can be entered. It will also contain two radio buttons that
give you the option of counting either the words or the number of characters in the text box.
TRY IT OUT Building the Form
Code file Word Counter.zip is available for download at Wrox.com
In this Try It Out, you build a basic Windows Forms application that enables users to enter text into a
form. The application will count the number of words and letters in the block of text that is entered.
1. Select File ➪ New Project from the Visual Studio 2010 menu and create a new Windows Forms
Application project. Enter the project name Windows Forms Word Counter andclickOK.
2. Click Form1 in the Forms Designer and in the Properties window, set the
Size
property to 442,
300,the
StartPosition
property to CenterScreen,andthe
Text
property to Word Counter.
FIGURE 7-8
3. To instruct users what to do with the form, add a label. Select the Label control from the Tool-
box and drag it to the top-left corner of the form. Use the snap lines to align this control in the
upper-left corner of the form as shown in Figure 7-8 before releasing the mouse button to add the
control. Change the
Text
property to Enter some text for counting:
Strictly speaking, unless you have to talk to the control from your code, you don’t need to change
its
Name
property. With a text box, you need to use its properties and methods in code to make
202
❘
CHAPTER 7 BUILDING WINDOWS APPLICATIONS
the application work. However, a label is just there for aesthetics, so you don’t need to change the
name for Label1.
NOTE When you are referring to a control from code, it’s a good coding practice
to give the control a name. Other developers should be able to determine what
the control represents based on its name, even if they’ve never seen your code
before. Refer to the section ‘‘Modified Hungarian Notation’’ in Chapter 1 for
prefixes to use with your control names.
4. Drag a TextBox control from the Toolbox and use the snap lines as shown in Figure 7-9 to align it
beneath the Label control that you just added. Once the snap lines show the position of the control
(refer to Figure 7-9), release the mouse button to have the control created and positioned.
FIGURE 7-9
Now change the properties of the text box as follows:
➤ Set
Name
to txtWords.
➤ Set
Multiline
to True.
➤ Set
ScrollBars
to Vertical.
➤ Set
Size
to 390, 190.
5. Your application will be capable of counting either the characters the user entered or the number
of words. To allow users to select the preferred count method, you use two radio buttons.Draw
two RadioButton controls onto the form next to each other below the text box. You need to refer
to the radio buttons from your code, so change the properties as follows:
For the first radio button:
➤ Set
Name
to radCountChars.
➤ Set
Checked
to True.
➤ Set
Text
to Chars.
Building a Simple Application
❘
203
For the second radio button:
➤ Set
Name
to radCountWords.
➤ Set
Text
to Words.
6. As the user types, the characters or words that the user enters will be counted as appropriate. You
want to pass your results to the user, so add two new Label controls next to the RadioButton con-
trols that you just added.
FIGURE 7-10
7. The first Label control is just for aesthetics, so leave the
Name
property as is and change its
Text
property to The results are:. The second Label control will report the results, so you need to give
it a name. Set the
Name
property as lblResults and clear the
Text
property. Your completed form
should look similar to the one shown in Figure 7-10.
8. Now that you have the controls laid out on your form the way you want, you can ensure that they
stay that way. Select one of the controls and not the actual form, and then select Format
➪ Lock
Controls from the menu. This sets the
Locked
property of each of the controls to
True
and prevents
them from accidentally being moved, resized, or deleted.
9. Save your project by clicking the Save All button on the toolbar.
10. Start another instance of Visual Studio 2010. Select File ➪ New Project from the Visual Studio
2010 menu and create a new WPF Application project. Enter the project name WPF Word
Counter andclickOK.
11. Click MainWindow in the Designer. In the Properties window, set the
Width
property to 442,the
WindowStartupLocation
property to CenterScreen,andthe
Title
property to Word Counter.
12. Drag a Label control from the Toolbox and drop it onto the window.
Now change the properties of the label as follows:
➤ Set
Content
to Enter some text for counting:
➤ Set
Width
to 180.
➤ Set
Margin
to 8,8,0,0.
204
❘
CHAPTER 7 BUILDING WINDOWS APPLICATIONS
13. Drag a TextBox control from the Toolbox and drop it on the form. Using the following list, set
the properties of the text box:
➤ Set
Name
to txtWords.
➤ Set
Width
to 390.
➤ Set
Height
to 190.
➤ Set
Margin
to 13,34,13,0.
➤ Set
VerticalScrollBarVisibility
to Visible.
➤ Enable the check box for AcceptsReturn.
➤ Set
TextWrapping
to Wrap.
14. Draw two RadioButton controls onto the form next to each other below the text box. Align them
the same as they appear in the Windows Application. You need to refer to the radio buttons from
your code, so change the properties as follows:
For the first radio button:
➤ Set
Name
to radCountChars.
➤ Set
Content
to Chars.
➤ Set
IsChecked
to True.
For the second radio button:
➤ Set
Name
to radCountWords.
➤ Set
Content
to Words.
15. Draw a Label control on the form. Align it the same as in the Windows Application and set its
properties as follows:
➤ Set
Content
to The results are:.
➤ Set
Width
to 100.
16. Draw another Label control. Align it on the form the same way it appears in the Windows Appli-
cation and set its properties as follows:
➤ Set
Name
to lblResults.
➤ Clear Content.
➤ Set
Width
to 175.
17. There are no lock control features for a WPF window so just save your project by clicking the Save
All button on the toolbar.
Counting Characters
❘
205
COUNTING CHARACTERS
With your forms designed, you’ll want to build some event handlers to count the number of charac-
ters in a block of text that the user types. Because your application will be able to count words and
characters, you build separate functions for each.
TRY IT OUT Counting Characters
Code file Word Counter.zip is available for download at Wrox.com
In this Try It Out, you write the code to count characters.
1. Return to the Windows Forms Word Counter project and view the code for Form1. Add the
following code to count characters. Remember that in order to insert an XML Document
Comment block, you need to type three apostrophes above the function after you have written
the code:
‘‘‘ <summary>
‘‘‘ Count the characters in a block of text
‘‘‘ </summary>
‘‘‘ <param name="text">The string containing the text to count
‘‘‘ characters in</param>
‘‘‘ <returns>The number of characters in the string</returns>
‘‘‘ <remarks></remarks>
Private Function CountCharacters(ByVal text As String) As Integer
Return text.Length
End Function
2. Now you need to build an event handler for the text box. Select
txtWords
in the Class Name
combo box and, in the Method Name combo box, select the
TextChanged
event. Add the follow-
ing bolded code to the event handler:
Private Sub txtWords_TextChanged(ByVal sender As Object, _
ByVal e As System.Windows.Controls.TextChangedEventArgs) _
Handles txtWords.TextChanged
‘Count the number of characters
Dim intChars As Integer = CountCharacters(txtWords.Text)
‘Display the results
lblResults.Text = intChars &
" characters"
End Sub
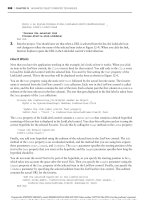
3. Run the project. Enter some text into the text box and you’ll see a screen like the one in
Figure 7-11.
206
❘
CHAPTER 7 BUILDING WINDOWS APPLICATIONS
FIGURE 7-11
4. Now return to the WPF Word Counter project and view the code for Window1. Add the following
code to count characters:
‘‘‘ <summary>
‘‘‘ Count the characters in a block of text
‘‘‘ </summary>
‘‘‘ <param name="text">The string containing the text to count</param>
‘‘‘ <returns>The number of characters in the string</returns>
‘‘‘ <remarks></remarks>
Private Function CountCharacters(ByVal text As String) As Integer
Return text.Length
End Function
5. To build the
TextChanged
event handler, select
txtWords
in the Class Name combo box and, in the
Method Name combo box, select the
TextChanged
event. Add this bolded code:
Private Sub txtWords_TextChanged(ByVal sender As Object, _
ByVal e As System.Windows.Controls.TextChangedEventArgs) _
Handles txtWords.TextChanged
‘Count the number of characters
Dim intChars As Integer = CountCharacters(txtWords.Text)
‘Display the results
lblResults.Content = intChars & " characters"
End Sub
6. Now run the WPF Word Counter project and enter some text. You’ll see a screen similar to the
one shown in Figure 7-12.
How It Works
Whenever a character is typed into the text box, the label at the bottom of the form reports the current
number of characters. That’s because the
TextChanged
event is fired whenever the user changes the text in
the box. This happens when new text is entered, when changes are made to existing text, and when old
text is deleted. The application is listening for this event, and whenever you hear it (or rather receive it),