Ophthalmic Microsurgical Suturing Techniques - part 9 pdf
Bạn đang xem bản rút gọn của tài liệu. Xem và tải ngay bản đầy đủ của tài liệu tại đây (1.27 MB, 15 trang )
116
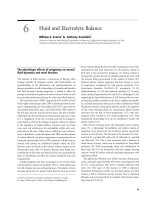
28. Duchesne B, Tahi H, Galand A. Use of human brin glue
and amniotic membrane transplant in corneal perfora-
tion. Cornea. 2001;20:230–232.
29. Hick S, Demers PE, Brunette I, La C, Mabon M, Duch-
esne B. Amniotic membrane transplantation and brin
glue in the management of corneal ulcers and perfora-
tions: a review of 33 cases. Cornea. 2005;24:369–377.
30. Anderson DF, Ellies P, Pires RT, Tseng SC. Amniotic
membrane transplantation for partial limbal stem cell
de ciency. Br J Ophthalmol. 2001;85:567–575.
31. Gris O, Campo Z, Wolley-Dod C, Guell JL, Bruix A, Ca-
latayud M, Adan A. Amniotic membrane implantation
as a therapeutic contact lens for the treatment of epithe-
lial disorders. Cornea. 2002;21:22–27.
24. Kobayashi A, Ijiri S, Sugiyama K, Di Pascuale MA, Tseng
SC. Detection of corneal epithelial defect through amni-
otic membrane patch by uorescein. Cornea.
2005;24:359–360.
25. Yoshita T, Kobayashi A, Takahashi M, Sugiyama K. Reli-
ability of intraocular pressure by Tono-Pen XL over am-
niotic membrane patch in human. J Glaucoma.
2004;13:413–416.
26. Koranyi G, Seregard S, Kopp ED. e cut-and-paste
method for primary pterygium surgery: long-term fol-
low-up. Acta Ophthalmol Scand. 2005;83:298–301.
27. Uy HS, Reyes JM, Flores JD, Lim-Bon-Siong R. Com-
parison of brin glue and sutures for attaching conjunc-
tival autogra s a er pterygium excision. Ophthalmolo-
gy. 2005;112:667–671.
Sche er C. G. Tseng, Antonio Elizondo, and Victoria Casas
Key Points
Surgical Indications
• Limbal conjunctival incision is preferable for
most reoperations, recess/resect procedures,
and in older adult patients.
• Adjustable suture technique is advantageous
with recession of a previously operated lateral
rectus muscle in an amblyopic eye undergo-
ing recess/resect surgery for large angle con-
secutive exotropia.
Instrumentation
• Use spatulated needles for all scleral suturing.
• Use nonabsorbable braided polyester sutures
for large “hangback” recession of the superior
rectus, posterior xation, and plication proce-
dures.
Surgical Technique
• Create a secure locking bite knot by pulling
the suture needle through the loop from the
correct side.
• Enter sclera with the needle tip parallel to the
surface of the globe.
Complications
• Suspect scleral perforation if resistance to
needle passage abruptly diminishes or if pig-
ment emerges from sclera with the suture.
12.1
Introduction
Eye muscle surgery di ers from the other topics ad-
dressed in this volume in that it is not routinely done
using a microscope. Flawless muscle operations can in
fact be performed absent any magnifying device, espe-
cially if the surgeon is not yet presbyopic. However,
there is unquestionably an advantage to operating on
muscles with, at a minimum, ×1.75 to ×2.5 magni ca-
tion provided by spectacle-mounted telescopes
(loupes). Simple and inexpensive but highly service-
able Telesight loupes are available from numerous ven-
dors. e excellent optical quality and durability of
high-end surgical telescopes such as those from De-
signs for Vision, Inc., make them a sound investment,
even for the beginning surgeon.
Some strabismus surgeons employ an operating mi-
croscope, particularly in teaching and learning situa-
tions. Advantages include greater con dence in deter-
mining the depth of scleral needle passes, consistency
with other operative approaches, and the relative ease
with which video recording of cases can be done. Mi-
croscope magni cation is also helpful when preserva-
tion of anterior ciliary vessels is attempted. Magni ca-
tion should generally be kept low to maximize eld of
view and depth of focus, zooming to higher magni ca-
tion, if desired, when passing needles through sclera.
If a microscope is not used, careful attention must
be paid to illumination of the operative eld. At least
two overhead lights should be positioned to minimize
shadows. Some surgeons use a ber optic headlamp,
particularly for procedures that require working on
the posterior half of the globe.
is chapter emphasizes techniques used in per-
forming recession and resection of previously unoper-
ated horizontal rectus muscles. Procedures on cyclo-
vertical muscles and reoperations involve maneuvers
that are o en quite similar.
12.2
Indications
Planning muscle surgery involves making numerous
decisions and choices. Foremost among these are
whether surgery is in fact the most appropriate thera-
peutic option in a particular case at a particular time,
and which muscle(s), which procedure(s), and what
quanti cation are likely to yield the best outcome in all
gaze positions. Consideration of these issues is beyond
the scope of this discussion, but their importance can-
not be overemphasized [6, 7, 15].
Having made a choice of muscles and procedures,
the surgeon must decide which conjunctival incision
to employ. Since the 1960s, nearly all muscle surgery in
North America has been done using either a limbal ap-
proach, following the example of Gunter von Noorden
[16], or a fornix approach, as developed and taught by
Marshall Parks [13, 14]. Limbal incisions make for
Strabismus
Mark J. Greenwald
12
Chapter 12
118
greater ease of locating and isolating rectus muscle in-
sertions, particularly helpful if the eye has previously
undergone surgery, and provide the opportunity to re-
sect or recess conjunctiva. Fornix incisions are indis-
pensable for procedures involving oblique muscles.
e principal advantages of this approach for rectus
muscle surgery are reduced operating time and greater
early postoperative comfort for the patient. For hori-
zontal muscles, inferior fornix incisions are usually
preferred, but use of the superior fornix is desirable
when supraplacement of the muscle (for A or V pat-
tern, or reduction of a small vertical deviation) is
planned.
Prior to the advent in the 1970s of synthetic poly-
mer absorbable sutures, 5-0 catgut was used for most
muscle surgery. e relatively frequent breakage of this
material made it essential to secure each muscle with
two separate sutures. e superior quality of sutures
currently available [12] has fostered the development
of one-suture reattachment approaches that are now
widely preferred. Nevertheless, use of two sutures per
muscle (representing the two parts of a two-needle
double-armed suture cut in half) still o ers a number
of advantages. With two sutures and two knots, excel-
lent scleral apposition and ease of tying can be achieved
without the requirement of long scleral tunnels, reduc-
ing the risk of perforation. Because the unsupported
central span is substantially shorter with two-suture
than with one-suture reattachment (absent incorpora-
tion of tissue into the knot at the time of tying), there
is actually less tendency for a doubly sutured muscle to
sag despite the fact the midportion of the tendon is
“out of the loop” (Fig. 12.1a, b). Using two sutures and
securing one end of the tendon at a time makes it con-
siderably easier to achieve muscle–scleral apposition
with a tight muscle, especially valuable for resection
and advancement procedures. Finally, two-suture
technique is better suited to instrument tying, an ad-
vantage for the surgeon who nds hand tying distaste-
ful. Muscle reattachment with two sutures was the
original choice of von Noorden for use with limbal in-
cisions, and remains particularly well matched with
that approach.
Prior to the 1980‘s strabismus surgeons believed
that muscles needed to be tightly apposed to sclera
when reattached. e popularization of adjustable su-
tures by Arthur Jampolsky in the 1980s [9] called this
belief into serious question, leading many practitio-
ners to begin using adjustable-inspired “ hangback”
suturing for most recession procedures (Fig. 12.1c). In
this approach, scleral support is at the original inser-
tion, and postoperative attachment site is determined
by the length of suture le between scleral and muscle
anchor points and tension in the muscle. e hang-
back technique provides acceptable results and is rela-
tively easy to perform. Nevertheless, many surgeons
use conventional suturing in most circumstances.
During hangback reattachment using absorbable su-
ture material, it is important (especially with the me-
dial rectus) that the muscle not be recessed for more
than the length of the scleral “arc of contact,” because a
muscle that is suspended o the scleral surface cannot
be relied upon to form an adequate connection to the
globe. Hangback suturing is useful for large (10 mm or
more) recessions of the superior rectus muscles in dis-
sociated vertical deviation. A nonabsorbable suture
should always be used because recession exceeds the
arc of contact and the interposed superior oblique ten-
don complicates the rectus–scleral healing process.
Adjustable sutures remain somewhat controversial
even a er decades of widespread experience, with
some surgeons using the approach for nearly all pos-
sible applications in adults and even children [4], while
others continue to reject the technique altogether. No
convincing clinical trial has established the superiority
of adjustable suture technique for any category of stra-
bismus [1]. e adjustable suture technique adds to the
patient’s postoperative stress and discomfort, yet the
“second chance to get it right” provided by adjustment
has an undeniable appeal.
abc
Fig. 12.1 a Conventional one-suture muscle reattachment.
b Conventional two-suture muscle reattachment. Note that,
in contrast to a, the muscle is supported at four points across
its width. c “Hangback” muscle reattachment. Suture ends
may also be anchored in sclera in the same manner as con-
ventional one-suture reattachment, entering at the two poles
of the original insertion
Mark J. Greenwald
119
12.3
Sutures and Instruments
e great majority of muscle surgery is done using
braided synthetic absorbable suture materials, of which
polyglactin ( Vicryl, Ethicon) is by far the most popu-
lar. Most surgeons prefer 6-0, though 5-0 is also suit-
able. Dusting with ne particles of the same polymer
(coating) in the manufacturing process reduces the
tendency for such sutures to adhere to fascial tissue
against which they brush.
Spatulated needles, at on the upper and lower sur-
faces, are essential to minimize the risks of scleral per-
foration and pull-through (Fig. 12.2). e S-29 needle
(Ethicon) has a small cross-sectional area that ensures
a desirable degree of friction between the suture and
the scleral tunnel and helps keep recessed muscles
from sliding posteriorly during tying. S-14 and S-24
needles also work well, especially with 5-0 suture. e
S-28 needle has a tighter curve that is useful for suture
placement in closely con ned situations.
Sutures of nonabsorbable material such as braided
polyester ( Mersilene, Ethicon) equipped with similar
needles should be available for applications in which
formation of a bond between muscle or tendon and
sclera may be problematic, such as large hangback re-
cessions (especially involving the superior rectus),
posterior xation, and plications.
e Barraquer needle holder (Storz/Bausch & Lomb
E3843) is advantageous because its hemicylindrical
handles facilitate holding the needle in a variety of ori-
entations, without adjustment of overall hand position.
It also works well as a tying instrument.
It is desirable to have both right- and le -handed
scissors available for muscle disinsertion, so that the
lower scissor blade can be placed beneath the tendon
regardless of the direction from which the instrument
is advanced. e author’s preferred instruments for
this purpose are the Aebli corneal section scissors
(Storz/Bausch & Lomb, right E3289, le E3290). If
only standard right-handed Westcott scissors are avail-
able, the maneuver can still be performed optimally if
the tips are advanced in the proper direction (e. g.,
from below the right medial rectus and above the le
medial rectus) when engaging the tendon.
Table 12.1 lists a complete set of instruments useful
in performing the maneuvers described below.
Table 12.1 Instruments for eye muscle surgery
No. of
items
per
tray
Item Storz/
Bausch &
Lomb
catalog nos.
2 Stevens tenotomy hooks E0600
2 Green strabismus hooks E0588
1 von Graefe strabismus hook E0593
1 Lester xation forceps E1656
2 Bishop-Harmon tissue forceps E1500
3 0.5-mm locking Castroviejo
forceps
E1798S
2 Storz tying forceps E1887
1 Westcott utility scissors E3322
1 Westcott stitch scissors E3221
1 Aebli corneal section scissors,
right
E3289
1 Aebli corneal section scissors,
le
E3290
2 Barraquer curved locking needle
holder
E3843
1 Castroviejo caliper E2404
1 Hartman straight mosquito
hemostat
E3915
2 Storz serre ne clamps E3900
1 Iris spatula E0700
1 Desmarres retractor, 11 mm E0980
1 Desmarres retractor, 13 mm E0981
1 Cook eye speculum, pediatric E4082
1 McKinney eye speculum E4086
12.4
Technique
Suture placement and tying involve similar maneuvers
for recession and resection of rectus muscles, di ering
mainly in location. e following description will cov-
er both procedures, with consideration of one-suture
and two-suture approaches, using conventional, hang-
back, and adjustable technique, and performed through
fornix and limbal incisions [3, 4].
Chapter 12 Strabismus
120
12.4.1
Muscle Suturing
For initial passage of suture through tendon (in reces-
sion) or muscle (in resection), the needle should be
grasped as far from the tip as possible without placing
the needle holder jaws on the circular cross-sectional
portion into which the suture is swaged (Fig. 12.2). A
key point of reference in making this pass is the site of
exit from tissue, which should be as close as possible to
the sclera for recession and at the appropriate mea-
sured distance from the insertion for resection. e
needle is introduced into tissue with the tip parallel to
the muscle plane and directed toward the exit point,
entering either in the middle of the tendon when using
a single double-armed suture, or one quarter the mus-
cle’s width from the edge when using one of two su-
tures. e exact entry site and path prior to exit are not
critical, and it is even acceptable if the suture emerges
from the tissue for a portion of its course. When mak-
ing half-width passes in a one-suture recession, start-
ing 1 to 2 mm from sclera makes it easier to guide the
curved needle to its exit (at the muscle insertion). e
needle point should emerge precisely through the ten-
don or muscle edge, not from the posterior or anterior
surface, creating slight outward bowing of the capsule
as it does so.
When regrasping the needle to withdraw it from
tissue in preparation for placement of the locking bite,
the needle holder should be applied with the convex
side of the curved jaws oriented toward the needle tip.
e suture is pulled in the same direction it took pass-
ing through the tissue (following the curve) until about
half the length of the suture is beyond the muscle.
Completion of tendon or muscle anchoring with a
locking bite should create a true knot that encircles
and tightly engages about 1 mm of tissue [10]. To
achieve this goal, careful attention to needle placement
is required (Fig. 12.3). e needle should be passed full
thickness through the tendon or muscle, perpendicu-
lar to the tissue plane as close as possible and immedi-
ately anterior to the rst tissue pass for recession, and
immediately posterior to the rst pass for resection.
e needle is released, and the empty needle holder tip
is passed through the loop of suture between the exit
point of the rst tissue pass and the entry point of the
second pass for a recession on the anterior side of the
rst pass, the needle holder needs to enter the loop
heading away from the insertion (Fig. 12.3); with the
second pass for a resection on the posterior side of the
rst, the needle holder must enter the loop heading to-
ward the insertion. Failure to execute this maneuver
properly will result in a less secure spiral rather than a
true knot. e locking bite should nally be tightened
by grasping and pulling the two sutures (not the nee-
dles) against each other in a continuous straight line.
is entire process is then repeated on the opposite
side of the muscle with the other end of the intact dou-
ble-armed suture in one-suture technique, or with the
other half of the divided suture in t wo-suture tech-
nique. e locking bite may be the weakest link in the
muscle’s reattachment. If for any reason the surgeon
doubts its adequacy, a second locking bite should be
placed in the same location, using the same technique
described above.
12.4.2
Disinsertion
Separation of the muscle from the globe is performed
with blunt-tipped scissors. For both recession and re-
section, cleavage should be as close as possible to the
sclera. With recession, this is necessary to minimize
the risk of cutting the preplaced suture that is very
close to the sclera, and to avoid an unsightly ridge that
Fig. 12.3 Path of suture through tendon. Passage of the nee-
dle holder from anterior to posterior through the suture loop
before grasping the needle end ensures creation of a true
knot, if the second pass through tissue was more anterior
(closer to the insertion) than was the rst
Mark J. Greenwald
Fig. 12.2 A spatulated needle. Note the di erence in cross
section between the cutting portion and the swaged portion
121
will be visible through conjunctiva a er healing. With
resection there is no need to leave a muscle stump be-
cause reattachment sutures should be anchored in
sclera, not muscle or tendon tissue. e blade of the
scissors that is internal to the muscle should be the
blade that is closer to sclera; having available both right
and le con gured scissors aids in achieving this. At
the beginning of disinsertion, traction on the muscle
hook should be great, and scissors tips should be rm-
ly pressed against sclera. As the process is completed,
traction on the hook should be relaxed and scleral
pressure reduced or eliminated; otherwise, force trans-
mitted through the narrow remaining attachment will
tent up sclera and create a risk of perforation.
During disinsertion the sutures need to be kept un-
der tension and away from the advancing scissors
blades. With one-suture technique, the author prefers
to hold the suture ends with the same hand that holds
the muscle hook, grasping the hook between the
curved third and fourth ngers while controlling the
suture with the thumb and fore nger (Fig. 12.4). is
permits tension in the muscle and the suture to be ad-
justed independently. With two-suture technique, ap-
plying serre ne (bulldog) clamps to the sutures and
draping them o to the side from which the muscle
originates works well.
Gentle traction on the suture ends a er disinsertion
should con rm that the locking bite knots are secure.
If this proves not to be the case (typically evidenced
with one-suture technique by one edge of the muscle
sliding toward the other), the nonsecure corner is
grasped with a locking forceps and held a full muscle
width away from the other corner, which is supported
by the suture. A new locking bite is created by passing
the nonsecure corner’s needle perpendicularly through
the full thickness of tissue immediately adjacent to the
forceps, and then proceeding to complete the knot as
described above.
It may also be discovered at this point in a one-su-
ture recession that the suture has been accidentally
severed between the two locking bite knots during dis-
insertion, either because the suture dipped slightly
into sclera in the course of passage through the tendon
or because scissors tips were insu ciently close to
sclera at disinsertion. is should be suspected if the
two edges of the tendon can be pulled further from
each other than the original muscle width, and is con-
rmed by identifying the cut ends in the tendon. Re-
leased from tension by the resulting discontinuity in
the suture loop, the lock bite knots can loosen and lose
their grip on tissue; therefore, the entire suture must be
replaced. Locking forceps are immediately applied to
both corners of the tendon, and a new double-armed
suture is passed and anchored as close as possible to
the original, with separation between the new locking
bite knots equal to the tendon’s original width. When
the new suture is securely in place, the original suture‘s
emerging ends are trimmed (being careful not to con-
fuse them with the new ends). e original locking
bite knots and their extensions into tissue can be le in
place.
In resection, before disinsertion a clamp is rmly ap-
plied across the full width of the muscle just in front of
the sutures, taking care not to crush the sutures them-
selves, and the posterior muscle hook is withdrawn. e
clamp is removed a er excising the tissue anterior to it,
with either sharp-tipped scissors or a blade.
12.4.3
Scleral Anchoring
Preparation for needle passage through sclera, the
most critical element in muscle suturing, begins with
application of Castroviejo 0.5-mm locking forceps to
stabilize and position the globe, usually at the two ends
of the original insertion site. No matter how close the
disinsertion has been, the line of former tendon at-
tachment can be identi ed by noting the abrupt change
in scleral thickness that is seen there, supplemented if
Fig. 12.4 Hand position that permits independent control
of tension in the muscle and in the suture during disinser-
tion
Chapter 12 Strabismus
122
necessary by palpating with a hook the step-up that
occurs when sliding from behind to in front of the line.
Achieving an adequate grasp with the forceps can be
tricky. It is helpful to start by lodging the single-tooth
forceps arm against the scleral step-up, directed to-
ward the limbus, and then dragging the double-tooth
arm over the anterior scleral surface to engage tissue
just before locking. Pressing too rmly tends to stretch
the sclera, making the process more di cult. With
gentle force, a slight fold can be created that facilitates
engagement. If repeated attempts fail to gain an e ec-
tive tissue grip, it may help to reverse the arms of the
forceps. When supraplacement or infraplacement is
planned, the rst forceps are applied at the center of
the insertion site and the second at a point along the
line of the insertion whose distance from the center
equals the width of the original insertion. e same
maneuvers can be performed here despite the lack of a
scleral step-up, if the single-tooth arm is deliberately
engaged in tissue at rst.
Positioning the globe for scleral suturing is accom-
plished by holding both locking forceps in one supi-
nated hand and applying force so as to rotate the globe
as far as possible toward the side opposite the muscle’s
eld of action, li ing it slightly from the orbit, and dis-
placing the insertion upward or downward as neces-
sary to provide optimal access to the scleral target of
the needle while maintaining the line of insertion in
vertical (head to foot) orientation. e needle should
be positioned between the needle holder jaws, close to
their tips, and locked in place. To maintain adequate
control during scleral passage, it is important that the
needle be grasped closer to its tip than to the suture-
swaged end (Fig. 12.5a). e tip of the needle is brought
to rest on the scleral surface, with its direction parallel
to the original insertion and pointing toward the cen-
ter of the new insertion, its location exactly at the
marked entry site, and its convex at side exactly tan-
gent to the scleral surface (Fig. 12.5a).
Immediately before entering sclera, the needle holder
lock is released by gently squeezing. With pressure di-
rected toward the center of the globe, the needle is used
to create an indentation in sclera (Fig. 12.5b), and while
maintaining this pressure, the needle tip is moved slow-
ly but steadily forward to enter and advance through
scleral tissue in approximately its midplane (Fig. 12.5c).
At this point, the surgeon must consciously resist the
temptation to let up on the indenting pressure, which
will result in loss of appropriate depth. (If the proper
plane is not reached quickly a er entry, the suture will
pull through the outer wall of the initial portion of the
tunnel during tying and undesirably shorten the new at-
tachment). e tip of the needle should be visible
through overlying tissue throughout the scleral passage.
If it becomes hard to see, stroking over it with the tip of
a small muscle hook may be helpful.
When two sutures are used for recession, the total
length of the scleral tunnel should match the length of
the suture’s passage through tendon, about one quarter
of the insertion width or 2 to 3 mm. A passage of this
length can usually be achieved without regrasping the
needle while the tip is within tissue. When the appro-
priate exit point has been reached, the needle holder is
rotated slightly so as to direct the needle tip toward the
surface, and the tip is advanced out of tissue. e trail-
ing end is then pushed to advance the needle until it
can be pulled the rest of the way through by grasping
the tip, taking care to follow the needle’s arc and not
apply force against the thin inner wall of the tunnel
(Fig. 12.5d). Both ends of the suture are again placed in
a serre ne clamp, and draped to the side opposite the
muscle’s origin. e second suture is anchored in a
similar manner.
For a one-suture procedure, the needle must be ad-
vanced further through sclera by repeatedly regrasp-
ing and pushing, slightly rotating the needle holder
each time to keep the tip directed parallel to the sclera
it is entering. When the tip of the rst needle has tra-
versed a distance (about 5 mm) equal to half the sepa-
ration between the locking forceps, it is directed to-
ward the surface by rotating the needle holder slightly,
and then advanced to expose 2 to 3 mm at the tip,
without being withdrawn from sclera. e second nee-
dle is passed similarly from its marked entry point,
Needle
holder
Sclera
ab
cd
Fig. 12.5 Scleral needle placement, with jaws of the needle
holder shown in cross section. a Needle tip resting at on
sclera. b Sclera indented by needle tip. c Needle engages
sclera, advancing parallel to a plane tangent to the sclera. d
Withdrawal from sclera along arc of needle
Mark J. Greenwald
123
along the same line as the rst but in the opposite di-
rection. Its tip remains within sclera until it has reached
or gone slightly beyond the exit point of its mate (di-
rected slightly to one side if it collides with the rst
needle), and is then guided to the surface where the
two needles create a so-called crossed-swords e ect. In
placing these needles, it is desirable to avoid leaving
even a tiny separation between exit points as a result of
tunneling for too short a distance. Such a gap makes it
di cult to avoid slack in the suture loop when tying.
ere is no problem if long tunnels extend a bit be-
yond each other‘s end.
Scleral anchoring for a resection, a hangback, or an
adjustable recession is done at the original insertion site.
In turn, each needle is placed against sclera just behind
the step-up, tangent to the surface and angled about 45°
toward the center of the insertion. Under minimal pres-
sure toward the center of the globe, the needle is moved
forward into the step-up, emerging from the surface
about 2 to 3 mm anteriorly and centrally. For resection,
the entry sites are at the ends of the original insertion;
for a hangback or an adjustable, they straddle the center,
separated from each other by about 3 mm, with the
needles emerging as nearly as possible at the same point
in crossed swords con guration.
12.4.4
Knot Formation
In preparation for tying, the muscle is drawn forward
to bring the knots into apposition with the scleral en-
try sites. e entry site must be watched carefully as
suture passes into it, and if it is noted that adherent
fascia is being pulled toward the tunnel, traction
should be released until the tissue is freed.
Hand tying the nal knot o ers considerable ad-
vantage in terms of speed and control with one-suture
recession. Alternatively, instrument tying may be per-
formed as discussed in Chap. 3. Regardless of the tech-
nique, a double throw followed by two single throws is
used to secure the suture. Friction between the suture
and the long scleral tunnels is usually su cient to keep
the slackened muscle from retracting, so maintaining
tension is unnecessary during the process of knot for-
mation. e suture ends should be held as far as pos-
sible from the globe for hand tying, close to the nee-
dles, which have not been trimmed. When tightening
the knot, force should build simultaneously in both su-
ture ends, which are stretched in a continuous straight
line tangent to the globe. is is best achieved by pull-
ing horizontally across the bridge of the nose and the
lateral canthus. A er tightening the rst throw, it is
important to avoid jarring the knot until it has been
stabilized by the second throw. Successive throws ( rst
one double followed by two or three single) should be
formed with practiced alternating hand movements to
ensure that they go down square and at. e suture
ends are nally trimmed to a length of 2 to 3 mm.
Two-suture reattachments are best done with in-
strument tying, forming a 2-1-1 knot. Either needle
holders or broad tying forceps can be used, one for
each suture end. e end that has passed through
sclera (pulling end) should be trimmed of its needle to
a 3- to 4-cm length, and the other (looping) end to
about 10 cm or more. Especially when tension in the
muscle is increased, as is typical with resection, force
applied along the line of scleral passage must be main-
tained on the pulling end. e looping end should be
deliberately kept slack, and suture contact with tissue
scrupulously avoided, until the knot is formed and
rests on sclera. With the initial double throw, it may be
necessary to jiggle the looping end repeatedly to over-
come snags, while steadfastly maintaining tension in
the pulling end. As suture length emerges from the di-
minishing loop, the looping end should be repeatedly
regrasped to keep the tying instrument close to the
knot. e knot is tightened by pulling both ends in a
horizontal straight line tangent to the globe. A er the
knot has been stabilized by the second throw, one or
two more throws are added in standard overhand fash-
ion, taking care to make them square and at, before
trimming the ends to 2 to 3 mm.
12.4.5
Hangback Suture
e ends of a double-armed suture used for hangback
recession without adjustment must be tied to each
other to leave a measured length of slack. is is ac-
complished by rst pulling the muscle forward until
the locking bite knots are tight against sclera at their
respective tunnel entry sites, bringing the cut tendon
back up to its original line of attachment. Using a cali-
per, the planned recession distance is measured anteri-
orly from the tunnels’ scleral exit site, and a locking
needle holder is applied across the two contiguous su-
tures, with the anterior surface of its jaws at the point
indicated by the caliper (Fig. 12.6). e emerging su-
tures are tied together to make a 2-1-1 surgeon’s knot
in contact with the needle holder, which is released af-
ter trimming the ends. When the muscle retracts and
pulls this knot back until it is stopped by the scleral
tunnel exits, the locking bite knots move back the same
distance from the entrances to establish the measured
recession.
Chapter 12 Strabismus
124
12.4.6
Adjustable Suture
To form an adjustable knot, a loop is formed with a
single overhand throw in the middle of a 15- to 20-cm
length of 6-0 Vicryl (which may be trimmed from one
of the muscle suture ends emerging from sclera). e
loop is slipped over the two muscle suture ends and
cinched as tightly as possible around them before add-
ing two more single throws. e resulting knot should
slide along the muscle sutures with moderate resis-
tance. To facilitate identi cation and manipulation for
postoperative adjustment, the ends of the sliding knot
suture are tied to each other (over an instrument such
as a closed Westcott scissors) to make a 4- to 5-mm
loop, and then trimmed short. e knot is positioned
(in the manner described above for a hangback suture)
to allow recession of the desired amount. e muscle
suture ends are trimmed to a length of about 5 cm and
tucked into the inferior cul-de-sac. To aid in adjust-
ment, a “handle” for the globe is created by anchoring
an additional suture (which may be 6-0 silk or nylon)
in sclera just posterior to the limbus directly in front of
the recessed muscle, tying it on itself to make another
4- to 5-mm loop. ( e adjustment process is described
at the end of this section.)
12.4.7
Finishing Touches
A er tying, the muscle should be closely inspected to
make sure both locking bite knots are tightly apposed
to their respective scleral tunnel entrances, and the
center of the anterior tendon or muscle edge does not
sag excessively (more than 1 to 2 mm) behind the line
joining the entry sites. Suture slack behind a tunnel en-
trance can be remedied as follows. e needle attached
to one of the le over 6-0 Vicryl suture ends should be
passed once through muscle or tendon just behind the
sagged locking bite, and then into sclera at a distance
from the entry site of the previously placed suture
equal to the distance the locking bite has pulled back,
measured away from the muscle along the line passing
through the two entry sites (Fig. 12.7a). When the su-
ture is tied on itself, the former sag will be converted
into increased width of scleral contact along the ap-
propriate line.
Central sagging with one-suture reattachment in
recession is a common occurrence that can usually but
not always be prevented by making sure the two scleral
entry sites are separated from each other by a distance
equal to the full width of the muscle, and that the tun-
nels reach full depth as soon a er scleral entry as pos-
sible. Fortunately this problem is easily eliminated in
the course of completing the nal knot by bringing the
needle attached to either suture end up through the
center of the tendon 1 to 2 mm behind the cut edge
a
a
Fig. 12.6 Tying a hangback suture. Length of suture a that
extends beyond the scleral exit site when the muscle is pulled
up to the original insertion (a) converts to an equal amount
of recession when the muscle is allowed to pull back (b)
Mark J. Greenwald
a
b
125
(just posterior to the span of suture) a er the second
or third throw, and then nishing with two to three
additional throws (Fig. 12.7b).
Central sagging with two-suture reattachment is in-
frequent with recession but typical with resection. It is
nicely dealt with by passing the two ends of an 8-0 dou-
ble-armed Vicryl suture through the muscle, from ex-
ternal to internal, each at a distance of 1 to 2 mm from
the center and from the anterior edge, and then anchor-
ing each in sclera just anterior to the muscle for 1 to
2 mm, with emergence in a crossed swords con gura-
tion, followed by hand or instrument tying (Fig. 12.7c).
12.4.8
Conjunctiva Closure
With a fornix incision, particularly for the medial rectus
muscle, conjunctival reapposition can o en be accom-
plished e ectively without suturing. A er completion
of muscle reattachment, a small hook is used to gently
separate Tenon’s fascia from sclera between the limbus
and the incision, and to massage conjunctiva in a poste-
rior direction until the incision returns to its original
position. If Tenon’s fascia is bulging between the wound
edges, it is excised as necessary to permit relaxed appo-
sition. (Removing the lid speculum may be necessary to
determine if apposition is adequate.) Persistent gaping
is eliminated by placement of one or more sutures. Al-
though it is tempting to use an end of the 6-0 Vicryl
trimmed from the muscle for this purpose, the resulting
knot may be a source of signi cant postoperative dis-
comfort. A so er material such as fast-absorbing 6-0
gut is preferable.
Limbal incisions may be closed at the limbus, or
with the anterior edge recessed several millimeters
(usually to the original line of muscle attachment) a er
recession. Conjunctival epithelium grows quickly to
cover exposed anterior sclera, with no adverse e ect
on postoperative comfort or appearance. Excision of a
2- to 3-mm strip of tissue (conjunctiva and Tenon’s
fascia) from the anterior edge is an option following
resection or advancement. Recession of conjunctiva is
indicated if the tissue is abnormally tight or thickened
from prior surgery or in ammation. In the author’s ex-
perience, both recession and resection of conjunctiva
are valuable adjuncts to most combined recession–re-
section procedures, promoting at and smooth heal-
ing of the ocular surface in addition to possibly en-
hancing the surgical e ect in such cases, and making
limbal incisions particularly well suited to them.
Conjunctiva and Tenon’s layer tend to retract and
coil during limbal incision surgery on the underlying
muscles, and need to be gently unfurled and stretched
forward prior to closure. (When closing a nasal limbal
incision, it is critical to identify the semilunar fold and
to ensure that it is not mistakenly sutured as the ante-
rior edge.) e author prefers to close at the limbus
with 8-0 Vicryl, which is passed rst through the xed
side of the upper radial portion of the incision, either
as close as possible to the limbus or at the desired re-
cession distance posteriorly, coming from beneath to
the surface of tissues stabilized by the limbus while
stretched from a distance with tissue forceps. e nee-
dle is then passed through the mobile tissues of the
ap (grasped with forceps exactly at the point of de-
sired needle placement) from external to internal, so
that the knot will be buried when tied, taking care to
emerge anterior to the bridging portion of the suture
so as to avoid a gure-eight con guration (Fig. 12.8). It
is not mandatory to suture at the original “corners” of
the ap, and in fact there may be advantage in shi ing
placement to achieve desired positioning when com-
pleting closure with a second suture on the lower side
of the ap. Tenon’s tissue protruding at the limbus or
along the radial incision lines should be trimmed. Ad-
ditional sutures may be placed along the radial lines
but are seldom necessary. If stretched conjunctiva
abc
Fig. 12.7 Elimination of muscle sagging. a Sag at pole, cor-
rected by placing an additional single-armed suture of 6-0
Vicryl to convert posterior displacement to lateral displace-
ment. b Central sag with one suture, corrected by engaging
Chapter 12 Strabismus
center with one arm of previously tied 6-0 Vicryl suture, and
then tying again. c Central sag with two sutures, corrected by
placing a double-armed 8-0 Vicryl suture in mattress fash-
ion
126
overlies the cornea to an undesired degree, the situa-
tion can be remedied by making a short radial nick in
the center of the anterior conjunctival edge with scis-
sors.
Most surgeons apply a topical antibiotic–corticoste-
roid combination, in drop or ointment form, at the
conclusion of surgery. Subsequent suture adjustment
may be facilitated by injecting corticosteroid subcon-
junctivally and avoiding topical ointment. Patching
the eye is not routinely indicated, but it may enhance
patient comfort a er unilateral surgery, and is neces-
sary to protect unsecured adjustable sutures. e au-
thor uses two oval cotton pads, the deeper of which
has been moistened with saline solution, securing
them in place with two 6-cm Tegaderm squares (3M
Health Care), which provide better adherence and
comfort than tape and are less painful to remove.
12.4.9
Suture Adjustment
Suture adjustment is best performed a few hours a er
surgery, but can be deferred for up to about 24 h. e
patient should be fully alert, sitting upright in a setting
that allows the head to be lowered if syncope threatens,
and with an emesis basin in hand. Topical anesthetic is
applied liberally. Loupes are helpful. e emerging
muscle suture ends are rst retrieved from the cul-de-
sac and cleared of accumulated mucus by sliding a
needle holder or tying forceps from the knot to the
tips. Alignment is measured and binocular function
assessed. If reduction or increase in the amount of re-
cession is indicated, the muscle is advanced slightly by
pulling forward on the suture ends while rotating the
globe toward the muscle with tissue forceps applied to
the handle loop anchored in sclera. e sliding knot is
moved posteriorly or anteriorly as appropriate by 1 to
2 mm, and the muscle repositioned by having the pa-
tient look into its eld of action against countertrac-
tion on the handle loop. e process is repeated as nec-
essary to achieve desired alignment and/or binocular
status, at which point the two muscle suture ends are
tied to each other with three additional throws. ese
ends and the loop of the sliding knot are nally
trimmed away and the handle suture is removed.
12.5
Complications
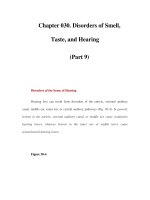
Scleral perforation during needle passage can be
avoided by taking care to keep the needle tip parallel to
the scleral surface and visible through the thin overly-
ing tissue layer at all times. Signs that perforation may
have occurred include tactile recognition of an abrupt
decrease in tissue resistance as the needle is advanced
and observation of dark pigment clinging to the suture
as it emerges from sclera. If perforation is suspected,
the fundus should be examined by indirect ophthal-
moscopy, using a sterile viewing lens and a small mus-
cle hook for scleral indentation. (If 2.5% phenyleph-
rine drops have been administered before starting
surgery to blanch conjunctival vessels, the pupil will
usually be dilated adequately for this purpose.) Perfo-
ration is recognizable as a small round or short cir-
cumferential linear loss of fundus pigmentation with
sharp borders (Fig. 12.9). Sometimes suture bers can
actually be seen within the pigmentary defect. ere
may be a small amount of subretinal or retinal hemor-
rhage. Management of scleral needle perforation re-
mains controversial [4, 8]. Because this relatively com-
mon occurrence very seldom leads to signi cant
consequences, and there is concern that overly vigor-
ous application of cryopexy may lead to signi cant
retinal damage, many surgeons choose not to treat the
complication in the absence of retinal detachment. It is
the author’s practice to inject a subconjunctival antibi-
otic if perforation is documented, and to apply light
cryopexy under direct visualization if a retinal hole is
recognized.
Mark J. Greenwald
Fig. 12.8 Suture placement to close conjunctiva at the lim-
bus with a buried knot
127
12.6
Future Challenges
e recent pace of change in muscle surgery has been
slow as compared with other areas in ophthalmology.
Most of the techniques described in this chapter have
been in use for decades and seem unlikely to be radi-
cally modi ed in the foreseeable future. As with other
areas covered by this volume, there has been prelimi-
nary investigation of tissue adhesive as a substitute for
suturing in muscle surgery [1, 11].
A fundamental limitation of all current surgical ap-
proaches to strabismus is that we work on the agents of
disordered ocular motility, not its sources. Break-
through advances are not likely to occur in this eld
until we succeed in determining the underlying causes
of the most common forms of surgically treated stra-
bismus.
2
4
Fig. 12.9 A needle track lesion in the fundus caused by a
deeply placed suture securing the recessed right medial rec-
tus muscle to sclera
References
1. Bloom JN, Du y MT, Davis JB, McNally-Heintzelman
KM (2003) A light-activated surgical adhesive technique
for sutureless ophthalmic surgery. Arch Ophthalmol
121:1591–1595
2. Bishop F, Doran RM (2004) Adjustable and non-adjust-
able strabismus surgery: a retrospective case-matched
study. Strabismus 12:3–11
3. Calhoun JH, Nelson LB, Harley RD (1987) Atlas of pedi-
atric ophthalmic surgery. Saunders, Philadelphia
4. Del Monte MA, Archer SM (1993) Atlas of pediatric
ophthalmology and strabismus surgery. Churchill Liv-
ingstone, New York
5. Engel JM, Rousta ST (2004) Adjustable sutures in chil-
dren using a modi ed technique. J AAPOS 8:243–248
6. Greenwald MJ (1992) Surgical management of essential
esotropia. In: Nelson LB, Lavrich JB (eds) Strabismus
surgery. Saunders, Philadelphia. Ophthalmology Clinics
of North America 5(1):9–23
7. Greenwald MJ (1993) Paretic strabismus. In: Cibis GW,
Tongue AC, Stass-Isern ML (eds) Decision making in
pediatric ophthalmology. Mosby, Saint Louis, pp 230–
233
8. Greenwald MJ, Lasky JB (1999) Extraocular muscle sur-
gery. In: Krupin T, Kolker AE, Rosenberg LF (eds) Com-
plications in ophthalmic surgery. Mosby, Saint Louis, pp
195–216
9. Jampolsky A (1979) Current techniques of adjustable
strabismus surgery. Am J Ophthalmol 88:406–418
10. Mims JL 3rd (1992) Forming and teaching true knots for
strabismus surgery. Ophthalmic Surg 23:477–481
11. Mulet ME, Alio JL, Mahiques MM, Martin JM (2006)
Adal-1 bioadhesive for sutureless recession muscle sur-
gery: a clinical trial. Br J Ophthalmol 90:208–212
12. Neumann D, Neumann R, Isenberg SJ (1999) A com-
parison of sutures for adjustable strabismus surgery. J
AAPOS 3:91–93
13. Parks MM (1968) Fornix incision for horizontal rectus
muscle surgery. Am J Ophthalmol 65:907–915
14. Parks MM, Parker JE (1983) Atlas of strabismus surgery.
Harper Row, Philadelphia
15. Plager DA, Buckley EG, Repka MX, Wilson ME, Parks
MM, von Noorden GK (2004) Strabismus Surgery: basic
and advanced strategies. Oxford University Press, Ox-
ford New York
16. von Noorden GK (1968) e limbal approach to surgery
of the rectus muscles. Arch Ophthalmol 80:94–97
Chapter 12 Strabismus
Chapter 13
Refractive Surgery
Suturing Techniques
Gaston O. Lacayo III and Parag A. Majmudar
13
Key Points
Surgical Indications
• Hyperopia following radial keratotomy
• Visually signi cant ap striae following laser
in situ keratomileusis ( LASIK)
• Visually signi cant epithelial ingrowth fol-
lowing LASIK
Surgical Technique
• Grene lasso technique
• Lindstrom “over-and-under” technique
• Flap suturing for ap striae
• Flap suturing and epithelial debridement for
epithelial ingrowth
Instrumentation
• Proparacaine 0.5%
• 25-Gauge needle on syringe
• No. 64 blade
• Merocel sponges
• Balanced salt solution
• Eight-incision radial marker
• 7-mm optical zone marker
• 10-0 nylon suture
• So contact lens
• Polymethylmethacrylate (PMMA) contact
lens
Complications and Future Challenges
• Decreased predictability
• Di culty in titrating refractive error correc-
tion
• Over time, the steepening e ect may be lost
• Potential for suture erosion
• Di use lamellar keratitis, infection and tem-
porary induced astigmatism
• Striae or epithelial ingrowth may recur
In the 1970s, the development of microsurgical sutur-
ing spurred ophthalmic surgery perhaps more than
any other invention, with the exception of the operat-
ing microscope. However, in the eld of refractive sur-
gery, sutures and suturing technique play a lesser role
than do excimer lasers and microkeratomes. Nonethe-
less, there are several indications for suturing to aid in
visual correction following refractive surgery.
13.1
Management of Hyperopia after Radial
Keratotomy
13.1.1
Introduction
Radial keratotomy (RK) was one of the earliest forms of
refractive surgery. Although it is e ective in reducing
myopia, unfortunately it is plagued by vagaries of the
corneal wound healing response. e conversion of a
myopic to a hyperopic refractive error is one of the
most frequent and signi cant complications of RK [1].
e clinical manifestations of hyperopia a er RK can
be seen either in the immediate postoperative setting
or years a er the initial surgery. Hyperopia in the im-
mediate post-RK period can be because of corneal
edema and wound gape, leading to greater attening of
the central cornea, and it o en resolves spontaneously.
e more common manifestation of hyperopia a er
RK is a gradual onset in the late postoperative period.
is slow attening of the cornea resulting in progres-
sive hyperopia is referred to as the “ hyperopic shi .”
Other patients experience continued diurnal uctua-
tions in their vision. In the Prospective Evaluation of
Radial Keratotomy (PERK) study, 43% of patients
demonstrated a hyperopic shi of +1.00 D or more
over a 10-year follow-up period. e greatest rate of
change occurred between 6 months and 2 years post-
operatively at a rate of +0.21 D per year, with a smaller
rate of change of 0.06 D per year between years 2 and
10 [2]. e degree of hyperopic shi is closely corre-
lated to higher degrees of preoperative myopia. Other
factors contributing to progressive hyperopia a er RK
include radial incisions that extend to the limbus, mul-
tiple enhancement procedures, peripheral redeepen-
ing procedures, use of a metal rather than diamond
blade [3], lack of preoperative cycloplegia with undis-
covered latent hyperopia, postoperative contact wear,
and postoperative ocular massage [2]. In addition, it
has been found that travel to a high altitude can induce
a hyperopic shi [4]. Although RK has fallen out of
favor since the introduction of laser in situ keratomi-
leusis ( LASIK), over 1.2 million RK procedures have
130
been performed worldwide since 1970, and it is esti-
mated that 20 to 30% of these patients may now be
hyperopic [5].
13.1.2
Surgical Indications
Hyperopia following radial keratotomy may be treated
surgically in a number of ways [6]. For the purposes of
this discussion, only the techniques that involve sutur-
ing are discussed.
13.1.3
Instrumentation and Equipment
• Fluorescein
• Polymethylmethacrylate (PMMA) contact lens
• 7-mm optical zone marker
• 10-0 nylon suture on compound J-curve needle
(Ethicon)
13.1.4
Surgical Technique
e objective in suturing a post-RK cornea is to rees-
tablish a steeper central curvature and thereby de-
crease the level of hyperopic shi . Compression su-
tures are particularly useful in patients with diurnal
uctuation in vision. e surgeon may opt for single
interrupted sutures, especially in the setting of asym-
metric incisions. When placing single interrupted su-
tures, one must choose an optical zone for suture
placement. A 7-mm optical zone appears to be opti-
mal, as sutures placed in smaller optical zones can in-
duce higher amounts of astigmatism. A disadvantage
to the interrupted suture technique is the loss of e ect
(by up to 70%) over time [7].
Lasso, or continuous “ purse-string” sutures are best
for symmetrical incisions. Hofman reported the use of
a single continuous suture of Merseline as a manage-
ment for overcorrection in 1987 [8]. e Grene lasso
was developed to better address wound gape by forc-
ing the corneal “knee” posteriorly [9]. It was rst de-
scribed in 1994 and re ned in subsequent years for
management of post-RK hyperopia [7]. is proce-
dure involves anesthetizing the cornea with propara-
caine 0.5% and placing a PMMA contact lens with a
base curve 1.00 D greater than the preoperative kera-
tometry, followed by a drop of uorescein on the cor-
nea. e amount of steepening needed is titrated by
observing the uorescein pattern beneath the contact
lens, with the end point being the initial disappearance
of the bubble. e technique of the Grene lasso utilizes
10-0 nylon suture on a compound J-curve needle (Eth-
icon CS-B-6, Johnson and Johnson, Sommerville, N.J.)
with a “steep-and-deep” suture path. Each suture bite
enters and exits adjacent to a radial incision to a depth
of 70 to 80% (Fig. 13.1). e suture is super cial over
the RK incisions and deep within the stroma between
the RK incisions. is is in contrast to traditional con-
tinuous suturing where the super cial portion of the
suture is over the intervening stroma, and the suture is
passed through the cornea adjacent and beneath the
RK incision. When the lasso is completed, the knot is
triple-tied and buried as deeply as possible (Fig. 13.2).
e Grene lasso addresses three factors that contribute
to hyperopia: wound gape, micro–irregular astigma-
Cornea with »lasso« suture (frontal view)
Passage of suture through stroma
and above RK incision (cross sectional view)
Intrastromal
suture
Intraepithelial suture
above RK incision
Fig. 13.1 Technique of Grene lasso placement (Am J Oph-
thalmol 1998; 126:825–827)
Fig. 13.2 Appearance of completed lasso procedure (Am J
Ophthalmol 1998; 126:825–827)
Gaston O. Lacayo III and Parag A. Majmudar
131
tism, and overcorrection [9]. Lindstrom modi ed the
Grene lasso into the over-and-under technique instead
of the steep-and-deep technique as described by Grene.
In an eight-cut RK, the rst bite goes under or through
an incision, and the next goes over an incision, alter-
nating under and over four times [9, 10]. With either
technique, the e ect can be titrated quantitatively with
a surgical keratometer. Lindstrom recommends steep-
ening the cornea by twice the amount of the consecu-
tive hyperopia. For example, if the patient is +2.00 D
with a mean keratometry reading of 40.00 D, the cor-
nea should be steepened 4 to 44.00 D. is induces
mild myopia, which slowly dri s toward plano over
time. In the over-and-under technique, there is a pos-
sibility of loosening of the sutures, which can lead to
irritation. Multiple lasso sutures may also be placed at
various optical zones to titrate the e ect [11].
13.1.5
Complications and Future Challenges
Nylon is the preferred suture material over Merseline
or Prolene. Approximately half of patients receiving
the Merseline sutures developed in ammatory kerati-
tis, and Prolene tended to stretch, resulting in less ef-
fective compression. Nylon is less in ammatory but,
may still cheese-wire through the cornea or dissolve
with time. In general, intrastromal circular sutures
( lasso sutures) are not highly predictable. Risks with
this procedure are decreased predictability and di -
culty in titrating the refractive correction. Over time,
the steepening e ect may be lost, and there is also the
potential for suture erosion.
13.2
Management of Recalcitrant Striae or Recur-
rent Epithelial Ingrowth after LASIK Surgery
13.2.1
Introduction
Visually signi cant ap striae and epithelial ingrowth
can occur following uncomplicated LASIK surgery
([12,13]; Figs. 13.3 and 13.4) Risk factors for striae in-
clude overhydration of the ap, delayed management
of primary misalignment, or high refractive error re-
quiring a deep ablation, causing ap-bed mismatch
(microstriae). Risk factors associated with epithelial
ingrowth include intraoperative epithelial defects
(which reduce the oncotic pressure of the endothelial
pump, and result in microscopic ap elevation), pri-
mary ap misalignment, enhancement surgeries, and
trauma. If untreated and progressive, signi cant astig-
matism and melting of the overlying ap because of
expression of collagenases from the epithelial cells may
result, with an associated loss in best-corrected visual
acuity (BCVA). Whereas simple techniques such as
debridement of epithelial cells, or li ing and mechani-
cal ap stretching to eliminate striae o en correct such
problems [14, 15], infrequently they may persist, lead-
ing to loss of BCVA. In the presence of striae and/or
epithelial ingrowth, ap suturing o ers a safe and ef-
fective treatment for this troublesome complication.
Suturing as a treatment for ap striae following
LASIK was originally described by Lam et al [13] and
more recently by Jackson et al. for treatment of recalci-
trant macrostriae [16]. Flap suturing for epithelial in-
growth was rst reported by Lim et al. [14]. e au-
thors described interface epithelial growth beneath the
hinge, which required surgical removal of the ap pri-
or to epithelial removal. e corneal lenticule was then
sutured back the bed, and no recurrence was observed.
Spanggord et al. recently described ap suturing with
proparacaine for recurrent epithelial ingrowth a er
LASIK. e authors were able to show e ective reduc-
tion of recurrent epithelial ingrowth, in previously de-
brided corneas, with the use of ap suturing and topi-
cal proparacaine [19].
Fig. 13.3 Epithelial ingrowth
Fig. 13.4 Flap striae
Chapter 13 Refractive Surgery Suturing Techniques