Microengineering MEMs and Interfacing - Danny Banks Part 2 potx
Bạn đang xem bản rút gọn của tài liệu. Xem và tải ngay bản đầy đủ của tài liệu tại đây (703.83 KB, 19 trang )
Part III
Interfacing 237
III.1 Introduction 237
References 238
Chapter 11
Amplifiers and Filtering 239
11.1 Introduction 239
11.1.1 Quick Introduction to Electronics 239
11.1.1.1 Voltage and Current Conventions 239
11.1.1.2 The Ideal Conductor and Insulator 241
11.1.1.3 The Ideal Resistor 241
11.1.1.4 The Ideal Capacitor 242
11.1.1.5 The Ideal Inductor 242
11.1.1.6 The Ideal Voltage Source 243
11.1.1.7 The Ideal Current Source 243
11.1.1.8 Controlled Sources 243
11.1.1.9 Power Calculations 244
11.1.1.9.1 Switching Losses 244
11.1.1.10 Components in Series and Parallel 245
11.1.1.11 Kirchoff’s Laws 246
11.2 Op-Amp 247
11.2.1 The Ideal Op-Amp 248
11.2.1.1 Nonideal Sources, Inverting, and Noninverting
Op-Amp Configurations 251
11.2.2 Nonideal Op-Amps 253
11.2.2.1 Bandwidth Limitations and Slew Rate 254
11.2.2.2 Input Impedance and Bias Currents 255
11.2.2.3 Common-Mode Rejection Ratio and Power
Supply Rejection Ratio 256
11.2.3 Noise 257
11.2.3.1 Combining White Noise Sources 257
11.2.3.2 Thermal Noise 258
11.2.4 Op-Amp Applications 258
11.2.4.1 The Unity-Gain Buffer Amplifier 258
11.2.4.2 AC-Coupled Amplifiers 260
11.2.4.3 Summing Amplifiers 261
11.2.4.4 Integrators and Differentiators 261
11.2.4.5 Other Functions 263
11.3 Instrumentation Amplifiers 263
11.4 Wheatstone Bridge 265
11.4.1 The Capacitor Bridge 266
11.5 Filtering 268
11.5.1 RC Filters 268
DK3182_C000.fm Page xviii Thursday, February 2, 2006 4:41 PM
Copyright © 2006 Taylor & Francis Group, LLC
11.5.2 Butterworth Filters 273
11.5.2.1 Synthesizing Butterworth Active Filters 276
11.5.2.2 Approximating the Frequency Response
of a Butterworth Filter 278
11.5.3 Switched-Capacitor Filters 279
References 280
Chapter 12
Computer Interfacing 281
12.1 Introduction 281
12.1.1 Number Representation 281
12.2 Driving Analog Devices from Digital Sources 282
12.2.1 Pulse-Width Modulation (PWM) 283
12.2.1.1 Estimating the PWM Frequency 284
12.2.1.2 Digital Implementation and Quantization 285
12.2.1.3 Reproducing Complex Signals with PWM 286
12.2.2 R-2R Ladder Digital-to-Analog Converter (DAC) 286
12.2.3 Current Output DAC 287
12.2.4 Reproducing Complex Signals with Voltage
Output DACs 288
12.3 Analog-to-Digital Convearsion 288
12.3.1 Sample Raate 289
12.3.1.1 Antialiasing Filters 290
12.3.2 Resolution 290
12.3.3 Signal Reconstruction: Sampling Rate
and Resolution Effects 291
12.3.4 Other ADC Errors 292
12.3.4.1 Missing Codes 292
12.3.4.2 Full-Scale Error 292
12.3.5 Companding 292
12.4 Analog-to-Digital Converters 292
12.4.1 Sample-and-Hold Circuit 293
12.4.2 PWM Output ADCs 293
12.4.2.1 Integrating ADC 293
12.4.2.2 Conversion Time 294
12.4.3 Successive Approximation 294
12.4.4 Flash ADC 295
12.4.5 Sigma-Delta Converter 295
12.5 Converter Summary 296
References 296
Chapter 13
Output Drivers 297
13.1 Introduction 297
13.2 Controlling Currents and Voltages with Op-Amps 297
13.2.1 Op-Amp Current Control 297
DK3182_C000.fm Page xix Thursday, February 2, 2006 4:41 PM
Copyright © 2006 Taylor & Francis Group, LLC
13.2.1.1 Four-Electrode Configuration 298
13.2.2 Op-Amp Voltage Control 299
13.3 Transistors 300
13.3.1 The BJT 300
13.3.2 The MOSFET 303
13.4 Relays 306
13.4.1 Relay Characteristics 307
13.4.2 Relay Types 307
13.5 BJT Output Boost for Op-Amps 308
13.6 Optoisolators 309
DK3182_C000.fm Page xx Thursday, February 2, 2006 4:41 PM
Copyright © 2006 Taylor & Francis Group, LLC
1
Part I
Micromachining
I.1. INTRODUCTION
I.1.1 W
HAT
I
S
M
ICROENGINEERING
?
Microengineering and Microelectromechanical systems (MEMS) have very few
watertight definitions regarding their subjects and technologies. Microengineering
can be described as the techniques, technologies, and practices involved in the
realization of structures and devices with dimensions on the order of micrometers.
MEMS often refer to mechanical devices with dimensions on the order of
micrometers fabricated using techniques originating in the integrated circuit (IC)
industry, with emphasis on silicon-based structures and integrated microelectronic
circuitry. However, the term is now used to refer to a much wider range of
microengineered devices and technologies.
There are other terms in common use that cover the same subject with slightly
different emphasis. Microsystems technology (MST) is a term that is commonly
used in Europe. The emphasis tends towards the development of systems, and
the use of different technologies to fabricate components that are then combined
into a system or device is more of a feature of MST than MEMS, where the
emphasis tends towards silicon technologies.
In Japan, particularly, the term micromachines is employed. There is a ten-
dency toward miniaturization of machines, with less emphasis on the technologies
or materials employed. This should not be confused with micromachining, the
processes of fabricating microdevices.
The most rigorous definition available was proposed by the British govern-
ment, which defined the term microengineering as working to micrometer
tolerances. An analogous definition for nanotechnology was advanced.
Although these definitions can be used effectively for policy setting, for exam-
ple, they tend to lead to some anomalies: very large precision-engineered
components that one would not normally consider to be MEMS were being
classified as such. For this reason, the definition tends to be used with qualifi-
cations in technical literature.
DK3182_S001.fm Page 1 Friday, January 13, 2006 11:03 AM
Copyright © 2006 Taylor & Francis Group, LLC
2
Microengineering, MEMS, and Interfacing: A Practical Guide
This volume will attempt to standardize the definitions for this technology
given in the glossary for microengineering and MEMS:
Microengineering:
The techniques, technologies, and practices involved
in the realization of structures and devices with dimensions on the order
of micrometers
MEMS
: Microengineered devices that convert between electrical and any
other form of energy and rely principally on their three-dimensional
mechanical structure for their operation
In this way, microengineering is a very broad term, as one may expect. It not
only covers MEMS but also IC fabrication and more conventional microelectron-
ics. As a rule of thumb, devices in which most of the features (gap or line width,
step height, etc.) are at or below 100
µ
m fulfill the “dimensions in the order of
micrometers” criteria.
The definition of MEMS as transducers means that the term can be used a
little more generally than other definitions would allow. For instance, infrared
displays that use suspended structures to thermally isolate each pixel fit nicely
into this definition as their operation relies on the three-dimensional suspended
structure even though there is no moving mechanical element to the device. It
does, however, exclude devices such as Hall effect sensors or photodiodes,
which rely principally on their electrical (or chemical) structure for their oper-
ation. It also tends to exclude semiconductor lasers for similar reasons, and
components such as power MOSFET transistors that are formed by etching V
grooves into the silicon substrate are also excluded as they are purely electrical
devices.
Once one is happy with the term
microengineering
, one can create all the
relevant subdisciplines that one requires simply by taking the conventional dis-
cipline name and adding the prefix micro to it. Thus, we have microfluidics,
micromechanics, microlithography, micromachining, etc., and, of course, micro-
electronics. This flippant comment does not mean that these disciplines are simply
the macroscale discipline with smaller numbers entered into the equations. In
many cases this can be done, but in others this can cause erroneous results. It is
intended to point out that there are relatively few surprises in the nomenclature.
At this point, it is worth highlighting the difference between science and
engineering as it is of considerable import to the microengineer. Science aims to
understand the universe and build a body of knowledge that describes how the
universe operates. Engineering is the practical application of science to the benefit
of humankind. The description of the universe compiled by scientists is often so
complex that it is too unwieldy to be practically applied. Engineers, therefore,
take more convenient chunks of this knowledge that apply to the situation with
which they are concerned. Specifically, engineers employ models that are limited.
For example, when calculating the trajectory of a thrown ball, Newton’s laws
of motion would normally be used, and no one would bother to consider how
Einstein’s relativity would affect the trajectory: the ball is unlikely to be traveling
DK3182_S001.fm Page 2 Friday, January 13, 2006 11:03 AM
Copyright © 2006 Taylor & Francis Group, LLC
Micromachining
3
at a relativistic speed where a significant effect may be expected (a substantial
fraction of the speed of light).
A good engineering course teaches not only the models that the student needs
to employ, and how to employ them, but also the limitations of those models.
The knowledge that models are limited is of significance in microengineering
because the discipline is still compiling a family of models and list of pitfalls.
Despite the vast body of literature on the subject, there is still far more anecdotal
knowledge available than written information. This is evidenced by the substantial
traffic that MEMS mailing lists and discussion groups receive. There is only so
much that can be achieved by reading and modeling, and even a little experience
of the practice is of great benefit.
I.1.2 W
HY
I
S
M
ICROENGINEERING
I
MPORTANT
?
The inspiration for nanotechnology, particularly molecular nanotechnology, is usu-
ally traced back to Richard Feynman’s presentation entitled “There’s Plenty of Room
at the Bottom” in 1959 [1]. A few people cite this presentation as the inspiration for
the field of microengineering, but it is more likely that it was the seminal paper by
Kurt Petersen, “Silicon as a Mechanical Material,” published in 1982 [2].
The micromachining of silicon for purposes other than the creation of elec-
tronic components was certainly being carried out at least a decade before
Petersen published this work, which compiled a variety of disparate threads and
technologies into something that was starting to look like a new technology. Not
only was silicon micromachining in existence at this time, but many of the other
techniques that will be discussed in later chapters of this volume were also being
used for specialized precision engineering work. However, despite the appearance
of some early devices, it was not until the end of that decade that commercial
exploitation of microengineering, as evidenced by the number of patents issued [3],
started to take off.
At the beginning of the 1990s, microengineering was presented as a revolu-
tionary technology that would have as great an impact as the microchip. It
promised miniaturized intelligent devices that would offer unprecedented accu-
racy and resolution and negligible power consumption. Batch fabrication would
provide us with these devices at negligible costs: few dollars, or even just a few
cents, for a silicon chip. The technology would permeate all areas of life: the
more adventurous projects proposed micromachines that would enter the blood-
stream and effect repairs, or examine the interior of nuclear reactors in minute
detail for the telltale signs of impending failure. As with many emerging tech-
nologies, some of the early predictions were wildly optimistic. Although some
of the adventurous projects proposed during this period remain inspirational for
technological development, the market has tended to be dominated by a few
applications — notably IT applications such as inkjet printer heads and hard disk
drive read–write heads. Pressure measurement appears next on the list; some may
intuitively feel that these devices, rather than inkjet printer heads, are more in
tune with the spirit of microengineering.
DK3182_S001.fm Page 3 Friday, January 13, 2006 11:03 AM
Copyright © 2006 Taylor & Francis Group, LLC
4
Microengineering, MEMS, and Interfacing: A Practical Guide
Nonetheless, microengineered devices have significant advantages and poten-
tial advantages over other solutions. Although the road to mass production and
low-cost devices is long and expensive, the destination can be reached; examine,
for example, the plethora of mass-produced silicon accelerometers and pressure
sensors. Beyond the direct advantages of miniaturization, integrating more intel-
ligence into a single component brings with it improved reliability: the fewer
components that need to be assembled into a system, the less chance there is that
it can go wrong. One great advantage of microengineering is that new tools
providing solutions to problems that have never been addressed before are still
to be fully exploited. The technology is still relatively new, and innovative think-
ing can potentially bring some startling results.
There is, however, a reason for the aforementioned cautious historical pre-
amble: market surveys are often conducted by groups with a particular interest
in the technology or by those interested in showing the economy in a positive
light. Evidence is often collected from people working in the field or companies
that have invested a lot of R&D dollars into the technology. The preamble thus
sets the following data in context.
It is undeniable that microengineering has had a substantial impact beyond
disk drives and printers. The sensors and transducers section of any commercial
electronics catalog reveals a dozen or so microengineered devices including
accelerometers, air-mass-flow sensors, and pressure transducers. (Surprisingly,
however, the electronics engineer may not be aware of the technological
advances that have gone into these devices). The molecular biologist cannot
help but be aware of the plethora of DNA chip technologies, and the material
scientist cannot have missed the micromachined atomic force microscope
(AFM) probe.
In the mid 1990s a number of different organizations compiled market growth
projections for the following few years. These were conveniently collected and
summarized by Detlefs and Pisano [3]. The European NEXUS (Network of
Excellence for Multifunctional Microsystems) has been particularly active in this
respect, publishing a report in 1998 [4] with a follow-up study appearing in 2002
[5]. Also, in 2002, the U.S based MEMS Industry Group published its own report
[6]. The absolute numbers for the global market in such reports vary depending
on how that market is defined. The NEXUS task force included all products with
a MEMS component, whereas the other groups only considered the individual
components themselves. The NEXUS 2002 report estimated the world market to
MEMS Advantages
• Suitable for high-volume and low-cost production
• Reduced size, mass, and power consumption
• High functionality
• Improved reliability
• Novel solutions and new applications
DK3182_S001.fm Page 4 Friday, January 13, 2006 11:03 AM
Copyright © 2006 Taylor & Francis Group, LLC
Micromachining
5
have been worth approximately $30 billions in 2000, whereas the U.S based
MEMS Industry Group estimated it to be in the region of $2 billions to $5 billions.
From the published summaries, it would appear that a growth of 20% per annum
would be a conservative estimate for the coming few years. It should be noted,
however, that many of these estimates are based on the highly volatile optical
communications and IT markets, where optical MEMS in particular are expected
to make a significant impact.
Detlefs and Pisano highlight microfluidics and RF MEMS, apart from optical
MEMS, as having significant potential for growth. This being in contrast to the
10 to 20% growth that they ascribe to more established microengineered sensors
(pressure, acceleration, etc.). This assessment is in concordance with the NEXUS
2002 findings, where IT peripherals and biomedical areas are identified as having
the most significant growth potential.
I.1.3 H
OW
C
AN
I M
AKE
M
ONEY
OUT
OF
M
ICROENGINEERING
?
This is not a book that intends to give financial business or other moneymaking
advice. It was inspired, in part at least, by the recognition that there is a growing
market and opportunities for microengineered products, and in order to exploit
these it is necessary to have some understanding of the technology. This book
deals with the technologies involved in microengineering, so pithy observations
about their potential exploitation are restricted to the introduction.
Firstly, nearly all the processes involved in micromachining involve a signif-
icant capital outlay in terms of clean rooms, processing equipment, and hazardous
chemicals. In the past this has restricted novel developments to those that had or
could afford the facilities or to those using lower-cost micromachining technol-
ogies. Multiproject processes, where designs from several different groups are
fabricated on the same substrate (wafer) using the same process, are now avail-
able. This cuts the cost, but limits you to a specific fabrication sequence. One
other option, if you happen to be in an area with a high density of small (R&D)
clean room facilities, is to try out your designs by shipping your batch of wafers
to as many laboratories as possible.
R&D, however, has not tended to be the bottleneck in commercial exploita-
tion. The main bottleneck has been in scaling up from prototype volumes to mass
production volumes. Much of the processing equipment is quite idiosyncratic
and needs to be characterized and monitored to ensure that the vast majority
of the devices coming off the line meet the specifications (process monitoring).
Furthermore, parameters that are required for good electrical performance may
result in undesirable mechanical characteristics. In short, it is highly likely that
Microengineering and Money
• Global market of billions of dollars
• 20% annual growth rate to 2005
• Significant areas: IT, optical and RF components, and microfluidics
DK3182_S001.fm Page 5 Friday, January 13, 2006 11:03 AM
Copyright © 2006 Taylor & Francis Group, LLC
6
Microengineering, MEMS, and Interfacing: A Practical Guide
a new line will have to be set up and characterized for the product, and unlike
IC foundries, it is difficult to adapt the line for the production of different devices.
Additionally, if a silicon device is required with integrated electronic circuitry,
the micromachining and circuit fabrication processes must be fully compatible
and may be intertwined.
If you are really serious about getting your microengineered device into the
market, and have the money to set up a fabrication facility (fab), one of your best
options is probably to work with a company (or organization) that has its own
facility and is willing to work with others (a MEMS foundry). Usually these will
be companies that already produce a few microengineered products of their own,
rather than companies set up for the sole purpose of providing micromachining
facilities to other parties. At the time of publication, there were a few (but a
growing number of) these companies that were genuinely willing to collaborate
in product development. Even if you have your own small R&D facility and are
serious about producing marketable devices, it would probably be a good idea to
find a few of these companies at an early stage in development and align your
R&D with their processes. Also, make use of their expertise — this will almost
certainly save you a lot of headaches.
Packaging is another area that has often been neglected during device R&D.
Most microengineered devices will need to interface with the outside world in a
way beyond the simple electrical connections of integrated circuits. This will
typically require the development of some specialized packages with appropriate
tubes, ports, or lenses. The device itself will be exposed to the environment,
which can contain all sorts of nasty surprises that are not found within a research
laboratory. These surprises include obvious problems, such as dust, bubbles, or
other contaminants in microfluidic systems, and the less obvious problems, such
as air (many resonant devices are first tested in an electron microscope under
vacuum — air can damp them sufficiently to prevent their working and packaging
devices under vacuum can be problematical). Other unexpected problems include
mechanical or other interactions with the package. Differential coefficients of
thermal expansion between device and package can put transducers under strain,
leading to erroneous results. Once again, resonant sensors are particularly sensi-
tive to the mechanical properties of the package and to the mounting of dies
within it.
Exploitation Problems
• Large initial capital outlay
• Process monitoring
• Potential incompatibility with integrated microelectronics
• Dedicated foundries
• Packaging
• Is there a market for this product?
DK3182_S001.fm Page 6 Friday, January 13, 2006 11:03 AM
Copyright © 2006 Taylor & Francis Group, LLC
Micromachining
7
Packaging and associated assembly stages are easily the most expensive of
any fabrication process. At this stage, each die must be handled individually, as
opposed to a hundred or more devices on each wafer during the earlier micro-
machining stages. Thus, the time spent handling individual dies should be kept
to a minimum and automated as much as possible.
A thing to note is that although mass production of microengineered devices
can potentially reduce their cost, the amount of R&D effort involved will probably
make it necessary to sell early versions at a premium in order to recover costs.
It pays, therefore, to be well aware of your market before investing in R&D.
The ideal thing to do is treat a microengineering technology as any other
technology: first identify the problem and then select the most appropriate tech-
nology to solve it. Of course, identifying the most appropriate technology does
assume awareness of the technologies that are available.
REFERENCES
1. Feynman, R., There’s Plenty of Room at the Bottom: An Invitation to Enter a
New Field of Physics, presentation given on 29 December 1959 at the annual
meeting of the APS at Caltech.
2. Petersen, K., Silicon as a mechanical material,
Proc. IEEE
, 70(5), 427–457, 1982.
3. Detlefs and Pisano, US MEMS Review, 5th World Micromachine Summit, 1999.
4. NEXUS! Task Force, Market Analysis for Microsystems 1996–2002, October
1998. The document can be ordered from the NEXUS web site, www
.nexus-
emsto.com, and an executive summary is freely available.
5. Wechsung, R., Market Analysis for Microsystems 2000–2005 — A Report from
the NEXUS Task Force, summary in MST News, April 2002, 43–44.
6. MEMS Industry Group report released at MEMS 2002, Las Vegas. A brief sum-
mary can be found at Small Times: J Fried, MEMS Market Continues to Grow,
Says Industry Group’s New Report, January 21, 2002. www
.smalltimes.com/
document_display.cfm?document_id=2949.
Incorporating Microengineering into Your Business
• Develop a novel solution to a new existing problem or gap in the
market.
• Develop new products to complement your existing product line or
as upgrades.
• Gain competitive advantage by incorporating new technology into
your products.
• Gain competitive advantage by using the new technology in new-
product development.
DK3182_S001.fm Page 7 Friday, January 13, 2006 11:03 AM
Copyright © 2006 Taylor & Francis Group, LLC
9
1
Photolithography
1.1 INTRODUCTION
The fundamental aim of microengineering — to take a design from a computer
aided design (CAD) software package and manifest it in a physical manner — may
be achieved through one of a number of different fabrication or micromachining
technologies. Many of these technologies employ a process known generally as
photolithography
, or a variation of this process, to transfer a two-dimensional
pattern from a mask into the structural material. The mask is created from the data
held by the CAD package, and the structure is built up by a series of steps that
involve the deposition (addition of material to the structure) and etching (removing
material from the structure) of patterned layers.
The term
photolithography
refers to a process that uses light or optical
techniques to transfer the pattern from the mask to the structural material. Typ-
ically, it will refer to a process that employs ultraviolet (UV) light, but it may
informally be employed to refer to other lithographic processes or lithography,
generally, within the context of microelectromechanical systems (MEMS) and
micromachining. Other processes may employ electrons or x-rays.
The purpose of this chapter is to introduce the common forms of lithography,
focusing on UV photolithography. Electron-beam (e-beam) and x-ray lithography,
as well as some key design matters and processes related to photolithography,
are introduced. This chapter is complemented by the matters discussed in Chapter
4 pertaining to mask design.
Features of Photolithography for MEMS
There are a number of features common in MEMS fabrication processes but
that are not as common in integrated circuit (IC) fabrication; these are:
• Nonplanar substrate (i.e., relatively large three-dimensional features,
such as pits)
• The use of thick resist layers (for structural purposes or for long
etching times)
• Relatively high-aspect-ratio structures (in resists as well as sub-
strates)
• Relatively large feature sizes (cf. IC processes)
• Unusual processing steps
• Unusual materials (particularly important in terms of adhesion)
DK3182_C001.fm Page 9 Friday, January 13, 2006 10:57 AM
Copyright © 2006 Taylor & Francis Group, LLC
10
Microengineering, MEMS, and Interfacing: A Practical Guide
1.2 UV PHOTOLITHOGRAPHY
UV photolithography is the workhorse of many micromachining processes and
nearly all semiconductor IC manufacturing processes. With the continual demand
for reduced transistor sizes and line widths from IC designers and manufacturers,
UV lithography is being pushed to its physical limit to achieve features (line
widths or gaps) with submicrometer dimensions. Generally, MEMS employ
relatively large structures with dimensions ranging from a few micrometers to
about 100
µ
m. Therefore, the techniques required to produce such small
dimensions will not be mentioned here but will be touched on in Part III of this
volume.
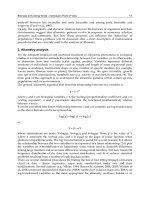
The basic principle of photolithography is illustrated in Figure 1.1. The aim
is to transfer a two-dimensional pattern that is formed on a mask (aka reticle,
especially when exposure systems are discussed) into a three-dimensional or two-
and-a-half-dimensional pattern in a structural material. The description “two-and-
a-half-dimensional” is used because, as you will see, although it is possible to
produce structures with complex curves in the xy plane, many micromachining
techniques only provide limited control of shapes in the vertical z dimension.
In the example in Figure 1.1, a thin film of silicon dioxide has been deposited
on the surface of a silicon wafer. It is desired that this film be selectively removed
FIGURE 1.1
Basic principle of photolithography (not to scale): (a) silicon substrate with
oxide coating, (b) photoresist spun on, (c) exposed to UV light through mask, (d) devel-
oped, (e) etching of underlying film, (f) photoresist stripped, leaving patterned film.
Positive
resist.
Negative
resist.
(a)
(b)
(c)
(d)
(e)
(f)
DK3182_C001.fm Page 10 Friday, January 13, 2006 10:57 AM
Copyright © 2006 Taylor & Francis Group, LLC
Photolithography
11
from certain areas of the wafer to expose the underlying silicon. To do this, a
mask is produced. This will typically be a chromium pattern on a glass (quartz)
plate, chromium being opaque to UV light and quartz being transparent. The
wafer is cleaned and coated with a material that is sensitive to UV light, known
as
photoresist
. The photoresist is exposed to UV light through the mask and then
developed, transferring the pattern from the mask into the photoresist.
There are two basic types of photoresists: positive resists and negative resists.
(These are also known, respectively, as light-field resists and dark-field resists,
although this terminology can cause some confusion when several different fab-
rication facilities are involved in one process.) With positive resists, the chemical
bonds within the resist are weakened when exposed to UV light, whereas they
are strengthened in negative resists. As a result, after developing, positive resists
take up a positive image of the mask (the resist remains on the mask where the
chrome was) and negative resists take up a negative image, as seen in Figure 1.1.
The next step involves the selective removal of the silicon dioxide film, through
an etching process. A typical example would be to immerse the wafer in a bath
of hydrofluoric acid. This will react with the exposed silicon dioxide, but not that
protected by the photoresist, which is, as its name implies, resistant to chemical
attack by the acid. Once the thin film of silicon dioxide has been etched through,
the unwanted photoresist is removed with a solvent, leaving the wafer with the
patterned silicon dioxide layer.
1.2.1 UV E
XPOSURE
S
YSTEMS
The structural dimensions that can be achieved in a photolithographic process are
related to the wavelength of the light employed. When light is incident upon a
narrow aperture, it will be diffracted. As the dimensions of the aperture approach
the wavelength of the incident light, this diffraction becomes significant.
Therefore, for smaller structures, smaller-wavelength light must be used. UV
light has therefore been one of the most convenient forms of illumination to
employ in photolithography. It conveniently interacts with chemical bonds in
various compounds, is relatively easily generated (at longer wavelengths, at
least), and has a relatively small wavelength compared to visible or infrared light
Terminology
Photoetching and photoengraving are terms that have also been used to refer
to photolithographic processes, although they are not commonly used today.
Although photolithography strictly refers to a process that involves light (pho-
tons), it is sometimes used in casual conversation to refer to the general sweep
of lithographic processes. It would be more correct to use the terms microli-
thography, nanolithography, or simply lithography (or lithographic) in such
cases. The term lithography itself refers to printing from a design onto a flat
surface. In addition to UV photolithography, x-ray lithography and e-beam
lithography will also be discussed.
DK3182_C001.fm Page 11 Friday, January 13, 2006 10:57 AM
Copyright © 2006 Taylor & Francis Group, LLC
12
Microengineering, MEMS, and Interfacing: A Practical Guide
(from about 400 nm down to 10 nm, where it merges into the soft x-ray region of
the spectrum). Also, in the upper reaches of the UV spectrum, optics can be
relatively easily fabricated from quartz. UV wavelengths from 426 nm down to
about 248 nm are fairly common.
1.2.1.1 Mask Aligners
Microstructures are typically built up through a series of steps in which thin films
of materials are deposited and selectively etched (patterned), each photolithographic
step, i.e., each pattern, requiring a different mask and each pattern having to be
precisely aligned to the preceding ones. Alignment marks are placed on each
layer of the design in an out-of-the-way area of the mask (i.e., somewhere where
they can easily be found and can fulfill their function but will not interfere with
the function of the finished device). The mask aligner is the tool used to align the
marks on the mask with those existing on the substrate in order to ensure accurate
registration of each layer of the design with the others, as well as to expose the
photoresist through the mask to UV light. Exposure may be through a contact
aligner or a step-and-repeat system.
The contact mask aligner is the system most commonly used in microma-
chining processes because they do not normally need the very small feature sizes
that can be achieved at greater expense and complexity by step-and-repeat sys-
tems. For the contact alignment system, the mask is produced at a 1:1 scale to
the finished design. This will invariably be a single large mask plate with many,
usually several hundred, individual chip designs on it.
The photoresist-coated substrate (silicon wafer, glass sheet, or whatever is
being micromachined) is placed in the aligner and adjusted so that the alignment
marks can be located within the viewer. The mask is introduced into the machine,
and the chrome-patterned face is brought into close approximation with the
photoresist-coated face of the substrate, typically only micrometers apart. The
alignment marks on the mask are located, and the position of the mask is adjusted
so that they register with the alignment marks etched into the substrate. The mask
is then brought into contact with the substrate, final alignment is checked, and
the photoresist is then exposed to a pulse of UV light.
The main advantage of contact photolithography is that relatively inexpensive
mask aligners and optics are required. Furthermore, the entire area of the substrate
is exposed in a single exposure. One advantage of micromachining is that a
number of different devices, or different versions of one device, can be placed
on the same mask for fabrication on the same substrate. This is of considerable
assistance, as MEMS require far more trial-and-error experiments than micro-
electronic circuits. Another advantage of micromachining is that the process of
aligning both sides of the substrate (front and back) is a little easier; specialist
double-sided alignment tools are also available. Double-sided alignment, in which
micromachining is performed on both sides of a flat silicon substrate, is one
feature of MEMS fabrication that is not used in conventional IC manufacture.
Contact photolithography suffers more from wear and tear of the masks than
does step-and-repeat, which uses a projection system to reduce the image of the
mask on the substrate. Additionally, any small damage or irregularities on the
DK3182_C001.fm Page 12 Friday, January 13, 2006 10:57 AM
Copyright © 2006 Taylor & Francis Group, LLC
Photolithography
13
mask are reproduced in the developed photoresist structure. Although the single
exposure tends to reduce the time required for photolithography, the UV intensity
across the substrate may not be uniform if the system is not set up correctly. In
this case, the developed image in the photoresist will not be different across the
wafer, and the process yield will be affected. Finally, one does not have the option
of using grayscale masks when employing contact lithographic techniques.
The wear and tear of masks can be reduced by using contact alignment’s
close relation, proximity alignment (or proximity printing). This proceeds in
almost exactly the same manner as contact alignment, except that the mask is
held at a very small distance from the photoresist. In consequence, the achievable
minimum feature size is less than that possible with contact alignment methods.
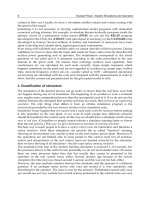
Contact photolithography is contrasted with the step-and-repeat process in
Figure 1.2. Note that the mask face bearing the chrome pattern is the one that is
brought into contact with the photoresist during contact lithography. The mask
plate itself is relatively thick, typically, a few millimeters. If the chrome were not
A Quick Way to Calibrate the Exposure Time in Your Contact Aligner
This method is especially useful when trying out an old system for experi-
mental purposes or trying out new resists, but not of much use if you hit problems
with a calibrated setup. Work out the likely minimum and maximum exposure
times. Then, subtract a bit from the one, and add a bit to the other. Apply resist
to a spare wafer. Now, take a suitable mask with a slot in it (it need not be a
quartz mask, but just something that will fit in the aligner). Starting at one end
of the wafer (near a flat would be a good idea), put your makeshift mask in and
expose it for your minimum exposure time. Now, move the strip up a bit and
expose for a little longer (making sure that you note down each exposure time
used and any other relevant settings). Repeat. Now, develop and examine the
results under a microscope. This is not going to get you very high quality results
but may be sufficient to get you started if you are just trying things out.
FIGURE 1.2
(a) Contact printing exposes the entire wafer at once, whereas (b) in projection
printing a single mask holds the pattern for a single device. This is reduced and projected
onto the coated wafer, which is stepped beneath it and receives a series of exposures.
y
x
(b)(a)
DK3182_C001.fm Page 13 Friday, January 13, 2006 10:57 AM
Copyright © 2006 Taylor & Francis Group, LLC
14
Microengineering, MEMS, and Interfacing: A Practical Guide
directly in contact with the photoresist, the optical effects due to the passage of
UV light through the glass plate, divergence of the source, etc., would reduce the
quality of the image formed in the resist.
The step-and-repeat approach involves the use of a mask that bears a larger
image of the desired pattern — usually the design for only one chip. This is placed
in an optical system that reduces and projects an image of the mask onto the substrate.
After each exposure, the substrate is moved (stepped) to expose the next section.
Reduction will typically be a factor of about ten. In this case, note that a 1-
µ
m
blemish in the mask pattern will be reduced to a 0.1-
µ
m blemish in the photoresist
when using the step-and-repeat system but will remain as a 1-
µ
m structure if a
contact system is used. The step-and-repeat system’s main strength is that it can be
used to produce devices with smaller feature sizes than in the case of the contact
approach, mainly due to the advantages provided by the projection system.
First, because the mask is made at a larger scale than that of the structure to
be produced, it does not necessarily need to be made using a very-high-resolution
technique. That is, for contact lithography with a 1-
µ
m minimum structural
feature size, the mask would have to be made using a process capable of producing
0.1-
µ
m, or better, features in order to get a reasonable reproduction. If the same
structure were to be created using a mask for 10:1 reduction in a projection system,
then the minimum structural feature on the mask would be of 10-
µ
m size. A process
with better than a 1-
µ
m minimum feature size would produce a result of the same
quality as would the contact mask made using the 0.1-
µ
m process.
Furthermore, this gives the designer a chance to control the intensity of the UV
light to specific areas of the photoresist which are exposed by creating grayscale
masks (Figure 1.3). These essentially incorporate meshes of small apertures in the
mask design, such that when the image is reduced, the image of the aperture is
beyond the resolving capacity of the photolithographic system. Thus, instead of
producing a series of islands or gaps in the imaged photoresist, a reduction in the
average intensity of the UV light over the area in proportion to the relative opaque
area of the mask is seen. The exact implications of this and the use it can be put
FIGURE 1.3
An example of a grayscale mask. If the openings in the mask are sufficiently
small, a variation in intensity rather than distinct lines will be produced when UV light
is projected onto the substrate through reducing optics.
Intensity
DK3182_C001.fm Page 14 Friday, January 13, 2006 10:57 AM
Copyright © 2006 Taylor & Francis Group, LLC
Photolithography
15
to depend on the chemistry and nature of the photoresist or the lithography system.
Table 1.1 summarizes the features of contact and projection lithography systems.
1.2.1.2 UV Light Sources
For most micromachining processes involving contact lithography, the UV light
source will be a broad-spectrum mercury arc lamp with a filter placed to restrict
illumination to one of the spectral lines (i or g). Photoresist manufacturers supply
data sheets that provide information about recommended exposure times and
wavelengths. Note that whereas some resists must be exposed to light within a
fairly strict spectrum in order to function correctly, others are available that also
work outside the range of UV wavelengths commonly used.
For very small feature sizes, in particular, the submicrometer feature sizes
typical of the most advanced IC technologies in use today, the excimer laser is
used as the UV source. This is a UV laser with a torch-like beam. This means
that it has to be employed in step-and-repeat processes as it cannot be used to
illuminate the entire substrate at once. The excimer laser has its own place in
micromachining and is discussed in more detail in Chapter 3.
Photoresists and photolithography systems are commonly referenced by the
nature of the UV source: g-line, the 436-nm band of the mercury arc lamp, i line,
the 365-nm band, and deep ultraviolet (DUV) at 248-nm and 193-nm wave-
lengths, in which excimer laser sources are preferred (Table 1.2).
1.2.1.3 Optical Systems
The resolution of an optical system is generally determined by considering its
ability to distinguish between two point sources of light [1,2,3]. This work by
Rayleigh in the 19th century gave rise to the Rayleigh criterion. Roughly stated,
the minimum resolved distance between two peaks depends on the wavelength of
light and the numerical aperture of the focusing optics:
(1.1)
TABLE 1.1
Advantages and Disadvantages of Contact
and Projection Systems
Contact vs. Projection Lithography Systems
Contact Projection
Single exposure
Multiple devices per wafer
Double-sided alignment
Low cost
More uniform light intensity
Small feature sizes
Grayscale masks
Longer mask life
d
NA
= 061.
λ
DK3182_C001.fm Page 15 Friday, January 13, 2006 10:57 AM
Copyright © 2006 Taylor & Francis Group, LLC
Photolithography
17
In the case of contact printing, the distance
s
will be half the thickness of the
photoresist. Note that this can be quite substantial in micromachining applications
(tens of micrometers) and that raised and indented micromachined features can
mean that the surface of the resist may be considerably more rippled or featured
than one normally finds. In the case of proximity printing, one may assume that
the distance between mask and substrate is significantly greater than the thickness
of the resist, so
s
will take this value, and the thickness of the resist may be
neglected. Once again, beware of assumptions that may be invalidated by the
unusual nature of MEMS processing.
As mentioned previously, one of the advantages of contact or proximity
printing is that the entire area of the substrate can be exposed in a single-process
step. Unfortunately UV sources such as the mercury arc lamp appear somewhat
point-like. These, therefore, require special optics to expand and homogenize
(make the intensity uniform across the area of the substrate that is being exposed)
the beam. Somewhat unintuitively, the best results are not provided by collimated
light; a divergence of a few degrees will smooth out peaks that appear in the
intensity towards the edge of the pattern [3]. The optics for a contact aligner are
shown schematically in Figure 1.4.
1.2.1.3.2 Projection Printing
The key parameters for projection printing are derived from the Rayleigh criteria for
resolution and depth of focus (Equation 1.1 and Equation 1.2, respectively; [1,2,4]):
(1.5)
(1.6)
Once again,
k
1
and
k
2
are empirically derived for the process in question. In
practice,
k
1
will be between 0.5 and 1, typically, about 0.7 [1,4], and
k
2
will be
somewhere about 0.5 ([4]; Peckerar et al. suggest that is closer to 1). Reche also
FIGURE 1.4
Contact aligner exposure optics schematic. Alignment is usually performed
through a binocular microscope system, not shown, which focuses at two points near the
center of the wafer. The relative position of the mask and wafer are adjusted, and the
optical components of the aligner are moved out of the way during exposure.
dk
NA
=
1
λ
δ
λ
= k
NA
2
2
Source
Homogenizer
Optics
Mask
Substrate
DK3182_C001.fm Page 17 Friday, January 13, 2006 10:57 AM
Copyright © 2006 Taylor & Francis Group, LLC
18
Microengineering, MEMS, and Interfacing: A Practical Guide
gives the economically practical value of a numerical aperture as being no more than
0.5 for one-to-one projection printing. With reduction optics, it may be increased to
0.6 [1], although economically this would amount to using a production line stepper
around the clock. The optics of a projection system are shown in outline in Figure 1.5.
1.2.1.3.3 Projection and Contact Printing Compared
Working with Equation 1.4, Equation 1.5, and Equation 1.6 and taking values of
0.7, 1, and 1.6 for
k
1
,
k
2
, and
k
3
, respectively, we find, with g-line (436 nm)
exposure for a 1:1 projection system with a numerical aperture of 0.5, the
achievable resolution will be approximately 0.61
µ
m with a depth of field of
1.7
µ
m. This would be adequate for many applications, but consider the situation
in which a 10-
µ
m thick resist is required. A trade-off between depth of field and
resolution can be seen by examining Equation 1.5 and Equation 1.6. For a 10-
µ
m
depth of field (greater, preferably, to accommodate positioning and other errors),
the resolution goes up to about 1.53
µ
m. Note that projection printing would
typically be used for high-resolution printing on thin films of resist.
Using the same numbers, contact printing would give a 3.34-
µ
m resolution
with the 10-
µ
m resist. In this case, we have considered the entire thickness of
the resist film as the separation distance, which will give a worst-case estimate
of resolution. For thin resists, the separation distance can be set to half the
thickness of the resist (implying that the resolution, in this case, is unlikely to be
better than 2.36
µ
m).
If we consider proximity printing with a 50-
µ
m total separation, our achiev-
able resolution increases to 7.47
µ
m, which will be adequate for many microengi-
neering applications.
Typically, thick resists are used as structural elements in MEMS. They may
also be desirable in deep-etching applications, in which a thick resist is required
to withstand long periods spent in the etching apparatus. In the latter situation,
high resolutions can be achieved by the use of a
hard mask
. A thin layer of resist
can be used to pattern an underlying layer of more resilient material for the
etching of the next process stem: a metal film, for instance. This is the hard mask;
the pattern in this would then be transferred to the underlying material during a
long etch process before the hard mask (etch mask) is stripped.
FIGURE 1.5
Schematic outline of a projection printing system.
Source
Homogenizer
Condenser
Mask
Projection lens
Substrate on
movable stage
DK3182_C001.fm Page 18 Friday, January 13, 2006 10:57 AM
Copyright © 2006 Taylor & Francis Group, LLC