Computer Programming for Teens phần 7 pdf
Bạn đang xem bản rút gọn của tài liệu. Xem và tải ngay bản đầy đủ của tài liệu tại đây (399.46 KB, 35 trang )
If we want to add an intervening space, we need to explicitly add it, as in this
example:
greeting = myWord + " " + name;
The addition (+) operator has been programmed to add two strings as well as two
numbers. We say that this operator has been overloaded to do this additional
operation. That means the language has two built-in functions for the addition
sign—one that works for numbers being added and another that works for
strings or characters being added. When the types of the arguments on either side
of the + sign are read, the appropriate function for the + sign is executed. As you
advance in your programming skills, you can learn how to write your own
overloaded operators.
Remember that the computer will know which function to use—it will use the
one that corresponds to the data types that match it. See Figure 11.2.
The workload that the plus sign normally has is to add two numbers. To overload
it is to add another job to its workload—that of concatenation.
The String as an Array 191
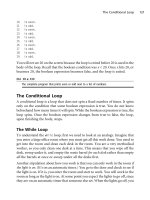
Figure 11.1
Each of the strings is viewed as an array, and the array greeting is seen as a composite of the other two
strings.
Here is another example of concatenation:
String sentence = " My" + " name" + " is" + " John.";
Notice that I added a space before each word so that the string will look good
when it is printed.
cout << sentence << endl;
My name is John.
String Functions
In this section, we will use some of the typical string functions in C++: length,
substring, and find. length is a useful function because it tells you how long your
string is. Of course, you could just count the letters in the word, assuming it is not
user input, and you would have the answer. But strings behave a little differently
than the array. There is often a special character called a null character, which is
put on the end of the string. I think of it as a stop sign, keeping the programmer
from looking for any other letters in the string.
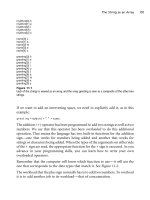
Consider Figure 11.3 where one part shows an array loaded with characters, and
the other shows a string with the same characters but also with the appended null
character.
192 Chapter 11
n
All About Strings
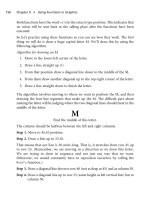
Figure 11.2
A plus sign is shown with arguments on either side of it. Depending on the arguments present, the
appropriate function will be used.
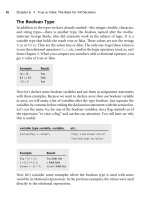
Length and Substring
Most languages have some kind of length function that returns the number of
letters, including any other characters, like blanks, punctuation, and so on. Since
you learned about functions in Chapter 8, we can practice calling that function.
Except for some early languages, like Pascal, strings are treated as objects in C++
and Java. Although you will read about objects in Chapter 15, we will have to
make some minor adjustments in the way we call functions.
With regular functions, you make a call by matching the parameter list with the
appropriate types in your call. Consider the following example.
The heading of a
length function could be as follows:
int length ( String m );
String Functions 193
Figure 11.3
Both strings appear as array s, but the string on the right shows the terminating null character.
So in ord er to call the length function, we would need to send in the appropriate
parameter—a string argument. Here would be the call to the function:
int m = length ( greeting);
Notice that greeting was passed into the function so that length could work on it
to find the length.
Objects use a different way of calling a function, and this is how it would
look:
String greeting = "Hello James." ;
cout << greeting.length( );
/* notice that greeting (the object) is followed by the function name, rather
than being contained in the parentheses. That is the main difference in the
call.*/
So let’s practice calling the length function again.
String firstString = "My cat is " ;
String secondString = "really cool.";
String thirdString = firstString + secondString;
cout << firstString.length( )<< " " << secondString.length( )<< endl;
cout << thirdString.length();
// 10 followed by 12 then 22 (on the next line) are printed.
// remember to count the blanks and punctuation.
Once you know the function heading and more about object syntax, you can
easily call other string functions that the language has. However, we will delay
calls made by objects until we learn more about objects. So all of the functions
that follow have different headings from the exact ones you find for the
String
object. However, the most important thing for you to understand is what each
function does.
Following is an example of a string function that can be useful:
substring.A
substring function will return a section of the string depending on what para-
meters are provided. Taking a subsection of a string is called extracting from the
string. Here are some typical substring headings:
Note
This code is for illustrative purposes so that you will know about the kinds of string functions you
can call. However, you have not learned all of the grammar of C++, so I am presenting them in
this way so that you can understand string functions even though we are not ready to look at the
actual code in C++.
194 Chapter 11
n
All About Strings
// Warning: not Standard C++ code!
String substring ( String m, int start );
String substring (String m, int start, int length);
String substring ( String m, int start, int firstIgnored );
Notice that both functions have the same name, but their parameters differ. This
is another example of overloading, specifically, function overloading. Here we
are overloading a given function rather than the arithmetic operator.
There are a couple of ways the extraction works. The first way is to take the string
and find the first position where you want to start your new string, and then you
extract everything both including and after that position. This is pretty easy to
do. Let’s put objects aside for the moment and look at the following example
where we call the first function:
// Warning: not Standard C++ code!
String m = "headhunter";
String result = substring (m, 4);
/* result will contain "hunter" since the ’h’ of "hunter" is in the 4th slot of the
array.*/
// Recall that all arrays in C++ begin with slot 0.
String word = substring (m, 6);
// word will contain "ter" since t is in slot 6
In the second example, there are two parameters besides the string m: the start and
the length. This function behaves a little differently from the previous
substring
function. The start position still refers to the place where the extraction should
begin, but
length tells how long that new string should be from the starting place.
Here are a couple of examples to demonstrate how this
substring function
works.
// Warning: not Standard C++ code!
String m = "headhunter";
String result = substring ( m, 4, 4);
// result will contain "hunt" since the starting position is 4 followed by
// the length of 4, meaning 4 characters are stored in the new string.
In another example, let’s extract the first part of headhunter, namely, the string
head. This is how we would do that:
// Warning: not standard C++ code!
String m = "headhunter";
String result = substring ( m,0,4);
String Functions 195
// since 0 is the starting position, we extract the h at the beginning and
// show 4 characters.
You can even extract a string of one character. Look at this example:
// Warning: not standard C++ code!
String m = "headhunter";
String result = substring ( m,3,1);
/* since the 3rd slot is the letter d followed by a length of 1, we extract only the
letter d */
The third function has two parameters in addition to the string. The third
parameter, instead of indicating the length of the newly extracted string, indicates
the first slot that will not be part of the extraction. That’s a mouthful! Let’s look at
an example to clarify how this works:
// Warning: not standard C++ code!
String m = "headhunter";
String result = substring ( m,4,8);
/* since 4 is the starting position, we extract from slot 4 through slot 7 because 8
is the first slot we wish to exclude. Result will contain "hunt" */
Here’s another extraction using this same substring function:
// Warning: not standard C++ code!
String m = "headhunter";
String result = substring ( m,2,9);
/* since 2 is the starting position, we extract from slot 2 through slot 8 because 9
is the first slot we wish to exclude. Result will contain "adhunte"
*/
Strings are objects in C++, so it is easier to wait until you learn something about
objects to address how the syntax changes.
Find and CharAt
Just like the previous functions, we can’t really use the precise C++ code to call
them, but at least we can look at what each of these functions does.
The
find function will take a string, call it firstString, and look for the occurrence
of another string, called
otherString, within it.
If it finds
otherString within the firstString string, it will return the slot (the
index) where that string begins. If it does not find the string, it will return –1.
196 Chapter 11
n
All About Strings
Look at this typical find function heading:
// Warning: not Standard C++ code
int find ( String firstString, String otherString);
Let’s look at an example to see how it works.
// Warning: not standard C++ code!
String firstString = "foolhardy";
String otherString = "hard";
int x = find(firstString, otherString);
cout << x << endl;
/* 4 will be printed on the screen. */
In another example, let’s pass in a string that is not in firstString.
// Warning: not standard C++ code!
String firstString = "foolhardy";
String otherString = "day";
int x = find(firstString, otherString);
cout << x << endl;
/* -1 will be printed on the screen. */
Obviously, "day" is not contained in the word "foolhardy", so the negative 1
passed into the x is clearly not an index value, since those values begin at zero.
Note
Negative 1 is a typical value used to indicate that something unusual has happe ned to an array,
and likewise, a string. Arrays usually start with the 0 index and continue through the positive
numbers. The negative 1 as a return value is a clever way of signaling that a problem has
occurred.
String functions are very precise. Words like day and Day will not be considered the
same because of the difference in the d’s. Nor will
day be found within Da y.
charAt is a simple function that allows you to extract a character from a string. It
behaves like the
substring function where the length is always 1. Let’s look at an
example:
// Warning: not standard C++ code!
String m = "foolhardy";
char letter = charAt(m,6);
cout << letter << endl;
/* r will be printed on the screen. */
String Functions 197
charAt is easier to use than the substring function we used previously. Even
easier to use is the following overloaded operator: the brace set.
The Brace Set Operator
The last function we will examine is the brace set, which works directly on a
string. The brace set represents another overloaded operator. We have seen the
brace set before in accessing array elements—
list[5], for example. By over-
loading this operator, we are making the string as accessible as the arrays we
studied. Look at how simple it is to use:
// Warning: not standard C++ code!
String m = "foolhardy";
cout << m[5] << endl;
/* The letter a will be printed on the screen. */
Here’s a better example of the braces at work:
// Warning: not standard C++ code!
String m = "foolhardy";
String otherString = "hard";
for( x = 0; x < m.length( ); x++)
cout << m[x] << endl;
/* Each letter is printed on a separate line. */
Of course, it is easier to just print out a string all at once. But the brace operator
allows you to treat the string like the array type.
Summary
The string is like an array of characters. In any language, there are str ing func-
tions available to you. In C++ and Java, the string is an object, so objects call
functions differently from the way we have studied function calls. We exam ined
typical string functions like
length, substring, find, charAt and two overloaded
operators: + and [ ].
The + allows two strings to be combined or concatenated. The
substring
function extracts a string from another string. length will find the length of the
string—this is the number of characters in the string, including any blanks or
punctuation.
find allows you to find the first occurrence of one string within
another. If the string is not found, a value like –1 will be returned.
charAt extracts
a single character from a string. Finally, the brace set allows the string to be
manipulated in the same way as an array.
198 Chapter 11
n
All About Strings
The Matrix—Before
the Movie
In this chapter, we will examine the matrix, which is an interesting data structure.
It is a two-dimensional holder for variables and is best understood as a grid or
table. You will learn how to assign values to each spot in the matrix as well as
learn how to retrieve values already stored in it. The last thing we will examine is
the diagonal—an important part of the matrix.
In This Chapte r
n The grid of rows and columns
n Loading one row at a time
n Nested for loops
n Manipulating a matrix
n The diagonal of a matrix
The Matrix as a Grid
Now that we have studied the array, it would be good to examine the matrix,
which is the name given to any multi-dimensional array. You might recall from
an algebra II class the word ‘‘matrix.’’ Matrices look like grids. See Figure 12.1.
199
chapter 12
Each slot in the grid has a numbered location, and this is why matrices are a good
place to store data. See Figure 12.2.
Each of the locations is unique because of the row and column, which vary for
each slot. Look at slot 1,1 and think of it as the first member in the first row and
first column. If you look at the slot just to the right of it, it is numbered 1,2. You
can think of this as the second member in the first row. Slot 1,3 is the third
member in the first row. If you skip down to slot 3,1 you can think of this
member as the first member in the third row.
Now let’s give a name to this matrix, just as we gave a name to the arrays we
examined. We could call it
Student. See Figure 12.3 for one interpretation of the
grid. Note that the grid serves to illustrate how the values in a matrix are organized.
Each student is identified by the two numbers, which could represent where they
sit in the class. Student 1,1 is the first student in the first row while Student 2,1 is
the first student in the second row. Then Student 3,2 must be the second student
in the third row. See Figure 12.4.
As mentioned earlier, computers lack imagination. It’s easier to use numbers to
identify elements than individual names.
200 Chapter 12
n
The Matrix—Before the Movie
Figure 12.1
A two-dimensional grid with three rows an d four columns.
Figure 12.2
Each slot has a unique location: its row followed by its column.
Figure 12.3
The grid is shown filled with different students identified by their row and co lumn.
When we studied the array, we looked at each part of the array as a separate
numbered slot with a common name. Do you recall how we called one array
group?
Each of the members were named
group[1], group[2], group[3], group[4],andso
on. The nice thing about the array was that we could easily distinguish among the
different group members because of the subscript attached.
Think of all the friends you have with the same name Mike, for example. I have a
lot of friends named Mike. The way I think of each Mike in my head is to
distinguish each one: I think of the Mike who takes the same math class as I do,
the Mike I work with, the Mike who is my cousin, and the Mike I met over the
summer. In computer programming, these distinctions are made as a matter of
fact and with less description: Mike1, Mike2, Mike3, Mike4, and so on, and these
would be written as follows:
Mike[1]
Mike[2]
Mike[3]
Mike[4]
So the array we talked about previously in Chapter 8 is a nice way of recognizing
that there is a common name for the variable holders, but each holder is also
unique.
The Matrix as a Grid 201
Figure 12.4
Each student is sitting at a different desk and identified by location instead of name.
Before we look at the matrix in computer terms, let’s examine it from the
perspective of algebra.
The Matrix
The matrix is a grid where each slot has a unique location, and the location is
numbered according to where it is in the grid. A matrix is a really nice holder for
data. It allows several values to be stored in one place under a common name that
reminds us that the data is grouped together.
In algebra II, matrices are often used to store coefficients of variables in equa-
tions. The matrix is a great storage facility. It can be used to calculate the
determinant. Whether you have learned this yet or not, the neat thing is that
understanding what a matrix is in computer programming will make it easier for
you to understand its use in algebra.
Let’s revisit the
Student matrix we talked about.
Note
In most computer languages, a matrix has a row 0 and a column 0. We have ignored that to
simplify the discussion. See the programs on the CD for examples of those matrices.
Let’s look at how each member would be named in a computer language.
Name Computer Name
Student 1,1 Student[1][1]
Student 1,2 Student [1][2]
Student 1,3 Student [1][3]
Student 1,4 Student [1][4]
As you can see, the first subscript is 1 and the second changes from 1 to 4. As a
matter of uniformity, the first number represents the row number while the
second number represents the column number. So when you declare a matrix to
the computer (compiler), you tell the computer how many rows and how many
columns your matrix will have using the same brackets we used when we declared
an array.
[3][4]
So now the matrix has three rows and four columns, like we discussed.
202 Chapter 12
n
The Matrix—Before the Movie
In each of the examples that follow, we will make different declarations for
different matrices. It requires a special declaration, just like the array we studied
previously. If you recall with the array, we had to state the name or identifier and
then how many members it would have and what type of data it would hold:
int list [10];
This array is a declaration of 10 members holding integers and all with the
common nam e of
list. The matrix will follow a similar syntax:
int group [6][4];
Here we have a 6 by 4 matrix that will hold integers and will have the name group.
Here’s another example of the
Student matrix we discussed previously:
String Student [3][4];
So the Student matrix has three rows and four columns, and each holder will
contain a string. Think of the string as the name of each student sitting in the
class at the assigned seat.
Consider this example:
double Prices [5][5];
This represents a 5 by 5 matrix with the name Prices and containing doubles
(real numbers).
How Does Storage Work?
So with the previous examples, we have informed the computer what kind of
data holder we need and how many slots of memory we need as well. In the
example with the
Student matrix, the computer has to set aside enough storage to
hold 12 different strings. Each string will take a fixed number of bytes for storage,
so 12 of those strings will take 12 times that number bytes of memory. Recall that
that is the most important reason for declaration of variables: we need to tell the
computer how much memory it should set aside, or allocate, for the data we have.
In the other example, where we declared the
group matrix, we needed to have 24
slots, all with the common name of
group and each holding an integer. If each
integer needs 2 bytes for storage, then 24 of those integers will take 48 bytes of
storage, and the computer will look for 48 sequential free bytes once the
declaration has been made (and the program starts to compile).
The Matrix as a Grid 203
Loading One Row at a Time
Consider this example where we will load the following:
int group[6][4];
We know we have six rows and four columns. Let’s start by loading the first row
only. And, to make things easier, let’s put the same number into each member of
the first row, like this:
Col 1 Col 2 Col 3 Col 4
Row 1
group [1][1] group [1][2] group [1][3] group [1][4]
Data inside 5555
If we were to load the row manually, we would have to write this code:
Row Col
group[1][1] = 5;
group[1][2] = 5;
group[1][3] = 5;
group[1][4] = 5;
So instead of typing each member separately, let’s use a for loop to hit each of the
members in row 1.
Here is the
for loop that will do that.
for (int x = 1; x <= 4; x++ )
{
group[1][x] = 5;
}
Ihaveonlyusedonefor loop just so that we can see that we are only loading
row 1 across. Notice that I referred to the row as
group[1][x].ThereasonIdid
this was because I wanted to stay in row 1, and then move across each of its
columns to load each member in that row. The x represents the changing
column.
It is helpful to keep the classroom seating plan in mind as we work with the
matrix. Let’s try to load all the members who are sitting in row 2, and let’s load
those members with the same number. Let’s put the number 10 into each
member of the second row.
204 Chapter 12
n
The Matrix—Before the Movie
Col 1 Col 2 Col 3 Col 4
Row 2
group[2][1] group[2][2] group[2][3] group[2][4]
Data inside 10 10 10 10
If we were to load the row manually, it would look like this:
Row Col
group[2][1] = 10;
group[2][2] = 10;
group[2][3] = 10;
group[2][4] = 10;
We can now use the same code as before with only a couple of alterations:
changing the row we are interested in loading, as well as the number we want to
store into the matrix.
for(int x = 1; x <= 4; x++ )
{
group[2][x] = 10;
}
On the CD
See each of these examples writte n in Java, which uses the 0 subscript.
Nested For Loops
Before we examine the array further, let’s look at nested for loops, which will
prove very useful in working with a matrix. There are two loops in a nested
for
loop: the inner loop and the outer loop. To understand the two loops better, let’s
examine a bicycle and its gears.
The Bicycle Gear Analogy
Think of the outer and inner loops as gears in a bike. On a 10-speed, you have
two outer gears and five inner gears. You set the outer gear to one of two
choices. The smaller one is for hills, and the bigger one is for flat riding. You
have a choice of five different speeds for the inner gear and two different speeds
fortheoutergear.
Let’s say you want to test all 10 speeds that the bike has. You decide that you will
methodically test them in an organized sequential manner. So you decide to set
Nested For Loops 205
the outer speed to the hill setting, and then try each of the inner gears with that
hill gear.
This is a list of the speeds that you are testing:
The hill gear with the inner gear #1
The hill gear with the inner gear #2
The hill gear with the inner gear #3
The hill gear with the inner gear #4
The hill gear with the inner gear #5
Notice how the hill gear does not change, while the inner gear does change. This
will be important when we look at nested loops. We have methodically exhausted
all of the inner gears with one of the outer gears set. Now if we change the outer
gear to the flat surface gear, we can do the same process again and test five more
speeds on the bike.
This is a list of the rest of the speeds you are testing:
The flat surface gear with the inner gear #1
The flat surface gear with the inner gear #2
The flat surface gear with the inner gear #3
The flat surface gear with the inner gear #4
The flat surface gear with the inner gear #5
Notice how the flat gear doesn’t change at all as we change the inner gears. So for
each outer gear, we used five different choices for the inner gear.
Let’s summarize what the different possibilities for each gear were:
Outer Inner
hill 1,2,3,4,5
flat 1,2,3,4,5
For each outer gear, the inner gear had five different choices. As we test each
choice of the inner gear, we make a complete ‘‘spin’’ through the options. What
do I mean by this? For example, the outer gear was in the hill setting, while the
inner gear spins from 1 through 5.
206 Chapter 12
n
The Matrix—Before the Movie
Applying the Loops
Let’s write some pseudo code to represent the gear settings on the bike. Recall
that pseudo code is not real code—just an approximation of real code.
for ( x = hill setting; x <= flat setting; x++)
for ( y = 1st gear; y < 6; y++)
Test gear.
Look at the preceding code. The outer loop with the variable x will be set to the
hill gear, and then the compiler will enter the inner loop because that is contained
within the body of the x loop. But there is another loop inside the x loop, and that
is the y loop. Since the y loop is completely contained within the x loop, the y
loop will spin completely from 1 to 5. Once the y variable hits 6, the y loop will
stop executing and control will bounce back up to the last statement of the x
loop, x++, where x’s value will change from hill gear to flat gear.
Once the x variable changes and is checked to be valid (that is, the boolean
statement is true), then the y loop is entered again and the y value is set to 1 as it
was the first time.
This is how the other five speeds get set. So now all five speeds will be paired with
the x value of flat gear.
Our next step is to examine a matrix and to use what we call nested
for loops to
load the matrix. The term nested means that we will put one
for loop inside the
other. Before I explain what this does, look at this code:
for ( int x = 1; x <= 5; x++ )
for ( int y = 1; y <= 4; y++)
{
group[x][y] = 5;
}
The loop that we see first is called the outer loop. The loop that is seco nd is called
the inner loop. The way I lik e to thi nk of the outer lo op is that it is the driver of the
inner loop. The outer loop engages the inner loop in the same way that a driver
engages the shift to cause the gears to engage. So let’s watch the computer step by
step to see what I mean when I say that the outer loop controls the inner loop.
for ( int x = 1; x <= 5; x++ )
// the outer loop sets x to the value of 1
//then the inner loop starts to spin:
for ( int y = 1; y <= 4; y++)
Nested For Loops 207
{
group[x][y] = 5;
// remember that x has the value of 1.
}
So the outer loop sets x to 1, and then the inner loop starts to spin. The inner loop
will spin, and y will go from 1 to 4. Look at this chart of values of the variables:
xy
1 no value
11
12
13
14
2
On the last line, we see that x becomes 2, and the inner loop that controls y will
start to spin again. Now look at the chart with the variables:
xy
1 no value
11
12
13
14
2 no value
21
22
23
24
So what happens is the outer loop holds its value, while the inner loop spins
through all its values. The entire execution of both loops looks like this:
xy
1 no value
11
12
13
14
208 Chapter 12
n
The Matrix—Before the Movie
5
y becomes 5, and so the value is too big for the loop condition to be true.
The y loop stops. The x loop then changes its value from 1 to 2 and executes
again.
Because the y loop is inside the x loop, the y loop starts to spin again.
xy
21
22
23
24
5
Notice that y again changes its value to 5, and its boolean condition is not
true.
Also notice that, while the y variable is changing its value, the x value is not
changing at all. This is because the end of the x loop has not been reached. Its
value cannot be increased until all its statements within are executed. Notice that
the statements inside the x loop are the body of the y loop.
xy
3
31
32
33
34
5
4
41
42
43
44
5
5
51
52
Nested For Loops 209
53
54
How to Store Data in a Matrix
Now that our declarations have been made, let’s consider how we might store
data into each slot of the matrix. When we worked with the array, we used a
for
loop to load each slot of the array. We will do the same thing with our matrix,
except that we will need two
for loops to load all the members of the matrix.
for ( int x = 1; x <= 5; x++ )
{
// the outer loop sets x to the value of 1
//then the inner loop starts to spin:
for ( int y = 1; y <= 4; y++)
{
cout << << Please type a value for each slot.";
cin>> group[x][y];
// remember that x has the value of 1.
} // closes the y loop
}// closes the x loop
How to Retrieve Data from a Matrix
Now that we have loaded a matrix, let’s check to see that everything we put into
the matrix got sent in correctly. Let’s start by checking row 1 of the
group matrix
to see if the first row contains 5s.
We want to print out the contents of row 1. These four statements will show row 1.
cout << group[1][1] <<" ";
cout << group[1][2] <<" ";
cout << group[1][3] <<" ";
cout << group[1][4] <<" ";
It will look like this:
5555
Let’s follow the previous code with a line feed and the next four print
statements
cout << endl;
cout << group[2][1] <<" ";
cout << group[2][2] <<" ";
cout << group[2][3] <<" ";
cout << group[2][4] <<" ";
210 Chapter 12
n
The Matrix—Before the Movie
So now all nine lines will produce the following output—the 5s from the first
row, a line feed, and the 10s from the second row.
5555
10 10 10 10
If we had not put the cout << endl statement in the code, all the numbers would
appear on one line like this:
555510101010
Now let’s take the previous code and replace it with two for loops:
for ( int x = 1: x <= 4; x++ )
{
cout << group[1][x] <<" ";
}
cout << endl;
for ( int x = 1: x <= 4; x++ )
{
cout << group[2][x] <<" ";
}
Each loop spins through its row and prints each member. We could write three
additional loops to print the other rows, but it will be easier to employ the nested
loops we studied in the previous section. Look at this code:
for ( int x = 1; x <= 5; x++ )
{
for ( int y = 1; y <= 4; y++)
{
cout << group[x][y]<<" ";
}
cout << endl; //This line feed puts each row on a separate line
}
Manipulating a Matrix
There are many ways to manipulate a matrix once it has been assigned values. We
will look at some examples in this section. One of the main alterations you can
make to a matrix is to change the values in one row or column. Another thing
you can do is work with the diagonal of a matrix. These are a few ways you can
manipulate a matrix.
Manipulating a Matrix 211
The Diagonal
First we need to define a square matrix. As its name suggests, it is a matrix with the
same number of rows and columns, so it looks like a square. The diagonal is the
diagonal line running through it from top-left to bottom-right. See Figure 12.5.
The diagonal members of a matrix are also interesting because of their locations.
Look at the same matrix, but this time look at the locations rather than the
contents. See Figure 12.6.
If you want to access the values along the diagonal of a matrix, you insert a
boolean condition inside the nested
for loop. Consider this example:
for ( int x = 1; x <= 4; x++ )
{
for ( int y = 1; y <= 4; y++)
{
If(x==y)
cout << box[x][y]<< " ";
}
}
212 Chapter 12
n
The Matrix—Before the Movie
Figure 12.5
Each member along the diagonal in this square matrix has the value 1, while the other members have 0.
Figure 12.6
All of the locations of the matrix are given. Notice how the diagonal locations have matching rows and
columns.
Notice that both x and y have an upper limit value, which is 4, indicating that the
matrix is a square matrix. The boolean condition, if x equals y, allows the pro-
grammer to select the member along the diagonal. The other members are
ignored.
How to Change an Individual Row or Column of a Matrix
In order to al ter a particular row or column, you need to spin a loop that holds
that column or row ‘‘fixed.’’ To see what I mean by this, let’s return to a previous
example where we loaded one row, row 1, of the
group matrix. Recall that the
group matrix was a 6 by 4 matrix of integers. This information will be useful when
we change a column instead of a row.
for (int x = 1; x <= 4; x++ )
{
group[1][x] = 5;
}
Notice that the row index, always the first index, is fixed at 1. It is only the
column index that is changing. The x is being used as the variable that controls
the column position. Right now each member of row 1 is being assigned the value 5.
Let’s change the code so that we set all the values in row 1 to have the value 8.
for (int x = 1; x <= 4; x++ )
{
group[1][x] = 8; // we only had to change this line!
}
Let’s say you wanted to change row 4 instead of row 1. We will change the fixed
row from 1 to 4. Here is the code that accomplishes that:
for (int x = 1; x <= 4; x++ )
{
group[4][x] = 10;
}
As you can see, we are assigning the value 10 to all the members of row 4.
Look at the next example where we print all the members of row 5.
for (int x = 1; x <= 4; x++ )
{
cout << group[5][x] <<" ";
}
Manipulating a Matrix 213
The only thing remaining to do is to alter a column. Let’s put the value 4 into all
the slots in column 3. Think of it this way: we need to fix the column and move
down the column from row 1 to row 6. In order to do that, we have to change the
for loop we are using to one that will target all the rows. Remember it is a 6 by 4
matrix. Look at this example:
for (int x = 1; x <= 6; x++ )
{
group[x][3] = 4;
}
Notice that column 3, as the second subscript, does not change. Only the rows
change, since we have to move down the rows in column 3.
Summary
In this chapter, we learned about the matrix, a two-dimensional grid, which has a
certain number of rows and columns. The matrix is ideally assigned through the
use of nested
for loops—one for loop inside of another. By using nested for
loops, we can move through every member of the matrix. We examined the
analogy of the gears on a bicycle, since holding one gear while changing the other
is very similar to the way nested
for loops work. After practicing some examples
of assigning and printing the contents of the matrix, we also manipulated
individual rows and columns as well as the diagonal of a square matrix.
214 Chapter 12
n
The Matrix—Before the Movie
Debugging: More
Important Than You Think
Debugging is the name given to the process of finding errors in programs when
they don’t run. One of the most frustrating experiences in programming is to
spend a lot of time writing a program, then having it run, but not get the results
you expect and wonder why that happened. Before I talk about the necessary
steps in debugging, let’s start by classifying the types of errors that are typically
found in programs. Once you understand the differences among these three
errors, you will better understand how to find the errors associated with each.
In This Chapte r
n Definition of debugging
n Syntax, run-time, and logic errors
n How to debug
n Tracing
Three Types of Errors
There are three types of errors you get when you run a program: syntax errors,
logic errors, and run-time errors. Let’s look at definitions and examples of
each so that we can learn how to eliminate those errors through debugging
techniques.
215
chapter 13