sybex mcitp microsoft windows vista desktop support consumer study guide exam 70 623 phần 3 pptx
Bạn đang xem bản rút gọn của tài liệu. Xem và tải ngay bản đầy đủ của tài liệu tại đây (2.73 MB, 56 trang )
74
Chapter 2
Customizing and Configuring Windows Vista
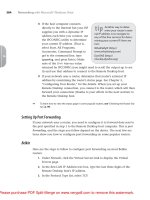
FIGURE 2.32 Service Properties
New to Windows Vista is the startup type Automatic (Delayed Start), which
starts after all Automatic services have started and sets the thread priority to
lowest, which reduces the possibility the service will be interfering with other
tasks. This can be useful for services that need to start automatically but are
not required right at startup, thus reducing the time it takes for the user to
boot the computer and use it. This solves the problem of too many services
starting at once, many of which are not essential to the function of the com-
puter at startup. In the past, this would cause the computer to be unusable
because it was so busy just after booting. Smart use of this option can bring
the user quicker boot times.
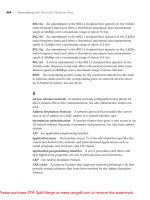
TABLE 2.2 Service Commands
Command Description
net start Starts a service
net stop Stops a service
net pause Pauses a service
net continue Continues a service
65348.book Page 74 Monday, October 22, 2007 4:27 PM
Choosing Settings to Optimize Performance
75
FIGURE 2.33 net start command
There are certain services, such as Event Log and Plug and Play, that cannot
be stopped through the NET commands or the Service snap-in because they
are required to run the operating system.
The Performance Hog
Users at ABC Company were complaining that their computers were running slowly. Allen
investigated the computers and noted that the hard drive was being accessed heavily, even
though there was no apparent activity on the computer. The computers had sufficient RAM
and should have been performing well. After having a look at the Resource Monitor, Allen
noted the disk and CPU were being used heavily by a process called indx.exe and that it was
interfering with other processes. After a quick search, Allen found it was a service set to start
automatically called Media Indexer.
This service installed with a third-party CD authoring software, which used it to index all
media files on the hard disk for its own media player. Since ABC Company users all use Win-
dows Media Player to play media files, and the service wasn’t essential to the CD software,
there seemed to be little gained in keeping the indexer running, so Allen set the service to Dis-
abled. This allowed Allen to keep the CD software in place but disable the performance-zapping
service that was redundant to the Windows Vista search function anyway. After disabling the
service, the computers ran smoothly.
65348.book Page 75 Monday, October 22, 2007 4:27 PM
76
Chapter 2
Customizing and Configuring Windows Vista
Using ReadyBoost
ReadyBoost is a way to increase performance by using a typical USB flash drive or other memory
card technology. It acts as a caching point between your hard disk and your system memory. A
typical memory card is, on average, ten times faster at random reads than a typical hard disk. The
ReadyBoost feature helps load applications faster by keeping data often used, as determined by
the SuperFetch caching technology, in a file on the memory card for fast access.
The SuperFetch memory management system in Windows Vista uses a ReadyBoost flash
drive as a storage point for caching of performance critical data. All data is written simulta-
neously to the file on the flash disk as well as the hard drive, preventing system error if the flash
drive is removed. The file is compressed 2 to 1 and encrypted so the data is not accessible by
others. The performance boost is most noticeable with a user who runs multiple programs
simultaneously or with a user reporting slow performance when opening programs. It also
improves response during power state transitions, such as from hibernate power mode.
The flash drive has to meet certain requirements before it can be used as a ReadyBoost
device. The hardware criteria include the type of device, size, internal speed, and bus speed.
The types of devices include USB flash drives, CompactFlash, Secure Digital (SD), and Mem-
ory Stick on a PCI bus, a PCIe bus, or an SSA bus. Flash drives connected to an external USB
reader are not supported. Flash drives attached to USB 1.0 or USB 1.1 are not supported. USB
flash drives must be USB 2.0 compliant and connected to a USB 2.0 port.
The performance of the flash drive must also meet certain standards before it’s used for
ReadyBoost. At a minimum, it must have 2.5MB-per-second throughput on random reads and
1.75MB-per-second throughput for random writes. There is a specification called Enhanced
for ReadyBoost that confirms a minimum performance of 5MB-per-second random reads and
3MB-per-second random writes. Windows Vista will perform a test of random reads and
writes on the device to check that it meets the minimum requirement. If the device doesn’t meet
the minimum requirement, the ReadyBoost tab or prompt will not be available.
The size of the flash drive determines the cache size that ReadyBoost will create. The
ReadyBoost cache file can be as small as 230MB or as big as 4GB. It’s recommended that the
size of the cache file be at least as big as the amount of physical memory. For example, if the
system has 512MB of system RAM, the ReadyBoost cache file should be at least 512MB too.
Bigger ratios of system memory to ReadyBoost cache will see bigger performance gains. Up to
three times the system memory is recommended.
Some kinds of flash memory have a limited number of write cycles before the
memory is unusable. In effect, too many writes can wear out a flash drive.
ReadyBoost does manage to limit the number of write cycles to reduce occur-
rence of this issue. Most devices will see many years of use without every
experiencing this problem with ReadyBoost.
To use ReadyBoost, just insert a compliant flash drive. An AutoPlay window will open with
the option called Speed Up My System, as shown in Figure 2.34. Click the option and the flash
drive Properties will open to the ReadyBoost tab, as shown in Figure 2.35. Select Use This
Device to make this a ReadyBoost device. You can specify the amount of memory from the
65348.book Page 76 Monday, October 22, 2007 4:27 PM
Choosing Settings to Optimize Performance
77
device to use for the cache file. If you use less than the maximum available you can use the rest
for regular file storage.
FIGURE 2.34 ReadyBoost AutoPlay
FIGURE 2.35 ReadyBoost configuration
If you browse the flash drive, you will see a file called ReadyBoost.sfcache. This is the file
that ReadyBoost saves to and reads from for caching between system memory and the hard
disk. To disable ReadyBoost on this drive and use it for other purposes, just right-click the
drive icon and click Properties. Click the ReadyBoost tab and select Do Not Use This Device.
When you use ReadyBoost, it is expected that the device will be connected to
the computer all the time. Removing the device will not cause any problems,
but it will turn off the performance gain of ReadyBoost. If the ReadyBoost file
still exists on the flash drive, you can just reattach the drive and ReadyBoost
will be enabled again without additional configuration. If you delete the cache
file, ReadyBoost will have to be reenabled.
65348.book Page 77 Monday, October 22, 2007 4:27 PM
78
Chapter 2
Customizing and Configuring Windows Vista
Setting Up and Configuring Windows
Applications
Windows Vista comes with a whole slew of new applications that allow you to do more than
ever before without additional software. Whether you need to set up e-mail, track appoint-
ments, attend meetings, edit a picture, or even create a home movie, Windows Vista has an
application to help you on your way. Additionally, there are even options for accessing files
while you’re away from home and for backing up your files in case the unthinkable happens.
In the following sections, we will look at the tools and utilities in Windows Vista, how to set
up them up, what configuration options are available, and how to decide which applications
a user may need.
Understanding Windows Mail
Windows Mail is used if a user needs to send and receive e-mail, subscribe to newsgroups, or
access Directory Services. Older versions of Windows had Outlook Express, which was actu-
ally a part of Internet Explorer, to accomplish these same tasks. Though similar, you will find
Windows Mail is easier to use and has many more features than its predecessor. Let’s take a
look at the ins and outs of this new application.
Setting Up an E-mail Account
To launch Windows Mail, click Start All Programs Windows Mail. When you open Win-
dows Mail for the time, you are presented with a setup wizard, as shown in Figure 2.36.
This wizard will walk you through some common setup options to get you going with Win-
dows Mail. Let’s take a look at the various settings:
Your Name This first screen asks for your display name; this is the name that will show up
on e-mail you send.
Internet E-mail Address This screen asks you to enter your e-mail address. This should be the
e-mail address that has been assigned to you by your ISP or e-mail provider. For example, if you
are using Gmail from Google.com, you would enter something like
Set Up E-mail Servers This section allows you to enter the details for your incoming and out-
going e-mail servers. For incoming, choose the server type provided by your ISP and enter the
address of the incoming mail server. In our Gmail example, you would select POP3 for the
Incoming E-mail Server Type and enter pop.gmail.com in the Incoming Mail text box. For the
outgoing mail you enter the name of the outgoing server, in our case smtp.gmail.com, and
select Outgoing Server Requires Authentication, if needed. Again, this information will be
provided by your ISP—for Gmail, check this option.
65348.book Page 78 Monday, October 22, 2007 4:27 PM
Setting Up and Configuring Windows Applications
79
FIGURE 2.36 The Windows Mail setup wizard
Internet Mail Logon This screen simply requires that you enter your username and pass-
word for the e-mail account. You can also choose the Remember Password option if you don’t
want Windows Mail to prompt you each time you open it.
Congratulations This final screen offers one option: Do Not Download My E-mail at This
Time. If you select this option, your account will be created and your e-mail will not be
downloaded. By default, this option is not selected and your e-mail will be downloaded
immediately. Click Finish to complete the wizard.
This wizard will complete most of the setup required to connect to a POP3 or IMAP mail-
box. Depending on your provider, you may need to configure some additional options, which
we will look at in the next section.
Before we move on, you need to know how to add an e-mail account to Windows Mail
if you already have an account configured or if you did not complete the wizard when you
first opened Windows Mail. To add an account, select Tools Accounts. This will open
the Internet Accounts dialog box, shown in Figure 2.37. To add a new e-mail account,
click the Add button, which opens the same setup wizard we just discussed. You can add
multiple e-mail accounts, so you can come here to set up your first account or add addi-
tional accounts.
65348.book Page 79 Monday, October 22, 2007 4:27 PM
80
Chapter 2
Customizing and Configuring Windows Vista
FIGURE 2.37 Windows Mail Internet Accounts
Advanced E-mail Account Settings
If you have some other settings you need to configure that weren’t available using the setup
wizard, or you just want to change the behavior of Windows Mail when accessing your e-mail,
you can access the advanced properties from the Internet Accounts dialog box. Launch this
dialog box by clicking Tools Accounts; this will open the same screen seen in Figure 2.37.
Now select the account you need to change and click Properties to open the properties dialog
box for the account you selected. Let’s take a look at the settings on each of the tabs:
General Tab The General tab allows you to enter your personal information and give the
mail account a friendly name. This tab, shown in Figure 2.38, contains the following options:
Mail Account This is the friendly name of the mail account, such as Eric’s Gmail account.
Name This is the same as the name you entered in the setup wizard. The entry you make
here will appear in the From field when you send e-mail.
Organization If you choose, you can enter the name of your organization here.
E-mail Address This is the address that your ISP has assigned you.
Reply Address You can enter a different reply address in this box. When users replay to
your e-mail, their reply will go to this address instead of your actual e-mail address.
Include This Account When Receiving and Sending Mail or Synchronizing This option
enables or disables this profile. When you enable it, Windows Mail will check for and send
e-mail with this account. Additionally, you will be able to synchronize this account with
mobile devices like PDAs.
65348.book Page 80 Monday, October 22, 2007 4:27 PM
Setting Up and Configuring Windows Applications
81
FIGURE 2.38 Windows Mail account properties, General tab
Servers Tab This tab, shown in Figure 2.39, provides you with settings related to your e-mail
servers. These settings should be provided by your ISP.
Incoming Mail This is the name or address of your incoming mail server and should
match the information you provided when you completed the setup wizard.
Outgoing Mail This is the name or address of your outgoing mail server and again should
match the information you provided during setup.
E-mail Username This is the username Windows Mail will use when logging on to your
Incoming mail server. This entry should match the information you provided during setup.
Password This is the password Windows Mail will use when logging on to your incoming
mail server. Again, this should match the information you provided during setup.
Remember Password When this option is enabled, Windows Mail will remember your
password so you won’t have to type it every time you log on to your account.
Log On Using Secure Password Authentication This option tells Windows Mail whether
to use Secure Password Authentication (SPA) when connecting to your mail server. SPA
provides for a more secure logon than just using clear-text usernames and passwords. If
your mail server is using SPA, enable this option. Enabling this option when your mail
server isn’t using it will cause you to be unable to connect to the server.
Outgoing Mail Server This section allows you to configure the logon settings for your
outgoing server. If you select My Server Requires Authentication, you will need to click Set-
tings and provide the logon details in the Logon Information screen, shown in Figure 2.40.
65348.book Page 81 Monday, October 22, 2007 4:27 PM
82
Chapter 2
Customizing and Configuring Windows Vista
Your options are to use the same credentials specified for your incoming server or to specify
a different set of credentials.
Connection Tab This tab, shown in Figure 2.41, has one option: the network connection
that is required to connect to the mail servers. If you select a dial-up or VPN connection, the
connection will be established when you start Windows Mail if it not already connected.
Security Tab The Security tab offers you two options, as shown in Figure 2.42. You can
specify a certificate to use in order to sign messages sent with this account, or you can choose
a certificate to encrypt your messages. These options are advanced features that should only
be used when you are specifically instructed to do so. Configuring digital signing and
encryption is outside the scope of this book.
FIGURE 2.39 Windows Mail account properties, Servers tab
FIGURE 2.40 The outgoing mail server logon information settings
65348.book Page 82 Monday, October 22, 2007 4:27 PM
Setting Up and Configuring Windows Applications
83
FIGURE 2.41 Windows Mail account properties, Connection tab
FIGURE 2.42 Windows Mail account properties, Security tab
65348.book Page 83 Monday, October 22, 2007 4:27 PM
84
Chapter 2
Customizing and Configuring Windows Vista
Advanced Tab The Advanced tab, shown in Figure 2.43, provides access to more options
than were available during the setup wizard. These options allow you to configure ports, SSL,
timeouts, and more. The settings are as follows:
Outgoing Mail This option allows you to specify the port on which to connect to the out-
going server. The default port for SMTP is 25. Under the outgoing mail server port is the
option This Server Requires a Secure Connection (SSL), which enables SSL for the connection
to the outgoing server. Only change these options if your ISP or mail provider requires it.
Incoming Mail This option allows you to specify the port on which to connect to the
incoming server. The default port for POP3 is 110. Under the incoming mail server port is
the option This Server Requires a Secure Connection (SSL), which enables SSL for the con-
nection to the incoming server. Only change these options if your ISP or mail provider
requires it.
Server Timeouts This setting controls how long Windows Mail will wait for a response
from the server before giving up.
Break Apart Messages Larger Than This option allows you to specify a size in KB in
which to break up messages. This can be useful on a slow link. Messages will be broken into
multiple sections, and none will be larger than the size you specify.
Leave a Copy of Messages on Server This option controls whether a copy of each mes-
sage is left on the server after its download to Windows Mail. When enabled, you can also
specify after how many days a message is removed and whether to delete a message from
the server when it has been deleted from the Deleted Items folder in Windows Mail.
FIGURE 2.43 Windows Mail account properties, Advanced tab
65348.book Page 84 Monday, October 22, 2007 4:27 PM
Setting Up and Configuring Windows Applications
85
Remember, most of these settings are only required in certain circumstances. Make sure
that you get a list of all the settings your mail servers require before making changes.
There is a lot more to Windows Mail than just setting up e-mail accounts. The program can
also connect to newsgroups and Directory Services. We aren’t going to provide further details on
these features—just know that Windows Mail is the application that can handle these items.
Understanding Windows Calendar
Windows Calendar is new to Windows Vista. It is a simple application that may look familiar
if you have used Microsoft Outlook (see Figure 2.44).
Using Windows Calendar, users can track appointments and tasks in an easy-to-read inter-
face. Users can even configure reminders to notify them of upcoming tasks or appointments.
Let’s take a quick look at the features available in Windows Calendar.
FIGURE 2.44 Windows Calendar
Creating Appointments
Appointments in Windows Calendar represent real-life appointments, meetings, or events. To
create an appointment, you have several options:
Click New Appointment in the toolbar.
Select File New Appointment.
65348.book Page 85 Monday, October 22, 2007 4:27 PM
86
Chapter 2
Customizing and Configuring Windows Vista
Press Ctrl+N on the keyboard.
Highlight a section of the calendar, right-click, and select New Appointment.
No matter how you choose to create an appointment, a box that represents the appoint-
ment will appear on your calendar and you will see the details of that appointment on the right
side in the Details pane, as shown in Figure 2.45.
FIGURE 2.45 A new appointment in Windows Calendar
You will notice that the name of the appointment is highlighted; this is so you can enter a
meaningful name for the appointment before adjusting the details. The details are fairly self-
explanatory. You can provide a meeting name, location, URL, date, and time; set a reminder;
and even invite other people. All the changes you make in the Details pane are saved to the
appointment in real time.
Creating Tasks
Tasks allow you to build to-do lists in Windows Calendar. These tasks are visible in a list on
the left side of the calendar at the bottom of the navigation pane. Creating a task is just as simple
as creating an appointment, and again you have several options:
Click New Task in the toolbar.
Select File New Task.
65348.book Page 86 Monday, October 22, 2007 4:27 PM
Setting Up and Configuring Windows Applications
87
Press Ctrl+T on the keyboard.
Right-click the task list and select New Task.
You are given the option to enter the task’s name immediately, and the Details pane con-
tains the remainder of the options you can set for the task, as shown in Figure 2.46.
FIGURE 2.46 A new task in Windows Calendar
Again, the details are pretty straightforward. We do need to talk about the Complete flag
on a task. You have two ways to mark a task as complete. First, you can select the task and
check the Complete option in the Details pane. Second, you will notice that there is a check
box to the left of your task in the tasks list, as shown in Figure 2.47. This check box corre-
sponds to the Complete property of the task—you can just check off tasks from the list as you
complete them.
FIGURE 2.47 The task list in Windows Calendar
65348.book Page 87 Monday, October 22, 2007 4:27 PM
88
Chapter 2
Customizing and Configuring Windows Vista
Managing Multiple Calendars
Windows Mail allows you to work with multiple calendars. This gives you the ability, for
example, to have one calendar for your appointments, another for work events, another for
your children’s appointments, and still another for the schedule of your favorite football team.
The sky is the limit when it comes to creating calendars. To make a new calendar, select File
New Calendar or right-click in the calendar list and select New Calendar. The only options
for calendars are name and color. Color controls the color of the appointments as shown on
the calendar. You will see the appointments for all the calendars that are enabled. You enable
a calendar by selecting the check box next to the calendar name in the list. Selecting a calen-
dar makes that calendar the primary one and appointments from other calendars will be
slightly faded, as shown in Figure 2.48.
When working with multiple calendars, you can also create groups to help manage the cal-
endars. You create a group in the same way you create a calendar: select File New Group
or right-click in the calendar list and select New Group. Once you create a group, you can drag
other calendars into the group and view all the calendars in the group as one, as shown in
Figure 2.49. You still have to add appointments to calendars, but a group lets you see all
appointments for all of your kids at once, for example.
FIGURE 2.48 Using multiple calendars in Windows Calendar
65348.book Page 88 Monday, October 22, 2007 4:27 PM
Setting Up and Configuring Windows Applications
89
FIGURE 2.49 Using calendar groups in Windows Calendar
Sharing Calendars
Windows Mail provides the ability to share your calendar with other users. This is done by placing
a copy of your calendar on a file share that other users have access to, which is called publishing
your calendar. To publish your calendar, select Share Publish to open the Publish Calendar dia-
log box, shown in Figure 2.50. The options for publishing are pretty straightforward.
Calendar Name This is the name of the published calendar that other users will see. By
default, this is the same as the name you have given the calendar locally, but you do have the
option to change it.
Location to Publish Calendar This is the path to the location where you want your pub-
lished calendar to reside. This can be on a file share or on an Internet server at your ISP. Make
sure the other users also have access to this location. Your calendar will be saved to this loca-
tion as an .ics file.
FIGURE 2.50 Publishing a calendar in Windows Calendar
65348.book Page 89 Monday, October 22, 2007 4:27 PM
90
Chapter 2
Customizing and Configuring Windows Vista
Automatically Publish Changes Made to This Calendar Selecting this option will cause any
changes you make to be automatically uploaded to the published copy of the calendar. If you
choose you leave this option unselected, you will need to manually sync your calendar if you
want your changes to be visible to others.
Calendar Details to Include This option allows you to select which of the details to include
in your published calendar. Appointments will automatically appear. You can also choose to
include:
Notes
Tasks
Reminders
When you are done setting your publishing options, click Publish. Windows Calendar will
create the shared copy of your calendar in the location you specified. Once this is complete,
you will see a screen telling you that the publication of your calendar was successful. You can
either close the wizard by clicking Finish, or you can send an e-mail to others telling them
about your published calendar by clicking Announce.
Subscribing to a Calendar
Once a calendar has been published, you can subscribe to that calendar so you can see the
changes via your local copy of Windows Calendar. To subscribe to a calendar, click Share
Subscribe and you will be presented with the Subscribe to a Calendar wizard, shown in Fig-
ure 2.51. Enter the path to the calendar and click Next.
FIGURE 2.51 Subscribing to a calendar in Windows Calendar
65348.book Page 90 Monday, October 22, 2007 4:27 PM
Setting Up and Configuring Windows Applications
91
The next screen, shown in Figure 2.52, gives you some options for the shared calendar you
are subscribing to. You can choose the name you want for the calendar on your machine, how
often the calendar will be updated, and whether to include reminders and tasks from the cal-
endar. When you are done, click Finish. The calendar will now show up on your calendar list
just like all your other local calendars.
FIGURE 2.52 Options when subscribing to a published calendar
Understanding Windows Meeting Space
Windows Meeting Space is a brand-new application that ships with Windows Vista. It allows
users to have virtual meetings with many of the same facilities as they would have if meeting
face to face. Previous versions of Windows contained an application called Net Meeting,
which is no longer available, to serve this same purpose. Windows Meeting Space is more full
featured and easier to work with than the older Net Meeting. In this section, we discuss how
to make the most of Windows Meeting Space.
Getting Familiar with Windows Meeting Space
When you first open Windows Meeting Space (Start All Programs Windows Meeting
Space), you will see the main screen, as shown in Figure 2.53. This screen provides you with
three simple options:
Start a New Meeting This option allows you to start a new meeting. When you select this
option, you provide the meeting and a password. Then you will be taken to the meeting that
you just created, as shown in Figure 2.54. We will look at how you run a meeting in the “Run-
ning a Meeting” section.
65348.book Page 91 Monday, October 22, 2007 4:27 PM
92
Chapter 2
Customizing and Configuring Windows Vista
FIGURE 2.53 Windows Meeting Space
FIGURE 2.54 An active meeting in Windows Meeting Space
65348.book Page 92 Monday, October 22, 2007 4:27 PM
Setting Up and Configuring Windows Applications
93
Join a Meeting Near Me This option displays a list of all meetings that are currently in
progress. You can select a meeting to join and enter the password to join the meeting.
Open an Invitation File Meeting organizers can choose to not publish their meeting in the
Join a Meeting Near Me list, in which case they will need to send you an invitation file so you
can join the meeting. Selecting this option allows you to find the invitation file they sent you.
Running a Meeting
Once you start a meeting, you have several options for running it. You can see a list of attend-
ees in your meeting on the right side of the screen. You can invite other people, share an appli-
cation or your desktop, or add handouts to the meeting.
To invite people to your meeting, click Invite on the toolbar. This will open a list of people
who are in the same subnet and who can be invited to your meeting, as shown in Figure 2.55.
If the user you want to invite isn’t on the list, you can also click Invite Others to create and send
an invitation file.
FIGURE 2.55 Invite people to a meeting in Windows Meeting Space
If you want to share an application, a document, or the desktop with other attendees, click
Share on the toolbar. This will open the Start a Shared Session window, where you can select
one of the running programs, a document, or the desktop to share. Select the item you wish
to share and click Share. It may take a minute, but the other attendees of your meeting should
see the item you are sharing in their meeting space, as shown in Figure 2.56.
65348.book Page 93 Monday, October 22, 2007 4:27 PM
94
Chapter 2
Customizing and Configuring Windows Vista
FIGURE 2.56 Sharing an application in Windows Meeting Space
As you can see, users get a mini-view of your entire desktop but only the portion of the
desktop containing the shared application or document is visible. Of course, if you share the
entire desktop, everything is visible. The view can be expanded to full screen, and other par-
ticipants can request to take control of the shared application. Keep in mind that if you open
another application on top of a shared application, it will cover the shared application and
participants will be unable to see that portion.
Finally, you can add handouts to a meeting. To add handouts, click Add on the toolbar and
browse for the file you want to add. It will be displayed in the handouts section in Windows
Meeting Space. All participants will have access to open the files you attached as handouts.
When your meeting is over, click Meeting Leave Meeting. You will be prompted to save
handouts, if there were any, and then you will exit the meeting. Other participants can con-
tinue to meet until everyone has left the meeting, at which time the meeting will end and no
longer be available in the Join a Meeting Near Me list.
Understanding Windows Movie Maker
Windows Movie Maker allows you to import your video and edit video to make home movies.
Movie Maker is a fairly complex application, so we are only to touch on the basics here. To
launch Window Movie Maker, click Start All Programs Window Movie Maker. The main
screen of Window Movie Maker is shown in Figure 2.57.
65348.book Page 94 Monday, October 22, 2007 4:27 PM
Setting Up and Configuring Windows Applications
95
FIGURE 2.57 Windows Movie Maker
The application is broken down into several sections, each providing you with access to dif-
ferent components of Windows Movie Maker. Let’s look briefly at each of these sections:
Tasks The tasks list on the left side allows you to perform different tasks in Movie Maker.
These tasks are broken into three categories. First, you have access to Import tasks, which
allows you to add video, pictures, or music to your movie project. Video can be added from
a file or imported directly from your camcorder. We will look at how to import video from
your camcorder in Chapter 3. Next, you have tasks related to editing your project. You can
choose to work with imported media, effects, transitions, or titles or credits. Finally, you have
tasks related to publishing your video for others to view.
Contents The Contents pane is the center section of Windows Movie Maker, which shows
you all the imported media, effects, or transitions available for your use. You control which
items show up here with the edit tasks. You can add these contents to your movie by dragging
them to the filmstrip, which we will talk about next.
Storyboard The Storyboard, across the bottom of Windows Movie Maker, is the heart of
your project. This is where you add video, pictures, music, effects, and so forth. The items in
the Storyboard make up your actual movie as it will look when you are done editing.
65348.book Page 95 Monday, October 22, 2007 4:27 PM
96
Chapter 2
Customizing and Configuring Windows Vista
Preview Monitor The Preview Monitor allows you to view your imported media or your
entire project as it exists in the Storyboard. This is great for previewing portions of your video
without having to compile the whole thing. Using the Preview Monitor, you can play with
effects and transitions and quickly see how they look.
When you’re done creating your movie, you can publish it to media or just as a file. To pub-
lish your movie, click the Publish Movie button on the toolbar. You will be presented with sev-
eral options for how you want to publish your movie:
This Computer
DVD
Recordable CD
Digital Video Camera
No matter which option you choose, Windows Movie Maker will finalize your project by
pulling all the pieces together and saving the movie to the media you selected. As we said,
there is a lot you can do with Windows Movie Maker, but we aren’t going to cover all that
in this book. The options are pretty straightforward should you want to investigate the
application further.
Understanding Windows Photo Gallery
Windows Photo Gallery is the center of the photo world in Windows Vista. Using it, you can
manage your photos and make some minor edits. To launch Windows Photo Gallery, click
Start All Programs Windows Photo Gallery, and you should see a screen similar to that
in Figure 2.58.
The Windows Photo Gallery screen is broken down into four major parts. On the left side
you can browse your photo collection using the navigation pane based on tag, date taken, rat-
ing, and folder location. This makes it easy to find the specific photo or photos you are looking
for. In the center of the screen are thumbnails of the pictures that match your criteria from the
navigation pane. The right side provides details on the selected photo, including the names and
any tags that may be assigned to the photo in the info pane. Finally, the toolbar across the top
of the screen provides easy access to many of the functions you can perform inside Windows
Photo Gallery.
Tagging Images
A tag is a text-based descriptor that you want to be common to photos that contain common
elements. Tags can be helpful when you later want to find your pictures. What you create a
tag, the text is completely up to you; it can be a person’s name, like Evan, or an event, like
Evan’s Birthday. Windows Photo Gallery provides several easy ways for you to tag pictures.
You can right-click a picture and select Add Tags, or click the Add Tags button in the info
65348.book Page 96 Monday, October 22, 2007 4:27 PM
Setting Up and Configuring Windows Applications
97
pane. Either of these methods will present you with a text box into which you can type the
desired tag. Additionally, you can drag and drop a photo onto the tag listed in the navigation
pane. With either method you can tag one or more photos at the same time.
Once all your photos are tagged, you can easily find them again by choosing the appropri-
ate tag in the navigation pane. If you have never tagged your photos in the past, the initial tag-
ging effort can be large, but it’s worth the effort in terms of being able to easily find photos.
Once you are all caught up, you can use the recently imported category in Windows Photo
Gallery to see the newest photos and apply tags after you import. Also, as you will learn in
Chapter 3,you can add tags to photos as you import them into Windows Photo Gallery.
FIGURE 2.58 Windows Photo Gallery
Editing Pictures
While not a fully featured photo-editing application like Photoshop, Windows Photo Gallery
does offer you some functionality in the way of photo editing. Mostly you are able to make
little tweaks to improve your photos. You access the editing tools by clicking Fix on the tool-
bar. This opens a list of editing tools, as shown in Figure 2.59.
65348.book Page 97 Monday, October 22, 2007 4:27 PM
98
Chapter 2
Customizing and Configuring Windows Vista
FIGURE 2.59 Windows Photo Gallery Fix tools
The tools available to you within Windows Photo Gallery for editing are as follows:
Auto Adjust lets you make adjustments from all categories in an attempt to automatically
fix any problems.
Adjust Exposure allows you to make adjustments to the picture’s brightness and
contrast.
Adjust Color allows you to modify the picture’s color temperature, tint, and
saturation.
Crop Picture allows you to select a smaller section of the photo and toss out the unselected
portion.
Fix Red Eye is a handy tool for removing annoying red eye from your photographs.
In addition, Windows Photo Gallery allows you to rotate images to obtain the correct ori-
entation. This is done with the Rotate Clockwise and Rotate Counterclockwise buttons at the
bottom of the screen, as shown in Figure 2.60.
Windows Photo Gallery also offers options to e-mail photos and to burn pictures to disc,
either as a data disk or a video DVD. Access these options via the E-mail and Burn button on
the toolbar.
65348.book Page 98 Monday, October 22, 2007 4:27 PM