Musculoskeletal problems and injuries - part 8 pot
Bạn đang xem bản rút gọn của tài liệu. Xem và tải ngay bản đầy đủ của tài liệu tại đây (466.57 KB, 31 trang )
11. Care of Acute Lacerations 235
Phase Three: Maturation (Remodeling) Phase
The wound continues to undergo remodeling for 18 to 24 months, dur-
ing which time collagen synthesis continues and retraction occurs.
Normally during this time the scar becomes softer and less conspicu-
ous. The prominent color of the scar gradually fades, resulting in a hue
consistent with the surrounding skin. Aberrations of the maturation
process can result in an unsightly scar such as a keloid. Such scars are
due to a combination of inherited tendencies and extrinsic factors of
the wound. Proper technique in wound care and repair minimizes the
extrinsic contribution to keloid formation. If it is necessary to revise an
unsightly scar, the ideal delay is 18 months or more after the initial
repair.
Anesthesia
Under most circumstances it is preferable to anesthetize the wound
prior to preparation for closure. Before applying anesthesia, the
wound is inspected using a slow, gentle, aseptic technique to ascertain
the extent of injury including an assessment of the neurovascular
supply. At this time a decision is made to refer the patient if the com-
plexity of the wound warrants consultation.
Topical Agents
When appropriate, topical anesthesia is ideal, as pain can be relieved
without causing more discomfort or anxiety. Small lacerations may be
closed without additional medications.
PAC (Pontocaine/Adrenaline/Cocaine) and
TAC (Tetracaine/Adrenaline/Cocaine)
Pontocaine or tetracaine 2%/aqueous epinephrine (adrenaline)
1:1000/cocaine (PAC) is the most commonly used topical agent.
3,4
It may
be prepared in a 100-mL volume by mixing 25 mL of 2% tetracaine, 50
mL of 1:1000 aqueous epinephrine, 11.8 g of cocaine, and sterile normal
saline to a volume of 100 mL.
Placing a saturated pledget over the wound for 5 to 15 minutes often
provides adequate local anesthesia. Blanching of the skin beyond the
margin of the wound allows an estimation of adequate anesthesia.
Further anesthesia may be applied by injection if necessary.
Emla
Emla is a commercially available preparation of 2.5% lidocaine/
2.5% prilocaine in a buffered vehicle. It is squeezed onto the skin sur-
face and covered with an occlusive dressing. Its efficacy is similar to
that of TAC, but it takes nearly twice as long to anesthetize the skin
(30 minutes). The same guideline of skin blanching applies to the use
of Emla.
Ethyl Chloride
A highly volatile fluid, ethyl chloride comes in commercially pre-
pared glass bottles with a sprayer lid. This fluid can be sprayed onto
the skin surface by inverting the bottle and pressing the lid. The flam-
mable fluid chills the skin rapidly. The agent may be applied until skin
frosting occurs. It provides brief anesthesia, allowing immediate
placement of a needle without causing additional pain.
Injectable Agents
Lidocaine
Lidocaine produces moderate duration of anesthesia (about 1–2
hours) when used in a 1% or 2% solution. When mixed with
1:100,000 aqueous epinephrine, the anesthetic effect is prolonged
(2–6 hours), and there is a local vasoconstrictive effect. Any anes-
thetic mixed with epinephrine should be used with caution on fingers,
toes, ears, nose, or the penis to avoid risk of ischemia and subsequent
necrosis. Occasional toxicity occurs with lidocaine, but most reac-
tions are due to inadvertent intravascular injection. Manifestations of
toxicity include tinnitus, numbness, confusion, and rarely progression
to coma. True allergic reactions are unusual.
It is possible to reduce the discomfort of lidocaine injection by
buffering the solution with the addition of sterile sodium bicarbon-
ate.
5–8
A solution of 9 mL of lidocaine plus 1 mL of sodium bicar-
bonate (44 mEq/50 mL) is less painful to inject but provides the same
level of anesthesia as the unbuffered solution. It is also possible to
buffer other injectable agents including those with epinephrine.
However, epinephrine is unstable at a pH above 5.5 and is commer-
cially prepared in solutions below that pH. Therefore, any buffered
local anesthetic with epinephrine must be used within a short time
of preparation.
9
Warming a buffered solution to body temperature
provides additional reduction of the pain of injection. Buffering
also appears to increase the antibacterial properties of anesthetic
solutions.
10
236 Bryan J. Campbell and Douglas J. Campbell
Additional Agents
Mepivacaine (Carbocaine) produces longer anesthesia than lidocaine
(about 45–90 minutes). It is not used with epinephrine. Reactions are
similar to those seen with lidocaine. Procaine (Novocain) works quickly
but has a short duration (usually less than 30–45 minutes). It has a wide
safety margin and may be used with epinephrine. Bupivacaine
(Marcaine) is the longest-acting local anesthetic (approximately 6–8
hours). It is often used for nerve blocks or may be mixed with lidocaine
for problems that take longer to repair. It is also useful for injecting into
a wound to provide postprocedural pain relief. It may be mixed with
epinephrine and is available in 0.25%, 0.50%, and 0.75% solutions.
Diphenhydramine
Diphenhydramine (Benadryl) may also be used as an injectable anes-
thetic.
11
It is somewhat more painful to inject than lidocaine but has
an efficacy similar to that of lidocaine. Diphenhydramine may be pre-
pared in a 0.5% solution by mixing a 1-mL vial of 50 mg diphenhy-
dramine with 9 mL of saline. This solution is useful when a patient
claims an allergy to all injectable anesthetics.
Anesthetic Methods
Infiltration Blocks
Infiltration blocks are useful for most laceration repairs. The wound is
infiltrated by multiple injections into the skin and subcutaneous tis-
sue. Using a long needle and a fan technique decreases the number of
injection sites and therefore decreases the pain to the patient. Using a
27-gauge or smaller needle to inject through the open wound margin
also minimizes the patient’s discomfort, as does moving from an anes-
thetized area slowly toward the unanesthetized tissue.
Field Blocks
Field blocks result in similar pain control but may distort the wound
margin less and are useful where accurate wound approximation is nec-
essary (e.g., the vermillion border). The area around the wound is
injected in a series of wheals completely around the wound, thereby
blocking the cutaneous nerve supply to the laceration. This technique is
more time-consuming but produces longer-lasting anesthesia. Another
option to reduce the initial pain of the injection is to produce a small
wheal using buffered sterile water and then injecting the anesthetic
through the wheal. The buffered water has a brief anesthetic action.
11. Care of Acute Lacerations 237
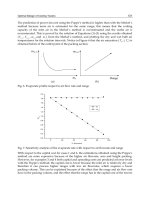
Nerve Blocks
Nerve blocks are most commonly effected by injecting a nerve prox-
imal to the injury site. The most frequent use of this technique is the
digital block performed by injecting anesthetic into the webbing
between the digits at the metacarpophalangeal joint on each side of
the digit (Fig. 11.2). Mouth and tongue lacerations are repairable
using dental blocks. It is useful to receive practical instruction in such
blocks from a dental colleague.
Sedation
The Task Force on Sedation and Analgesia by Non Anesthesiologists
12
provides excellent protocols for sedative use by family physicians.
Under adequate observation sedative agents can help the doctor deal
238 Bryan J. Campbell and Douglas J. Campbell
Injection sites and
infiltration zone
for digital nerve
block
Injection sites,
common digital
nerve blocks
Fig. 11.2. Digital nerve block.
with difficult patients. For all agents described herein, it is imperative
that there be appropriate monitoring and that adequate resuscitation
equipment be readily available. The welfare of the patient is of prime
concern, and such medications should not be used solely for the
provider’s convenience.
Ketamine
Ketamine is a phencyclidine derivative. It provides a dissociative state
resulting in a trancelike condition and may provide amnesia for the
procedure. Ketamine can be administered by many routes, but the
most practical for laceration repair is the oral method. It usually
results in significant analgesia without hypotension, decreased heart
rate, or decreased respiratory drive. The use of proper monitoring and
the availability of resuscitation equipment is mandatory. Oral keta-
mine can be prepared by adding 2.5 mL of ketamine hydrochloride
injection (100 mg/mL) to 7.5 mL of flavored syrup. It is then given at
a dose of 10 mg/kg. Sedation occurs over 20 to 45 minutes after inges-
tion. The most common side effects include nystagmus, random
extremity movements, and vomiting during the recovery stage.
13
Midazolam (Versed)
Midazolam is a benzodiazepine with typical class effects of hypnosis,
amnesia, and anxiety reduction. It is readily absorbed and has a short
elimination half-life. It may be given as a single dose via the nasal,
oral, rectal, or parenteral route. The rectal route is useful when the
patient is combative. A cooperative patient prefers oral or nasal
administration (oral dose 0.5 mg/kg; nasal dose 0.25 mg/kg, by nasal
drops). Injectable midazolam is used to make a solution that may be
given orally or nasally. The drug should be made into a 5 mg/mL solu-
tion. For oral use it may be added to punch or apple juice to improve
the taste. The maximum dose for children by any route is 8 mg.
For rectal administration, a 6-French (F) feeding tube is attached to
an angiocath connected to a 5-mL syringe. The lubricated catheter is
then inserted into the rectum and the drug injected followed by a
syringe full of air to propel the medication into the rectum. The tube is
then withdrawn and the patient’s buttocks are held together for approx-
imately 1 minute. The dose is 0.45 mg/kg by this route. The medication
may begin to work as soon as 10 minutes after administration. Side
effects may be delayed, so the patient should be observed for at least an
hour as the duration of a single dose lasts about an hour. Some burning
can occur when the nasal route is used. Inconsolable agitation may
11. Care of Acute Lacerations 239
appear regardless of the route of administration. This side effect of agi-
tated crying resolves after several hours. Vomiting may also occur.
12,14,15
Fentanyl
Fentanyl is a powerful synthetic opioid that produces rapid, short-last-
ing sedation and analgesia. Like other opioids, its effects are
reversible, and it has limited cardiovascular effects. Although it can be
given in many forms, oral transmucosal fentanyl citrate (OTFC) is
available commercially in a lollipop (Fentanyl Oralet). This drug,
commonly used as an preanesthetic medication, is available in three
dosage forms (200, 300, and 400 mg). The dose for adults is 5 mg/kg
to a maximum of 400 mg regardless of weight. Pediatric dosages
begin at 5 mg/kg to a maximum of 15 mg/kg or 400 mg (whichever is
less). Children weighing less than 15 kg should not receive fentanyl.
OTFC effects are apparent 5 to 10 minutes after sucking the Oralet.
The maximum effect is usually achieved about 30 minutes after use,
but effects may persist for several hours. Side effects are common but
usually minor. About half of patients develop transient pruritus, 15%
notice dizziness, and at least one third develop vomiting. The most
dangerous effect is hypoventilation, which can be fatal.
12,16,17
Oversedation or respiratory depression responds to naloxone.
Nitrous Oxide
Nitrous oxide is a rapid-acting anesthetic that works within 3 to 5
minutes with a similar duration after cessation of administration.
18
Commercial equipment is available to deliver a mixture of nitrous
oxide and oxygen at various ratios (usually 30–50% N
2
O/50–70%
O
2
). Side effects include nausea in about 10% to 15% of patients with
occasional emesis. The efficacy of nitrous oxide is known to be vari-
able. Although some patients object to the use of the mask, many
patients prefer using a specially designed self-administration mask.
Nitrous oxide can cause expansion of gas-filled body pockets, and for
that reason it should not be used in patients with head injuries, pneu-
mothoraces, bowel obstructions, or middle ear effusions.
Wound Preparation
Proper preparation of a wound can improve the success of aestheti-
cally acceptable healing. The wound should be closed as soon as pos-
sible, although most lacerations heal well if closed within 24 hours
240 Bryan J. Campbell and Douglas J. Campbell
after the injury. After anesthesia, proper cleansing should be accom-
plished by wiping, scrubbing, and irrigating with normal saline using
a large syringe with or without a 22-gauge needle, which produces
enough velocity to clean most wounds. Antiseptic soaps such as hexa-
chlorophene (pHisoHex), chlorhexidine gluconate (Hibiclens), or
povidone-iodine (Betadine) can also be used, but one should be aware
that all of these cleansing agents with the exception of normal saline
will delay wound healing to some extent by destroying fibroblasts and
leukocytes as well as bacteria. Sterile scrub brushes may be useful for
cleaning grossly contaminated lesions.
After washing and irrigation, the area is draped with sterile towels
to create a clean field. The wound is then explored using sterile tech-
nique to confirm the depth of injury, ascertain whether injury to
underlying tissue has occurred, rule out the presence of any foreign
body, and determine the adequacy of anesthesia. After examination,
debridement is performed if necessary.
Debridement is the process of converting an irregular dirty wound
to a clean one with smooth edges. Wound margins that are crushed,
mangled, or devitalized are excised unless it is unwise to do so. Tissue
in areas such as the lip or eyelid should be removed with extreme cau-
tion. It is pointless to increase the deformity when a somewhat imper-
fect scar can provide a more functional result. If a considerable
amount of tissue has been crushed, initial removal of all the damaged
tissue may result in undesirable function (such as would occur if the
skin over a joint were removed). Such injuries should be closed
loosely using subcutaneous absorbable sutures. The scar can be
revised later if necessary.
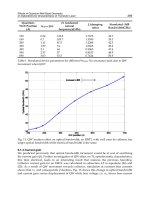
The initial incision is made with a scalpel followed by excision with
a pair of sharp tissue scissors. The edges should be perpendicular to the
skin surface or even slightly undercut to facilitate eversion of the skin
margins (Fig. 11.3). In hairy areas incisions should parallel the hair
shafts to minimize the likelihood of hairless areas around the healed
wound (Fig. 11.4).
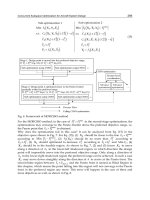
After debridement the skin edges are held together to see if it
is possible to approximate them with minimal tension. Generally, it is
necessary to undermine the skin to achieve greater mobility of the sur-
face by releasing some of the subcutaneous skin attachments that pre-
vent the skin from sliding (Fig. 11.5). This step takes place in the
subcutaneous layer and can be done with a scalpel or scissors. The
wound is then undermined circumferentially about 4 to 5 mm from
the edge of the margin. The undermining should be equal across the
wound and widest where the skin needs to move the most, usually the
center of the cut.
11. Care of Acute Lacerations 241
Hemostasis can be accomplished most easily by simple pressure on
the wound site for 5 to 10 minutes. If pressure is unsuccessful, bleed-
ers may be carefully cauterized or ligated. Cautery or ligation can hin-
der healing if large amounts of tissue are damaged. Small vessels can
be controlled with absorbable suture if necessary, but large arterial
242 Bryan J. Campbell and Douglas J. Campbell
Fig. 11.3. Slight undercutting of the wound edges facilitates
slight eversion of the wound edge.
Fig. 11.4. Parallel debridement in a hairy area avoids damaging
hair follicles.
bleeders may need to be controlled with permanent ligature if it is
possible to do so without compromising the distal circulation. If ooz-
ing persists, the wound is closed with a drain (e.g., a sterile rubber
band or Penrose drain) left in the wound several days. An overlying
pressure dressing minimizes bleeding. Advancing the drain every
other day permits healing with minimal hematoma formation.
Wound Closure
Suture options are listed in Table 11.1. Absorbable materials are grad-
ually broken down and absorbed by tissue; nonabsorbable sutures are
made from chemicals that are encapsulated by the body and thus iso-
lated from tissue. Monofilament sutures are less irritating to tissue but
are more difficult to handle and require more knots than braided
sutures. Stitches placed through the epidermis are done with nonab-
sorbable materials to minimize the tissue reactivity that occurs with
absorbable stitches. Reverse cutting needles in a three-eighths or one-
half circle design are available in various sizes for each type of suture.
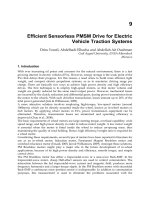
A well-closed wound has three characteristics: the margins are
approximated without tension, the tissue layers are accurately aligned,
and dead space is eliminated. Deep stitches are placed in layers that
hold the suture, such as the fat–fascial junction or the derma–fat
11. Care of Acute Lacerations 243
Fig. 11.5. Undermining the subdermal layer facilitates closure.
244 Bryan J. Campbell and Douglas J. Campbell
Table 11.1. Common Suture Materials
Suture Advantages Disadvantages
Absorbable
Catgut Inexpensive Low tensile strength
Strength lasts 4–5 days
High tissue reactivity
Chromic catgut Inexpensive Moderate tensile strength and reactivity
Polyglycolic acid (Dexon) Low tissue reactivity Moderately difficult to handle
Polyglactic acid (Vicryl) Easy handling Occasional “spitting” of suture due to absorption
Good tensile strength delay
Polyglyconate (Maxon) Easy handling Expensive
Good tensile strength
Nonabsorbable
Silk Handles well Low tensile strength
Moderately inexpensive High tissue reactivity
Increased infection rate
Nylon (Ethilon, Dermilon) High tensile strength Difficult to handle; slippery, so many knots needed
Minimal tissue reactivity
Inexpensive
Polypropylene (Proline SurgiPro) No tissue reaction Expensive
Stretches, accommodates swelling
Braided polyester (Mersilene, Handles well Tissue drag if uncoated
Ethiflex) Knots secure Expensive
Polybutester (Novofil) Elastic, accommodates swelling Expensive
and retraction
junction. A buried knot technique is the preferred method for placing
deep sutures. Deep sutures provide most of the strength of the repair,
and skin sutures approximate the skin margins and improve the cos-
metic result (Fig. 11.6).
Suture Techniques
19–21
Simple Interrupted Stitch
A simple interrupted stitch is placed by passing the needle through the
skin surface at right angles, placing the suture as wide as it is deep.
The goal is to place sutures that slightly evert the edge of the wound
(Fig. 11.7). This maneuver produces a slightly raised scar that recedes
during the remodeling stage of healing and leaves a smooth scar. The
opposite margin is approximated using a mirror image of the first
placement. Following the natural radius of the curved needle places
the suture in such a way as to evert the wound margin. It can be mod-
ified to correctly approximate the margins when the wound edges are
asymmetric
1
(Fig. 11.8). Occasionally a wound exhibits excessively
everted margins. By reversing the usual approach and taking a stitch
that is wider at the top than at the base, the wound can be inverted,
11. Care of Acute Lacerations 245
Deep tissue
Subcutaneous
tissue
Dermis
Epidermis
Fig. 11.6. Layer closure showing sutures in the epidermis, at the
dermal–epidermal junction, and at the dermal–fat junction.
improving the cosmetic appearance (Fig. 11.9). A useful general rule
is that the entrance and exit points should be 2 mm from the margin
for facial wounds but may be farther apart on other surfaces.
1,2
The
open-loop knot (Fig. 11.10) avoids placing the suture under excessive
tension and facilitates removal of the stitch. The first throw of the knot
246 Bryan J. Campbell and Douglas J. Campbell
Fig. 11.7. Simple interrupted suture with placement to facilitate
wound eversion.
Fig. 11.8. Placement of suture in an asymmetric wound.
with two loops (“surgeon’s knot”) is placed with just enough tension
to approximate the wound margin. The second throw, a single loop, is
tied, leaving a little space so no additional tension is placed on the first
loop. Subsequent throws can be tightened snugly without increasing
tension on the wound edge. Pulling all the knots to the same side of
11. Care of Acute Lacerations 247
Fig. 11.9. Suture placement in a wound with everted edges.
Fig. 11.10. Model of skin showing surgeon’s knot.
the wound makes suture removal easier and improves the aesthetics of
the repair. As a rule of thumb one should put at least the same num-
ber of knots of a monofilament suture as the size of the ligature (e.g.,
five knots with 5-0 suture).
Vertical or Horizontal Mattress Suture
The vertical mattress suture promotes eversion and is useful where thick
layers are encountered or tension exists. Two techniques may be used.
The classic method first places the deep stitch and closes with the super-
ficial stitch (Fig. 11.11). The short-hand method
22
is performed by plac-
ing the shallow stitch first, pulling up on the suture (tenting the skin),
and then placing the deeper stitch. Horizontal mattress sutures also have
the advantage of needing fewer knots to cover the same area.
Intracuticular Running Suture
The intracuticular running suture, utilizing a nonabsorbable suture,
can be used where there is minimal skin tension. It results in minimal
scarring without suture marks. Controlled tissue apposition is difficult
with this method, but it is a popular technique because of the cosmetic
result. The suture ends do not need to be tied but can be taped in place
under slight tension (Fig. 11.12).
Three-Point Mattress Suture
The three-point or corner stitch is used to minimize the possibility of
vascular necrosis of the tip of a V-shaped wound. The needle is inserted
248 Bryan J. Campbell and Douglas J. Campbell
Fig. 11.11. Vertical mattress suture.
11. Care of Acute Lacerations 249
into the skin of the wound edge on one side of the wound opposite the
flap near the apex of the wound (Fig. 11.13A,B). The suture is placed
at the mid-dermis level, brought across the wound, and placed trans-
versely at the same level through the apex of the flap. It is then brought
across the wound and returned at the same level on the opposite side of
the V parallel to the point of entry. The suture is then tied, drawing the
tip of the wound into position without compromising the blood supply
(Fig. 11.13C). This method can also be used for stellate injuries where
multiple tips can be approximated in purse-string fashion.
Running or Continuous Stitch
The running stitch is useful in situations where speed is important
(e.g., a field emergency) because individual knots do not have to be
Fig. 11.12. Intracuticular running stitch.
tied. It is appropriate for use on scalp lacerations especially, because
it is good for hemostasis. The continuous method does not allow fine
control of wound margins (Fig. 11.14).
Specific Circumstances
Lacerations Across a Landmark
Lacerations that involve prominent anatomic features or landmarks,
such as the vermilion border of the lip or the eyebrow, require special
consideration. Commonly a laceration is closed from one end to the
other, but in special situations it is advisable to place a retention stitch
(a simple or vertical mattress stitch) to reapproximate the landmark
border accurately. The remainder of the wound can then be closed by
an appropriate method. If the retention stitch is under significant ten-
sion when the repair seems complete, it should be removed and
replaced.
Beveled Lacerations
A frequently seen injury, the beveled laceration, tempts the physician to
close it as it is; but the undercut flap may not heal well owing to dis-
ruption of the blood supply. The margins of the wound should be mod-
ified, as shown in Figure 11.15. The edges are squared, undermined,
and closed in layers.
250 Bryan J. Campbell and Douglas J. Campbell
ABC
Fig. 11.13. Three-point stitch. (A) Three-dimensional view show-
ing suture placement. (B) Schematic view. (C) Finished stitch.
Dog Ears
Dog ear, a common problem, results from wound closure where the sides
of the laceration are unequal. One side bunches up, and a mound of skin
occurs. It also occurs when an elliptical wound is closed in the center, leav-
ing excess tissue at each end. To correct the problem, the dog ear is tented
up with a skin hook, and a linear incision is made along one side. The
excess triangle is then grasped at the tip and a second linear incision is
made (Fig. 11.16). This maneuver allows closure in a single line.
Complex Lacerations
A wound may occur with unequal sides with a hump of tissue on one
side. This lump of tissue may be excised using the technique described
above for removal of dog ears. The triangular defect is then closed
11. Care of Acute Lacerations 251
Fig. 11.14. Running stitch.
using a modification of the three-point mattress suture, the four-point
technique shown in Figure 11.17. The resulting closure forms a
T-shaped repair.
Finger Injuries
Amputated Fingertip
If the area of the fingertip amputation is less than 1 cm
2
, the wound
can be handled by careful cleansing, proper dressings, and subsequent
healing by secondary intention. If the wound is larger, the complexity
of treatment increases. If the amputation is beveled dorsally and dis-
tally, a conservative approach without suturing or grafting usually
results in good healing. An unfavorable angle requires more extensive
repair.
23
Referral to a plastic or hand surgeon may be warranted.
Nail Bed Injuries
Nail bed injuries can be managed by saving the nail and reapproximat-
ing nail matrix lacerations with fine absorbable sutures. It may be
necessary to remove the nail to repair an underlying nail bed tear. The
252 Bryan J. Campbell and Douglas J. Campbell
AB
C
Incisions
Fig. 11.15. Closure of beveled wound. (A) Squaring beveled
edges. (B) Undermining the fat layer. (C) Layered closure.
nail may then be replaced and held in position with several sutures,
allowing the nail to act as a splint.
Alternatives to Suturing
Suturing has been an effective method for closing wounds for cen-
turies, but options for skin suturing are now available. They may even
represent more cost-effective methods of wound closure.
Staples
One option is the use of skin staples, which have been used for years
in the operating room as the final closure for a variety of incisions.
11. Care of Acute Lacerations 253
A
Excess tissue
C
B
D
Fig. 11.16. Correction of “dog ear.” (A) Excess tissue at end of
repair. (B) Tenting the dog ear and first incision. (C) Pulling flap
across initial incision and position of second incision. (D)
Appearance of final closure.
Typically, staples are used on the skin in wounds that would be closed
in a straight line. The skin is closed with staples after other layers are
closed by suturing. The most significant advantage to the use of sta-
ples is the decreased time necessary to close the skin. An assistant
may be required to position the skin properly.
24
Adhesives
The most commonly used tissue glues are related to cyanoacrylate
ester known as Super Glue. Tissue glues for superficial wounds have
the advantage of rapid closure, minimal physical and emotional
trauma to the patient, and absence of a foreign body in the wound.
25,26
They may also be less expensive to use than traditional methods of
closure.
Histoacryl Blue, a.k.a. Dermabond, has been commercially avail-
able in Canada since 1975, and in the United States since 1998. It is
a safe alternative to suturing.
27–29
Hemostasis must be achieved before
applying the glue. Because some chemicals used for hemostasis such
as Monsel’s solution will prevent the adhesive from bonding to the
skin, care must be taken to avoid skin edges. Layered closure may be
accomplished using deep, absorbable sutures combined with surface
adhesive. Surface sutures combined with adhesive should be avoided
because the adhesive will bond to the suture material and may make
removing the suture difficult. Only wounds that are under no tension
are appropriate for adhesive, such as those on the face and the fore-
arm. Even wounds such as on the foot are generally inappropriate
because as soon as the patient steps on the foot, pressure is generated
across the wound edges. After hemostasis and cleansing have been
achieved, the wound must be approximated using gloved fingers
(vinyl is preferred to latex because it also does not bond as well to the
254 Bryan J. Campbell and Douglas J. Campbell
A
B
A
C
C
A
B
B
AB
C
Fig. 11.17. Unequal wound closure. (A) Sides of laceration are
unequal. (B) Excise triangle of tissue on longer side. (C) T-closure
showing four-point suture.
adhesive), metal instruments (preferred because metal also does not
bond as tightly to the adhesive as plastic), Steri-strips, or specially
manufactured closure devices for use with the adhesive. With the
wound edges approximated, a layer of adhesive is applied to the top
of the wound and allowed to polymerize. Two more subsequent lay-
ers should be applied and allowed to polymerize over the top of the
first layer. Some other precautions: because the adhesive is a very
thin, runny liquid, gravity should be utilized to keep the liquid from
running into eyes, the wound itself, or other undesirable areas. If
adhesive does get on the cornea in spite of appropriate precautions, it
does not cause damage and may be left to come off within a few days.
Other methods to control the spread of the adhesive include sponges
lightly moistened with saline or use of Vaseline around the area. The
patient should be instructed to keep the wound dry for 7 to 10 days
because moisture weakens the bonding strength. The wound can
either be left open to air, or covered with a clean bandage. Petroleum-
based products should also be avoided on the adhesive because of a
weakening effect.
Postrepair Management
Most wounds should be protected during the first 1 to 2 days after repair.
Frequently a commercial bandage may be used; but when the wound is
still oozing, a pressure dressing is applied. The initial layer is a nonstick
gauze dressing available in sterile packages, such as Adaptic, Telfa, or
Xeroderm. A gauze pad is then placed and held in place by roller gauze,
elastic wrap, or elastic tape. Dressings are removed and the wound reex-
amined at 48 to 72 hours. If a drain has been placed, it should be
advanced every 24 to 48 hours. If the wound is under significant tension,
additional support can be achieved by using Steri-Strips or bulky sup-
portive dressings, including splints that are commercially available or
custom-made from plaster or fiberglass.
Most wounds can be left open after the first 24 to 48 hours. It is
important to remove wet dressings from a repair because the skin mac-
eration that results from them may prolong healing and increase the
risk of infection. Initial epithelialization takes place during the first
24 hours, and thereafter it is permissible to wash the wound briefly.
Lacerations on the scalp and face may be impractical to bandage.
Wounds should be reexamined for infection or hematoma formation
after 2 to 3 days if there is any concern at the time of repair.
Contaminated wounds and wounds that have been open longer than
24 hours have a greater likelihood of infection.
11. Care of Acute Lacerations 255
Timing of suture removal should be individualized, based on wound
location, the mechanical stress placed on the repair, and the tension of
the closure. Facial sutures should be removed within 3 to 5 days to min-
imize the possibility of suture tracks. Supporting the repair with Steri-
Strips may decrease the likelihood of dehiscence. In skin areas that are
not highly mobile (e.g., the back or extremities) sutures are left in place
for 7 to 10 days. On fingers, palms, soles, and over joints, the sutures
remain in place at least 10 to 14 days and sometimes longer. Table 11.2
is a sample instruction sheet for patients.
Concurrent Therapy
Preventing infection is an important aspect of laceration treatment.
Puncture wounds and bites usually should not be closed because the
risk of infection negates the advantage of closure. Dog bites can usu-
ally be safely closed, however. Sometimes a gaping puncture wound
on the face requires closure for cosmetic reasons despite the risk of
infection.
Antibiotic Usage
Antibiotic prophylaxis is probably not helpful in most circumstances
unless given in sufficient quantity to obtain good tissue levels while
256 Bryan J. Campbell and Douglas J. Campbell
Table 11.2. Instructions for Patients
1. Keep wound dressings clean and dry. Protect dressings from mois-
ture when bathing.
2. If the dressing gets wet, remove it and reapply a clean, dry dressing.
3. Remove the dressing after 2 days and reapply every 2 days unless
instructed otherwise.
4. If any of the following signs appear, contact your physician or clinic
immediately.
A. Wound becomes red, warm, swollen, or tender.
B. Wound begins to drain.
C. Red streaks appear near the wound or up the arm or leg.
D. Tender lumps appear in the armpit or groin.
E. Chills or fever occur.
5. Because of your particular injury the doctor would like your wound
check in ______ days.
6. Please return for removal of your stitches in _______ days.
7. You received the following vaccinations:
A. Tetanus toxoid ______
B. DT (diphtheria/tetanus) ______
C. DPT (diphtheria/pertussis/tetanus) ______
the wound is still open. If extensive repair is necessary, intravenous
antibiotics should be started during wound closure. Animal and
human bite wounds are often treated by post-closure antibiotics. The
efficacy of this practice remains controversial, but antibiotics are
often given because of the extensive contamination that occurs with
bite wounds, especially those from cats. Amoxicillin-clavulanate cov-
ers the typical bacteria of bite wounds. Doxycycline and ceftriaxone
are alternative medications.
29
Tetanus Prophylaxis
Tetanus prophylaxis is a crucial part of the care of the lacerated
patient; it is imperative that the immunization status of the patient be
documented. Patients most likely to be inadequately immunized are
the elderly, who may have never received a primary series. Table 11.3
is a summary of the guide published by the Centers for Disease
Control and Prevention. Whenever passive immunity is required,
human tetanus immune globulin (TIg) is preferred. The usual dose of
TIg is 500 units IM. Tetanus toxoid and TIg should be given through
separate needles at separate sites.
30,31
11. Care of Acute Lacerations 257
Table 11.3. Guide to Tetanus Prophylaxis During Routine Wound
Management
History of adsorbed Clean, minor wounds All other wounds
a
tetanus
toxoid (doses) Td
b
TIg Td
b
TIg
Unknown or Ͻ3 Yes No Yes Yes
ՆThree
c
No
d
No No
e
No
a
Such as, but not limited to, wounds contaminated with dirt, feces, soil,
and saliva; puncture wounds; avulsions; and wounds resulting from mis-
siles, crushing, burns, and frostbite.
b
For children Ͻ7 years old; DPT (DT if pertussis vaccine is contraindi-
cated) is preferred to tetanus toxoid alone. For persons Ն7 years of age
Td is preferred to tetanus toxoid alone.
c
If only three doses of fluid toxoid have been received, a fourth dose of
toxoid, preferably an adsorbed toxoid, is given.
d
Yes, if Ͼ10 years since last dose.
e
Yes, if Ͼ5 years since last dose. (More frequent boosters are not needed
and can accentuate side effects.)
Td ϭ tetanus-diphtheria toxoid; TIg ϭ tetanus immune globulin; DPT ϭ
diphtheria/pertussis/tetanus.
References
1. Brietenbach KL, Bergera JJ. Principles and techniques of primary wound
closure. Prim Care 1986;13:411–31.
2. Snell G. Laceration repair. In: Pfenninger JL, Fowler GC, eds.
Procedures for primary care physicians. St. Louis: Mosby, 1994;12–19.
3. Bonadio WA, Wagner V. Efficacy of TAC topical anesthetic for repair of
pediatric lacerations. Am J Dis Child 1988;142:203–5.
4. Hegenbarth MA, Altieri MF, Hawk WH, Green A, Ochsenschlager DW,
O’Donnell R. Comparison of topical tetracaine, adrenaline, and cocaine
anesthesia with lidocaine infiltration for repair of lacerations in children.
Ann Emerg Med 1990;19:63–7.
5. Matsumoto AH, Reifsnyder AC, Hartwell GD, Angle JF, Selby JB,
Tegtmeyer CJ. Reducing the discomfort of lidocaine administration
through pH buffering. J Vasc Interv Radiol 1994;5:171–5.
6. Bartfield JM, Ford DT, Homer PJ. Buffered versus plain lidocaine for
digital nerve blocks. Ann Emerg Med 1993;22:216–19.
7. Mader TJ, Playe SJ, Garb JL. Reducing the pain of local anesthetic infil-
tration: warming and buffering have a synergistic effect. Ann Emerg Med
1994;23:550–4.
8. Brogan BX Jr, Giarrusso E, Hollander JE, Cassara G, Mararnga MC,
Thode HC. Comparison of plain, warmed, and buffered lidocaine for
anesthesia of traumatic wounds. Ann Emerg Med 1995;26:121–5.
9. Murakami CS, Odland PB, Ross BK. Buffered local anesthetics and epi-
nephrine degradation. J Dermatol Surg Oncol 1994;20:192–5.
10. Thompson KD, Welykyj S, Massa MC. Antibacterial activity of lidocaine
in combination with a bicarbonate buffer. J Dermatol Surg Oncol
1993;19:216–20.
11. Ernst AA, Marvez-Valls E, Mall G, Patterson J, Xie X, Weiss SJ. 1%
lidocaine versus 0.5% diphenhydramine for local anesthesia in minor lac-
eration repair. Ann Emerg Med 1994;23:1328–32.
12. Task Force on Sedation and Analgesia by Non-Anesthesiologists.
Practical guidelines for sedation and analgesia by non-anesthesiologists.
Anesthesiology 1996;84:459–71.
13. Qureshi FA, Mellis PT, McFadden MA. Efficacy of oral ketamine for
providing sedation and analgesia to children requiring laceration repair.
Pediatr Emerg Care 1995;11:93–7.
14. Connors K, Terndrup TE. Nasal versus oral midazolam for sedation of
anxious children undergoing laceration repair. Ann Emerg Med
1994;24:1074–9.
15. Shane SA, Fuchs SM, Khine H. Efficacy of rectal midazolam for the
sedation of preschool children undergoing laceration repair. Ann Emerg
Med 1994;24:1065–73.
16. Schutzman SA, Burg J, Liebelt E, et al. Oral transmucosal fentanyl cit-
rate for the premedication of children undergoing laceration repair. Ann
Emerg Med 1994;24:1059–64.
17. Clinical considerations in the use of fentanyl Oralet. North Chicago, IL:
Abbott Laboratories, 1995;1–16.
18. Gamis AS, Knapp JF, Glenski JA. Nitrous oxide analgesia in a pediatric
emergency department. Ann Emerg Med 1989;18:177–81.
258 Bryan J. Campbell and Douglas J. Campbell
19. Moy RL, Lee A, Zolka A. Commonly used suture materials in skin sur-
gery. Am Fam Physician 1991;44:2123–8.
20. Epperson WJ. Suture selection. In: Pfenninger JL, Fowler GC, eds.
Procedures for primary care physicians. St. Louis: Mosby, 1994;3–6.
21. Moy RL, Waldman B, Hein DW. A review of sutures and suturing tech-
niques. J Dermatol Surg Oncol 1992;18:785–95.
22. Jones JS, Gartner M, Drew G, Pack S. The shorthand vertical mattress
stitch: evaluation of a new suture technique. Am J Emerg Med 1993;11:
483–5.
23. Ditmars DM Jr. Finger tip and nail bed injuries. Occup Med 1989;4:
449–61.
24. Edlich RF, Thacker JG, Silloway RF, Morgan RF, Rodeheaver GT.
Scientific basis of skin staple closure. In: Haval Mutaz B, ed. Advances
in plastic and reconstructive surgery. Chicago: Year Book, 1986;233–71.
25. Osmond MH, Klassen TP, Quinn JV. Economic comparison of a tissue
adhesive and suturing in the repair of pediatric facial lacerations.
J Pediatr 1995;126(6):892–5.
26. Quinn JV, Drzewiecki A, Li MM, et al. A randomized, controlled trial
comparing tissue adhesive with suturing in the repair of pediatric facial
lacerations. Ann Emerg Med 1993;22:1130–5.
27. Applebaum JS, Zalut T, Applebaum D. The use of tissue adhesive for
traumatic laceration repair in the emergency department. Ann Emerg
Med 1993;22:1190–2.
28. Fisher AA. Reactions to cyanoacrylate adhesives: “instant glue.” Cutis
1995:18–22,46,58.
29. Lewis KT, Stiles M. Management of cat and dog bites. Am Fam
Physician 1995;52:479–85.
30. Centers for Disease Control. Tetanus prophylaxis during routine wound
management. MMWR 1991;40(RR-10):1–28.
31. Richardson JP, Knight AL. The management and prevention of tetanus.
J Emerg Med 1993;11:737–42.
11. Care of Acute Lacerations 259