ASP.NET 2.0 Instant Results phần 2 pptx
Bạn đang xem bản rút gọn của tài liệu. Xem và tải ngay bản đầy đủ của tài liệu tại đây (994.81 KB, 54 trang )
It gets its data from the ObjectDataSource control ObjectDataSource1, which in turn connects to the
Contact class’s GetContactByFirstLetter() shared method:
<asp:ObjectDataSource ID=”ObjectDataSource1” runat=”server”
SelectMethod=”GetContactsByFirstLetter”
TypeName=”Contact” DeleteMethod=”DeleteContact”>
<SelectParameters>
<asp:SessionParameter DefaultValue=”6” Name=”DiaryId”
SessionField=”DiaryId” Type=”Int32” />
<asp:Parameter Name=”FirstLetterOfSurname” Type=”Char” />
</SelectParameters>
<DeleteParameters>
<asp:ControlParameter ControlID=”GridView1” Name=”ContactId”
PropertyName=”SelectedValue”
Type=”Int64” />
</DeleteParameters>
</asp:ObjectDataSource>
The ObjectDataSource control’s DeleteMethod parameter is also hooked to the Contact class’s
DeleteContact. The GridView control has been set to show a link to delete each contact, and it’s this
method that does the actual deleting:
Public Shared Sub DeleteContact(ByVal ContactId As Long)
Dim diaryDBConn As New SqlConnection(conString)
Dim sqlString As String = “DeleteContact”
Dim sqlCmd As New SqlCommand(sqlString, diaryDBConn)
sqlCmd.CommandType = CommandType.StoredProcedure
sqlCmd.Parameters.AddWithValue(“@ContactId”, ContactId)
diaryDBConn.Open()
sqlCmd.ExecuteNonQuery()
diaryDBConn.Close()
sqlCmd = Nothing
diaryDBConn = Nothing
End Sub
The GridView also includes an Edit link, which when clicked navigates the user to the EditContact.aspx
page:
<asp:HyperLinkField DataNavigateUrlFields=”ContactId”
DataNavigateUrlFormatString=”~/SecureDiary/EditContact.aspx?ContactId={0}”
Text=”Edit” />
The corresponding ContactId is passed in the URL as URL data.
Adding a new user involves clicking the Add Contact link on the YourContacts.aspx page. This takes
you to a basic form for adding contact information such as name, e-mail, phone number, and so on. This
page and the EditContact.aspx page are identical in operation except for one important detail: The
EditContact.aspx page retrieves the details of the contact to be edited using the
Contact class. This hap-
pens in the
Page_Load event:
33
The Online Diary and Organizer
04_749516 ch01.qxp 2/10/06 9:11 PM Page 33
Protected Sub Page_Load(ByVal sender As Object, ByVal e As System.EventArgs)
Handles Me.Load
If IsPostBack Then
Dim currentContact As New
Contact(CLng(Request.QueryString(“ContactId”)))
currentContact.FirstName = firstNameTextBox.Text
currentContact.LastName = lastNameTextBox.Text
currentContact.AddressLine1 = addressLine1TextBox.Text
currentContact.City = cityTextBox.Text
currentContact.PostalCode = postalCodeTextBox.Text
currentContact.State = stateTextBox.Text
currentContact.Telephone = telephoneTextBox.Text
currentContact.MobilePhone = mobilePhoneTextBox.Text
currentContact.Email = emailTextBox.Text
currentContact.SaveContact()
currentContact = Nothing
Response.Redirect(“YourContacts.aspx”)
Else
Dim currentContact As New
Contact(CLng(Request.QueryString(“ContactId”)))
firstNameTextBox.Text = currentContact.FirstName
lastNameTextBox.Text = currentContact.LastName
addressLine1TextBox.Text = currentContact.AddressLine1
cityTextBox.Text = currentContact.City
postalCodeTextBox.Text = currentContact.PostalCode
stateTextBox.Text = currentContact.State
telephoneTextBox.Text = currentContact.Telephone
mobilePhoneTextBox.Text = currentContact.MobilePhone
emailTextBox.Text = currentContact.Email
currentContact = Nothing
End If
End Sub
The If statement determines whether this is a postback (the form has been submitted to itself) or
whether the page has just been loaded. If it’s a postback, you need to save the data and then move back
to the main contacts section. If it’s a new page load, it’s necessary to create a new
Contact object, and
use the data from that to populate the form fields with the contact information.
The AddContact.aspx page is identical except there’s no need to populate with existing contact data,
because a new contact has no prior data!
Setting up the Online Diary
One of the great things about ASP.NET 2.0 is how easy it is to set up web applications created on one
machine onto another. To install the application on your PC, simply copy the entire directory and files
from the accompanying CD-ROM (or download it from
www.wrox.com) onto a directory on your PC
(for example,
C:\Websites). In VWD, all you have to do is choose File➪Open Web Site and browse to
the folder where you copied the files. Then press F5 to run it.
34
Chapter 1
04_749516 ch01.qxp 2/10/06 9:11 PM Page 34
Alternatively, if you have IIS installed make the OnlineDiary directory you copied over a virtual direc-
tory and then simply browse to SignOn.aspx.
To find out how to modify the Online Diary application, visit
www.wrox.com and download this chapter’s
code, or you can grab it from the companion CD-ROM in the back of the book.
Summary
In this chapter you’ve seen how to create a fully functioning diary and contacts management system, all
with only a little code thanks to ASP.NET 2.0’s new controls and functionality. The new security controls
in particular help save a lot of time and coding. In this chapter they’ve been used to create users and
login control. However, they can also help provide a lot more functionality like creating different types
of user roles, which then allows you to specify what users can and cannot do based on their role. Or you
can let users determine the look and feel of their pages using their account details and ASP.NET 2.0’s
new login and role controls.
Another great control you discovered in this chapter is the
ObjectDataSource control. In the past data
source controls have made life nice and easy. But they were quick and dirty, which meant poor code
design, and you had to wave goodbye to a three-tier architecture. Now with the
ObjectDataSource
control you can have quick and dirty and three-tier architecture — great news for creating easily main-
tainable, well-designed projects.
In the next chapter you will be creating a file sharing project and learning some more about ASP.NET 2.0’s
great new features.
35
The Online Diary and Organizer
04_749516 ch01.qxp 2/10/06 9:11 PM Page 35
04_749516 ch01.qxp 2/10/06 9:11 PM Page 36
2
Wrox File Share
If you have ever tried to send a large e-mail attachment and failed, you’re not alone. The idea that
you can attach a file or document to an e-mail message and send it over the Internet is a revolutionary
concept in the history of computer technology. But not so fast! In order to send a document over the
Internet, your Internet connection has to be fast enough to upload the file. In addition, the file has to
be small enough to pass through the Internet connection before a timeout event occurs. If an Internet
service provider decides that there is a limit on the size of files that can be transferred over the
connection they provide, your e-mail capabilities may be greatly hindered. Furthermore, e-mail
attachments can take up space on the server where they reside, and must be treated carefully. Some
of the popular e-mail providers have to balance millions of e-mail users, and must create file storage
policies that are fair and reasonable. Most of the time, there are limits to the size of e-mail attachments
allowed to be sent through the e-mail server. Some providers allow for e-mail attachments up to
10MB; other providers allow for files even larger. This phenomenon has caused problems over the
years because users are not able to send large files to their coworkers and friends over an Internet
connection. What’s a user to do?
A solution to the conundrum of sending large e-mail attachments is to use a go-between web site—
commonly known as a file share—that acts as an online file repository. The web site can send out a
notification as to the file being sent to the server and provide a clickable link for the user to click and
prompt to download the file. In this way, you’re not actually sending an e-mail message, but rather
uploading a file tool web site for propagation. This solution has been copied many times over by
many different web sites. This chapter, then, uses the file share as an opportunity to demonstrate
some of the new and powerful features in ASP.NET 2.0.
The essential features of the Wrox File Share include the following:
❑ The capability to upload a file to the web site, specifying which e-mail address to send the
file to via an e-mail hyperlink for downloading the file.
❑ Sending an e-mail automatically to the recipient, with the custom message and hyperlink
to the download file.
❑ The option to change the text content of the automatically sent e-mail, using specific variables
for the values of the sender, recipient, hyperlink, and a custom message to the recipient.
05_749516 ch02.qxp 2/10/06 9:11 PM Page 37
❑ The capability to specify SMTP server information and e-mail account information as a configu-
ration entry rather than a hard-coded value.
❑ The capability to change the look and feel of the entire web site by simply modifying one entry
in a configuration file.
This chapter also analyzes the various components that make up the web site, including the specific con-
trols that ship with the ASP.NET 2.0 development environments. These controls include the following:
❑
Login control
❑
PasswordRecovery control
❑
LoginStatus control
❑
Menu control
❑
SiteMapDataSource control
❑ Themes
❑
FileUpload control
The section “File Share Design” explores the design of the application in great detail. This includes the
essential elements of involvement with regard to the technology and structure of the web site, as well as
the various classes involved, a detailed look at all of the members of each class, and an explanation
regarding the database tables and their relationships and values.
The section titled “Code and Code Explanation” focuses on the code of each class or module of importance.
Some areas of focus include the WebForms used to upload files to the system, inserting data into the
database tables.
The final section reviews how to extract and customize the Wrox File Share in a development environment,
and how to install it to production.
Using the Wrox File Share
Using the Wrox File Share is extremely easy and naturally intuitive. The web site has only a few functional
areas, because its purpose in life is simply to upload files and send e-mails.
If the Wrox File Share web site has been successfully installed (refer to the section “Setting up the Project”
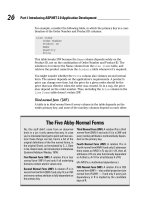
later in this chapter), you can browse to view the site by going to
http://localhost/fileshare. The
screen shown in Figure 2-1 appears.
At the top of the menu are several links to choose from:
❑ Home
❑ About
❑ Contact Us
❑ Admin
38
Chapter 2
05_749516 ch02.qxp 2/10/06 9:11 PM Page 38
Figure 2-1
On the homepage, a total of three steps are required to send a large file to the site. The steps are to capture
the recipient’s e-mail address, the actual file, a comment or message to the recipient, and, optionally, the
e-mail address of the sender. Once these fields have been completed, clicking the Send button performs
the upload and sends the e-mail.
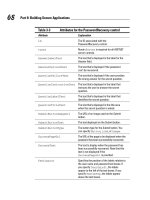
An example of an e-mail sent to a recipient is shown in Figure 2-2.
This e-mail contains a hyperlink that streams via HTTP the file originally sent to the recipient.
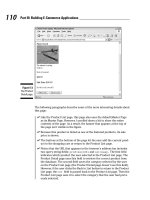
Upon clicking the hyperlink, the dialog box depicted in Figure 2-3 appears.
Clicking Save opens the window’s Save As dialog box, prompting you to select a location and filename.
This completes the task of sending a very large file to an e-mail recipient through a file share.
When you click the Admin link in the main menu, you are brought to the login screen if you have not
already logged in to the web site and created a session. This page contains a
Login control and a
passwordRecovery control for you to use. Enter in Admin for the username and password# for the
password, then click the Log In button.
39
Wrox File Share
05_749516 ch02.qxp 2/10/06 9:11 PM Page 39
Figure 2-2
Figure 2-3
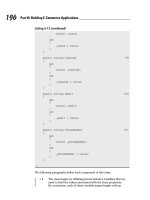
Once you log in to the site, you are brought to the administration section landing page, displayed in
Figure 2-4.
This interface provides a way to customize the e-mails being sent out to file download recipients. The
variables in use are the hyperlink, message, sender’s e-mail, and recipient’s e-mail. These variables are
replaced as text in the body of the e-mail message, providing a customized e-mail experience.
This chapter covers the essential areas of the development that comprise the application. It walks
through the class files in detail, explaining the methods and properties they expose. In addition, you will
gain insight into the database, data model, and database objects.
The next section addresses the design of the Wrox File Share application, walking through the classes
and database objects.
40
Chapter 2
05_749516 ch02.qxp 2/10/06 9:11 PM Page 40
Figure 2-4
Wrox File Share Design
The Wrox File Share design is based on a few abstractions, including the following:
❑ The file saved to the server is considered as a
Resource class.
❑ The methods used to save and get e-mail content are stored within the
EmailContent class.
❑ For each business class object there is a data class object that retrieves data from the database or
performs inserts into the database.
❑ The design provides visibility to the existence of business and data layers for the logical separation
to occur.
In the sections that follow, you learn how to upload files and send e-mails; discern the Wrox File Share’s
structure; and understand the data model and database objects, site themes, and the security model. You
also learn about the classes involved and their scope of impact within the web site’s architecture.
Uploading Files
The FileUpload control is used to upload a file to the server. It displays a simple TextBox control next
to a Browse button, which together allow users to select a file from their local machine to upload to the
server. The
fileupload1 instance of the FileUpload control exposes properties such as filename or
41
Wrox File Share
05_749516 ch02.qxp 2/10/06 9:11 PM Page 41
filebytes, which prior to ASP.NET 2.0 were very difficult to expose. Also, the FileUpload control
does not automatically save a file to the server once the user chooses it and submits the form that contains
the control. The logic in the submitted form must explicitly save the specified file to disk. This code to
save the file simply called the
SaveAs method, which saves the file to a stated path on the local server
file system.
Sending E-Mails
To send e-mails in ASP.NET 2.0, there are numerous areas to consider in the planning and development
process. The first area to be certain of is the use of a valid SMTP mail server, with a valid e-mail account.
The e-mail account to be used must allow permissions to relay mail.
The classes provided by ASP.NET 2.0 are maintained out of the
System.Net.Mail class, providing the
essential properties and contents of a mail message. The
SmtpClient subclass sends the e-mail to the
SMTP server that you designate.
The Web.config file provides the e-mail settings necessary for the configuration of the SMTP server.
These settings are as follows:
❑
EmailFrom
❑ EmailSubject
❑ SmtpServer
❑ MailUser
❑ MailPassword
❑ MailPort
❑ EmailFormatSelected
These are accessed from the Utilities class, formulating the contents of a struct variable. This struct
variable is declared toward the top of the
Utilities class, displayed here:
‘’’ <summary>
‘’’ MailSettings is a struct used to define the mail server information
‘’’ </summary>
Public Structure MailSettings
Public MailServer As String
Public MailPort As Integer
Public MailFrom As String
Public MailUser As String
Public MailPassword As String
End Structure
The actual sending of the e-mail is performed in the Utilities class, within the following function:
‘’’ <summary>
‘’’ SendEmail is used to send an email, with the established settings
‘’’ </summary>
Public Shared Sub SendEmail(ByVal MsgTo As String, ByVal MsgFrom As String, _
42
Chapter 2
05_749516 ch02.qxp 2/10/06 9:11 PM Page 42
ByVal MsgSubject As String, ByVal MsgText As String)
Dim SmtpSettings As MailSettings
SmtpSettings = GetSmtpSettings()
Dim SmptCl As New SmtpClient(SmtpSettings.MailServer, _
SmtpSettings.MailPort)
SmptCl.Credentials = GetCredentials(SmtpSettings)
Dim MailMsg As New MailMessage(MsgFrom, MsgTo)
MailMsg.Subject = MsgSubject
MailMsg.Body = MsgText
SmptCl.Send(MailMsg)
End Sub
This concludes the design and usage of the e-mail classes built into ASP.NET 2.0, and how the Wrox File
Share implements the e-mail functionality.
Structure of the Site
The ASP.NET 2.0 web site file structure has been standardized a bit since its predecessor versions. These
standardizations have to do with the naming conventions given to the folders within the site. The sections
of the project are listed in the following table:
Section Description
App_Code Houses the business layer class (resource.vb) and the data layer class
(resourceDB.vb).
App_Data The standard .NET folder for database files.
App_Themes The themes folder, containing two themes for use within the site.
ContentFiles The standard ASPX WebForm files for displaying content.
Controls Stores all user controls.
FileStorage The folder for storing uploaded files to be e-mailed to a recipient.
Images Stores images for the header or any other pages.
Management Stores the secured administrative WebForm pages.
[miscellaneous files] These include the login page, config file, sitemap file, and master
page file at the root of the site.
One of the essential pieces of the Wrox File Share web site is the database. This database is made up of a
SQL Server 2005 Express file, which contains a full representation of the database objects within it. The next
section highlights the areas of focus within the database file, namely the stored procedures and tables.
43
Wrox File Share
05_749516 ch02.qxp 2/10/06 9:11 PM Page 43
Data Model and Database Objects
The data model is very simple in nature; it only needs to store three basic data elements:
❑ Resource
❑ Contact
Each resource contains references to the Email contact table, with the e-mail addresses of the contacts
that have sent and received the e-mails from files uploaded to the system. Figure 2-5 displays the dia-
gram of the database tables involved.
Figure 2-5
Following is a detailed view of each of the three tables.
The Email Table
Field Name Data Type Description
id Int The unique identifier for this record.
text
varchar(MAX) The actual e-mail content stored as text, which the user
can edit in the administrative section of the web site.
The Contact Table
Field Name Data Type Description
id Int The unique identifier for this record.
email Varchar(200) The e-mail address of the contact.
44
Chapter 2
05_749516 ch02.qxp 2/10/06 9:11 PM Page 44
The Resource Table
Field Name Data Type Description
id Int The unique identifier for this record.
filename varchar(300) The question ID to which this response applies.
fromContactID Int The ID of the contact record that sent the file.
toContactID Int The ID of the contact record that received the file.
message
Varchar(1000) The message that the sender provided with the file
being uploaded.
datesent Datetime The datetime stamp at the time the file is uploaded.
In addition to these three tables, a number of stored procedures are in use. They follow a consistent nam-
ing pattern with the other chapters, as shown here:
❑
sprocTableNameSelectList
❑ sprocTableNameSelectSingleItem
❑ sprocTableNameInsertUpdateItem
In such fashion, the following stored procedures are used in the application:
❑
sprocEmailInsertUpdateItem
❑ sprocEmailSelectSingleItem
❑ sprocResourceInsertUpdateItem
❑ sprocResourceSelectSingleItem
The naming convention allows you to easily and quickly find the stored procedures that apply to a spe-
cific table, and whether they are selects, inserts, updates, or deletes.
There are a few stored procedures that you need to walk through. The first stored procedure,
sproc
ResourceSelectSingleItem
, is a basic SELECT statement based on the ID parameter, which selects a
single resource record from the database and returns it to the caller:
ALTER PROCEDURE dbo.sprocResourceSelectSingleItem
/* ‘===============================================================
‘ NAME: sprocResourceSelectSingleItem
‘ DATE CREATED: October 19, 2005
‘ CREATED BY: Shawn Livermore (shawnlivermore.blogspot.com)
‘ CREATED FOR: ASP.NET 2.0 - Instant Results
‘ FUNCTION: Gets a specific resource from the DB
‘===============================================================
45
Wrox File Share
05_749516 ch02.qxp 2/10/06 9:11 PM Page 45
*/
(@id int)
as
select * from Resource where id = @id
The preceding stored procedure is called from the ResourceDB.vb data layer, in the
GetResourceFileName function.
In similar fashion, the next stored procedure,
sprocEmailSelectSingleItem, is used to select a single
record from the Email table. There is no
ID parameter in this one, because it assumes you will be storing
only one record in this table for now. If you choose to add different e-mail versions or types in the system
at a later time, this is the place to manage that information:
ALTER PROCEDURE dbo.sprocEmailSelectSingleItem
/* ‘===============================================================
‘ NAME: sprocEmailSelectSingleItem
‘ DATE CREATED: October 19, 2005
‘ CREATED BY: Shawn Livermore (shawnlivermore.blogspot.com)
‘ CREATED FOR: ASP.NET 2.0 - Instant Results
‘ FUNCTION: Gets the html and text message body from the DB
‘===============================================================
*/
as
select top 1 * from Email
Moving into the other two stored procedures, the level of complexity increases slightly. The following is
the next stored procedure,
sprocEmailInsertUpdateItem, which is used to update the e-mail text in
the Email table’s one record. It accepts one parameter,
@text, which is simply the text content of the
template e-mail that is used to send e-mails to recipients:
ALTER PROCEDURE dbo.sprocEmailInsertUpdateItem
/* ‘===============================================================
‘ NAME: sprocEmailInsertUpdateItem
‘ DATE CREATED: October 21, 2005
‘ CREATED BY: Shawn Livermore (shawnlivermore.blogspot.com)
‘ CREATED FOR: ASP.NET 2.0 - Instant Results
‘ FUNCTION: Inserts or Updates the email content to the DB
‘===============================================================
*/
(@text varchar(MAX))
AS
UPDATE
SET
[text] = @text
46
Chapter 2
05_749516 ch02.qxp 2/10/06 9:11 PM Page 46
The final stored procedure, sprocResourceInsertUpdateItem, is by far the most complex one, but not
to worry. The basic idea of it is actually quite simple:
ALTER PROCEDURE dbo.sprocResourceInsertUpdateItem
/* ‘===============================================================
‘ NAME: sprocResourceInsertUpdateItem
‘ DATE CREATED: October 19, 2005
‘ CREATED BY: Shawn Livermore (shawnlivermore.blogspot.com)
‘ CREATED FOR: ASP.NET 2.0 - Instant Results
‘ FUNCTION: Inserts or Updates a resource into the DB
‘===============================================================
*/
(@id int,
@filename varchar(300),
@fromContactEmail varchar(300),
@toContactEmail varchar(300),
@message varchar(1000))
AS
DECLARE @returnValue int
Declare @fromContactID int
Declare @toContactID int
/*
fromContactID
*/
insert the contact records if they do not already exist
if((select count(*) from contact where email = @fromContactEmail)=0)
begin
insert into contact (email) values (@fromContactEmail)
SET @fromContactID = SCOPE_IDENTITY() extract the contact id from the
insert
end
else
begin
extract the contact id from the insert
SET @fromContactID = (select id from contact where email = @fromContactEmail)
end
/*
toContactID
*/
if((select count(*) from contact where email = @toContactEmail)=0)
begin
insert into contact (email) values (@toContactEmail)
SET @toContactID = SCOPE_IDENTITY() extract the contact id from the insert
end
else
begin
extract the contact id from the insert
SET @toContactID = (select id from contact where email = @toContactEmail)
end
Insert a new resource record
47
Wrox File Share
05_749516 ch02.qxp 2/10/06 9:11 PM Page 47
IF (@id IS NULL)
BEGIN
INSERT INTO
Resource
(
filename,
fromContactID,
toContactID,
message
)
VALUES
(
@filename,
@fromContactID,
@toContactID,
@message
)
SET @returnValue = SCOPE_IDENTITY()
END
ELSE
BEGIN
UPDATE
Resource
SET
filename = @filename,
fromContactID = @fromContactID,
toContactID = @toContactID,
message = @message
WHERE
Id = @id
SET @returnValue = @id
END
select @returnValue
This procedure is used to insert the resource information into the database, add new contacts to the
Contact table, and resources to the Resource table. It uses the upsert methodology, wherein it will pro-
vide an update if the record already exists, or an insert if it does not.
sprocResourceInsertUpdateItem follows these specific steps:
1. Checks to see if the e-mail address of the sender (@fromContactEmail) is not already in the
system:
/*
fromContactID
*/
insert the contact records if they do not already exist
if((select count(*) from contact where email = @fromContactEmail)=0)
2. If not, the stored procedure adds the e-mail address as new contact record, extracting the unique ID
value to set the the
@fromContactID locally declared variable for later insertion into the Resource
table. If the record does exist, it performs a
select statement to populate @fromContactID:
48
Chapter 2
05_749516 ch02.qxp 2/10/06 9:11 PM Page 48
begin
insert into contact (email)
values (@fromContactEmail)
SET @fromContactID = SCOPE_IDENTITY()
we extracted the contact id from the insert
end
else
begin
extract the contact id from the insert
SET @fromContactID =
(select id from contact
where email = @fromContactEmail)
end
* The next section of the stored procedure does the exact same thing, except this time it is
with the
@toContactEmail parameter, populating the @toContactID variable.
3. After you have valid ContactIDs, you can focus on the insertion of the resource record into the
database. The following section is used to insert a new resource record into the Resource table,
returning the new ID of the resource into the
@resourceID variable:
Insert a new resource record
IF (@id IS NULL)
BEGIN
INSERT INTO
Resource
(
filename,
fromContactID,
toContactID,
message
)
VALUES
(
@filename,
@fromContactID,
@toContactID,
@message
)
SET @returnValue = SCOPE_IDENTITY()
END
4. The following else statement immediately follows this if clause, with the case in which the
@id parameter is not null. This would be the case if the application passed an ID to the stored
procedure, indicating that a resource record already existed, and the stored procedure is
expected to perform an update, instead of an insert:
ELSE
BEGIN
UPDATE
Resource
SET
filename = @filename,
fromContactID = @fromContactID,
49
Wrox File Share
05_749516 ch02.qxp 2/10/06 9:11 PM Page 49
toContactID = @toContactID,
message = @message
WHERE
Id = @id
SET @returnValue = @id
END
select @returnValue
❑ The preceding code performs the UPDATE query, and returns the resulting @resourceID
variable. Once the @resourceID variable is sent back to the caller (the data layer), the
process for inserting a resource into the system is complete.
These are the stored procedures used within the Wrox File Share, and are entirely common for this type
of application.
Themes and Skins
The Wrox File Share project provides a simple way to apply themes and skins to each page of the site,
without modifying any HTML markup sections on any page (even the master page is safe from special
control-based HTML markup). You can apply a theme to the entire web site by modifying the Web.config
file to point to the name of your theme (assuming the theme exists in your project under the app_themes
folder). This is carried out within each ASP.NET form by using the following code in each of the form’s
pre-initialization events:
‘’’ <summary>
‘’’ this preinit event fires to initialize the page. It allows for the
‘’’ theme and title to be set for this page, which actually pulls from
‘’’ the web.config setting via the shared Config class’s exposed properties.
‘’’ </summary>
Protected Sub Page_PreInit(ByVal sender As Object, ByVal e As System.EventArgs)
Handles Me.PreInit
Page.Theme = Config.CurrentTheme
Page.Title = Config.PageTitle
End Sub
This basically accesses the config class’s properties (pulled from the Web.config file), and sets the page’s
theme member to be the current theme value. In this way, you can maintain a consistent experience
throughout the web site, with only one change needed to the Web.config to change the look and feel of the
entire user experience! You are probably glad to hear that—I know I am. The exact place where you would
change the theme for the site is in the
appSettings section of the Web.config, as displayed here:
<!
<add key=”CurrentTheme” value=”CleanBlue” />
>
<add key=”CurrentTheme” value=”CleanRed” />
This code displays one of the theme entries as commented out, and one of them as active. Simply swap
the two values to change the theme.
50
Chapter 2
05_749516 ch02.qxp 2/10/06 9:11 PM Page 50