Beginning Web Development, Silverlight, and ASP.NET AJAX From Novice to Professional phần 3 pps
Bạn đang xem bản rút gọn của tài liệu. Xem và tải ngay bản đầy đủ của tài liệu tại đây (1.6 MB, 44 trang )
9594CH03.qxd 1/2/08 2:57 PM Page 68
Data Binding with ASP.NET
Most applications use some form of data store, with the application itself being a
means to store, retrieve, manipulate, and view data. These applications might use a SQL
Server 2005 database, a storage area network, or even a simple XML file. Web applications
are no exception, and typically these applications are termed
data-driven applications.
When it comes to retrieving and representing data, a myriad of options are available; over
time, the technology has evolved dramatically. The reason for this is that the code needed
to access data and the engines that run the data itself tend to be resource heavy, and in
situations such as on the Web where they may be used in clustered environments (i.e.,
the same application running on a number of machines) and serving millions of users,
they can be expensive to maintain. As a result, the technology that developers use to cre-
ate data-driven applications has evolved rapidly, driven by the needs of scaling to large
audiences.
.NET provides a data programming technology for you to use in your applications. It
is called ADO.NET. It consists of a number of managed classes that enable your applica-
tions to connect to data sources, execute commands, and manage disconnected data. In
this chapter, you’ll look at the architecture of ADO.NET and how it works to bring data to
your application.
You’ll look into the SQL Server 2005 Express edition, a free version of the industry-
leading enterprise database software from Microsoft, as well as a sample database,
AdventureWorks, that is used to demonstrate many of its features.
You’ll wrap the chapter up with a tour through some of the server controls that can
be used to provide data awareness to your web application through
data binding.
What Is ADO.NET?
Scalability is typically achieved by breaking an application into functional tiers. As I men-
tioned in the previous chapter, keeping state between tiers has a high cost when it comes
to scalability, performance, and security. Data-aware applications are no exception.
ASP.NET offers view state as a great alternative to maintaining control state between the
browser and server to provide both a nice programming interface and control state man-
agement with minimum resource consumption. When writing data applications, the cost
69
CHAPTER 4
9594CH04.qxd 1/22/08 10:17 AM Page 69
of maintaining state between the tiers of your application can be much higher, as you
may be passing large amounts of data (sometimes referred to as
data sets) between them.
Thus, ADO.NET offers a
disconnected model that enables you to access data from
another tier, disconnect from that tier (thus breaking state), and access that data locally.
To prevent data from being corrupted, ADO.NET provides the means for syncing back up
with the data store when your transaction is complete, as well as locking mechanisms to
prevent other processes from affecting the data while your application is holding it in a
disconnected state.
At the heart of the disconnected model is XML. ADO.NET was designed with the
XML classes of the .NET Framework in mind, and at the core of this is the
DataSet object,
which you’ll undoubtedly encounter if you continue writing ADO.NET-based applica-
tions. (It’s also used under the covers when controls are automatically bound to a
database
, although that’s not obvious at a casual glance.)
Using ADO.NET
You use a .NET data provider to connect to the data store. A provider is one or more
classes that give you pr
ogrammatic access to a database, providing methods that enable
you to read or update data stored in the supported data store. The main classes that you’ll
use when using a data provider to connect to databases are as follows:
Connection: As its name suggests, the Connection class is used to make and manage
the connection with the database.
Command: You use Command to create and execute Structured Query Language (SQL)
statements against your database, or to access stored procedures already on the
database and execute them.
DataReader: When you want to access data in a read-only manner, moving forward
through the data as you read, this class provides a lightweight, fast component that
achieves this.
DataAdapter: The DataAdapter class is used to facilitate the communication between
the disconnected
DataSet and the data store. It fills the DataSet with data and pro-
vides the methods to apply changes to the data stored within the data store based
on any modifications made within the (disconnected)
DataSet.
DataSet: The DataSet is a disconnected representation of all or part of a database. It is
much more sophisticated than something like a recordset or table because it can
support a collection of tables, relationships, constraints, and more.
ADO
.NET supplies y
ou with a number of built-in pr
o
viders, including a SQL Server
pr
o
vider that is optimiz
ed for SQL S
erver. This includes all of the preceding classes
CHAPTER 4 ■ DATA BINDING WITH ASP.NET70
9594CH04.qxd 1/22/08 10:17 AM Page 70
(Connection, Command, etc.) that are written specifically for this database. In addition to
this, there is also an Object Linking and Embedding for Databases (OLEDB) provider and
an Open Database Connectivity (ODBC) provider, which are written to access any data-
base that provides OLEDB or ODBC databases, respectively. Although these aren’t
optimized for a database such as SQL Server, they will still work. For older versions of
SQL Server that do not support the ADO.NET provider (earlier than 7.0), they provide a
viable option.
The built-in set of providers is rounded out with an Oracle provider, which is opti-
mized for Oracle databases.
The recommendation if you are using Oracle or SQL Server is to use their dedicated
pr
oviders, due to the optimization inherent in them. Should this not work, OLEDB is rec-
ommended, and then the ODBC provider as a final fallback option.
You are, of course, not limited to these providers, and a third-party ecosystem of
providers around databases such as MySQL and PostGreSQL has evolved. Take note that
these providers form dependencies that you’ll need to account for when you deploy your
application.
Despite the fact that you use different providers for different databases or versions of
databases, the API has been carefully designed to avoid fragmentation. Each provider is
built upon a standard set of interfaces that ensure that the method signatures for stan-
dard operations such as open and close are preserved. Because of this, your application
data access code is buffered from change if you switch databases.
We’ll go into ADO.NET programming a little later in this chapter, but first, it’s a good
idea to get a copy of SQL Server. If you don’t have one already, the Express edition can be
downloaded from MSDN at
We’ll explore
this in the next few sections before delving back into ADO.NET development to round
out the chapter. Note that if y
ou are using Windows Vista, you should find Service Pack 2
(SP2) for SQL Server Express and then do
wnload and install that. SP2 is available from
the Visual Studio Express download site at
/>sql/register/default.aspx.
SQL Server 2005 Express
If you’ve developed Windows applications before, you may have encountered a “mini”
desktop database called Microsoft SQL Server Desktop Engine 2000 (MSDE). SQL Server
2005 Express edition is the next version of this and is free to download, redistribute, and
embed in y
our applications
. It’s a great way to get familiar with SQL Server because it can
be used with tools such as SQL S
er
ver Management Studio, which may be downloaded
and installed fr
om the same site as SQL S
erver Express. This tool is also used in the Enter-
pr
ise editions
. In this section, you’ll look at downloading, installing, and configuring SQL
S
erver Express for your applications.
CHAPTER 4 ■ DATA BINDING WITH ASP.NET 71
9594CH04.qxd 1/22/08 10:17 AM Page 71
Downloading and Installing SQL Server 2005 Express
There are a number of different options presented to you when you want to download
SQL Server Express:
Core SQL Server Express: This provides the basic runtime engine for SQL Server. It can
be embedded within Microsoft Visual Studio 2005 (but not the Express editions), is
free to distribute, and can be seamlessly upgraded to Professional or Enterprise
editions of SQL Server.
SQL Server Management Studio Express: This is the tool that you can use to manage
instances of SQL Server or SQL Server Express. It is a recommended tool if you are
using Express editions of Visual Studio, or if you want to learn about administration
of the Professional versions of SQL Server. Please note that this is downloaded
separately.
SQL Server Express with Advanced Services: This adds features to Core SQL Server
Express, including Management Studio, reporting services, and full-text search.
SQL Server Express Edition Toolkit: This adds tools, including a report creator for
reporting services, the business intelligence development studio for building stored
pr
ocedures and other database-related functionality, and the SQL Server software
development kit (SDK).
In this chapter, we’ll be looking at SQL Server 2005 Express with Advanced Services,
which provides a single download that gives you SQL Server and Management Studio.
Starting the Install
Once you’ve downloaded SQL Server 2005 Express with Advanced Services (available at
www.microsoft.com/express/sql/default.aspx), launch it to get the installer. The first
screen that you’ll see is the End User License Agreement (EULA), which you will need
to accept to continue (see Figure 4-1).
CHAPTER 4 ■ DATA BINDING WITH ASP.NET72
9594CH04.qxd 1/22/08 10:17 AM Page 72
Figure 4-1. SQL Server Express EULA
Click Next to continue the installation, and the installer will install all the necessary
setup files. Once this is complete, the installer will scan your system for prerequisites,
and should you have them all installed, it will launch (see Figure 4-2). If there are any
installation problems, a different dialog will show you what they are.
Figure 4-2. Beginning the installation
CHAPTER 4 ■ DATA BINDING WITH ASP.NET 73
9594CH04.qxd 1/22/08 10:17 AM Page 73
Clicking Next will take you to the System Configuration Check, at which point your
system will be scanned for the required components. Should any of them be missing, you
will receive a warning or an error message, and the Message column will instruct you
what to do. Figure 4-3 shows an example in which the Internet Information Services (IIS)
feature requirement hasn’t been met; it isn’t a critical problem, just a warning. This is one
of the Windows Vista incompatibilities mentioned earlier—the current version of SQL
Server Express doesn’t recognize IIS 7.
Figure 4-3. System Configuration Check
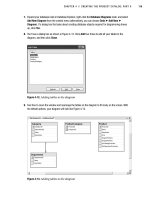
When you get to the Registration Information screen (see Figure 4-4), remember to
uncheck the box that reads “Hide advanced configuration options.”
CHAPTER 4 ■ DATA BINDING WITH ASP.NET74
9594CH04.qxd 1/22/08 10:17 AM Page 74
Figure 4-4. Registration information
The next screen is where you configure what you want to install. In this case, you
should make sure that you install at least Database Services and Management Studio
Express (see Figure 4-5).
Figure 4-5. F
eatur
e S
election scr
een
CHAPTER 4 ■ DATA BINDING WITH ASP.NET 75
9594CH04.qxd 1/22/08 10:17 AM Page 75
Your next step is to set the authentication mode for SQL Server (see Figure 4-6).
There are two ways you can log into the database. You can use Windows authentication
only when your Windows sign-on credentials are used to access the database, and you
can use Mixed Mode authentication when SQL Server has its own set of credentials.
Windows authentication is considered the most secure and direct method of authen-
tication, and for this book, I recommend that you use it. You also have the option of using
Mixed Mode authentication for greater flexibility. Should you do this, you will have to
configure the sa login, which is the credential set for the SQL Server administrator.
Figure 4-6. Configuring the SQL Server authentication mode
The next screen allows you to set the configuration options (see Figure 4-7). There
ar
e two main options that you can set. The first is Enable User Instances, which if set will
allo
w users that do not hav
e administr
ative access to run separate instances of the SQL
S
er
ver Express engine. The second, if set, will add the user that is installing the database
as a SQL S
er
ver administrator. You can see this in Figure 4-7.
CHAPTER 4 ■ DATA BINDING WITH ASP.NET76
9594CH04.qxd 1/22/08 10:17 AM Page 76
Figure 4-7. Configuration options
The final step is an option screen that allows you to configure feedback settings that,
if set, will allow SQL Server to send errors back to Microsoft, allowing them to improve
the product. This is shown in Figure 4-8.
Figure 4-8. E
rr
or and U
sage R
epor
t S
ettings scr
een
CHAPTER 4 ■ DATA BINDING WITH ASP.NET 77
9594CH04.qxd 1/22/08 10:17 AM Page 77
After this, SQL Server Express will install itself. When installation is complete, the
specified services will run.
Using SQL Server Management Studio Express
Now you can launch the SQL Server Management Studio Express tool. This tool enables
you to sign into a database and manipulate its artifacts for creating tables, queries, data,
user accounts, and more.
When you first launch Management Studio, you will be asked to log into your data-
base. By default, your database will be called
MachineName\SQLExpress (see Figure 4-9).
You can sign on with your Windows credentials, or if you specified Mixed Mode authenti-
cation and wish to, sign on with your SQL Server sa account. With Mixed Mode, you can
sign on either way.
Figure 4-9. Signing into SQL Server 2005
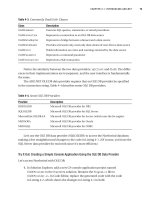
Once you’ve successfully connected, Management Studio will launch (see Figure 4-10).
From here, you have complete control over your database instance and all the data-
bases attached to it. At this point in our example, no databases are installed, so the next
step is to download and install a sample database.
CHAPTER 4 ■ DATA BINDING WITH ASP.NET78
9594CH04.qxd 1/22/08 10:17 AM Page 78
Figure 4-10. SQL Server Management Studio
Installing the AdventureWorks Database
You can download the AdventureWorks database from />vstudio/express/sql/register/default.aspx. This will take you to the SQL Server 2005
downloads page, where a number of different downloads are available. Select the SQL
Server 2005 Samples option to download the AdventureWorks sample database. Note
that several versions are available for different hardware, so be sure to select the one that
is appropriate for your setup. The preceding link takes you first to a registration page, but
registration isn’t necessary to get the AdventureWorks sample. Simply choose the “No, I
do not wish to register” option if you just want to directly access this sample.
Run through the setup process, and the database will be installed on your machine.
However, you won’t be able to do anything with it until you attach it to your current SQL
Express instance. You can do so by using Management Studio. Launch Management Stu-
dio and select the Databases node. Right-click it and select Attach. The Attach Databases
dialog box will appear (see Figure 4-11).
CHAPTER 4 ■ DATA BINDING WITH ASP.NET 79
9594CH04.qxd 1/22/08 10:17 AM Page 79
Figure 4-11. Attach Databases dialog box
You use this dialog box to attach database files (files with the .mdf extension) to your
instance of SQL Server. Click Add, and a file browser will open on the default location for
MDF files on your system. This will likely be:
C:\Program Files\Microsoft SQL Server\
MSSQL.1\MSSQL\Data
, but its exact location depends upon the location you selected when
you installed SQL Server 2005 Express.
F
ind the
AdventureWorks_data.mdf file and click OK.
Y
ou can see this dialog box in
F
igure 4-12.
CHAPTER 4 ■ DATA BINDING WITH ASP.NET80
9594CH04.qxd 1/22/08 10:17 AM Page 80
Figure 4-12. Finding a database to attach
Once you’ve done this, the database and its log file will be attached to your SQL
Server instance, and you will be able to write applications that access it from within
Visual Studio.
N
ote that if you are using Windows Vista, the operating system will prevent you from
wr
iting to the
Data dir
ectory for security reasons, and this operation will fail. You will need
to navigate to the MDF and LDF files for A
dventureWorks from within Windows Explorer
and use the security settings in the Properties dialog box. Add permissions for the SQL
Server processes to have full control over these files.
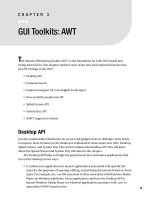
Once you’ve connected the database, you can view its contents within Management
Studio. See Figure 4-13 for an example of the data that this table contains, namely the
addresses of the (fictional) people who are part of the AdventureWorks customer data-
base.
CHAPTER 4 ■ DATA BINDING WITH ASP.NET 81
9594CH04.qxd 1/22/08 10:17 AM Page 81
Figure 4-13. Browsing data with Management Studio
Using ADO.NET to Build Data-Driven Applications
Now that you’ve installed and configured a SQL Server database, the next step is to learn
more about ADO.NET and start building some applications designed to work with data-
bases and data. You’ll do this in two steps. First, you’ll learn how to use the coding
environment to cr
eate connections to the data and to retrieve data sets that you’ll manip-
ulate, and then you’ll star
t looking at the graphical user interface (GUI) tools that provide
this for you, as well as the server controls that you can use to provide sophisticated data-
binding functionality in your application.
The Connection Class and C
onnection Str
ings
ADO
.NET provides a connection class that you use to connect to your database. A spe-
cially for
matted string, called a
connection string, contains the specifications for ho
w you
will connect to it. An example of a connection string is shown here:
Data Source=BOOKDEV\SQLEXPRESS;
Initial Catalog=AdventureWorks;
Integrated Security=True
CHAPTER 4 ■ DATA BINDING WITH ASP.NET82
9594CH04.qxd 1/22/08 10:17 AM Page 82
It contains a semicolon-separated list of name/value pairs. You need at least three
pairs in any connection string: the name of the database server (
Data Source), the
database on that server to connect to (
Initial Catalog), and the sign-on credentials. If
you set
Integrated Security to True, SQL Server will use the Windows account of the cur-
rent process to sign into SQL Server. Or, you can specify a user ID and password to sign in
using SQL Server credentials in Mixed Mode.
You can easily hard-code a connection string into your application like this:
string strConn = "Data Source=BOOKDEV\SQLEXPRESS;" +
"Initial Catalog=AdventureWorks;Integrated Security=True";
However, it makes much more sense to store the connection string in your Web.config
file, because you may want to change it over time and prefer not to recompile your code
just to reconfigure the connection to your database. You do this by using the
<connectionStrings> section within Web.config. Here’s an example:
<configuration>
<connectionStrings>
<add name="AW" connectionString="Data Source=BOOKDEV\SQLEXPRESS;
Initial Catalog=AdventureWorks;Integrated Security=True" />
</connectionStrings>
</configuration>
Now, from your code, you can use WebConfigurationManager (found in System.Web.
Configuration) to access the connection string like this:
string connectionString =
WebConfigurationManager.ConnectionStrings["AW"].ConnectionString;
Visually Designing Your Connection String
Visual Studio gives you a nice tool to help you build your connection strings. This tool
also wor
ks with the E
xpress editions.
F
rom the tools menu in Visual Studio, select Connect to Database. The Add Connec-
tion dialog bo
x will appear. From here, fill out the details for your database, including the
ser
ver instance name, the database to connect to, and the sign-on credentials. You can
see an example of this in F
igure 4-14.
CHAPTER 4 ■ DATA BINDING WITH ASP.NET 83
9594CH04.qxd 1/22/08 10:17 AM Page 83
Figure 4-14. Connecting to a database
You can also test the connection from this dialog box to work out any bugs in your
connection string. When you are done (i.e., you are connecting successfully), click OK.
An entr
y for this connection will be added to the D
atabase E
xplorer in Visual Studio
(see F
igur
e 4-15).
CHAPTER 4 ■ DATA BINDING WITH ASP.NET84
9594CH04.qxd 1/22/08 10:17 AM Page 84
Figure 4-15. The Database Explorer
At this point, you can see that the connection string is displayed for you in the Prop-
erties window (see Figure 4-16).
Figure 4-16. Using the Properties window to view the connection string
CHAPTER 4 ■ DATA BINDING WITH ASP.NET 85
9594CH04.qxd 1/22/08 10:17 AM Page 85
Accessing a Connection
You use the SqlConnection class, which is derived from the generic ADO.NET Connection
class, to access your SQL Server database. This is part of the SQL Server–specific
ADO.NET Providers suite found in
System.Data.SqlClient.
Here’s a simple piece of code that opens a connection, queries the server, and then
closes the connection:
string connectionString =
WebConfigurationManager.ConnectionStrings["AW"].ConnectionString;
using (SqlConnection sqlCon = new SqlConnection(connectionString))
{
sqlCon.Open();
lblVersion.Text = sqlCon.ServerVersion;
}
Note that connections are expensive resources on a server, and you should take every
precaution to prevent connection leaks, which are orphaned connections. Every time you
open a connection, you must close that connection. Therefore, it’s best to wrap your data
access code in a
try catch block and place the SqlConnection.Close method invocation
in a
finally block, or create the SqlConnection in a using statement. The using statement
will call the connection’s
Dispose method when it goes out of scope, thereby closing the
database connection for you. This way, the connection is assured to be closed, even if
your code sustains an error while accessing the data.
It is also highly recommended that when developing data applications, you open
them as late as possible (i.e., perform all required initialization before you open the con-
nections to your database) and close them as early as possible (i.e., process any resulting
DataSet after you close the connection), unless you have to keep the connection open for
some compelling reason. The goal here is to minimize the time connections are held
open, which serves to increase scalability.
Using Commands
A command r
epr
esents any kind of
SQL statement made against y
our database. This
giv
es y
ou po
w
erful application control over your database structure and contents,
enabling y
ou to cr
eate and delete databases
, insert and retrieve data, and manipulate
table str
uctur
es
, among other things.
A command is implemented via the
SqlCommand class and contr
olled using the
SqlCommand.CommandType and SqlCommand.CommandText pr
oper
ties
, which are often used in
tandem. I
f y
ou set the
CommandType to CommandType.Text, the CommandText pr
oper
ty (a str
ing)
should contain the SQL statement that y
ou want to execute
. I
f the type is
CommandType.
StoredProcedure, the CommandText should contain the name of the stor
ed pr
ocedur
e to exe-
cute
. F
inally
, if the type is
CommandType.Table, the command text should contain the name
CHAPTER 4 ■ DATA BINDING WITH ASP.NET86
9594CH04.qxd 1/22/08 10:17 AM Page 86
of a table in your database. Executing this type of command will return all records stored
in that table.
So, for example, if you want to create a query that returns the street address for cus-
tomers in the AdventureWorks address database who live at postal code 98011, you
would use code like this:
string connectionString =
WebConfigurationManager.ConnectionStrings["AW"].ConnectionString;
SqlConnection sqlCon = new SqlConnection(connectionString);
SqlCommand sqlComm = new SqlCommand();
sqlComm.Connection = sqlCon;
sqlComm.CommandType = CommandType.Text;
sqlComm.CommandText =
"SELECT AddressLine1 FROM Person.Address " +
"WHERE (PostalCode = N'98011')";
Executing the Command
Now that you have your command, you are going to want to execute it to do anything
meaningful. There are four different methods for executing an ADO.NET command:
ExecuteNonQuery: This is used to execute a query for which you do not want to return
a result set. For example, if you are inserting, updating, or deleting records, you can
use the command’s
ExecuteNonQuery method. It will return an integer containing the
number of records that were affected.
ExecuteScalar: This executes the query and returns the first column of the first row
of the result set. This is very useful for queries that use SQL
COUNT or SUM, or other
queries that return a desirable value.
ExecuteReader: This executes a SELECT query and returns a DataReader object that can
be used to provide forward-only read access to your data.
ExecuteXmlReader:
This is similar to
ExecuteReader ex
cept that it gives you an
XmlReader
to access the data.
So, executing a command to generate the required feedback is very straightforward.
Here’s an example of executing the previous query, with the results available via a
SqlDataReader:
SqlDataReader sRead = sqlComm.ExecuteReader();
CHAPTER 4 ■ DATA BINDING WITH ASP.NET 87
9594CH04.qxd 1/22/08 10:17 AM Page 87
In the next section, you’ll see how to use this reader to step through the results of the
query and access the first line of the returned addresses.
Reading the Data
When you execute the previous command, ADO.NET returns a SqlDataReader. This reader
is a forward-based read-only cursor that moves forward by one record every time you call
its
Read method. The Read method returns True if it reads a record and False otherwise.
Upon a successful read, it will then load an array of values with the index of the array rep-
resenting the column name—so
reader["ColumnName"] will contain this record’s value for
ColumnName.
Thus, we can iterate through the returned result set using a
while loop, and upon a
successful read, retrieve the result set’s data by simply accessing the reader as if it were an
array.
Listing 4-1 contains the complete code to access the addresses for postal code 98011
in the AdventureWorks database.
Listing 4-1. Using Connection, Command, and Reader to Access Data
using System;
using System.Data;
using System.Configuration;
using System.Web;
using System.Web.Security;
using System.Web.UI;
using System.Web.UI.WebControls;
using System.Web.UI.WebControls.WebParts;
using System.Web.UI.HtmlControls;
using System.Web.Configuration;
using System.Data.SqlClient;
using System.Text;
public partial class _Default : System.Web.UI.Page
{
protected void Page_Load(object sender, EventArgs e)
{
string connectionString =
WebConfigurationManager.ConnectionStrings["AW"].ConnectionString;
StringBuilder strReturn = new StringBuilder();
using (SqlConnection sqlCon = new SqlConnection(connectionString))
{
SqlCommand sqlComm = new SqlCommand();
CHAPTER 4 ■ DATA BINDING WITH ASP.NET88
9594CH04.qxd 1/22/08 10:17 AM Page 88
sqlComm.Connection = sqlCon;
sqlComm.CommandType = CommandType.Text;
sqlComm.CommandText =
"SELECT AddressLine1 FROM Person.Address " +
"WHERE (PostalCode = N'98011')";
sqlCon.Open();
SqlDataReader sRead = sqlComm.ExecuteReader();
while (sRead.Read())
{
strReturn.Append("<li>");
strReturn.Append(sRead["AddressLine1"]);
strReturn.Append("</li>");
}
}
litResults.Text = strReturn.ToString();
}
}
You can see the results of running this in Figure 4-17.
Figure 4-17. Viewing the results of the postal code query
CHAPTER 4 ■ DATA BINDING WITH ASP.NET 89
9594CH04.qxd 1/22/08 10:17 AM Page 89
Using Parameters in Commands
Now, this is all very well for a fixed SQL statement like the one we had hard-coded to
query for postal code 98011. But what happens if you want the user to specify the postal
code that they are searching for? You achieve this using parameters. Thus, you can pro-
vide an application where the user specifies (using text input, request parameters, or
other input mechanisms) what they want, and your application responds accordingly.
Be careful when using parameters in SQL statements that are derived from user
input, as this is a common source of SQL injection attacks. This type of hacker attack
involves a cleverly crafted parameter value on the user’s part and an insecure application
that doesn’t validate user input. This attack can allow a malicious user to access private
data or even destroy your database.
To use a parameter in SQL, you specify a placeholder for the parameter by prefixing
it with the @ character. So, for example, our hard-coded query from earlier could be
changed to this:
sqlComm.CommandText =
"SELECT AddressLine1 FROM Person.Address WHERE (PostalCode = @strZIP)";
Then, before executing, you add the value of the parameter to the command,
like this:
sqlComm.Parameters.Add("@strZIP", strParamZIP);
The value you’ll assign to the parameterized postal code is contained in the variable
strParamZIP. The value can be the result of text input, or, if you prefer, taken directly off
the query string. The code to access it from the query string will look like this:
string strParamZIP = "98011";
if (Request.Params["ZIP"] != null)
strParamZIP = Request.Params["ZIP"];
But if you use code like this, don’t forget to sanitize strParamZIP before passing it to
the database to avoid injection attacks. By
sanitize, I mean that you should evaluate the
value contained within
strParamZIP and make sure it’s a valid postal code, not some other
(invalid) text.
Now if you run your application, your query string can contain a postal code, and the
query results for that postal code will be displayed. Figure 4-18 shows an example of this
where I used a postal code of 14111.
CHAPTER 4 ■ DATA BINDING WITH ASP.NET90
9594CH04.qxd 1/22/08 10:17 AM Page 90
Figure 4-18. Using a parameterized query
Data Binding with Server Controls
You’ve seen in the previous sections how ASP.NET and ADO.NET can be used to connect
to databases and manipulate the data therein through connections, commands, and
readers. However, most modern applications require flexible, graphical access to the
same data. As a developer, you aren’t going to want to develop all of this complex data
access and binding code from the ground up.
ASP.NET provides controls that give you visual- and designer-based access to data
through data binding, but all of them use a DataSource control to provide access to the
underlying database. Because we are using SQL Server data in this example, the SQL
Server–specific DataSource control will be used. You aren’t limited to using this control,
because .NET provides several others, such as ObjectDataSource and XMLDataSource,
but these go beyond the scope of this chapter. Still, the principles that you learn from the
SqlDataSource control will apply across all data sources when data binding is taken into
context.
CHAPTER 4 ■ DATA BINDING WITH ASP.NET 91
9594CH04.qxd 1/22/08 10:17 AM Page 91
Using the SQLDataSource Control
When you are using Visual Studio or Visual Web Developer Express, open the Designer to
edit any ASP.NET page. You will see a Data tab on the Toolbox. This tab contains the
SqlDataSource control. Drag and drop it onto the design surface, and its Tasks pane will
open (see Figure 4-19).
Figure 4-19. The SqlDataSource control
This pane contains a Configure Data Source link. Selecting this link will launch the
SQL Server Connection wizard (see Figure 4-20). The first step in this wizard is to select a
database connection, if one already exists.
Figure 4-20. Choosing the database connection
CHAPTER 4 ■ DATA BINDING WITH ASP.NET92
9594CH04.qxd 1/22/08 10:17 AM Page 92