Beginning PHP and Postgre SQL E-Commerce From Novice to Professional phần 6 potx
Bạn đang xem bản rút gọn của tài liệu. Xem và tải ngay bản đầy đủ của tài liệu tại đây (627.91 KB, 63 trang )
<th> </th>
</tr>
{section name=cCart loop=$cart_details->mCartProducts}
<tr>
<td>
<input name="productID[]" type="hidden"
value="{$cart_details->mCartProducts[cCart].product_id}" />
{$cart_details->mCartProducts[cCart].name}
</td>
<td>${$cart_details->mCartProducts[cCart].price}</td>
<td>
<input type="text" name="quantity[]" size="10"
value="{$cart_details->mCartProducts[cCart].quantity}" />
</td>
<td>${$cart_details->mCartProducts[cCart].subtotal}</td>
<td align="right">
<input type="button" name="saveForLater" value="Save for later"
onclick="window.location=
'{$cart_details->mCartProducts[cCart].save|prepare_link}';" />
<input type="button" name="remove" value="Remove"
onclick="window.location=
'{$cart_details->mCartProducts[cCart].remove|prepare_link}';" />
</td>
</tr>
{/section}
</table>
<table>
<tr>
<td class="cart_total">
<span>Total amount:</span>
<span class="price">${$cart_details->mTotalAmount}</span>
</td>
<td class="cart_total" align="right">
<input type="submit" name="update" value="Update" />
</td>
</tr>
</table>
</form>
{/if}
{if ($cart_details->mIsCartLaterEmpty == 0)}
<br />
<span class="description">Saved products to buy later:</span>
<br /><br />
<table>
<tr>
<th>Product Name</th>
<th>Price</th>
CHAPTER 8 ■ THE SHOPPING CART294
648XCH08.qxd 10/31/06 10:07 PM Page 294
<th> </th>
</tr>
{section name=cSavedCart loop=$cart_details->mSavedCartProducts}
<tr>
<td>{$cart_details->mSavedCartProducts[cSavedCart].name}</td>
<td>
${$cart_details->mSavedCartProducts[cSavedCart].price}
</td>
<td align="right">
<input type="button" name="moveToCart" value="Move to cart"
onclick="window.location=
'{$cart_details->mSavedCartProducts[cSavedCart].move|prepare_link}';"
/>
<input type="button" name="remove" value="Remove"
onclick="window.location=
'{$cart_details->mSavedCartProducts[cSavedCart].remove|prepare_link}';"
/>
</td>
</tr>
{/section}
</table>
{/if}
<br />
<input type="button" name="continueShopping" value="Continue Shopping"
onclick="window.location='{$cart_details->mCartReferrer}';" />
4. Add the following styles to hatshop.css:
.cart_total
{
background: #ffffff;
border: none;
}
You just finished the visitor’s part of the code for this chapter, so now it’s time to try it out and make sure everything
works as expected. Test it by adding products to the shopping cart, changing the quantity, and removing items.
How It Works: The Shopping Cart
The actions that the shopping cart can execute are defined by the following constants defined in include/
config.php: ADD_PRODUCT, REMOVE_PRODUCT, UPDATE_PRODUCTS_QUANTITIES, SAVE_PRODUCT_
FOR_LATER, and MOVE_PRODUCT_TO_CART. Note that we didn’t define any variable for viewing the shopping
cart, so if CartAction does not take any value or its value is not equal to one of the action variables, it will
simply display the shopping cart content.
Every shopping cart action, except viewing and updating the shopping cart, relies on the ProductID query string
parameter (an error is raised if it isn’t set). If the proper conditions are met, the business tier method that corre-
sponds to the visitor’s action is called.
CHAPTER 8 ■ THE SHOPPING CART 295
648XCH08.qxd 10/31/06 10:07 PM Page 295
Administering the Shopping Cart
Now that you’ve finished writing the shopping cart, there are two more things you need to take
into account, both related to administration issues:
• How to delete from the catalog a product that exists in shopping carts.
• How to count or remove old shopping cart elements by building a simple shopping cart
administration page. This is important because without this feature, the shopping_cart
table keeps growing, filled with old temporary (and useless) carts.
Deleting Products Residing in the Shopping Cart
The catalog administration pages enable you to completely delete products from the catalog.
Before removing a product, you should also remove its appearances in visitors’ shopping carts.
Update the catalog_delete_product function from the hatshop database by following
these steps:
1. Load pgAdmin III, and connect to the hatshop database.
2. Click Tools
➤ Query tool (or click the SQL button on the toolbar). A new query window
should appear.
3. Use the query tool to execute this code, which updates the catalog_delete_product
function from your hatshop database:
Updates catalog_delete_product function
CREATE OR REPLACE FUNCTION catalog_delete_product(INTEGER)
RETURNS VOID LANGUAGE plpgsql AS $$
DECLARE
inProductId ALIAS FOR $1;
BEGIN
DELETE FROM product_category WHERE product_id = inProductId;
DELETE FROM shopping_cart WHERE product_id = inProductId;
DELETE FROM product WHERE product_id = inProductId;
END;
$$;
Building the Shopping Cart Admin Page
The second problem with the shopping cart is that at this moment no mechanism exists
to delete the old records from the shopping_cart table. On a high-activity web site, the
shopping_cart table can grow very large.
With the current version of the code, shopping cart IDs are stored at the client browser for
seven days. As a result, you can assume that any shopping carts that haven’t been updated in
the last ten days are invalid and can be safely removed.
CHAPTER 8 ■ THE SHOPPING CART296
648XCH08.qxd 10/31/06 10:07 PM Page 296
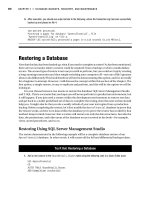
In the following exercise, you’ll quickly implement a simple shopping cart administration
page, where the administrator can see how many old shopping cart entries exist, and can
delete them if he or she wants to. Figure 8-5 shows this page.
Figure 8-5. Administering shopping carts
The most interesting aspect you need to understand is the SQL logic that deletes all shop-
ping carts that haven’t been updated in a certain amount of time. This isn’t as simple as it
sounds—at first sight, you might think all you have to do is delete all the records in
shopping_cart whose added_on is older than a specified date. However, this strategy doesn’t
work with shopping carts that are modified over time (say, the visitor has been adding items to
the cart each week in the past three months). If the last change to the shopping cart is recent,
none of its elements should be deleted, even if some are very old. In other words, you should
either remove all elements in a shopping cart or none of them. The age of a shopping cart is
given by the age of its most recently modified or added product.
This being said, implement the new functionality by following the exercise steps.
Exercise: Creating the Shopping Cart Admin Page
1. Load pgAdmin III, and connect to the hatshop database.
2. Add the following data tier functions to the hatshop database:
Create shopping_cart_count_old_carts function
CREATE FUNCTION shopping_cart_count_old_carts(INTEGER)
RETURNS INTEGER LANGUAGE plpgsql AS $$
DECLARE
inDays ALIAS FOR $1;
outOldShoppingCartsCount INTEGER;
BEGIN
SELECT INTO outOldShoppingCartsCount
COUNT(cart_id)
FROM (SELECT cart_id
FROM shopping_cart
CHAPTER 8 ■ THE SHOPPING CART 297
648XCH08.qxd 10/31/06 10:07 PM Page 297
GROUP BY cart_id
HAVING ((NOW() - ('1'||' DAYS')::INTERVAL) >= MAX(added_on)))
AS old_carts;
RETURN outOldShoppingCartsCount;
END;
$$;
Create shopping_cart_delete_old_carts function
CREATE FUNCTION shopping_cart_delete_old_carts(INTEGER)
RETURNS VOID LANGUAGE plpgsql AS $$
DECLARE
inDays ALIAS FOR $1;
BEGIN
DELETE FROM shopping_cart
WHERE cart_id IN
(SELECT cart_id
FROM shopping_cart
GROUP BY cart_id
HAVING ((NOW() - (inDays||' DAYS')::INTERVAL) >= MAX(added_on)));
END;
$$;
3. Add the following business tier method to business/shopping_cart.php:
// Count old shopping carts
public static function CountOldShoppingCarts($days)
{
// Build SQL query
$sql = 'SELECT shopping_cart_count_old_carts(:days);';
// Build the parameters array
$params = array (':days' => $days);
// Prepare the statement with PDO-specific functionality
$result = DatabaseHandler::Prepare($sql);
// Execute the query and return the results
return DatabaseHandler::GetOne($result, $params);
}
// Deletes old shopping carts
public static function DeleteOldShoppingCarts($days)
{
// Build the SQL query
$sql = 'SELECT shopping_cart_delete_old_carts(:days);';
// Build the parameters array
$params = array (':days' => $days);
// Prepare the statement with PDO-specific functionality
$result = DatabaseHandler::Prepare($sql);
CHAPTER 8 ■ THE SHOPPING CART298
648XCH08.qxd 10/31/06 10:07 PM Page 298
// Execute the query
return DatabaseHandler::Execute($result, $params);
}
4. Create a new file named presentation/smarty_plugins/function.load_admin_cart.php, and
add the following code to it:
<?php
/* Smarty plugin function that gets called when the
load_admin_cart function plugin is loaded from a template */
function smarty_function_load_admin_cart($params, $smarty)
{
// Create AdminCart object
$admin_cart = new AdminCart();
$admin_cart->init();
// Assign template variable
$smarty->assign($params['assign'], $admin_cart);
}
// Class that supports cart admin functionality
class AdminCart
{
// Public variables available in smarty template
public $mMessage;
public $mDaysOptions = array (0 => 'All shopping carts',
1 => 'One day old',
10 => 'Ten days old',
20 => 'Twenty days old',
30 => 'Thirty days old',
90 => 'Ninety days old');
public $mSelectedDaysNumber = 0;
// Private members
public $_mAction = '';
// Class constructor
public function __construct()
{
foreach ($_POST as $key => $value)
// If a submit button was clicked
if (substr($key, 0, 6) == 'submit')
{
// Get the scope of submit button
$this->_mAction = substr($key, strlen('submit_'), strlen($key));
// Get selected days number
if (isset ($_POST['days']))
CHAPTER 8 ■ THE SHOPPING CART 299
648XCH08.qxd 10/31/06 10:07 PM Page 299
$this->mSelectedDaysNumber = (int) $_POST['days'];
else
trigger_error('days value not set');
}
}
public function init()
{
// If counting shopping carts
if ($this->_mAction == 'count')
{
$count_old_carts =
ShoppingCart::CountOldShoppingCarts($this->mSelectedDaysNumber);
if ($count_old_carts == 0)
$count_old_carts = 'no';
$this->mMessage = 'There are ' . $count_old_carts .
' old shopping carts (selected option: ' .
$this->mDaysOptions[$this->mSelectedDaysNumber] .
').';
}
// If deleting shopping carts
if ($this->_mAction == 'delete')
{
$this->mDeletedCarts =
ShoppingCart::DeleteOldShoppingCarts($this->mSelectedDaysNumber);
$this->mMessage = 'The old shopping carts were removed from the
database (selected option: ' .
$this->mDaysOptions[$this->mSelectedDaysNumber] .').';
}
}
}
?>
5. Create a new file in the presentation/templates folder named admin_cart.tpl, and type the
following code:
{* admin_cart.tpl *}
{load_admin_cart assign='admin_cart'}
<span class="admin_page_text">Admin users' shopping carts:</span>
<br /><br />
{if $admin_cart->mMessage neq ""}
<span class="admin_page_text">{$admin_cart->mMessage}</span>
<br /><br />
{/if}
CHAPTER 8 ■ THE SHOPPING CART300
648XCH08.qxd 10/31/06 10:07 PM Page 300
<form action="{"admin.php?Page=Cart"|prepare_link:"https"}" method="post">
<span class="admin_page_text">Select carts</span>
{html_options name="days" options=$admin_cart->mDaysOptions
selected=$admin_cart->mSelectedDaysNumber}
<input type="submit" name="submit_count" value="Count Old Shopping Carts" />
<input type="submit" name="submit_delete" value="Delete Old Shopping Carts" />
</form>
6. Modify presentation/templates/admin_menu.tpl by adding the highlighted link code to the cart
admin page:
<span class="menu_text"> |
<a href="{"admin.php?Page=Cart"|prepare_link:"https"}">CART ADMIN</a> |
<a href="{"admin.php"|prepare_link:"https"}">CATALOG ADMIN</a> |
7. Add the highlighted code that loads the admin_cart.tpl in admin.php:
elseif ($admin_page == 'ProductDetails')
$pageContentsCell = 'admin_product.tpl';
elseif ($admin_page == 'Cart')
$pageContentsCell = 'admin_cart.tpl';
How It Works: The Shopping Cart Admin Page
The hard work of the shopping cart admin page is done by the two functions you’ve added to the hatshop data-
base: shopping_cart_count_old_carts and shopping_cart_delete_old_carts. They both receive as
parameter the number of days that determine when a shopping cart is old, and they use the same logic to calcu-
late the shopping cart elements that are old and should be removed.
The age of a shopping cart is given by the age of the most recently added or changed item and is calculated using
the GROUP BY SQL clause. The condition that establishes whether a cart should be considered old is the following:
WHERE cart_id IN
(SELECT cart_id
FROM shopping_cart
GROUP BY cart_id
HAVING ((NOW() - (inDays||' DAYS')::INTERVAL) >= MAX(added_on)));
Summary
In this chapter, you learned how to store the shopping cart information in the database, and
you learned a few things in the process as well. Probably the most interesting was the way you
can store the shopping cart ID as a cookie on the client because you haven’t done anything
similar so far in this book.
CHAPTER 8 ■ THE SHOPPING CART 301
648XCH08.qxd 10/31/06 10:07 PM Page 301
After working through the process of creating the shopping cart, starting with the data-
base and ending with the presentation tier, we also touched on the new administrative
challenges.
You’ll complete the functionality offered by the custom shopping cart in the next chapter
with a custom checkout system. You’ll add a Place Order button to the shopping cart, which
will allow you to save the shopping cart information as a separate order in the database.
CHAPTER 8 ■ THE SHOPPING CART302
648XCH08.qxd 10/31/06 10:07 PM Page 302
Dealing with Customer Orders
The good news is that your shopping cart looks good and is fully functional. The bad news is
that it doesn’t allow the visitor to actually place an order, which makes the cart totally useless in
the context of a production system. We’ll deal with that problem in this chapter in two separate
stages. In the first part of the chapter, you’ll implement the client-side part of the order-placing
mechanism. More precisely, you’ll add a Place Order button to the shopping cart control, which
will allow the visitor to order the products in the shopping cart.
In the second part of the chapter, you’ll implement a simple orders administration page
where the site administrator can view and handle pending orders.
The code for each part of the site will be presented in the usual way, starting with the data-
base tier, continuing with the business tier, and finishing with the user interface (UI).
Implementing an Order Placement System
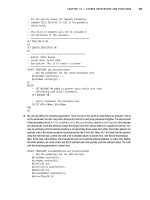
The entire order-placement system is related to the Place Order button mentioned earlier.
Figure 9-1 shows how this button will look after you update the cart_details componentized
template in this chapter.
Figure 9-1. The shopping cart with a Place Order button
303
CHAPTER 9
648XCH09.qxd 11/17/06 3:39 PM Page 303
304 CHAPTER 9 ■ DEALING WITH CUSTOMER ORDERS
The button looks quite boring for something that we can honestly say is the center of this
chapter’s universe. Still, a lot of logic is hidden behind it, so let’s talk about what should hap-
pen when the customer clicks that button. Remember that at this stage we don’t care who
places the order, but we do want to store information in the database about the products that
were ordered.
Basically, two things need to happen when the customer clicks the Place Order button:
• First, the order must be stored somewhere in the database. This means that you must
save the shopping cart’s products to an order named HatShop Order nnn and clear the
shopping cart.
• Secondly, the customer is redirected to a PayPal payment page where the customer
pays the necessary amount for the order. You can see the PayPal payment page in
Figure 9-2.
Figure 9-2. The PayPal payment page
■Note For the second development stage, we still don’t process payments ourselves but use a third-party
payment processor instead. Now we no longer need the PayPal shopping cart because we implemented our
own in the previous chapter. Instead, we’ll use the Single Item Purchases option of PayPal, which redirects
the visitor directly to a payment page.
A problem that arises when using a third-party payment processor is that the customer
can change his mind and cancel the order while at the checkout page. This can result in orders
648XCH09.qxd 11/17/06 3:39 PM Page 304
that are saved to the database (the order is saved before the page is redirected to the payment
page) but for which payment wasn’t completed. Obviously, we need a payment confirmation
system, along with a database structure that is able to store status information about each
order.
The confirmation system that you’ll implement is simple. Every payment processor,
including PayPal, can be instructed to send a confirmation message after a payment has been
processed. We’ll allow the site administrator to manually check, in the administration page,
which orders have been paid for. These orders are known as verified orders. You’ll see later in
this chapter how to manage them in the orders-management part of the site.
■Note PayPal and its competitors offer automated systems that inform your web site when a payment has
been completed or canceled. However, this book doesn’t visit the intimate details of any of these payment
systems—you’ll need to do your homework and study the documentation of your company of choice. The
PayPal Instant Payment Notification documentation is included in the Order Management Integration Guide,
which can be downloaded at
/>PP_OrderManagement_IntegrationGuide.pdf.
Now that you have an idea of what to do with that Place Order button, the next major
concerns are what order information to store in the database and how to store it. As you saw
in previous chapters, deciding how to store information helps you get a better idea of how the
whole system works.
Storing Orders in the Database
Two kinds of order information need to be stored:
• General details about the order, such as the date the order was created; whether and
when the products have been shipped; whether the order is verified, completed, or
canceled; and a few other details
• The products that belong to that order and their quantities
In the orders administration page that you’ll create later in this chapter, you’ll be able to
see and modify the general order information.
Creating the New Data Tables
Due to the nature of the information that will be stored, you need two data tables: orders and
order_detail. The orders table stores information regarding the order as a whole, while
order_detail contains the products that belong to each order.
CHAPTER 9 ■ DEALING WITH CUSTOMER ORDERS 305
648XCH09.qxd 11/17/06 3:39 PM Page 305
■Tip So far we have been consistent about naming our tables in singular form (shopping_cart,
department, and so on). However, here we make an exception for the orders table because ORDER is
also an SQL keyword. For the purposes of this book, we prefer to break the naming convention to avoid any
confusion while writing the SQL code, and generally speaking, it isn’t good practice to use SQL keywords as
object names.
These tables have a one-to-many relationship, enforced through a FOREIGN KEY constraint
on their order_id fields. One-to-many is the usual relationship implemented between an
orders table and an order_detail table. The order_detail table contains many records that
belong to one order. You might want to revisit Chapter 4 where the table relationships are
explained in more detail.
You’ll implement the tables in the following exercise.
Exercise: Adding the orders and the order_detail Tables to the Database
1. Load pgAdmin III, and connect to the hatshop database.
2. Click Tools
➤ Query tool (or click the SQL button on the toolbar).A new query window should appear.
3. Use the query tool to execute this code, which creates the orders table in your hatshop database:
Create orders table
CREATE TABLE orders
(
order_id SERIAL NOT NULL,
total_amount NUMERIC(10,2) NOT NULL DEFAULT 0.00,
created_on TIMESTAMP NOT NULL,
shipped_on TIMESTAMP,
status INTEGER NOT NULL DEFAULT 0,
comments VARCHAR(255),
customer_name VARCHAR(50),
shipping_address VARCHAR(255),
customer_email VARCHAR(50),
CONSTRAINT pk_order_id PRIMARY KEY (order_id)
);
4. Use the query tool to execute this code, which creates the order_detail table in your hatshop database:
Create order_detail table
CREATE TABLE order_detail
(
order_id INTEGER NOT NULL,
product_id INTEGER NOT NULL,
product_name VARCHAR(50) NOT NULL,
quantity INTEGER NOT NULL,
unit_cost NUMERIC(10, 2) NOT NULL,
CHAPTER 9 ■ DEALING WITH CUSTOMER ORDERS306
648XCH09.qxd 11/17/06 3:39 PM Page 306
CONSTRAINT pk_order_id_product_id PRIMARY KEY (order_id, product_id),
CONSTRAINT fk_order_id FOREIGN KEY (order_id)
REFERENCES orders (order_id)
ON UPDATE RESTRICT ON DELETE RESTRICT
);
How It Works: The Data Tables
Now that you’ve created the tables, let’s take a closer look at their structure and relationships.
The orders Table
The orders table contains two categories of information: data about the order itself (the first six fields) and data
about the customer that made the order (last three fields).
An alternative would be to store the customer information in a separate table named customer and store only the
customer_id value in the orders table. However, storing customer data is not one of the goals of this develop-
ment stage. At this stage, we prefer to keep things simple because it doesn’t matter who made the order, just what
products have been sold. You’ll deal with creating a separate customer table in Chapter 11.
Third-party payment processors such as PayPal store and manage the complete customer information, so it
doesn’t need to be stored in your database as well. We have added the customer_name, shipping_address,
and customer_email fields as optional fields that can be filled by the administrator if it’s easier to have this
information at hand for certain (or all) orders.
The field names are self-explanatory. order_id is the primary key of the table. total_amount stores the total
value of the order. created_on and shipped_on specify when the order was created and shipped (the latter
supports NULLs if the order hasn’t been shipped yet).
The status field contains an integer that can have these values:
• 0: The order has been
placed
. This is the initial status of an order after the Place Order button is clicked in
the shopping cart.
• 1: The order is
verified
. The administrator marks the order as verified after the payment was confirmed.
• 2: The order is
completed
. The administrator marks the order as completed after the products have been
shipped. At the same time, the shipped_on field is also populated.
• 3: The order is
canceled
. Typically, the administrator marks the order as canceled if the order has been
placed (by clicking the Place Order button), but the payment wasn’t processed, or in other scenarios that
require canceling the order.
■Note PayPal can automatically tell your web site when a payment is completed through the Instant Pay-
ment Notification feature. Using this feature can make things easier for the site administrator because he or
she wouldn’t need to manually check orders for which payment was received; however, we won’t use this
feature in HatShop because it’s too specific to PayPal. Consult the documentation of the payment provider
you choose to check what specific features they have prepared for you to play with.
CHAPTER 9 ■ DEALING WITH CUSTOMER ORDERS 307
648XCH09.qxd 11/17/06 3:39 PM Page 307
The order_detail Table
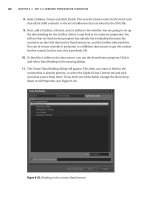
Let’s see what information the order_detail table contains. Take a look at Figure 9-3 to see some typical
order_detail records.
Figure 9-3. Sample data in the order_detail table
Each record in order_detail represents an ordered product that belongs to the order specified by order_id.
The primary key is formed by both order_id and product_id because a particular product can be ordered only
once in one order. A quantity field contains the number of ordered items, so it wouldn’t make any sense to have
one product_id recorded more than once for one order.
You might be wondering why the product_id
and
the price and product name are recorded in the
order_detail table, especially because if you have the product id, you can get all of the product’s details
from the product table without having any duplicated information.
We chose to duplicate the product data (the product’s name and price) in the order_detail table to guard
against product information changes; products can be removed from the database, and their name and price
can change, but this shouldn’t affect the orders’ data.
We store the product_id because apart from being the only programmatic way to link back to the original
product info (if the product still exists), product_id is used to create the primary key of order_detail.
product_id comes in very handy here because having it in the composite primary key in order_detail
saves you from needing to add another primary key field, and also ensures that you won’t have the same product
more than once in a single order.
Implementing the Data Tier
At this stage, you need to add two additional data tier functions in the hatshop database. The
most important is shopping_cart_create_order, which takes the products from the shopping
cart and creates an order with them. The other function is shopping_cart_empty, which
empties the visitor’s cart after the order has been placed.
CHAPTER 9 ■ DEALING WITH CUSTOMER ORDERS308
648XCH09.qxd 11/17/06 3:39 PM Page 308
In the following exercise we’ll implement those functions starting with
shopping_cart_empty because this is called from shopping_cart_create_order.
Exercise: Implementing the Functions
1. Load pgAdmin III, and connect to the hatshop database.
2. Click Tools
➤ Query tool (or click the SQL button on the toolbar).A new query window should appear.
3. Use the query tool to execute this code, which creates the shopping_cart_empty function in your
hatshop database:
Create shopping_cart_empty function
CREATE FUNCTION shopping_cart_empty(CHAR(32))
RETURNS VOID LANGUAGE plpgsql AS $$
DECLARE
inCartId ALIAS FOR $1;
BEGIN
DELETE FROM shopping_cart WHERE cart_id = inCartId;
END;
$$;
When a customer places an order, shopping_cart_create_order will call shopping_cart_empty to
delete the products from the customer’s shopping cart.
4. Use the query tool to execute this code, which creates the shopping_cart_create_order function in
your hatshop database:
Create shopping_cart_create_order function
CREATE FUNCTION shopping_cart_create_order(CHAR(32))
RETURNS INTEGER LANGUAGE plpgsql AS $$
DECLARE
inCartId ALIAS FOR $1;
outOrderId INTEGER;
cartItem cart_product;
orderTotalAmount NUMERIC(10, 2);
BEGIN
Insert a new record into orders
INSERT INTO orders (created_on) VALUES (NOW());
Obtain the new Order ID
SELECT INTO outOrderId
currval('orders_order_id_seq');
orderTotalAmount := 0;
Insert order details in order_detail table
FOR cartItem IN
SELECT p.product_id, p.name,
COALESCE(NULLIF(p.discounted_price, 0), p.price) AS price,
sc.quantity,
COALESCE(NULLIF(p.discounted_price, 0), p.price) * sc.quantity
AS subtotal
CHAPTER 9 ■ DEALING WITH CUSTOMER ORDERS 309
648XCH09.qxd 11/17/06 3:39 PM Page 309
FROM shopping_cart sc
INNER JOIN product p
ON sc.product_id = p.product_id
WHERE sc.cart_id = inCartId AND sc.buy_now
LOOP
INSERT INTO order_detail (order_id, product_id, product_name,
quantity, unit_cost)
VALUES (outOrderId, cartItem.product_id, cartItem.name,
cartItem.quantity, cartItem.price);
orderTotalAmount := orderTotalAmount + cartItem.subtotal;
END LOOP;
Save the order's total amount
UPDATE orders
SET total_amount = orderTotalAmount
WHERE order_id = outOrderId;
Clear the shopping cart
PERFORM shopping_cart_empty(inCartId);
Return the Order ID
RETURN outOrderId;
END;
$$;
This function gets called when the customer decides to buy the products in the shopping cart and clicks the
Place Order button.
The role of shopping_cart_create_order is to create a new order based on the products in the
customer’s shopping cart. This implies adding a new record to the orders table and a number of records
(one record for each product) in the order_detail table.
How It Works: Implementing Functions
The first step in shopping_cart_create_order involves creating the new record in the orders table. You
need to do this at the beginning to find out what order_id was generated for the new order. Remember that the
order_id field is an INTEGER column that has a sequence associated (orders_order_id_seq) and is auto-
matically generated by the database, so you need to retrieve its value after inserting a record into orders:
Insert a new record into orders
INSERT INTO orders (created_on) VALUES (NOW());
Obtain the new Order ID
SELECT INTO outOrderId
currval('orders_order_id_seq');
This is the basic mechanism of extracting the newly generated ID. After the INSERT statement, you save the
value returned by currval to a variable.You must do this immediately after inserting the new row because the value
returned by currval is incremented after the next successful insert operation. currval returns the current
value of the sequence that is equivalent with the last inserted order_id.
CHAPTER 9 ■ DEALING WITH CUSTOMER ORDERS310
648XCH09.qxd 11/17/06 3:39 PM Page 310
Using the outOrderId variable, you add the order_detail records by gathering information from the product
and shopping_cart tables. You get the list of the products and their quantities from shopping_cart, get their
names and prices from product, and save these records one by one to the order_detail table.
Insert order details in order_detail table
FOR cartItem IN
SELECT p.product_id, p.name,
COALESCE(NULLIF(p.discounted_price, 0), p.price) AS price,
sc.quantity,
COALESCE(NULLIF(p.discounted_price, 0), p.price) * sc.quantity
AS subtotal
FROM shopping_cart sc
INNER JOIN product p
ON sc.product_id = p.product_id
WHERE sc.cart_id = inCartId AND sc.buy_now
LOOP
INSERT INTO order_detail (order_id, product_id, product_name,
quantity, unit_cost)
VALUES (outOrderId, cartItem.product_id, cartItem.name,
cartItem.quantity, cartItem.price);
orderTotalAmount := orderTotalAmount + cartItem.subtotal;
END LOOP;
■Tip When joining product and shopping_cart, you get the product_id from product, but you
could also get it from
shopping_cart; the result would be the same because the table join is made on
the product_id column.
While saving the products, the function also calculates the total amount of the order by adding each product’s
price multiplied by its quantity to orderTotalAmount. This value is then saved as the order’s total_amount:
Save the order's total amount
UPDATE orders
SET total_amount = orderTotalAmount
WHERE order_id = outOrderId;
In the end, the function empties the visitor’s shopping cart calling the shopping_cart_empty function and
returns the order’s ID:
Clear the shopping cart
PERFORM shopping_cart_empty(inCartId);
Return the Order ID
RETURN outOrderId;
CHAPTER 9 ■ DEALING WITH CUSTOMER ORDERS 311
648XCH09.qxd 11/17/06 3:39 PM Page 311
Implementing the Business Tier
In this step, you only need a single method, CreateOrder, which you’ll add to the ShoppingCart
class inside business/shopping_cart.php:
// Create a new order
public static function CreateOrder()
{
// Build SQL query
$sql = 'SELECT shopping_cart_create_order(:cart_id);';
// Build the parameters array
$params = array (':cart_id' => self::GetCartId());
// Prepare the statement with PDO-specific functionality
$result = DatabaseHandler::Prepare($sql);
// Execute the query and return the results
return DatabaseHandler::GetOne($result, $params);
}
The method calls the shopping_cart_create_order data tier function, returning the
order_id of the newly created order.
Implementing the Presentation Tier
You’ve finally arrived at the part of the process where you’ll put the code you’ve written into
action. The UI consists of the Place Order button along with all the logic behind it, which
allows the visitor to become a customer.
This button is the only addition on the visitor side for the custom checkout. Let’s first
place the button on the cart_details template file, and then implement its functionality.
To get the desired functionality, you just follow a few simple steps. The first one involves
adding the Place Order button to the shopping cart.
Adding the Place Order Button
Modify presentation/templates/cart_details.tpl by adding a new button just after the
Update button, as highlighted in the following code snippet:
<table>
<tr>
<td class="cart_total">
<span>Total amount:</span>
<span class="price">${$cart_details->mTotalAmount}</span>
</td>
<td class="cart_total" align="right">
<input type="submit" name="update" value="Update" />
<input type="submit" name="place_order" value="Place Order" />
</td>
</tr>
</table>
Cool, now you have a Place Order button in the shopping cart!
CHAPTER 9 ■ DEALING WITH CUSTOMER ORDERS312
648XCH09.qxd 11/17/06 3:39 PM Page 312
Implementing the Order Placement Functionality
Now it’s time to implement the Place Order button’s functionality. Because this functionality
depends on the company that processes your payments, you might need to adapt it to the
behavior of your payment processing company. If you use PayPal, the code that redirects the
visitor to a payment was already presented in “Using the PayPal Single Item Purchases
Feature” section of Chapter 6.
Add the following highlighted code in the init() method of the CartDetails class in
presentation/smarty_plugins/function.load_cart_details.php:
// Calculate the total amount for the shopping cart
$this->mTotalAmount = ShoppingCart::GetTotalAmount();
// If the Place Order button was clicked
if(isset ($_POST['place_order']))
{
// Create the order and get the order ID
$order_id = ShoppingCart::CreateOrder();
// This will contain the PayPal link
$redirect =
' .
'&item_name=HatShop Order ' . $order_id .
'&item_number=' . $order_id .
'&amount=' . $this->mTotalAmount .
'¤cy=USD&return=www.example.com' .
'&cancel_return=www.example.com';
// Redirection to the payment page
header('Location: ' . $redirect);
exit;
}
// Get shopping cart products
$this->mCartProducts =
ShoppingCart::GetCartProducts(GET_CART_PRODUCTS);
Of course, if you use another company to process your payments, you’ll need to modify
the code accordingly.
When a visitor clicks the Place Order button, two important actions happen. First, the
order is created in the database by calling the CreateOrder method of the ShoppingCart class.
This function calls the shopping_cart_create_order database function to create a new order
with the products in the shopping cart and returns the ID of the new order:
// Create the order and get the order ID
$order_id = ShoppingCart::CreateOrder();
CHAPTER 9 ■ DEALING WITH CUSTOMER ORDERS 313
648XCH09.qxd 11/17/06 3:39 PM Page 313
Second, the visitor is redirected to the payment page, which requests payment for an item
named “HatShop Order nnn” with a value that amounts to the total value of the order.
Right now, your Place Order button is fully functional! Test it by adding some products to
your cart, and clicking Place Order. Your shopping cart should be cleared, and you should be
forwarded to a PayPal payment page like the one shown earlier in Figure 9-2.
Administering Orders
So your visitor just made an order. Now what?
After giving visitors the option to pay for your products, you need to make sure they
actually get what they paid for. HatShop needs a carefully designed orders administration
page, where the administrator can quickly see the status of pending orders.
■Note This chapter doesn't intend to help you create a perfect order administration system but rather
something that is simple and functional enough to get you on the right track.
The orders administration part of the site will consist of two componentized templates
named admin_orders and admin_order_details.
When the administrator clicks on the ORDERS ADMIN link, the admin.php page loads the
admin_orders componentized template that offers the capability to filter the orders. When
first loaded, it offers you various ways of selecting orders, as shown in Figure 9-4.
Figure 9-4. The Orders Admin page
After clicking one of the Go! buttons, the matching orders appear in a table (see Figure 9-5).
CHAPTER 9 ■ DEALING WITH CUSTOMER ORDERS314
648XCH09.qxd 11/17/06 3:39 PM Page 314
Figure 9-5. Selecting the most recent orders in the Orders Admin page
When you click the View Details button for an order, you are sent to a page where you can
view and update order information, as shown in Figure 9-6.
Figure 9-6. Administering order details
CHAPTER 9 ■ DEALING WITH CUSTOMER ORDERS 315
648XCH09.qxd 11/17/06 3:39 PM Page 315
Setting Up the Orders Administration Page
Before you start creating the admin_orders and the admin_order_details componentized
templates, let’s modify admin.php to load these componentized templates and also modify
admin_menu.tpl to display an ORDERS ADMIN link.
Exercise: Setting Up ADMIN ORDERS
1. Modify admin.php to include a reference to include/app_top.php that we’ll later create:
// Load Business Tier
require_once BUSINESS_DIR . 'catalog.php';
require_once BUSINESS_DIR . 'shopping_cart.php';
require_once BUSINESS_DIR . 'orders.php';
2. In the admin.php file, add the highlighted code that loads admin_orders.tpl and
admin_order_details.tpl:
elseif ($admin_page == 'Cart')
$pageContentsCell = 'admin_cart.tpl';
elseif ($admin_page == 'Orders')
$pageContentsCell = 'admin_orders.tpl';
elseif ($admin_page == 'OrderDetails')
$pageContentsCell = 'admin_order_details.tpl';
3. Modify presentation/templates/admin_menu.tpl by adding the highlighted link code to the cart
admin page:
<span class="menu_text"> |
<a href="{"admin.php?Page=Orders"|prepare_link:"https"}">ORDERS ADMIN</a>
|
<a href="{"admin.php?Page=Cart"|prepare_link:"https"}">CART ADMIN</a> |
Displaying Pending Orders
In the following pages, you’ll implement the admin_orders componentized template and its
supporting data tier and business tier functionality. admin_orders is the componentized tem-
plate that allows the administrator to view the orders that have been placed on the web site.
Because the orders list will become very long, it is important to have a few well-chosen
filtering options.
The administrator will be able to select the orders using the following criteria:
• Show the most recent orders.
• Show orders that took place in a certain period of time.
• Show orders with a specified status value.
CHAPTER 9 ■ DEALING WITH CUSTOMER ORDERS316
648XCH09.qxd 11/17/06 3:39 PM Page 316
Okay, now that you know what you want, let’s start writing some code. You’ll start with the
data tier.
Implementing the Data Tier
In the following exercise, you’ll create the data tier functions one at a time, and we’ll comment
a little upon each one of them.
Exercise: Implementing the Functions
1. Load pgAdmin III, and connect to the hatshop database.
2. Click Tools
➤ Query tool (or click the SQL button on the toolbar).A new query window should appear.
3. Use the query tool to execute this code, which creates the order_short_details type and
orders_get_most_recent_orders function in your hatshop database:
Create order_short_details type
CREATE TYPE order_short_details AS
(
order_id INTEGER,
total_amount NUMERIC(10, 2),
created_on TIMESTAMP,
shipped_on TIMESTAMP,
status INTEGER,
customer_name VARCHAR(50)
);
Create orders_get_most_recent_orders function
CREATE FUNCTION orders_get_most_recent_orders(INTEGER)
RETURNS SETOF order_short_details LANGUAGE plpgsql AS $$
DECLARE
inHowMany ALIAS FOR $1;
outOrderShortDetailsRow order_short_details;
BEGIN
FOR outOrderShortDetailsRow IN
SELECT order_id, total_amount, created_on,
shipped_on, status, customer_name
FROM orders
ORDER BY created_on DESC
LIMIT inHowMany
LOOP
RETURN NEXT outOrderShortDetailsRow;
END LOOP;
END;
$$;
CHAPTER 9 ■ DEALING WITH CUSTOMER ORDERS 317
648XCH09.qxd 11/17/06 3:39 PM Page 317
The orders_get_most_recent_orders function retrieves a list of the most recent orders. The SELECT
SQL statement used in this method uses the LIMIT clause to limit the number of returned rows to
inHowMany rows.
The ORDER BY clause is used to sort the results. The default sorting mode is ascending, but by adding
DESC, the descending sort mode is set (so the most recent orders will be listed first).
4. Use the query tool to execute this code, which creates the orders_get_orders_between_dates
function in your hatshop database:
Create orders_get_orders_between_dates function
CREATE FUNCTION orders_get_orders_between_dates(TIMESTAMP, TIMESTAMP)
RETURNS SETOF order_short_details LANGUAGE plpgsql AS $$
DECLARE
inStartDate ALIAS FOR $1;
inEndDate ALIAS FOR $2;
outOrderShortDetailsRow order_short_details;
BEGIN
FOR outOrderShortDetailsRow IN
SELECT order_id, total_amount, created_on,
shipped_on, status, customer_name
FROM orders
WHERE created_on >= inStartDate AND created_on <= inEndDate
ORDER BY created_on DESC
LOOP
RETURN NEXT outOrderShortDetailsRow;
END LOOP;
END;
$$;
This function returns all the records in which the current date is between inStartDate and inEndDate
that are supplied as parameters. The results are sorted descending by date.
5. Use the query tool to execute this code, which creates the orders_get_orders_by_status function
in your hatshop database:
Create orders_get_orders_by_status function
CREATE FUNCTION orders_get_orders_by_status(INTEGER)
RETURNS SETOF order_short_details LANGUAGE plpgsql AS $$
DECLARE
inStatus ALIAS FOR $1;
outOrderShortDetailsRow order_short_details;
BEGIN
FOR outOrderShortDetailsRow IN
SELECT order_id, total_amount, created_on,
shipped_on, status, customer_name
FROM orders
WHERE status = inStatus
ORDER BY created_on DESC
LOOP
CHAPTER 9 ■ DEALING WITH CUSTOMER ORDERS318
648XCH09.qxd 11/17/06 3:39 PM Page 318