Adobe Photoshop CS4 Digital Classroom phần 9 doc
Bạn đang xem bản rút gọn của tài liệu. Xem và tải ngay bản đầy đủ của tài liệu tại đây (2.44 MB, 39 trang )
293Lesson 12, Creating Images for Web and Video
What you’ll learn
in this lesson:
Creating web and •
video presets
Saving a still image for •
use on the web
Saving a still image with •
transparency for video
Building animation for •
web and video
Creating Images for
Web and Video
Photoshop’s exibility and range of features have allowed it to gain
acceptance in nearly every sector of the computer graphics industry.
A very common use for Photoshop is creating imagery for web and
video production.
Starting up
In this lesson, you’ll create a group of projects for both web and video production. You’ll work
with still and animated graphics for each medium.
Before starting, make sure that your tools and panels are consistent by resetting your preferences.
See “Resetting Adobe Photoshop CS4 preferences” on page 3.
You will work with several les from the ps12lessons folder in this lesson. Make sure that you
have loaded the pslessons folder onto your hard drive from the supplied DVD. See “Loading
lesson les” on page 5.
Lesson 12
PSCS4.indb 293PSCS4.indb 293 9/17/2008 2:48:52 PM9/17/2008 2:48:52 PM
294
Starting up
Adobe Photoshop CS4 Digital Classroom
12
In order to work with video in Photoshop, you must have the Extended version and the
QuickTime player plug-in installed on your computer. While pre-installed with the Mac OS
operating system, for Windows users, the QuickTime player is available as a free download from
the Apple web site, apple.com/quicktime.
See Lesson 12 in action!
Use the accompanying video to gain a better understanding of how to use some of the features
shown in this lesson. The video tutorial for this lesson can be found on the included DVD.
Viewing the completed le
Before starting this lesson, you’ll use your browser to view the completed page with
navigational links that you will create in this part of the lesson. This might be used as a starting
point for a web page, or for comping a wireframe for client approval.
1 Open your web browser—you can use any browser for this lesson (Firefox, Safari, Opera,
or Internet Explorer, to name a few).
2 Choose File > Open, or Open File. The exact menu selection may vary, depending upon
the type and v
ersion of your browser, but the menu item for opening a page in your
browser should be under the File menu.
This page is created using CSS, you can export pages built from tables of CSS out of Photoshop’s
Save for Web and Devices feature. Find out more about CSS (Cascading Styles Sheets) at
w3.org/Style/CSS/.
12
PSCS4.indb 294PSCS4.indb 294 9/17/2008 2:48:54 PM9/17/2008 2:48:54 PM
Starting up
295Lesson 12, Creating Images for Web and Video
12
3 In the Open dialog box, navigate to the ps12lessons folder on your hard drive and
open the le named ps1201_done.html. An image created to help viewers navigate a
web site appears.
The completed web page in a web browser.
4 Click on the Sales, Service, About and Contact text links to see that you are directed to
generic pages with related titles.
You will create this web page from start to nish,
including adding the links, and
exporting the page using CSS technology.
5 You can keep the nished w
eb page open in the browser for reference, or choose
File > Close.
6 Return to Photoshop CS4.
PSCS4.indb 295PSCS4.indb 295 9/17/2008 2:48:55 PM9/17/2008 2:48:55 PM
296
Changing your units of measurement
Adobe Photoshop CS4 Digital Classroom
12
Determining image size for the Web
This gure represents a typical monitor that is set at a screen resolution of 800 x 600. Many
viewers will use a higher resolution, but this is the typical resolution that most web designers
build images to t.
800 pixels
600 pixels
400 pixels
200 pixels
A typical screen display broken into quarters.
To determine how wide a web image should be, break down the total number of screen pixels
into sections. Instead of thinking about how many pixels wide an image should be, think about
what percentage of the screen you want the image to occupy. In other words, if you want the
image to occupy half of the screen (typically estimated at 800 pixels for browser windows), type
400 into the Width text eld in the Pixel Dimension section of the Image Size dialog box. For
one quarter of the screen, type 200, and so on. It is a di erent way of thinking, especially for
those from the print design environment. It should also be noted that a pixel is a pixel, no matter
what the ppi resolution of your image is. So, 200 pixels in a 300 ppi image takes up the same
amount of disk space as 200 pixels in a 72 ppi image.
PSCS4.indb 296PSCS4.indb 296 9/17/2008 2:48:56 PM9/17/2008 2:48:56 PM
Changing your units of measurement
297Lesson 12, Creating Images for Web and Video
12
Changing your units of measurement
Before starting the web project, verify that your measurements are set in the pixel unit. You
make that change in your Photoshop Preferences.
1 Choose Edit > Preferences > Units & Rulers (Windows) or Photoshop > Preferences
> Units & Rulers (Mac OS). The Preferences dialog box appears, with Units & Rulers
already selected.
2 From the Units section of the Preferences dialog box, choose pixels from the Rulers
dr
op-down menu. Press OK.
Changing the unit of measurement in Photoshop.
PSCS4.indb 297PSCS4.indb 297 9/17/2008 2:48:57 PM9/17/2008 2:48:57 PM
298
Creating the web page
Adobe Photoshop CS4 Digital Classroom
12
Creating the web page
In this part of the lesson you will open the start le and get right to work adding content, links
and slices.
1 From Photoshop choose File > Browse, or click on Launch Bridge ( ) in the
Application bar. When Adobe Bridge appears, navigate to the ps12lessons folder and
double-click to open the le named ps1201.psd. An image of a man on a beach with a
kite appears.
The ps1201.psd image.
The rst step you will take with this le is save it as a work le, then ip the image so
that man is on the left side rather than the right.
2 Choose File > Save As. When the Save As dialog box appears navigate to the ps12lessons
folder and type ps1201_w
ork.psd into the Name text eld. Choose Photoshop from the
Format drop-down menu and press Save.
3 Choose Image > Image Rotation and select Flip Canvas Horizontal. The image ips
so
that the man is now on the left. Press Ctrl+S (Windows) or Command+S (Mac OS) to
save the le.
Adding the Text
You will now add the header text, in the upper left of the image, and the text that will serve as
links in the nal page.
1 Select the Type tool ( ) and click anywhere in the upper left of the image, the text cursor
appears. In the Options bar, select Myriad Pro from the Font family drop-down menu,
Bold from the Font style drop-down menu, and 60 from the Font size drop-down menu.
2 Press the Center text button (
) in the Options bar, then click once on the Text color
swatch in the Options bar and choose white from the Color Picker dialog box that
appears, press OK.
The Options bar as it appears after step 1 and 2.
PSCS4.indb 298PSCS4.indb 298 9/17/2008 2:48:57 PM9/17/2008 2:48:57 PM
Creating the web page
299Lesson 12, Creating Images for Web and Video
12
3 Now that the text options are set, type the following with returns as shown:
Go
Fly
a Kite
If you need to reposition your text, and do not wish to exit the type options, hold down the Ctrl
(Windows) or Command (Mac OS) key, then click and drag to reposition the text layer.
You will now ne-tune the text by adjusting the leading (space between the lines of
text) and the kerning (space between the letters).
4 With the text area still active press Ctrl+A (Windows) or Command+A (Mac OS) to
select all the text,
then press Alt+Arrow Up key (Windows) or Option+Arrow Up
key to reduce the space between the letters. If the space is reduced too much, press
Alt+Arrow Down key (Windows) or Option+Arrow Down key (Mac OS) to move the
lines of text further apart from each other. Try to set the leading so that the text is almost
on top of the next line.
5 Reduce the spacing between the word a and kite b
y clicking to insert the cursor
anywhere between those letters, then hold down the Alt+Left Arrow key (Windows) or
Option+Left Arrow key (Mac OS) and press repeatedly until the space is smaller, you
can determine the amount of space. In our example, the Alt/Option+Left Arrow key was
pressed approximately 15 times.
Alternately, you could have left no space between the words a and kite, kern out the space
between by repeatedly pressing the Alt/Option+Right Arrow key.
6 While the text is still active, click on the Create warped text button (
) in the Options
bar. The Warp Text dialog box appears. You can warp text to create all sorts of e ects, in
this example the text is being distorted to add a little dimension.
7 In the Warp Text dialog box, select Rise from the Style drop-down menu, and make sure
that the Hor
izontal radio button is active.
8 Click and drag the Bend slider to the left to change the value to +10, or type +10 into
the Bend text eld.
PSCS4.indb 299PSCS4.indb 299 9/17/2008 2:48:59 PM9/17/2008 2:48:59 PM
300
Creating the web page
Adobe Photoshop CS4 Digital Classroom
12
9 Verify that the Horizontal Distortion is set to 0 (zero), then click and drag the Vertical
Distortion slider to the right to about the value of 25, or type 25 into the Vertical
Distortion text eld. Press OK. The warp is applied to the text.
Applying the Rise warp. Result.
10 Click on the Commit checkbox ( ) on the right side of the Options bar to con rm your
text edits. If necessary choose the Move tool (
) and click and drag to reposition the text
so that it is visible in the upper left corner of the image.
Adding Style to the text
Now that you have your header text created, you will add a layer style to it.
1 With the Go Fly a Kite text layer still selected, click the Add a layer style button ( )
at the bottom of the Layers panel. Select Outer Glow from the layer style drop-down
menu. The Layer Style dialog box appears with Outer Glow settings visible.
2 From the Blend Mode drop-down menu choose Normal.
3 In the Structure section, click once on the Set color of glow swatch, the Color Picker
appear
s. Click and drag the slider, on the right of the color pane, until you see blue
colors in the color pane. Click on a navy blue and press OK.
PSCS4.indb 300PSCS4.indb 300 9/17/2008 2:49:00 PM9/17/2008 2:49:00 PM
Creating the text for the links
301Lesson 12, Creating Images for Web and Video
12
4 Click and drag the Size slider to the right until you reach the value of 25, or enter 25
into the Size text eld. Press OK to close the dialog box.
Change the options for the Outer Glow style. Result.
Creating the text for the links
Now that you have the header text completed, you will create the individual text layers that
will serve as links.
1 Select the Text tool ( ) and click somewhere to the top right of the large kite the man is
holding in the image, the text cursor appears.
The Type tool remembers the last settings, such as font and size. Before typing you need
to change the text size and or
ientation.
2 Choose 30 from the Font size drop-down menu, then click on the Left align text button
(
) in the Options bar.
3 Type Sales,
then press Ctrl+Enter (Windows) or Command+Return (Mac OS) to
commit the text entry and exit the type options.
Pressing Ctrl/Command+Enter or Return is the same as pressing the Commit ( ) checkbox in
the Options bar.
4 Position your cursor under the Sales text and click to create a new text entry. Exact
position is not impor
tant as you will reposition the text later. Type Service, then press
Ctrl+Enter (Windows) or Command+Return (Mac OS) to commit the text entry and
exit the type options.
PSCS4.indb 301PSCS4.indb 301 9/17/2008 2:49:02 PM9/17/2008 2:49:02 PM
302
Creating the text for the links
Adobe Photoshop CS4 Digital Classroom
12
5 Position your cursor under the word Service and click and type About, then press
Ctrl+Enter (Windows) or Command+Return (Mac OS) to commit the text entry and
exit the type options.
6 Position your cursor under the word About, to make the last text entry, and click. Type
the w
ord Contact, then press Ctrl+Return (Windows) or Command+Enter (Mac OS)
to commit the text entry and exit the type options.
7 Choose File > Save, or press Ctrl+S (Windows) or Command+S (Mac OS) to save the
le
. Keep this le open for the next part of this lesson.
Positioning and distribution of text
In this part of the lesson, you will use the Move tool to reposition the text and then distribute
the vertical space between them evenly.
1 Select the Move tool ( ) and Ctrl+Click (Windows) or Command+Click (Mac OS)
on the word Sales (in the image). By holding down the Ctrl/Command key you have
turned on the auto-select feature. You can easily activate layers without having to go to
the Layers panel.
With the Sales layer selected, click and drag the text so that it is o to the r
ight of the
curved edge of the kite.
2 Hold down the Ctrl/Command key and click on the other three text layers and position
them o to the r
ight of the kite, following the curve of the kite image.
3 Make sure that the Layers panel is visible and select the Sales text layer. Then Ctrl+click
(W
indows) or Command+Click (Mac OS) on the Service, About, and Contact text
layers (in the Layers panel).
Note that when you select three or more layers, the Align and Distribute options become
visib
le in the Options bar. (Align becomes visible with two layers selected.)
4 Choose Distribute vertical centers (
) from the Options bar. The text layers are
distributed evenly.
Select the four text layers. Distribute the text layers vertically.
PSCS4.indb 302PSCS4.indb 302 9/17/2008 2:49:04 PM9/17/2008 2:49:04 PM
Creating the text for the links
303Lesson 12, Creating Images for Web and Video
12
Creating slices
A slice is a part of an image that is cut from a larger image. Think of a slice as a piece of a puzzle
that, when placed alongside other related pieces, creates an entire image. What holds the pieces
together is either an HTML table or CSS. In this example, you will use Cascading styles to
create the nal HTML page.
An example of a sliced image.
Slices can be bene cial when images are large in size, as downloading smaller packets of
information on the Web is faster than downloading one large packet, and also better when you
need to save parts of an image in di erent formats. In this exercise, you will create guides that
will then determine where the slicing of your image occurs.
1 If rulers are not already displayed, choose View > Rulers to show the rulers on the top
and left side of the document window.
2 Choose View > Snap to turn o the snapping featur
es for the rest of this lesson. The
snapping features sometimes force the cursor to align with elements in your images such
as the edges of the text layers.
Using the rulers, you will create guides on your document that will later de ne wher
e
you want to slice your image.
3 Click directly on the top (horizontal) ruler and then click and drag to pull a guide from
the r
uler. Continue dragging the guide; release it when the guide is just above the Sales
text layer.
PSCS4.indb 303PSCS4.indb 303 9/17/2008 2:49:05 PM9/17/2008 2:49:05 PM
304
Creating the text for the links
Adobe Photoshop CS4 Digital Classroom
12
4 Now, click and drag another guide from the top ruler and release it when it is in-
between the word Sales and the word Service in the image area.
Click and drag horizontal guides to separate the text.
5 Click and drag another guide from the top ruler and release it between the Service and
About text on the image, and another between the About and Contact text.
6 Lastly, click and drag a guide from the top ruler and release it underneath the Contact
text.
You should have a total of ve horizontal guides. You will now create the
vertical guides.
7 Click on the ruler on the left side of the image window and drag out a guide; release
the guide when y
ou reach the left side of the Sales, Service, About, Contact text on
the image.
8 Click again on the ruler on the left, and drag out a guide; release it when it is on the
r
ight side of the Sales, Service, About, Contact text on the image.
The guides are completed, the image with guides should look similar to our example.
The image with the guides in place.
If necessary, you can use the Move tool ( ) to click and drag existing guides.
PSCS4.indb 304PSCS4.indb 304 9/17/2008 2:49:06 PM9/17/2008 2:49:06 PM
Slicing it up
305Lesson 12, Creating Images for Web and Video
12
Slicing it up
No slicing has occurred at this point. In this part of the lesson you use options that are available
when using the Slice tool to easily create your slices.
1 Click and hold down on the Crop tool to select the hidden Slice tool ( ). Note that the
options change in the Options bar.
2 Click on the Slices Fr
om Guides button in the Options bar. Your image is automatically
sliced into several smaller images, based upon the location of your guides. The image is
not actually sliced in Photoshop, but will be when you save the le in the Save for Web
& Devices section of this lesson.
The slices created from the position of the guides.
Selecting and combining slices
In this section, you will select several slices and combine them into one slice. You can combine
and divide slices easily using contextual tools in Photoshop. You will rst remove the guides
since you no longer need them.
1 Choose View > Clear Guides. The guides are cleared, but the slices remain.
2 Click and hold on the Slice tool (
) to choose the hidden Slice Select tool ( ). Using
this tool, you can click to activate and adjust your slices.
You will now select all the slices, that are not going to be hyperlinks and combine them.
PSCS4.indb 305PSCS4.indb 305 9/17/2008 2:49:08 PM9/17/2008 2:49:08 PM
306
Slicing it up
Adobe Photoshop CS4 Digital Classroom
12
3 Using the Slice Select tool, click on the large slice in the lower-left corner of the image.
Then Shift+click on each one of the slices above. This adds each slice to the selection.
4 When you have all the slices on the left side selected, right-click (Windows) or
Ctrl+Click (Mac OS) and select Combine slices fr
om the contextual menu. The slices
are combined into one slice.
Select all slices on the left. Combine into one.
5 Now use the Slice Select tool to select the slice directly above the Sales text slice, then
hold down the Shift key and select the slice to the right. Right-click (Windows) or
Ctrl+Click (Mac OS) and select Combine slices from the contextual menu. The slices
are combined into one slice.
6 Select the large slice in the lower right of the image and select it with the Slice Select
tool.
Shift+click on the slices above it, excluding the top slice, which you have already
combined. Right-click (Windows) or Ctrl+Click (Mac OS) and select Combine slices
from the contextual menu. The slices are combined into one slice.
The task of combining slices is nished.
The slices as they appear after being combined.
In this example, you are combining slices manually, but you can also select slices across
columns and rows and let Photoshop determine which slice combination works best.
7 Choose File > Save to save this le
. Keep the image open for the next part of this lesson.
PSCS4.indb 306PSCS4.indb 306 9/17/2008 2:49:09 PM9/17/2008 2:49:09 PM
Slicing it up
307Lesson 12, Creating Images for Web and Video
12
Applying attributes to your slices
Now that you have de ned your slices, you will apply attributes to them. The attributes that
you will apply in this lesson are URL and Alt Tags. By de ning a URL, a link is made from
that slice to a location or le on the Web. By de ning an Alt Tag, you allow viewers to read a
text description of an image. This is helpful if a viewer is visually impaired or has turned o the
option for viewing graphics. An Alt Tag also helps search engines nd more relevant content on
your page.
1 With the ps1201_work.psd le still open and the Slice Select tool ( ) still selected, select
the slice containing the Sales text.
2 Click on the Set options for the cur
rent slice button ( ) in the Options bar. The Slice
Options dialog box appears.
You will be supplied with a link to a le in your lessons folder to test your links.
3 Type sales.html into the URL text eld.
4 Type Sales into the
Alt Tag text eld and press OK.
Enter the URL and Alt Tag information.
Your HTML le must be saved inside the ps12lessons folder in order to have a working link.
PSCS4.indb 307PSCS4.indb 307 9/17/2008 2:49:11 PM9/17/2008 2:49:11 PM
308
Using Save For Web & Devices
Adobe Photoshop CS4 Digital Classroom
12
5 Now, select the slice containing the text Service, and choose the Set options for the
current slice button in the Options bar. The Slice Options dialog box appears.
6 Type ser
vice.html into the URL text eld and Service in the Alt Tag text eld.
Press OK.
7 Select the slice containing the text About, and choose the Set options for the current
slice b
utton in the Options bar. The Slice Options dialog box appears.
8 Type a
bout.html into the URL text eld and About Us in the Alt Tag text eld.
Press OK.
9 Select the slice containing the text Contact, and choose the Set options for the current
slice b
utton in the Options bar. The Slice Options dialog box appears.
10 Type contact.html into the URL text eld and Contact Us in the
Alt Tag text eld.
Press OK.
11 Choose File > Save. Keep the document open for the next part of the lesson.
For this lesson, you do not put an alt tag on each slice, but it is recommended that you assign a
descriptive alt tag to each slice when producing images for the web.
Using Save For Web & Devices
The process of making an image look as good as possible at the smallest le size is called
optimizing. This is important for all images that are to be used on the Web, as most viewers
don’t want to wait long for information to appear.
In this part of the lesson, you’ll use the Save For Web & Devices feature to optimize your
navigational banner.
1 With the ps1201_work.psd le still open, choose File > Save For Web & Devices. The
Save For Web & Devices dialog box appears.
PSCS4.indb 308PSCS4.indb 308 9/17/2008 2:49:13 PM9/17/2008 2:49:13 PM
Using Save For Web & Devices
309Lesson 12, Creating Images for Web and Video
12
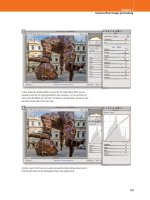
2 Select the 2-up tab to view your original image on the top and your optimized image
on the bottom. Note that the window may display the original on the left side and the
optimized image on the right.
C
A
B
A. Toolbox. B. Preview window. C. Optimization settings.
3 Select the Hand tool ( ) and click and drag directly on the image in either window to
reposition the image so that you can see the four slices containing text.
The Save For Web & Devices window is broken into three main areas:
Toolbox:
The Toolbox provides you with tools for panning and zooming in your image,
selecting slices, and sampling color.
Preview window: In addition to ha
ving the ability to view both the original and
optimized images individually, you can also preview the original and optimized images
side-by-side in 2-up view or with up to three variations in the 4-up view.
Optimization settings:
The Optimization settings allows you to specify the format and
settings of your optimized le.
PSCS4.indb 309PSCS4.indb 309 9/17/2008 2:49:13 PM9/17/2008 2:49:13 PM
310
Using Save For Web & Devices
Adobe Photoshop CS4 Digital Classroom
12
How to choose web image formats
When you want to optimize an image for the Web, what format should you choose? Based upon
the image you have in front of you, choose the format best suited for that type of image.
GIF: An acronym for Graphic Interchange File, the GIF format is
usually used on the Web to display simple colored logos, motifs, and
other limited-tone imagery. The GIF format supports a maximum of
256 colors as well as transparency. GIF is the only one of the four
formats here that supports built-in animation.
JPEG: An acronym for Joint Photographic Experts Group, the JPEG le
format has found wide acceptance on the Web as the main format for
displaying photographs and other continuous-tone imagery. The JPEG
format supports a range of millions of colors, allowing for the accurate
display of a wide range of artwork.
PNG: An acronym for Portable Network Graphics. PNG was intended
to blend the best of both the GIF and JPEG formats. PNG les come in
two di erent varieties: like GIF, PNG-8 can support up to 256 colors,
while the PNG-24 variety can support millions of colors, similar to the
JPEG format. Both PNG varieties support transparency and, as an
improvement on GIF’s all-or-nothing transparency function, a PNG le supports varying
amounts of transparency so that you can actually see through an image to your web page
contents. Note that not all browsers support the PNG format.
WBMP-de ne: A standard format for optimizing images for mobile
devices, WBMP les are 1-bit, meaning they contain only black and
white pixels.
4 Using the Slice Select tool, click on the Sales slice, then Shift+click on the Service,
About, and the Contact slices. Now they are all active.
Make sure that you are selecting the text slices in the Optimize preview, not the Original
preview window.
Now you will use a preset to optimize this text for the web. Typically, artwork with lots
of solid colors and text are saved as GIF or PNG-8, but images, like photographs fare
better in size and nal appearance when saved in the JPEG, or PNG-24 format. In this
example you will save just the text as GIF slices, and the rest of the image slices as JPEG.
PSCS4.indb 310PSCS4.indb 310 9/17/2008 2:49:15 PM9/17/2008 2:49:15 PM
Using Save For Web & Devices
311Lesson 12, Creating Images for Web and Video
12
5 In the Optimize panel, on the right, choose GIF 64 No Dither from the Preset
drop-down menu. The options are loaded in the optimize settings below the Preset
drop-down, but can be further edited, and customized if necessary.
This is why you selected this preset:
• The GIF format was selected because the text contains a solid white color. GIF
compr
esses images with solid colors to the smallest possible le size.
• 64 represents the number of colors that are retained when the le is sa
ved in GIF
format. GIF les utilize a color table model that allows up to 256 colors in an image.
The fewer the number of colors, the smaller the le size. You can see the color table
in the Color Table panel on the right side of the Save for Web & Devices dialog box.
• No Dither indicates that you do not want Photoshop to use dithering, or pixelation,
to cr
eate colors that are not included in the 64-color panel you have speci ed.
6 If it is not already selected, choose Adaptive from the Color reduction algorithm
dr
op-down menu, which is directly underneath the Optimized le format
drop-down menu.
Select GIF 64 No Dither format
for the slices containing text.
Note that the le size of the optimized image, based upon your current settings, is
displayed at the bottom of the optimized image preview.
The le size of the optimized image.
PSCS4.indb 311PSCS4.indb 311 9/17/2008 2:49:21 PM9/17/2008 2:49:21 PM
312
Optimizing the image slices
Adobe Photoshop CS4 Digital Classroom
12
Understanding Color Algorithms
GIFs can be reduced in size by reducing the amount of colors that create the image. This is
referred to as the Color Algorithm. The color Algorithm helps to specify the color palette that
will create the nal image. There are four main choices from which you can select.
Perceptual: a perceptual rendering is one where the goal is to produce a pleasing reproduction
of an original. This a good choice for illustrative graphics where color consistency or integrity is
less important.
Selective: creates a color table similar to the Perceptual color table, but favoring broad areas
of color and the preservation of web colors. If color integrity is important, this would be a good
selection. Selective is the default option.
Adaptive: creates a custom color table by sampling colors from the predominant spectrum in
the image. For example, if an image has many shades of red, the sampled colors are created from
colors in the red spectrum, providing a better range of important colors.
Web: uses the standard 216-color color table common to the Windows and Mac OS 8-bit
(256-color) palettes. This option ensures that no browser dither is applied to colors when
the image is displayed using 8-bit color. Using the web palette can create larger les, and is
becoming less of an issue as viewers increase their monitor capabilities.
Optimizing the image slices
Now that you optimized the text slices you will optimize the remaining image slices using a
di erent format. Though this isn’t always recommended, it can work well for some images. You
can optimize images even more by saving varying levels of the same format, for instance select
JPEG for all the slices but vary the quality level, depending upon the importance or location of
the slice.
1 Switch to show only the Optimized view, and open up the image preview window, by
clicking on the Optimized tab.
2 Using the Slice Select tool (
), click on the slice in the upper left side of the image, then
Shift+click on each of the other three (non-text) slices. There should be a total of four
slices selected.
3 From the Preset drop-down menu in the Optimized panel choose JPEG Medium.
You can test your le in a w
eb browser directly from the Save For Web & Devices
dialog box.
PSCS4.indb 312PSCS4.indb 312 9/17/2008 2:49:23 PM9/17/2008 2:49:23 PM
Saving files for video
313Lesson 12, Creating Images for Web and Video
12
4 Select the Preview in default browser button at the bottom of the Save For Web &
Devices dialog box. If you have a default browser installed, your image is opened on
a browser page. You can also de ne a browser using the Preview the optimized image
drop-down menu.
Notice that the slices are not apparent and that the code is visible in your preview.
Preview the optimized image in a browser.
5 Click on the slices that you designated as having URLs. You should be connected to the
assigned URLs. Use the Back button in your browser to return to your sliced image.
Close the browser window when you are nished testing the image. The Save For Web
& Devices Dialog box is still open.
6 Choose Save, and the Save Optimized As dialog box appears. Browse to the ps12lessons
folder and choose HTML and Images fr
om the Save as type (Windows) or Format
(Mac OS) drop-down menu. Press Save.
An HTML page, along with the sliced images, is saved in your ps12lessons folder. You
can no
w open the le in Dreamweaver, or any other web editing program, and continue
building the page, or copy and paste the table to another page.
7 Choose File > Save to save your original image. Choose File > Close to close the le
.
Saving les for video
If you are saving into Adobe applications such as After E ects, Premiere, or Flash, you do
not need to take extra steps to maintain transparency. In fact, you can simply browse, search,
and organize native .psd images directly in Adobe Bridge from the other Adobe Creative
Suite applications.
When importing into a non-Adobe video application, you need to consider transparency. Each
video application has its own set of importable formats. For this lesson, you will open a pre-
built le and save it as a TIFF with an alpha channel. Video editing applications recognize alpha
channels when de ning transparent areas on an image.
PSCS4.indb 313PSCS4.indb 313 9/17/2008 2:49:23 PM9/17/2008 2:49:23 PM
314
Saving files for video
Adobe Photoshop CS4 Digital Classroom
12
1 Open the le ps1202.psd. The image that appears is intended to overlay a video le.
An image with transparency applied to it.
2 If the Layers panel is not visible, choose Window > Layers to open the Layers panel.
3 Position your cursor over the vector mask on the Shape 1 layer. Hold down the Ctrl
(W
indows) or Command (Mac OS) key and click on the vector thumbnail for the
Rectangle Shape layer. This selects everything on that layer that is not transparent.
Ctrl/Command+click to make a selection from
a layer’s contents.
4 Click and hold the Ctrl+Shift (Windows) or Command+Shift (Mac OS) keys, and
click on the layer thumbnail for the layer named balloon. This adds the balloon layer to
the selection.
5 Choose Window > Channels to open the Channels panel.
PSCS4.indb 314PSCS4.indb 314 9/17/2008 2:49:24 PM9/17/2008 2:49:24 PM
Creating animation
315Lesson 12, Creating Images for Web and Video
12
6 Press the Save Selection as channel button ( ) at the bottom of the Channels panel. This
creates an alpha channel from the active selection.
Create an alpha channel from the selection.
In your alpha channel, the areas that are black are fully transparent, the areas that are white
are fully opaque, and any areas that are gray will be varying degrees of transparency. This is the
standard way that video editing applications treat alpha channels.
7 Choose File > Save As. When the Save As dialog box appears, navigate to the ps12lessons
folder and type ps1202_w
ork.psd into the Name text eld. Select TIFF from the
Format drop-down menu.
8 In the Save Options eld,
make sure that Layers is not checked and Alpha Channels is
checked. A warning stating that this image needs to be saved as a copy appears, which
means that your original le will keep layers intact. Press Save. The TIFF Options dialog
box appears.
9 In the TIFF Options dialog box, make sure that None is selected in the Image
Compr
ession section and leave other settings at their default settings. Select OK in
the TIFF Options window. You have saved a TIFF le with an area that will appear
transparent in your video editing application.
10 Close the original Photoshop document by choosing File > Close. If asked if you would
lik
e to save the changes, choose Don’t Save.
PSCS4.indb 315PSCS4.indb 315 9/17/2008 2:49:25 PM9/17/2008 2:49:25 PM
316
Creating animation
Adobe Photoshop CS4 Digital Classroom
12
Creating animation
In this lesson, you will create an animation using the default animation panel. If you have
Photoshop CS4 Extended, you can take the lesson further and use the Advanced timeline in the
video lesson that follows.
Working in Frame mode
Working in the Frame mode of the animation panel is much like creating an animation using
a ip book. When played, each frame is converted into a nal animation. Using the Frame
animation panel, you can also build individual frames and then have Photoshop automatically
create transitions between the frames for you. This process is called tweening. For this part of
the lesson, you will add a oating hot air balloon to the image of the lake.
1 Choose File > Browse and navigate to the ps12lessons folder. Select the images named
ps1203.psd and ps1204.psd, then Right-click (Windows) or Ctrl+click (Mac OS) and
select Open from the contextual menu. An image of a lake and an image of a red hot air
balloon open in separate document window tabs.
2 Click on the arrow to the right of the Arrange Documents (
) icon in the Application
bar at the top of the workspace and choose 2 Up from the drop-down menu.
Choose to show your two
images, side by side.
3 Select the Move tool ( ) and click and drag the balloon image (ps1204.psd) over to
the image of the lake (ps1203.psd). Release the mouse when you see the border appear
around the document window of the ps1203.psd image.
4 Click on the ps1204.psd image to make it active, and choose File > Close.
PSCS4.indb 316PSCS4.indb 316 9/17/2008 2:49:26 PM9/17/2008 2:49:26 PM
Creating animation
317Lesson 12, Creating Images for Web and Video
12
5 Choose Window > Animation to open the Photoshop Animation panel. As a default, the
Animation panel displays as a frame animation panel. If you see the Animation Timeline,
choose Convert to Frame Animation from the panel menu in the upper right corner.
Using the Frame Animation panel, you will create two di er
ent key frames and have
Photoshop automatically build the additional frames for you.
A
B
C
E
F G
H
I
D
A. Key frame. B. Selects frame delay time. C. Selects looping options. D. Player controls. E. Tween.
F. Duplicates selected frames. G. Delete selected frames. H. Panel menu. I. Convert to timeline animation.
6 If the Layers panel is not visible, choose Window > Layers. Select the balloon layer to
make sure that it is the active layer, then, using the Move tool, click and drag the balloon
so that it is in the lower left corner of the lake image.
Position the balloon to be in the lower left corner.
7 Type 15 to change the layer to a 15% opacity.
8 Click on the Duplicate selected frames button (
), at the bottom of the Animation panel.
A second frame is added to the right of the original.
9 Verify that you still have the balloon layer selected, then, using the Move tool (
), click
and drag the balloon to the upper right corner of the lake image. Then type 0 (zero) to
set the layer opacity at 100%.
PSCS4.indb 317PSCS4.indb 317 9/17/2008 2:49:27 PM9/17/2008 2:49:27 PM