Foundations of Python Network Programming 2nd edition phần 6 pptx
Bạn đang xem bản rút gọn của tài liệu. Xem và tải ngay bản đầy đủ của tài liệu tại đây (657.39 KB, 36 trang )
CHAPTER 9 ■ HTTP
160
But you should know that these other mechanisms exist if you are writing web clients, proxies, or even if
you simply browse the Web yourself and are interested in controlling your identity.
HTTP Session Hijacking
A perpetual problem with cookies is that web site designers do not seem to realize that cookies need to
be protected as zealously as your username and password. While it is true that well-designed cookies
expire and will no longer be accepted as valid by the server, cookies—while they last—give exactly as
much access to a web site as a username and password. If someone can make requests to a site with your
login cookie, the site will think it is you who has just logged in.
Some sites do not protect cookies at all: they might require HTTPS for your username and password,
but then return you to normal HTTP for the rest of your session. And with every HTTP request, your
session cookies are transmitted in the clear for anyone to intercept and start using.
Other sites are smart enough to protect subsequent page loads with HTTPS, even after you have left
the login page, but they forget that static data from the same domain, like images, decorations, CSS files,
and JavaScript source code, will also carry your cookie. The better alternatives are to either send all of
that information over HTTPS, or to carefully serve it from a different domain or path that is outside the
jurisdiction of the session cookie.
And despite the fact this problem has existed for years, at the time of writing it is once again back in
the news with the celebrated release of Firesheep. Sites need to learn that session cookies should always
be marked as secure, so that browsers will not divulge them over insecure links.
Earlier generations of browsers would refuse to cache content that came in over HTTPS, and that
might be where some developers got into the habit of not encrypting most of their web site. But modern
browsers will happily cache resources fetched over HTTPS—some will even save it on disk if the Cache-
control: header is set to public—so there are no longer good reasons not to encrypt everything sent
from a web site. Remember: If your users really need privacy, then exposing even what images,
decorations, and JavaScript they are downloading might allow an observer to guess which pages they are
visiting and which actions they are taking on your site.
Should you happen to observe or capture a Cookie: header from an HTTP request that you observe,
remember that there is no need to store it in a CookieJar or represent it as a cookielib object at all.
Indeed, you could not do that anyway because the outgoing Cookie: header does not reveal the domain
and path rules that the cookie was stored with. Instead, just inject the Cookie: header raw into the
requests you make to the web site:
request = urllib2.Request(url)
request.add_header('Cookie', intercepted_value)
info = urllib2.urlopen(request)
As always, use your powers for good and not evil!
Cross-Site Scripting Attacks
The earliest experiments with scripts that could run in web browsers revealed a problem: all of the HTTP
requests made by the browser were done with the authority of the user’s cookies, so pages could cause
quite a bit of trouble by attempting to, say, POST to the online web site of a popular bank asking that
money be transferred to the attacker’s account. Anyone who visited the problem site while logged on to
that particular bank in another window could lose money.
To address this, browsers imposed the restriction that scripts in languages like JavaScript can only
make connections back to the site that served the web page, and not to other web sites. This is called the
“same origin policy.”
Download from Wow! eBook <www.wowebook.com>
CHAPTER 9 ■ HTTP
161
So the techniques to attack sites have evolved and mutated. Today, would-be attackers find ways
around this policy by using a constellation of attacks called cross-site scripting (known by the acronym
XSS to prevent confusion with Cascading Style Sheets). These techniques include things like finding the
fields on a web page where the site will include snippets of user-provided data without properly
escaping them, and then figuring out how to craft a snippet of data that will perform some
compromising action on behalf of the user or send private information to a third party. Next, the would-
be attackers release a link or code containing that snippet onto a popular web site, bulletin board, or in
spam e-mails, hoping that thousands of people will click and inadvertently assist in their attack against
the site.
There are a collection of techniques that are important for avoiding cross-site scripting; you can find
them in any good reference on web development. The most important ones include the following:
• When processing a form that is supposed to submit a POST request, always
carefully disregard any GET parameters.
• Never support URLs that produce some side effect or perform some action simply
through being the subject of a GET.
• In every form, include not only the obvious information—such as a dollar amount
and destination account number for bank transfers—but also a hidden field with a
secret value that must match for the submission to be valid. That way, random
POST requests that attackers generate with the dollar amount and destination
account number will not work because they will lack the secret that would make
the submission valid.
While the possibilities for XSS are not, strictly speaking, problems or issues with the HTTP protocol
itself, it helps to have a solid understanding of them when you are trying to write any program that
operates safely on the World Wide Web.
WebOb
We have seen that HTTP requests and responses are each represented by ad-hoc objects in urllib2.
Many Python programmers find its interface unwieldy, as well as incomplete! But, in their defense, the
objects seem to have been created as minimal constructs, containing only what urllib2 needed to
function.
But a library called WebOb is also available for Python (and listed on the Python Package Index) that
contains HTTP request and response classes that were designed from the other direction: that is, they
were intended all along as general-purpose representations of HTTP in all of its low-level details. You
can learn more about them at the WebOb project web page:
This library’s objects are specifically designed to interface well with WSGI, which makes them useful
when writing HTTP servers, as we will see in Chapter 11.
Summary
The HTTP protocol sounds simple enough: each request names a document (which can be an image or
program or whatever), and responses are supposed to supply its content. But the reality, of course, is
rather more complicated, as its main features to support the modern Web have driven its specification,
RFC 2616, to nearly 60,000 words. In this chapter, we tried to capture its essence in around 10,000 words
and obviously had to leave things out. Along the way, we discussed (and showed sample Python code)
for the following concepts:
CHAPTER 9 ■ HTTP
162
• URLs and their structure.
• The GET method and fetching documents.
• How the Host: header makes up for the fact that the hostname from the URL is not
included in the path that follows the word GET.
• The success and error codes returned in HTTP responses and how they induce
browser actions like redirection.
• How persistent connections can increase the speed at which HTTP resources can
be fetched.
• The POST method for performing actions and submitting forms.
• How redirection should always follow the successful POST of a web form.
• That POST is often used for web service requests from programs and can directly
return useful information.
• Other HTTP methods exist and can be used to design web-centric applications
using a methodology called REST.
• Browsers identify themselves through a user agent string, and some servers are
sensitive to this value.
• Requests often specify what content types a client can display, and well-written
servers will try to choose content representations that fit these constraints.
• Clients can request—and servers can use—compression that results in a page
arriving more quickly over the network.
• Several headers and a set of rules govern which HTTP-delivered documents can
and cannot be cached.
• The HEAD command only returns the headers.
• The HTTPS protocol adds TLS/SSL protection to HTTP.
• An old and awkward form of authentication is supported by HTTP itself.
• Most sites today supply their own login form and then use cookies to identify
users as they move across the site.
• If a cookie is captured, it can allow an attacker to view a web site as though the
attacker were the user whose cookie was stolen.
• Even more difficult classes of attack exist on the modern dynamic web, collectively
called cross-site-scripting attacks.
Armed with the knowledge and examples in this chapter, you should be able to use the urllib2
module from the Standard Library to fetch resources from the Web and even implement primitive
browser behaviors like retaining cookies.
C H A P T E R 10
■ ■ ■
163
Screen Scraping
Most web sites are designed first and foremost for human eyes. While well-designed sites offer formal
APIs by which you can construct Google maps, upload Flickr photos, or browse YouTube videos, many
sites offer nothing but HTML pages formatted for humans. If you need a program to be able to fetch its
data, then you will need the ability to dive into densely formatted markup and retrieve the information
you need—a process known affectionately as screen scraping.
In one’s haste to grab information from a web page sitting open in your browser in front of you, it
can be easy for even experienced programmers to forget to check whether an API is provided for data
that they need. So try to take a few minutes investigating the site in which you are interested to see if
some more formal programming interface is offered to their services. Even an RSS feed can sometimes
be easier to parse than a list of items on a full web page.
Also be careful to check for a “terms of service” document on each site. YouTube, for example, offers
an API and, in return, disallows programs from trying to parse their web pages. Sites usually do this for
very important reasons related to performance and usage patterns, so I recommend always obeying the
terms of service and simply going elsewhere for your data if they prove too restrictive.
Regardless of whether terms of service exist, always try to be polite when hitting public web sites.
Cache pages or data that you will need for several minutes or hours, rather than hitting their site
needlessly over and over again. When developing your screen-scraping algorithm, test against a copy of
their web page that you save to disk, instead of doing an HTTP round-trip with every test. And always be
aware that excessive use can result in your IP being temporarily or permanently blocked from a site if its
owners are sensitive to automated sources of load.
Fetching Web Pages
Before you can parse an HTML-formatted web page, you of course have to acquire some. Chapter 9
provides the kind of thorough introduction to the HTTP protocol that can help you figure out how to
fetch information even from sites that require passwords or cookies. But, in brief, here are some options
for downloading content.
• You can use urllib2, or the even lower-level httplib, to construct an HTTP
request that will return a web page. For each form that has to be filled out, you will
have to build a dictionary representing the field names and data values inside;
unlike a real web browser, these libraries will give you no help in submitting
forms.
• You can to install mechanize and write a program that fills out and submits web
forms much as you would do when sitting in front of a web browser. The downside
is that, to benefit from this automation, you will need to download the page
containing the form HTML before you can then submit it—possibly doubling the
number of web requests you perform!
CHAPTER 10 ■ SCREEN SCRAPING
164
• If you need to download and parse entire web sites, take a look at the Scrapy
project, hosted at , which provides a framework for
implementing your own web spiders. With the tools it provides, you can write
programs that follow links to every page on a web site, tabulating the data you
want extracted from each page.
• When web pages wind up being incomplete because they use dynamic JavaScript
to load data that you need, you can use the QtWebKit module of the PyQt4 library to
load a page, let the JavaScript run, and then save or parse the resulting complete
HTML page.
• Finally, if you really need a browser to load the site, both the Selenium and
Windmill test platforms provide a way to drive a standard web browser from
inside a Python program. You can start the browser up, direct it to the page of
interest, fill out and submit forms, do whatever else is necessary to bring up the
data you need, and then pull the resulting information directly from the DOM
elements that hold them.
These last two options both require third-party components or Python modules that are built
against large libraries, and so we will not cover them here, in favor of techniques that require only pure
Python.
For our examples in this chapter, we will use the site of the United States National Weather Service,
which lives here: www.weather.gov/.
Among the better features of the United States government is its having long ago decreed that all
publications produced by their agencies are public domain. This means, happily, that I can pull all sorts
of data from their web site and not worry about the fact that copies of the data are working their way into
this book.
Of course, web sites change, so the source code package for this book available from the Apress web
site will include the downloaded pages on which the scripts in this chapter are designed to work. That
way, even if their site undergoes a major redesign, you will still be able to try out the code examples in
the future. And, anyway—as I recommended previously—you should be kind to web sites by always
developing your scraping code against a downloaded copy of a web page to help reduce their load.
Downloading Pages Through Form Submission
The task of grabbing information from a web site usually starts by reading it carefully with a web browser
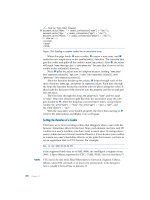
and finding a route to the information you need. Figure 10–1 shows the site of the National Weather
Service; for our first example, we will write a program that takes a city and state as arguments and prints
out the current conditions, temperature, and humidity. If you will explore the site a bit, you will find that
city-specific forecasts can be visited by typing the city name into the small “Local forecast” form in the
left margin.
CHAPTER 10 ■ SCREEN SCRAPING
165
Figure 10–1. The National Weather Service web site
When using the urllib2 module from the Standard Library, you will have to read the web page
HTML manually to find the form. You can use the View Source command in your browser, search for the
words “Local forecast,” and find the following form in the middle of the sea of HTML:
<form method="post" action=" >
<input type="text" id="zipcity" name="inputstring" size="9"
» value="City, St" onfocus="this.value='';" />
<input type="submit" name="Go2" value="Go" />
</form>
The only important elements here are the <form> itself and the <input> fields inside; everything else
is just decoration intended to help human readers.
This form does a POST to a particular URL with, it appears, just one parameter: an inputstring giving
the city name and state. Listing 10–1 shows a simple Python program that uses only the Standard Library
to perform this interaction, and saves the result to phoenix.html.
Listing 10–1. Submitting a Form with “urllib2”
#!/usr/bin/env python
# Foundations of Python Network Programming - Chapter 10 - fetch_urllib2.py
# Submitting a form and retrieving a page with urllib2
import urllib, urllib2
CHAPTER 10 ■ SCREEN SCRAPING
166
data = urllib.urlencode({'inputstring': 'Phoenix, AZ'})
info = urllib2.urlopen(' data)
content = info.read()
open('phoenix.html', 'w').write(content)
On the one hand, urllib2 makes this interaction very convenient; we are able to download a
forecast page using only a few lines of code. But, on the other hand, we had to read and understand the
form ourselves instead of relying on an actual HTML parser to read it. The approach encouraged by
mechanize is quite different: you need only the address of the opening page to get started, and the library
itself will take responsibility for exploring the HTML and letting you know what forms are present. Here
are the forms that it finds on this particular page:
>>> import mechanize
>>> br = mechanize.Browser()
>>> response = br.open('
>>> for form in br.forms():
print '%r %r %s' % (form.name, form.attrs.get('id'), form.action)
for control in form.controls:
print ' ', control.type, control.name, repr(control.value)
None None
» hidden v:project 'firstgov'
» text query ''
» radio affiliate ['nws.noaa.gov']
» submit None 'Go'
None None
» text inputstring 'City, St'
» submit Go2 'Go'
'jump' 'jump'
» select menu ['
» button None None
Here, mechanize has helped us avoid reading any HTML at all. Of course, pages with very obscure
form names and fields might make it very difficult to look at a list of forms like this and decide which is
the form we see on the page that we want to submit; in those cases, inspecting the HTML ourselves can
be helpful, or—if you use Google Chrome, or Firefox with Firebug installed—right-clicking the form and
selecting “Inspect Element” to jump right to its element in the document tree.
Once we have determined that we need the zipcity.php form, we can write a program like that
shown in Listing 10–2. You can see that at no point does it build a set of form fields manually itself, as
was necessary in our previous listing. Instead, it simply loads the front page, sets the one field value that
we care about, and then presses the form’s submit button. Note that since this HTML form did not
specify a name, we had to create our own filter function—the lambda function in the listing—to choose
which of the three forms we wanted.
Listing 10–2. Submitting a Form with mechanize
#!/usr/bin/env python
# Foundations of Python Network Programming - Chapter 10 - fetch_mechanize.py
# Submitting a form and retrieving a page with mechanize
import mechanize
br = mechanize.Browser()
br.open('
br.select_form(predicate=lambda(form): 'zipcity' in form.action)
br['inputstring'] = 'Phoenix, AZ'
response = br.submit()
CHAPTER 10 ■ SCREEN SCRAPING
167
content = response.read()
open('phoenix.html', 'w').write(content)
Many mechanize users instead choose to select forms by the order in which they appear in the
page—in which case we could have called select_form(nr=1). But I prefer not to rely on the order, since
the real identity of a form is inherent in the action that it performs, not its location on a page.
You will see immediately the problem with using mechanize for this kind of simple task: whereas
Listing 10–1 was able to fetch the page we wanted with a single HTTP request, Listing 10–2 requires two
round-trips to the web site to do the same task. For this reason, I avoid using mechanize for simple form
submission. Instead, I keep it in reserve for the task at which it really shines: logging on to web sites like
banks, which set cookies when you first arrive at their front page and require those cookies to be present
as you log in and browse your accounts. Since these web sessions require a visit to the front page
anyway, no extra round-trips are incurred by using mechanize.
The Structure of Web Pages
There is a veritable glut of online guides and published books on the subject of HTML, but a few notes
about the format would seem to be appropriate here for users who might be encountering the format for
the first time.
The Hypertext Markup Language (HTML) is one of many markup dialects built atop the Standard
Generalized Markup Language (SGML), which bequeathed to the world the idea of using thousands of
angle brackets to mark up plain text. Inserting bold and italics into a format like HTML is as simple as
typing eight angle brackets:
The <b>very</b> strange book <i>Tristram Shandy</i>.
In the terminology of SGML, the strings <b> and </b> are each tags—they are, in fact, an opening
and a closing tag—and together they create an element that contains the text very inside it. Elements
can contain text as well as other elements, and can define a series of key/value attribute pairs that give
more information about the element:
<p content="personal">I am reading <i document="play">Hamlet</i>.</p>
There is a whole subfamily of markup languages based on the simpler Extensible Markup Language
(XML), which takes SGML and removes most of its special cases and features to produce documents that
can be generated and parsed without knowing their structure ahead of time. The problem with SGML
languages in this regard—and HTML is one particular example—is that they expect parsers to know the
rules about which elements can be nested inside which other elements, and this leads to constructions
like this unordered list <ul>, inside which are several list items <li>:
<ul><li>First<li>Second<li>Third<li>Fourth</ul>
At first this might look like a series of <li> elements that are more and more deeply nested, so that
the final word here is four list elements deep. But since HTML in fact says that <li> elements cannot
nest, an HTML parser will understand the foregoing snippet to be equivalent to this more explicit XML
string:
<ul><li>First</li><li>Second</li><li>Third</li><li>Fourth</li></ul>
And beyond this implicit understanding of HTML that a parser must possess are the twin problems
that, first, various browsers over the years have varied wildly in how well they can reconstruct the
document structure when given very concise or even deeply broken HTML; and, second, most web page
authors judge the quality of their HTML by whether their browser of choice renders it correctly. This has
resulted not only in a World Wide Web that is full of sites with invalid and broken HTML markup, but
CHAPTER 10 ■ SCREEN SCRAPING
168
also in the fact that the permissiveness built into browsers has encouraged different flavors of broken
HTML among their different user groups.
If HTML is a new concept to you, you can find abundant resources online. Here are a few
documents that have been longstanding resources in helping programmers learn the format:
www.w3.org/MarkUp/Guide/
www.w3.org/MarkUp/Guide/Advanced.html
www.w3.org/MarkUp/Guide/Style
The brief bare-bones guide, and the long and verbose HTML standard itself, are good resources to
have when trying to remember an element name or the name of a particular attribute value:
When building your own web pages, try to install a real HTML validator in your editor, IDE, or build
process, or test your web site once it is online by submitting it to
You might also want to consider using the tidy tool, which can also be integrated into an editor or
build process:
We will now turn to that weather forecast for Phoenix, Arizona, that we downloaded earlier using
our scripts (note that we will avoid creating extra traffic for the NWS by running our experiments against
this local file), and we will learn how to extract actual data from HTML.
Three Axes
Parsing HTML with Python requires three choices:
• The parser you will use to digest the HTML, and try to make sense of its tangle of
opening and closing tags
• The API by which your Python program will access the tree of concentric elements
that the parser built from its analysis of the HTML page
• What kinds of selectors you will be able to write to jump directly to the part of the
page that interests you, instead of having to step into the hierarchy one element at
a time
The issue of selectors is a very important one, because a well-written selector can unambiguously
identify an HTML element that interests you without your having to touch any of the elements above it
in the document tree. This can insulate your program from larger design changes that might be made to
a web site; as long as the element you are selecting retains the same ID, name, or whatever other
property you select it with, your program will still find it even if after the redesign it is several levels
deeper in the document.
I should pause for a second to explain terms like “deeper,” and I think the concept will be clearest if
we reconsider the unordered list that was quoted in the previous section. An experienced web developer
looking at that list rearranges it in her head, so that this is what it looks like:
<ul>
<li>First</li>
<li>Second</li>
CHAPTER 10 ■ SCREEN SCRAPING
169
<li>Third</li>
<li>Fourth</li>
</ul>
Here the <ul> element is said to be a “parent” element of the individual list items, which “wraps”
them and which is one level “above” them in the whole document. The <li> elements are “siblings” of
one another; each is a “child” of the <ul> element that “contains” them, and they sit “below” their parent
in the larger document tree. This kind of spatial thinking winds up being very important for working
your way into a document through an API.
In brief, here are your choices along each of the three axes that were just listed:
• The most powerful, flexible, and fastest parser at the moment appears to be the
HTMLParser that comes with lxml; the next most powerful is the longtime favorite
BeautifulSoup (I see that its author has, in his words, “abandoned” the new 3.1
version because it is weaker when given broken HTML, and recommends using
the 3.0 series until he has time to release 3.2); and coming in dead last are the
parsing classes included with the Python Standard Library, which no one seems to
use for serious screen scraping.
• The best API for manipulating a tree of HTML elements is ElementTree, which has
been brought into the Standard Library for use with the Standard Library parsers,
and is also the API supported by lxml; BeautifulSoup supports an API peculiar to
itself; and a pair of ancient, ugly, event-based interfaces to HTML still exist in the
Python Standard Library.
• The lxml library supports two of the major industry-standard selectors: CSS
selectors and XPath query language; BeautifulSoup has a selector system all its
own, but one that is very powerful and has powered countless web-scraping
programs over the years.
Given the foregoing range of options, I recommend using lxml when doing so is at all possible—
installation requires compiling a C extension so that it can accelerate its parsing using libxml2—and
using BeautifulSoup if you are on a machine where you can install only pure Python. Note that lxml is
available as a pre-compiled package named python-lxml on Ubuntu machines, and that the best
approach to installation is often this command line:
STATIC_DEPS=true pip install lxml
And if you consult the lxml documentation, you will find that it can optionally use the BeautifulSoup
parser to build its own ElementTree-compliant trees of elements. This leaves very little reason to use
BeautifulSoup by itself unless its selectors happen to be a perfect fit for your problem; we will discuss
them later in this chapter.
But the state of the art may advance over the years, so be sure to consult its own documentation as
well as recent blogs or Stack Overflow questions if you are having problems getting it to compile.
Diving into an HTML Document
The tree of objects that a parser creates from an HTML file is often called a Document Object Model, or
DOM, even though this is officially the name of one particular API defined by the standards bodies and
implemented by browsers for the use of JavaScript running on a web page.
The task we have set for ourselves, you will recall, is to find the current conditions, temperature, and
humidity in the phoenix.html page that we have downloaded. You can view the page in full by
downloading the source bundle for this book from Apress; I cannot include it verbatim here, because it
CHAPTER 10 ■ SCREEN SCRAPING
170
consists of nearly 17,000 characters of dense HTML code. But let me at least show you an excerpt:
Listing 10–3, which focuses on the pane that we are interested in.
Listing 10–3. Excerpt from the Phoenix Forecast Page
<!doctype html public "-//W3C//DTD HTML 4.0 Transitional//EN"><html><head>
<title>7-Day Forecast for Latitude 33.45°N and Longitude 112.07°W (Elev. 1132
ft)</title><link rel="STYLESHEET" type="text/css" href="fonts/main.css">
<table cellspacing="0" cellspacing="0" border="0" width="100%"><tr align="center"><td><table
width='100%' border='0'>
<tr>
<td align ='center'>
<span class='blue1'>Phoenix, Phoenix Sky Harbor International Airport</span><br>
Last Update on 29 Oct 7:51 MST<br><br>
</td>
</tr>
<tr>
<td colspan='2'>
<table cellspacing='0' cellpadding='0' border='0' align='left'>
<tr>
<td class='big' width='120' align='center'>
<font size='3' color='000066'>
A Few Clouds<br>
<br>71°F<br>(22°C)</td>
</font><td rowspan='2' width='200'><table cellspacing='0' cellpadding='2' border='0'
width='100%'>
<tr bgcolor='#b0c4de'>
<td><b>Humidity</b>:</td>
<td align='right'>30 %</td>
</tr>
<tr bgcolor='#ffefd5'>
<td><b>Wind Speed</b>:</td><td align='right'>SE 5 MPH<br>
</td>
</tr>
<tr bgcolor='#b0c4de'>
<td><b>Barometer</b>:</td><td align='right' nowrap>30.05 in (1015.90 mb)</td></tr>
<tr bgcolor='#ffefd5'>
<td><b>Dewpoint</b>:</td><td align='right'>38°F (3°C)</td>
</tr>
</tr>
<tr bgcolor='#ffefd5'>
<td><b>Visibility</b>:</td><td align='right'>10.00 Miles</td>
</tr>
<tr><td nowrap><b><a
href=' />class='link'>More Local Wx:</a></b> </td>
<td nowrap align='right'><b><a
href=' class='link'>3
Day History:</a></b> </td></tr>
</table>
Download from Wow! eBook <www.wowebook.com>
CHAPTER 10 ■ SCREEN SCRAPING
171
There are two approaches to narrowing your attention to the specific area of the document in which
you are interested. You can either search the HTML for a word or phrase close to the data that you want,
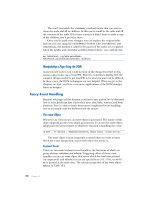
or, as we mentioned previously, use Google Chrome or Firefox with Firebug to “Inspect Element” and
see the element you want embedded in an attractive diagram of the document tree. Figure 10–2 shows
Google Chrome with its Developer Tools pane open following an Inspect Element command: my mouse
is poised over the <font> element that was brought up in its document tree, and the element itself is
highlighted in blue on the web page itself.
Figure 10–2. Examining Document Elements in the Browser
Note that Google Chrome does have an annoying habit of filling in “conceptual” tags that are not
actually present in the source code, like the <tbody> tags that you can see in every one of the tables
shown here. For that reason, I look at the actual HTML source before writing my Python code; I mainly
use Chrome to help me find the right places in the HTML.
We will want to grab the text “A Few Clouds” as well as the temperature before turning our attention
to the table that sits to this element’s right, which contains the humidity.
A properly indented version of the HTML page that you are scraping is good to have at your elbow
while writing code. I have included phoenix-tidied.html with the source code bundle for this chapter so
that you can take a look at how much easier it is to read!
You can see that the element displaying the current conditions in Phoenix sits very deep within the
document hierarchy. Deep nesting is a very common feature of complicated page designs, and that is
why simply walking a document object model can be a very verbose way to select part of a document—
and, of course, a brittle one, because it will be sensitive to changes in any of the target element’s parent.
This will break your screen-scraping program not only if the target web site does a redesign, but also
simply because changes in the time of day or the need for the site to host different kinds of ads can
change the layout subtly and ruin your selector logic.
To see how direct document-object manipulation would work in this case, we can load the raw page
directly into both the lxml and BeautifulSoup systems.
CHAPTER 10 ■ SCREEN SCRAPING
172
>>> import lxml.etree
>>> parser = lxml.etree.HTMLParser(encoding='utf-8')
>>> tree = lxml.etree.parse('phoenix.html', parser)
The need for a separate parser object here is because, as you might guess from its name, lxml is
natively targeted at XML files.
>>> from BeautifulSoup import BeautifulSoup
>>> soup = BeautifulSoup(open('phoenix.html'))
Traceback (most recent call last):
HTMLParseError: malformed start tag, at line 96, column 720
What on earth? Well, look, the National Weather Service does not check or tidy its HTML! I might
have chosen a different example for this book if I had known, but since this is a good illustration of the
way the real world works, let’s press on. Jumping to line 96, column 720 of phoenix.html, we see that
there does indeed appear to be some broken HTML:
<a href=""<u>www.weather.gov</u></a>
You can see that the <u> tag starts before a closing angle bracket has been encountered for the <a>
tag. But why should BeautifulSoup care? I wonder what version I have installed.
>>> BeautifulSoup.__version__
'3.1.0'
Well, drat. I typed too quickly and was not careful to specify a working version when I ran pip to
install BeautifulSoup into my virtual environment. Let’s try again:
$ pip install BeautifulSoup==3.0.8.1
And now the broken document parses successfully:
>>> from BeautifulSoup import BeautifulSoup
>>> soup = BeautifulSoup(open('phoenix.html'))
That is much better!
Now, if we were to take the approach of starting at the top of the document and digging ever deeper
until we find the node that we are interested in, we are going to have to generate some very verbose
code. Here is the approach we would have to take with lxml:
>>> fonttag = tree.find('body').find('div').findall('table')[3] \
.findall('tr')[1].find('td').findall('table')[1].find('tr') \
.findall('td')[1].findall('table')[1].find('tr').find('td') \
.find('table').findall('tr')[1].find('td').find('table') \
.find('tr').find('td').find('font')
>>> fonttag.text
'\nA Few Clouds'
An attractive syntactic convention lets BeautifulSoup handle some of these steps more beautifully:
>>> fonttag = soup.body.div('table', recursive=False)[3] \
('tr', recursive=False)[1].td('table', recursive=False)[1].tr \
('td', recursive=False)[1]('table', recursive=False)[1].tr.td \
.table('tr', recursive=False)[1].td.table \
.tr.td.font
>>> fonttag.text
u'A Few Clouds71°F(22°C)'
CHAPTER 10 ■ SCREEN SCRAPING
173
BeautifulSoup lets you choose the first child element with a given tag by simply selecting the
attribute .tagname, and lets you receive a list of child elements with a given tag name by calling an
element like a function—you can also explicitly call the method findAll()—with the tag name and a
recursive option telling it to pay attention just to the children of an element; by default, this option is set
to True, and BeautifulSoup will run off and find all elements with that tag in the entire sub-tree beneath
an element!
Anyway, two lessons should be evident from the foregoing exploration.
First, both lxml and BeautifulSoup provide attractive ways to quickly grab a child element based on
its tag name and position in the document.
Second, we clearly should not be using such primitive navigation to try descending into a real-world
web page! I have no idea how code like the expressions just shown can easily be debugged or
maintained; they would probably have to be re-built from the ground up if anything went wrong with
them—they are a painful example of write-once code.
And that is why selectors that each screen-scraping library supports are so critically important: they
are how you can ignore the many layers of elements that might surround a particular target, and dive
right in to the piece of information you need.
Figuring out how HTML elements are grouped, by the way, is much easier if you either view HTML
with an editor that prints it as a tree, or if you run it through a tool like HTML tidy from W3C that can
indent each tag to show you which ones are inside which other ones:
$ tidy phoenix.html > phoenix-tidied.html
You can also use either of these libraries to try tidying the code, with a call like one of these:
lxml.html.tostring(html)
soup.prettify()
See each library’s documentation for more details on using these calls.
Selectors
A selector is a pattern that is crafted to match document elements on which your program wants to
operate. There are several popular flavors of selector, and we will look at each of them as possible
techniques for finding the current-conditions <font> tag in the National Weather Service page for
Phoenix. We will look at three:
• People who are deeply XML-centric prefer XPath expressions, which are a
companion technology to XML itself and let you match elements based on their
ancestors, their own identity, and textual matches against their attributes and text
content. They are very powerful as well as quite general.
• If you are a web developer, then you probably link to CSS selectors as the most
natural choice for examining HTML. These are the same patterns used in
Cascading Style Sheets documents to describe the set of elements to which each
set of styles should be applied.
• Both lxml and BeautifulSoup, as we have seen, provide a smattering of their own
methods for finding document elements.
Here are standards and descriptions for each of the selector styles just described— first, XPath:
CHAPTER 10 ■ SCREEN SCRAPING
174
And here are some CSS selector resources:
And, finally, here are links to documentation that looks at selector methods peculiar to lxml and
BeautifulSoup:
the Parse Tree
The National Weather Service has not been kind to us in constructing this web page. The area that
contains the current conditions seems to be constructed entirely of generic untagged elements; none of
them have id or class values like currentConditions or temperature that might help guide us to them.
Well, what are the features of the elements that contain the current weather conditions in
Listing 10–3? The first thing I notice is that the enclosing <td> element has the class "big". Looking at the
page visually, I see that nothing else seems to be of exactly that font size; could it be so simple as to
search the document for every <td> with this CSS class? Let us try, using a CSS selector to begin with:
>>> from lxml.cssselect import CSSSelector
>>> sel = CSSSelector('td.big')
>>> sel(tree)
[<Element td at b72ec0a4>]
Perfect! It is also easy to grab elements with a particular class attribute using the peculiar syntax of
BeautifulSoup:
>>> soup.find('td', 'big')
<td class="big" width="120" align="center">
<font size="3" color="000066">
A Few Clouds<br />
<br />71°F<br />(22°C)</font></td>
Writing an XPath selector that can find CSS classes is a bit difficult since the class="" attribute
contains space-separated values and we do not know, in general, whether the class will be listed first,
last, or in the middle.
>>> tree.xpath(".//td[contains(concat(' ', normalize-space(@class), ' '), ' big ')]")
[<Element td at a567fcc>]
This is a common trick when using XPath against HTML: by prepending and appending spaces to
the class attribute, the selector assures that it can look for the target class name with spaces around it
and find a match regardless of where in the list of classes the name falls.
Selectors, then, can make it simple, elegant, and also quite fast to find elements deep within a
document that interest us. And if they break because the document is redesigned or because of a corner
case we did not anticipate, they tend to break in obvious ways, unlike the tedious and deep procedure of
walking the document tree that we attempted first.
Once you have zeroed in on the part of the document that interests you, it is generally a very simple
matter to use the ElementTree or the old BeautifulSoup API to get the text or attribute values you need.
Compare the following code to the actual tree shown in Listing 10–3:
>>> td = sel(tree)[0]
>>> td.find('font').text
'\nA Few Clouds'
>>> td.find('font').findall('br')[1].tail
u'71°F'
CHAPTER 10 ■ SCREEN SCRAPING
175
If you are annoyed that the first string did not return as a Unicode object, you will have to blame the
ElementTree standard; the glitch has been corrected in Python 3! Note that ElementTree thinks of text
strings in an HTML file not as entities of their own, but as either the .text of its parent element or the
.tail of the previous element. This can take a bit of getting used to, and works like this:
<p>
My favorite play is # the <p> element's .text
<i>
» Hamlet # the <i> element's .text
</i>
which is not really # the <i> element's .tail
<b>
» Danish # the <b> element's .text
</b>
but English. # the <b> element's .tail
</p>
This can be confusing because you would think of the three words favorite and really and English
as being at the same “level” of the document—as all being children of the <p> element somehow—but
lxml considers only the first word to be part of the text attached to the <p> element, and considers the
other two to belong to the tail texts of the inner <i> and <b> elements. This arrangement can require a bit
of contortion if you ever want to move elements without disturbing the text around them, but leads to
rather clean code otherwise, if the programmer can keep a clear picture of it in her mind.
BeautifulSoup, by contrast, considers the snippets of text and the <br> elements inside the <font>
tag to all be children sitting at the same level of its hierarchy. Strings of text, in other words, are treated
as phantom elements. This means that we can simply grab our text snippets by choosing the right child
nodes:
>>> td = soup.find('td', 'big')
>>> td.font.contents[0]
u'\nA Few Clouds'
>>> td.font.contents[4]
u'71°F'
Through a similar operation, we can direct either lxml or BeautifulSoup to the humidity datum.
Since the word Humidity: will always occur literally in the document next to the numeric value, this
search can be driven by a meaningful term rather than by something as random as the big CSS tag. See
Listing 10–4 for a complete screen-scraping routine that does the same operation first with lxml and
then with BeautifulSoup.
This complete program, which hits the National Weather Service web page for each request, takes
the city name on the command line:
$ python weather.py Springfield, IL
Condition:
Traceback (most recent call last):
AttributeError: 'NoneType' object has no attribute 'text'
And here you can see, superbly illustrated, why screen scraping is always an approach of last resort
and should always be avoided if you can possibly get your hands on the data some other way: because
presentation markup is typically designed for one thing—human readability in browsers—and can vary
in crazy ways depending on what it is displaying.
What is the problem here? A short investigation suggests that the NWS page includes only a <font>
element inside of the <tr> if—and this is just a guess of mine, based on a few examples—the description
of the current conditions is several words long and thus happens to contain a space. The conditions in
Phoenix as I have written this chapter are “A Few Clouds,” so the foregoing code has worked just fine;
CHAPTER 10 ■ SCREEN SCRAPING
176
but in Springfield, the weather is “Fair” and therefore does not need a <font> wrapper around it,
apparently.
Listing 10–4. Completed Weather Scraper
#!/usr/bin/env python
# Foundations of Python Network Programming - Chapter 10 - weather.py
# Fetch the weather forecast from the National Weather Service.
import sys, urllib, urllib2
import lxml.etree
from lxml.cssselect import CSSSelector
from BeautifulSoup import BeautifulSoup
if len(sys.argv) < 2:
» print >>sys.stderr, 'usage: weather.py CITY, STATE'
» exit(2)
data = urllib.urlencode({'inputstring': ' '.join(sys.argv[1:])})
info = urllib2.urlopen(' data)
content = info.read()
# Solution #1
parser = lxml.etree.HTMLParser(encoding='utf-8')
tree = lxml.etree.fromstring(content, parser)
big = CSSSelector('td.big')(tree)[0]
if big.find('font') is not None:
» big = big.find('font')
print 'Condition:', big.text.strip()
print 'Temperature:', big.findall('br')[1].tail
tr = tree.xpath('.//td[b="Humidity"]')[0].getparent()
print 'Humidity:', tr.findall('td')[1].text
# Solution #2
soup = BeautifulSoup(content) # doctest: +SKIP
big = soup.find('td', 'big')
if big.font is not None:
» big = big.font
print 'Condition:', big.contents[0].string.strip()
temp = big.contents[3].string or big.contents[4].string # can be either
print 'Temperature:', temp.replace('°', ' ')
tr = soup.find('b', text='Humidity').parent.parent.parent
print 'Humidity:', tr('td')[1].string
If you look at the final form of Listing 10–4, you will see a few other tweaks that I made as I noticed
changes in format with different cities. It now seems to work against a reasonable selection of locations;
again, note that it gives the same report twice, generated once with lxml and once with BeautifulSoup:
$ python weather.py Springfield, IL
Condition: Fair
Temperature: 54 °F
Humidity: 28 %
CHAPTER 10 ■ SCREEN SCRAPING
177
Condition: Fair
Temperature: 54 F
Humidity: 28 %
$ python weather.py Grand Canyon, AZ
Condition: Fair
Temperature: 67°F
Humidity: 28 %
Condition: Fair
Temperature: 67 F
Humidity: 28 %
You will note that some cities have spaces between the temperature and the F, and others do not.
No, I have no idea why. But if you were to parse these values to compare them, you would have to learn
every possible variant and your parser would have to take them into account.
I leave it as an exercise to the reader to determine why the web page currently displays the word
“NULL”—you can even see it in the browser—for the temperature in Elk City, Oklahoma. Maybe that
location is too forlorn to even deserve a reading? In any case, it is yet another special case that you would
have to treat sanely if you were actually trying to repackage this HTML page for access from an API:
$ python weather.py Elk City, OK
Condition: Fair and Breezy
Temperature: NULL
Humidity: NA
Condition: Fair and Breezy
Temperature: NULL
Humidity: NA
I also leave as an exercise to the reader the task of parsing the error page that comes up if a city
cannot be found, or if the Weather Service finds it ambiguous and prints a list of more specific choices!
Summary
Although the Python Standard Library has several modules related to SGML and, more specifically, to
HTML parsing, there are two premier screen-scraping technologies in use today: the fast and powerful
lxml library that supports the standard Python “ElementTree” API for accessing trees of elements, and
the quirky BeautifulSoup library that has powerful API conventions all its own for querying and
traversing a document.
If you use BeautifulSoup before 3.2 comes out, be sure to download the most recent 3.0 version; the
3.1 series, which unfortunately will install by default, is broken and chokes easily on HTML glitches.
Screen scraping is, at bottom, a complete mess. Web pages vary in unpredictable ways even if you
are browsing just one kind of object on the site—like cities at the National Weather Service, for example.
To prepare to screen scrape, download a copy of the page, and use HTML tidy, or else your screen-
scraping library of choice, to create a copy of the file that your eyes can more easily read. Always run
your program against the ugly original copy, however, lest HTML tidy fixes something in the markup
that your program will need to repair!
Once you find the data you want in the web page, look around at the nearby elements for tags,
classes, and text that are unique to that spot on the screen. Then, construct a Python command using
your scraping library that looks for the pattern you have discovered and retrieves the element in
question. By looking at its children, parents, or enclosed text, you should be able to pull out the data that
you need from the web page intact.
CHAPTER 10 ■ SCREEN SCRAPING
178
When you have a basic script working, continue testing it; you will probably find many edge cases
that have to be handled correctly before it becomes generally useful. Remember: when possible, always
use true APIs, and treat screen scraping as a technique of last resort!
C H A P T E R 11
■ ■ ■
179
Web Applications
This chapter focuses on the actual act of programming—on what it means to sit down and write a
Python web application. Every other issue that we consider will be in the service of this overarching goal:
to create a new web service using Python as our language.
The work of designing a web site can be enormous and incur months of graphic design and usability
work. Or it can involve nothing more than a single-page sketch on the back of a napkin. It can even be as
simple as an idea in your head. But when it comes to implementation, applications that are designed to
face the public Internet demand at least three big decisions from their implementers:
• A front-end web server will need to be chosen. Its job is to listen on port 80 of the
web server—or whatever port has been designated for the site—and to serve static
content like images, style sheets, and JavaScript files. And, for the specific URLs
that serve the actual dynamic site content, the front-end server needs to delegate
page creation to your Python program.
• Some means of linking the server and the Python application needs to be selected.
We will spend the most time on the WSGI standard, which provides a standard
invocation protocol between a web server and Python; however, it is also common
for servers and Python to be linked through mechanisms like FastCGI and SCGI.
• Either in the web server itself or in the harness that runs the Python code, there
needs to be logic that spawns several copies of the Python web application code,
whether as threads or processes. This enables your app to answer different
customers simultaneously without blocking.
• Finally, the programmer needs to decide which Python libraries he will use for
common tasks like URL dispatch, database access, and template rendering—or
whether to do without the convenience of standard tools altogether and to roll
some of these solutions on his own. Often he will choose to use a web framework
that provides these features as a more-or-less unified suite.
Very often, the process of building a web application goes through these bullet points in reverse
order. Most often, a programmer starts experimenting with an idea by running the “create project”
routine of a popular web framework and adding her own code to the skeleton that gets created. Days or
weeks or months later, when it is time to start exposing her application to real users on the local intranet
or even out on the World Wide Web, the developer belatedly researches the best choice of front-end
server for her framework of choice. She spends a few hours getting everything tweaked and configured
correctly, so she can put her application into production.
But we will tackle the steps in the order listed previously, moving from the front end of the system
towards its core. This means that we will first establish the context in which Python web services run,
and then spend the rest of the chapter focusing on actual programming techniques.
CHAPTER 11 ■ WEB APPLICATIONS
180
Web Servers and Python
Acceptable web site performance generally requires the ability to serve several users concurrently. And
since few Python programmers condescend to writing their web application logic using Twisted
callbacks (see Chapter 7), achieving this performance means running several copies of your web
application concurrently, using either threads or processes.
You will recall from our discussion of threads in Chapter 7 that the standard C language
implementation of Python—the version of Python people download from its web site—does not actually
run Python code in a thread-safe manner. To avoid corrupting in-memory data structures, C Python
employs a Global Interpreter Lock (GIL), so that only one thread in a multi-threaded program can
actually be executing Python code at any given time. Thus Python will let you create as many threads as
you want in a given process; however, only one thread can run code at a time, as though your threads
were confined to a single processor.
You might think that multiprocessing would always be the required approach; however, it turns out
that threading can have decent performance because so many web applications are essentially light
front-ends that sit between the user and a database. A typical web application receives and parses the
user's request, then makes a corresponding request to the database behind it; while that thread is
waiting for a response from the database, the GIL is available for any other threads that need to run
Python code. Finally the database answers; the waiting thread reacquires the GIL; and, in a quick blaze
of CPU activity, the data is turned into an attractive web page, and the response is sent winging its way
back to the user.
Thus threads can sometimes at least perform decently. Nevertheless, multiple processes are the
more general way to scale. This is because, as a service gets bigger, additional processes can be brought
up on additional machines, rather than being confined to a single machine. Threads, no matter their
other merits, cannot do that!
There are two general approaches to running a Python web application inside of a collector of
identical worker processes:
• The Apache web server can be combined with the popular mod_wsgi module to
host a separate Python interpreter in every Apache worker process.
• The web application can be run inside of either the flup server or the uWSGI server.
Both of these servers will manage a pool of worker processes where each process
hosts a Python interpreter running your application. The front-end web server can
submit requests to flup using either the standard Fast CGI (FCGI) or Simple CGI
(SCGI) protocol, while it has to speak to uWSGI in its own special “uwsgi” protocol
(whose name is all lowercase to distinguish it from the name of the server).
Note that both approaches insist that a powerful, secure, name-brand web server face the actual
customer, with your Python web application sitting safely behind it. This lets the web server use its fast,
compiled code to reject obviously malformed or nonsensical HTTP requests, passing along to your
application only those requests that are at least superficially parsable. It can also have performance
benefits, as you will see in the next section.
Two Tiers
Most objects fetched by your web browser each day are completely static: images, movies, style sheets,
and JavaScript files. These are usually served directly from disk, without undergoing any dynamic
modification or customization. Modern web pages with even fairly simple designs typically include a
dozen or more static elements for every dynamically-generated page you actually visit—elements that
will remain the same for weeks or months until, in fact, the site is upgraded or redesigned.
Download from Wow! eBook <www.wowebook.com>
CHAPTER 11 ■ WEB APPLICATIONS
181
This will be familiar to you if you have ever used the Google Chrome built-in Developer Tools or the
Firebug extension for Firefox to look behind the scenes and see the resources that must be downloaded
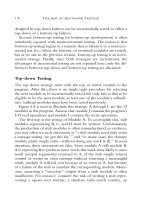
to actually display a web page. For example, Figure 11–1 shows the files that Google Chrome downloads
to display the Stack Overflow front page. The time axis goes from left to right, with the entire download
taking about 1.5 seconds. The last few outliers appear to be advertisements, which are often the slowest
elements of a web site to load.
Figure 11–1. Downloading the Stack Overflow Front Page
For our purposes, the most important fact in this graph is that, of all of the many resources that
make up the front page, it is likely that only one of them—the initial HTML page itself, whose download
is displayed as the upper-left bar on the graph—was generated dynamically. The HTML contains the
dynamic list of most-active questions, along with user-specific information such as my name and the list
of tags that I find interesting. Everything else is completely generic; all the images, styles, and scripts
remain exactly the same, regardless of who is visiting the site.
And so production web apps are best designed with two tiers of servers:
• The first server actually faces users and their browsers. It should be configured to
serve the high-volume static content directly from disk using a fast, static language
like C.
• The second server is a framework that powers the dynamic pages. It is invoked
only for pages that absolutely require it. Often the dynamic code runs in a separate
process that listens on a localhost port that only the front-end web server can
access. (see Chapters 2 and 3 for more about sockets and localhost.)
CHAPTER 11 ■ WEB APPLICATIONS
182
Many administrators are tempted to run only one web server that combines these two roles. They
accomplish this by choosing a very flexible front-end web server that can also directly host their
application code. But having two separate servers for the static and dynamic content has a number of
benefits, including the ability to performance tune the servers separately. For example, the front-end
workers can be small and light to answer requests for static content, while the back-end worker
processes can be fewer but heavier because they each need to host a full Python interpreter. If you try
running just one server, then every worker will need to contain both the lightweight code for serving
static files and the Python interpreter for creating dynamic pages, but only one or the other piece of code
will get invoked for a given request.
Choosing a Web Server
All of the popular open source web servers can be used to serve Python web applications, so the full
range of modern options is available:
Apache HTTP Server: Since taking the lead as the most popular HTTP server
back in 1996, Apache has always remained in the top spot and has never yet
been eclipsed by a competitor. Its stated goal is flexibility and modularity; it is
reasonably fast, but it will not win speed records against more recent servers
that focus only on speed. Its configuration files can be a bit long and verbose,
but through them Apache offers very powerful options for applying different
rules and behaviors to different directories and URLs. A variety of extension
modules are available (many of which come bundled with it), and user
directories can have separate .htaccess configuration files that make further
adjustments to the main configuration.
nginx (“engine X”): Started by a Russian programmer in the early 2000's, the
nginx server has become a great favorite of organizations with a large volume of
content that needs to be served quickly. It is considered fairly easy to configure.
lighttpd (“lighty”): First written to demonstrate an architecture that could
support tens of thousands of open client sockets (both nginx and Cherokee are
also contenders in this class), this server is known for being very easy to
configure. Some system administrators complain about its memory usage, but
many others have observed no problems with it.
Cherokee: Not only does this server offer performance that might edge out even
nginx and lighttpd, but it lets you configure the server through a built-in web
interface.
Of course, this list will grow slowly out-of-date over time, so you should use it only as a jumping-off
point for your own research into choosing an HTTP server. Nevertheless, having a good list of specific
examples at this point is important because it enables us to turn to the concrete question of Python
integration.
So how can each of these servers be combined with Python?
One option, of course, is to simply set up Apache and configure it to serve all of your content, both
static and dynamic.
Alternatively, the mod_wsgi module has a daemon mode where it internally runs your Python code
inside a stack of dedicated server processes that are separate from Apache. Each WSGI process can even
run as a different user. If you really want to use Apache as your front end, this is one of the best options
available.
CHAPTER 11 ■ WEB APPLICATIONS
183
But the most strongly recommended approach today is to set up one of the three fast servers to
provide your static content, and then use one of the following three techniques to run your Python code
behind them:
• Use HTTP proxying so that your nginx, lighttpd, or Cherokee front-end server
delivers HTTP requests for dynamic web pages to a back-end Apache instance
running mod_wsgi.
• Use the FastCGI protocol or SCGI protocol to talk to a flup instance running your
Python code.
• Use the uwsgi protocol to talk to a uWSGI instance running your Python code.
Given that every one of the four major web servers supports HTTP, the fast CGI protocols, and
uwsgi, your options are quite broad. So how do you decide on a specific approach?
Your first task should be to look at the documentation, tweets, and blogs for the Python web
framework or tools on which you intend to build your solution. Choosing a configuration that is a
standard in that community increases your chances of success; it also increases the possibility of getting
useful help if things go wrong.
Also, list any specific features that you require of your front end and choose only from among the
HTTP servers that support them. Make sure your choice can support your requirements involving
certificates and encryption, as well as any restrictions you want placed on SSL protocol versions or
permitted ciphers (see Chapter 6). You should also make sure your choice runs well on the operating
system you will be deploying. If your operating system vendor (like Red Hat or Ubuntu) already provides
precompiled versions of any of these servers, then that might also deserve consideration.
As mentioned previously, the task of selecting and configuring a front-end web server often comes
quite late in the timeline of a project; and the choice will draw much more deeply upon your system
administrator skills than it will upon your expertise as a programmer.
At this point, you understand something of the larger context in which Python web applications are
usually run; you are now ready to turn your attention to the task of programming.
WSGI
When the front-end web server receives an HTTP request, consults the patterns listed in its
configuration, and decides that this particular URL needs to be handled by a Python web application,
how does it actually invoke the Python code? And how can that code then communicate back to the
server, whether to signal an error, make a redirect, or return a particular block of data as the web page?
Integrating Python with web servers used to be the Wild West: every server presented programmers
with different data formats and calling conventions. Small web programs written against one server's
API would need to be ported before they could be used with another brand of web server; and web
frameworks themselves had to maintain a separate entry point for each server which developers might
want to use to deploy their applications.
This situation was much improved by the creation of PEP 333, which defines the Python Web Server
Gateway Interface (WSGI): www.python.org/dev/peps/pep-0333/
WSGI introduced a single calling convention that every web server could implement, thereby
making that web server instantly compatible with all of the Python web applications and web
frameworks that also support WSGI.
Developers generally avoid writing raw WSGI applications because the conveniences of even a
simple web framework make code so much easier to write and maintain. But, for the sake of illustration,
Listing 10-1 shows a small WSGI application whose front page asks the user to type a string. Submitting
the string takes the user to a second web page, where he can see its base64 encoding. From there, a link
will take him back to the first page to repeat the process.
CHAPTER 11 ■ WEB APPLICATIONS
184
Listing 11–1. A Complete WSGI Application
#!/usr/bin/env python
# Foundations of Python Network Programming - Chapter 11 - wsgi_app.py
# A simple web application built directly against the low-level WSGI spec.
import cgi, base64
from wsgiref.simple_server import make_server
def page(content, *args):
» yield '<html><head><title>wsgi_app.py</title></head><body>'
» yield content % args
» yield '</body>'
def simple_app(environ, start_response):
» gohome = '<br><a href="/">Return to the home page</a>'
» q = cgi.parse_qs(environ['QUERY_STRING'])
» if environ['PATH_INFO'] == '/':
» » if environ['REQUEST_METHOD'] != 'GET' or environ['QUERY_STRING']:
» » » start_response('400 Bad Request', [('Content-Type', 'text/plain')])
» » » return ['Error: the front page is not a form']
» » start_response('200 OK', [('Content-Type', 'text/html')])
» » return page('Welcome! Enter a string: <form action="encode">'
» » » » » '<input name="mystring"><input type="submit"></form>')
» elif environ['PATH_INFO'] == '/encode':
» » if environ['REQUEST_METHOD'] != 'GET':
» » » start_response('400 Bad Request', [('Content-Type', 'text/plain')])
» » » return ['Error: this form does not support POST parameters']
» » if 'mystring' not in q or not q['mystring'][0]:
» » » start_response('400 Bad Request', [('Content-Type', 'text/plain')])
» » » return ['Error: this form requires a "mystring" parameter']
» » my = q['mystring'][0]
» » start_response('200 OK', [('Content-Type', 'text/html')])
» » return page('<tt>%s</tt> base64 encoded is: <tt>%s</tt>' + gohome,
»
» » » » cgi.escape(repr(my)), cgi.escape(base64.b64encode(my)))
» else:
» » start_response('404 Not Found', [('Content-Type', 'text/plain')])
» » return ['That URL is not valid']
print 'Listening on localhost:8000'
make_server('localhost', 8000, simple_app).serve_forever()
The first thing to note in this code listing is that two very different objects are being created: a WSGI
server that knows how to use HTTP to talk to a web browser and an application written to respond
correctly when invoked per the WSGI calling convention. Note that these two pieces—the client and
server—could easily be swapped out. Other WSGI applications would all work equally well when run by